

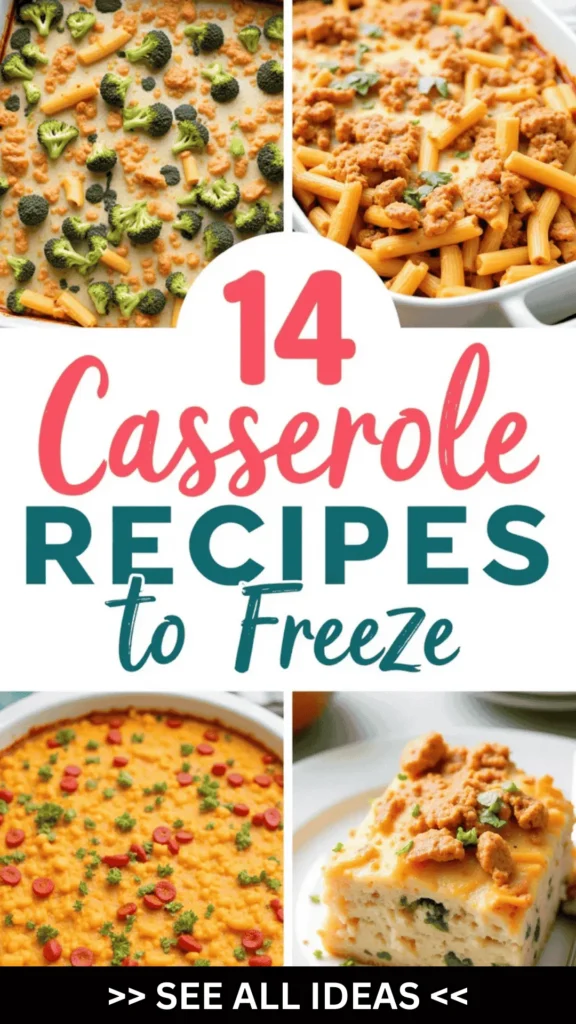
Are you looking for a way to simplify your busy weeknights?
Casserole recipes that you can freeze are the answer!
These delicious meals are all about convenience and flavor.
From Chicken and Broccoli Cheddar to Beef and Rice Stuffed Peppers, there’s something for everyone.
Just thaw overnight and pop them in the oven for an easy homemade dinner that’s ready in no time!
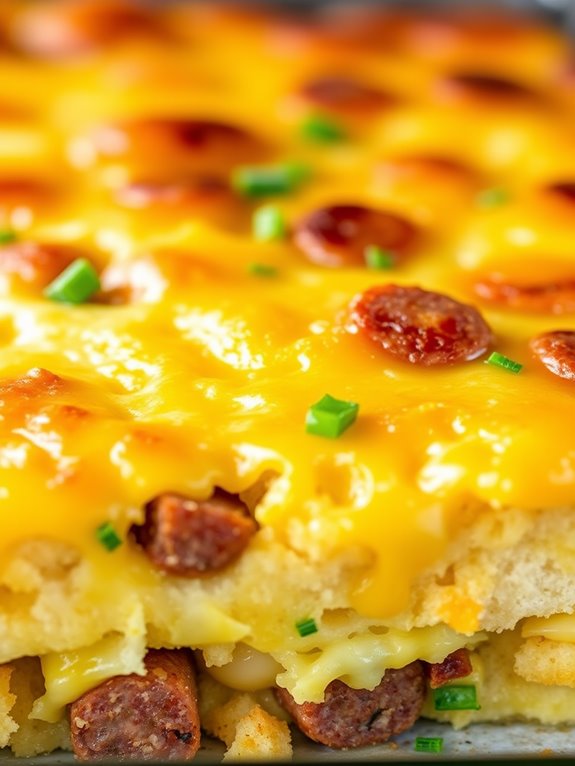
Chicken and Broccoli Cheddar Casserole
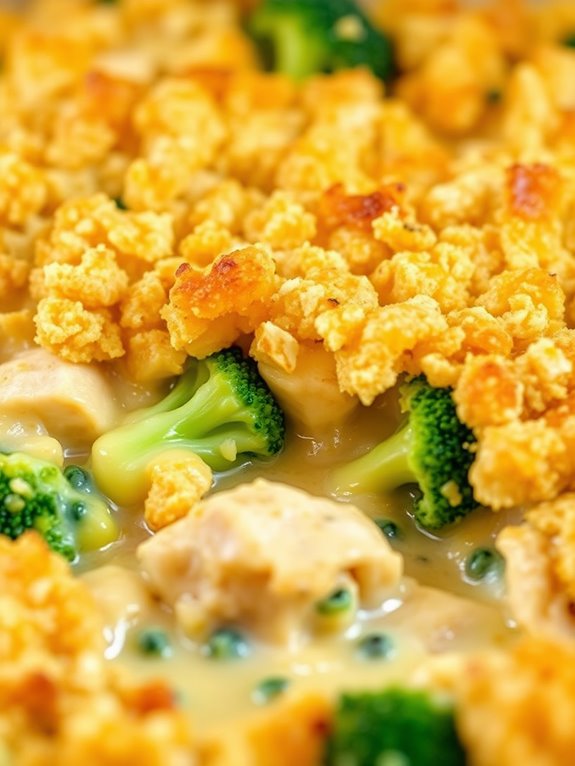
Chicken and Broccoli Cheddar Casserole is a comforting and delicious dish perfect for a cozy family dinner or as a make-ahead meal to enjoy throughout the week. The combination of tender chicken, fresh broccoli, and creamy cheddar cheese sauce creates a delightful blend of flavors that will satisfy even the pickiest eaters.
This casserole isn’t only packed with flavor but is also easy to prepare and can be conveniently frozen for those busy weeknights when you need a quick and hearty meal.
This recipe is designed for a serving size of 4-6 people, making it ideal for a family dinner or for leftovers to enjoy later. The casserole is layered with cooked chicken and broccoli, coated in a rich cheese sauce, and baked until bubbly and golden brown. The ease of preparation and the ability to freeze make this dish a staple for those who love homemade meals without the fuss.
Ingredients:
- 1 1/2 pounds boneless, skinless chicken breasts
- 2 cups broccoli florets
- 2 cups shredded cheddar cheese
- 1 can (10.5 ounces) condensed cream of chicken soup
- 1/2 cup sour cream
- 1/4 cup milk
- 1 teaspoon garlic powder
- 1 teaspoon onion powder
- Salt and pepper to taste
- 1 cup cooked white rice (optional)
- 1/2 cup breadcrumbs (optional)
- 2 tablespoons butter (optional)
Cooking Instructions:
- Preheat Oven: Preheat your oven to 375°F (190°C) to guarantee it’s hot and ready for baking once the casserole is assembled.
- Cook Chicken: Season the chicken breasts with salt and pepper. In a large skillet over medium heat, cook the chicken until no longer pink, about 6-7 minutes per side. Once cooked, remove from heat and let cool slightly before shredding or chopping into bite-sized pieces.
- Prepare Broccoli: Steam the broccoli florets until just tender, about 4-5 minutes. You can use a steaming basket over boiling water or microwave in a covered dish with a splash of water.
- Make Cheese Sauce: In a medium saucepan, combine the cream of chicken soup, sour cream, milk, garlic powder, onion powder, and half of the shredded cheddar cheese. Stir over medium heat until the cheese is melted and the sauce is smooth.
- Assemble Casserole: In a large mixing bowl, combine the cooked chicken, steamed broccoli, cooked rice (if using), and the cheese sauce. Stir until everything is evenly coated. Transfer the mixture to a greased 9×13 inch baking dish.
- Top with Cheese and Breadcrumbs: Sprinkle the remaining cheddar cheese over the top of the casserole. If using, mix breadcrumbs with melted butter and sprinkle over the cheese for a crunchy topping.
- Bake: Place the baking dish in the preheated oven and bake for 25-30 minutes, or until the casserole is bubbly and the top is golden brown.
- Serve: Allow the casserole to cool for a few minutes before serving, allowing the flavors to meld together. Enjoy!
Extra Tips:
For a richer flavor, consider adding a splash of white wine to the cheese sauce while it’s heating. If you prefer a bit of extra crunch, you can add toasted almonds or crushed cornflakes to the breadcrumb topping.
To make this dish even more convenient, you can fully assemble the casserole, cover it tightly, and freeze it before baking. When ready to eat, simply thaw in the refrigerator overnight and bake as instructed. This flexibility makes it an ideal dish for meal prepping or offering as a gift to friends and family in need of a comforting meal.
Beef and Rice Stuffed Pepper Casserole

Beef and Rice Stuffed Pepper Casserole is a hearty and comforting dish that combines the robust flavors of seasoned beef, tender rice, and sweet bell peppers. This casserole is perfect for busy weeknights or for preparing ahead of time to store in the freezer. The vibrant colors of the bell peppers not only make this dish visually appealing but also add a natural sweetness that complements the savory ingredients.
Whether you’re serving this for a family dinner or a casual get-together, it’s sure to be a crowd-pleaser. By making a casserole instead of traditional stuffed peppers, you save time without compromising on flavor. The ingredients meld together beautifully, creating a satisfying meal in each scoop.
This dish can be conveniently prepared in advance and frozen, allowing you to enjoy a home-cooked meal with minimal effort on even the busiest days. Simply heat and serve to enjoy the delicious combination of beef, rice, and peppers.
Ingredients for 4-6 servings:
- 1 lb ground beef
- 1 cup uncooked white rice
- 2 cups beef broth
- 3 large bell peppers (any color), diced
- 1 medium onion, chopped
- 2 cloves garlic, minced
- 1 can (15 oz) tomato sauce
- 1 can (15 oz) diced tomatoes
- 1 teaspoon Italian seasoning
- 1 teaspoon salt
- 1/2 teaspoon black pepper
- 1 cup shredded mozzarella cheese
- 1 tablespoon olive oil
Cooking Instructions:
- Preheat and Prepare: Preheat your oven to 375°F (190°C). Grease a 9×13-inch baking dish with a bit of olive oil to prevent sticking.
- Cook the Beef: In a large skillet over medium heat, add the olive oil and sauté the chopped onion and minced garlic until softened. Add the ground beef and cook until browned, breaking up any large chunks with a wooden spoon. Drain excess fat if necessary.
- Combine Ingredients: Add the diced bell peppers to the skillet with the beef and cook for an additional 5 minutes until they begin to soften. Stir in the uncooked rice, beef broth, tomato sauce, diced tomatoes, Italian seasoning, salt, and black pepper. Mix well to combine all ingredients.
- Assemble the Casserole: Pour the mixture into the prepared baking dish, spreading it evenly. Cover the dish with aluminum foil to keep the moisture in.
- Bake: Place in the preheated oven and bake for 45 minutes. After 45 minutes, remove the foil, sprinkle the shredded mozzarella cheese over the top, and return to the oven for an additional 10-15 minutes until the cheese is melted and bubbly.
- Serve: Let the casserole cool for a few minutes before serving. This will make it easier to cut and serve without falling apart.
Extra Tips:
When preparing this Beef and Rice Stuffed Pepper Casserole for freezing, allow it to cool completely before transferring it to a freezer-safe container. Be sure to label the container with the date and dish name.
When you’re ready to enjoy it, thaw the casserole in the refrigerator overnight and then reheat it in the oven at 350°F (175°C) until warmed through. Additionally, you can customize this dish by adding other vegetables such as zucchini or mushrooms, or by using brown rice for a healthier option.
Classic Tuna Noodle Casserole
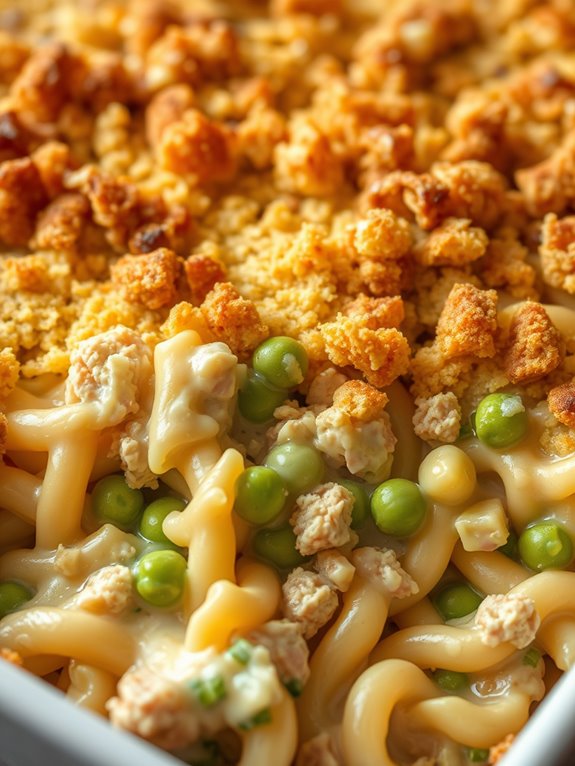
Classic Tuna Noodle Casserole is a comforting and satisfying dish that has been a staple in many households for decades. Perfect for a quick weeknight meal or as a hearty dish to bring to a potluck, this casserole is known for its creamy texture, delicious flavor, and the ease with which it can be prepared. The combination of tender noodles, savory tuna, and crunchy topping makes it a crowd-pleaser for both adults and children alike.
One of the greatest advantages of this Classic Tuna Noodle Casserole is its capacity to be prepared ahead of time and stored in the freezer for later use. This makes it an ideal option for busy families or individuals who enjoy meal prepping. When you’re ready to enjoy the casserole, simply thaw and bake it to perfection. This recipe yields enough to serve 4-6 people, making it perfect for family dinners or small gatherings.
Ingredients:
- 12 ounces egg noodles
- 2 (5-ounce) cans tuna, drained
- 1 cup frozen peas
- 1 cup chopped celery
- 1/2 cup chopped onion
- 1 cup grated cheddar cheese
- 1 can (10.5 ounces) cream of mushroom soup
- 1/2 cup milk
- 1/2 teaspoon salt
- 1/4 teaspoon black pepper
- 1 cup bread crumbs
- 2 tablespoons butter, melted
Instructions:
- Preheat Oven and Prepare Dish: Preheat your oven to 375°F (190°C). Lightly grease a 9×13-inch baking dish to prevent sticking.
- Cook Noodles: In a large pot of boiling salted water, cook the egg noodles until al dente, as per package instructions. Drain and set aside.
- Mix Ingredients: In a large bowl, combine the drained noodles, tuna, frozen peas, celery, onion, and cheddar cheese. Stir in the cream of mushroom soup and milk, mixing until well combined. Season with salt and black pepper.
- Assemble the Casserole: Pour the noodle mixture into the prepared baking dish, spreading it out evenly.
- Prepare Topping: In a small bowl, mix the bread crumbs with the melted butter until they’re well coated. Sprinkle the bread crumb mixture evenly over the top of the casserole.
- Bake the Casserole: Place the casserole in the preheated oven and bake for 25-30 minutes, or until the top is golden brown and the casserole is heated through.
- Cool and Freeze (if applicable): If you plan to freeze the casserole, allow it to cool completely, then cover it tightly with aluminum foil and freeze. When ready to serve, thaw in the refrigerator overnight and reheat in the oven at 375°F until warmed through.
Extra Tips:
When preparing this Classic Tuna Noodle Casserole, feel free to experiment with different vegetables or cheeses to suit your taste. Try adding diced bell peppers or swapping cheddar for mozzarella or Swiss cheese for a unique flavor.
Additionally, if you prefer a crispier topping, consider using crushed potato chips or fried onions in place of bread crumbs. When freezing, confirm the casserole is tightly covered to prevent freezer burn, and label it with the date to keep track of freshness.
Spinach and Ricotta Stuffed Shells
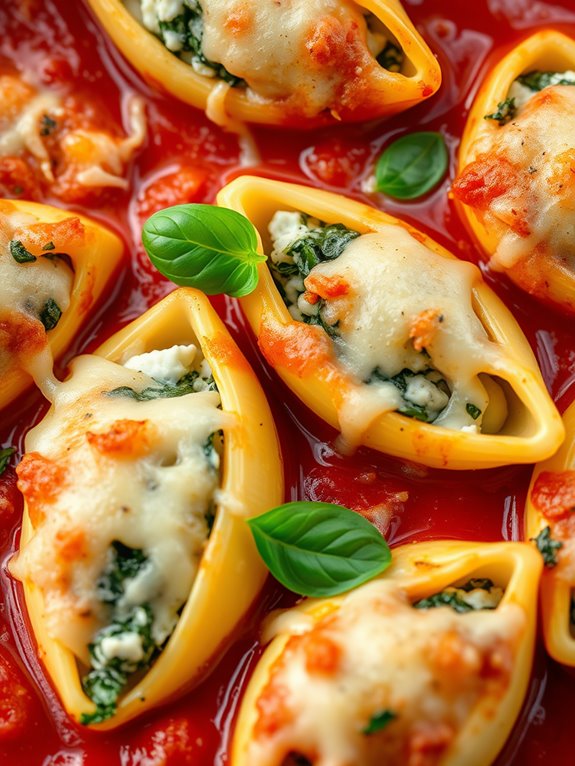
Spinach and Ricotta Stuffed Shells is a delicious and hearty dish that’s perfect for making ahead and freezing for a convenient meal option. This Italian-inspired casserole combines tender pasta shells filled with a creamy mixture of ricotta cheese, spinach, and herbs, all smothered in a rich tomato sauce and topped with melted mozzarella cheese.
It’s a comforting meal that’s sure to please the whole family, and it’s easy to prepare in advance for those busy weeknights. Freezing casseroles like Spinach and Ricotta Stuffed Shells not only saves you time but also preserves the dish’s flavors and textures, making it a great option for meal prep.
By making the dish in advance and storing it in the freezer, you can enjoy a homemade meal without the hassle of cooking from scratch every time. Plus, this dish is packed with nutrients from the spinach and offers a satisfying mix of protein and carbohydrates, making it both a nutritious and filling meal.
Ingredients (Serves 4-6)
- 20 jumbo pasta shells
- 2 cups ricotta cheese
- 1 cup cooked spinach, drained and chopped
- 1 egg
- 1 cup grated Parmesan cheese
- 1 teaspoon garlic powder
- 1 teaspoon dried basil
- 1 teaspoon dried oregano
- 1 teaspoon salt
- 1/2 teaspoon black pepper
- 2 cups marinara sauce
- 1 cup shredded mozzarella cheese
Cooking Instructions
- Preheat the Oven: Begin by preheating your oven to 375°F (190°C).
- Cook the Pasta Shells: Bring a large pot of salted water to a boil. Add the jumbo pasta shells and cook them until they’re al dente, according to package instructions. Once cooked, drain the shells and rinse them under cold water to stop the cooking process. Set them aside.
- Prepare the Filling: In a large mixing bowl, combine the ricotta cheese, cooked spinach, egg, Parmesan cheese, garlic powder, basil, oregano, salt, and black pepper. Mix until all the ingredients are well combined and the filling is smooth.
- Stuff the Shells: Using a spoon, carefully fill each cooked pasta shell with the ricotta and spinach mixture. Place the stuffed shells in a single layer in a baking dish.
- Add the Sauce: Pour the marinara sauce evenly over the stuffed shells, ensuring that all the shells are covered with sauce.
- Top with Mozzarella: Sprinkle the shredded mozzarella cheese over the top of the sauce-covered shells.
- Bake the Casserole: Cover the baking dish with aluminum foil and bake in the preheated oven for 25 minutes. Remove the foil and bake for an additional 10 minutes, or until the mozzarella cheese is bubbly and golden brown.
- Cool and Serve: Allow the casserole to cool for a few minutes before serving. Enjoy the dish hot, garnished with fresh basil or parsley if desired.
Extra Tips
To guarantee the best results when freezing Spinach and Ricotta Stuffed Shells, allow the dish to cool completely before wrapping it tightly with plastic wrap and aluminum foil. This will prevent freezer burn and maintain the dish’s flavor.
When you’re ready to enjoy the casserole, defrost it overnight in the refrigerator and reheat it in the oven at 350°F (175°C) until heated through. If you prefer a bit more flavor, consider adding a pinch of red pepper flakes to the filling for a slight kick.
Mexican-Style Enchilada Casserole
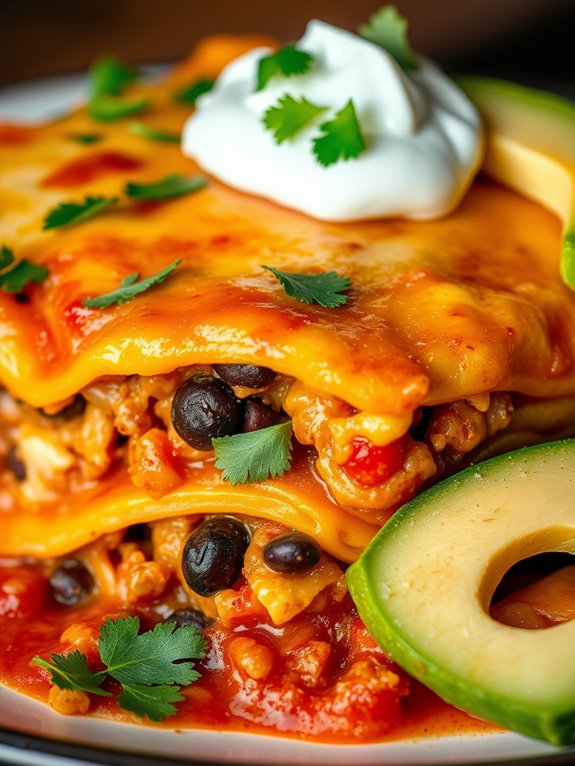
Mexican-Style Enchilada Casserole is a delightful and comforting dish that brings the vibrant flavors of Mexican cuisine to your dining table. This casserole is perfect for busy weeknights or for preparing ahead of time, as it can be easily frozen and reheated for a quick meal. Combining layers of tortillas, seasoned meat, cheese, and a rich enchilada sauce, this dish is sure to become a family favorite.
The beauty of this casserole lies in its versatility. You can customize it to your liking by adding beans, corn, or even different types of cheese. It’s a great way to use up leftover ingredients and can easily be made vegetarian by substituting the meat with more vegetables or plant-based protein.
Whether you’re cooking for a crowd or preparing meals for the week, Mexican-Style Enchilada Casserole is a convenient and delicious option.
Ingredients (Serving size: 4-6 people):
- 1 pound ground beef or turkey
- 1 tablespoon olive oil
- 1 medium onion, chopped
- 2 cloves garlic, minced
- 1 teaspoon ground cumin
- 1 teaspoon chili powder
- Salt and pepper to taste
- 1 can (15 oz) red enchilada sauce
- 1 can (10 oz) diced tomatoes with green chilies
- 1 can (15 oz) black beans, drained and rinsed
- 8 small corn tortillas
- 2 cups shredded Mexican blend cheese
- 1/4 cup chopped fresh cilantro
- Sour cream and sliced avocado, for serving
Cooking Instructions:
- Preheat the Oven: Preheat your oven to 375°F (190°C) to guarantee it’s ready for baking once the casserole is assembled.
- Cook the Meat: In a large skillet, heat the olive oil over medium heat. Add the chopped onion and garlic, sautéing until they’re soft and fragrant. Add the ground beef or turkey, breaking it up with a spoon, and cook until browned and cooked through. Drain excess fat if necessary.
- Season the Meat: Stir in the cumin, chili powder, salt, and pepper. Mix well to guarantee the meat is evenly coated with spices. Add the diced tomatoes with green chilies and black beans, stirring to combine. Let it simmer for about 5 minutes to blend the flavors.
- Layer the Casserole: Spread a thin layer of enchilada sauce on the bottom of a 9×13-inch baking dish. Place a layer of corn tortillas over the sauce. Spread half of the meat mixture over the tortillas, followed by a layer of cheese. Repeat the layers: tortillas, remaining meat mixture, and more cheese. Finish with a final layer of tortillas, enchilada sauce, and cheese.
- Bake the Casserole: Cover the baking dish with aluminum foil and bake in the preheated oven for 25 minutes. Remove the foil and bake for an additional 10 minutes, or until the cheese is melted and bubbly.
- Garnish and Serve: Remove the casserole from the oven and let it cool slightly. Garnish with chopped cilantro. Serve with sour cream and sliced avocado on the side for added flavor and texture.
Extra Tips:
When freezing the Mexican-Style Enchilada Casserole, confirm it has cooled completely before wrapping it tightly with plastic wrap and foil. It can be stored in the freezer for up to 3 months.
To reheat, thaw the casserole in the refrigerator overnight and bake at 375°F (190°C) until heated through. For a more vibrant flavor, try using homemade enchilada sauce or adding a splash of lime juice before serving. If you want to add a bit of heat, consider adding sliced jalapeños to the top before baking.
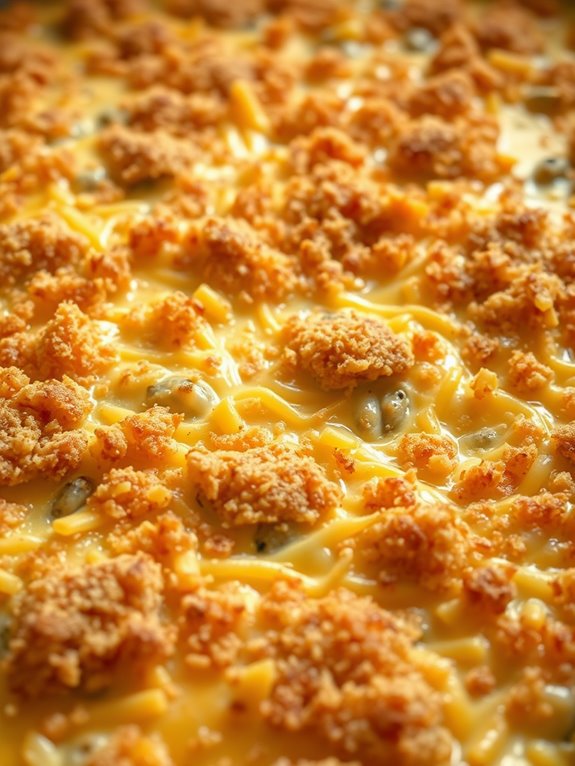
Loaded Baked Potato Casserole
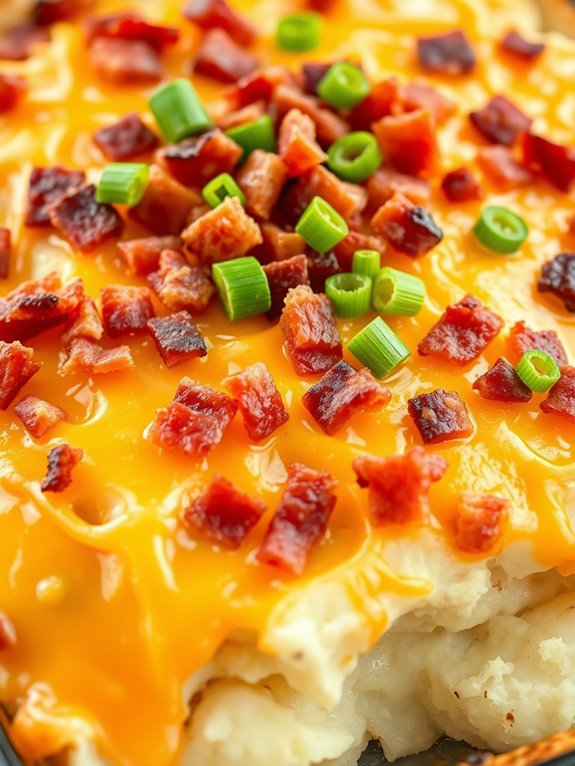
Loaded Baked Potato Casserole is the ultimate comfort food, combining all the flavors of a loaded baked potato into a creamy, cheesy, and satisfying dish. Perfect for feeding a crowd or preparing ahead of time, this casserole can be made in advance and stored in the freezer, making it a convenient option for busy weeknights or unexpected guests.
With layers of fluffy mashed potatoes, crispy bacon, gooey cheese, and fresh green onions, each bite is a delicious blend of textures and flavors. This recipe is designed to serve 4-6 people, making it an ideal choice for family dinners or small gatherings.
The key to a successful Loaded Baked Potato Casserole lies in choosing the right ingredients and following the steps carefully to achieve the perfect balance of creaminess and crispiness. By using ingredients that freeze well, you can guarantee that your casserole maintains its delicious flavor and texture even after being stored.
Ingredients (for 4-6 servings):
- 6 medium russet potatoes, peeled and cubed
- 1 cup sour cream
- 1/2 cup milk
- 1/2 cup unsalted butter
- 2 cups shredded cheddar cheese, divided
- 8 slices of bacon, cooked and crumbled
- 3 green onions, sliced
- Salt and pepper to taste
Instructions:
- Preheat the Oven: Start by preheating your oven to 350°F (175°C) to guarantee it’s hot and ready for your casserole.
- Cook the Potatoes: Place the cubed potatoes in a large pot of salted water. Bring to a boil and cook until the potatoes are tender, about 15-20 minutes.
- Prepare the Mashed Potatoes: Drain the cooked potatoes and return them to the pot. Add the sour cream, milk, and butter. Mash until smooth and creamy, adding salt and pepper to taste.
- Assemble the Casserole: Spread half of the mashed potatoes in a greased 9×13-inch baking dish. Sprinkle with half of the shredded cheddar cheese, half of the crumbled bacon, and half of the green onions.
- Layer Again: Spread the remaining mashed potatoes over the first layer. Top with the remaining cheese, bacon, and green onions.
- Bake the Casserole: Place the casserole in the preheated oven and bake for 20-25 minutes, or until the cheese is melted and bubbly.
- Serve and Enjoy: Allow the casserole to cool slightly before serving. This will help the layers set, making it easier to cut and serve.
Extra Tips: For a smooth and creamy texture, make sure to mash the potatoes while they’re still hot. If you prefer a bit of a kick, you can add a pinch of cayenne pepper or a dash of hot sauce to the mashed potatoes.
When freezing, cover the casserole tightly with plastic wrap and foil to prevent freezer burn. To reheat, thaw overnight in the refrigerator and bake at 350°F (175°C) until heated through, about 30 minutes.
Creamy Chicken Alfredo Bake
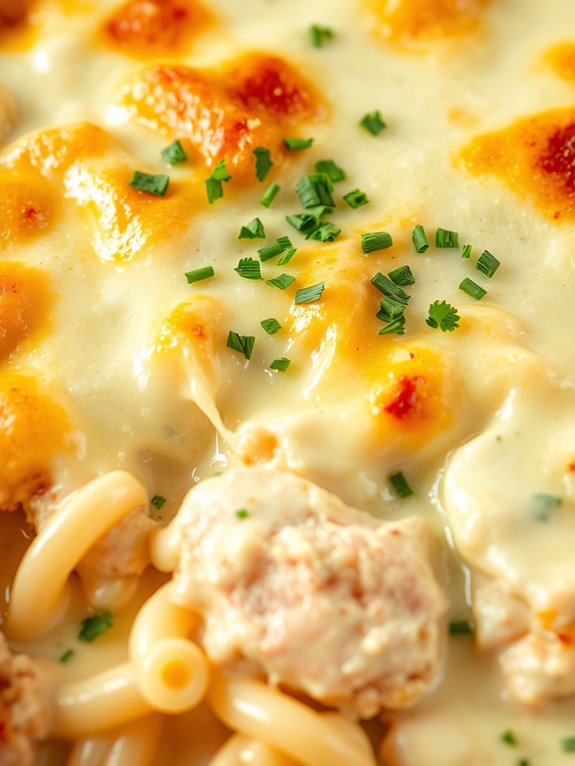
Creamy Chicken Alfredo Bake is a delightful and hearty casserole dish that combines the rich flavors of Alfredo sauce with tender chicken, pasta, and a blend of cheeses. This dish is perfect for a family dinner and can be prepared in advance, making it a great option for busy weeknights.
Once baked, it offers a comforting combination of creamy sauce and baked cheese that everyone will love. It also freezes well, so you can enjoy it at a later date without any hassle.
Preparing this dish involves cooking pasta and chicken, then mixing them with a luscious Alfredo sauce, and finally baking it all with a generous layer of cheese on top. The result is a deliciously creamy and cheesy casserole that’s sure to please.
This recipe is designed to serve 4-6 people, making it perfect for a small family gathering or for having leftovers. The following ingredients and instructions will guide you through the process of creating this delectable meal.
Ingredients (Serves 4-6):
- 2 cups cooked chicken breast, shredded or cubed
- 12 ounces fettuccine or penne pasta
- 2 tablespoons butter
- 2 cloves garlic, minced
- 1 1/2 cups heavy cream
- 1 cup grated Parmesan cheese
- 1 cup shredded mozzarella cheese
- 1/2 teaspoon salt
- 1/4 teaspoon black pepper
- 1/4 teaspoon nutmeg (optional)
- 1 tablespoon olive oil
- 1/4 cup chopped fresh parsley (for garnish)
Cooking Instructions:
- Preheat the Oven: Preheat your oven to 350°F (175°C) to prepare for baking the casserole.
- Cook the Pasta: In a large pot of boiling salted water, cook the pasta until al dente, according to the package instructions. Drain and set aside.
- Prepare the Sauce: In a large skillet, melt the butter over medium heat. Add the minced garlic and sauté for about 1 minute until fragrant.
- Add Cheese and Seasoning: Pour in the heavy cream and bring to a gentle simmer. Slowly stir in the Parmesan cheese until fully melted and the sauce is smooth. Season with salt, black pepper, and nutmeg if using. Let the sauce simmer for an additional 3-4 minutes, stirring occasionally.
- Combine Ingredients: In a large mixing bowl, combine the cooked pasta, shredded or cubed chicken, and the Alfredo sauce. Mix well to guarantee the pasta and chicken are fully coated with the sauce.
- Assemble the Casserole: Lightly grease a 9×13-inch baking dish with olive oil. Pour the pasta and chicken mixture into the dish and spread it evenly. Sprinkle the shredded mozzarella cheese on top.
- Bake the Casserole: Place the baking dish in the preheated oven and bake for 25-30 minutes, or until the cheese is bubbly and golden brown.
- Garnish and Serve: Remove from the oven and let it cool slightly. Garnish with freshly chopped parsley before serving.
Extra Tips:
To make this dish even more flavorful, consider adding vegetables like broccoli or spinach to the mix before baking.
If you’re planning to freeze the casserole, let it cool completely after baking, then cover it tightly with foil or transfer it to an airtight container. It can be kept frozen for up to three months.
When ready to enjoy, thaw it in the refrigerator overnight and reheat in the oven at 350°F (175°C) until heated through.
Sausage and Egg Breakfast Casserole
Sausage and Egg Breakfast Casserole is a hearty, satisfying dish that’s perfect for a weekend brunch or a make-ahead breakfast option. This casserole combines savory sausage, eggs, cheese, and bread for a delicious and filling meal that can be prepared in advance and frozen for convenience.
It’s a versatile recipe that allows you to incorporate your favorite ingredients, making it easy to tailor to your taste preferences. Whether you enjoy it fresh out of the oven or reheat it from the freezer, this casserole is sure to please everyone at the table.
Preparing this casserole is straightforward, and it’s a great way to use up leftover bread or vegetables. The combination of protein-rich eggs and sausage with the comforting texture of bread makes it an ideal choice for a nourishing breakfast. Plus, the addition of cheese adds a delightful creaminess that enhances the overall flavor.
This recipe is designed for a serving size of 4-6 people, making it perfect for family gatherings or meal prepping for the week ahead.
Ingredients (Serving Size: 4-6 people):
- 1 pound ground breakfast sausage
- 6 large eggs
- 2 cups milk
- 1 teaspoon salt
- 1/2 teaspoon black pepper
- 1 teaspoon dried mustard powder
- 4 cups cubed day-old bread (such as French bread or sourdough)
- 2 cups shredded cheddar cheese
- 1/4 cup chopped green onions
- Cooking spray or butter for greasing
Cooking Instructions:
- Preheat the Oven: Preheat your oven to 350°F (175°C). Grease a 9×13-inch baking dish with cooking spray or butter to prevent sticking.
- Cook the Sausage: In a large skillet over medium heat, cook the ground sausage until it’s browned and cooked through, breaking it into small pieces with a spatula. Once cooked, drain excess fat and set the sausage aside.
- Prepare the Egg Mixture: In a large mixing bowl, whisk together the eggs, milk, salt, black pepper, and dried mustard powder until well combined.
- Assemble the Casserole: Layer the cubed bread evenly in the prepared baking dish. Add the cooked sausage over the bread, followed by the shredded cheddar cheese and chopped green onions. Pour the egg mixture over the top, ensuring all bread pieces are soaked.
- Bake the Casserole: Cover the baking dish with aluminum foil and bake in the preheated oven for 30 minutes. Remove the foil and continue baking for an additional 15-20 minutes, or until the center is set and the top is golden brown.
- Cool and Serve: Allow the casserole to cool for about 10 minutes before serving. This will help the casserole set and make it easier to slice.
Extra Tips:
For the best results, use day-old bread or bread that’s slightly stale, as it will absorb the egg mixture more effectively without becoming too soggy. If you prefer, you can add vegetables like bell peppers or spinach for extra nutrition and flavor.
When freezing the casserole, allow it to cool completely before wrapping it tightly in plastic wrap and aluminum foil. To reheat, thaw overnight in the refrigerator and bake at 350°F (175°C) until heated through. Enjoy your Sausage and Egg Breakfast Casserole with a side of fresh fruit or a light salad for a balanced meal.
Vegetarian Black Bean and Quinoa Casserole
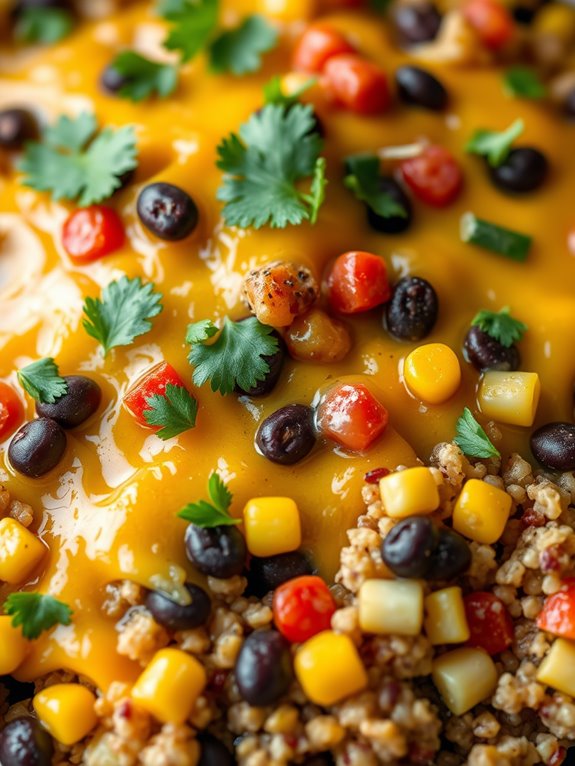
Vegetarian Black Bean and Quinoa Casserole is a delicious and nutritious dish that’s perfect for those looking to enjoy a meatless meal. This casserole combines the rich flavors of black beans, the nutty texture of quinoa, and a medley of vegetables, all enveloped in a savory sauce.
It’s a versatile dish that can be prepared in advance and frozen for later use, making it an excellent choice for busy weeknights or meal prepping. Not only does this casserole offer a delightful taste experience, but it also provides a substantial amount of protein and fiber, thanks to the combination of black beans and quinoa.
The vibrant colors from the vegetables make this dish as pleasing to the eyes as it’s to the palate. With minimal prep work and easy-to-find ingredients, this Vegetarian Black Bean and Quinoa Casserole is sure to become a family favorite.
Ingredients (serving size: 4-6 people):
- 1 cup quinoa, rinsed
- 2 cups vegetable broth
- 2 tablespoons olive oil
- 1 medium onion, chopped
- 3 cloves garlic, minced
- 1 red bell pepper, chopped
- 1 zucchini, chopped
- 1 can (15 oz) black beans, drained and rinsed
- 1 can (14.5 oz) diced tomatoes, drained
- 1 teaspoon cumin
- 1 teaspoon chili powder
- Salt and pepper to taste
- 1 cup corn kernels (fresh, frozen, or canned and drained)
- 1 cup shredded cheddar cheese
- 1/4 cup chopped fresh cilantro
- Juice of 1 lime
Cooking Instructions:
- Prepare the Quinoa: In a medium saucepan, combine the rinsed quinoa and vegetable broth. Bring to a boil, then reduce the heat to low, cover, and simmer for about 15 minutes, or until the quinoa is fluffy and the liquid is absorbed. Remove from heat and set aside.
- Saute the Vegetables: In a large skillet, heat the olive oil over medium heat. Add the chopped onion and garlic, and sauté until the onion becomes translucent, about 5 minutes. Add the red bell pepper and zucchini, and cook for an additional 5 minutes, stirring occasionally, until the vegetables are tender.
- Combine Ingredients: Preheat your oven to 375°F (190°C). In a large mixing bowl, combine the cooked quinoa, sautéed vegetables, black beans, diced tomatoes, cumin, chili powder, salt, and pepper. Stir in the corn kernels and half of the shredded cheddar cheese.
- Assemble the Casserole: Transfer the mixture to a greased 9×13 inch baking dish. Sprinkle the remaining shredded cheddar cheese evenly over the top.
- Bake: Cover the dish with aluminum foil and bake in the preheated oven for 20 minutes. Remove the foil and continue baking for an additional 10 minutes, or until the cheese is melted and bubbly.
- Garnish and Serve: Once baked, remove the casserole from the oven and let it cool for a few minutes. Sprinkle with fresh cilantro and drizzle with lime juice before serving.
Extra Tips:
To enhance the flavor of the casserole, consider adding some smoked paprika or a dash of hot sauce if you prefer a bit of heat. You can also substitute or add other vegetables like mushrooms or spinach based on your preference.
This casserole freezes well, so you can portion it into individual servings and store them in airtight containers for up to three months. When ready to eat, simply thaw in the refrigerator overnight and reheat in the oven until warmed through.
Baked Ziti With Italian Sausage
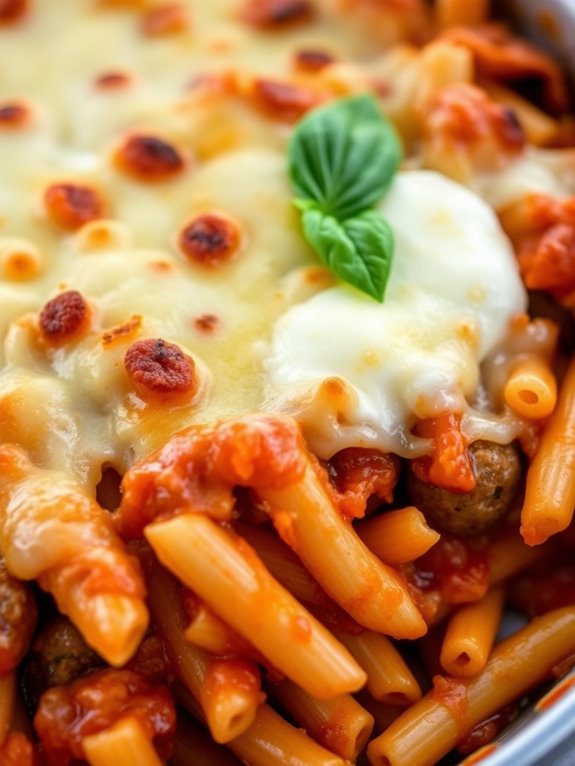
Baked Ziti With Italian Sausage is a comforting and hearty dish perfect for any family dinner or gathering. This casserole combines the rich flavors of Italian sausage, tangy tomato sauce, and creamy cheese, all layered with perfectly cooked ziti pasta.
The best part about this dish is that it can be prepared ahead of time and frozen, making it an ideal option for busy weeknights when you need a quick yet delicious meal. Simply heat it up, and you have a home-cooked dinner ready in no time.
The combination of savory sausage and luscious cheese creates a dish that’s both satisfying and flavorful. This baked ziti isn’t only easy to make but also versatile, allowing you to add your favorite ingredients or adjust the seasoning to suit your taste.
It’s a dish that will have everyone coming back for seconds, and since it can be frozen, you can enjoy it anytime you crave a homemade Italian meal.
Ingredients for 4-6 servings:
- 1 pound ziti pasta
- 1 pound Italian sausage, casings removed
- 2 cups marinara sauce
- 1 cup ricotta cheese
- 1 cup mozzarella cheese, shredded
- 1/2 cup Parmesan cheese, grated
- 1 tablespoon olive oil
- 1 small onion, diced
- 3 cloves garlic, minced
- 1 teaspoon Italian seasoning
- Salt and pepper to taste
- Fresh basil leaves, for garnish
Cooking Instructions:
- Preheat and Prepare: Preheat your oven to 375°F (190°C). Begin by bringing a large pot of salted water to a boil. Add the ziti pasta and cook until it’s al dente, about 8-10 minutes. Drain the pasta and set aside.
- Cook the Sausage: In a large skillet, heat olive oil over medium heat. Add the Italian sausage and cook until browned, breaking it up with a spoon as it cooks. Once browned, remove the sausage from the skillet and set aside.
- Sauté the Aromatics: In the same skillet, add the diced onion and garlic. Sauté until the onion is translucent and fragrant, about 3-4 minutes. Add the Italian seasoning, salt, and pepper, stirring to combine.
- Combine Ingredients: Return the cooked sausage to the skillet with the onion and garlic. Pour in the marinara sauce and stir well to combine. Let the mixture simmer for 5-7 minutes to blend the flavors.
- Assemble the Casserole: In a large mixing bowl, combine the cooked ziti, sausage sauce, and ricotta cheese. Stir until the pasta is well coated. Transfer half of the mixture to a greased 9×13 inch baking dish.
- Layer the Cheese: Sprinkle half of the mozzarella and Parmesan cheese over the pasta mixture in the baking dish. Add the remaining pasta mixture on top and finish with the remaining mozzarella and Parmesan cheese.
- Bake the Ziti: Cover the baking dish with aluminum foil and bake in the preheated oven for 25 minutes. Remove the foil and bake for an additional 10-15 minutes, or until the cheese is bubbly and golden brown.
- Serve: Once baked, remove from the oven and let it cool for a few minutes. Garnish with fresh basil leaves before serving.
Extra Tips:
When preparing Baked Ziti With Italian Sausage, consider using a high-quality marinara sauce to enhance the flavor of the dish. You can also add vegetables such as spinach or bell peppers for added nutrition and flavor.
If you plan to freeze this casserole, let it cool completely before wrapping it tightly with plastic wrap and aluminum foil. When ready to serve, thaw it overnight in the refrigerator and reheat in the oven until warmed through.
This dish is perfect for meal prepping and can be enjoyed at any time with minimal effort.
Shepherd’s Pie With Mashed Potato Topping
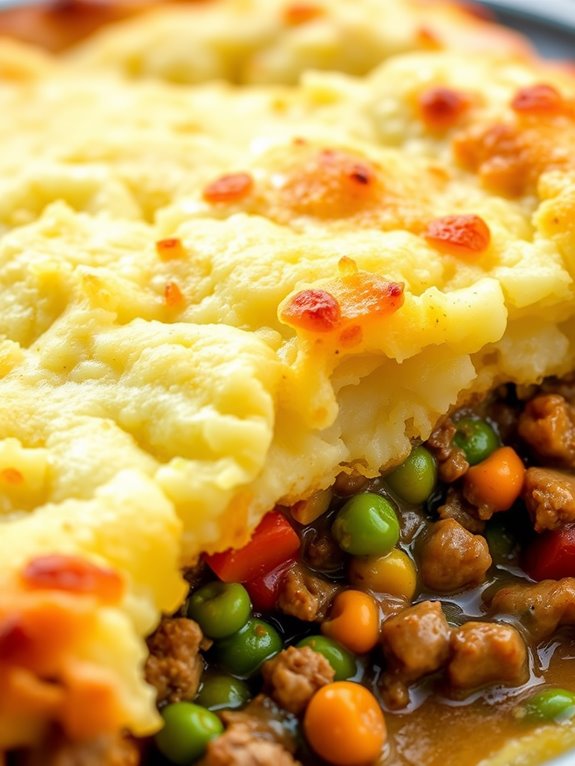
Shepherd’s Pie with Mashed Potato Topping is a comforting, savory dish that combines a flavorful ground meat filling with a creamy mashed potato topping. This classic casserole is perfect for batch cooking and freezing, making it an ideal choice for busy weeknights or when you want to enjoy a homemade meal without the hassle of daily cooking. The rich meat filling, typically made with ground beef or lamb, is layered with vegetables and a savory gravy, then topped with a layer of fluffy mashed potatoes that crisps up beautifully in the oven.
This dish isn’t only a crowd-pleaser but also incredibly versatile. You can customize the filling with your favorite vegetables or adjust the seasoning to suit your taste. When frozen, Shepherd’s Pie maintains its texture and flavor, making it an excellent candidate for make-ahead meals. By preparing it in advance and freezing, you guarantee that a hearty, delicious dinner is always within reach.
Ingredients for 4-6 servings:
- 1 ½ pounds ground beef or lamb
- 1 tablespoon olive oil
- 1 large onion, chopped
- 2 carrots, peeled and diced
- 2 cloves garlic, minced
- 1 cup frozen peas
- 2 tablespoons tomato paste
- 1 tablespoon Worcestershire sauce
- 1 cup beef broth
- 1 teaspoon dried thyme
- Salt and pepper to taste
- 2 pounds potatoes, peeled and cubed
- ½ cup milk
- 4 tablespoons butter
- 1 cup shredded cheddar cheese (optional)
Cooking Instructions:
- Prepare the Filling: In a large skillet, heat olive oil over medium heat. Add the chopped onion and carrots, and sauté until the onions are translucent and the carrots are tender, about 5-7 minutes. Stir in the minced garlic and cook for another minute.
- Cook the Meat: Add the ground beef or lamb to the skillet, breaking it apart with a spatula. Cook until browned and cooked through. Drain any excess fat from the skillet.
- Flavor the Filling: Stir in the tomato paste, Worcestershire sauce, beef broth, and dried thyme. Add salt and pepper to taste. Let the mixture simmer for about 10 minutes, allowing the flavors to meld and the sauce to thicken.
- Add Vegetables: Mix in the frozen peas and let them cook for a couple of minutes until they’re heated through. Remove the skillet from the heat and set aside.
- Prepare the Mashed Potato Topping: While the filling simmers, boil the cubed potatoes in a large pot of salted water until tender, about 15-20 minutes. Drain the potatoes and return them to the pot. Add the milk and butter, then mash until smooth and creamy. Season with salt and pepper to taste.
- Assemble the Pie: Preheat your oven to 400°F (200°C). Spread the meat filling evenly in a baking dish. Spoon the mashed potatoes over the filling, smoothing them out to cover completely. If desired, sprinkle shredded cheddar cheese over the mashed potatoes.
- Bake the Casserole: Place the baking dish in the oven and bake for 25-30 minutes, or until the mashed potatoes are golden brown and the filling is bubbling around the edges.
- Cool and Freeze (if desired): Allow the casserole to cool completely if you plan to freeze it. Wrap tightly with plastic wrap and aluminum foil before placing in the freezer.
Extra Tips:
For best results when freezing Shepherd’s Pie, verify it’s fully cooled before wrapping it to prevent ice crystals from forming, which can affect texture.
When ready to eat, thaw the casserole in the refrigerator overnight before reheating. You can reheat it in the oven at 350°F (175°C) until heated through, usually about 30 minutes. If you prefer a crispy topping, finish with a few minutes under the broiler.
Adjust the seasoning as needed after reheating, as flavors can sometimes mellow in the freezer.
Ham and Cheese Pasta Bake
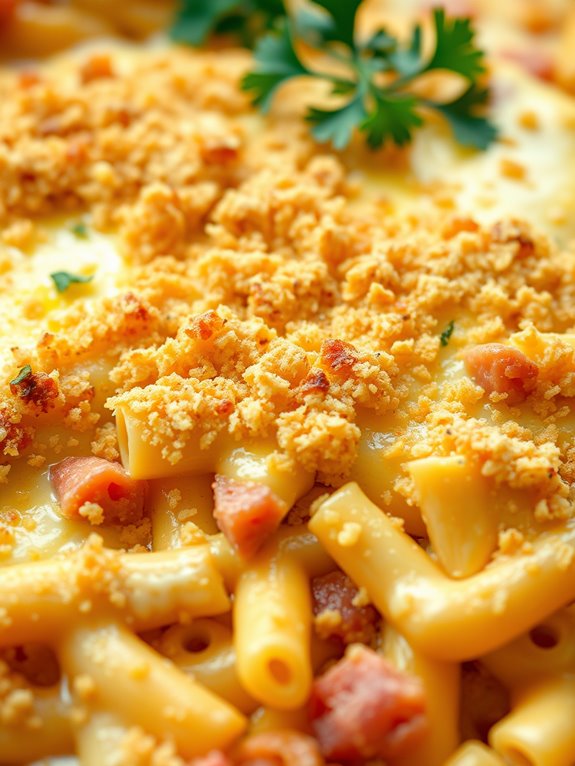
Ham and Cheese Pasta Bake is a comforting and delicious casserole that’s perfect for freezing and enjoying at a later time. This dish combines creamy cheese, savory ham, and tender pasta in a rich sauce that melds beautifully when baked. It’s an ideal make-ahead meal for busy weeknights, family gatherings, or potlucks, offering a warm and satisfying dinner that everyone will love.
This recipe serves 4-6 people and is designed to be easily frozen for later use. The key to a successful Ham and Cheese Pasta Bake lies in the quality of the ingredients and the balance of flavors. By preparing the dish ahead of time and freezing it, you can enjoy a homemade meal without the hassle of last-minute cooking. The casserole can be baked directly from the freezer or thawed in the refrigerator overnight for a quicker bake time.
Ingredients:
- 12 ounces of pasta (such as penne or rotini)
- 2 cups diced cooked ham
- 2 cups shredded cheddar cheese
- 1 cup shredded mozzarella cheese
- 1/4 cup grated Parmesan cheese
- 2 tablespoons butter
- 2 tablespoons all-purpose flour
- 2 cups milk
- 1 teaspoon Dijon mustard
- 1/2 teaspoon garlic powder
- 1/2 teaspoon onion powder
- Salt and pepper to taste
- 1/4 cup breadcrumbs (optional)
- 2 tablespoons chopped fresh parsley (optional, for garnish)
Cooking Instructions:
- Preheat the Oven: Preheat your oven to 350°F (175°C). If you plan to freeze the casserole, this step will be for when you’re ready to bake it.
- Cook the Pasta: Bring a large pot of salted water to a boil. Add the pasta and cook until al dente, according to the package instructions. Drain the pasta and set it aside.
- Prepare the Sauce: In a medium saucepan, melt the butter over medium heat. Stir in the flour and cook for about 1 minute until it forms a paste. Gradually whisk in the milk, making sure there are no lumps. Continue to cook until the sauce thickens, about 5 minutes.
- Add Flavorings: Stir in the Dijon mustard, garlic powder, onion powder, salt, and pepper. Mix until well combined. Remove the sauce from heat and stir in 1 1/2 cups of cheddar cheese and all of the mozzarella cheese until melted and smooth.
- Assemble the Casserole: In a large mixing bowl, combine the cooked pasta, diced ham, and cheese sauce. Mix until the pasta and ham are fully coated with the sauce.
- Transfer to Baking Dish: Pour the mixture into a greased 9×13 inch baking dish. Sprinkle the remaining 1/2 cup of cheddar cheese and Parmesan cheese over the top. If using breadcrumbs, sprinkle them evenly across the top as well.
- Bake or Freeze: If baking immediately, place the casserole in the preheated oven and bake for 25-30 minutes, or until the top is golden brown and bubbly. If freezing, cover the dish tightly with aluminum foil and freeze.
- Garnish and Serve: Once baked, remove from the oven and let it cool for a few minutes. Garnish with chopped parsley before serving.
Extra Tips: When preparing the Ham and Cheese Pasta Bake for freezing, make certain it has cooled completely before covering it tightly with aluminum foil or a lid. Label the dish with the date and reheating instructions for convenience.
When ready to enjoy, you can bake it straight from the freezer; just add about 20 minutes to the baking time to make sure it’s heated through. For a creamier texture, consider adding a splash of milk when reheating. Don’t forget to let the baked casserole rest for a few minutes to allow the flavors to meld and the sauce to thicken slightly before serving.
BBQ Pulled Pork and Sweet Potato Casserole
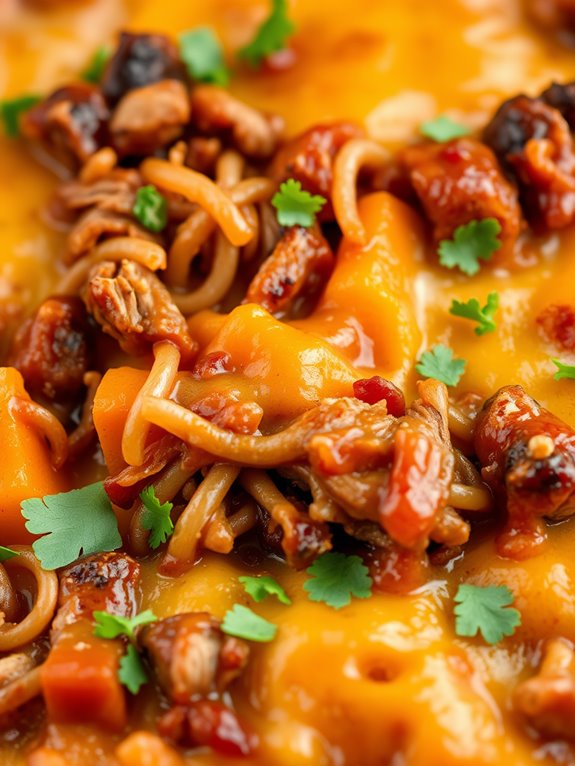
BBQ Pulled Pork and Sweet Potato Casserole is a comforting and hearty dish that combines the rich flavors of succulent pulled pork with the natural sweetness of sweet potatoes. This casserole is perfect for any occasion, whether you’re hosting a family dinner or looking for a meal to prepare in advance and freeze for later.
The marriage of tangy BBQ sauce with tender sweet potatoes and savory pork creates a delightful balance that’s sure to please even the pickiest of eaters. This casserole isn’t only delicious but also convenient, as it can be prepared ahead of time and stored in the freezer for those busy days when you need a quick yet satisfying meal.
The recipe yields enough to feed 4-6 people, making it ideal for family gatherings or meal prep. With a few simple ingredients and easy steps, you can create a dish that will become a staple in your household.
Ingredients (Serving Size: 4-6 people):
- 2 lbs pulled pork (store-bought or homemade)
- 3 large sweet potatoes, peeled and cubed
- 1 cup BBQ sauce
- 1 medium onion, diced
- 2 cloves garlic, minced
- 1 cup shredded cheddar cheese
- 2 tablespoons olive oil
- Salt and pepper to taste
- 1 teaspoon smoked paprika
- 1 tablespoon fresh parsley, chopped (optional, for garnish)
Cooking Instructions:
- Preheat your oven to 375°F (190°C). While the oven is heating, prepare the sweet potatoes by peeling and cubing them into bite-sized pieces.
- In a large pot, bring water to a boil and add the cubed sweet potatoes. Cook for 8-10 minutes until they’re just tender. Drain and set aside.
- In a skillet, heat olive oil over medium heat. Add the diced onion and minced garlic, sautéing for 3-4 minutes until the onion becomes translucent and fragrant.
- Add the cooked sweet potatoes to the skillet with the onions and garlic. Sprinkle with smoked paprika, salt, and pepper, stirring to combine.
- In a large mixing bowl, combine the pulled pork and BBQ sauce, ensuring the pork is well-coated.
- In a 9×13 inch baking dish, layer the BBQ pulled pork mixture at the bottom. Spread the sweet potato mixture evenly over the pulled pork.
- Sprinkle the shredded cheddar cheese over the top of the casserole, covering it completely.
- Place the casserole in the preheated oven and bake for 25-30 minutes, or until the cheese is bubbling and golden brown.
- Remove the casserole from the oven and let it cool for a few minutes. Garnish with fresh parsley before serving, if desired.
Extra Tips:
For best flavor, consider using your favorite BBQ sauce, whether it’s smoky, spicy, or sweet, to complement the pulled pork. If you want to save time, you can use pre-cooked pulled pork available at most grocery stores.
To freeze the casserole, allow it to cool completely after baking, then wrap it tightly in aluminum foil or place it in an airtight container. When ready to enjoy, simply thaw in the refrigerator overnight and reheat in the oven at 350°F (175°C) until warmed through.
Turkey and Wild Rice Casserole
Turkey and Wild Rice Casserole is a comforting and hearty dish that combines tender turkey, nutty wild rice, and a rich, creamy sauce. This casserole is perfect for family dinners or gatherings and can be prepared in advance and stored in the freezer for a quick and easy meal later.
The combination of flavors and textures, from the delicate turkey pieces to the chewy wild rice and the creamy sauce, makes this dish a favorite among both kids and adults.
This recipe for Turkey and Wild Rice Casserole is designed to serve 4-6 people, making it ideal for a family meal or for having leftovers. The dish isn’t only delicious but also packed with nutrients, thanks to the inclusion of protein-rich turkey and fiber-rich wild rice. Once assembled, the casserole can be cooked immediately or stored in the freezer, making it a convenient option for busy weeknights.
Ingredients (Serving Size: 4-6 people):
- 2 cups cooked wild rice
- 2 cups cooked, diced turkey
- 1 cup sliced mushrooms
- 1/2 cup diced onion
- 1/2 cup diced celery
- 2 cloves garlic, minced
- 1 cup chicken broth
- 1 cup heavy cream
- 1 cup shredded cheddar cheese
- 1/2 teaspoon dried thyme
- Salt and pepper to taste
- 2 tablespoons olive oil
- 1/4 cup breadcrumbs (optional)
- 2 tablespoons butter
Cooking Instructions:
- Preheat the Oven: Preheat your oven to 350°F (175°C) to guarantee it’s ready for baking once the casserole is prepared.
- Prepare the Vegetables: In a large skillet, heat the olive oil over medium heat. Add the diced onion, celery, and sliced mushrooms. Sauté for about 5-7 minutes until the vegetables are softened. Add the minced garlic and cook for another minute.
- Make the Sauce: Reduce the heat to low and pour in the chicken broth and heavy cream. Stir in the dried thyme, salt, and pepper. Let the mixture simmer for about 5 minutes to thicken slightly.
- Combine Ingredients: In a large mixing bowl, combine the cooked wild rice, diced turkey, and the vegetable-cream mixture. Stir until everything is well incorporated.
- Assemble the Casserole: Transfer the mixture into a greased 9×13 inch baking dish. Sprinkle the shredded cheddar cheese evenly over the top. If using, mix the breadcrumbs with melted butter and sprinkle over the cheese for an added crunchy topping.
- Bake: Place the casserole in the preheated oven and bake for 25-30 minutes, or until the cheese is melted and bubbly and the top is golden brown.
- Serve: Let the casserole cool for a few minutes before serving to allow it to set slightly. Enjoy your meal warm.
Extra Tips:
When preparing Turkey and Wild Rice Casserole, consider using leftover turkey from a previous meal, which can enhance the flavor and reduce waste.
If wild rice is unavailable, you can substitute with brown rice or a wild rice blend. For a bit of extra flavor, consider adding a teaspoon of Dijon mustard to the cream sauce.
To freeze, assemble the casserole without baking, cover it tightly with plastic wrap and aluminum foil, and store it in the freezer for up to 3 months. When ready to enjoy, thaw it in the refrigerator overnight and bake as instructed.