

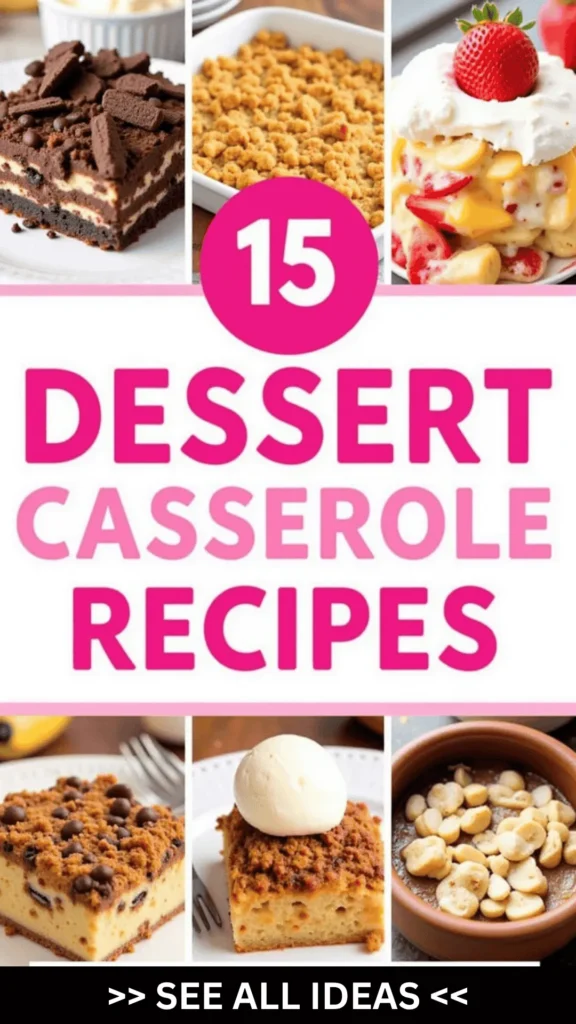
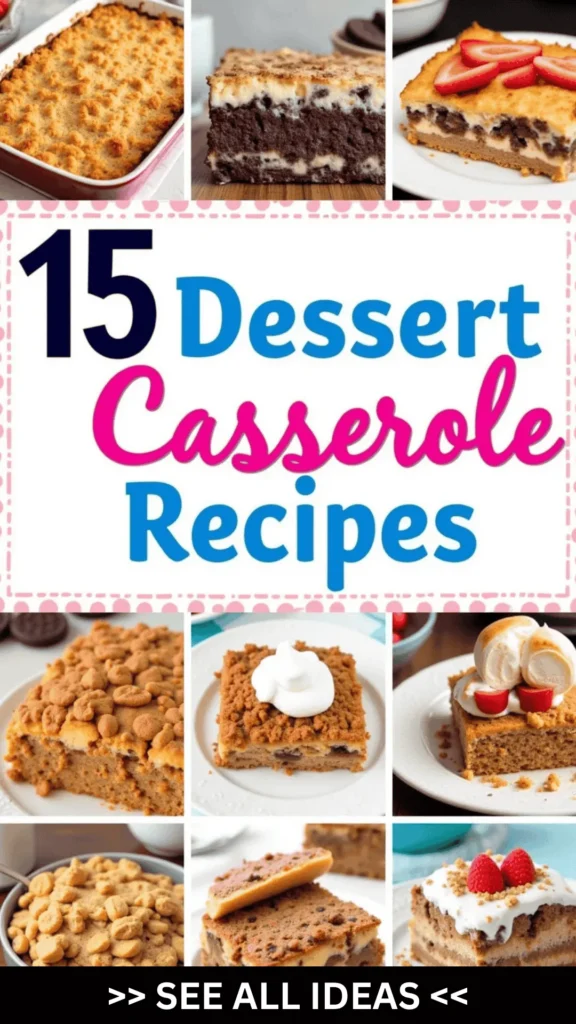
I recently discovered a delightful collection of dessert casserole recipes that have completely redefined my sweet cravings.
There’s something so comforting about the warm, inviting scent of a classic apple crisp casserole filling the air.
And let’s not forget the sheer indulgence of a rich chocolate brownie bake—pure bliss in every bite!
These recipes bring a fun twist to familiar flavors and are perfect for any gathering or cozy night in.
Join me as we explore these mouthwatering creations that are sure to impress your friends and family!
Classic Apple Crisp Casserole
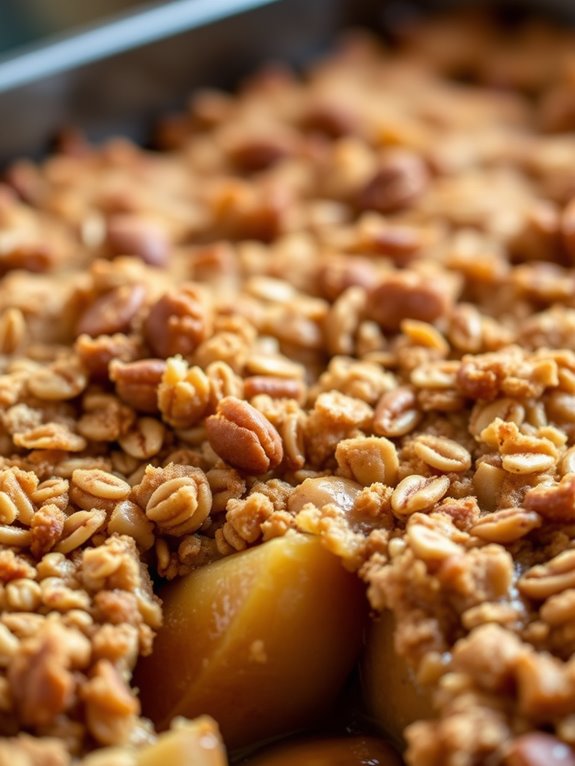
The Classic Apple Crisp Casserole is a timeless dessert that combines the comfort of baked apples with a delightful, crispy topping. This dish is perfect for family gatherings or as a cozy treat on a chilly evening. The combination of soft, cinnamon-spiced apples and a buttery, crumbly topping makes it an irresistible dessert that will have everyone coming back for seconds.
Whether you’re an experienced baker or a novice in the kitchen, this recipe is straightforward and rewarding to make.
In this recipe, fresh apples are peeled and sliced, then tossed in a mixture of sugar, cinnamon, and a hint of nutmeg, providing a warm and spicy flavor. The topping is a blend of oats, flour, brown sugar, and butter, creating a crunchy texture that complements the softness of the baked apples.
This Classic Apple Crisp Casserole serves 4-6 people, making it the perfect size for a small gathering or family dessert night.
Ingredients:
- 6 medium-sized apples (such as Granny Smith or Honeycrisp), peeled, cored, and sliced
- 1 tablespoon lemon juice
- 1/2 cup granulated sugar
- 1 teaspoon ground cinnamon
- 1/4 teaspoon ground nutmeg
- 1 cup all-purpose flour
- 1 cup rolled oats
- 1/2 cup packed brown sugar
- 1/2 cup unsalted butter, melted
- 1/4 teaspoon salt
Instructions:
- Preheat the Oven: Begin by preheating your oven to 350°F (175°C). This guarantees that the oven is at the right temperature for even baking once your casserole is ready to go in.
- Prepare the Apples: In a large bowl, combine the sliced apples with lemon juice, granulated sugar, cinnamon, and nutmeg. Toss the apples until they’re well-coated with the sugar and spices, which will enhance their natural sweetness and add a warm flavor.
- Make the Topping: In another bowl, mix together the flour, oats, brown sugar, and salt. Pour the melted butter over the dry ingredients and stir until the mixture forms coarse crumbs. This will be your crispy topping.
- Assemble the Casserole: Spread the prepared apples evenly in a 9×13-inch baking dish. Sprinkle the oat mixture evenly over the top of the apples, ensuring that the apples are fully covered.
- Bake the Casserole: Place the baking dish in the preheated oven and bake for 40-45 minutes, or until the topping is golden brown and the apples are tender when pierced with a fork.
- Cool and Serve: Allow the Apple Crisp Casserole to cool for about 10 minutes before serving. This will let the flavors meld together and make it easier to serve.
Extra Tips:
When selecting apples for this recipe, choose varieties that are firm and slightly tart, such as Granny Smith, to create a nice balance with the sweet topping. If you prefer a sweeter apple, Honeycrisp is a great choice.
For an added twist, consider including a handful of chopped nuts, such as walnuts or pecans, into the topping mixture for an extra layer of crunch. Remember, the casserole can be served warm with a scoop of vanilla ice cream or a dollop of whipped cream for an extra indulgent treat.
Decadent Chocolate Brownie Casserole

Indulge in the ultimate chocolate dessert experience with this Decadent Chocolate Brownie Casserole. This rich and gooey treat combines the classic flavors of a brownie with the comforting warmth of a casserole, making it perfect for special occasions or a delightful family dessert.
Each bite of this casserole is filled with deep chocolate flavors, a hint of vanilla, and the satisfying crunch of walnuts, creating a dessert that’s both familiar and excitingly unique.
Designed to serve 4-6 people, this brownie casserole is easy to prepare and is guaranteed to impress your guests. The recipe uses simple pantry ingredients and can be made in under an hour, making it a convenient option for any gathering.
Serve it warm with a scoop of vanilla ice cream or a dollop of whipped cream for an added touch of luxury.
Ingredients:
- 1 cup all-purpose flour
- 1/2 cup unsweetened cocoa powder
- 1/2 teaspoon baking powder
- 1/4 teaspoon salt
- 1 cup granulated sugar
- 1/2 cup unsalted butter, melted
- 2 large eggs
- 1 teaspoon vanilla extract
- 1/2 cup semi-sweet chocolate chips
- 1/2 cup chopped walnuts (optional)
- 1/4 cup hot water
Cooking Instructions:
1. Preheat the Oven: Start by preheating your oven to 350°F (175°C). Grease a 9×9-inch baking dish with butter or non-stick spray to guarantee easy removal of the casserole after baking.
2. Mix Dry Ingredients: In a medium-sized bowl, whisk together the all-purpose flour, cocoa powder, baking powder, and salt. This will guarantee that your dry ingredients are evenly distributed and will help prevent lumps in your batter.
3. Combine Wet Ingredients: In a separate large mixing bowl, beat the granulated sugar and melted butter together until well combined. Add the eggs one at a time, mixing thoroughly after each addition. Stir in the vanilla extract to enhance the chocolate flavor.
4. Create the Batter: Gradually add the dry ingredient mixture to the wet ingredients, stirring until just combined. Avoid overmixing to keep the brownies tender.
Gently fold in the chocolate chips and walnuts, ensuring an even distribution throughout the batter.
5. Prepare the Casserole: Pour the batter into the prepared baking dish, spreading it evenly. Carefully pour the hot water over the top of the batter without mixing it in; this will help create a fudgy texture as it bakes.
6. Bake: Place the dish in the preheated oven and Bake for 30-35 minutes, or until the top is set and a toothpick inserted into the center comes out with a few moist crumbs. Be careful not to overbake, as you want the center to remain soft and gooey.
7. Cool and Serve: Allow the casserole to cool for about 10 minutes before serving. This rest time will help set the structure, making it easier to cut into portions. Serve warm with your choice of toppings.
Extra Tips:
For an even deeper chocolate flavor, consider using dark chocolate cocoa powder or adding a tablespoon of instant coffee granules to the dry ingredients.
If you prefer a nuttier flavor, toast the walnuts lightly before folding them into the batter. For a gluten-free version, substitute the all-purpose flour with a gluten-free flour blend.
Finally, for an extra special touch, drizzle some melted chocolate or caramel sauce over the top before serving. Enjoy this decadent treat with family and friends for a truly memorable dessert experience.
Blueberry French Toast Bake
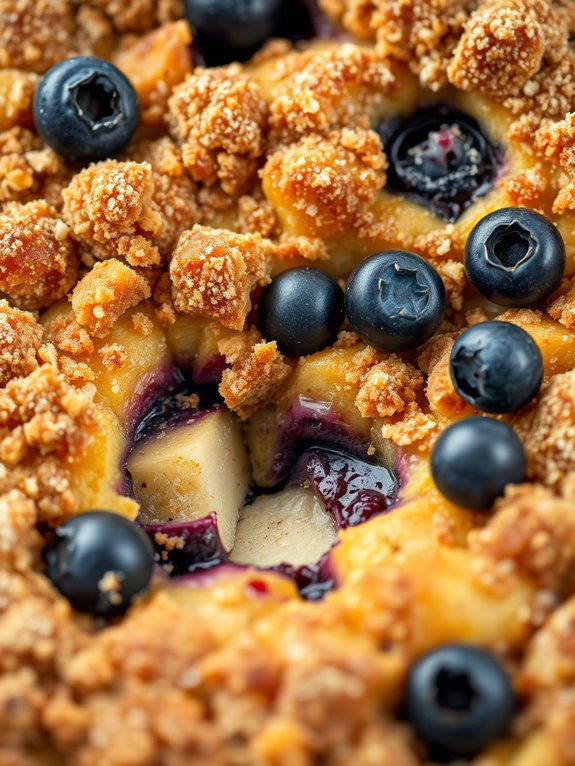
Blueberry French Toast Bake is a delightful and comforting dish that combines the rich flavors of fresh blueberries and the warm, buttery goodness of French toast. This breakfast casserole is perfect for family gatherings, brunch celebrations, or even as a sweet treat after dinner. The best part is that you can prepare it the night before, allowing the bread to soak up all the delicious flavors, and simply pop it in the oven the next morning.
This recipe serves 4-6 people and is designed to be both easy and satisfying. With its crisp top and custardy interior, the Blueberry French Toast Bake is sure to become a family favorite. The addition of blueberries not only adds a burst of flavor but also provides a lovely visual appeal with its vibrant color against the golden-brown crust.
Ingredients:
- 1 loaf of French bread, cubed
- 8 large eggs
- 2 cups milk
- ½ cup heavy cream
- ¾ cup granulated sugar
- 2 teaspoons vanilla extract
- 1 teaspoon ground cinnamon
- ¼ teaspoon salt
- 2 cups fresh blueberries
- ½ cup packed brown sugar
- ¼ cup all-purpose flour
- ½ cup cold butter, cubed
Instructions:
- Prepare the Bread: Cut the French bread into cubes and place them in a greased 9×13-inch baking dish. Make sure the bread is evenly distributed to create a uniform layer.
- Make the Egg Mixture: In a large bowl, whisk together the eggs, milk, heavy cream, granulated sugar, vanilla extract, ground cinnamon, and salt until well combined. This mixture will serve as the custard base for the French toast.
- Assemble the Bake: Pour the egg mixture evenly over the bread cubes, ensuring all pieces are covered. Gently press down on the bread to help it absorb the liquid.
- Add Blueberries: Sprinkle the fresh blueberries evenly over the top of the soaked bread, slightly pressing them into the mixture.
- Prepare the Topping: In a medium bowl, mix the brown sugar and flour together. Add the cold, cubed butter and use a pastry cutter or your fingers to combine until the mixture resembles coarse crumbs.
- Top the Bake: Sprinkle the crumb topping over the entire casserole, ensuring even coverage. This will form a delicious, crunchy topping once baked.
- Chill the Casserole: Cover the dish with plastic wrap and refrigerate for at least 2 hours, or preferably overnight, allowing the bread to fully soak up the egg mixture.
- Bake the Casserole: Preheat your oven to 350°F (175°C). Remove the plastic wrap from the baking dish and bake the casserole for 45-50 minutes, or until the top is golden brown and the custard is set.
- Serve: Let the bake cool for a few minutes before serving. Enjoy it warm, possibly with a drizzle of maple syrup or a dollop of whipped cream.
Extra Tips:
For the best results, use day-old or slightly stale bread as it will absorb the egg mixture more effectively without becoming too soggy. If fresh blueberries aren’t available, you can use frozen blueberries; just make sure to thaw and drain them before using to avoid excess moisture.
Additionally, feel free to experiment with other fruits such as raspberries or strawberries for a different flavor profile. For a nutty crunch, consider adding sliced almonds or chopped pecans to the crumb topping.
Creamy Pumpkin Pie Casserole
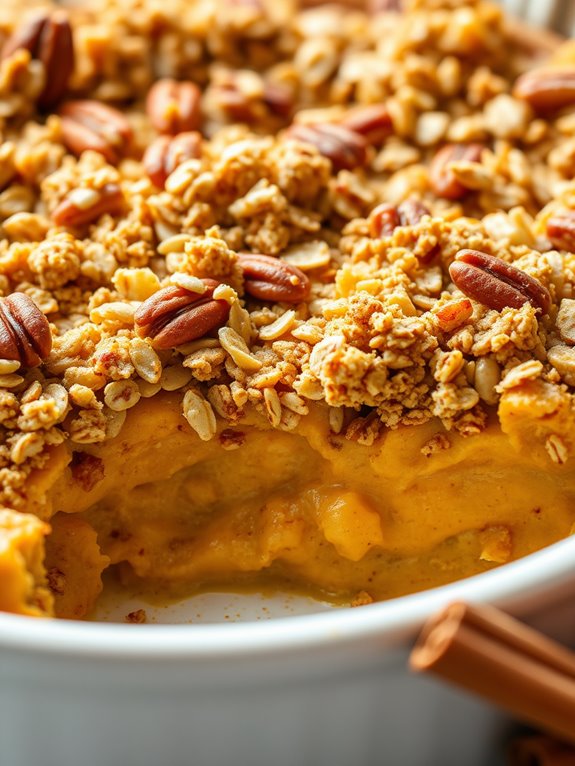
Creamy Pumpkin Pie Casserole is a delightful twist on the classic pumpkin pie, perfect for dessert lovers looking to serve a crowd. This comforting dish combines the familiar flavors of spiced pumpkin pie with a creamy, custard-like texture, making it an ideal choice for holiday gatherings or cozy family dinners.
The casserole approach allows for easy preparation and serving, giving you more time to enjoy with your loved ones. This recipe serves 4-6 people and is a wonderful showcase of autumnal flavors. It brings together the rich taste of pumpkin, the warmth of spices like cinnamon and nutmeg, and the smoothness of a cream cheese mixture.
Topped with a crunchy streusel, this dessert casserole offers a satisfying contrast of textures, making each bite a delightful experience. Whether you’re a pumpkin pie purist or a fan of innovative desserts, this Creamy Pumpkin Pie Casserole is sure to be a hit.
Ingredients:
- 1 can (15 ounces) pumpkin puree
- 1 package (8 ounces) cream cheese, softened
- 1/2 cup granulated sugar
- 1/4 cup brown sugar
- 2 large eggs
- 1 teaspoon vanilla extract
- 1 teaspoon ground cinnamon
- 1/2 teaspoon ground nutmeg
- 1/2 teaspoon ground ginger
- 1/4 teaspoon salt
- 1 cup evaporated milk
- 1 cup all-purpose flour
- 1/2 cup cold unsalted butter, diced
- 1/2 cup chopped pecans (optional)
- 1/2 cup rolled oats
Cooking Instructions:
- Preheat the Oven: Start by preheating your oven to 350°F (175°C). This guarantees that the casserole will bake evenly once it’s ready to go in.
- Prepare the Pumpkin Mixture: In a large mixing bowl, combine the pumpkin puree, softened cream cheese, granulated sugar, and brown sugar. Use an electric mixer to blend these ingredients until smooth and creamy.
- Add Eggs and Spices: Beat in the eggs one at a time, followed by the vanilla extract. Then, add the ground cinnamon, nutmeg, ginger, and salt, making sure everything is well incorporated.
- Incorporate the Evaporated Milk: Gradually stir in the evaporated milk until you have a smooth and creamy pumpkin mixture.
- Make the Streusel Topping: In a separate bowl, combine the flour, diced cold butter, chopped pecans (if using), and rolled oats. Use a pastry cutter or your fingers to mix until the mixture resembles coarse crumbs.
- Assemble the Casserole: Pour the pumpkin mixture into a greased 9×13-inch baking dish. Evenly sprinkle the streusel topping over the pumpkin mixture.
- Bake the Casserole: Place the dish in the preheated oven and bake for 50-60 minutes, or until the casserole is set and the topping is golden brown. A toothpick inserted in the center should come out clean.
- Cool and Serve: Allow the casserole to cool slightly before serving. This will help the flavors to meld together and make serving easier.
Extra Tips:
For extra flavor, consider adding a dash of allspice or cloves to the pumpkin mixture. If you prefer a less sweet casserole, reduce the amount of granulated sugar to your taste.
If you’re serving this dessert at a special occasion, a dollop of whipped cream or a scoop of vanilla ice cream can add a touch of elegance and complement the rich pumpkin flavor beautifully. Remember to store any leftovers in the refrigerator, as the cream cheese mixture needs to be kept cool.
Peanut Butter and Jelly Bread Pudding
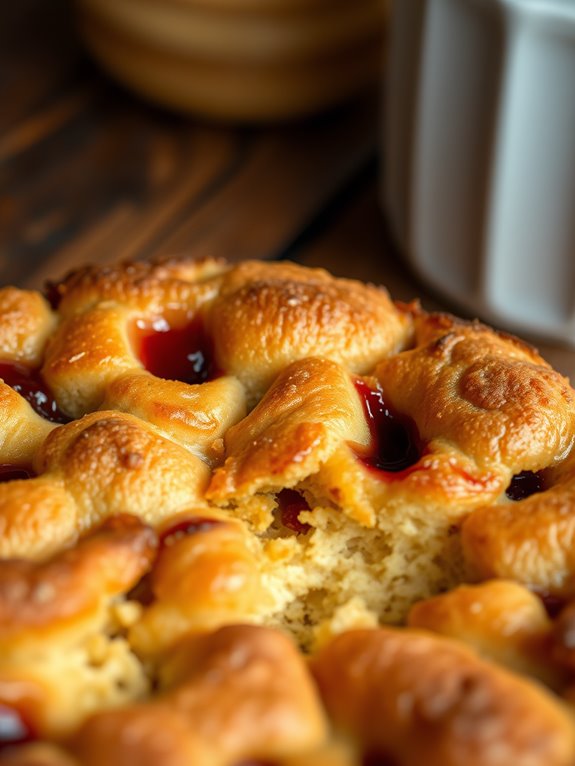
Peanut Butter and Jelly Bread Pudding is a delightful twist on a classic dessert, bringing together the nostalgic flavors of a beloved sandwich into a warm, comforting treat. This dish is perfect for family gatherings or as a sweet conclusion to a weeknight meal. The combination of creamy peanut butter, sweet jelly, and soft bread is transformed into a luscious pudding that’s bound to be a hit with both kids and adults alike.
With just a few simple ingredients, this bread pudding offers a rich, flavorful experience that ignites memories of childhood while satisfying your sweet tooth.
The beauty of Peanut Butter and Jelly Bread Pudding lies in its simplicity and the ease with which it can be prepared. It requires minimal preparation time and uses ingredients that are often already on hand. The pudding’s custardy texture is achieved by soaking bread in a mixture of eggs, milk, and vanilla, while the peanut butter and jelly add layers of flavor and richness.
Baking the pudding allows the flavors to meld together beautifully, resulting in a dish that’s crispy on the outside and soft on the inside. This dessert is a demonstration of how classic flavors can be reinvented into something extraordinary.
Ingredients for 4-6 servings:
- 6 cups of day-old bread, cubed
- 1 cup of milk
- 1 cup of heavy cream
- 4 large eggs
- 1 teaspoon vanilla extract
- 1/2 cup granulated sugar
- 1/2 cup creamy peanut butter
- 1/2 cup jelly or jam of choice
- 1/4 teaspoon salt
- Butter for greasing the baking dish
Cooking Instructions:
- Preheat the Oven: Begin by preheating your oven to 350°F (175°C). Grease a 9×13-inch baking dish with butter to prevent the bread pudding from sticking.
- Prepare the Custard: In a large mixing bowl, whisk together the milk, heavy cream, eggs, vanilla extract, granulated sugar, and salt until well combined. This mixture will serve as the custard that gives the bread pudding its creamy texture.
- Assemble the Bread Base: Spread the cubed bread evenly in the prepared baking dish. Confirm the bread is evenly distributed to allow the custard to soak in properly.
- Add Peanut Butter and Jelly: Dollop spoonfuls of peanut butter and jelly over the bread cubes. Use a spoon or spatula to slightly swirl them into the bread, creating pockets of flavor throughout the pudding.
- Pour the Custard: Slowly pour the custard mixture over the bread and peanut butter/jelly. Gently press down on the bread cubes to confirm they’re submerged and soaking up the custard mixture.
- Set and Bake: Allow the assembled dish to sit for about 10 minutes, letting the bread absorb the custard. Place the dish in the preheated oven and bake for 35-40 minutes, or until the top is golden brown and the custard is set.
- Cool and Serve: Remove the bread pudding from the oven and let it cool slightly before serving. This dish can be enjoyed warm or at room temperature.
Extra Tips:
For a richer flavor, use brioche or challah bread as they absorb the custard wonderfully while adding a buttery note. If you like a bit of crunch, consider adding a handful of chopped peanuts or toasted almonds on top before baking.
You can also switch up the jelly flavor to suit your preference, like using strawberry, raspberry, or grape. For a fun twist, drizzle some melted chocolate over the top before serving, or serve with a scoop of vanilla ice cream for an extra indulgent treat.
Lemon Berry Cheesecake Casserole
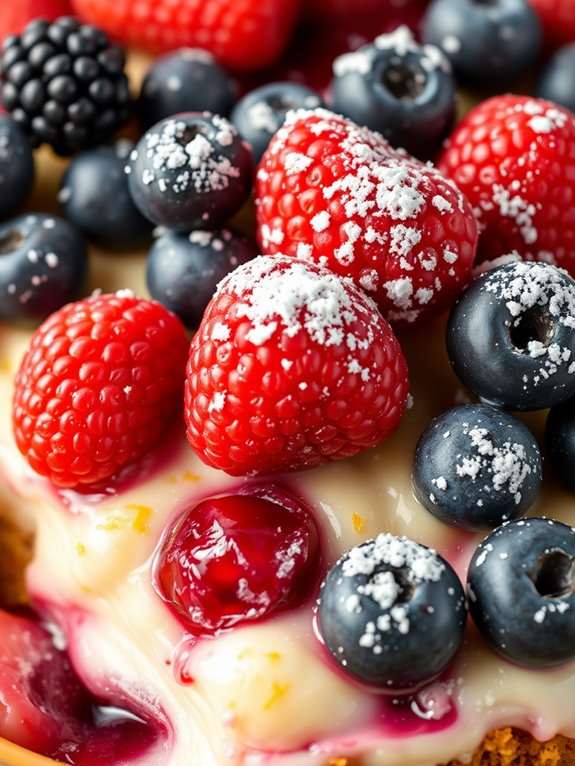
Lemon Berry Cheesecake Casserole is a delightful dessert that combines the creamy richness of cheesecake with the fresh flavors of lemon and mixed berries. This casserole is perfect for gatherings or family dinners, offering an invigorating twist on traditional cheesecake. The combination of tangy lemon with the sweetness of berries creates a balanced flavor profile that’s both light and indulgent. Served warm or chilled, this dessert is sure to impress with its vibrant colors and delightful taste.
The base of this casserole is made from a buttery graham cracker crust, which provides a crunchy contrast to the creamy filling. The filling itself is a luscious blend of cream cheese, lemon zest, and a hint of vanilla, making it smooth and flavorful. Topping this creamy layer is a medley of fresh berries, which not only adds to the visual appeal but also infuses the dish with natural sweetness and tartness. This Lemon Berry Cheesecake Casserole is a crowd-pleaser, perfect for serving 4-6 people.
Ingredients:
- 1 1/2 cups graham cracker crumbs
- 1/3 cup unsalted butter, melted
- 2 tablespoons granulated sugar
- 16 oz cream cheese, softened
- 1/2 cup granulated sugar
- 2 large eggs
- 1 teaspoon vanilla extract
- Zest of 1 lemon
- 2 tablespoons lemon juice
- 1 1/2 cups mixed fresh berries (e.g., blueberries, raspberries, sliced strawberries)
- Powdered sugar, for dusting (optional)
Instructions:
- Prepare the Oven and Baking Dish: Preheat your oven to 325°F (165°C). Lightly grease a 9×9-inch baking dish or line it with parchment paper for easy removal.
- Make the Crust: In a medium bowl, mix the graham cracker crumbs, melted butter, and 2 tablespoons of granulated sugar until well combined. Press this mixture evenly into the bottom of the prepared baking dish to form a crust. Bake for 8-10 minutes, then allow it to cool while preparing the filling.
- Prepare the Filling: In a large mixing bowl, beat the softened cream cheese with 1/2 cup of granulated sugar until smooth and creamy. Add the eggs one at a time, mixing well after each addition. Stir in the vanilla extract, lemon zest, and lemon juice, making sure everything is well combined.
- Assemble the Casserole: Pour the cream cheese mixture over the cooled crust and spread evenly. Sprinkle the mixed fresh berries over the top, distributing them evenly across the surface.
- Bake the Casserole: Bake in the preheated oven for 30-35 minutes, or until the center is set and the edges are lightly golden. Remove from the oven and let it cool to room temperature.
- Chill and Serve: Once cooled, refrigerate the casserole for at least 2 hours to allow it to set fully. Before serving, dust with powdered sugar if desired. Slice into squares and serve chilled or at room temperature.
Extra Tips:
When making the Lemon Berry Cheesecake Casserole, make certain the cream cheese is fully softened to avoid lumps in the filling. For a more intense lemon flavor, consider adding a bit more lemon zest.
You can use any combination of berries you prefer, depending on what’s in season or available. If you’re short on time, you can prepare the crust and filling a day ahead and bake it the next day.
This dish can also be frozen for longer storage; just make sure to thaw it in the refrigerator before serving.
S’mores Casserole Delight
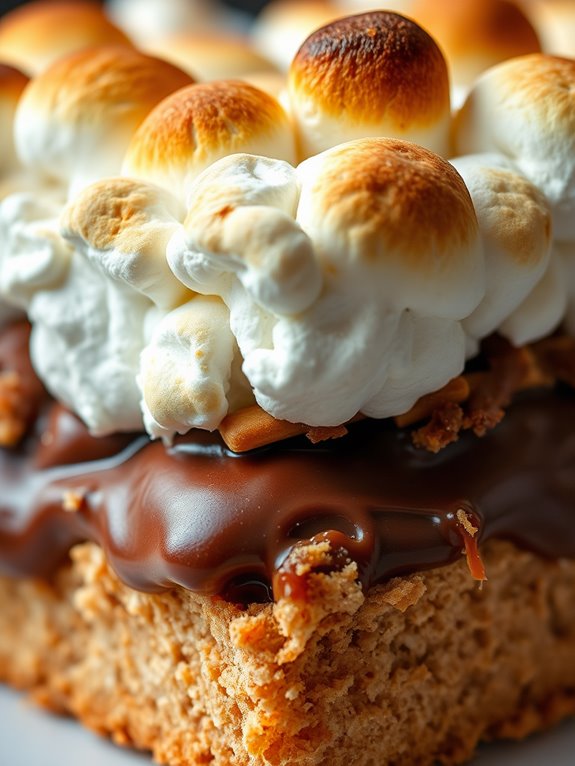
S’mores Casserole Delight is a delightful twist on the classic campfire treat, perfect for those who love the combination of gooey marshmallows, melted chocolate, and crunchy graham crackers. This dessert casserole is ideal for gatherings and family dinners, as it transforms the beloved s’mores into a warm and comforting dish that everyone will love.
The recipe brings all the elements of a traditional s’more into one easy-to-make casserole that can be enjoyed without the need for a campfire. The S’mores Casserole Delight isn’t only delicious but also incredibly easy to prepare, making it a great choice for busy weeknights or last-minute parties.
It requires minimal ingredients, most of which you might already have in your pantry. This recipe serves 4-6 people, making it perfect for small to medium-sized groups. Whether you’re looking to relive childhood memories or simply want to enjoy a sweet treat, this casserole will undoubtedly satisfy your cravings.
Ingredients (serves 4-6):
- 4 cups mini marshmallows
- 12 graham cracker sheets, broken into pieces
- 2 cups semi-sweet chocolate chips
- 1/2 cup unsalted butter, melted
- 1/4 cup granulated sugar
- 1 teaspoon vanilla extract
- 1/4 teaspoon salt
Cooking Instructions:
- Preheat the Oven: Start by preheating your oven to 350°F (175°C). This will guarantee the casserole cooks evenly.
- Prepare the Graham Cracker Base: In a large mixing bowl, combine the broken graham cracker pieces with the melted butter, sugar, vanilla extract, and salt. Mix until the graham cracker pieces are well-coated and the mixture resembles wet sand.
- Layer the Base in the Baking Dish: Grease a 9×13-inch baking dish lightly with cooking spray. Evenly spread the graham cracker mixture along the bottom of the dish, pressing it down firmly to form an even layer.
- Add the Chocolate and Marshmallows: Sprinkle the semi-sweet chocolate chips evenly over the graham cracker layer. Follow by spreading the mini marshmallows evenly over the chocolate chips.
- Bake the Casserole: Place the baking dish in the preheated oven and bake for about 15-20 minutes. The marshmallows should be golden brown and the chocolate should be melted.
- Cool and Serve: Remove the casserole from the oven and let it cool for about 5-10 minutes. This will allow the casserole to set slightly and make it easier to cut into squares.
Extra Tips:
For extra flavor, consider adding a sprinkle of cinnamon to the graham cracker crust before baking. If you prefer a slightly less sweet version, you can substitute dark chocolate chips for the semi-sweet chocolate chips.
Additionally, for a more rustic look, you can leave some of the graham crackers in larger pieces. If you want to prepare this dish ahead of time, you can assemble the casserole and refrigerate it until you’re ready to bake. Just add a few extra minutes to the baking time if starting from a refrigerated state.
Coconut Pineapple Upside-Down Bake
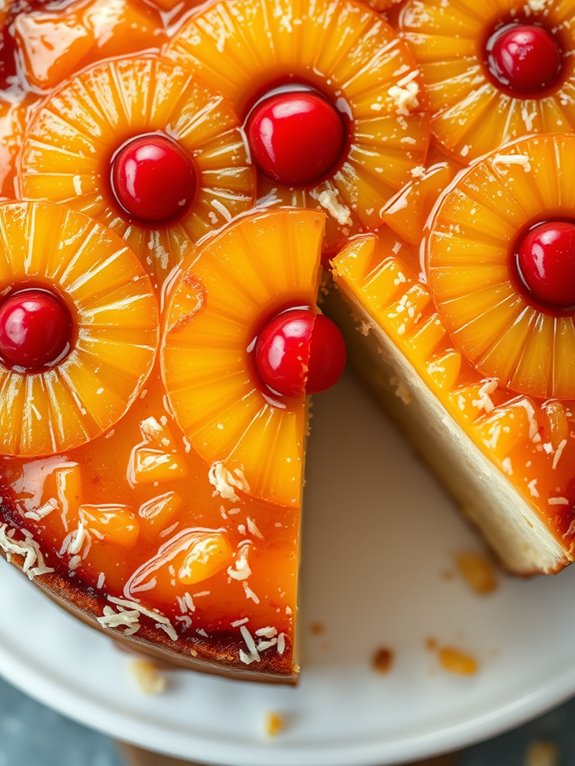
Coconut Pineapple Upside-Down Bake is a delightful twist on the classic pineapple upside-down cake, combining the tropical flavors of pineapple and coconut to create a dessert that’s both visually stunning and deliciously satisfying. This dish is perfect for gatherings or family dinners, offering a sweet and tropical escape that everyone will enjoy.
The combination of moist cake, caramelized pineapple, and toasted coconut is sure to make it a favorite at any dessert table. This recipe is designed to serve 4-6 people and is relatively simple to prepare. The key to this dessert lies in the layering of ingredients, which guarantees each bite is packed with flavor.
By following the instructions carefully, you’ll achieve a beautifully caramelized top layer with a soft, fluffy cake base. Whether you’re an experienced baker or a novice in the kitchen, this Coconut Pineapple Upside-Down Bake will be a delightful addition to your dessert repertoire.
Ingredients (Serves 4-6):
- 1/2 cup unsalted butter
- 1 cup packed brown sugar
- 1 can (20 oz) pineapple slices, drained
- Maraschino cherries (optional)
- 1 cup shredded sweetened coconut
- 1 1/2 cups all-purpose flour
- 1 cup granulated sugar
- 1 1/2 teaspoons baking powder
- 1/2 teaspoon salt
- 2 large eggs
- 1/2 cup coconut milk
- 1/3 cup vegetable oil
- 1 teaspoon vanilla extract
Cooking Instructions:
- Preheat and Prepare Pan: Preheat your oven to 350°F (175°C). Grease a 9-inch round cake pan generously with butter to prevent sticking.
- Create Topping: In a small saucepan, melt the 1/2 cup of butter over low heat. Stir in the brown sugar until completely dissolved, then pour the mixture into the prepared cake pan. Arrange the pineapple slices on top of the sugar mixture. Place a maraschino cherry in the center of each pineapple ring if using. Sprinkle the shredded coconut evenly over the pineapple.
- Mix Dry Ingredients: In a medium bowl, whisk together the flour, granulated sugar, baking powder, and salt until well combined.
- Combine Wet Ingredients: In a separate large bowl, whisk the eggs, coconut milk, vegetable oil, and vanilla extract until well mixed.
- Combine Batter: Gradually add the dry ingredients to the wet ingredients, stirring until just combined. Be careful not to overmix the batter, as this can result in a dense cake.
- Assemble and Bake: Pour the batter over the layered pineapple and coconut in the cake pan, spreading it evenly with a spatula. Bake in the preheated oven for 45-50 minutes, or until a toothpick inserted into the center of the cake comes out clean.
- Cool and Invert: Allow the cake to cool in the pan for 10 minutes. Run a knife around the edge to loosen it, then carefully invert the cake onto a serving platter. Let it cool completely before serving.
Extra Tips:
For the best results, confirm that the butter and sugar mixture is thoroughly melted and combined before pouring it into the cake pan, as this will help achieve a smooth caramel layer.
If you prefer a nuttier flavor, you can toast the shredded coconut lightly in a pan before adding it to the cake pan. Additionally, using fresh pineapple instead of canned can enhance the flavor, but make sure to slice it thinly for even cooking.
Enjoy your Coconut Pineapple Upside-Down Bake with a scoop of vanilla ice cream for an extra indulgent treat!
Cinnamon Roll Casserole
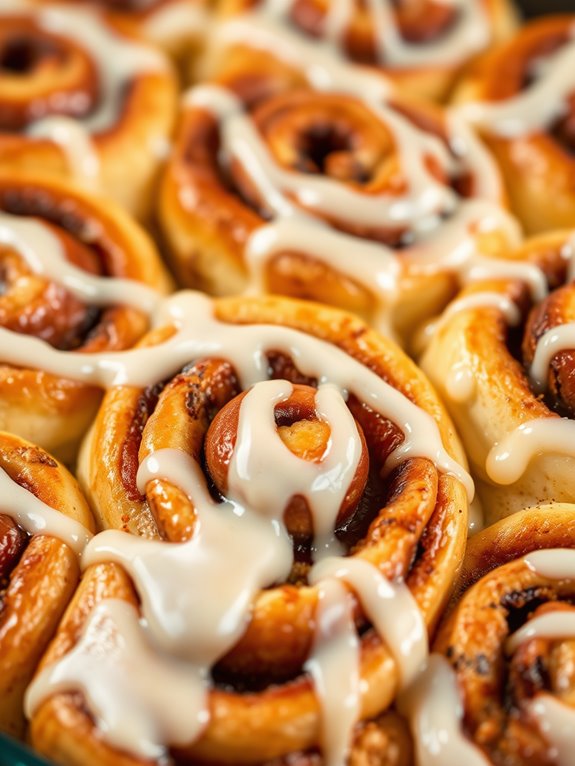
Indulge in a delightful breakfast or brunch treat with this Cinnamon Roll Casserole. This dish combines the comforting flavors of classic cinnamon rolls with the ease of a casserole, making it perfect for feeding a crowd of 4-6 people.
Whether you’re hosting a brunch or simply want a special weekend breakfast, this casserole is sure to impress with its gooey cinnamon goodness and creamy glaze.
This recipe transforms your favorite cinnamon rolls into a warm, comforting casserole. The rolls are baked in a creamy custard-like mixture that enhances their flavor and guarantees they remain soft and delightful.
Topped with a sweet glaze, this dish is a perfect balance of fluffy, sweet, and spicy, making it an irresistible treat for any cinnamon roll lover.
Ingredients:
- 2 tubes of refrigerated cinnamon rolls (with icing)
- 4 large eggs
- 1/2 cup heavy cream
- 1/4 cup maple syrup
- 1 teaspoon ground cinnamon
- 1 teaspoon vanilla extract
- Cooking spray or butter (for greasing the baking dish)
Cooking Instructions:
- Preheat the Oven: Preheat your oven to 375°F (190°C). Lightly grease a 9×13 inch baking dish with cooking spray or butter to prevent sticking.
- Prepare the Cinnamon Rolls: Open the tubes of cinnamon rolls and set aside the icing. Cut each cinnamon roll into quarters and spread the pieces evenly in the prepared baking dish.
- Make the Custard Mixture: In a large mixing bowl, whisk together the eggs, heavy cream, maple syrup, ground cinnamon, and vanilla extract until fully combined. This will create a rich custard that will soak into the cinnamon rolls during baking.
- Combine and Bake: Pour the custard mixture evenly over the cinnamon roll pieces in the baking dish, ensuring all pieces are well-coated. Gently press down to help the rolls absorb the liquid. Cover the dish with aluminum foil and bake in the preheated oven for 20 minutes.
- Remove Foil and Continue Baking: After 20 minutes, remove the foil and bake for an additional 15-20 minutes or until the casserole is set and the top is golden brown. The cinnamon rolls should be puffed up and cooked through.
- Apply the Icing: Once baked, remove the casserole from the oven and let it cool slightly. Drizzle the reserved icing over the top of the casserole for a glossy, sweet finish.
Extra Tips:
For an extra touch of flavor, consider adding a handful of chopped pecans or walnuts to the cinnamon roll pieces before baking for a bit of crunch.
You can also sprinkle a little extra cinnamon sugar on top for a more pronounced cinnamon flavor. If you’d like to prepare this dish in advance, assemble the casserole the night before, cover, and refrigerate it.
Then, simply bake it the next morning for a fuss-free breakfast option.
Salted Caramel Pretzel Casserole

Salted Caramel Pretzel Casserole is a delightful blend of salty and sweet flavors, perfect for those who enjoy a twist on traditional desserts. This dessert casserole combines the crunch of pretzels with the smoothness of caramel, creating a unique texture that’s both satisfying and indulgent.
The addition of a creamy layer adds another dimension to this already tempting dish, making it a standout choice for gatherings or special occasions. This recipe serves 4-6 people, making it ideal for family dinners or small parties.
With its simple preparation and crowd-pleasing flavors, the Salted Caramel Pretzel Casserole is sure to become a favorite in your dessert repertoire. The combination of ingredients guarantees a balanced sweetness, while the pretzels provide a delightful crunch that contrasts beautifully with the creamy and caramel layers.
Follow the steps below to create this dish, and enjoy the sweet and salty magic it brings to your table.
Ingredients:
- 2 cups crushed pretzels
- 1/2 cup unsalted butter, melted
- 1/4 cup granulated sugar
- 1 package (8 oz) cream cheese, softened
- 1 cup powdered sugar
- 1 container (8 oz) whipped topping, thawed
- 1 jar (12 oz) salted caramel sauce
- Sea salt, for garnish
Instructions:
1. Preparation of Pretzel Crust: Preheat your oven to 350°F (175°C). In a medium-sized bowl, combine the crushed pretzels, melted butter, and granulated sugar. Mix well until the pretzels are evenly coated with the butter and sugar.
Press this mixture firmly into the bottom of a 9×13 inch baking dish to form the crust. Bake for about 10 minutes or until the crust is slightly browned. Remove from the oven and let it cool completely.
2. Cream Cheese Layer: In a large mixing bowl, beat the softened cream cheese and powdered sugar together until smooth and creamy. Gently fold in the whipped topping until well combined.
Spread this mixture evenly over the cooled pretzel crust, ensuring it reaches all edges of the dish.
3. Caramel Layer: Pour the salted caramel sauce over the cream cheese layer. Use a spatula to spread it evenly, covering the entire surface. Be careful not to disturb the cream cheese layer underneath.
4. Chill and Serve: Sprinkle a small amount of sea salt over the top for an extra burst of flavor. Cover the dish with plastic wrap or aluminum foil and refrigerate for at least 2 hours, or until the casserole is set.
Before serving, cut into squares and enjoy!
Extra Tips: For the best results, verify your cream cheese is at room temperature before mixing to achieve a smooth, lump-free consistency. If you prefer a thicker caramel layer, consider using an additional half jar of caramel sauce.
Additionally, you can prepare the casserole a day in advance to enhance the flavors, making it a convenient option for entertaining. Don’t forget to taste and adjust the amount of sea salt to suit your preferences, as it can greatly enhance the flavor profile of the dish.
Tiramisu Overnight Casserole
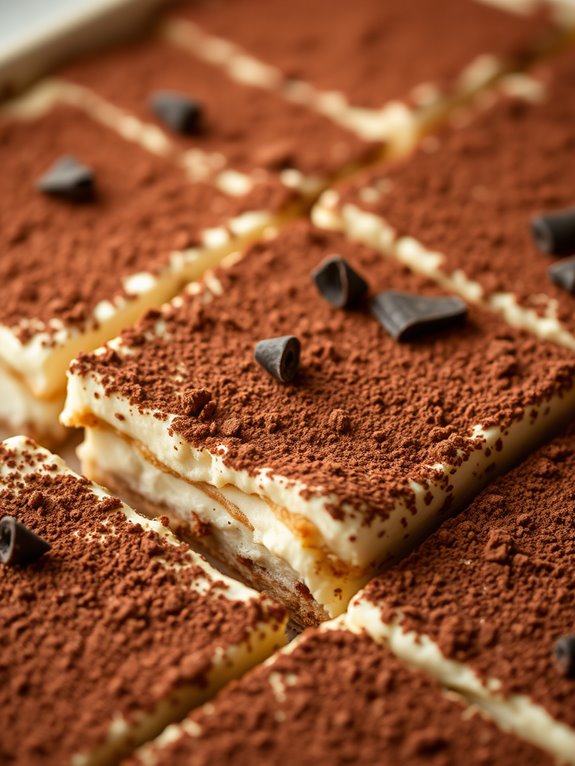
Tiramisu is a classic Italian dessert that combines layers of coffee-soaked ladyfingers with a rich mascarpone cheese mixture. Our Tiramisu Overnight Casserole takes the traditional elements of this beloved dessert and transforms them into an easy-to-make casserole perfect for serving a crowd.
By preparing it the night before, you allow the flavors to meld together, creating a delectable dessert that’s ready to serve straight from the fridge. This recipe is designed to serve 4-6 people, making it an ideal choice for intimate gatherings or family dinners.
The Tiramisu Overnight Casserole maintains all the creamy, coffee-flavored goodness of traditional tiramisu but simplifies the process into a few straightforward steps. It’s a great way to enjoy a taste of Italy without spending hours in the kitchen.
Ingredients:
- 1 cup brewed espresso or strong coffee, cooled
- 1/4 cup coffee liqueur (optional)
- 16-18 ladyfinger cookies
- 8 oz mascarpone cheese, softened
- 1 cup heavy cream
- 1/2 cup granulated sugar
- 1 teaspoon vanilla extract
- Unsweetened cocoa powder, for dusting
- Dark chocolate shavings, for garnish (optional)
Cooking Instructions:
- Prepare the Coffee Mixture: In a shallow dish, combine the brewed espresso or strong coffee with the coffee liqueur (if using). Stir well to mix. This will be used to soak the ladyfingers, so make sure it’s cooled to room temperature.
- Soak the Ladyfingers: Quickly dip each ladyfinger into the coffee mixture, making certain that both sides are soaked but not too soggy. Place them in a single layer at the bottom of an 8×8 inch baking dish.
- Make the Mascarpone Mixture: In a medium bowl, beat the mascarpone cheese, heavy cream, granulated sugar, and vanilla extract together until smooth and fluffy. This should take about 3-4 minutes with an electric mixer on medium speed.
- Layer the Casserole: Spread half of the mascarpone mixture over the layer of soaked ladyfingers. Add another layer of dipped ladyfingers on top, followed by the remaining mascarpone mixture. Smooth the top with a spatula.
- Chill Overnight: Cover the casserole with plastic wrap or aluminum foil and refrigerate overnight. This allows the flavors to develop and the dessert to set properly.
- Serve: Before serving, dust the top with unsweetened cocoa powder and garnish with dark chocolate shavings if desired. Cut into squares and serve chilled.
Extra Tips:
For the best results, choose high-quality mascarpone cheese and fresh ingredients. If you prefer a less sweet dessert, you can reduce the amount of sugar slightly.
The coffee liqueur is optional, but it adds a delicious depth of flavor. If you’re serving this to children or prefer a non-alcoholic version, simply omit it.
Finally, verify each ladyfinger is thoroughly soaked but not overly saturated to maintain the right texture in the finished dish.
Raspberry Almond Crumble Casserole
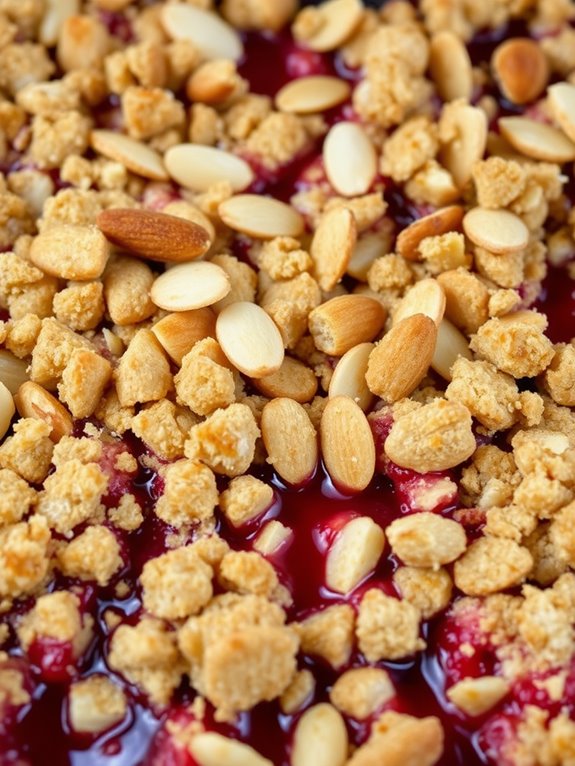
Raspberry Almond Crumble Casserole is a delightful dessert that combines the tartness of raspberries with the nutty flavor of almonds, all topped with a buttery crumble. This dish is perfect for those who enjoy a mix of textures and tastes, offering a sweet and tangy experience in every bite. It’s an excellent choice for family gatherings, potlucks, or just a cozy evening treat.
The beauty of this casserole lies in its simplicity, as it requires minimal preparation time and uses readily available ingredients. The warm, bubbling raspberries nestled under a crisp almond-studded crumble make for an irresistible aroma that fills your kitchen.
As the casserole bakes, the juices from the raspberries meld with the sugar and spices, creating a luscious sauce that pairs beautifully with a scoop of vanilla ice cream or a dollop of whipped cream. Whether you’re a seasoned baker or a beginner, this Raspberry Almond Crumble Casserole is a fail-proof recipe that promises to impress.
Ingredients (serves 4-6):
- 4 cups fresh raspberries
- ½ cup granulated sugar
- 1 tablespoon cornstarch
- 1 teaspoon vanilla extract
- 1 cup all-purpose flour
- ½ cup rolled oats
- ½ cup brown sugar
- ½ cup sliced almonds
- ½ teaspoon cinnamon
- ½ cup unsalted butter (cold, cut into small cubes)
Cooking Instructions:
- Preheat the Oven: Start by preheating your oven to 350°F (175°C). This guarantees that the casserole bakes evenly and the crumble achieves a golden brown color.
- Prepare the Raspberry Mixture: In a large mixing bowl, combine the raspberries, granulated sugar, cornstarch, and vanilla extract. Gently toss the ingredients together until the raspberries are well-coated. Transfer the mixture into a greased 9×13-inch baking dish, spreading it into an even layer.
- Make the Crumble Topping: In another bowl, mix together the flour, rolled oats, brown sugar, sliced almonds, and cinnamon. Add the cold butter cubes to the mixture, and using your fingers or a pastry cutter, blend until the mixture resembles coarse crumbs.
- Assemble the Casserole: Evenly sprinkle the crumble topping over the raspberry mixture in the baking dish. Make sure the entire surface is covered to guarantee a crispy topping.
- Bake: Place the dish in the preheated oven and bake for 35-40 minutes, or until the topping is golden brown and the raspberry filling is bubbly.
- Cool and Serve: Allow the casserole to cool for at least 10 minutes before serving. This resting time helps the juices thicken slightly, making it easier to serve.
Extra Tips:
For a more robust almond flavor, consider adding a teaspoon of almond extract to the raspberry mixture. If fresh raspberries aren’t available, frozen raspberries can be used; just be sure to thaw and drain them before using to avoid excess moisture.
To make the crumble topping even more decadent, try adding a handful of chopped pecans or walnuts. Finally, if you prefer a less sweet dessert, reduce the sugar in the raspberry mixture to ⅓ cup. Enjoy your Raspberry Almond Crumble Casserole warm with a side of ice cream for an elevated dessert experience.
Banana Foster Bread Casserole
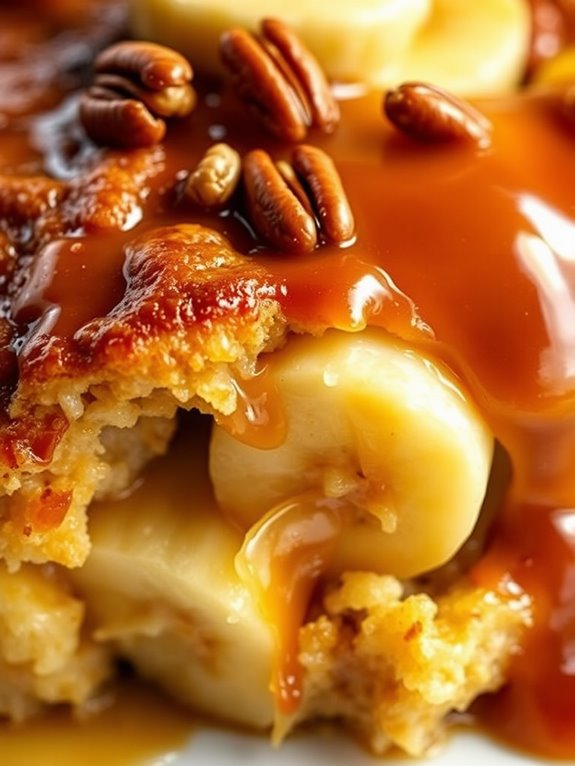
Banana Foster Bread Casserole is a delightful twist on the classic Bananas Foster dessert, combining the rich flavors of caramelized bananas with the comforting texture of bread pudding. This decadent dessert casserole is perfect for gatherings or a cozy family meal, offering a warm and indulgent treat that will have everyone coming back for seconds.
The fusion of ripe bananas, rum, and buttery caramel sauce soaking into soft bread creates a symphony of flavors that’s both nostalgic and exciting for your taste buds.
This recipe is designed to serve 4-6 people, making it an ideal choice for a small dinner party or a family dessert night. By using easily accessible ingredients and straightforward steps, you can prepare this luscious dessert with minimal effort while impressing your guests with its gourmet taste. Whether you serve it as is or with a scoop of vanilla ice cream, Banana Foster Bread Casserole is sure to become a favorite in your dessert repertoire.
Ingredients (Serves 4-6)
- 1 loaf of brioche or challah bread, cubed
- 4 ripe bananas, sliced
- 1 cup of brown sugar
- 1/2 cup of unsalted butter
- 1/2 cup of heavy cream
- 1/4 cup of dark rum
- 1 teaspoon of vanilla extract
- 1 teaspoon of ground cinnamon
- 4 large eggs
- 2 cups of whole milk
- 1/4 teaspoon of salt
- 1/2 cup of chopped pecans (optional)
Cooking Instructions
- Preheat the Oven: Start by preheating your oven to 350°F (175°C). Grease a 9×13-inch baking dish with butter or non-stick cooking spray to prevent the casserole from sticking.
- Prepare the Bread: Cut the brioche or challah bread into 1-inch cubes and spread them evenly in the prepared baking dish.
- Make the Caramel Sauce: In a medium saucepan over medium heat, melt the butter and stir in the brown sugar until dissolved. Add the heavy cream and bring to a gentle boil. Stir constantly until the mixture thickens slightly, about 3-4 minutes.
- Add Bananas and Rum: Carefully add the sliced bananas to the caramel sauce, followed by the dark rum. Continue to cook for another 2-3 minutes, allowing the bananas to soften slightly. Remove from heat and stir in the vanilla extract and ground cinnamon.
- Combine Wet Ingredients: In a separate bowl, whisk together the eggs, milk, and salt until fully combined. Pour this mixture over the bread cubes in the baking dish, making sure all pieces are soaked.
- Assemble the Casserole: Pour the banana and caramel mixture over the soaked bread, using a spatula to distribute evenly. If using, sprinkle the chopped pecans on top for added texture and flavor.
- Bake: Place the baking dish in the preheated oven and bake for 40-45 minutes, or until the top is golden brown and the custard is set. A knife inserted into the center should come out mostly clean.
- Serve: Allow the casserole to cool for at least 10 minutes before serving. This resting time helps the flavors meld together and makes slicing easier.
Extra Tips
For a more pronounced rum flavor, you can increase the amount of rum to 1/3 cup, but make certain to cook it sufficiently with the caramel to allow the alcohol to evaporate while retaining the essence.
If you prefer a crunchier texture, toast the pecans lightly before adding them to the casserole. For those who enjoy extra sweetness, serve the Banana Foster Bread Casserole with a drizzle of additional caramel sauce or a scoop of vanilla ice cream.
This dish can also be prepared a day in advance and refrigerated, then baked just before serving for convenience.
Cherry Chocolate Chip Casserole
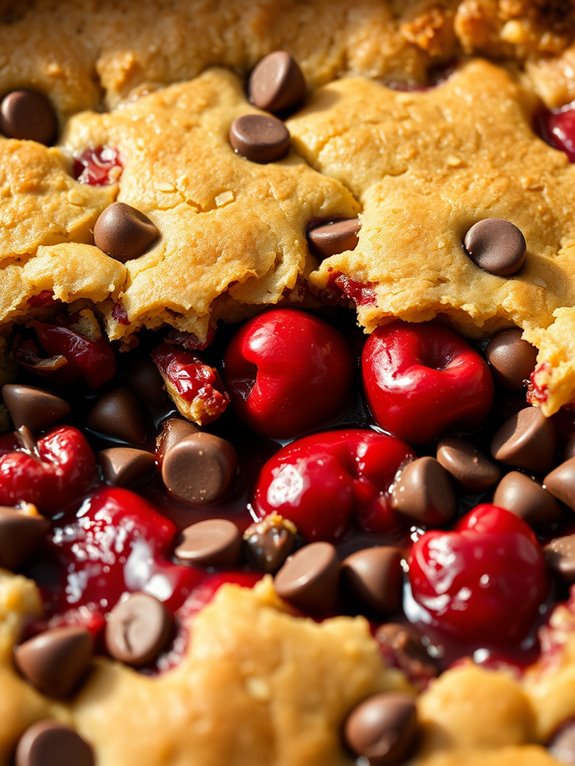
Indulge in the ultimate comfort dessert with this Cherry Chocolate Chip Casserole. This scrumptious dish combines the tartness of cherries with the rich, velvety taste of chocolate chips, all baked together in a delightful, warm casserole that’s perfect for any occasion.
Whether you’re serving it as a weekend treat or a sweet ending to a holiday meal, this dessert is bound to please everyone at the table. Its gooey texture and harmonious blend of flavors make it a crowd favorite.
The Cherry Chocolate Chip Casserole isn’t only delicious but also incredibly easy to prepare. With a few simple ingredients, you can whip up this dessert in no time. The preparation is straightforward, making it ideal for both novice bakers and seasoned pros.
The balance of sweet and tart flavors, combined with the delightful crunch of the chocolate chips, creates a dessert that’s both comforting and satisfying. Serve it warm with a scoop of vanilla ice cream or a dollop of whipped cream for an extra treat.
Ingredients (Serves 4-6):
- 2 cups pitted cherries (fresh or canned)
- 1 cup chocolate chips
- 1 cup all-purpose flour
- 1 cup granulated sugar
- 1/2 cup unsalted butter, melted
- 1 teaspoon baking powder
- 1/2 teaspoon salt
- 1 teaspoon vanilla extract
- 2 large eggs
Cooking Instructions:
- Preheat the Oven: Begin by preheating your oven to 350°F (175°C) to make certain it’s hot enough when you’re ready to bake the casserole.
- Prepare the Baking Dish: Grease a 9×9-inch baking dish with a little butter or non-stick cooking spray to prevent the casserole from sticking.
- Mix Dry Ingredients: In a mixing bowl, combine the flour, sugar, baking powder, and salt. Stir them together until they’re well-mixed.
- Combine Wet Ingredients: In another bowl, whisk together the melted butter, eggs, and vanilla extract. Make sure the melted butter isn’t too hot, or it will cook the eggs.
- Create the Batter: Gradually add the wet ingredients to the dry ingredients, stirring continuously until you achieve a smooth batter.
- Add Cherries and Chocolate Chips: Gently fold the cherries and chocolate chips into the batter until they’re evenly distributed.
- Assemble the Casserole: Pour the batter into the prepared baking dish, spreading it evenly with a spatula.
- Bake: Place the dish in the preheated oven and bake for 35-40 minutes, or until a toothpick inserted into the center comes out clean.
- Cool and Serve: Allow the casserole to cool for at least 10 minutes before serving. This will help the flavors meld and make it easier to cut.
Extra Tips:
When making this Cherry Chocolate Chip Casserole, feel free to experiment with different types of chocolate chips, such as dark or white chocolate, to suit your preference.
If you’re using canned cherries, make certain they’re well-drained to prevent excess moisture in the casserole. Additionally, you can sprinkle a little cinnamon or nutmeg into the batter for an added depth of flavor.
Pecan Praline Sweet Potato Casserole
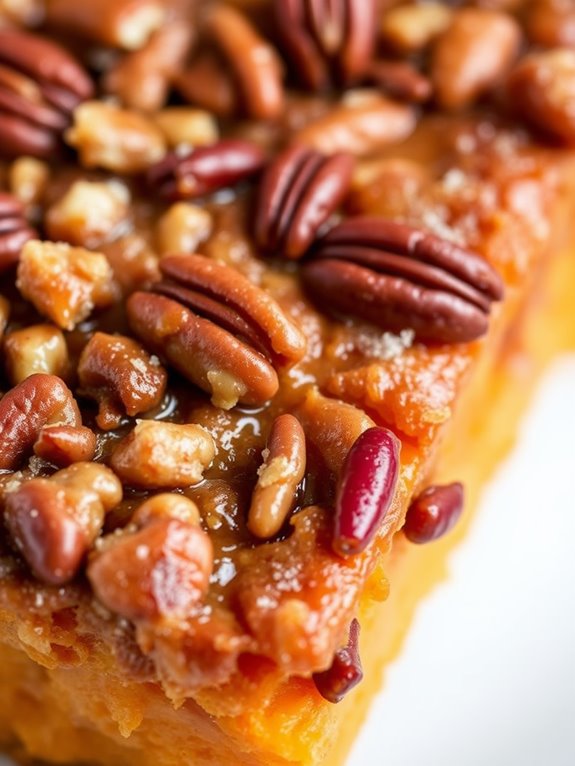
Pecan Praline Sweet Potato Casserole is a delectable dessert that combines the creamy sweetness of mashed sweet potatoes with the rich, nutty flavor of a pecan praline topping. This dish is perfect for holiday gatherings or any special occasion where you want to impress your guests with a comforting and flavorful treat.
The sweet potatoes are first cooked until tender, then mashed and mixed with warm spices, butter, and a hint of vanilla. The topping is a delicious blend of pecans, brown sugar, and butter, which caramelizes to create a crunchy contrast to the soft sweet potatoes beneath.
This casserole isn’t only a treat for the taste buds but also visually appealing with its golden-brown topping and vibrant orange base. It’s a great way to elevate the humble sweet potato into something truly special. While traditionally served as a side dish, its sweetness makes it just as suitable as a dessert. This recipe serves 4-6 people, making it perfect for a small dinner party or family meal.
Ingredients:
- 4 medium sweet potatoes (about 2 lbs)
- 1/3 cup milk
- 1/4 cup unsalted butter, melted
- 1/4 cup light brown sugar
- 2 large eggs
- 1 teaspoon vanilla extract
- 1/2 teaspoon ground cinnamon
- 1/4 teaspoon ground nutmeg
- 1/4 teaspoon salt
For the Topping:
- 1 cup pecans, chopped
- 1/3 cup all-purpose flour
- 1/3 cup light brown sugar
- 1/4 cup unsalted butter, melted
Instructions:
- Preheat the Oven: Begin by preheating your oven to 350°F (175°C). This guarantees the oven is at the right temperature by the time you’re ready to bake the casserole.
- Cook the Sweet Potatoes: Peel and cube the sweet potatoes. Place them in a large pot of water and bring to a boil. Cook until the sweet potatoes are tender, about 15-20 minutes. Drain the potatoes and let them cool slightly.
- Mash the Sweet Potatoes: In a large mixing bowl, mash the cooked sweet potatoes until smooth. You can use a potato masher or an electric mixer for a smoother texture.
- Mix the Casserole Base: Add the milk, melted butter, brown sugar, eggs, vanilla extract, cinnamon, nutmeg, and salt to the mashed sweet potatoes. Mix well until all ingredients are fully combined and the mixture is smooth.
- Prepare the Topping: In a separate bowl, combine the chopped pecans, flour, brown sugar, and melted butter. Stir until the mixture is crumbly but well combined.
- Assemble the Casserole: Pour the sweet potato mixture into a greased 9×13-inch baking dish and spread it evenly. Sprinkle the pecan topping evenly over the sweet potato layer.
- Bake the Casserole: Place the casserole in the preheated oven and bake for 25-30 minutes, or until the topping is golden brown and the filling is set.
- Cool and Serve: Remove the casserole from the oven and let it cool for a few minutes before serving. This will allow the topping to set slightly and make serving easier.
Extra Tips:
When cooking the sweet potatoes, make sure they’re thoroughly tender before mashing; this guarantees a smooth texture in your casserole. If you prefer a chunkier texture, you can mash the sweet potatoes less thoroughly.
For a sweeter dish, increase the brown sugar in the sweet potato mixture or add a touch of maple syrup. To add a twist, consider incorporating a dash of bourbon or rum into the sweet potato mixture for a deeper flavor profile.
This casserole can be made a day in advance and reheated in the oven before serving, making it a convenient option for busy holiday cooking schedules.