

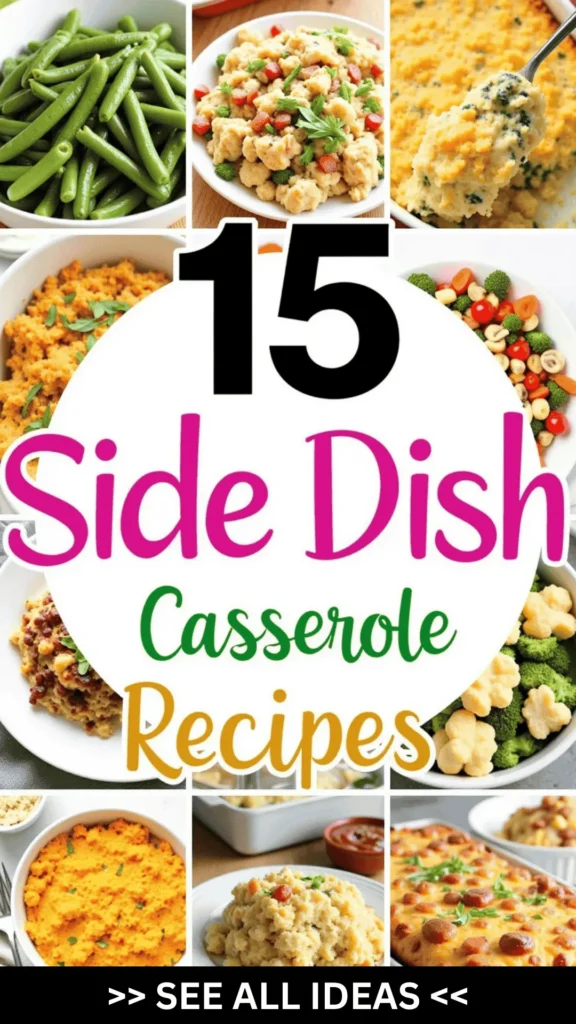
When it comes to side dish casseroles, nothing beats that cozy feeling they bring to the table.
From the melty goodness of cheesy broccoli rice to the indulgent layers of scalloped potatoes, each recipe is a little slice of comfort.
These casseroles are perfect for turning any meal into a special occasion, whether it’s a festive holiday gathering or a simple weeknight dinner.
I can’t wait to share my favorite recipes with you that are sure to impress your family and friends.
Let’s explore these delicious side dish casseroles that will elevate your dining experience!
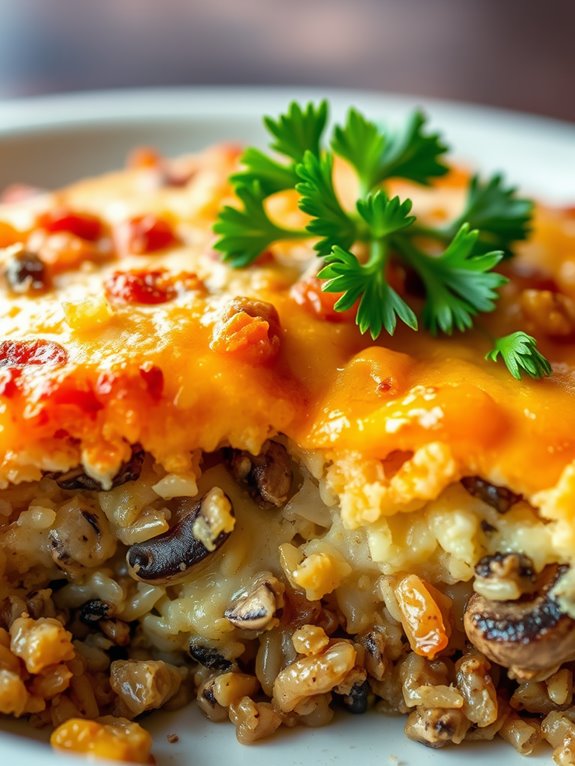
Cheesy Broccoli Rice Casserole
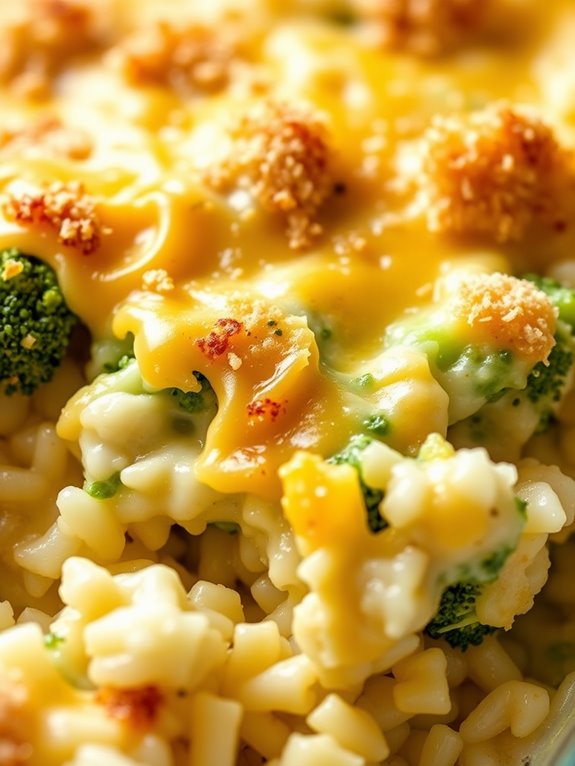
Cheesy Broccoli Rice Casserole is a comforting and delicious side dish that combines the wholesome goodness of broccoli with fluffy rice and a rich, cheesy sauce. Perfect for family gatherings or weeknight dinners, this casserole is both hearty and easy to prepare.
The combination of tender broccoli, creamy cheese, and perfectly cooked rice makes it a favorite among both kids and adults. Whether you’re looking to impress your guests or just want a warm, satisfying dish to complement your main course, this recipe is bound to please.
This casserole can be prepared ahead of time and simply baked before serving, making it a convenient option for busy schedules. The ingredients are straightforward, and the steps are simple, guaranteeing that even novice cooks can achieve excellent results.
With a serving size of 4-6 people, this dish is ideal for small gatherings or family meals. So gather your ingredients and get ready to create a cheesy, flavorful delight that will have everyone asking for seconds.
Ingredients (Serves 4-6):
- 2 cups broccoli florets, fresh or frozen
- 1 cup uncooked white rice
- 2 cups chicken broth
- 1 cup shredded cheddar cheese
- 1 cup cream of mushroom soup
- 1/2 cup milk
- 1/4 cup grated Parmesan cheese
- 1 tablespoon butter
- 1 teaspoon garlic powder
- 1/2 teaspoon salt
- 1/4 teaspoon black pepper
Cooking Instructions:
- Preheat the Oven: Begin by preheating your oven to 350°F (175°C). This will guarantee your casserole bakes evenly and reaches the perfect golden color on top.
- Cook the Rice: In a medium saucepan, bring the chicken broth to a boil. Add the uncooked rice, reduce the heat to low, cover, and let it simmer for about 15 minutes, or until the rice is tender and the liquid is absorbed.
- Steam the Broccoli: While the rice is cooking, steam the broccoli florets until they’re just tender. This can be done using a steamer basket over boiling water for about 5 minutes. If using frozen broccoli, thaw and drain any excess water.
- Prepare the Cheese Sauce: In a large mixing bowl, combine the cream of mushroom soup, milk, shredded cheddar cheese, garlic powder, salt, and black pepper. Stir until well combined and smooth.
- Combine Ingredients: Add the cooked rice and steamed broccoli to the cheese sauce. Mix until the rice and broccoli are evenly coated with the sauce.
- Assemble the Casserole: Grease a 9×13-inch baking dish with butter. Pour the broccoli and rice mixture into the dish, spreading it evenly.
- Top with Parmesan Cheese: Sprinkle the grated Parmesan cheese evenly over the top of the casserole. This will form a delicious crust as it bakes.
- Bake: Place the casserole in the preheated oven and bake for 25-30 minutes, or until the top is golden brown and the edges are bubbling.
- Serve: Allow the casserole to cool for a few minutes before serving. This will help the dish set and make it easier to serve in neat squares.
Extra Tips:
For added flavor, consider mixing in some sautéed onions or mushrooms with the rice and broccoli. If you prefer a spicier kick, a pinch of red pepper flakes can be added to the cheese sauce.
Leftovers can be stored in an airtight container in the refrigerator for up to three days and reheated in the oven or microwave. If you’re looking to make this dish vegetarian, simply substitute the chicken broth with vegetable broth. Enjoy your Cheesy Broccoli Rice Casserole with a side of warm bread or a fresh salad for a complete meal.
Classic Green Bean Casserole
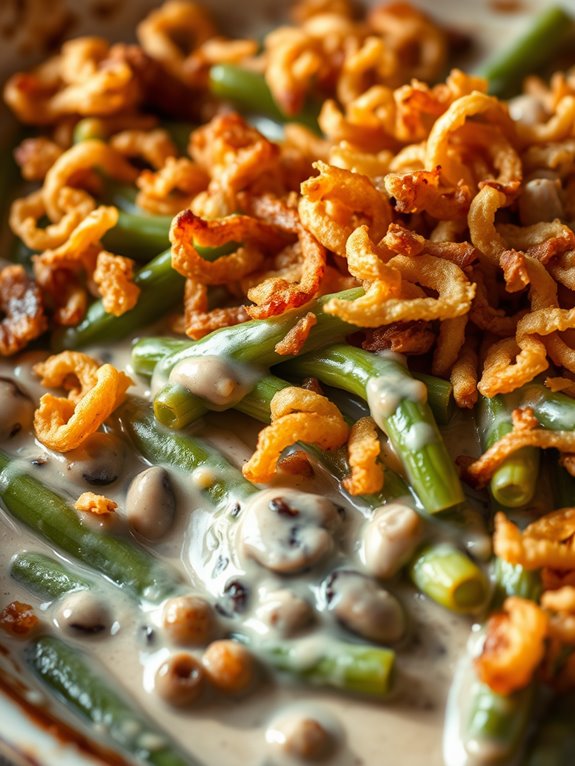
The Classic Green Bean Casserole is a beloved side dish that graces many holiday tables. This comfort food delight combines tender green beans, a creamy and savory mushroom sauce, and a crispy onion topping for a dish that’s both satisfying and nostalgic. Perfect for Thanksgiving or any family gathering, this dish is a surefire way to please a crowd with its rich flavors and inviting textures.
Originally created by the Campbell Soup Company in the 1950s, the green bean casserole has stood the test of time, becoming a staple in American cuisine. The combination of simple ingredients and easy preparation makes it an appealing choice for both novice and experienced cooks. This version serves 4-6 people, making it ideal for a small family gathering or as part of a larger feast spread.
Ingredients:
- 1 pound fresh green beans, trimmed and cut into 1-inch pieces
- 1 can (10.5 ounces) condensed cream of mushroom soup
- 1/2 cup milk
- 1 teaspoon soy sauce
- 1/4 teaspoon black pepper
- 1 1/3 cups French fried onions
- Salt, to taste
Cooking Instructions:
- Preheat the oven: Start by preheating your oven to 350°F (175°C). This guarantees that it’s hot enough to properly cook the casserole once it’s assembled.
- Prepare the green beans: In a large pot, bring water to a boil. Add the green beans and cook them for about 5 minutes until they’re tender-crisp. Drain the beans and set them aside.
- Make the sauce: In a large mixing bowl, combine the condensed cream of mushroom soup, milk, soy sauce, and black pepper. Stir well until the mixture is smooth and fully combined.
- Mix the casserole: Add the cooked green beans and 2/3 cup of the French fried onions to the soup mixture. Stir gently to coat the beans evenly with the sauce.
- Bake the casserole: Pour the green bean mixture into a 1 1/2-quart casserole dish or a baking dish of similar size. Spread it evenly. Bake in the preheated oven for 25 minutes.
- Add crispy topping: After 25 minutes, remove the casserole from the oven and sprinkle the remaining 2/3 cup of French fried onions over the top. Return the dish to the oven and bake for an additional 5 minutes until the onions are golden brown and crunchy.
- Serve: Let the casserole sit for a few minutes before serving to allow the sauce to thicken slightly. Serve warm and enjoy!
Extra Tips:
For a fresher flavor, consider using fresh mushrooms instead of canned soup. Simply sauté them with a bit of butter and onions before mixing them with cream or a roux to create your version of a mushroom sauce.
To add a touch of spice, you can include a pinch of cayenne pepper or a few dashes of hot sauce to the mixture. If you prefer a vegetarian version, verify the mushroom soup and onions are vegetarian-friendly.
Creamy Scalloped Potatoes

Scalloped potatoes are the quintessential comfort food, often gracing the table at family gatherings and festive occasions. This classic side dish combines tender slices of potatoes with a rich, creamy sauce that’s both indulgent and satisfying. The layers of potatoes absorb the creamy mixture as they bake, resulting in a luscious dish with a golden, bubbly top. The combination of flavors from the cream, butter, and cheese creates a perfect balance that pairs well with a variety of main courses, from roasted meats to vegetarian entrees.
Perfect for serving a group of 4-6 people, this creamy scalloped potatoes recipe is a crowd-pleaser that requires minimal preparation and delivers maximum flavor. The key to achieving the ideal texture lies in slicing the potatoes thinly and evenly, guaranteeing they cook uniformly. The addition of cheese in the creamy sauce elevates the dish, offering a delightful depth of flavor that complements the earthiness of the potatoes.
Whether you’re hosting a holiday feast or a casual dinner, this recipe is sure to become a staple in your side dish repertoire.
Ingredients:
- 3 pounds russet potatoes, peeled and thinly sliced
- 2 tablespoons unsalted butter
- 2 tablespoons all-purpose flour
- 2 cups heavy cream
- 1 cup whole milk
- 2 cups shredded cheddar cheese
- 1 teaspoon garlic powder
- 1 teaspoon salt
- 1/2 teaspoon black pepper
- 1/4 teaspoon nutmeg
- 1/2 cup grated Parmesan cheese
Cooking Instructions:
- Preheat the Oven: Start by preheating your oven to 350°F (175°C). This guarantees that your dish begins cooking evenly the moment you place it in the oven.
- Prepare the Potatoes: Peel and thinly slice the potatoes, aiming for uniform thickness to ensure even cooking. A mandoline slicer can be helpful for this task.
- Make the Creamy Sauce: In a medium saucepan, melt the butter over medium heat. Add the flour and stir continuously for about one minute to create a roux. Gradually whisk in the heavy cream and milk, continuing to stir until the mixture thickens slightly.
- Add Seasonings and Cheese: Remove the saucepan from the heat and stir in the garlic powder, salt, pepper, and nutmeg. Then, add the shredded cheddar cheese, stirring until it’s completely melted and the sauce is smooth.
- Assemble the Dish: In a greased 9×13-inch baking dish, arrange a layer of potatoes. Pour a portion of the creamy cheese sauce over the potatoes. Repeat the layers until all ingredients are used, finishing with a layer of sauce on top.
- Top with Parmesan: Sprinkle the grated Parmesan cheese evenly over the top layer of sauce for an extra cheesy crust.
- Bake: Cover the dish with aluminum foil and bake in the preheated oven for 45 minutes. Remove the foil and bake for an additional 15-20 minutes, or until the top is golden brown and the potatoes are tender when pierced with a fork.
- Cool and Serve: Allow the scalloped potatoes to cool for a few minutes before serving. This helps the sauce thicken slightly and makes it easier to serve.
Extra Tips:
For best results, use starchy potatoes like russets, as they absorb the sauce well and become tender. Guarantee the potatoes are sliced uniformly to avoid uneven cooking. If you prefer a crispier top, broil the dish for an additional 2-3 minutes after baking, keeping a close eye to prevent burning.
Scalloped potatoes can be made ahead and reheated, making them a convenient option for entertaining. If you find the sauce too thick, you can adjust the consistency by adding more milk.
Cornbread and Sausage Stuffing
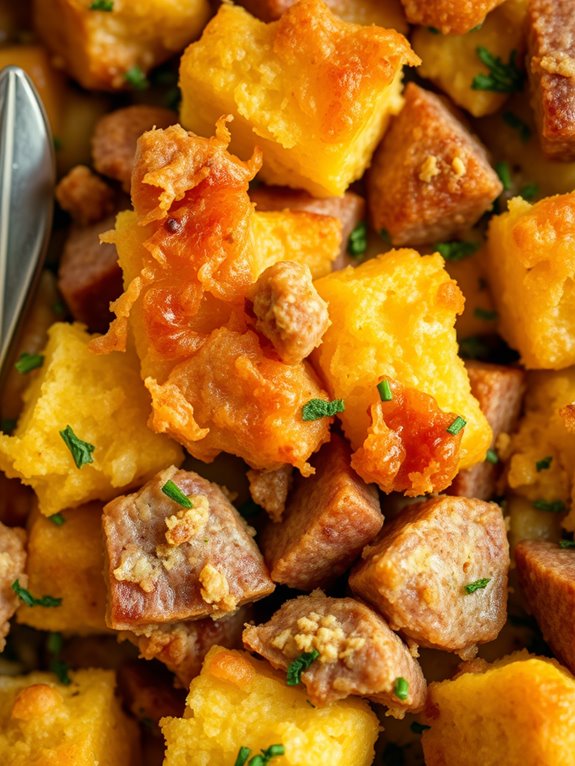
Cornbread and Sausage Stuffing is a delectable side dish that brings together the rich flavors of savory sausage, aromatic herbs, and the slightly sweet crumbly texture of cornbread. This dish is perfect for holiday gatherings or any occasion that calls for a comforting and flavorful accompaniment.
The combination of ingredients creates a harmonious blend that pairs well with roasted meats and vegetables, making it a versatile addition to your dining table. The stuffing features chunks of cornbread that absorb the flavorful juices from the sausage and vegetables, resulting in a moist and satisfying texture.
The addition of herbs such as sage and thyme adds depth and complexity, while the sausage provides a hearty element that elevates the dish beyond a typical stuffing. With its rustic charm and inviting flavors, this Cornbread and Sausage Stuffing is sure to be a crowd-pleaser at your next special occasion.
Ingredients for 4-6 servings:
- 8 cups of cubed cornbread
- 1 pound of sausage (mild or spicy, according to preference)
- 1 cup of diced onion
- 1 cup of diced celery
- 2 cloves garlic, minced
- 2 teaspoons fresh sage, chopped
- 1 teaspoon fresh thyme leaves
- 1/2 teaspoon salt
- 1/4 teaspoon black pepper
- 1/4 cup unsalted butter
- 2 cups chicken broth
- 2 eggs, beaten
Cooking Instructions:
- Preheat the Oven: Preheat your oven to 350°F (175°C) to prepare for baking the stuffing.
- Prepare the Cornbread: Place the cubed cornbread on a baking sheet in a single layer. Toast in the preheated oven for about 10 minutes to dry it out slightly. This helps the cornbread absorb the flavors without becoming mushy. Remove from the oven and set aside.
- Cook the Sausage: In a large skillet over medium heat, cook the sausage until it’s browned and crumbled. Use a spatula to break the sausage into small pieces as it cooks. Once done, remove the sausage from the skillet and drain any excess fat.
- Sauté Vegetables: In the same skillet, melt the unsalted butter over medium heat. Add the diced onion, celery, and garlic. Sauté for about 5 minutes until the vegetables are softened and translucent.
- Combine Ingredients: In a large mixing bowl, combine the toasted cornbread cubes, cooked sausage, sautéed vegetables, chopped sage, thyme, salt, and black pepper. Toss everything together until well combined.
- Add Liquid Ingredients: In a separate bowl, whisk together the chicken broth and beaten eggs. Pour this mixture over the cornbread and sausage mixture, gently mixing to moisten all the ingredients evenly.
- Transfer to Baking Dish: Grease a 9×13-inch baking dish. Transfer the stuffing mixture into the prepared dish, spreading it out evenly.
- Bake the Stuffing: Cover the dish with foil and bake in the preheated oven for 30 minutes. Then, remove the foil and bake for an additional 15-20 minutes, or until the top is golden brown and crispy.
- Serve: Once baked, remove the stuffing from the oven and let it sit for a few minutes before serving. Enjoy as a delicious side dish.
Extra Tips:
To guarantee the best texture, it’s important to let the cornbread dry out slightly before making the stuffing. This prevents it from becoming too soggy when mixed with the other ingredients.
If you prefer a spicier stuffing, opt for a spicy sausage or add a pinch of red pepper flakes to the sautéed vegetables. Additionally, this dish can be prepared a day in advance up to the baking step, making it a convenient option for busy holiday meal preparations.
Just store the uncooked stuffing in the refrigerator and bake it when you’re ready to serve.
Loaded Baked Potato Casserole

Loaded Baked Potato Casserole is a hearty and delicious dish that combines all the comforting flavors of a loaded baked potato into one easy-to-make casserole. This dish is perfect for family gatherings, potlucks, or simply as a satisfying side to your favorite main course. It features layers of creamy potatoes, melted cheese, crispy bacon, and fresh green onions, making it a crowd-pleaser that everyone will love.
The preparation of this dish is straightforward and can be done ahead of time, making it convenient for busy days. The key to a successful Loaded Baked Potato Casserole is using the right balance of ingredients to guarantee each bite is full of flavor. Be sure to select high-quality potatoes and cheese to enhance the taste even further. This recipe serves 4-6 people, making it ideal for a small gathering or as leftovers to enjoy throughout the week.
Ingredients:
- 6 medium-sized russet potatoes
- 1 cup sour cream
- 1/2 cup milk
- 1/2 cup unsalted butter, melted
- 2 cups shredded cheddar cheese
- 1/2 cup cooked bacon, crumbled
- 1/4 cup chopped green onions
- Salt and pepper to taste
Cooking Instructions:
- Preparation: Preheat your oven to 350°F (175°C). Begin by washing and peeling the potatoes. Cut them into small, even chunks to guarantee they cook evenly.
- Boil Potatoes: Place the potato chunks in a large pot filled with salted water. Bring the water to a boil over medium-high heat and cook the potatoes until they’re tender, about 15-20 minutes. Drain the potatoes thoroughly.
- Mash Potatoes: Return the drained potatoes to the pot. Add the melted butter, sour cream, and milk. Use a potato masher or an electric mixer to mash the potatoes until smooth and creamy. Season with salt and pepper to taste.
- Assemble Casserole: Spread half of the mashed potatoes evenly into the bottom of a greased 9×13 inch baking dish. Sprinkle half of the shredded cheddar cheese over the potatoes, followed by half of the crumbled bacon and chopped green onions.
- Layer and Bake: Add the remaining mashed potatoes on top of the first layer. Sprinkle the remaining cheese, bacon, and green onions over the top layer. Cover the baking dish with aluminum foil.
- Bake: Place the casserole in the preheated oven and bake for 20 minutes. Remove the foil and continue baking for an additional 10 minutes, or until the cheese is bubbly and slightly golden.
- Serve: Allow the casserole to cool for a few minutes before serving. This dish pairs well with a variety of main courses or can be enjoyed on its own.
Extra Tips:
To guarantee the best texture, choose russet potatoes as they’re starchy and ideal for mashing. You can also experiment with different types of cheese, such as Monterey Jack or mozzarella, to alter the flavor profile.
If you prefer a bit of spice, consider adding chopped jalapeños or a dash of hot sauce to the mashed potatoes. For a vegetarian version, simply omit the bacon or replace it with a plant-based alternative.
Additionally, the casserole can be prepared a day in advance and stored in the refrigerator, making it easy to bake when needed.
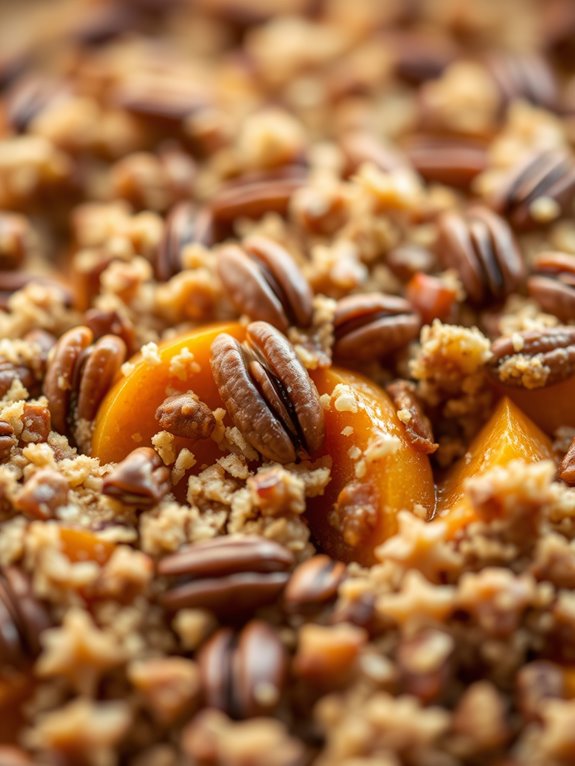
Sweet Potato Casserole With Pecan Topping
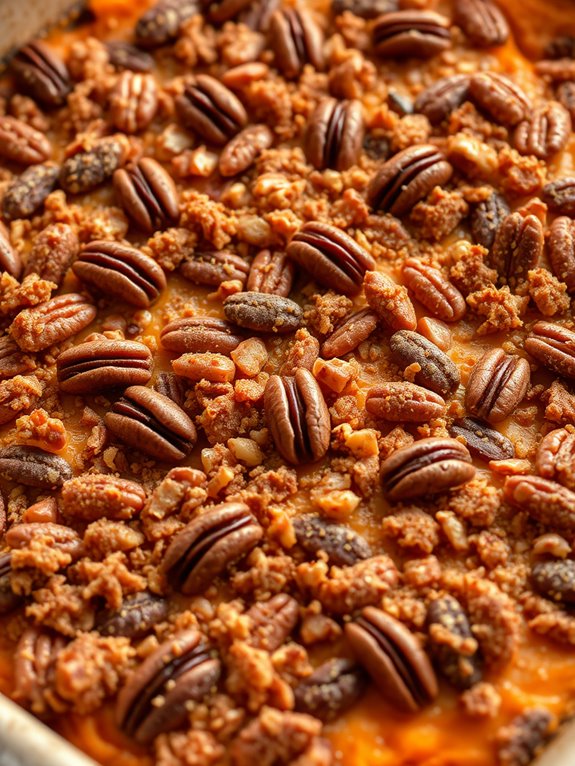
Sweet Potato Casserole with Pecan Topping is a delightful side dish that perfectly complements any holiday meal or family gathering. The creamy and slightly sweet mashed sweet potatoes are enriched with butter and brown sugar, creating a comforting base that contrasts beautifully with a crunchy, spiced pecan topping. This dish offers an irresistible combination of flavors and textures that are sure to become a family favorite.
The casserole is simple to prepare, making it a great go-to recipe for both novice and seasoned cooks. By roasting the sweet potatoes until they’re tender, you allow their natural sweetness to develop, enhancing the dish’s overall flavor profile. The pecan topping, with its buttery, cinnamon-infused crunch, adds a layer of complexity that makes this casserole not just a side dish, but a standout feature on any dining table.
Ingredients (Serves 4-6):
- 4 large sweet potatoes
- 1/2 cup unsalted butter, melted
- 1/3 cup brown sugar
- 1/2 cup milk
- 1 teaspoon vanilla extract
- 1/2 teaspoon salt
- 2 large eggs
- 1 cup chopped pecans
- 1/2 cup all-purpose flour
- 1/2 cup brown sugar (for the topping)
- 1/4 cup unsalted butter, melted (for the topping)
- 1 teaspoon ground cinnamon
Cooking Instructions:
- Preheat the Oven: Begin by preheating your oven to 375°F (190°C). This guarantees that the oven is at the right temperature for baking the casserole.
- Prepare the Sweet Potatoes: Wash and scrub the sweet potatoes thoroughly. Pierce them with a fork and place them on a baking sheet. Roast in the preheated oven for about 45-60 minutes, or until they’re tender when pierced with a fork.
- Mash the Sweet Potatoes: Once the sweet potatoes are roasted, allow them to cool slightly. Peel the skins off and place the flesh in a large mixing bowl. Mash them until smooth.
- Combine Ingredients: To the mashed sweet potatoes, add the melted butter, brown sugar, milk, vanilla extract, salt, and eggs. Mix well until all ingredients are fully incorporated.
- Prepare the Casserole Dish: Lightly grease a 9×13-inch baking dish. Pour the sweet potato mixture into the dish, spreading it evenly with a spatula.
- Make the Pecan Topping: In a separate bowl, combine the chopped pecans, flour, brown sugar, melted butter, and cinnamon. Mix until the pecans are well coated and crumbly.
- Add the Topping: Sprinkle the pecan mixture evenly over the sweet potato layer in the baking dish.
- Bake the Casserole: Place the casserole in the oven and bake for about 25-30 minutes, or until the topping is golden brown and crispy.
- Serve: Allow the casserole to cool for a few minutes before serving. Enjoy it warm as a delectable side dish to your meal.
Extra Tips:
- For a deeper flavor, consider roasting the sweet potatoes a day ahead and storing them in the refrigerator. This can also help save time when assembling the casserole.
- If you prefer a smoother texture, you can use a hand mixer or food processor to mash the sweet potatoes.
- Feel free to adjust the sweetness to your liking by varying the amount of brown sugar used in both the potato mixture and the topping.
- For a nut-free version, you can substitute the pecans with oats or omit them entirely.
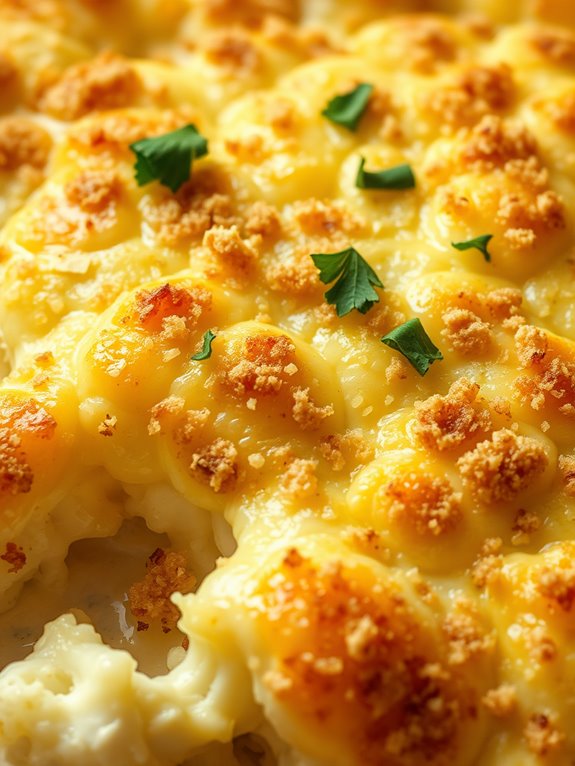
Baked Mac and Cheese Casserole
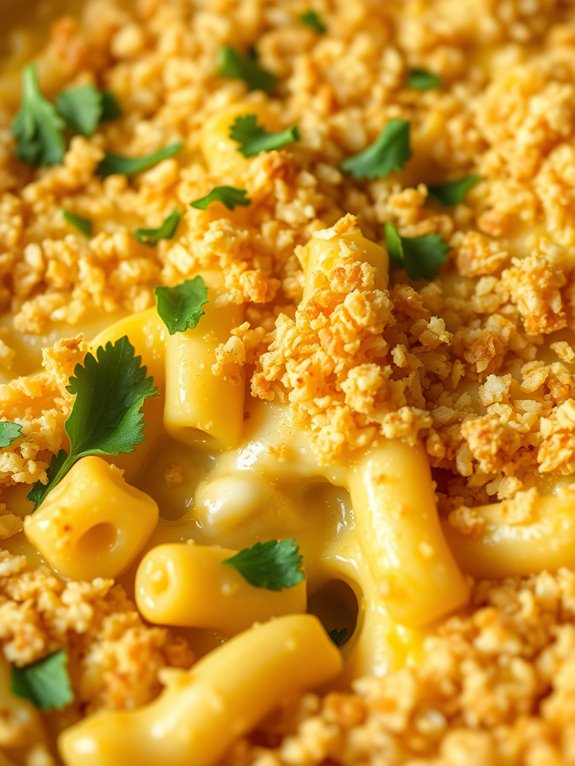
Baked Mac and Cheese Casserole is the ultimate comfort food that’s perfect for any occasion, whether it’s a family dinner, holiday gathering, or a potluck with friends. This creamy, cheesy dish combines tender pasta with a rich cheese sauce, all baked to golden perfection. The crispy breadcrumb topping adds a delightful crunch, making each bite irresistibly delicious.
Making Baked Mac and Cheese Casserole from scratch is surprisingly easy, and it allows for customization to suit your taste. By using a combination of cheeses, you can create a depth of flavor that beats any store-bought version. This recipe serves 4-6 people, ensuring there’s plenty of cheesy goodness to go around.
Ingredients for 4-6 servings:
- 8 ounces elbow macaroni
- 2 tablespoons unsalted butter
- 2 tablespoons all-purpose flour
- 2 cups whole milk
- 1/2 teaspoon salt
- 1/4 teaspoon black pepper
- 1/4 teaspoon garlic powder
- 1/4 teaspoon onion powder
- 1/4 teaspoon paprika
- 2 cups shredded sharp cheddar cheese
- 1 cup shredded mozzarella cheese
- 1/2 cup grated Parmesan cheese
- 1/2 cup breadcrumbs
- 2 tablespoons melted butter
- Optional: chopped parsley for garnish
Cooking Instructions:
- Preheat the Oven: Preheat your oven to 350°F (175°C). Grease a 9×13-inch baking dish with butter or cooking spray.
- Cook the Pasta: Bring a large pot of salted water to a boil. Add the elbow macaroni and cook according to package instructions until al dente. Drain and set aside.
- Make the Cheese Sauce: In a medium saucepan over medium heat, melt the butter. Stir in the flour to form a roux, cooking for about 1 minute until it turns light golden. Gradually whisk in the milk, ensuring no lumps form. Continue to whisk until the mixture thickens, about 3-5 minutes.
- Season the Sauce: Add the salt, pepper, garlic powder, onion powder, and paprika to the sauce. Stir well to combine.
- Add the Cheese: Remove the saucepan from heat, then add the cheddar, mozzarella, and Parmesan cheeses, stirring until completely melted and smooth.
- Combine Pasta and Sauce: Add the cooked macaroni to the cheese sauce, stirring until the pasta is fully coated.
- Assemble the Casserole: Pour the mac and cheese mixture into the prepared baking dish, spreading it evenly.
- Prepare the Topping: In a small bowl, mix the breadcrumbs with melted butter. Sprinkle the breadcrumb mixture evenly over the mac and cheese.
- Bake: Place the casserole in the preheated oven and bake for 25-30 minutes, or until the top is golden brown and the cheese is bubbly.
- Garnish and Serve: Remove from the oven and let it cool for a few minutes. Garnish with chopped parsley, if desired, and serve warm.
Extra Tips:
For a richer flavor, consider using a combination of different cheeses, such as Gruyère or Monterey Jack, alongside the cheddar and mozzarella. You can also add a pinch of cayenne pepper for a bit of heat.
To save time, the cheese sauce can be prepared a day in advance and stored in the refrigerator. Just reheat gently before combining with the pasta.
If you want a protein boost, consider adding cooked bacon or diced ham into the mix before baking. Enjoy your homemade Baked Mac and Cheese Casserole with a side salad or roasted vegetables for a complete meal.

Spinach and Artichoke Casserole
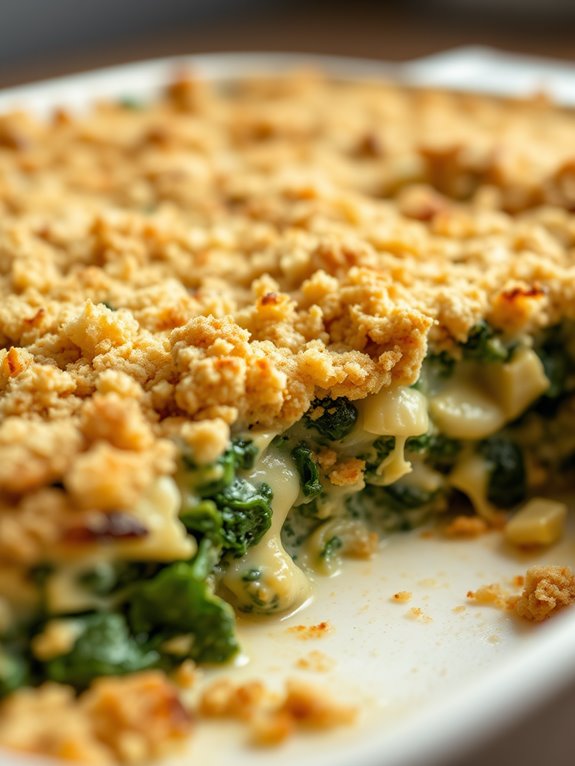
Spinach and Artichoke Casserole is a delightful side dish that combines the earthy flavors of spinach with the tangy and nutty notes of artichokes. This dish is perfect for family dinners or as a delicious addition to holiday gatherings. The creamy texture and cheesy goodness make it a crowd favorite, and its vibrant colors add a lovely touch to any dinner table.
This casserole isn’t only easy to prepare but also offers a healthy dose of greens, making it a nutritious option to accompany your main course. A warm and comforting dish, Spinach and Artichoke Casserole is made with fresh or frozen spinach, marinated artichoke hearts, and a blend of cheeses for creaminess and richness.
The combination is baked to perfection, creating a crusty top layer that contrasts beautifully with its soft and creamy interior. This recipe serves 4-6 people, making it ideal for a family meal or a small dinner party. Whether you’re a seasoned chef or a novice in the kitchen, this recipe is straightforward and guarantees a delicious outcome.
Ingredients (Serves 4-6):
- 1 tablespoon olive oil
- 1 small onion, finely chopped
- 2 cloves garlic, minced
- 10 ounces fresh spinach (or 1 package frozen spinach, thawed and drained)
- 1 can (14 ounces) artichoke hearts, drained and chopped
- 1 cup sour cream
- 1/2 cup mayonnaise
- 1 cup grated Parmesan cheese
- 1 cup shredded mozzarella cheese
- 1 teaspoon salt
- 1/2 teaspoon black pepper
- 1/4 teaspoon red pepper flakes (optional)
- 1/2 cup breadcrumbs
Cooking Instructions:
- Preheat the Oven: Begin by preheating your oven to 375°F (190°C). This guarantees that the casserole bakes evenly and achieves a nice golden crust.
- Sauté the Aromatics: In a large skillet, heat the olive oil over medium heat. Add the chopped onion and minced garlic, and sauté for about 3-4 minutes until they become translucent and fragrant.
- Cook the Spinach: If using fresh spinach, add it to the skillet and cook until wilted, about 5 minutes. If using frozen spinach, ensure it’s well-drained and add it directly to the skillet, stirring to combine with the onions and garlic.
- Mix the Filling: In a large mixing bowl, combine the cooked spinach mixture with the chopped artichoke hearts, sour cream, mayonnaise, Parmesan cheese, mozzarella cheese, salt, black pepper, and red pepper flakes (if using). Mix until all ingredients are well incorporated.
- Prepare the Casserole Dish: Lightly grease a 9×13-inch baking dish. Pour the spinach and artichoke mixture into the dish, spreading it evenly.
- Add the Topping: Sprinkle the breadcrumbs over the top of the casserole to create a crunchy topping.
- Bake the Casserole: Place the dish in the preheated oven and bake for 25-30 minutes, or until the top is golden brown and the cheese is bubbly.
- Cool and Serve: Remove the casserole from the oven and let it cool for a few minutes before serving. This allows the dish to set slightly and makes serving easier.
Extra Tips:
For a richer flavor, consider adding a few tablespoons of cream cheese to the mixture. If you prefer a bit of a crunch, you can mix chopped nuts such as almonds or walnuts with the breadcrumbs before sprinkling on top.
For an added twist, incorporate sun-dried tomatoes or roasted red peppers into the mix for extra flavor and color. Finally, if you have leftovers, they’re perfect for reheating, as the flavors will have melded together even more overnight.
Zucchini and Tomato Gratin
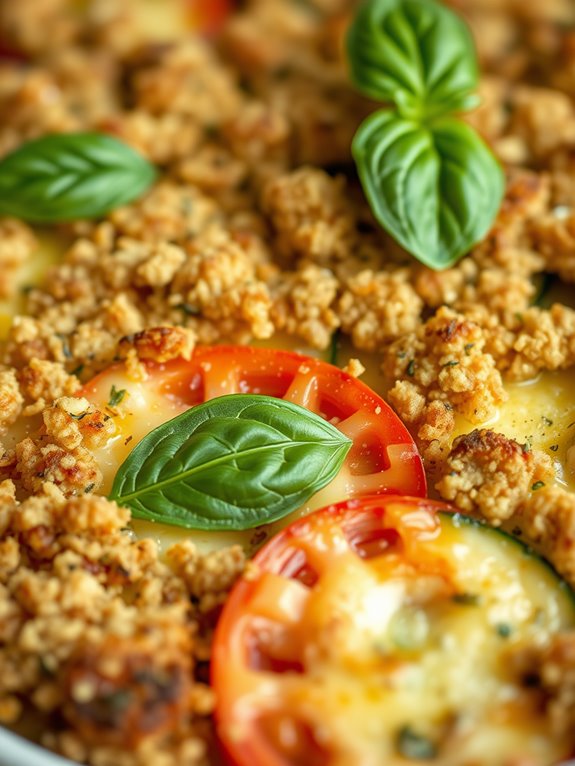
Zucchini and Tomato Gratin is a delightful side dish that combines the fresh flavors of summer vegetables with the comforting elements of a traditional gratin. This dish is perfect for showcasing the natural sweetness of zucchini and tomatoes, enhanced by a savory breadcrumb and cheese topping. The result is a creamy and flavorful casserole that pairs well with almost any main course, making it an ideal addition to family dinners or gatherings.
This gratin isn’t only delicious but also easy to prepare, making it a great option for both experienced cooks and those new to the kitchen. By layering slices of zucchini and tomato between a rich mixture of cheese and breadcrumbs, the vegetables are allowed to cook until tender, while the topping becomes golden and crispy. The interplay of textures and the infusion of fresh herbs make this Zucchini and Tomato Gratin a must-try for anyone looking to elevate their side dish game.
Ingredients (serving size: 4-6 people):
- 4 medium zucchinis, thinly sliced
- 4 medium tomatoes, thinly sliced
- 1 cup grated Parmesan cheese
- 1 cup shredded mozzarella cheese
- 1 cup panko breadcrumbs
- 2 cloves garlic, minced
- 3 tablespoons olive oil
- 1 teaspoon dried oregano
- 1 teaspoon dried basil
- Salt and pepper to taste
- Fresh basil leaves for garnish
Cooking Instructions:
- Preheat the Oven: Start by preheating your oven to 375°F (190°C). This guarantees that the gratin will cook evenly and the cheese topping will achieve that perfect golden brown color.
- Prepare the Baking Dish: Lightly grease a 9×13-inch baking dish with olive oil. This will prevent the vegetables from sticking and make cleaning up afterward easier.
- Layer the Vegetables: Arrange a layer of zucchini slices in the bottom of the prepared dish. Overlap slightly to guarantee full coverage. Follow with a layer of tomato slices. Sprinkle a little salt and pepper over the top to season the layers.
- Add the Cheese: Mix together the Parmesan and mozzarella cheeses in a bowl. Sprinkle a portion of the cheese mixture over the tomato layer.
- Create Additional Layers: Repeat the layering process with the remaining zucchini and tomato slices, followed by more cheese, until all the vegetables are used. Finish with a generous layer of cheese on top.
- Prepare the Breadcrumb Topping: In a separate bowl, combine the panko breadcrumbs, minced garlic, oregano, basil, and the remaining olive oil. Mix until the breadcrumbs are well coated with the oil and herbs.
- Add the Topping: Evenly sprinkle the breadcrumb mixture over the top layer of cheese. This will form a crispy, flavorful crust as it bakes.
- Bake the Gratin: Place the dish in the preheated oven and bake for about 30-35 minutes, or until the top is golden brown and the vegetables are tender when pierced with a fork.
- Garnish and Serve: Once baked, remove the gratin from the oven and let it cool for a few minutes. Garnish with fresh basil leaves before serving for an added touch of freshness and color.
For best results, choose zucchinis and tomatoes that are firm and ripe, as this will enhance the flavor and texture of the gratin. To guarantee even cooking, try to slice the vegetables as uniformly as possible.
If you prefer a spicier dish, consider adding a pinch of red pepper flakes to the breadcrumb mixture. This Zucchini and Tomato Gratin can be made ahead of time and reheated just before serving, making it a convenient option for busy occasions.
Wild Rice and Mushroom Casserole
Wild Rice and Mushroom Casserole is a hearty and savory side dish that pairs beautifully with a variety of main courses. This dish combines the nutty flavor of wild rice with the earthy tones of mushrooms, creating a perfect balance of taste and texture.
The casserole is also enhanced with a creamy sauce, which binds the ingredients together, making it a comforting and filling option for any meal. Whether you’re preparing a family dinner or hosting a holiday gathering, this casserole is sure to be a crowd-pleaser.
This recipe serves 4-6 people and is ideal for those who appreciate the depth of flavor that mushrooms and wild rice offer. It can be prepared ahead of time, making it a convenient choice for busy cooks.
The blend of herbs and spices in the dish adds an aromatic touch, while the addition of cheese gives it a delightful richness. Serve it alongside roasted meats or poultry, or enjoy it as a standalone vegetarian dish for a satisfying meal.
Ingredients:
- 1 cup wild rice
- 2 cups vegetable broth
- 2 tablespoons olive oil
- 1 medium onion, diced
- 2 cloves garlic, minced
- 8 ounces cremini or button mushrooms, sliced
- 1 teaspoon thyme
- 1 teaspoon rosemary
- Salt and pepper to taste
- 1 cup heavy cream
- 1 cup grated Parmesan cheese
- 1/4 cup chopped parsley
Cooking Instructions:
1. Cook the Wild Rice: Rinse the wild rice under cold water. In a medium saucepan, combine the wild rice and vegetable broth. Bring to a boil, then reduce the heat to low, cover, and simmer for about 45 minutes or until the rice is tender and has absorbed most of the liquid. Drain any excess liquid and set aside.
2. Prepare the Mushroom Mixture: In a large skillet, heat the olive oil over medium heat. Add the diced onion and sauté until translucent, about 5 minutes. Stir in the garlic and cook for an additional minute.
Add the sliced mushrooms, thyme, and rosemary. Cook until the mushrooms are browned and tender, about 8-10 minutes. Season with salt and pepper to taste.
3. Combine Ingredients: Preheat the oven to 350°F (175°C). In a large mixing bowl, combine the cooked wild rice, mushroom mixture, heavy cream, and half of the grated Parmesan cheese. Stir until well combined.
4. Assemble the Casserole: Transfer the mixture into a greased 9×13 inch baking dish. Spread it out evenly. Sprinkle the remaining Parmesan cheese over the top.
5. Bake the Casserole: Place the baking dish in the preheated oven and bake for 25-30 minutes, or until the top is golden brown and the casserole is heated through.
6. Garnish and Serve: Remove the casserole from the oven and let it cool slightly. Garnish with chopped parsley before serving.
Extra Tips:
For a richer flavor, consider using a combination of different mushroom varieties such as shiitake or portobello. If you prefer a dairy-free version, substitute the heavy cream with coconut milk and use nutritional yeast instead of Parmesan cheese.
To add a bit of crunch, top the casserole with toasted breadcrumbs before baking. This dish can be made a day in advance; simply cover and refrigerate, then reheat in the oven before serving. Enjoy this versatile dish with your favorite main courses or as a comforting meal on its own.
Cauliflower Au Gratin
Cauliflower Au Gratin is a creamy, cheesy side dish that’s perfect for holiday gatherings or a cozy family dinner. This classic French-inspired recipe transforms humble cauliflower into an elegant and delicious dish, thanks to a rich bechamel sauce and a golden, bubbling cheese crust.
It’s a great way to make vegetables more appealing to everyone at the table, even those who normally shy away from veggies. This recipe serves 4-6 people and combines tender cauliflower florets with a creamy sauce made from butter, flour, milk, and cheese, topped with breadcrumbs for a crunchy finish.
The result is a comforting dish with a subtle nutty flavor that pairs well with a variety of main courses, from roast chicken to grilled steak. Simple to prepare and certain to impress, Cauliflower Au Gratin is a must-try for anyone looking to expand their side dish repertoire.
Ingredients (serves 4-6):
- 1 large head of cauliflower, cut into florets
- 3 tablespoons unsalted butter
- 3 tablespoons all-purpose flour
- 2 cups whole milk
- 1 cup grated Gruyère cheese
- 1/2 cup grated Parmesan cheese
- Salt and pepper, to taste
- 1/4 teaspoon ground nutmeg
- 1/2 cup breadcrumbs
- 2 tablespoons chopped fresh parsley (optional)
Cooking Instructions:
- Preheat and Prep: Preheat your oven to 375°F (190°C). Meanwhile, bring a large pot of salted water to a boil. Add the cauliflower florets and cook for about 5 minutes until just tender. Drain and set aside.
- Make the Bechamel Sauce: In a medium saucepan over medium heat, melt the butter. Once melted, add the flour and whisk continuously for about 1-2 minutes to create a roux. Slowly add the milk, whisking constantly to avoid lumps. Cook until the sauce thickens, about 5 minutes.
- Add Cheese: Remove the saucepan from heat and stir in the Gruyère and Parmesan cheeses until melted and smooth. Season with salt, pepper, and nutmeg.
- Assemble the Dish: Place the cooked cauliflower florets in a greased baking dish. Pour the cheese sauce over the cauliflower, making sure all pieces are well-coated.
- Add Toppings: In a small bowl, mix the breadcrumbs with a tablespoon of melted butter (optional) and sprinkle over the top of the cauliflower and sauce. This will create a crispy topping.
- Bake: Place the dish in the preheated oven and bake for 25-30 minutes, or until the top is golden brown and bubbly.
- Garnish and Serve: Remove from the oven and let it cool slightly before serving. Garnish with chopped parsley if desired.
Extra Tips: For an extra depth of flavor, consider adding a pinch of cayenne pepper or mustard powder to the cheese sauce. If you prefer a more pronounced cheese flavor, experiment with different types of cheese like sharp cheddar or a mix of Gruyère and Swiss.
To guarantee a perfect golden crust, broil the dish for an additional 2-3 minutes at the end of baking, but keep a close eye on it to prevent burning. Finally, this dish can be made ahead of time up to the baking step and refrigerated, making it a convenient option for busy holiday meal preparations.
Butternut Squash and Apple Casserole
This Butternut Squash and Apple Casserole is a delightful side dish that perfectly complements any fall or holiday meal. The natural sweetness of butternut squash and apples is enhanced with a touch of cinnamon and nutmeg, creating a comforting flavor profile that’s both savory and sweet.
This casserole is perfect for those who enjoy the warmth and coziness of autumn flavors and is sure to be a crowd-pleaser at your next gathering. The dish is topped with a crunchy pecan and breadcrumb mixture that adds a satisfying texture to each bite.
Whether you’re serving it alongside a Thanksgiving turkey or a simple weeknight roast, this casserole can shine on any table. It’s not only delicious but also a great way to incorporate seasonal produce into your meals. The following recipe serves 4-6 people, making it ideal for a family dinner or a small gathering.
Ingredients:
- 1 medium butternut squash, peeled and diced
- 3 medium apples, peeled, cored, and sliced
- 1/4 cup unsalted butter, melted
- 1/4 cup brown sugar
- 1 teaspoon ground cinnamon
- 1/2 teaspoon ground nutmeg
- 1/2 teaspoon salt
- 1/3 cup chopped pecans
- 1/3 cup breadcrumbs
- 2 tablespoons all-purpose flour
- 1 tablespoon maple syrup
Instructions:
- Preheat the Oven: Preheat your oven to 375°F (190°C) to make sure it’s ready for baking the casserole.
- Prepare the Squash and Apples: In a large bowl, combine the diced butternut squash and sliced apples. Add the melted butter, brown sugar, cinnamon, nutmeg, and salt. Toss everything together until the squash and apples are well coated with the mixture.
- Assemble the Casserole: Transfer the squash and apple mixture into a greased 9×13-inch baking dish, spreading it out evenly.
- Mix Topping Ingredients: In a separate bowl, combine the chopped pecans, breadcrumbs, and flour. Drizzle the maple syrup over the mixture and stir until everything is evenly coated.
- Add the Topping: Sprinkle the pecan and breadcrumb mixture over the squash and apples in the baking dish.
- Bake the Casserole: Place the casserole in the preheated oven and bake for 35-40 minutes, or until the squash is tender and the topping is golden brown.
- Serve: Allow the casserole to cool for a few minutes before serving. This will help the flavors to meld together and make it easier to serve.
Extra Tips:
For a more robust flavor, consider roasting the butternut squash for about 10 minutes before combining it with the apples. This will enhance the natural sweetness of the squash.
Additionally, if you prefer a less sweet dish, you can reduce the amount of brown sugar or omit the maple syrup. Feel free to experiment with different types of apples; tart varieties like Granny Smith can add a nice contrast to the sweetness of the squash.
Finally, this casserole can be made a day ahead and reheated before serving, saving you time on the day of your event.
Southern Corn Pudding Casserole

Southern Corn Pudding Casserole is a classic Southern side dish that’s both sweet and savory, making it the perfect accompaniment to any meal. This dish combines the natural sweetness of corn with a custard-like base, resulting in a creamy, comforting casserole that’s certain to please a crowd. Whether you’re serving it at a family gathering, holiday dinner, or just a weeknight meal, this dish is assured to be a hit.
The origins of corn pudding can be traced back to Native American cooking, but over the years, it has been embraced and adapted by Southern chefs and home cooks alike. The key to a great Southern Corn Pudding Casserole lies in using fresh or high-quality canned corn, along with a few pantry staples that bring the dish together. It’s simple yet satisfying, and it can easily be doubled to feed a larger group if needed.
Ingredients for 4-6 servings:
- 2 cups corn kernels (fresh, frozen, or canned)
- 1/4 cup unsalted butter, melted
- 2 large eggs
- 1 cup whole milk
- 1/2 cup heavy cream
- 1/3 cup granulated sugar
- 1/4 cup all-purpose flour
- 1 teaspoon baking powder
- 1/2 teaspoon salt
- 1/4 teaspoon ground black pepper
- 1/4 teaspoon ground nutmeg (optional)
- 1/4 cup finely chopped green onions (optional)
Cooking Instructions:
- Preheat the Oven: Begin by preheating your oven to 350°F (175°C). This guarantees that the casserole will cook evenly and develop a nice golden top.
- Prepare the Corn: If using fresh corn, remove the kernels from the cob. If using frozen corn, thaw it completely, and if using canned corn, drain it well.
- Mix Wet Ingredients: In a large bowl, whisk together the melted butter, eggs, milk, heavy cream, and sugar until well combined. This mixture will form the custard base of the pudding.
- Combine Dry Ingredients: In a separate bowl, mix the flour, baking powder, salt, pepper, and nutmeg (if using). Gradually add this to the wet ingredients, stirring until smooth.
- Incorporate Corn and Onions: Fold the corn kernels and green onions into the batter, ensuring they’re evenly distributed throughout the mixture.
- Transfer to Baking Dish: Pour the mixture into a greased 8×8-inch baking dish, smoothing the top with a spatula to guarantee even cooking.
- Bake the Casserole: Place the dish in the preheated oven and bake for 45-50 minutes, or until the pudding is set and the top is golden brown. A toothpick inserted in the center should come out clean.
- Cool Slightly Before Serving: Allow the casserole to cool for about 5 minutes before serving. This will make it easier to cut and serve.
Extra Tips:
For a richer flavor, consider using half-and-half instead of milk and cream. If you prefer a more textured pudding, you can leave some of the corn kernels whole and puree the rest before mixing them into the batter.
Additionally, adding a sprinkle of shredded cheddar cheese on top before baking can add a delicious cheesy crust. If you’re making this dish ahead of time, it can be assembled and stored in the refrigerator for up to 24 hours before baking. Just be sure to let it come to room temperature before placing it in the oven.
Eggplant Parmesan Casserole

Eggplant Parmesan Casserole is a delightful side dish that combines the rich flavors of eggplant, marinara sauce, and gooey melted cheese into a comforting and satisfying casserole. Perfect for family dinners or special occasions, this dish brings a taste of Italy to your table.
The layers of crispy, breaded eggplant slices are nestled between savory marinara and creamy mozzarella, making each bite a symphony of textures and tastes. This casserole isn’t only delicious but also a great way to incorporate more vegetables into your diet.
The eggplant provides a hearty base that absorbs the flavors of the sauce and cheese, while the breadcrumbs add a satisfying crunch. This recipe serves 4-6 people and is sure to be a hit at your next gathering.
Ingredients:
- 2 large eggplants
- 1 teaspoon salt
- 2 cups marinara sauce
- 2 cups shredded mozzarella cheese
- 1 cup grated Parmesan cheese
- 1 cup Italian-style breadcrumbs
- 2 large eggs
- 1/2 cup all-purpose flour
- 1/4 cup olive oil
- 1 teaspoon dried oregano
- 1 teaspoon garlic powder
- Fresh basil leaves for garnish (optional)
Cooking Instructions:
1. Prepare the Eggplant: Start by slicing the eggplants into 1/4-inch thick rounds. Lay the slices on a baking sheet lined with paper towels and sprinkle both sides with salt. Let them sit for about 30 minutes to draw out excess moisture.
Afterward, rinse the slices and pat them dry with paper towels.
2. Bread the Eggplant: Set up a breading station with three shallow bowls. In the first bowl, place the flour. In the second bowl, beat the eggs. In the third bowl, combine the breadcrumbs, garlic powder, and oregano.
Dredge each eggplant slice first in the flour, then dip it into the beaten eggs, and finally coat it with the breadcrumb mixture.
3. Fry the Eggplant: Heat the olive oil in a large skillet over medium heat. Fry the breaded eggplant slices in batches, about 3-4 minutes per side, until golden brown and crispy.
Transfer the cooked slices to a paper towel-lined plate to drain excess oil.
4. Assemble the Casserole: Preheat your oven to 375°F (190°C). In a 9×13 inch baking dish, spread a thin layer of marinara sauce on the bottom. Layer half of the fried eggplant slices over the sauce.
Sprinkle half of the mozzarella and Parmesan cheese over the eggplant. Repeat the layers with the remaining ingredients, finishing with a generous layer of cheese on top.
5. Bake the Casserole: Cover the casserole with foil and bake for 25 minutes. Remove the foil and bake for an additional 15 minutes, or until the cheese is bubbly and golden brown.
Allow the casserole to cool for a few minutes before serving.
6. Garnish and Serve: If desired, garnish with fresh basil leaves before serving. Enjoy the eggplant Parmesan casserole hot as a delicious side dish.
Extra Tips:
When preparing the eggplant, salting and draining them is essential to prevent a soggy texture in the final dish.
Be sure to fry the eggplant slices until they’re well-crisped, as this will guarantee they hold up well in the casserole. Feel free to experiment with additional spices or herbs in the breadcrumb mixture to suit your taste preferences.
Additionally, if you prefer a lighter version, you can bake the breaded eggplant slices instead of frying them. Just place them on a parchment-lined baking sheet and bake at 400°F (200°C) for about 20 minutes, flipping halfway through.
Brussels Sprouts and Bacon Casserole
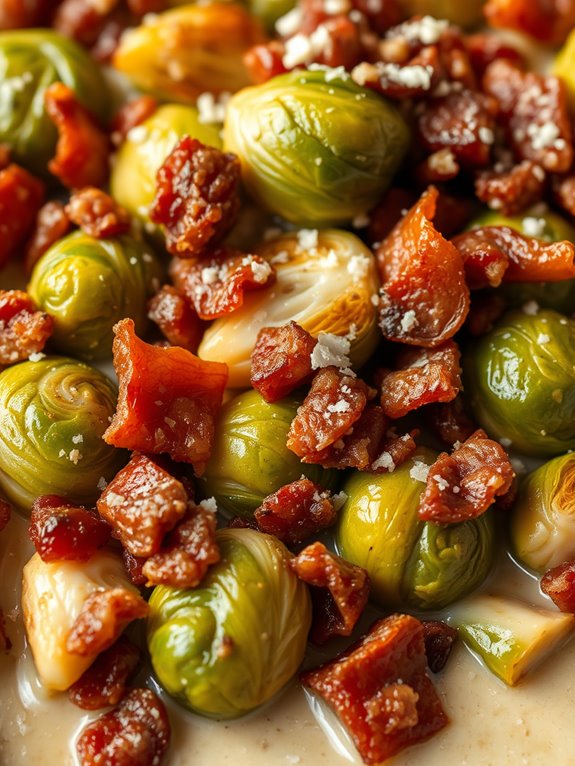
Brussels Sprouts and Bacon Casserole is a delightful blend of savory and slightly sweet flavors, making it an excellent side dish for any meal. This casserole combines the earthy taste of Brussels sprouts with the rich, smoky flavor of crispy bacon, all brought together with a creamy cheese sauce.
The dish is perfect for serving at family gatherings or as a comforting side to a weeknight dinner, offering a wonderful balance of textures and flavors that will please both vegetable lovers and bacon enthusiasts alike.
The casserole is designed to serve 4-6 people and is relatively simple to prepare. By roasting the Brussels sprouts, you enhance their natural sweetness and create a delicious caramelized crust. The bacon adds a salty, crunchy element that complements the creaminess of the cheese sauce.
This dish isn’t only tasty but also visually appealing, making it an excellent choice for any occasion. With just a few ingredients and straightforward preparation, Brussels Sprouts and Bacon Casserole will quickly become a favorite in your household.
Ingredients:
- 1 1/2 pounds Brussels sprouts, trimmed and halved
- 6 slices bacon, chopped
- 2 tablespoons olive oil
- Salt and pepper to taste
- 1 cup shredded sharp cheddar cheese
- 1/2 cup heavy cream
- 1/4 cup grated Parmesan cheese
- 1 teaspoon garlic powder
- 1/4 teaspoon nutmeg
Cooking Instructions:
- Preheat the Oven: Preheat your oven to 400°F (200°C) to guarantee it reaches the desired temperature for roasting the Brussels sprouts.
- Prepare the Brussels Sprouts: In a large bowl, toss the halved Brussels sprouts with olive oil, salt, and pepper until evenly coated. Spread them out in a single layer on a baking sheet.
- Roast the Brussels Sprouts: Place the baking sheet in the preheated oven and roast the Brussels sprouts for about 20 minutes, or until they’re tender and golden brown. Stir them halfway through to promote even roasting.
- Cook the Bacon: Meanwhile, in a large skillet over medium heat, cook the chopped bacon until it becomes crispy. Once cooked, remove the bacon with a slotted spoon and place it on a paper towel-lined plate to drain excess grease.
- Prepare the Cheese Sauce: In a saucepan over low heat, combine the heavy cream, shredded cheddar cheese, grated Parmesan cheese, garlic powder, and nutmeg. Stir continuously until the cheeses melt and the mixture is smooth and creamy.
- Combine Ingredients: In a casserole dish, combine the roasted Brussels sprouts and crispy bacon. Pour the cheese sauce over the top, making sure everything is well-coated.
- Bake the Casserole: Place the casserole dish in the oven and bake for an additional 10-15 minutes, or until the cheese is bubbly and slightly browned on top.
- Serve: Remove the casserole from the oven and let it cool for a few minutes before serving. Enjoy as a delicious side dish to your favorite meal.
Extra Tips:
For the best results, choose fresh Brussels sprouts that are bright green and firm. If possible, opt for thick-cut bacon for added texture and flavor.
When roasting the Brussels sprouts, make sure they’re all cut to a similar size to guarantee even cooking. If you prefer a spicier kick, consider adding a pinch of red pepper flakes to the cheese sauce.
Finally, if you find the cheese sauce too thick, you can thin it out with a splash of milk before combining it with the Brussels sprouts and bacon.