

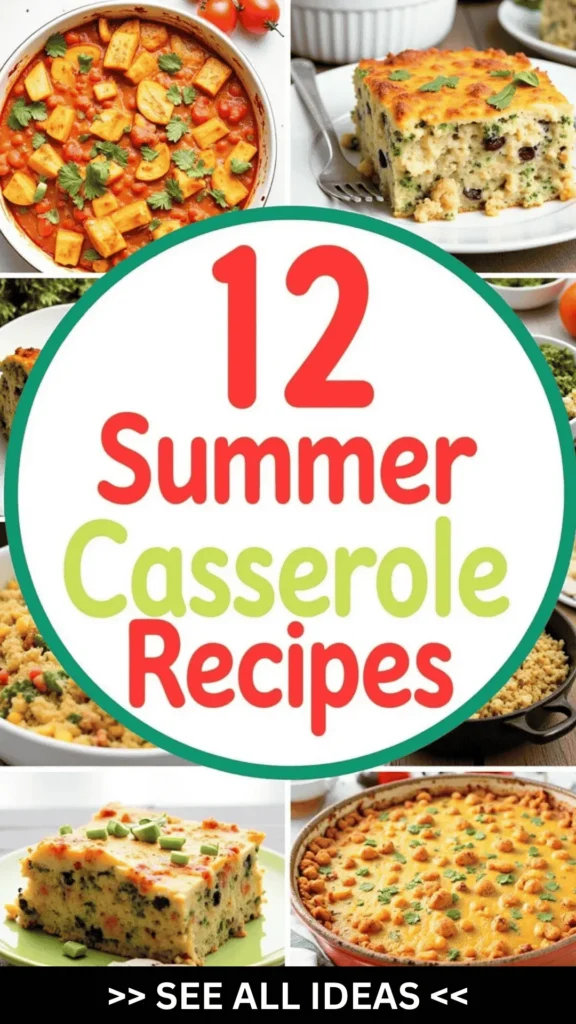
Summer is such a delightful time for fresh and vibrant meals!
There’s something so comforting about casseroles that highlight the season’s best ingredients.
Recipes like Zucchini and Tomato Casserole or Corn and Black Bean Enchilada Bake are not only bursting with flavor, but they also add a pop of color to your table.
Plus, they can be prepped in advance, giving you more time to relax and enjoy with family and friends.
Let’s explore these delicious summer casserole recipes that are sure to impress at your next gathering!
Zucchini and Tomato Casserole
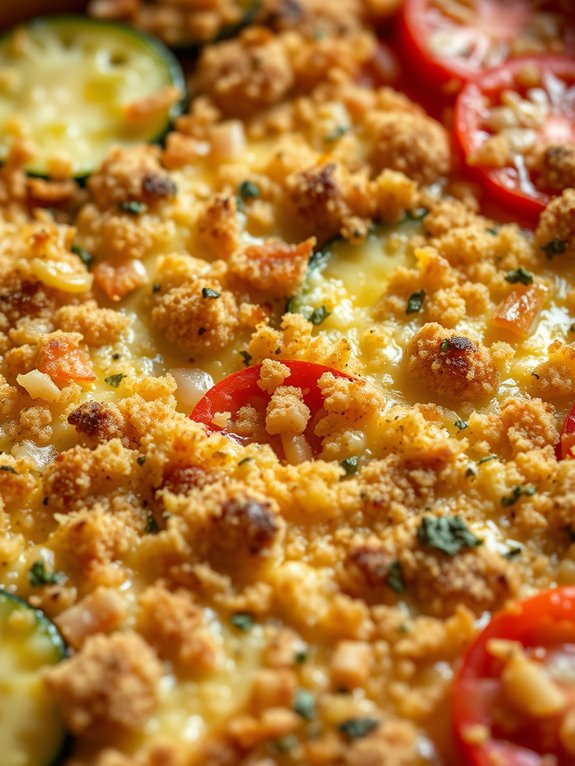
Zucchini and Tomato Casserole is a delightful summer dish that combines fresh garden vegetables with flavorful herbs and a cheesy topping. This casserole is perfect for a light dinner or as a side dish at a summer gathering, offering a burst of vitality and taste. The zucchini provides a subtle crunch, while the tomatoes add a juicy richness, all brought together by a delicious herb-infused breadcrumb and cheese topping. This dish isn’t only delicious but also a great way to use up any surplus zucchini or tomatoes from your summer garden.
The Zucchini and Tomato Casserole is easy to prepare and is certain to be a hit with family and friends. It’s a versatile dish that can be modified to suit different tastes or dietary needs. Serve it warm as a comforting meal, or at room temperature as a rejuvenating side dish. This recipe is designed to serve 4-6 people, making it suitable for a family dinner or a small gathering. Enjoy the flavors of summer with this easy-to-make, nutritious casserole.
Ingredients (serving size: 4-6 people):
- 3 medium zucchinis, sliced into 1/4-inch rounds
- 4 medium tomatoes, sliced
- 1 large onion, thinly sliced
- 2 cloves garlic, minced
- 1 cup shredded mozzarella cheese
- 1/2 cup grated Parmesan cheese
- 1/2 cup breadcrumbs
- 2 tablespoons olive oil
- 1 teaspoon dried oregano
- 1 teaspoon dried basil
- Salt and pepper to taste
- Fresh basil leaves for garnish (optional)
Instructions:
- Preheat the Oven: Start by preheating your oven to 375°F (190°C). This guarantees that the casserole will cook evenly once it’s assembled and placed in the oven.
- Prepare the Vegetables: Slice the zucchinis and tomatoes into 1/4-inch rounds, and thinly slice the onion. Mince the garlic cloves to make sure they distribute evenly through the dish.
- Layer the Vegetables: In a large casserole dish, drizzle 1 tablespoon of olive oil on the bottom. Begin layering your vegetables by placing a layer of zucchini slices, followed by a layer of tomato slices, and then a layer of onion slices. Sprinkle some minced garlic over the top. Repeat the layers until all vegetables are used.
- Season the Casserole: Sprinkle the dried oregano, dried basil, salt, and pepper evenly over the layered vegetables to enhance the flavors.
- Add Cheese and Breadcrumbs: Combine the breadcrumbs, Parmesan cheese, and remaining olive oil in a small bowl. Mix until well combined. Sprinkle this mixture evenly over the top of the vegetables. Then, evenly distribute the shredded mozzarella cheese on top.
- Bake the Casserole: Place the casserole dish in the preheated oven and bake for about 25-30 minutes, or until the cheese is golden brown and bubbly and the vegetables are tender.
- Garnish and Serve: Remove the casserole from the oven and let it cool for a few minutes before serving. Garnish with fresh basil leaves if desired, and enjoy!
Extra Tips:
For a more robust flavor, consider adding a layer of sautéed mushrooms or bell peppers. If you prefer a spicier dish, add a pinch of red pepper flakes to the seasoning mix. To make the casserole more filling, you can add cooked quinoa or rice to the layers.
When slicing the vegetables, try to keep them uniform in thickness to guarantee even cooking. Finally, if preparing in advance, you can assemble the casserole, cover it, and refrigerate it for up to a day before baking.
Corn and Black Bean Enchilada Bake

Corn and Black Bean Enchilada Bake is a delightful summer casserole that combines the vibrant flavors of fresh vegetables with the comforting essence of a traditional enchilada. This dish is perfect for a family gathering or a casual dinner with friends, offering a hearty and satisfying meal that’s both nutritious and delicious. The combination of sweet corn, savory black beans, and melty cheese creates a rich and flavorful experience that’s certain to be a crowd-pleaser.
The enchilada bake is easy to prepare and full of vibrant colors and textures, making it a visually appealing dish as well. The layers of tortillas, beans, corn, and cheese create a beautiful mosaic, while the enchilada sauce ties everything together with a spicy kick. This recipe can be made ahead of time, which makes it a convenient choice for busy summer days when entertaining guests or enjoying a picnic in the park.
Ingredients (serving size: 4-6 people):
- 2 cups cooked black beans (canned or homemade)
- 2 cups corn kernels (fresh, canned, or frozen)
- 1 small red onion, diced
- 1 red bell pepper, diced
- 2 cups shredded Monterey Jack or cheddar cheese
- 12 corn tortillas
- 2 cups enchilada sauce
- 1 teaspoon ground cumin
- 1 teaspoon chili powder
- Salt and pepper to taste
- 1 tablespoon olive oil
- Fresh cilantro, chopped (for garnish)
- Lime wedges (for serving)
Instructions:
- Preheat the Oven: Begin by preheating your oven to 375°F (190°C) to verify it’s ready by the time you prepare your casserole.
- Sauté the Vegetables: In a large skillet, heat the olive oil over medium heat. Add the diced red onion and red bell pepper. Cook until the onion is translucent and the bell pepper is softened, about 5 minutes.
- Add Beans and Corn: Stir in the black beans and corn kernels, followed by the ground cumin, chili powder, salt, and pepper. Continue to cook for another 2-3 minutes, allowing the flavors to meld.
- Layer the Ingredients: In a 9×13-inch baking dish, pour a small amount of enchilada sauce to cover the bottom. Layer 4 corn tortillas over the sauce. Then, spread half of the bean and corn mixture over the tortillas, followed by one-third of the shredded cheese. Repeat the process with another layer, using 4 more tortillas, the remaining bean mixture, and another third of the cheese.
- Top and Bake: Finish with a final layer of 4 tortillas, cover with the remaining enchilada sauce, and sprinkle the rest of the cheese on top. Cover with foil and bake in the preheated oven for 20 minutes. Remove the foil and bake for an additional 10-15 minutes, or until the cheese is bubbly and golden brown.
- Garnish and Serve: Once baked, remove from the oven and let it cool for a few minutes. Garnish with freshly chopped cilantro and serve with lime wedges on the side for an added burst of freshness.
Extra Tips:
For a more personalized touch, consider adding some diced jalapeños for extra heat or a layer of cooked, shredded chicken for additional protein.
If you prefer a milder version, use mild enchilada sauce and reduce the chili powder. This dish can be made vegetarian by substituting cheese with a plant-based alternative.
Additionally, letting the casserole sit for a few minutes before serving will make it easier to cut and serve. Enjoy this dish with a side of guacamole or a fresh green salad for a complete meal.
Caprese Chicken Casserole
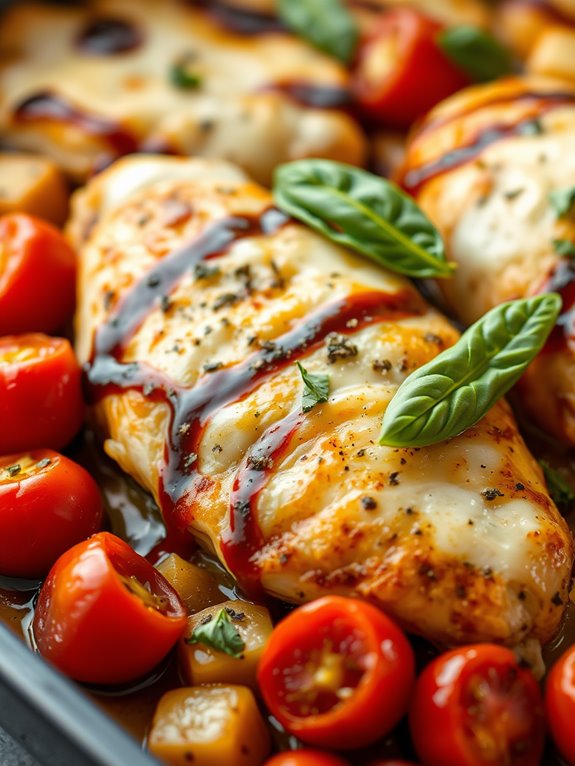
Caprese Chicken Casserole is a delightful summer dish that captures the essence of fresh Italian flavors with the comforting warmth of a casserole. This dish combines tender chicken breasts with ripe tomatoes, creamy mozzarella, and aromatic basil, all baked together to create a harmonious blend of flavors and textures. Perfect for a family dinner or a casual gathering, this recipe is a surefire way to impress your guests with minimal effort.
The casserole not only looks vibrant but also bursts with flavor in every bite. The juicy chicken is marinated in a balsamic glaze, which adds a tangy sweetness that complements the creamy mozzarella and sweet tomatoes. Fresh basil leaves provide an aromatic freshness that ties the whole dish together. It’s a versatile recipe that can be prepared ahead of time, making it an ideal choice for busy summer days.
Ingredients for 4-6 servings:
- 4 boneless, skinless chicken breasts
- 2 cups cherry tomatoes, halved
- 8 ounces fresh mozzarella cheese, sliced
- 1/4 cup fresh basil leaves
- 1/4 cup balsamic glaze
- 2 tablespoons olive oil
- 2 cloves garlic, minced
- Salt and pepper to taste
- 1 teaspoon dried Italian seasoning
Cooking Instructions:
- Preheat the Oven: Start by preheating your oven to 400°F (200°C). This will guarantee that your casserole cooks evenly and develops a nice, golden crust.
- Prepare the Chicken: In a large baking dish, arrange the chicken breasts in a single layer. Drizzle with olive oil, then season both sides with salt, pepper, and dried Italian seasoning. Rub the minced garlic over the chicken to infuse it with flavor.
- Add the Tomatoes and Cheese: Scatter the halved cherry tomatoes around the chicken breasts. Place slices of fresh mozzarella on top of each chicken breast, ensuring they’re well-covered for a gooey, cheesy topping.
- Drizzle with Balsamic Glaze: Pour the balsamic glaze evenly over the chicken and tomatoes. This will give the dish its signature tangy sweetness and help to caramelize the top during baking.
- Bake the Casserole: Place the baking dish in the preheated oven and bake for 25-30 minutes, or until the chicken is cooked through and the cheese is bubbly and golden brown.
- Add Fresh Basil: Once out of the oven, immediately sprinkle the fresh basil leaves over the casserole. The residual heat will release the basil’s aroma, enhancing the dish’s flavor.
- Serve and Enjoy: Let the casserole rest for a few minutes before serving. This allows the juices to redistribute, guaranteeing every bite is moist and flavorful.
Extra Tips:
For best results, choose high-quality, fresh ingredients, especially the mozzarella and tomatoes, as they’re key to the dish’s flavor. If you prefer a more robust flavor, consider marinating the chicken in the balsamic glaze for a few hours before cooking.
Additionally, you can add a layer of cooked pasta or grains like quinoa or farro at the bottom of the dish for a heartier meal. If you have leftovers, this casserole reheats well and can be stored in the refrigerator for up to three days.
Summer Squash and Sausage Gratin
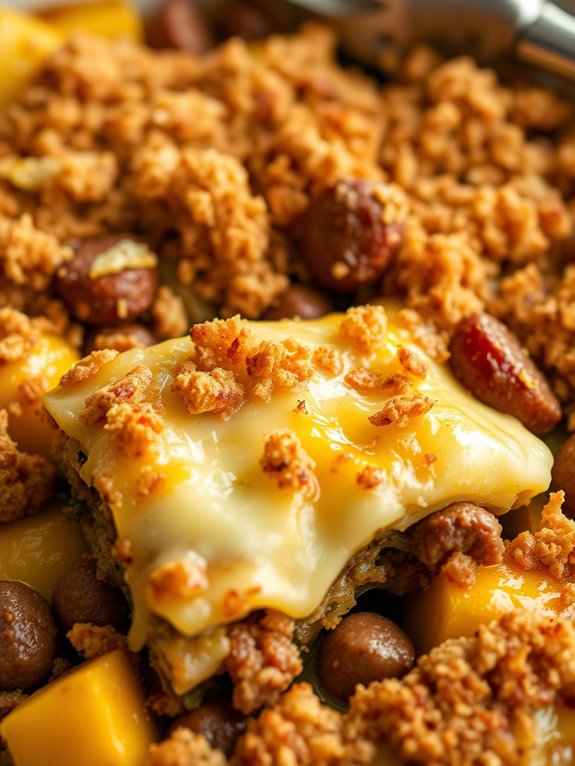
Summer Squash and Sausage Gratin is a delightful dish that combines the fresh flavors of summer squash with the savory taste of sausage. This gratin is perfect for a summer gathering or a comforting family dinner. The combination of tender squash, flavorful sausage, and creamy cheese creates a rich and satisfying casserole that’s certain to be a crowd-pleaser.
With its vibrant colors and delicious aroma, this dish not only tastes great but is also a feast for the eyes. This gratin is an excellent way to utilize the abundance of summer squash available during the warmer months. The dish is versatile and can be adapted to include your favorite types of sausage, such as spicy Italian or mild breakfast sausage, depending on your preference.
When baked to a golden-brown perfection, the Summer Squash and Sausage Gratin is a delightful blend of textures and flavors that will have everyone coming back for seconds.
Ingredients (Serving Size: 4-6 people):
- 2 medium-sized summer squash, thinly sliced
- 1 pound of sausage (your choice of type), crumbled
- 1 medium onion, finely chopped
- 2 cloves garlic, minced
- 1 cup shredded mozzarella cheese
- 1/2 cup grated Parmesan cheese
- 1 cup heavy cream
- 2 tablespoons olive oil
- 1 teaspoon dried thyme
- 1 teaspoon dried oregano
- Salt and pepper to taste
- 1/2 cup breadcrumbs
Instructions:
- Preheat the Oven: Preheat your oven to 375°F (190°C) to guarantee it’s at the right temperature when the dish is ready to bake.
- Prepare the Sausage: In a large skillet over medium heat, add the olive oil. Once heated, add the crumbled sausage and cook until browned and cooked through, about 6-8 minutes. Remove the sausage from the skillet and set aside.
- Cook the Vegetables: In the same skillet, add the chopped onion and garlic. Sauté until the onion is translucent and the garlic is fragrant, about 3-4 minutes. Add the sliced summer squash to the skillet and cook for an additional 5 minutes, until slightly softened. Season with salt, pepper, thyme, and oregano.
- Assemble the Gratin: In a large baking dish, layer half of the cooked summer squash and onion mixture. Top with half of the cooked sausage. Sprinkle half of the mozzarella and Parmesan cheese over the sausage. Repeat the layers with the remaining squash mixture, sausage, and cheeses.
- Add the Cream: Pour the heavy cream evenly over the entire dish. This will add a rich, creamy texture to the gratin.
- Top with Breadcrumbs: Sprinkle the breadcrumbs evenly over the top of the gratin for a crunchy, golden topping.
- Bake the Gratin: Place the baking dish in the preheated oven and bake for 25-30 minutes, or until the top is golden brown and the cheese is bubbly.
- Cool and Serve: Allow the gratin to cool for a few minutes before serving. This will allow the flavors to settle and make it easier to slice and serve.
Extra Tips:
For an even more flavorful gratin, consider adding a pinch of red pepper flakes for a touch of heat, or fresh basil leaves for added freshness. If you prefer a lighter version, you can substitute the heavy cream with half-and-half or milk, although the texture will be slightly less rich.
Confirm the summer squash is sliced evenly to allow for uniform cooking. You can also prepare the dish ahead of time and refrigerate it until you’re ready to bake, making it a convenient option for busy days or gatherings.
Peach and Berry Breakfast Casserole

Peach and Berry Breakfast Casserole is a delightful dish that perfectly captures the essence of summer. The combination of juicy peaches and vibrant berries creates a sweet and tangy flavor that’s both invigorating and satisfying. This breakfast casserole isn’t only easy to make but also a crowd-pleaser, making it an ideal choice for a family breakfast or a brunch gathering with friends.
Whether served warm straight out of the oven or at room temperature, this dish is sure to impress everyone at the table. The beauty of this casserole lies in its simplicity and the use of fresh, seasonal ingredients. The peaches add a luscious sweetness, while the berries provide a burst of tartness, creating a harmonious balance of flavors.
Additionally, the creamy base of the casserole, made with eggs and milk, provides a rich and custard-like texture that complements the fruits beautifully. This Peach and Berry Breakfast Casserole isn’t only a treat for the taste buds but also a visually appealing dish, with its colorful array of fruits sitting atop a golden, baked surface.
Ingredients (Serves 4-6):
- 4 large eggs
- 1 cup milk
- 1/4 cup granulated sugar
- 1 teaspoon vanilla extract
- 1/2 teaspoon ground cinnamon
- 4 cups cubed day-old bread (such as challah or brioche)
- 2 cups sliced peaches (fresh or canned, drained)
- 1 cup mixed berries (such as blueberries, raspberries, and blackberries)
- 1/4 cup sliced almonds (optional)
- 2 tablespoons unsalted butter, melted
- Powdered sugar for dusting (optional)
Cooking Instructions:
- Preheat and Prepare Dish: Preheat your oven to 350°F (175°C). Grease a 9×13 inch baking dish with butter or non-stick spray to make sure the casserole doesn’t stick.
- Mix Wet Ingredients: In a large mixing bowl, whisk together the eggs, milk, granulated sugar, vanilla extract, and ground cinnamon until well combined and smooth.
- Layer Bread and Fruits: Spread the cubed bread evenly in the prepared baking dish. Distribute the sliced peaches and mixed berries uniformly over the bread cubes.
- Pour Egg Mixture: Pour the egg mixture over the layered bread and fruits. Gently press down on the bread to make sure it absorbs the custard mixture thoroughly.
- Add Toppings: If desired, sprinkle sliced almonds over the top for an added crunch. Drizzle the melted butter evenly over the entire dish for a richer flavor.
- Bake: Place the casserole in the preheated oven and bake for 35-40 minutes, or until the top is golden brown and the center is set. A knife inserted into the center should come out clean.
- Cool and Serve: Allow the casserole to cool for about 10 minutes before serving. Dust with powdered sugar for an extra touch of sweetness before slicing and serving.
Extra Tips: For the best flavor and texture, use day-old bread, as it will absorb the egg mixture better without becoming too soggy. If fresh peaches aren’t available, canned peaches can be a suitable substitute, just make sure they’re well-drained.
Feel free to experiment with different types of berries depending on what’s in season or to your personal preference. For a make-ahead option, assemble the casserole the night before, cover, and refrigerate. In the morning, simply bake and enjoy a hassle-free breakfast.

Greek Orzo and Spinach Bake
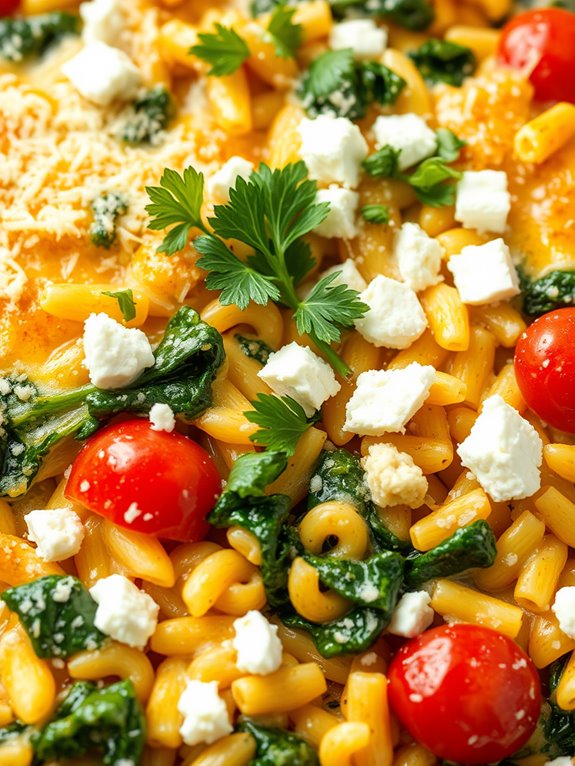
Greek Orzo and Spinach Bake is a delightful summer casserole that combines Mediterranean flavors with the heartiness of pasta and fresh vegetables. This dish is perfect for warm-weather gatherings or a family dinner, offering a blend of orzo pasta, spinach, feta cheese, and a variety of herbs and spices.
The combination of these ingredients results in a creamy, tangy, and savory dish that’s both nutritious and satisfying. Whether you’re a fan of Greek cuisine or just looking for a new casserole recipe to try, this bake is bound to become a favorite.
This recipe is designed for a serving size of 4-6 people, making it ideal for small get-togethers or a cozy family meal. It’s relatively easy to prepare, requiring minimal ingredients and simple steps.
With vibrant colors and bold flavors, the Greek Orzo and Spinach Bake isn’t only delicious but also visually appealing, making it a standout dish for any occasion.
Ingredients:
- 1 ½ cups orzo pasta
- 2 tablespoons olive oil
- 1 medium onion, chopped
- 3 cloves garlic, minced
- 1 (14-ounce) can diced tomatoes, drained
- 6 cups fresh spinach, roughly chopped
- 1 teaspoon dried oregano
- 1 teaspoon dried basil
- ½ teaspoon salt
- ¼ teaspoon black pepper
- 1 cup crumbled feta cheese
- ½ cup grated Parmesan cheese
- ¼ cup chopped fresh parsley
- 2 eggs, beaten
Instructions:
- Preheat and Prepare: Preheat your oven to 375°F (190°C). Lightly grease a 9×13-inch baking dish with olive oil or cooking spray.
- Cook Orzo: In a large pot of salted boiling water, cook the orzo pasta until al dente, according to package instructions. Drain and set aside.
- Sauté Vegetables: In a large skillet over medium heat, heat the olive oil. Add the chopped onion and garlic, sautéing until the onion becomes translucent and the garlic is fragrant, about 3-4 minutes.
- Add Spinach and Tomatoes: Stir in the drained diced tomatoes and chopped spinach. Cook until the spinach is wilted, about 4-5 minutes. Stir in the dried oregano, dried basil, salt, and black pepper.
- Combine Ingredients: In a large mixing bowl, combine the cooked orzo, vegetable mixture, crumbled feta cheese, and half of the Parmesan cheese. Mix thoroughly. Stir in the beaten eggs to bind the ingredients together.
- Transfer and Bake: Pour the orzo mixture into the prepared baking dish, spreading it evenly. Sprinkle the remaining Parmesan cheese on top. Bake in the preheated oven for 25-30 minutes, until the top is golden and the casserole is heated through.
- Garnish and Serve: Once baked, remove from the oven and let it cool slightly. Garnish with freshly chopped parsley before serving.
Extra Tips:
For added flavor, you can include a handful of Kalamata olives, sliced, for an authentic Greek touch. If you prefer a bit of heat, sprinkle a pinch of red pepper flakes into the mix.
To guarantee the top is nicely browned, you can switch to broil mode for the last 2-3 minutes of baking, but keep a close eye to prevent burning. This dish pairs wonderfully with a side of Greek salad or warm pita bread. Enjoy your Greek Orzo and Spinach Bake as a main course or a flavorful side dish.
Cheesy Broccoli and Quinoa Casserole
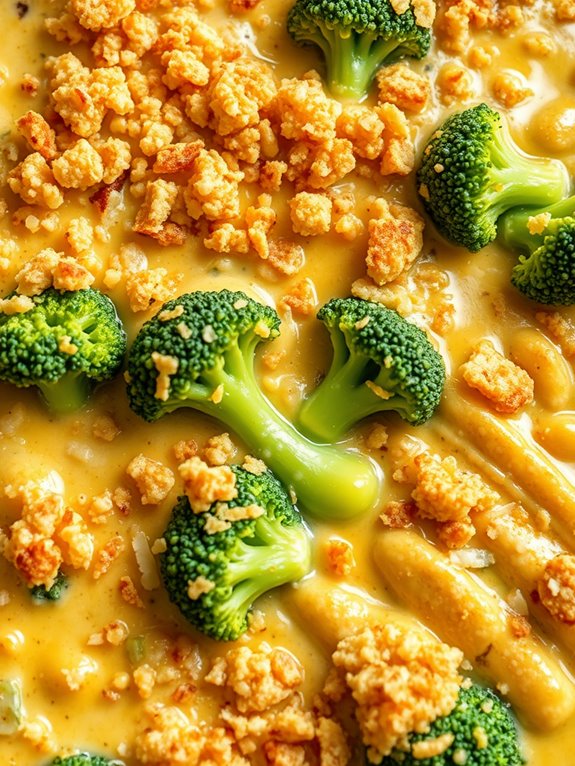
Cheesy Broccoli and Quinoa Casserole is a delightful and nutritious dish perfect for those warm summer evenings when you want something comforting yet light. This casserole combines the earthy flavors of quinoa with the vibrant, healthful essence of broccoli, all enveloped in a rich, creamy cheese sauce. The golden crust created by baking it to perfection adds an irresistible texture to each bite.
Whether you’re feeding a family or hosting friends, this casserole is sure to be a hit, providing both flavor and essential nutrients in one satisfying dish.
As you prepare this Cheesy Broccoli and Quinoa Casserole, you’ll appreciate how simple and straightforward it’s to make, without compromising on taste. With minimal prep work and a baking time that allows you to attend to other tasks, this recipe is a convenient choice for busy summer days.
The hearty combination of quinoa and broccoli not only offers a delicious taste but also guarantees a meal packed with protein and fiber, making it a wholesome choice for a main course or a side dish.
Ingredients (Serves 4-6):
- 1 cup quinoa, rinsed
- 2 cups vegetable broth or water
- 4 cups broccoli florets
- 2 tablespoons olive oil
- 1 medium onion, chopped
- 3 cloves garlic, minced
- 1 cup milk
- 2 cups shredded cheddar cheese
- 1 teaspoon mustard powder
- 1/2 teaspoon paprika
- Salt and pepper to taste
- 1/4 cup breadcrumbs
- 2 tablespoons grated Parmesan cheese
Cooking Instructions:
- Preheat and Prepare Quinoa: Preheat your oven to 375°F (190°C). In a medium saucepan, bring the vegetable broth or water to a boil. Add the rinsed quinoa, reduce the heat to low, and cover. Simmer for about 15 minutes, or until the quinoa is tender and the liquid is absorbed. Fluff with a fork and set aside.
- Cook Broccoli: Steam the broccoli florets for about 5 minutes until they’re bright green and slightly tender. Drain and set aside.
- Sauté Aromatics: In a large skillet, heat the olive oil over medium heat. Add the chopped onion and cook for 3-4 minutes until translucent. Stir in the minced garlic and cook for an additional minute.
- Prepare Cheese Sauce: Add the milk to the skillet and bring to a simmer. Gradually stir in the shredded cheddar cheese, mustard powder, and paprika until the cheese is fully melted and the sauce is smooth. Season with salt and pepper to taste.
- Combine Ingredients: In a large mixing bowl, combine the cooked quinoa, steamed broccoli, and cheese sauce. Mix until well combined.
- Assemble Casserole: Transfer the mixture to a lightly greased 9×13 inch baking dish. Sprinkle the breadcrumbs and grated Parmesan cheese evenly over the top.
- Bake: Place the casserole in the preheated oven and bake for 25-30 minutes, or until the top is golden and crispy.
- Serve: Allow the casserole to cool for a few minutes before serving. Enjoy as a main dish or a side.
Extra Tips:
To enhance the flavor, consider adding a dash of nutmeg to the cheese sauce or a squeeze of lemon juice before serving for a fresh twist. If you prefer a little spice, a pinch of cayenne pepper can be added to the sauce.
For a crispy topping, broil the casserole for the last 2-3 minutes of baking, keeping a close watch to prevent burning. Finally, this dish can be prepared in advance and refrigerated; simply bake when ready to serve, making it an excellent make-ahead meal.
Lemon Herb Chicken and Rice
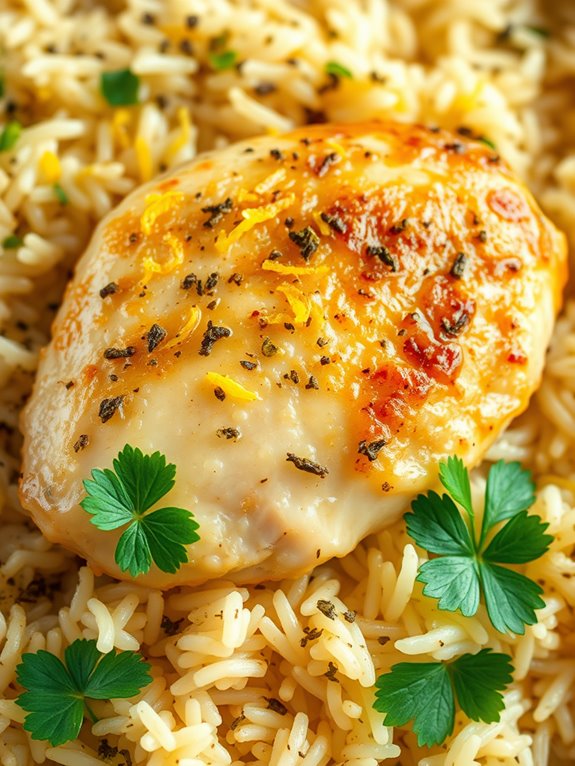
Lemon Herb Chicken and Rice is a delightful summer casserole that brings a burst of fresh flavors to your table. This dish combines tender pieces of chicken with aromatic herbs and zesty lemon, all perfectly balanced with fluffy rice.
It’s a comforting, yet light meal that’s perfect for a family dinner or a gathering with friends. The lemon and herbs create a revitalizing flavor profile, making it an ideal choice for warm-weather dining.
This casserole isn’t only delicious but also easy to prepare, making it a great option for busy weeknights. With simple ingredients and straightforward steps, you can have a nutritious and satisfying meal ready in no time. The recipe serves 4-6 people, guaranteeing there’s plenty to go around, or leftovers for the next day.
Ingredients (serving size: 4-6 people):
- 4 boneless, skinless chicken breasts
- 1 cup long-grain white rice
- 2 cups chicken broth
- 1 lemon (zested and juiced)
- 3 tablespoons olive oil
- 2 teaspoons dried oregano
- 1 teaspoon dried thyme
- 2 cloves garlic (minced)
- Salt and pepper to taste
- Fresh parsley for garnish (optional)
Cooking Instructions:
- Preheat the Oven: Start by preheating your oven to 375°F (190°C). This guarantees that it’s hot enough to cook the casserole evenly once everything is assembled.
- Prepare the Chicken: Season the chicken breasts with salt, pepper, 1 teaspoon of dried oregano, and 1 teaspoon of dried thyme. In a large skillet, heat 2 tablespoons of olive oil over medium heat. Add the chicken breasts and cook for about 3-4 minutes on each side until golden brown but not cooked through. Remove from the skillet and set aside.
- Cook the Rice: In the same skillet, add the remaining tablespoon of olive oil and minced garlic. Sauté for about 1 minute until fragrant. Add the rice, stirring to coat it in the garlic oil for about 2 minutes. This step helps infuse the rice with flavor.
- Assemble the Casserole: In a large baking dish, combine the sautéed rice, chicken broth, lemon juice, and lemon zest. Stir well to mix the ingredients. Place the seared chicken breasts on top of the rice mixture.
- Bake the Casserole: Cover the baking dish with aluminum foil and bake in the preheated oven for 30 minutes. After 30 minutes, remove the foil and bake for an additional 10-15 minutes, or until the chicken is fully cooked and the rice is tender.
- Garnish and Serve: Once done, remove the casserole from the oven. Let it rest for about 5 minutes. Garnish with fresh parsley, if desired, before serving.
Extra Tips: When preparing Lemon Herb Chicken and Rice, consider marinating the chicken for an hour beforehand for a deeper flavor. You can also add vegetables like bell peppers or peas for extra nutrition and color.
If you prefer a creamier texture, stir in a tablespoon of butter or a dollop of sour cream before serving. Finally, always check the rice for doneness before removing the casserole from the oven, as oven temperatures can vary.
Fresh Herb and Ricotta Stuffed Shells
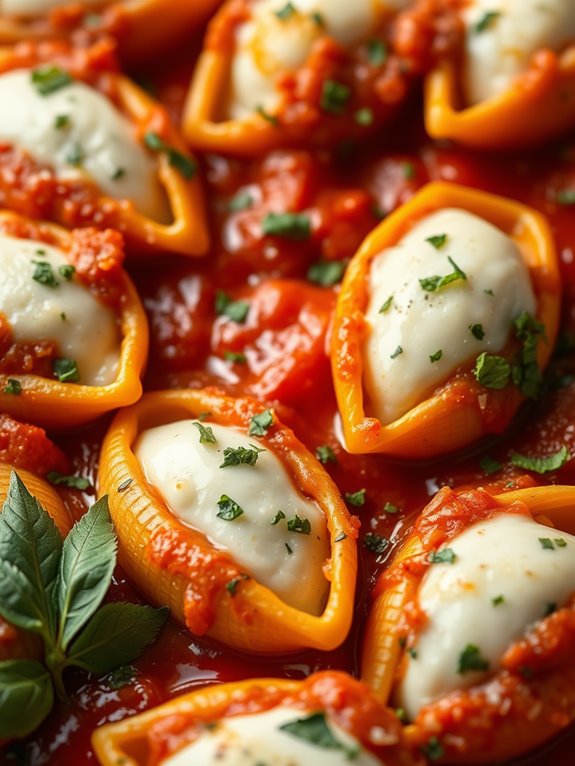
Fresh Herb and Ricotta Stuffed Shells is a delightful summer casserole dish that combines the creamy richness of ricotta cheese with the vibrant flavors of fresh herbs. This dish isn’t only visually appealing with its beautifully stuffed pasta shells, but it’s also a feast for the taste buds.
The fresh herbs, such as basil, parsley, and oregano, add a rejuvenating element that perfectly complements the rich and creamy ricotta filling. The shells are then nestled in a bed of tangy marinara sauce, creating a harmonious balance of flavors that’s both comforting and satisfying.
Ideal for a family meal or a gathering with friends, this dish can be prepared in advance and baked just before serving, making it a convenient and delicious option for busy summer days. The stuffed shells are generously filled with a mixture of ricotta, Parmesan, and mozzarella cheese, which melts beautifully during baking, creating a luscious and gooey center.
This recipe serves 4-6 people, making it perfect for sharing. Enjoy the simplicity and elegance of Fresh Herb and Ricotta Stuffed Shells, a dish that celebrates the best of summer’s bounty.
Ingredients (Serves 4-6):
- 20 jumbo pasta shells
- 2 cups ricotta cheese
- 1 cup shredded mozzarella cheese
- 1/2 cup grated Parmesan cheese
- 1/4 cup chopped fresh basil
- 1/4 cup chopped fresh parsley
- 2 tablespoons chopped fresh oregano
- 1 egg, lightly beaten
- 1 teaspoon garlic powder
- 1/2 teaspoon salt
- 1/4 teaspoon black pepper
- 3 cups marinara sauce
- 2 tablespoons olive oil
Instructions:
- Preheat the Oven: Preheat your oven to 375°F (190°C) to make sure it’s ready for baking once the shells are prepared.
- Cook the Pasta Shells: In a large pot of salted boiling water, cook the jumbo pasta shells until al dente, approximately 8-10 minutes. Drain and let them cool slightly, making them easier to handle without breaking.
- Prepare the Filling: In a large mixing bowl, combine the ricotta cheese, mozzarella cheese, Parmesan cheese, fresh basil, parsley, oregano, beaten egg, garlic powder, salt, and black pepper. Mix well until all ingredients are thoroughly incorporated.
- Stuff the Shells: Carefully fill each cooled pasta shell with about 2 tablespoons of the ricotta mixture, ensuring each shell is generously stuffed.
- Assemble the Casserole: Spread 1 cup of marinara sauce evenly over the bottom of a 9×13-inch baking dish. Arrange the stuffed shells in the dish, open side up. Pour the remaining marinara sauce over the shells, ensuring they’re well-covered.
- Drizzle with Olive Oil: Drizzle the olive oil over the top of the shells to add extra flavor and help the shells develop a slight crisp during baking.
- Bake: Cover the dish with aluminum foil and bake in the preheated oven for 25 minutes. Remove the foil and bake for an additional 10 minutes, or until the cheese is bubbly and the tops of the shells are lightly golden.
- Serve: Allow the dish to cool for a few minutes before serving. Garnish with extra fresh herbs if desired.
Extra Tips:
For the best results, use high-quality ricotta cheese, as it greatly influences the texture and flavor of the filling. If you prefer a spicier kick, consider adding a pinch of red pepper flakes to the ricotta mixture.
To make the dish ahead of time, you can assemble the casserole, cover it with plastic wrap, and refrigerate it for up to 24 hours before baking. This flexibility allows you to enjoy more time with your guests or family instead of being tied to the kitchen.
Mexican Street Corn Casserole

Mexican Street Corn Casserole is a delightful fusion of traditional Mexican street food and the comforting warmth of a baked casserole. This dish combines the sweet and smoky flavors of grilled corn with creamy cheese, spicy jalapeños, and zesty lime juice, resulting in a taste explosion that’s both savory and satisfying. Ideal for summer gatherings or as a side dish to your favorite grilled meats, this casserole is bound to impress your taste buds and those of your guests.
Perfect for serving 4 to 6 people, this casserole is easy to prepare and can be made ahead of time for convenience. By using fresh corn, you preserve the authenticity of the street corn flavor, while canned or frozen corn can be a suitable substitute in a pinch. The combination of ingredients in this recipe creates a balance of flavors and textures, making it a standout dish that will bring a touch of summer to your dining table.
Ingredients for 4-6 Servings:
- 6 ears of corn, kernels removed (or 4 cups of frozen/canned corn, drained)
- 2 tablespoons olive oil
- 1/2 cup mayonnaise
- 1/2 cup sour cream
- 1 cup crumbled cotija cheese (or feta cheese as a substitute)
- 1 tablespoon lime juice
- 1 teaspoon chili powder
- 1 teaspoon smoked paprika
- 2 cloves garlic, minced
- 1 jalapeño, seeded and finely chopped
- 1/2 cup chopped fresh cilantro
- Salt and pepper to taste
- 1 cup shredded Monterey Jack cheese
Cooking Instructions:
- Prepare the Corn: Preheat your oven to 350°F (175°C). If using fresh corn, remove the kernels from the cob. If using frozen or canned corn, verify it’s thoroughly drained.
- Sauté the Corn: In a large skillet, heat the olive oil over medium-high heat. Add the corn kernels and sauté for about 5-7 minutes until they’re slightly charred and tender. Remove from heat and set aside.
- Mix the Base: In a large mixing bowl, combine the mayonnaise, sour cream, cotija cheese, lime juice, chili powder, smoked paprika, minced garlic, and chopped jalapeño. Stir until all ingredients are well blended.
- Combine Ingredients: Gently fold in the sautéed corn and half of the chopped cilantro into the mixture. Season with salt and pepper to taste.
- Assemble the Casserole: Transfer the corn mixture into a greased 9×13 inch baking dish. Spread evenly, then sprinkle the shredded Monterey Jack cheese over the top.
- Bake the Casserole: Place the casserole in the preheated oven and bake for 20-25 minutes, or until the cheese on top is melted and bubbly.
- Garnish and Serve: Remove from the oven and let it cool for a few minutes. Garnish with the remaining cilantro before serving warm.
Extra Tips:
For added flavor, consider grilling the corn on the cob before removing the kernels. This will enhance the smoky taste of the dish.
If you prefer a milder taste, you can omit the jalapeño or adjust the amount of chili powder.
Additionally, this casserole can be made a day in advance and stored in the refrigerator; just reheat it in the oven before serving.
For a heartier meal, try adding cooked, shredded chicken or black beans to the mixture before baking.
Spinach and Artichoke Pasta Bake
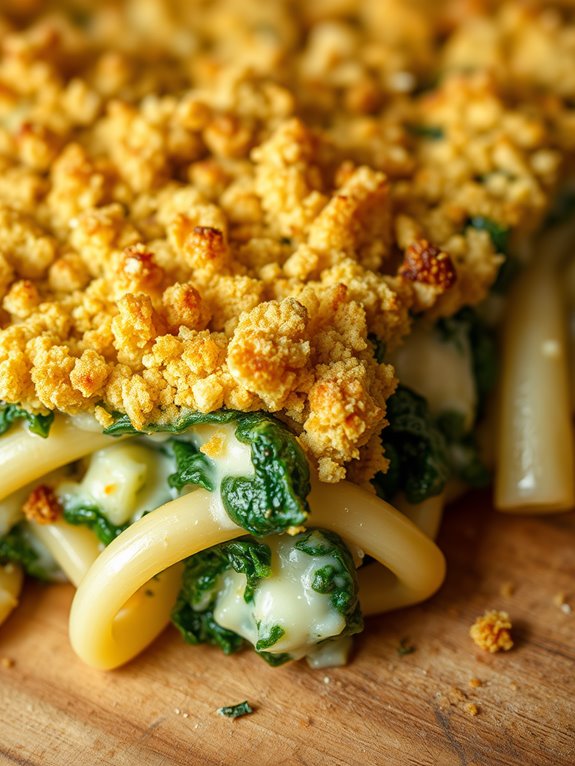
Spinach and Artichoke Pasta Bake is a delightful combination of creamy pasta, hearty spinach, and tangy artichokes. This summer casserole recipe brings together the classic flavors of a spinach artichoke dip, but in a comforting baked pasta form. It’s perfect for family dinners or gatherings with friends, offering a delicious and satisfying meal that’s both nutritious and full of flavor.
This dish isn’t only easy to prepare, but it also allows for some flexibility in ingredients. The creamy sauce binds the pasta and vegetables together, while the crispy breadcrumb topping adds a delightful crunch. Whether you’re a fan of cheesy casseroles or looking to incorporate more greens into your meals, this pasta bake is sure to please everyone at the table.
Ingredients (Serves 4-6 people):
- 12 ounces penne pasta
- 2 tablespoons olive oil
- 1 medium onion, diced
- 3 cloves garlic, minced
- 10 ounces fresh spinach, roughly chopped
- 1 (14-ounce) can artichoke hearts, drained and quartered
- 1 cup ricotta cheese
- 1 cup grated Parmesan cheese
- 1 cup shredded mozzarella cheese
- 1 cup heavy cream
- 1 teaspoon dried oregano
- Salt and pepper to taste
- 1 cup breadcrumbs
- 2 tablespoons butter, melted
Cooking Instructions:
- Preheat the Oven: Preheat your oven to 375°F (190°C) to guarantee it reaches the correct temperature by the time you’re ready to bake the dish.
- Cook the Pasta: Bring a large pot of salted water to a boil. Add the penne pasta and cook according to package instructions until al dente. Drain and set aside.
- Prepare the Sauce: In a large skillet, heat the olive oil over medium heat. Add the diced onion and sauté until translucent, about 5 minutes. Stir in the minced garlic and cook for another 1-2 minutes until fragrant.
- Add Spinach and Artichokes: Add the chopped spinach to the skillet, cooking until wilted. Then, stir in the artichoke hearts and cook for an additional 2-3 minutes.
- Mix the Cheeses: In a large mixing bowl, combine the ricotta cheese, Parmesan cheese, mozzarella cheese, heavy cream, dried oregano, salt, and pepper. Mix well to create a creamy mixture.
- Combine All Ingredients: Add the cooked pasta and the spinach-artichoke mixture to the cheese mixture. Stir until all ingredients are well combined and evenly coated.
- Assemble the Casserole: Transfer the pasta mixture into a greased baking dish. In a small bowl, mix the breadcrumbs with the melted butter, then sprinkle evenly over the top of the pasta.
- Bake: Place the baking dish in the preheated oven and bake for 25-30 minutes, or until the top is golden brown and the cheese is bubbly.
- Serve: Remove from the oven and let it cool slightly before serving. Enjoy your Spinach and Artichoke Pasta Bake warm.
Extra Tips:
For an extra burst of flavor, consider adding a pinch of red pepper flakes to the cheese mixture if you enjoy a bit of heat. You can also substitute the penne pasta with any other short pasta of your choice, such as rotini or rigatoni.
If you want to make the dish healthier, use whole-wheat pasta and reduce the amount of cheese. This casserole can be prepared a day in advance and stored in the refrigerator until you’re ready to bake, making it a convenient option for busy weeknights.
Seafood and Vegetable Casserole

Indulge in the flavors of the ocean combined with the freshness of garden vegetables with this delicious Seafood and Vegetable Casserole. This dish is perfect for a summer gathering, combining a variety of seafood with seasonal vegetables, all baked together in a creamy, flavorful sauce.
The casserole isn’t only a feast for the taste buds but also a colorful presentation, making it a delightful centerpiece for your summer dining table.
The Seafood and Vegetable Casserole is versatile and can be easily adapted to your seafood preferences, whether you prefer shrimp, scallops, or a medley of both. The vegetables add a revitalizing crunch and nutritional value, while the creamy base ties all the flavors together.
Prepare this comforting dish for a serving size of 4-6 people and enjoy the harmonious blend of sea and garden delights.
Ingredients:
- 1 pound shrimp, peeled and deveined
- 1 pound sea scallops
- 2 tablespoons olive oil
- 1 onion, finely chopped
- 2 cloves garlic, minced
- 1 red bell pepper, diced
- 1 zucchini, sliced
- 1 cup cherry tomatoes, halved
- 1 cup fresh or frozen peas
- 1 teaspoon dried thyme
- 1 teaspoon dried oregano
- Salt and pepper to taste
- 1 cup heavy cream
- 1/2 cup grated Parmesan cheese
- 1/2 cup breadcrumbs
- 2 tablespoons chopped fresh parsley
Instructions:
1. Preheat the Oven: Preheat your oven to 375°F (190°C). This guarantees the casserole will bake evenly once assembled.
2. Prepare the Seafood: Rinse the shrimp and scallops under cold water and pat them dry with a paper towel. This step is essential to prevent excess moisture from affecting the casserole’s texture.
3. Sauté Vegetables: In a large skillet, heat olive oil over medium heat. Add the chopped onion and minced garlic, cooking until the onion becomes translucent, about 3 minutes.
Add the red bell pepper, zucchini, cherry tomatoes, and peas. Season with thyme, oregano, salt, and pepper. Cook for 5-7 minutes until the vegetables are tender yet still crisp.
4. Combine Ingredients: Stir in the shrimp and scallops, cooking until the seafood begins to turn opaque, approximately 3 minutes. Pour in the heavy cream and bring the mixture to a gentle simmer.
Allow the flavors to meld together for about 5 minutes.
5. Transfer to Baking Dish: Pour the seafood and vegetable mixture into a greased 9×13-inch baking dish. Top evenly with grated Parmesan cheese and breadcrumbs for a golden, crispy topping.
6. Bake the Casserole: Place the dish in the preheated oven and bake for 20-25 minutes, or until the top is golden brown and the seafood is fully cooked.
7. Garnish and Serve: Once baked, remove from the oven and let it sit for a few minutes before serving. Garnish with freshly chopped parsley for a burst of color and freshness.
Extra Tips:
To guarantee the seafood is perfectly cooked and not rubbery, avoid overcooking during the sautéing step.
Additionally, you can customize this casserole by adding your favorite seafood or vegetables. Serve it with a side of crusty bread to soak up the delicious creamy sauce.
If you prefer a lighter version, substitute half of the heavy cream with milk. Enjoy your summer feast!