

I absolutely adore getting creative in the kitchen, especially when it involves crafting treats that are spooky yet sweet for Halloween. Monster Marshmallow Pops with candy eyes and Witches’ Hat Cookies made with chocolate wafers are not just treats; they’re little works of art. The best part? These recipes are simple enough that kids can join in on the fun. Ready to discover more delightful ideas that will enchant your little monsters?
Monster Marshmallow Pops

Monster Marshmallow Pops are a fun and spooky treat perfect for Halloween festivities. These delightful pops are easy to make and a hit with kids of all ages. With just a few ingredients and a bit of creativity, you can transform ordinary marshmallows into colorful and imaginative monster faces that will delight your little ghosts and goblins.
Whether you’re hosting a Halloween party or looking for a fun activity to do with your kids, these Monster Marshmallow Pops are sure to be a crowd-pleaser. This recipe is suitable for a serving size of 4-6 people, making it perfect for a small gathering or family treat.
The pops are made by decorating marshmallows with candy eyes, edible markers, and colored melting chocolate to create a variety of monster designs. Each pop is then placed on a stick, making them easy to eat and display. Get ready to release your creativity and make these deliciously spooky treats!
Ingredients:
- 12 large marshmallows
- 1 cup of green melting chocolate
- 1 cup of purple melting chocolate
- 1 cup of orange melting chocolate
- 24 candy eyeballs
- Edible markers in various colors
- 12 lollipop sticks
- Sprinkles (optional)
- Wax paper
Instructions:
- Prepare the Workspace: Line a baking sheet with wax paper to hold the finished pops and prevent them from sticking. Gather all your decorating tools and ingredients.
- Melt the Chocolate: In separate microwave-safe bowls, melt the green, purple, and orange chocolates according to package instructions. Typically, this involves microwaving the chocolate in 30-second intervals, stirring in between until smooth.
- Assemble the Pops: Insert a lollipop stick into the center of each marshmallow. Confirm the sticks are secure but don’t push them all the way through.
- Dip the Marshmallows: Dip each marshmallow into the melted chocolate, confirming it’s evenly coated. Gently tap the stick on the edge of the bowl to remove any excess chocolate.
- Decorate the Monsters: Before the chocolate sets, quickly place candy eyeballs onto the marshmallow to form the monster’s face. Use edible markers to draw additional features such as mouths, scars, or eyebrows. Add sprinkles for extra texture if desired.
- Let Them Set: Place each decorated marshmallow pop on the prepared wax paper and allow the chocolate to set completely. This can take about 10-15 minutes at room temperature, or you can speed up the process by placing them in the refrigerator.
- Serve and Enjoy: Once the chocolate is set, your Monster Marshmallow Pops are ready to be served. Arrange them in a fun display for your Halloween event or wrap them individually for party favors.
Extra Tips:
Feel free to experiment with different colors and designs to create a variety of monster characters. Using a combination of colors and patterns can enhance the visual appeal of your treats.
If you’re having trouble with the candy eyes or decorations staying in place, try dabbing a small amount of melted chocolate on the back before placing them on the marshmallow. Also, when using edible markers, make sure the chocolate is completely set to prevent smudging. Enjoy getting creative with this festive Halloween treat!
Witches’ Hat Cookies
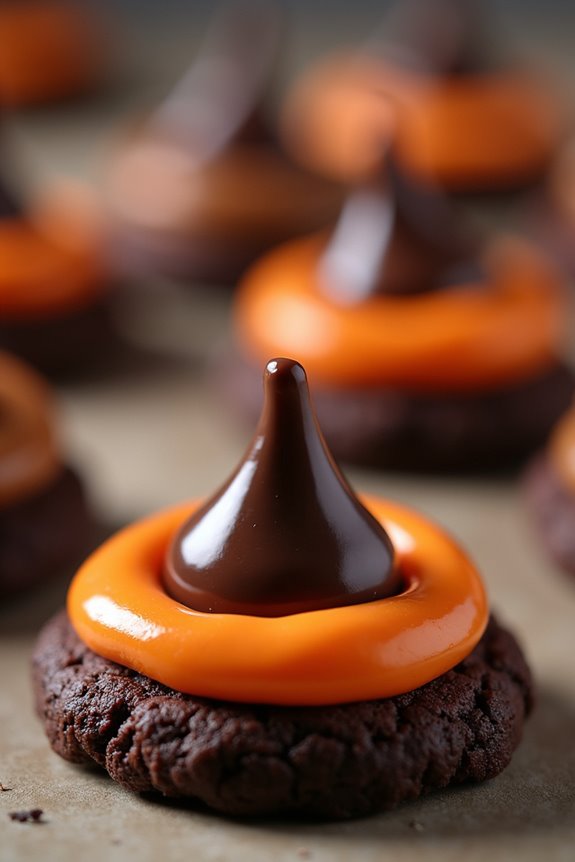
These cookies are incredibly easy to assemble, making them an ideal project for kids to help with in the kitchen. The basic idea is to use a cookie as the brim of the hat, topped with a chocolate kiss to form the pointed top. The addition of a brightly colored icing band around the base of the chocolate kiss adds a pop of color and a charming detail to the finished cookie.
With just a few ingredients and a little bit of creativity, you and your kids can whip up a batch of these magical treats in no time.
Ingredients (Serves 4-6):
- 24 chocolate wafer cookies
- 24 chocolate kisses
- 1 tube of orange or green decorating icing
- 1/4 cup of chocolate chips
- 1 teaspoon of vegetable oil
Instructions:
- Prepare the Cookies: Begin by laying out the chocolate wafer cookies on a baking sheet or platter. These will serve as the base for your witches’ hats.
- Melt the Chocolate: In a small microwave-safe bowl, combine the chocolate chips with the vegetable oil. Microwave in 15-second intervals, stirring in between, until the chocolate is completely melted and smooth.
- Attach the Chocolate Kisses: Using a small spoon or a piping bag, place a small dollop of melted chocolate in the center of each wafer cookie. Press a chocolate kiss onto the melted chocolate, making sure it adheres well. This will form the pointed top of the hat.
- Decorate the Hat: Using the tube of orange or green decorating icing, pipe a band around the base of each chocolate kiss where it meets the wafer cookie. This creates the look of a hatband and adds a festive pop of color.
- Set the Cookies: Allow the cookies to sit at room temperature or place them in the refrigerator for a few minutes until the chocolate sets and the kisses are firmly attached to the cookies.
Extra Tips:
For a more personalized touch, experiment with different icing colors or add edible glitter to the hatbands for extra sparkle.
If you’re making these with kids, let them choose their favorite colors and decorations to customize their witches’ hats.
If you’re short on time, you can also use pre-made chocolate wafer cookies from the store. Confirm that the chocolate is fully melted and smooth before attaching the kisses to avoid any difficulties in sticking the pieces together.
Enjoy these Witches’ Hat Cookies as a fun and tasty Halloween activity!
Ghostly Pretzel Rods

Halloween is the perfect time to indulge in spooky, creative treats, and Ghostly Pretzel Rods are a delightfully eerie addition to any Halloween party spread. These simple yet fun treats aren’t only easy to make but also a hit with kids and adults alike. Dipped in white chocolate and decorated with candy eyes, these ghostly snacks are the perfect combination of sweet and salty.
Whether you’re hosting a Halloween party or just looking for a fun kitchen activity to do with your kids, these pretzel rods are guaranteed to be a crowd-pleaser. Ghostly Pretzel Rods are a great way to get creative in the kitchen. With just a few ingredients and a little imagination, you can transform ordinary pretzel rods into spooky ghosts that are as delicious as they’re adorable.
The process is simple enough for kids to participate, making it a fantastic opportunity for family bonding. These treats are ideal for serving a group of 4-6 people, assuring everyone gets a taste of the Halloween fun. So, gather your ingredients, set up a spooky decorating station, and let the ghostly creations begin!
Ingredients (Serves 4-6):
- 12 pretzel rods
- 12 oz white chocolate chips or white candy melts
- 24 candy eyes
- 1 tablespoon coconut oil (optional, for thinning the chocolate)
- Black gel icing or chocolate chips (for additional decoration)
Cooking Instructions:
- Prepare the Ingredients: Begin by laying out all your ingredients and setting up a workspace. Line a baking sheet with parchment paper to place your finished pretzel rods on.
- Melt the Chocolate: In a microwave-safe bowl, combine the white chocolate chips and coconut oil. Microwave in 30-second increments, stirring in between, until the chocolate is fully melted and smooth. If you prefer, you can also melt the chocolate using a double boiler on the stove.
- Dip the Pretzel Rods: Hold a pretzel rod by one end and dip it into the melted white chocolate, covering about three-quarters of the rod. Gently tap off any excess chocolate back into the bowl to avoid drips.
- Add the Candy Eyes: Quickly place two candy eyes onto the coated part of the pretzel, positioning them near the top to resemble a ghost’s face. Press gently to guarantee they stick.
- Decorate with Gel Icing: If desired, use black gel icing to draw a small mouth on each ghostly pretzel rod. Alternatively, you can use melted chocolate chips for this step. Allow your creativity to shine with different expressions!
- Let the Chocolate Set: Place the completed pretzel rods onto the prepared baking sheet. Let them sit at room temperature until the chocolate is fully set. For quicker results, you can place the baking sheet in the refrigerator for about 15 minutes.
Extra Tips:
For a smoother chocolate coating, confirm the white chocolate is thoroughly melted and add a little more coconut oil if needed. Keep in mind that the chocolate can seize up if it comes into contact with water, so be cautious of any moisture nearby.
If you want to add a little more flair, consider using different colored candy eyes or adding sprinkles to the chocolate coating before it sets. Finally, store any leftover Ghostly Pretzel Rods in an airtight container to maintain their freshness and crunch. Enjoy your spooky Halloween treat!
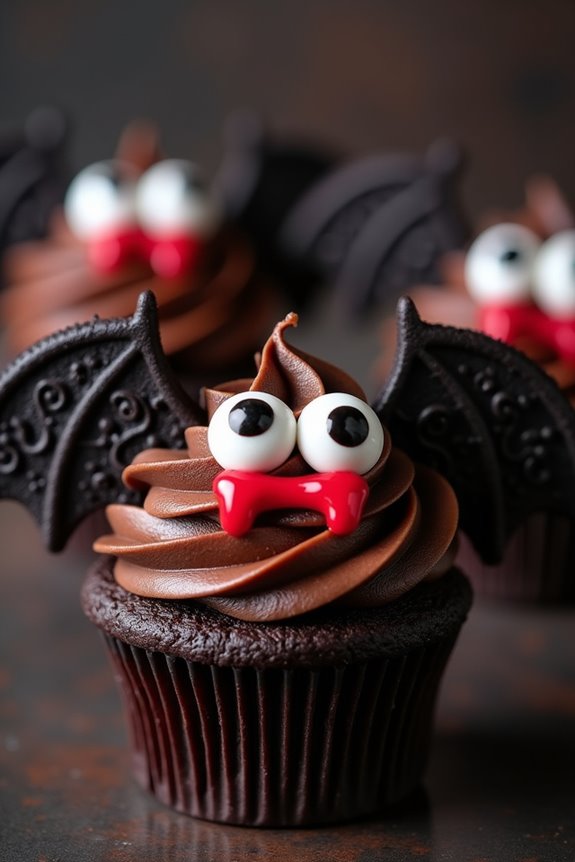
Vampire Bat Cupcakes
Halloween is the perfect time to indulge in some spooky and fun treats, and Vampire Bat Cupcakes are just the thing to delight both kids and adults alike. These cupcakes aren’t only delicious but also visually exciting, making them a must-have on your Halloween dessert table.
With a rich chocolate base and creative bat decorations, these cupcakes will certainly add a touch of eerie charm to your festivities. Designed to serve 4-6 people, this recipe is simple enough to make with your kids, providing a fun and creative bonding experience.
The chocolate cupcakes are topped with a decadent frosting and decorated to resemble vampire bats, complete with wings and eyes. These adorable yet spooky cupcakes are sure to be a hit at any Halloween gathering.
Ingredients:
- 1 cup all-purpose flour
- 1/2 cup unsweetened cocoa powder
- 1 cup granulated sugar
- 1 teaspoon baking powder
- 1/2 teaspoon baking soda
- 1/4 teaspoon salt
- 2 large eggs
- 1/2 cup milk
- 1/4 cup vegetable oil
- 1 teaspoon vanilla extract
- 1/2 cup boiling water
- 1 cup chocolate frosting (store-bought or homemade)
- 12 Oreo cookies (for bat wings)
- 12 candy eyes
- Red gel icing (for vampire fangs)
Instructions:
- Preheat and Prepare: Preheat your oven to 350°F (175°C) and line a 12-cup muffin tin with paper cupcake liners.
- Mix Dry Ingredients: In a large mixing bowl, whisk together the flour, cocoa powder, sugar, baking powder, baking soda, and salt until well combined.
- Combine Wet Ingredients: In another bowl, beat the eggs, then add the milk, vegetable oil, and vanilla extract. Mix until smooth.
- Create Batter: Gradually add the wet ingredients to the dry ingredients, stirring until the mixture is just combined. Slowly add the boiling water and mix until smooth. The batter will be thin, but this is normal.
- Fill and Bake: Divide the batter evenly among the prepared cupcake liners, filling each about two-thirds full. Bake for 18-20 minutes or until a toothpick inserted into the center of a cupcake comes out clean. Let them cool completely on a wire rack.
- Decorate Cupcakes: Once the cupcakes are cool, spread a generous amount of chocolate frosting on each one. Split the Oreo cookies in half and remove the filling. Use one half of the Oreo for each wing, pressing gently into the frosting at an angle to create the bat wings.
- Add Eyes and Fangs: Place two candy eyes on each cupcake using a small dab of frosting as glue. Use the red gel icing to draw small fangs beneath the eyes for that vampire effect.
Extra Tips:
For an added touch of creativity, you can use colored cupcake liners to enhance the Halloween theme. If you’re feeling adventurous, try using a mix of candy eyes of different sizes for a quirky, playful look.
If you don’t have candy eyes, small chocolate chips can be a great alternative. Remember to let the cupcakes cool completely before decorating to prevent the frosting from melting. Enjoy your spooky Vampire Bat Cupcakes and have a fang-tastic Halloween!
Pumpkin Patch Brownies

Celebrate Halloween with a delightful treat that combines the classic appeal of brownies with festive, seasonal flair. Pumpkin Patch Brownies are a fun and creative way to get kids excited about Halloween. These brownies are deliciously rich and chocolatey, topped with a whimsical pumpkin patch made from colorful candies and frosting. Perfect for Halloween parties or simply as a sweet treat to enjoy at home, these brownies are sure to be a hit with kids and adults alike.
This recipe is designed to serve 4-6 people, making it ideal for small gatherings or a family dessert. The rich chocolate base is complemented by the playful and decorative pumpkin patch on top, which can be customized with your favorite candies and sprinkles. Whether you’re an experienced baker or a novice in the kitchen, this recipe is both fun to make and easy to follow, guaranteeing a delightful and festive treat for everyone.
Ingredients for Pumpkin Patch Brownies (Serves 4-6):
- 1 cup all-purpose flour
- 1 cup granulated sugar
- 1/2 cup unsweetened cocoa powder
- 1/2 teaspoon baking powder
- 1/4 teaspoon salt
- 1/2 cup unsalted butter, melted
- 2 large eggs
- 1 teaspoon vanilla extract
- 1/2 cup semi-sweet chocolate chips
- 1/2 cup cream cheese, softened
- 1/4 cup powdered sugar
- Orange food coloring
- Mini pretzel sticks
- Green sprinkles or candies
Cooking Instructions:
- Preheat the Oven: Start by preheating your oven to 350°F (175°C). This guarantees your brownies will cook evenly.
- Prepare the Baking Pan: Line an 8×8-inch baking pan with parchment paper, leaving some overhang on the sides for easy removal later.
- Mix Dry Ingredients: In a large bowl, whisk together the flour, granulated sugar, cocoa powder, baking powder, and salt until well combined.
- Combine Wet Ingredients: In a separate bowl, mix the melted butter, eggs, and vanilla extract until smooth. Gradually add this to the dry ingredients, stirring until just combined. Fold in the chocolate chips.
- Bake the Brownies: Pour the brownie batter into the prepared pan and spread it evenly. Bake in the preheated oven for 25-30 minutes, or until a toothpick inserted into the center comes out mostly clean. Allow the brownies to cool completely in the pan.
- Prepare the Topping: While the brownies are cooling, prepare the pumpkin patch topping. In a small bowl, mix the softened cream cheese with powdered sugar and a few drops of orange food coloring until smooth and creamy.
- Decorate the Brownies: Once the brownies are cooled, spread the orange cream cheese mixture evenly over the top. Break the mini pretzel sticks into small pieces and press them into the frosting to create “pumpkin stems.” Sprinkle green candies or sprinkles around the pretzels to resemble pumpkin vines.
- Serve and Enjoy: Cut the brownies into squares and serve. Enjoy your festive Pumpkin Patch Brownies!
Extra Tips:
When making Pumpkin Patch Brownies, verify that the brownies are fully cooled before adding the cream cheese topping to prevent melting. You can use any type of small candies or sprinkles to create the pumpkin patch effect, making it a fun activity for kids to help with.
If you prefer a more robust pumpkin flavor, consider adding a touch of pumpkin spice to the cream cheese mixture. Store any leftovers in an airtight container in the refrigerator for up to three days to maintain freshness.
Creepy Crawly Jello Cups
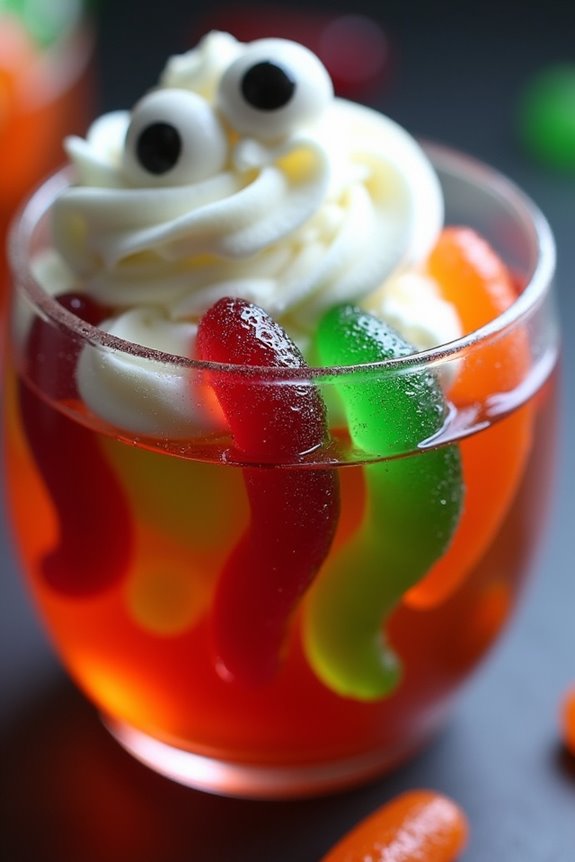
Creepy Crawly Jello Cups are the perfect spooky treat to serve at your Halloween party. These jello cups combine the wobbly fun of jello with the eerie appearance of gummy worms and insects to create an enticingly creepy dessert. Not only are they fun to look at, but they’re also deliciously fruity, making them a hit with kids and adults alike.
With just a few simple ingredients, you can whip up these festive cups in no time, leaving you plenty of time to enjoy the party.
The recipe for Creepy Crawly Jello Cups is straightforward, making it an excellent choice for a quick dessert option. The secret to their creepy charm lies in the use of gummy candies that resemble worms and insects, which are set inside the jello. As the jello firms up, the candies appear to be trapped inside, giving the cups their eerie look.
This recipe serves 4-6 people, making it ideal for a small gathering or as part of a larger dessert spread.
Ingredients:
- 2 packs (3 oz each) of flavored gelatin (any color)
- 2 cups boiling water
- 2 cups cold water
- 1 package gummy worms
- 1 package gummy spiders or insects
- Whipped cream (optional for topping)
Cooking Instructions:
- Prepare the Gelatin: Begin by emptying the contents of the gelatin packs into a large mixing bowl. Pour in the boiling water and stir continuously until the gelatin is fully dissolved.
- Add Cold Water: Once the gelatin has dissolved, stir in the cold water. Mix thoroughly to verify a consistent mixture.
- Pour into Cups: Carefully pour the gelatin mixture into clear plastic or glass cups, filling them about halfway.
- Add Gummy Candies: Before the gelatin sets, place a few gummy worms and gummy insects into each cup. Make sure some of the candies are partially submerged and others are sticking out for the best creepy effect.
- Chill to Set: Place the cups in the refrigerator and allow them to chill for at least 2-3 hours, or until the gelatin is completely set.
- Serve: Once set, top each jello cup with a dollop of whipped cream if desired. Serve chilled for the best texture and appearance.
Extra Tips: For an added eerie touch, consider using different colored gelatin for each layer to create a layered effect. You can also make the jello cups ahead of time and keep them refrigerated until you’re ready to serve.
If you want to get even more creative, try adding a few candy eyes on top of the whipped cream to make the cups look like they’re watching your guests. Remember to use clear cups so the creepy crawly effect is visible to everyone!
Mummy Rice Krispie Treats
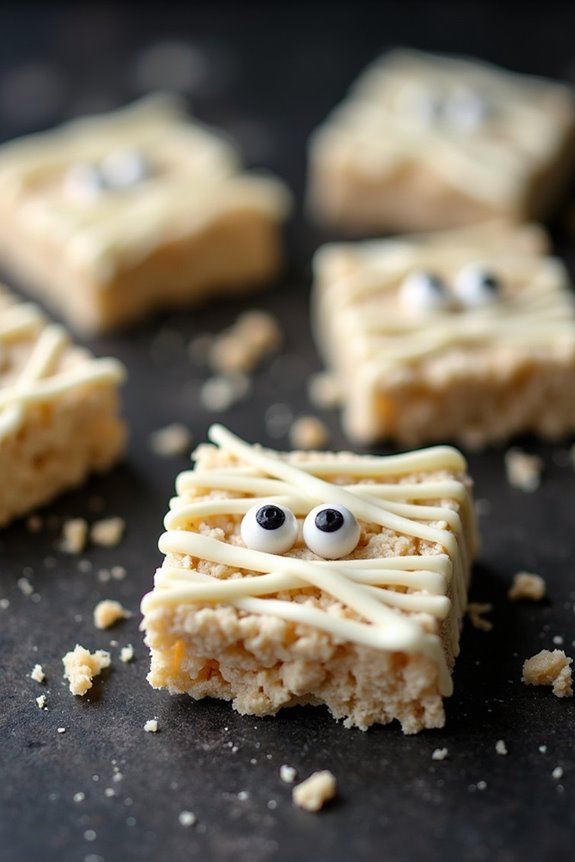
Mummy Rice Krispie Treats are a delightful and spooky treat perfect for any Halloween celebration. These crispy, sweet snacks are transformed into adorable mummies with a bit of creativity and a few extra ingredients. Not only are they fun to look at, but they’re also incredibly easy to make, making them a great activity for the whole family to enjoy together.
The combination of marshmallow and rice cereal provides a classic taste that kids and adults alike will love, while the white chocolate draping gives them that extra festive flair. This recipe yields approximately 12-15 mummy treats, making it ideal for serving 4-6 people.
The preparation involves crafting the traditional Rice Krispie treats and then adorning them with white chocolate to achieve the mummy effect. The whole process is straightforward, and you can even get the kids involved in the decorating process. So gather your ingredients, put on some spooky tunes, and get ready to create these charming Mummy Rice Krispie Treats!
Ingredients:
- 4 cups Rice Krispies cereal
- 1/4 cup unsalted butter
- 10 oz mini marshmallows
- 12 oz white chocolate chips or candy melts
- Candy eyeballs
- Cooking spray or butter for greasing
Instructions:
1. Prepare the Pan:
Begin by greasing a 9×13-inch baking pan with cooking spray or butter. This will guarantee that your Rice Krispie mixture doesn’t stick to the pan, making it easier to remove the treats later.
2. Melt the Marshmallows:
In a large saucepan, melt the butter over low heat. Once melted, add the mini marshmallows and stir continuously until they’re completely melted and the mixture is smooth. Be sure to keep the heat low to prevent burning the marshmallows.
3. Mix in the Cereal:
Remove the saucepan from heat and quickly stir in the Rice Krispies cereal until fully coated in the marshmallow mixture. Work quickly to guarantee an even coating.
4. Form the Base:
Pour the mixture into the prepared baking pan. Using a buttered spatula or wax paper, press the mixture evenly into the pan. Allow it to cool and set, which should take about 30 minutes.
5. Shape the Treats:
Once set, remove the Rice Krispie layer from the pan and cut it into rectangles or desired mummy shapes. Make sure they’re small enough to hold easily in hand but large enough to decorate.
6. Create the Mummy Look:
Melt the white chocolate chips or candy melts according to package instructions. Using a spoon or a piping bag, drizzle the melted white chocolate over each rectangle to create the look of mummy bandages. Place two candy eyeballs on each treat while the chocolate is still soft so they adhere well.
7. Set and Serve:
Allow the white chocolate to set completely before serving. You can speed up this process by placing them in the refrigerator for a few minutes.
Extra Tips:
For an added twist, try mixing in a few drops of vanilla extract or a pinch of salt into the marshmallow mixture for extra flavor. If you don’t have a piping bag, simply use a plastic sandwich bag with a small corner snipped off to drizzle the chocolate.
Make sure your treats are completely cool before cutting and decorating them to keep their shape intact. Enjoy these Mummy Rice Krispie Treats as a fun and festive addition to your Halloween festivities!
Frankenstein Pudding Cups
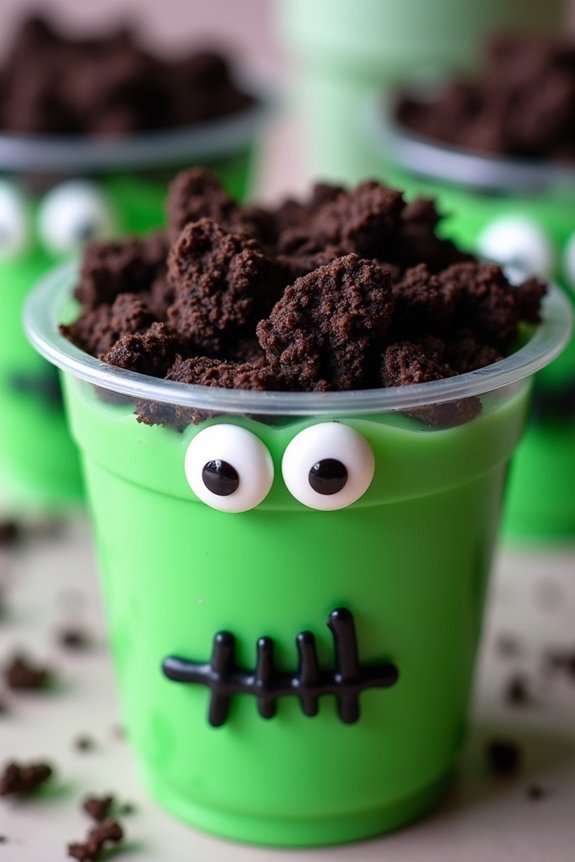
Frankenstein Pudding Cups are a fun and creative treat perfect for Halloween! These spooky yet delightful cups are a fantastic way to jazz up your Halloween party, and are certain to be a hit with kids and adults alike.
They’re easy to make and involve layering green-colored pudding with a few simple decorations to bring the monster to life. Not only are these pudding cups visually appealing, but they’re also delicious and satisfying.
The pudding cups are designed to resemble Frankenstein’s monster, complete with a green hue and a quirky face. The recipe involves using instant pudding mix that’s colored with green food coloring, creating the perfect eerie shade.
The pudding is then topped with crumbled cookies to imitate hair, and adorned with candy eyes and a mouth to give it that unmistakable Frankenstein look. This recipe yields 4-6 servings, making it ideal for a small gathering or family treat.
Ingredients:
- 2 packages (3.4 oz each) instant vanilla pudding mix
- 4 cups cold milk
- Green food coloring
- 18 chocolate sandwich cookies (like Oreos)
- Candy eyes (12 count)
- Black decorating gel or icing
- Clear plastic cups (4-6 cups)
Cooking Instructions:
- Prepare the Pudding: In a medium-sized mixing bowl, combine the instant vanilla pudding mix with 4 cups of cold milk. Whisk the mixture for about 2 minutes until it begins to thicken.
- Color the Pudding: Add a few drops of green food coloring to the pudding and stir until you achieve the desired shade of green. Make sure the color is evenly distributed.
- Chill the Pudding: Cover the bowl with plastic wrap and refrigerate for at least 5 minutes, or until the pudding is fully set.
- Crush the Cookies: While the pudding sets, place the chocolate sandwich cookies in a sealable plastic bag and crush them using a rolling pin or your hands until they resemble coarse crumbs.
- Assemble the Cups: Once the pudding is set, spoon it evenly into the clear plastic cups, filling each cup about 3/4 full.
- Add the Hair: Sprinkle the crushed cookies on top of the pudding in each cup to resemble Frankenstein’s hair.
- Decorate the Faces: Place two candy eyes on the front side of each cup, pressing gently to adhere them to the pudding. Use the black decorating gel or icing to draw a mouth below the eyes, creating a classic Frankenstein expression.
Extra Tips:
For a more realistic Frankenstein look, use different sizes and shapes of candy eyes to give each pudding cup a unique personality.
If you want to prepare these pudding cups in advance, store them without the cookie topping in the refrigerator for up to a day. Add the cookie crumbs just before serving to make sure they remain crunchy.
Additionally, you can substitute the black decorating gel with melted chocolate for a more natural look. Enjoy your spooky and delicious Frankenstein Pudding Cups!
Eyeball Cake Pops
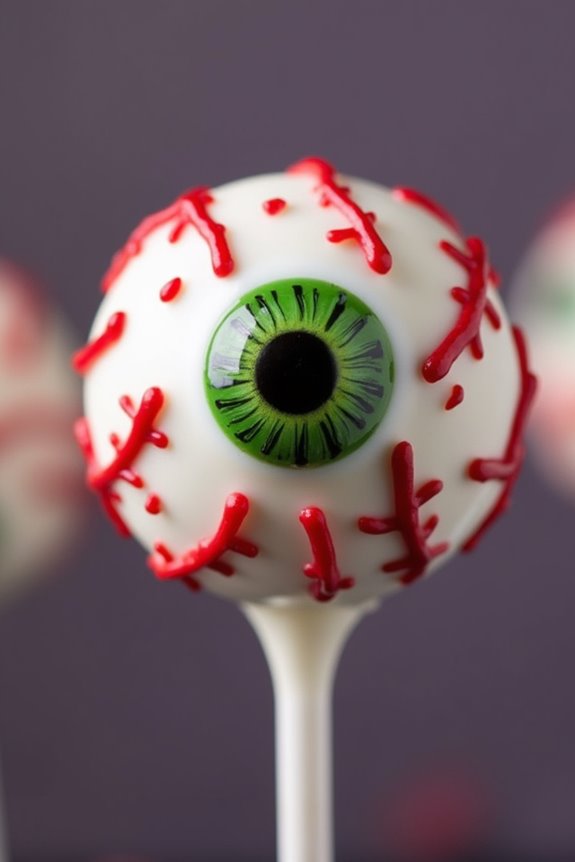
Eyeball Cake Pops are a spooky and fun treat perfect for Halloween celebrations. These delightful pops aren’t only visually striking but also delicious, making them a hit among kids and adults alike. With their creepy yet cute eyeball design, they add a festive touch to any Halloween party spread.
Whether you’re hosting a party or attending one, these cake pops are sure to impress guests with their creativity and taste. The process of making Eyeball Cake Pops is straightforward, but it requires a bit of patience and creativity.
You’ll start by baking a simple cake, which will then be crumbled and mixed with frosting to form the base of the cake pops. After shaping the cake mixture into balls, you’ll dip them in white chocolate and decorate them to resemble eerie eyeballs. This recipe serves 4-6 people and is ideal for those looking to add a unique homemade treat to their Halloween festivities.
Ingredients:
- 1 box of cake mix (any flavor)
- Ingredients required for cake mix (usually eggs, oil, and water)
- 1 cup of frosting (store-bought or homemade)
- 1 package of white candy melts
- 1 package of red candy melts
- 1 package of black candy melts
- Lollipop sticks
- Edible candy eyes
Instructions:
- Bake the Cake: Preheat your oven according to the cake mix instructions. Prepare the cake mix as directed on the box and bake it in a 9×13 inch pan. Allow the cake to cool completely once it’s done baking.
- Prepare the Cake Mixture: Once cooled, crumble the cake into fine pieces in a large bowl. Add the frosting and mix until the texture is smooth and moldable, similar to dough.
- Shape the Cake Pops: Roll the cake mixture into 1-inch balls. Place them on a baking sheet lined with parchment paper and insert a lollipop stick into each ball. Refrigerate for at least 2 hours or until firm.
- Melt the Candy Coating: In separate bowls, melt the white, red, and black candy melts according to package instructions. Make sure each is smooth and free of lumps.
- Dip and Decorate: Dip each cake ball into the white candy melts, coating them completely. Allow excess coating to drip off before placing them back on the parchment paper.
- Create the Eyeballs: Before the white coating sets, place an edible candy eye in the center of each cake pop. Using a toothpick, add red candy melt lines around the eye to mimic bloodshot veins. Use the black candy melts to add details like a pupil or any additional design you desire.
- Set the Cake Pops: Allow the decorated cake pops to set completely at room temperature or in the refrigerator before serving.
Extra Tips:
To make the process easier, you can prepare the cake mixture a day in advance and refrigerate it overnight. This will help the cake balls hold their shape better during the dipping process.
If you find the candy melts too thick, you can add a small amount of vegetable oil to achieve a smoother consistency. Additionally, feel free to mix and match colors for a more vibrant or creepier look, and don’t hesitate to get creative with the designs!
Spider Web Donuts
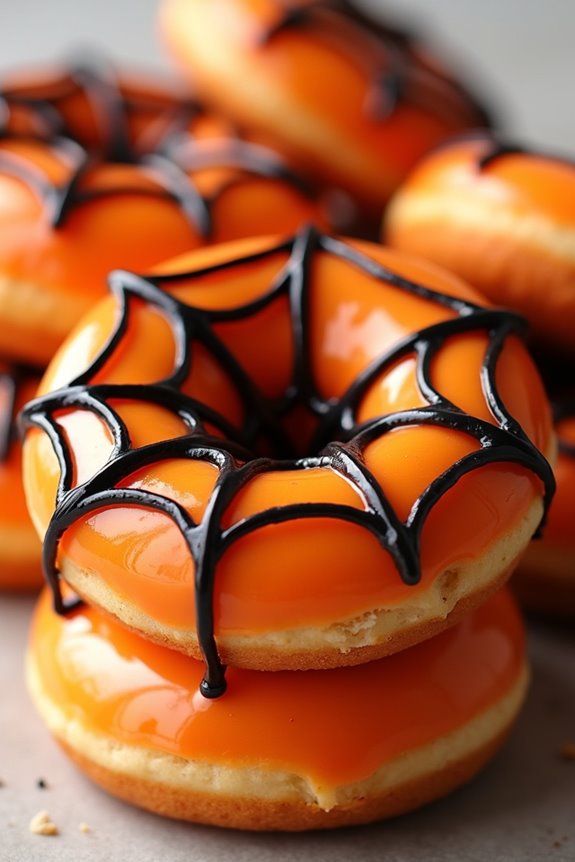
Halloween is a time for spooky fun and delicious treats, and what better way to celebrate than with Spider Web Donuts? These festive donuts aren’t only delightful to look at but also a treat for the taste buds. Perfect for a Halloween party or a fun family activity, Spider Web Donuts are sure to be a hit among kids and adults alike. The combination of a soft, sweet donut base with a spooky web design is both eye-catching and scrumptious.
Making Spider Web Donuts at home is simpler than you might think. The key to achieving the perfect web design lies in the use of melted chocolate or icing, which contrasts beautifully with the bright glaze of the donut. Whether you choose to make your donuts from scratch or start with store-bought ones, the decoration process is where the fun truly begins. Ready to create some spooktacular treats? Let’s plunge into the recipe.
Ingredients for Spider Web Donuts (serving size: 4-6 people):
- 2 ½ cups all-purpose flour
- ½ cup granulated sugar
- 1 tablespoon baking powder
- ½ teaspoon salt
- 1 cup milk
- 2 large eggs
- 1 teaspoon vanilla extract
- ¼ cup unsalted butter, melted
- 2 cups powdered sugar
- 2-3 tablespoons milk (for glaze)
- Black gel food coloring or melted dark chocolate
- Orange food coloring
- Vegetable oil for frying
Cooking Instructions:
- Prepare the Donut Batter: In a large mixing bowl, combine the all-purpose flour, granulated sugar, baking powder, and salt. In a separate bowl, whisk together the milk, eggs, vanilla extract, and melted butter. Gradually add the wet ingredients to the dry ingredients, stirring until the batter is smooth and well combined.
- Fry the Donuts: Heat vegetable oil in a deep fryer or a large pot to 350°F (175°C). Carefully drop spoonfuls of batter into the hot oil, frying the donuts in batches. Fry each donut for about 2-3 minutes on each side or until they’re golden brown and cooked through. Use a slotted spoon to remove the donuts from the oil and place them on a paper towel-lined plate to drain excess oil.
- Make the Glaze: In a medium bowl, combine the powdered sugar with 2-3 tablespoons of milk and a few drops of orange food coloring to achieve the desired color. Stir until the glaze is smooth and coats the back of a spoon.
- Decorate the Donuts: Dip each cooled donut into the orange glaze, allowing any excess to drip off. Once the glaze is set slightly, use black gel food coloring or melted dark chocolate to draw spider web designs on top. Start by drawing a few straight lines from the center of the donut outward, then connect them with curved lines to form a web pattern.
- Set and Serve: Allow the decorated donuts to set completely before serving. Arrange them on a Halloween-themed platter for a festive presentation.
Extra Tips:
When making Spider Web Donuts, confirm that your oil is at the right temperature before frying to achieve the perfect texture—crispy on the outside and soft on the inside. If you don’t have a candy thermometer, test the oil by dropping in a small piece of bread; it should sizzle and turn golden brown in about a minute.
For a simpler version, you can use ready-made donuts and focus on the decoration. Experiment with different colors for the glaze or web to add variety to your Halloween spread. Finally, involve the kids in the decorating process for a fun and creative family activity.
Haunted House Gingerbread Cookies

Indulge your little ghouls and goblins this Halloween with a spooky twist on a classic holiday treat: Haunted House Gingerbread Cookies. These delightful cookies are perfect for getting into the festive spirit and double as both a fun activity and a tasty treat.
Using traditional gingerbread cookie ingredients with a creative spin, you can decorate each cookie to resemble a miniature haunted house. Perfect for Halloween parties or as a family activity, these cookies will surely enchant both kids and adults alike.
Creating these Haunted House Gingerbread Cookies involves not only baking but also a bit of artistry. The recipe is designed for a serving size suitable for 4-6 people, ensuring there are plenty of cookies to share.
Once the cookies are baked and cooled, grab some colorful icing and candies to bring your haunted houses to life. Whether you’re constructing a creepy castle or a ghostly gingerbread mansion, these cookies are sure to become a family favorite each Halloween season.
Ingredients for 4-6 servings
- 3 cups all-purpose flour
- 3/4 cup dark brown sugar
- 3/4 cup molasses
- 1/2 cup unsalted butter, softened
- 2 teaspoons ground ginger
- 1 teaspoon ground cinnamon
- 1/2 teaspoon ground cloves
- 1/2 teaspoon baking soda
- 1/4 teaspoon salt
- 1 large egg
- Assorted candies for decoration (e.g., candy corn, mini marshmallows, chocolate chips)
- Royal icing for decoration
Cooking Instructions
- Prepare the Dough: In a large bowl, beat the softened butter and dark brown sugar together until creamy. Add the egg and molasses, mixing well until fully combined.
- Mix Dry Ingredients: In a separate bowl, whisk together the flour, ginger, cinnamon, cloves, baking soda, and salt. Gradually add this dry mixture to the wet ingredients, stirring until a dough forms.
- Chill the Dough: Divide the dough in half, flatten each into a disc, and wrap in plastic wrap. Refrigerate for at least 1 hour or until firm. Chilling the dough helps it retain its shape when baking.
- Preheat and Prep: Preheat your oven to 350°F (175°C). Line baking sheets with parchment paper.
- Roll Out the Dough: On a lightly floured surface, roll out one dough disc to about 1/4-inch thickness. Cut into desired haunted house shapes using cookie cutters or a template and place on prepared baking sheets.
- Bake the Cookies: Bake in the preheated oven for 8-10 minutes or until the edges are firm. Let them cool on the baking sheet for a few minutes before transferring to a wire rack to cool completely.
- Decorate: Once cooled, use royal icing to outline and fill in the haunted house details. Add assorted candies for windows, doors, and spooky decorations. Allow the icing to set before serving.
Extra Tips
For extra crispiness, roll the dough slightly thinner but watch carefully to avoid burning. If you don’t have royal icing, you can make a simple glaze with powdered sugar and milk.
For smaller children, consider using squeezable icing tubes for easier handling. Remember, creativity is key – let the kids go wild with their spooky designs!
Zombie Finger Breadsticks

Zombie Finger Breadsticks are a spooky and delicious treat perfect for adding a touch of eerie fun to your Halloween festivities. These creepy breadsticks are shaped to resemble grotesque zombie fingers, complete with gory details that are sure to thrill and delight both kids and adults alike. The buttery, garlicky flavor makes them a tasty snack that pairs perfectly with a side of marinara sauce or a spooky green dip for added effect. Kids will love the chance to play with their food and enjoy a Halloween treat that’s both delicious and playful.
Making Zombie Finger Breadsticks is a fun kitchen project that requires only a few simple ingredients and offers plenty of room for creativity with the decorations. This recipe yields enough breadsticks to serve 4-6 people, making it ideal for a small party or family gathering. The dough is easy to work with, allowing kids to get involved in shaping the fingers and adding the “nails” and “knuckles” to create the ultimate spine-chilling snack.
Ingredients (for 4-6 servings):
- 1 can (13.8 oz) refrigerated pizza dough
- 2 tablespoons butter, melted
- 1 teaspoon garlic powder
- 1 teaspoon Italian seasoning
- 24 sliced almonds
- Red food coloring
- Marinara sauce (optional for dipping)
Cooking Instructions:
- Preheat the Oven: Start by preheating your oven to 375°F (190°C) to guarantee it reaches the right temperature by the time your breadsticks are ready to bake.
- Prepare the Dough: Unroll the pizza dough onto a clean surface. Using a sharp knife or pizza cutter, slice the dough into 12 equal strips. These will form the base of your zombie fingers.
- Shape the Fingers: Roll each strip into a finger-like shape, making sure to taper one end to resemble a fingertip. Use your fingers or a butter knife to create knuckle lines and other details for a realistic look.
- Add the Nails: Press a sliced almond onto the tapered end of each breadstick to create a fingernail. To add a gruesome touch, you can use a bit of red food coloring on the almond to simulate blood.
- Season the Breadsticks: In a small bowl, mix the melted butter, garlic powder, and Italian seasoning. Brush this mixture generously over each breadstick, ensuring even coverage for enhanced flavor.
- Bake the Breadsticks: Place the breadsticks on a parchment-lined baking sheet, ensuring they’re spaced apart. Bake in the preheated oven for 12-15 minutes, or until golden brown.
- Serve: Once baked, remove the breadsticks from the oven and let them cool for a few minutes before serving. Offer them with a side of marinara sauce for dipping, if desired.
Extra Tips:
For an added level of spookiness, consider using tinted dough by adding a few drops of green or gray food coloring before shaping the fingers. This will give your Zombie Finger Breadsticks an even more undead appearance.
You can also experiment with different seasonings or add cheese to the dough for a cheesy twist. If you’re short on time, pre-made breadstick dough can be used as an alternative to pizza dough.
Finally, let your creativity shine by trying different almond placements or adding additional knuckle details with the help of a toothpick.
Candy Corn Parfaits
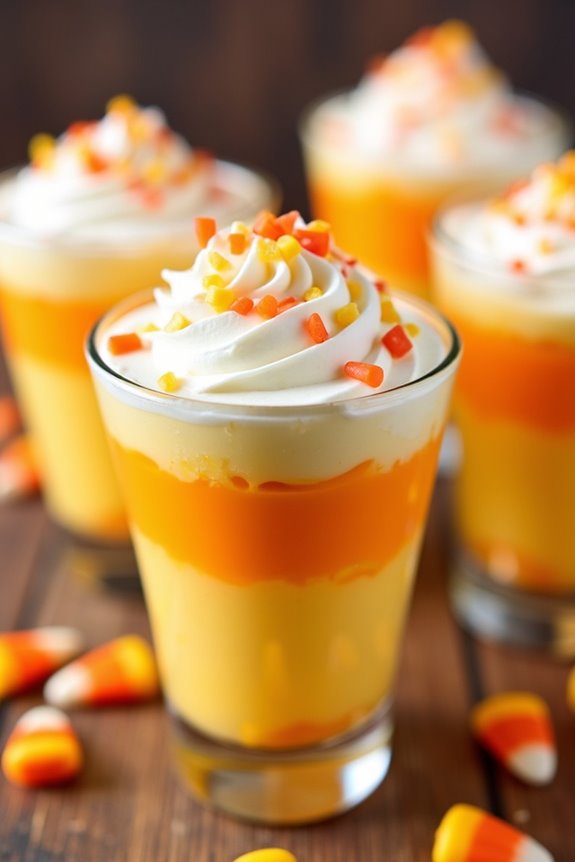
Candy Corn Parfaits are the perfect Halloween treat for kids, combining the festive colors of candy corn with delicious layers of creamy sweetness. This no-bake dessert is incredibly easy to prepare and makes for a delightful presentation at Halloween parties or family gatherings.
By using a combination of pudding, whipped cream, and candy corn, you can create a treat that isn’t only visually appealing but also irresistibly tasty. These parfaits are sure to be a hit with kids and adults alike, making them a staple in your Halloween treat repertoire.
The contrasting textures and flavors in Candy Corn Parfaits provide a delightful eating experience. The smoothness of the pudding, the lightness of the whipped cream, and the chewy texture of candy corn come together beautifully in each spoonful.
Designed to serve 4-6 people, this recipe allows for easy scaling if you’re hosting a larger crowd. Best of all, they can be prepared ahead of time, allowing you to focus on other Halloween festivities.
Ingredients for 4-6 servings:
- 1 (3.4 oz) box of vanilla instant pudding mix
- 2 cups cold milk
- Yellow food coloring
- 1 (8 oz) tub of whipped topping (such as Cool Whip)
- 1 cup candy corn
- Clear plastic cups or small glass cups for serving
Cooking Instructions:
- Prepare the Vanilla Pudding: In a large mixing bowl, combine the vanilla instant pudding mix with 2 cups of cold milk. Whisk the mixture for about 2 minutes until it thickens. Let the pudding sit for an additional 5 minutes to fully set.
- Color the Pudding: Once the pudding is set, add a few drops of yellow food coloring to the pudding and mix well until you achieve the desired shade of yellow. This will form the middle layer of the parfait, resembling the yellow layer of candy corn.
- Layer the Parfaits: Begin by placing a spoonful of whipped topping at the bottom of each cup to form the white layer. Next, spoon a generous layer of the yellow-colored pudding on top of the whipped topping. Finish with another layer of whipped topping on top of the pudding.
- Add the Candy Corn: Sprinkle a handful of candy corn on top of each parfait as a garnish. This not only adds to the visual appeal but also enhances the candy corn theme of the dessert.
- Chill: Place the parfaits in the refrigerator for at least 30 minutes before serving. This will allow the layers to set and the flavors to meld together.
Extra Tips:
For an extra touch of Halloween flair, consider adding a few drops of orange food coloring to a portion of the whipped topping to create an additional orange layer in your parfaits.
If you want to make the dessert healthier, try using sugar-free pudding mix and light whipped topping. Additionally, you can customize the parfaits with different types of candy for a personalized touch.
Remember to prepare the parfaits a few hours before serving to allow ample time for chilling and setting. Enjoy your colorful and delicious Halloween treat!