

As Halloween creeps closer, there’s nothing quite like the thrill of whipping up some sophisticated, adult-themed desserts with a gourmet twist. Picture yourself savoring treats like Dark Chocolate Raspberry Truffle Bats or Spiced Pumpkin Churros with Bourbon Caramel. Each dessert is a masterpiece with unique flavors and elegant presentations, just right for that special adult gathering. Ready to explore more decadent delights? This hauntingly delicious collection is waiting just for you.
Dark Chocolate Raspberry Truffle Bats
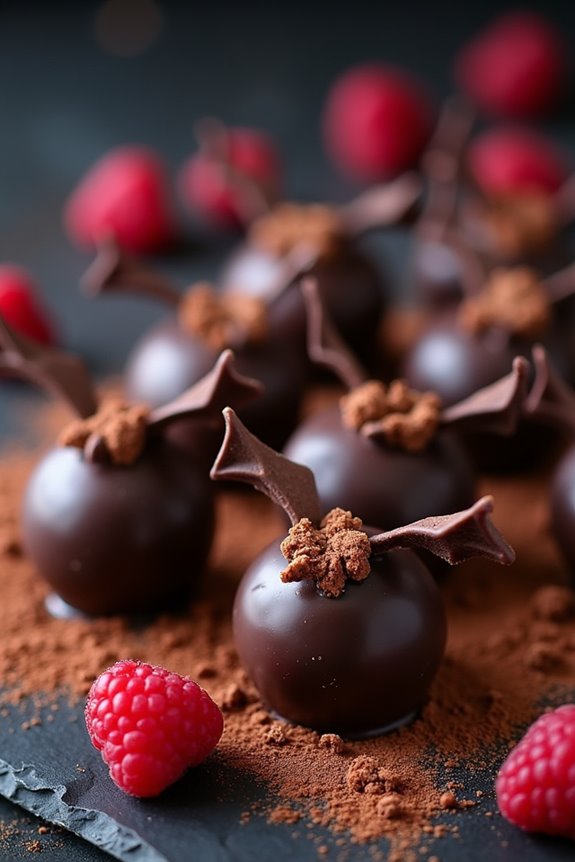
Dark Chocolate Raspberry Truffle Bats are a sophisticated and spooky twist on Halloween treats, perfect for adults looking to indulge in something decadent. These truffles combine the rich, deep flavors of dark chocolate with the tartness of fresh raspberries, creating a harmonious blend that will delight your taste buds.
Shaped like little bats, these truffles are a playful yet elegant addition to your Halloween dessert table, making them ideal for a themed party or a cozy night in. Creating these Dark Chocolate Raspberry Truffle Bats isn’t only a fun activity but also a great way to impress guests with your culinary skills.
The process involves making a smooth raspberry-infused ganache, which is then shaped and coated in high-quality dark chocolate. Assembling these truffles into bat shapes adds an element of creativity, ensuring that your Halloween gathering is both delicious and memorable. So, gather your ingredients and prepare to set off on a delightful confectionery adventure.
Ingredients (Serves 4-6):
- 1 cup fresh raspberries
- 1/4 cup granulated sugar
- 8 oz. high-quality dark chocolate, finely chopped
- 1/2 cup heavy cream
- 2 tablespoons unsalted butter
- 1 teaspoon vanilla extract
- 1/4 teaspoon salt
- 2 tablespoons cocoa powder (for dusting)
- 4 oz. dark chocolate (for coating and decorating)
- Almond slivers or bat-shaped candy decorations
Instructions:
1. Prepare Raspberry Puree: In a small saucepan over medium heat, combine the fresh raspberries and granulated sugar. Stir frequently and cook until the raspberries break down and the mixture thickens, about 5-7 minutes.
Strain the raspberry mixture through a fine-mesh sieve into a bowl to remove seeds, pressing down with a spoon to extract as much liquid as possible.
2. Make Ganache: In a heatproof bowl, combine the finely chopped dark chocolate, heavy cream, and unsalted butter. Place the bowl over a pot of simmering water (double boiler method) and stir until the chocolate and butter are completely melted and the mixture is smooth.
Remove from heat and stir in the raspberry puree, vanilla extract, and salt.
3. Chill Ganache: Cover the bowl with plastic wrap and refrigerate the ganache for at least 2 hours, or until it’s firm enough to scoop and shape.
4. Shape Truffles: Once the ganache is firm, use a small cookie scoop or spoon to portion out small balls of the mixture. Roll each portion into a ball and then gently shape them into ovals to resemble bat bodies.
Place on a parchment-lined baking sheet.
5. Coat with Chocolate: In a microwave-safe bowl, melt the additional 4 oz. of dark chocolate in 30-second intervals, stirring in between until smooth. Dip each truffle into the melted chocolate, using a fork to tap off excess, and return to the parchment-lined baking sheet.
6. Decorate: While the coating is still wet, attach almond slivers or bat-shaped candy decorations as wings. Allow the chocolate to set completely at room temperature or in the refrigerator.
7. Dust with Cocoa: Once set, lightly dust the truffles with cocoa powder for a dramatic effect.
Extra Tips:
For the best results, use high-quality dark chocolate with at least 70% cocoa content, which will provide a richer flavor and smoother texture. If you prefer a sweeter truffle, you can adjust the sugar in the raspberry puree to taste.
Be patient when melting chocolate; overheating can cause it to seize, so use gentle heat. Additionally, when shaping the truffles, lightly oil your hands to prevent sticking. These truffles can be made a day in advance and stored in the refrigerator, making them a convenient yet impressive option for your Halloween gathering.
Spiced Pumpkin Churros With Bourbon Caramel
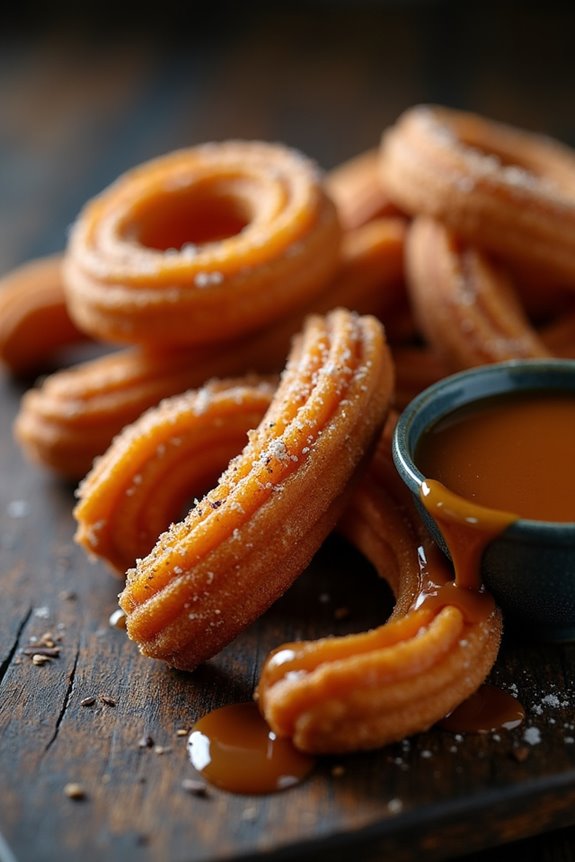
Spiced Pumpkin Churros With Bourbon Caramel is a delightful twist on the traditional churro, perfect for adding a touch of sophistication to your Halloween dessert table. These churros are flavored with pumpkin puree and a medley of spices that add warmth and depth, while the bourbon caramel sauce adds a layer of indulgence that’s sure to impress your party guests. The combination of crispy, spiced dough and rich, boozy caramel makes this dish a perfect treat for adults celebrating the spooky season.
Crafting these churros involves preparing a spiced dough that incorporates the flavors of pumpkin, cinnamon, nutmeg, and cloves. Once fried to a golden brown, these churros are served with a luscious bourbon caramel sauce that enhances their flavor profile. The bourbon caramel adds a luxurious touch, making this dessert both festive and elegant. This recipe serves 4-6 people, making it ideal for a small gathering.
Ingredients for Spiced Pumpkin Churros With Bourbon Caramel:
*For the Churros:*
- 1 cup water
- 1/2 cup pumpkin puree
- 1/4 cup unsalted butter
- 2 tablespoons granulated sugar
- 1 teaspoon vanilla extract
- 1 cup all-purpose flour
- 1 teaspoon ground cinnamon
- 1/2 teaspoon ground nutmeg
- 1/4 teaspoon ground cloves
- 1/4 teaspoon salt
- 3 large eggs
- Vegetable oil, for frying
For the Bourbon Caramel Sauce:
- 1 cup granulated sugar
- 1/4 cup water
- 1/2 cup heavy cream
- 2 tablespoons unsalted butter
- 2 tablespoons bourbon
- 1/2 teaspoon vanilla extract
- Pinch of salt
Cooking Instructions:
- Prepare the Dough: In a medium saucepan over medium heat, combine water, pumpkin puree, butter, sugar, and vanilla extract. Stir until the butter melts and the mixture is smooth. Bring to a gentle boil.
- Incorporate Dry Ingredients: Reduce heat to low and add flour, cinnamon, nutmeg, cloves, and salt. Stir vigorously with a wooden spoon until the mixture forms a smooth dough that pulls away from the sides of the pan.
- Add Eggs: Remove the pan from heat and allow the dough to cool slightly. Add eggs one at a time, mixing thoroughly after each addition until the dough is smooth and glossy.
- Heat Oil: In a large, deep skillet or fryer, heat about 2 inches of vegetable oil to 350°F (175°C).
- Pipe the Churros: Transfer the dough to a piping bag fitted with a large star tip. Carefully pipe 4-6 inch strips of dough into the hot oil, cutting with scissors to release. Fry in batches, turning occasionally, until golden brown, about 2-3 minutes per side.
- Drain and Cool: Use a slotted spoon to transfer the churros to a paper towel-lined plate to drain excess oil. Allow them to cool slightly.
- Prepare the Bourbon Caramel Sauce: In a medium saucepan, combine sugar and water. Cook over medium heat without stirring, until the sugar dissolves and turns a deep amber color, about 8-10 minutes.
- Finish the Caramel Sauce: Remove from heat and carefully whisk in the cream and butter until smooth. Stir in bourbon, vanilla extract, and a pinch of salt. Return to low heat to thicken slightly, if needed.
- Serve: Arrange churros on a serving platter and drizzle with bourbon caramel sauce, or serve the sauce on the side for dipping.
Extra Tips:
When making the bourbon caramel sauce, be cautious when adding the cream to the hot sugar mixture, as it will bubble vigorously. It’s essential to have all ingredients measured and ready to go before starting the caramel process to promote safety and prevent burning.
For a non-alcoholic version, you can omit the bourbon or substitute it with a splash of vanilla extract for additional flavor. Additionally, verify the oil temperature remains consistent while frying to achieve perfectly crispy churros.
Blood Orange and Black Sesame Macarons

Indulge in the sophisticated flavors of Blood Orange and Black Sesame Macarons, a perfect Halloween dessert for adults looking for something unique and elegant.
These macarons feature a delicate almond shell with the nutty and slightly smoky notes of black sesame seeds, paired with a luscious blood orange filling. The combination isn’t only visually striking with its bold contrast of colors but also tantalizing to the taste buds, making them an ideal treat for any Halloween gathering or adult-themed party.
Crafting macarons can be a bit challenging, but with patience and precision, they can become a rewarding experience. The key to successful macarons lies in the technique, from creating the perfect meringue to achieving the right consistency of the macaronage.
Once you’ve mastered these steps, you’ll be able to impress your guests with this spooky yet sophisticated dessert. Let’s plunge into this delightful recipe to create 4-6 servings of Blood Orange and Black Sesame Macarons.
Ingredients
- 100g almond flour
- 100g powdered sugar
- 10g black sesame seeds, finely ground
- 2 large egg whites, room temperature
- 50g granulated sugar
- 1 teaspoon black gel food coloring
- 100g unsalted butter, room temperature
- 100g white chocolate, melted
- 60ml fresh blood orange juice
- Zest of one blood orange
- 1 teaspoon vanilla extract
- Pinch of salt
Instructions
- Prepare Your Ingredients: Before you start, measure all your ingredients precisely. Sift together the almond flour, powdered sugar, and ground black sesame seeds into a large mixing bowl. This guarantees there are no lumps and creates a smooth macaron shell.
- Make the Meringue: In a clean, dry bowl, whisk the egg whites on medium speed until they become frothy. Gradually add granulated sugar, continuing to whisk until stiff peaks form. Add the black gel food coloring to achieve your desired shade, mixing until evenly distributed.
- Macaronage Process: Gently fold the dry ingredients into the meringue, using a spatula. Be careful not to overmix or undermix; the batter should have a lava-like consistency, flowing smoothly yet holding its shape for a couple of seconds.
- Pipe the Shells: Transfer the batter into a piping bag fitted with a round tip. Pipe small, consistent circles onto a baking sheet lined with parchment paper. Tap the baking sheet firmly on the counter to release any air bubbles.
- Rest the Macarons: Allow the piped shells to rest at room temperature for 30-60 minutes, or until they form a skin and are no longer sticky to the touch. This step is essential for the development of the signature macaron “feet.”
- Bake the Macarons: Preheat your oven to 300°F (150°C). Bake the macarons for 15-18 minutes, rotating the tray halfway through to guarantee even baking. The macarons are done when they come off the parchment paper easily without sticking.
- Prepare the Filling: In a bowl, beat the softened butter until creamy. Gradually add melted white chocolate, blood orange juice, orange zest, vanilla extract, and a pinch of salt. Mix until smooth and well combined.
- Assemble the Macarons: Once the shells have completely cooled, pipe a generous amount of the blood orange filling onto the flat side of one shell and sandwich it with another shell, twisting slightly to distribute the filling evenly.
Extra Tips
When making macarons, precision is everything. Confirm your ingredients are accurately measured, especially the egg whites, which should be at room temperature for maximum meringue formation.
Also, be mindful of the humidity in your kitchen, as high moisture levels can affect the drying process of the macarons. If you’re new to macaron-making, practice patience and don’t be discouraged by initial failures.
With time and practice, you’ll perfect the art of creating these delightful treats.
Boozy Candied Apple Tarts

Boozy Candied Apple Tarts are a sophisticated twist on the classic fall treat that are perfect for an adult Halloween gathering. These tarts combine the sweet and tangy flavors of candied apples with a delightful hint of bourbon, wrapped in a flaky pastry shell. The warm spices and caramel notes in the filling make these tarts a festive and indulgent dessert that will impress your guests. Best served with a scoop of vanilla ice cream or a dollop of whipped cream, these tarts are a delightful way to enjoy the flavors of fall.
The beauty of Boozy Candied Apple Tarts lies in their balance of flavors and textures. The apples are cooked to perfection, tender yet still holding their shape, and the addition of bourbon adds a warm depth that complements the sweetness of the caramel. The pastry, golden and crisp, encases the filling beautifully, creating a perfect bite every time.
Whether you’re hosting a Halloween party or simply want to enjoy a grown-up dessert, these tarts are sure to be a hit.
Ingredients (Serves 4-6):
- 2 sheets of puff pastry, thawed
- 4 medium apples, peeled, cored, and thinly sliced
- 1/2 cup granulated sugar
- 1/4 cup brown sugar
- 1 teaspoon ground cinnamon
- 1/4 teaspoon ground nutmeg
- 1/4 teaspoon ground cloves
- 1/4 cup unsalted butter
- 1/4 cup bourbon
- 1 tablespoon lemon juice
- 1 egg, beaten (for egg wash)
- 1 tablespoon coarse sugar, for sprinkling
Cooking Instructions:
- Preheat Your Oven: Begin by preheating your oven to 375°F (190°C). Line a baking sheet with parchment paper or a silicone mat to prevent sticking and set aside.
- Prepare the Apple Filling: In a large skillet over medium heat, melt the unsalted butter. Add the granulated sugar, brown sugar, cinnamon, nutmeg, and cloves, stirring until the mixture begins to bubble.
- Cook the Apples: Add the sliced apples to the skillet, tossing them in the sugary-spice mixture. Cook for about 5-7 minutes, or until the apples are slightly tender but still hold their shape.
- Add the Bourbon: Pour the bourbon into the skillet, stirring to combine. Cook for an additional 2-3 minutes to allow the alcohol to cook off and the flavors to meld. Remove from heat and stir in the lemon juice.
- Prepare the Pastry: Roll out the puff pastry sheets on a lightly floured surface. Cut each sheet into desired tart shapes (circles, squares, or rectangles work well). Place the cut pastry pieces onto the prepared baking sheet.
- Assemble the Tarts: Spoon the apple mixture evenly onto the center of each pastry piece, leaving a small border around the edges. Brush the borders with the beaten egg to help them brown and puff up.
- Bake the Tarts: Sprinkle the coarse sugar over the tarts for extra crunch and sweetness. Bake in the preheated oven for 20-25 minutes or until the pastry is golden brown and puffed up around the filling.
- Cool and Serve: Allow the tarts to cool slightly on the baking sheet before serving. These are best enjoyed warm, with a scoop of vanilla ice cream or a dollop of whipped cream on top.
Extra Tips:
When making Boozy Candied Apple Tarts, it’s crucial to choose apples that hold their shape well during cooking, such as Granny Smith or Honeycrisp. If you prefer a stronger bourbon flavor, you can increase the amount slightly, but be sure to cook off the alcohol thoroughly to maintain the balance of flavors.
Additionally, make sure the puff pastry is well thawed but still cold to guarantee it puffs up nicely and achieves a flaky texture. Enjoy these tarts fresh from the oven for the best taste and texture!
Black Velvet Espresso Brownies
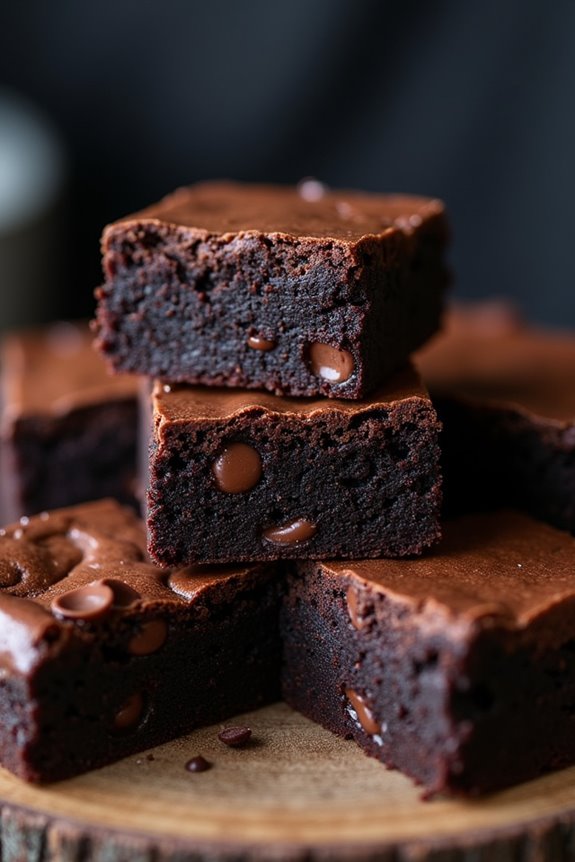
Indulge in the decadent allure of Black Velvet Espresso Brownies, a Halloween dessert that’s perfect for adults with a refined palate. This recipe combines the rich, dark flavors of espresso with the smooth, luxurious texture of black velvet cake, resulting in a brownie that’s as sophisticated as it’s spooky.
The deep, dark color of the brownies, reminiscent of a moonless night, makes them an ideal treat for a Halloween gathering, adding an element of elegance and mystery to your dessert table.
These brownies aren’t only visually striking but also pack a punch of flavor thanks to the addition of espresso. The caffeine enhances the chocolate, creating a more intense flavor profile that coffee lovers will appreciate.
With a moist, fudgy interior and a slightly crisp top, these brownies are sure to be a hit at any adult Halloween party. Prepare to be bewitched by their rich taste and enchanting appearance, perfect for those who crave a grown-up twist on a classic treat.
Ingredients (Serves 4-6 people):
- 1 cup unsalted butter
- 1 1/2 cups granulated sugar
- 2 large eggs
- 1 tablespoon vanilla extract
- 3/4 cup all-purpose flour
- 1 cup unsweetened cocoa powder
- 1/2 teaspoon salt
- 2 tablespoons instant espresso powder
- 1/2 cup dark chocolate chips
Instructions:
- Preheat the Oven: Begin by preheating your oven to 350°F (175°C). This guarantees that your brownies bake evenly.
- Prepare the Baking Dish: Line an 8×8 inch baking dish with parchment paper, leaving some overhang on the sides for easy removal of the brownies once baked.
- Melt the Butter: In a medium saucepan, melt the butter over low heat. Once melted, remove from heat and stir in the granulated sugar, making sure it dissolves completely.
- Combine Wet Ingredients: Allow the butter and sugar mixture to cool slightly, then whisk in the eggs one at a time, making sure each is fully incorporated before adding the next. Add the vanilla extract and mix well.
- Mix Dry Ingredients: In a separate bowl, sift together the flour, cocoa powder, salt, and espresso powder. This helps to eliminate any lumps and blends the dry ingredients thoroughly.
- Combine Wet and Dry Ingredients: Gradually add the dry ingredients to the wet mixture, stirring gently with a spatula until just combined. Be careful not to overmix as this can result in tougher brownies.
- Add Chocolate Chips: Fold in the dark chocolate chips, distributing them evenly throughout the batter.
- Bake: Pour the batter into the prepared baking dish, spreading it out evenly. Bake for 25-30 minutes, or until a toothpick inserted into the center comes out with a few moist crumbs attached.
- Cool and Serve: Allow the brownies to cool in the pan on a wire rack for at least 15 minutes. Use the parchment overhang to lift the brownies out of the pan, then cut into squares and serve.
Extra Tips:
For the best results, use high-quality cocoa powder and chocolate chips, as they directly impact the flavor and texture of the brownies. If you prefer a more intense coffee flavor, you can increase the amount of espresso powder slightly.
Be sure not to overbake the brownies; they should be fudgy in the center. Additionally, for a festive Halloween touch, consider dusting the top with a little edible gold or silver glitter before serving. Enjoy these sumptuous treats with a cup of espresso or a glass of dessert wine for the ultimate Halloween indulgence.
Chai Spiced Ghost Meringues
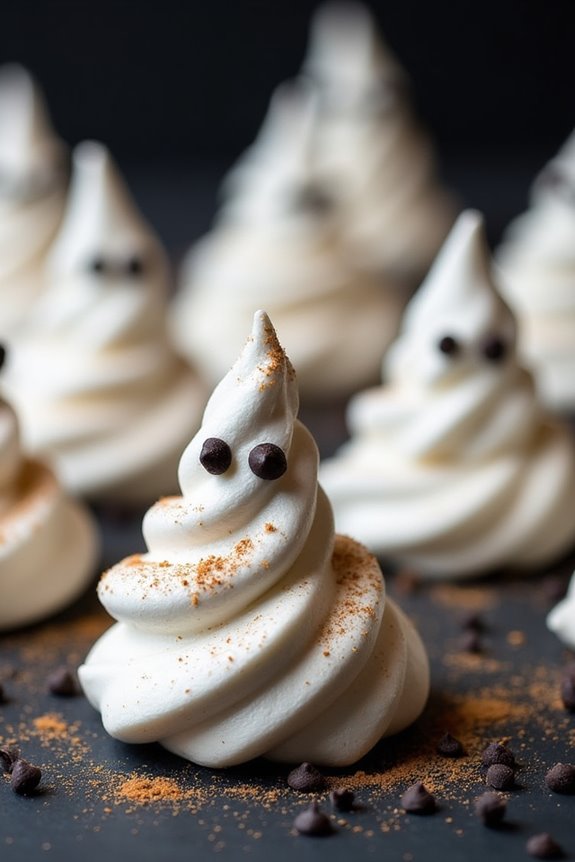
Chai Spiced Ghost Meringues are a delightful and whimsical treat that’s perfect for an adult Halloween gathering. These ethereal meringues are infused with the warm and aromatic flavors of chai spices, adding an unexpected twist to a classic confection.
Shaped into ghostly figures, they bring a playful spirit to any Halloween dessert table while tantalizing your taste buds with a sophisticated blend of spices. Perfectly crisp on the outside and soft on the inside, these meringues offer a light and airy texture that pairs beautifully with a spooky, festive atmosphere.
Crafting these ghostly delights is a fun and straightforward process that results in a unique and delicious dessert. The chai spices, including cinnamon, cardamom, and cloves, add depth and complexity to the meringues, making them a sophisticated choice for adult gatherings.
Whether you’re hosting a Halloween party or simply looking for a themed dessert to enjoy with friends, these Chai Spiced Ghost Meringues are bound to be a hit. With just a few ingredients and some creative piping skills, you can bring these charmingly eerie treats to life.
Ingredients for 4-6 servings:
- 4 large egg whites
- 1 cup granulated sugar
- 1 teaspoon vanilla extract
- 1 teaspoon ground cinnamon
- 1/2 teaspoon ground cardamom
- 1/4 teaspoon ground cloves
- Pinch of salt
- Black food coloring gel or chocolate chips for eyes
Instructions:
- Prepare the Oven and Baking Sheets: Preheat your oven to 200°F (93°C). Line two baking sheets with parchment paper to prevent the meringues from sticking.
- Beat the Egg Whites: In a large, clean mixing bowl, add the egg whites and a pinch of salt. Using an electric mixer, beat the egg whites on medium speed until soft peaks form.
- Incorporate Sugar Gradually: Gradually add the granulated sugar, one tablespoon at a time, while continuing to beat the mixture. Increase the mixer speed to high and beat until stiff, glossy peaks form.
- Add Flavorings: Gently fold in the vanilla extract, ground cinnamon, cardamom, and cloves until well combined. Be careful not to deflate the meringue mixture.
- Pipe the Ghost Shapes: Transfer the meringue mixture to a piping bag fitted with a large round tip. Pipe ghost shapes onto the prepared baking sheets by creating a base and gradually pulling up to form the peak of the ghost. Use black food coloring gel or chocolate chips to create eyes on each ghost.
- Bake the Meringues: Place the baking sheets in the preheated oven and bake for 1.5 to 2 hours, or until the meringues are dry and can easily be lifted off the parchment paper. Turn off the oven and let the meringues cool completely inside the oven to guarantee they become crisp.
- Serve and Enjoy: Once cooled, gently remove the meringues from the parchment paper and serve immediately or store in an airtight container for up to a week.
Extra Tips:
For the best results, make sure your mixing bowl and beaters are completely clean and free of any grease, as this can prevent the egg whites from whipping properly.
If you’re new to piping, practice ghost shapes on a piece of parchment paper before moving to the actual baking sheet. Additionally, be patient during the baking and cooling process, as this low and slow method is essential for achieving the desired texture.
Finally, feel free to experiment with the chai spices to suit your personal taste preferences – a touch more cinnamon or a hint of nutmeg can offer a delightful variation.
Maple Bourbon Pecan Pie Bars
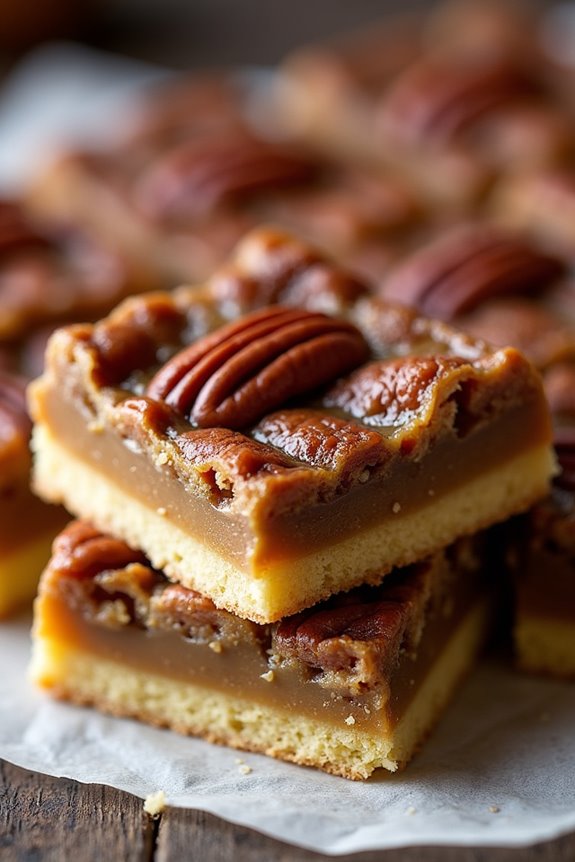
Maple Bourbon Pecan Pie Bars are a sophisticated twist on the classic pecan pie, perfect for a Halloween gathering of adults who appreciate a blend of rich, nutty flavors with a hint of warmth from bourbon. These bars feature a buttery shortbread crust, topped with a gooey, sweet filling of maple syrup, bourbon, and crunchy pecans. The combination of these ingredients creates a dessert that’s both decadent and uniquely festive, making it an ideal treat for an adult Halloween party.
These bars are easy to make and can be prepared in advance, allowing you to focus on other party preparations. The use of bourbon not only enhances the depth of flavor but also gives the dessert a grown-up touch that sets it apart from traditional Halloween treats. Whether you’re hosting a gathering or attending one, these Maple Bourbon Pecan Pie Bars are sure to captivate and satisfy the crowd.
Ingredients (Serving size: 4-6 people):
- 1 cup all-purpose flour
- 1/2 cup unsalted butter, softened
- 1/4 cup granulated sugar
- 1/4 teaspoon salt
- 2 large eggs
- 1 cup packed brown sugar
- 1/2 cup pure maple syrup
- 1/4 cup bourbon
- 1 teaspoon vanilla extract
- 1 1/2 cups pecan halves
Cooking Instructions:
- Preheat the Oven: Begin by preheating your oven to 350°F (175°C). This guarantees that your oven is at the right temperature when you’re ready to bake the bars.
- Prepare the Crust: In a medium bowl, combine the flour, softened butter, granulated sugar, and salt. Mix until the ingredients are well incorporated and the mixture becomes crumbly. Press this mixture evenly into the bottom of a greased 9×9-inch baking pan to form the crust.
- Bake the Crust: Place the crust in the preheated oven and bake for 15 minutes, or until it’s lightly golden. Remove the pan from the oven and set it aside to cool slightly.
- Prepare the Filling: In a large bowl, whisk together the eggs, brown sugar, maple syrup, bourbon, and vanilla extract until smooth and well combined.
- Add Pecans: Stir the pecan halves into the filling mixture, ensuring they’re evenly distributed throughout the mixture.
- Assemble the Bars: Pour the filling over the pre-baked crust, spreading it evenly with a spatula to guarantee the pecans are distributed evenly across the surface.
- Bake the Bars: Place the assembled bars back into the oven and bake for 30-35 minutes, or until the filling is set and slightly firm to the touch.
- Cool and Cut: Allow the bars to cool completely in the pan on a wire rack. Once cooled, cut them into squares or bars using a sharp knife.
Extra Tips:
To achieve the best flavor, use high-quality maple syrup and bourbon, as these ingredients are key to the dish’s rich taste. If you prefer a stronger bourbon flavor, consider increasing the bourbon slightly, but be careful not to overpower the other flavors.
For a neat presentation, chill the bars in the refrigerator for a few hours before cutting; this will make them easier to slice. Additionally, these bars can be made a day in advance and stored in an airtight container at room temperature, allowing the flavors to meld beautifully over time.
Vampire Wine Poached Pears

Vampire Wine Poached Pears are a sophisticated and hauntingly delicious dessert perfect for an adult Halloween gathering. This dish takes the natural elegance of poached pears and infuses them with a deep crimson hue reminiscent of a vampire’s thirst. The use of red wine not only imparts a rich color but also layers the dessert with a complexity of flavors, making it a truly indulgent experience.
Ideal for those wanting to strike a balance between eerie and elegant, these pears will leave your guests both enchanted and satisfied. This recipe serves 4-6 people, depending on your serving size, and is an excellent choice for a Halloween-themed dinner party or a cozy night in with friends.
The preparation involves poaching ripe pears in a spiced red wine mixture until they’re tender and infused with flavor. Once done, the pears are served with the reduced wine syrup, creating a visually stunning and tastefully complex dessert that celebrates the dark and mysterious spirit of Halloween.
Ingredients:
- 4-6 ripe but firm pears, peeled with stems intact
- 1 bottle (750ml) of dry red wine
- 1 cup granulated sugar
- 1 cinnamon stick
- 4 cloves
- 1 vanilla bean, split (or 1 teaspoon vanilla extract)
- Zest of 1 orange
- 1/4 cup fresh orange juice
- 1 star anise (optional)
Cooking Instructions:
- Prepare the Wine Mixture: In a large saucepan, combine the red wine, sugar, cinnamon stick, cloves, vanilla bean, orange zest, orange juice, and star anise if using. Stir over medium heat until the sugar has completely dissolved.
- Peel the Pears: While the wine mixture is coming to a simmer, carefully peel the pears, leaving the stems intact. Trim the bottoms slightly if necessary to help them stand upright.
- Poach the Pears: Gently place the peeled pears into the simmering wine mixture. Make certain that the pears are mostly submerged in the liquid. Cover the saucepan with a lid and allow the pears to poach gently over low heat for about 25-30 minutes, turning occasionally to make certain of even cooking.
- Check for Doneness: The pears are done when a knife can easily pierce through the flesh without resistance. Adjust the poaching time based on the size and ripeness of your pears.
- Reduce the Wine Syrup: Once the pears are tender, carefully remove them from the saucepan and set them aside. Increase the heat to medium-high and bring the wine mixture to a boil. Allow it to reduce to a syrupy consistency, approximately 10-15 minutes.
- Serve: Place each pear on a dessert plate and drizzle generously with the reduced wine syrup. Optionally, you can garnish with a dollop of whipped cream or a scoop of vanilla ice cream.
Extra Tips:
When choosing pears for this dish, opt for varieties like Bosc or Anjou, which hold their shape well during poaching. If you’re serving this dessert at a party, consider poaching the pears a day in advance and letting them soak in the wine overnight for an even deeper flavor. Just be sure to reheat the syrup before serving for that warm, inviting finish.
Additionally, if you prefer a non-alcoholic version, substitute the red wine with pomegranate or cranberry juice for a similarly rich color and flavor.
Spooky Saffron and Almond Rice Pudding

As the cool autumn winds usher in the eerie charm of Halloween, it’s time to set the stage for a festive feast that caters to the adult palate. Spooky Saffron and Almond Rice Pudding is an enchanting dessert that combines the luxurious aroma of saffron with the nutty richness of almonds, perfect for a sophisticated Halloween gathering.
This pudding is a delightful twist on the classic rice pudding, with a ghostly presentation that can be enhanced with a few clever tricks for an eerie effect. This dish isn’t only a treat for the taste buds but also a visual delight that can set the perfect tone for an adult Halloween party.
The golden hue from the saffron threads and the crunch of almonds create a luxurious texture that contrasts beautifully with the creamy rice pudding base. Serve it in dark, gothic-themed bowls to enhance the spooky theme, and you’ll have a dessert that both intrigues and satisfies. This recipe serves 4-6 people, making it ideal for small gatherings or an intimate dinner party.
Ingredients:
- 1 cup basmati rice
- 4 cups whole milk
- 1/2 cup heavy cream
- 1/2 cup granulated sugar
- A pinch of saffron threads
- 1/4 cup slivered almonds
- 1/2 teaspoon ground cardamom
- 1/4 teaspoon salt
- 2 tablespoons rose water
- 1 teaspoon vanilla extract
- Black food coloring (optional for spooky effect)
- Edible silver leaf or edible glitter (optional for decoration)
Instructions:
- Prepare the Rice: Rinse the basmati rice under cold water until the water runs clear to remove excess starch. Allow it to soak in water for about 30 minutes, then drain.
- Infuse the Milk: In a large saucepan, combine the whole milk and heavy cream. Heat the mixture over medium heat until warm, but don’t let it boil. Add the saffron threads and let them steep for about 5 minutes to release their color and aroma.
- Cook the Rice: Add the soaked and drained rice to the milk mixture. Reduce the heat to low and cook, stirring occasionally, for about 30-40 minutes until the rice is tender and the mixture thickens.
- Add Sweetness and Flavor: Stir in the sugar, ground cardamom, and salt. Continue to cook for another 5-10 minutes until the sugar dissolves and the pudding reaches your desired consistency.
- Finish with Aromatics: Remove the saucepan from heat. Stir in the rose water and vanilla extract for an aromatic finish. If you want a spooky effect, add a few drops of black food coloring to give the pudding a ghostly hue.
- Garnish and Serve: Toast the slivered almonds in a dry skillet over medium heat until golden brown. Sprinkle them over the pudding. Optionally, add edible silver leaf or edible glitter for an extra spooky and elegant touch. Serve warm or chilled.
Extra Tips:
For the best results, use high-quality saffron, as it greatly impacts the flavor and color of the pudding. To achieve the perfect creamy consistency, be patient and allow the pudding to cook slowly, stirring frequently to prevent sticking.
If you prefer a thicker pudding, let it cook a bit longer, but keep in mind it will thicken further as it cools. Adjust the sweetness to your taste by adding more or less sugar. If serving chilled, prepare the pudding a few hours in advance and let it rest in the refrigerator.
Don’t forget to add those spooky embellishments just before serving to maintain their visual impact!
Black Licorice and Lemon Gelato
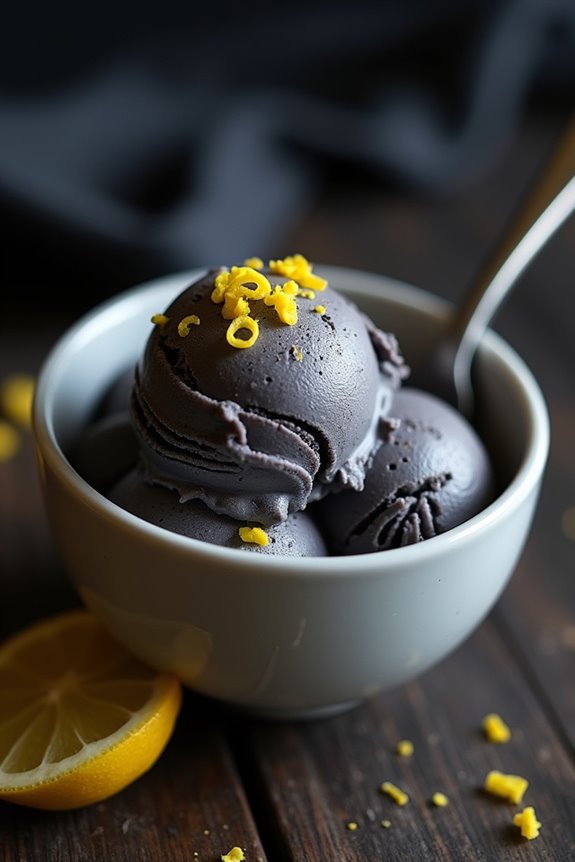
Indulge in a sophisticated and spooky treat this Halloween with Black Licorice and Lemon Gelato. This unique blend brings together the bold, aromatic flavor of black licorice with the zesty brightness of lemon, creating a dessert that’s both invigorating and intriguing.
Ideal for adult gatherings, this gelato offers a taste that’s both familiar and daring, perfect for those seeking something different from the classic Halloween sweets. The creamy texture of the gelato is achieved through a careful balance of ingredients, and the stark contrast of colors makes it an eye-catching addition to any Halloween spread.
Whether you’re a fan of licorice or simply looking to experiment with new flavors, this dessert promises to be a conversation starter. Immerse yourself in this recipe for Black Licorice and Lemon Gelato, serving 4-6 people, and surprise your guests with a chillingly delightful dessert.
Ingredients:
- 1 cup whole milk
- 1 cup heavy cream
- 3/4 cup sugar
- 4 large egg yolks
- 1 teaspoon pure black licorice extract
- 1 tablespoon fresh lemon juice
- Zest of 1 lemon
- Black food coloring (optional)
Instructions:
- Heat the Milk and Cream: In a medium saucepan, combine the whole milk and heavy cream. Heat the mixture over medium heat until it’s steaming but not boiling.
- Whisk the Egg Yolks and Sugar: In a separate bowl, whisk together the egg yolks and sugar until the mixture is pale and thick.
- Temper the Egg Mixture: Slowly pour a small amount of the hot milk and cream into the egg yolk mixture, whisking constantly to avoid curdling the eggs. Gradually add the rest of the milk mixture while continuing to whisk.
- Cook the Custard: Pour the combined mixture back into the saucepan. Cook over low heat, stirring constantly with a wooden spoon, until the custard thickens enough to coat the back of the spoon.
- Add Flavor and Color: Remove the saucepan from heat. Stir in the black licorice extract, fresh lemon juice, and lemon zest. If desired, add a few drops of black food coloring to achieve a darker hue.
- Chill the Mixture: Transfer the custard to a bowl and cover with plastic wrap, pressing it directly onto the surface to prevent a skin from forming. Refrigerate until completely cold, at least 4 hours or overnight.
- Churn the Gelato: Once chilled, pour the custard into an ice cream maker and churn according to the manufacturer’s instructions until it reaches a soft-serve consistency.
- Freeze the Gelato: Transfer the gelato to an airtight container and freeze for at least 2 hours to allow it to firm up before serving.
Extra Tips:
For those who aren’t fans of black licorice, consider starting with a smaller amount of licorice extract and gradually adding more to taste. The lemon zest can be adjusted for more or less citrus flavor, depending on your preference.
Confirm that the custard is fully chilled before churning to achieve the best texture. If you don’t have an ice cream maker, you can freeze the mixture in a shallow dish, stirring every 30 minutes until it reaches the desired consistency.
Enjoy this bold and unique gelato as a standalone treat or paired with a lemon cookie for an extra zing.
Smoky Mezcal Chocolate Mousse
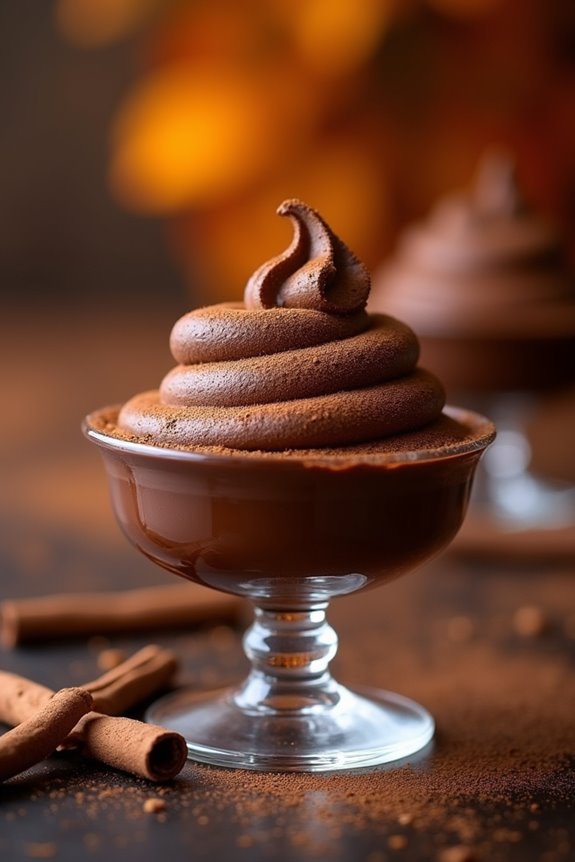
Halloween is a time for indulgence, and while the kids are out trick-or-treating, the adults can enjoy a sophisticated treat of their own. Smoky Mezcal Chocolate Mousse is a decadent dessert that combines the rich, velvety texture of chocolate mousse with the complex, smoky flavor of mezcal.
This dessert is perfect for those who appreciate the finer things in life and want to add a little grown-up flair to their Halloween festivities. The combination of dark chocolate and mezcal creates a bold flavor profile that’s both tantalizing and satisfying.
The smoky undertones of the mezcal enhance the bitterness of the dark chocolate, while a hint of cinnamon adds warmth, making this mousse an ideal dessert for a chilly October evening. Whether you’re hosting a Halloween dinner party or simply want to treat yourself, this Smoky Mezcal Chocolate Mousse is sure to impress.
Ingredients for 4-6 servings:
- 8 oz dark chocolate (70% cocoa), chopped
- 3 tablespoons mezcal
- 1 teaspoon ground cinnamon
- 4 large eggs, separated
- 1/4 cup sugar
- 1 cup heavy cream
- Pinch of salt
- Cocoa powder, for dusting
Instructions:
- Melt the Chocolate: In a heatproof bowl set over a pot of simmering water, melt the chopped dark chocolate, stirring occasionally until smooth. Remove from heat and stir in the mezcal and ground cinnamon. Allow it to cool slightly.
- Prepare the Egg Yolks: In a separate bowl, whisk together the egg yolks and sugar until the mixture is pale and slightly thickened. Gradually add the chocolate mixture to the yolk mixture, stirring continuously until well combined.
- Beat the Egg Whites: In another clean, dry bowl, beat the egg whites with a pinch of salt until soft peaks form. Gently fold the egg whites into the chocolate mixture in three additions, being careful not to deflate the mixture.
- Whip the Cream: In a separate bowl, whip the heavy cream until soft peaks form. Fold the whipped cream into the chocolate mixture until fully incorporated and smooth.
- Chill the Mousse: Divide the mousse into individual serving cups or bowls. Cover and refrigerate for at least 2 hours, or until set.
- Serve: Before serving, dust the tops with cocoa powder for an added touch of indulgence.
Extra Tips:
For the best results, confirm that all your ingredients are at room temperature before beginning the recipe to help them incorporate more smoothly.
When folding the whipped cream and egg whites into the chocolate mixture, use a gentle hand to maintain the mousse’s airy texture. If you prefer a milder mezcal flavor, reduce the mezcal to 2 tablespoons.
Finally, for an added touch of elegance, garnish with a sprinkle of sea salt or top with a dollop of freshly whipped cream just before serving.
Red Wine and Fig Dark Chocolate Bark
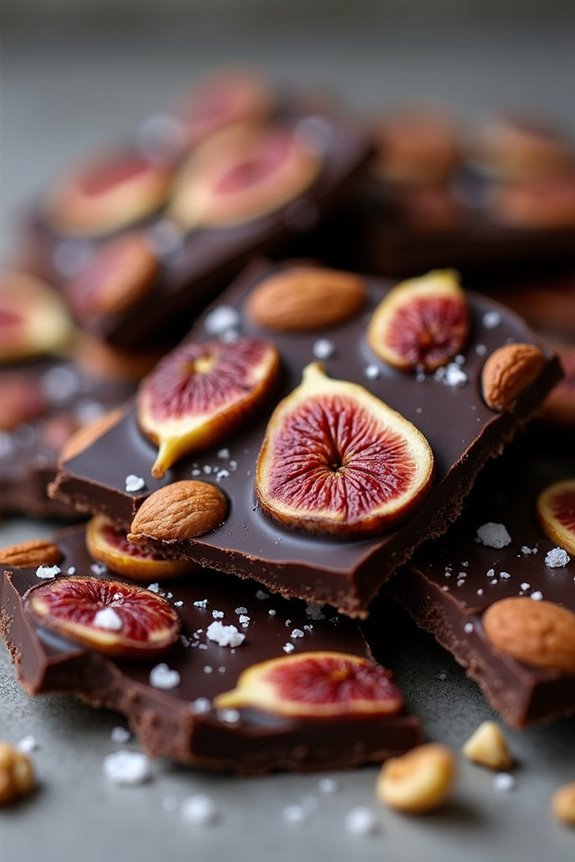
Indulge in a sophisticated treat this Halloween with a batch of Red Wine and Fig Dark Chocolate Bark. This dessert combines the rich flavors of dark chocolate with the fruity notes of red wine and the sweet, earthy taste of figs. It’s a perfect blend of flavors that caters to the adult palate, offering a unique twist on traditional Halloween sweets.
Whether you’re hosting a party or simply enjoying a quiet night in, this dessert will add a touch of elegance and decadence to your celebrations.
Preparing this chocolate bark is a delightful experience that’s as enjoyable as eating it. The process of melting chocolate and infusing it with red wine creates an intoxicating aroma that fills the kitchen. Dried figs add texture and a burst of flavor, complementing the smoothness of the chocolate.
The recipe is simple enough to prepare in advance, allowing you to focus on other party preparations or simply enjoy the festivities.
Ingredients (Serves 4-6):
- 12 ounces dark chocolate (at least 70% cocoa)
- 1/2 cup red wine (such as Merlot or Cabernet Sauvignon)
- 1/2 cup dried figs, chopped
- 1/4 cup almonds, chopped
- 1/4 cup walnuts, chopped
- Sea salt, for sprinkling
Instructions:
- Prepare the Ingredients: Start by chopping the dark chocolate into small pieces to guarantee it melts evenly. Chop the dried figs, almonds, and walnuts into small, bite-sized pieces and set aside.
- Melt the Chocolate: Place the chopped dark chocolate in a heatproof bowl over a saucepan of simmering water (double boiler method). Stir occasionally until the chocolate is completely melted and smooth.
- Infuse with Red Wine: Once the chocolate is melted, slowly pour in the red wine, stirring continuously. The chocolate may initially seize up, but keep stirring until the mixture becomes smooth and glossy again.
- Mix in the Figs and Nuts: Remove the bowl from the heat and stir in the chopped figs, almonds, and walnuts until they’re evenly distributed throughout the chocolate.
- Spread the Mixture: Line a baking sheet with parchment paper. Pour the chocolate mixture onto the parchment paper and spread it out evenly to about 1/4 inch thick using a spatula.
- Add a Finishing Touch: Sprinkle a light layer of sea salt over the top of the chocolate mixture to enhance the flavors.
- Chill and Set: Place the baking sheet in the refrigerator for at least two hours, or until the chocolate is fully set and hardened.
- Break and Serve: Once set, remove the chocolate bark from the fridge and break it into irregular pieces. Serve immediately or store in an airtight container.
Extra Tips: When selecting dark chocolate, opt for high-quality varieties with a high cocoa content for the best flavor. If you prefer a sweeter bark, you can adjust the ratio by using a blend of dark and milk chocolate.
For a more intense wine flavor, consider reducing the wine slightly on the stove before adding it to the chocolate. This dessert can also be customized by adding other dried fruits or nuts according to personal preference, making it a versatile option for any occasion.
Lavender Honey Skull Madeleines
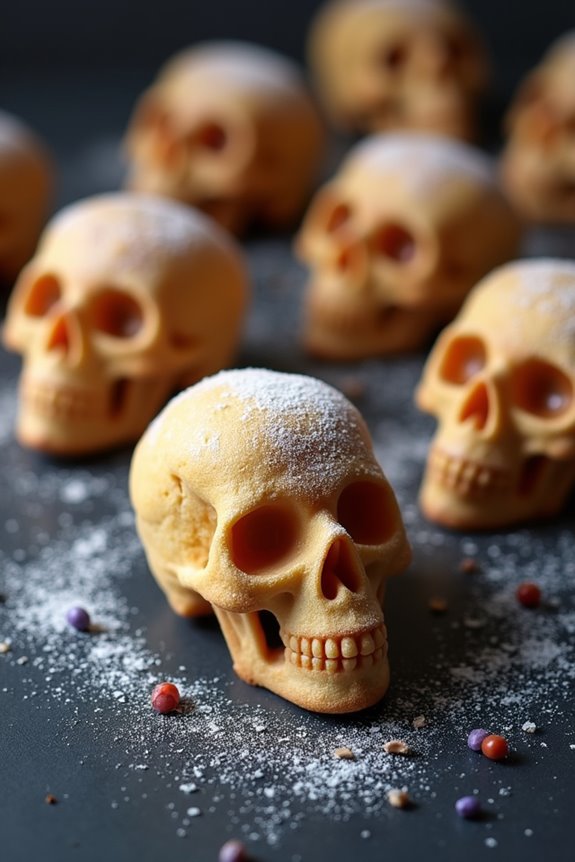
Lavender Honey Skull Madeleines are the perfect Halloween treat for adults seeking a sophisticated yet spooky dessert. These delicate French cakes, traditionally baked in shell-shaped molds, are given a haunting twist with skull-shaped molds. The subtle floral notes of lavender paired with the rich sweetness of honey make these madeleines an irresistible choice for your Halloween gathering. Not only do they taste divine, but their eerie appearance adds a touch of macabre elegance to any adult Halloween party.
The key to mastering Lavender Honey Skull Madeleines lies in balancing the flavors. Lavender can be quite potent, so it’s important to use it sparingly, guaranteeing it enhances rather than overpowers the delicate honey flavor. The combination of these ingredients will result in a moist, buttery cake with a unique taste profile. Serve them with a cup of tea or a glass of Prosecco for a truly indulgent experience. This recipe is designed to serve 4-6 people, making it ideal for a small gathering or intimate dinner party.
Ingredients:
- 1/2 cup unsalted butter, melted and cooled
- 2/3 cup all-purpose flour
- 1/2 teaspoon baking powder
- 1/4 teaspoon salt
- 2 large eggs
- 1/2 cup granulated sugar
- 1 tablespoon honey
- 1 teaspoon dried culinary lavender, ground
- 1 teaspoon vanilla extract
- 1 tablespoon powdered sugar for dusting (optional)
Cooking Instructions:
- Prepare the Skull Molds: Preheat your oven to 375°F (190°C). Lightly grease your skull-shaped madeleine molds with butter, guaranteeing every crevice is coated. This will help the madeleines release easily after baking.
- Mix Dry Ingredients: In a medium bowl, sift together the flour, baking powder, and salt. Sifting guarantees that the madeleines will have a light and airy texture.
- Beat Eggs and Sugar: In a separate large bowl, beat the eggs and granulated sugar using an electric mixer on high speed until the mixture is pale, thick, and doubled in volume, about 5 minutes.
- Add Honey and Lavender: Gently fold the honey, ground lavender, and vanilla extract into the egg mixture, taking care not to deflate the airy texture you’ve achieved.
- Incorporate Dry Ingredients: Gradually fold the flour mixture into the wet ingredients, doing so in batches to maintain the batter’s lightness.
- Add Melted Butter: Gently fold the cooled melted butter into the batter until just combined. The butter will add a rich flavor and moisture to the madeleines.
- Fill the Molds: Spoon the batter into the prepared skull molds, filling each one about three-quarters full to allow space for the madeleines to rise.
- Bake: Place the molds on a baking sheet and bake in the preheated oven for 10-12 minutes, or until the edges are golden brown and a toothpick inserted into the center comes out clean.
- Cool and Serve: Allow the madeleines to cool in the molds for a few minutes before gently removing them. Dust with powdered sugar if desired before serving.
Extra Tips:
When grinding the lavender, guarantee it’s finely ground to avoid any unpleasant texture in the madeleines. You can use a mortar and pestle or a spice grinder for this task.
Additionally, if you don’t have skull molds, standard madeleine molds can be used, though they won’t have the Halloween theme.
Finally, madeleines are best enjoyed fresh, but they can be stored in an airtight container for up to two days. Reheat them slightly in a warm oven for the best texture if serving later.