

As Halloween approaches, I’m thrilled to share some enchanting party food ideas that will captivate your guests and keep the spooky vibes alive. This year, I’ve found 11 recipes that are sure to impress, combining creativity with mouthwatering flavors. From creepy spider deviled eggs to haunting vampire bite cupcakes, each dish adds a whimsical touch that will be the talk of the party. Ready to bring these eerie treats to life at your celebration? Let’s get started on crafting some ghoulishly delightful bites!
Spooky Spider Deviled Eggs
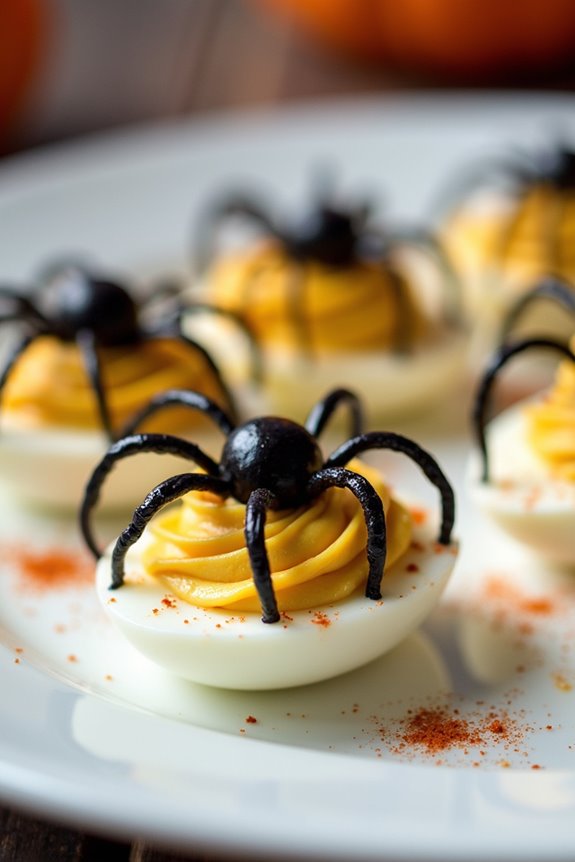
Spooky Spider Deviled Eggs are a fun and creepy addition to any Halloween party spread. These deviled eggs aren’t only delicious but also visually intriguing, with black olive spiders perched on top of each creamy, tangy egg half. The combination of flavors and textures makes this dish a hit amongst both kids and adults.
Whether you’re hosting a Halloween bash or just want to add some spooky fun to your dinner table, these deviled eggs are guaranteed to be a crowd-pleaser.
The key to making these eggs look spooky yet appetizing lies in the decoration. The black olives are cleverly cut to resemble spiders, which sit atop the classic deviled egg mixture of egg yolk, mayonnaise, mustard, and a hint of paprika. The result is a perfectly balanced bite of creamy filling and the slight brininess of the olives.
Serve them as an appetizer or as part of your Halloween buffet, and watch them disappear quickly!
Ingredients (serving size: 4-6 people):
- 6 large eggs
- 3 tablespoons mayonnaise
- 1 teaspoon yellow mustard
- Salt and pepper to taste
- Paprika for garnish
- 12 black olives
Cooking Instructions:
- Boil the Eggs: Place the eggs in a saucepan and cover them with water. Bring the water to a boil over medium-high heat. Once boiling, remove the saucepan from heat, cover it with a lid, and let the eggs sit for 12 minutes.
- Cool and Peel the Eggs: After 12 minutes, transfer the eggs to a bowl of ice water to cool them quickly. Once cooled, gently crack and peel the eggs under running water.
- Prepare the Egg Halves: Slice each egg in half lengthwise. Carefully remove the yolks and place them in a mixing bowl. Arrange the egg whites on a serving platter.
- Make the Filling: Mash the yolks with a fork until smooth. Add mayonnaise, mustard, salt, and pepper to the yolks and mix until well combined.
- Fill the Egg Whites: Use a spoon or a piping bag to fill each egg white half with the yolk mixture, mounding slightly.
- Create the Spiders: Slice the black olives in half. Place one half on each filled egg to form the spider’s body. Cut the remaining halves into thin strips to create legs, placing four on each side of the olive body.
- Garnish and Serve: Lightly sprinkle paprika over the filled eggs for added color and flavor. Serve immediately or refrigerate until ready to serve.
Extra Tips:
When making Spooky Spider Deviled Eggs, it’s important to ascertain that the eggs are thoroughly cooked but not overdone, as this can make peeling difficult. Fresh eggs may also be harder to peel, so using eggs that are a few days old can help.
If you’re short on time, consider prepping the eggs and the filling a day in advance; just assemble the spider decorations right before serving. For an extra spooky effect, use a small dab of cream cheese or mayonnaise to help the olive “spiders” adhere better to the eggs, preventing them from sliding off.
Ghostly Guacamole Dip
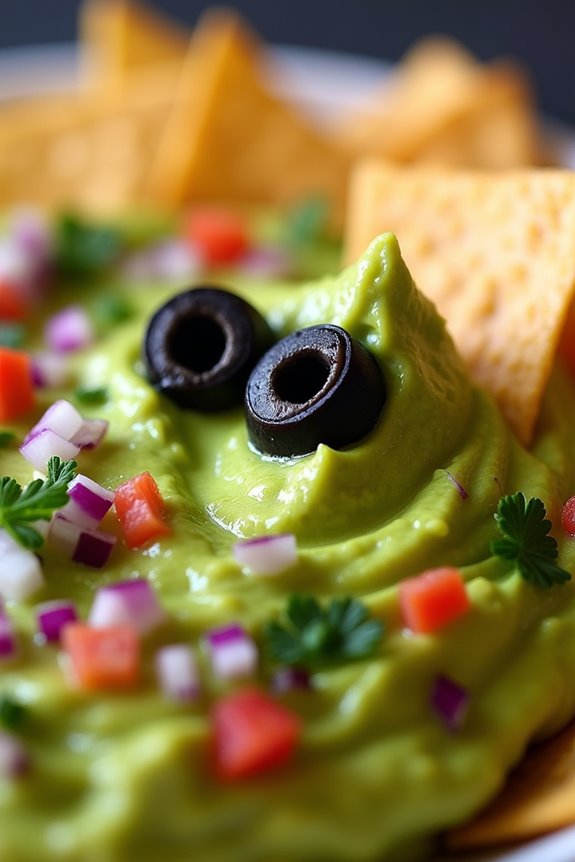
Halloween is a time for spooky treats and festive gatherings, and what better way to add a touch of eerie elegance to your party than with a Ghostly Guacamole Dip? This dish is a spooky twist on the classic guacamole, perfect for a Halloween-themed menu. Its vibrant green color and creamy texture make it a crowd-pleaser, while the ghostly presentation adds a playful touch.
Whether you’re hosting a big bash or a small get-together, this dip is sure to be a hit with guests of all ages. The Ghostly Guacamole Dip combines ripe avocados with a blend of fresh ingredients to create a flavorful and healthy snack. The dip is easy to prepare and can be made ahead of time, allowing you more time to enjoy the party.
Pair it with your favorite tortilla chips, veggie sticks, or even spooky-shaped crackers to complete the theme. This recipe serves 4-6 people, making it ideal for sharing with friends or family.
Ingredients for Ghostly Guacamole Dip (Serves 4-6):
- 3 ripe avocados
- 1 lime, juiced
- 1 small red onion, finely chopped
- 1 medium tomato, diced
- 1 clove garlic, minced
- 1 small jalapeño, seeded and finely chopped (optional)
- Salt, to taste
- Fresh cilantro, chopped (optional, for garnish)
- Black olives, sliced (for ghost eyes)
- Tortilla chips or veggie sticks (for serving)
Cooking Instructions:
- Prepare the Avocados: Start by cutting the avocados in half, removing the pits, and scooping the flesh into a mixing bowl. Use a fork to mash the avocados until you achieve a smooth yet slightly chunky consistency.
- Add Citrus and Seasoning: Squeeze the juice of one lime over the mashed avocados. The lime juice not only adds flavor but also helps to prevent the avocados from browning. Add a pinch of salt to taste, and mix well.
- Incorporate Fresh Ingredients: Add the finely chopped red onion, diced tomato, and minced garlic to the avocado mixture. If you prefer a bit of heat, include the chopped jalapeño. Stir everything together until well combined.
- Garnish the Dip: Transfer the guacamole to a serving dish. For a ghostly effect, use the black olive slices to create eyes on the surface of the dip. You can also sprinkle chopped cilantro over the top for added flavor and decoration.
- Serve and Enjoy: Serve the Ghostly Guacamole Dip with tortilla chips or veggie sticks on the side. Encourage guests to dip and enjoy this spooky treat.
Extra Tips:
To keep your Ghostly Guacamole Dip looking fresh and green, cover it tightly with plastic wrap, ensuring the wrap touches the surface of the dip to minimize air exposure, and refrigerate until ready to serve.
If you’re making the dip ahead of time, wait to garnish it with the olive eyes until just before serving to maintain their distinct appearance. For an extra festive touch, consider using Halloween-themed serving dishes or arranging the chips around the dip in a spooky pattern.
Witch’s Finger Breadsticks

Witch’s Finger Breadsticks are a spooky and delicious addition to any Halloween party. These creepy breadsticks are shaped like gnarly witch fingers, complete with almond fingernails and a hint of garlic flavor. Perfect for dipping in a marinara sauce or serving alongside a hearty stew, these breadsticks are guaranteed to delight both kids and adults.
The dough is simple to make and easy to work with, making this a fun recipe to prepare with the whole family. The key to achieving realistic witch fingers is in the detailing – a few strategic cuts and some careful placement of slivered almonds transform ordinary breadsticks into eerie finger-like creations.
These breadsticks bake to a golden brown, offering a crisp exterior with a soft, chewy interior. Whether you’re hosting a Halloween bash or looking for a fun activity to do with the kids, Witch’s Finger Breadsticks are sure to be a hit.
Ingredients (Serves 4-6):
- 2 ½ cups all-purpose flour
- 1 cup warm water
- 2 ¼ teaspoons active dry yeast
- 1 tablespoon sugar
- 1 teaspoon salt
- 2 tablespoons olive oil
- 2 tablespoons melted butter
- 2 teaspoons garlic powder
- ½ cup slivered almonds
- Red food coloring (optional)
Instructions:
- Prepare the Yeast Mixture: In a small bowl, combine the warm water, sugar, and yeast. Stir gently and let it sit for about 5-10 minutes until it becomes frothy. This indicates that the yeast is activated.
- Mix the Dough: In a large mixing bowl, combine the flour and salt. Make a well in the center and add the yeast mixture and olive oil. Mix until a dough forms.
- Knead the Dough: Turn the dough out onto a lightly floured surface and knead for about 8-10 minutes, until the dough is smooth and elastic.
- First Rise: Place the dough in a lightly greased bowl, cover with a damp cloth, and let it rise in a warm place for about 1 hour, or until doubled in size.
- Shape the Fingers: Preheat your oven to 375°F (190°C). Punch down the risen dough and divide it into 20-24 equal pieces. Roll each piece into a thin log, about 3-4 inches long. Pinch and shape one end to form a fingertip, and use a knife to make knuckle marks and wrinkles along the length.
- Add Fingernails: Press a slivered almond into the fingertip end of each breadstick to resemble a fingernail. For added effect, you can dip the almonds in red food coloring before placing them on the dough.
- Second Rise: Place the shaped fingers on a baking sheet lined with parchment paper. Cover with a towel and let them rise for another 10-15 minutes.
- Bake the Breadsticks: Brush the fingers with melted butter and sprinkle with garlic powder. Bake in the preheated oven for 15-20 minutes, or until they’re golden brown.
- Cool and Serve: Allow the breadsticks to cool slightly on the baking sheet before serving. Pair them with a side of marinara sauce for dipping.
Extra Tips:
When shaping the breadsticks, don’t worry about making each finger perfect – the more irregular and gnarled, the better! If you’re using food coloring, consider brushing a bit on the tips of the fingers for added spookiness.
Be sure to use fresh yeast for best results, and give the dough enough time to rise properly for a nice texture. If you want a more intense garlic flavor, consider adding minced garlic to the melted butter before brushing it on the breadsticks. Enjoy your Halloween treat!
Pumpkin Cheese Ball

The Pumpkin Cheese Ball is a festive and flavorful centerpiece for any Halloween party or fall gathering. This delightful dish combines a creamy cheese mixture with a variety of spices to create a savory appetizer that resembles a mini pumpkin.
It’s easy to prepare and can be made ahead of time, making it a convenient choice for entertaining. Served with crackers, vegetables, or breadsticks, this cheese ball will surely impress your guests with its charming appearance and delicious taste.
To make the Pumpkin Cheese Ball, you’ll need a combination of cream cheese, shredded cheddar cheese, and seasonings that are blended together and shaped into a ball. The exterior is coated with crushed nuts or crushed cheese-flavored crackers for a crunchy texture.
The final touch is adding a pretzel stick as the pumpkin stem and using parsley leaves to create a realistic pumpkin appearance. This recipe serves 4-6 people, making it perfect for small gatherings or as part of a larger spread.
Ingredients (serves 4-6):
- 16 oz cream cheese, softened
- 2 cups shredded cheddar cheese
- 1 teaspoon garlic powder
- 1 teaspoon onion powder
- 1 teaspoon smoked paprika
- 1/2 teaspoon cayenne pepper (optional, for a bit of heat)
- Salt and pepper to taste
- 1 cup crushed nuts or cheese-flavored crackers
- 1 large pretzel stick
- Fresh parsley leaves for garnish
Instructions:
- Prepare the Cheese Mixture: In a large mixing bowl, combine the softened cream cheese, shredded cheddar cheese, garlic powder, onion powder, smoked paprika, cayenne pepper (if using), salt, and pepper. Mix well using a hand mixer or a wooden spoon until all ingredients are thoroughly combined and the mixture is smooth.
- Shape the Cheese Ball: Lay a large piece of plastic wrap on a flat surface. Transfer the cheese mixture onto the plastic wrap and shape it into a ball using your hands. Wrap it tightly in the plastic wrap and refrigerate for at least 2 hours or until firm.
- Coat the Cheese Ball: Once the cheese ball is firm, remove it from the refrigerator and unwrap it. Roll the cheese ball in the crushed nuts or crushed cheese-flavored crackers until it’s evenly coated on all sides. Gently press the coating into the cheese ball to guarantee it sticks.
- Decorate the Cheese Ball: Insert a large pretzel stick into the top center of the cheese ball to resemble the pumpkin stem. Arrange fresh parsley leaves around the stem to mimic pumpkin leaves, enhancing the festive appearance.
- Serve and Enjoy: Place the Pumpkin Cheese Ball on a serving platter. Surround it with an assortment of crackers, sliced vegetables, or breadsticks for dipping. Serve chilled and enjoy the compliments!
Extra Tips:
For best results, make sure your cream cheese is well softened before mixing to guarantee a smooth texture.
Feel free to customize the cheese ball by adding other ingredients such as chopped chives, bacon bits, or different types of cheese to suit your taste. If you prefer a sweeter version, you can incorporate a small amount of honey or maple syrup into the cheese mixture.
Additionally, if you’re short on time, you can prepare the cheese ball a day in advance and keep it refrigerated until serving time.
Monster Eyeball Tacos
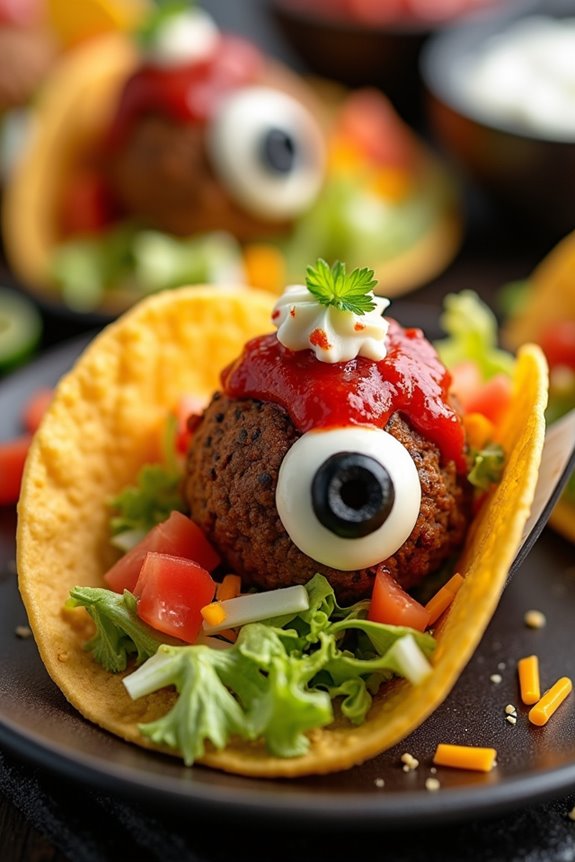
Monster Eyeball Tacos are a fun and spooky twist on a classic taco recipe, perfect for your Halloween party. These ghoulishly delightful tacos aren’t only visually entertaining but also deliciously satisfying. The main feature of the Monster Eyeball Tacos is the “eyeball,” which is crafted from seasoned meatballs, and when paired with vibrant toppings, it creates a spooky yet delectable treat that will be a hit at any Halloween gathering.
These tacos are easy to prepare and allow for a lot of creativity, making them a great choice for involving kids or guests in the preparation process. Using simple ingredients, you can quickly assemble these Monster Eyeball Tacos without spending hours in the kitchen. The key is in the presentation, so don’t forget to have some fun with it! This recipe serves 4-6 people, ensuring that your party guests will have plenty to enjoy.
Ingredients:
- 1 lb ground beef
- 1 packet taco seasoning
- 1 egg
- 1/4 cup breadcrumbs
- 12 taco shells
- 1 cup shredded lettuce
- 1 cup diced tomatoes
- 1 cup shredded cheese
- 1/2 cup black olive slices
- 12 small mozzarella balls
- 1/4 cup salsa
- 1/4 cup sour cream
Cooking Instructions:
- Prepare the Meatballs: In a large mixing bowl, combine the ground beef, taco seasoning, egg, and breadcrumbs. Mix well until all ingredients are fully incorporated. Roll the mixture into small meatballs, about the size of a walnut.
- Cook the Meatballs: Preheat the oven to 375°F (190°C). Place the meatballs on a baking sheet lined with parchment paper. Bake for 15-20 minutes, or until the meatballs are cooked through and browned on the outside.
- Assemble the Eyeballs: Once the meatballs are cooked, allow them to cool slightly. Place one mozzarella ball on top of each meatball and gently press a slice of black olive into the center of the mozzarella ball to create an “eyeball” effect.
- Prepare the Toppings: While the meatballs are cooking, prepare your taco toppings. Shred the lettuce, dice the tomatoes, and set out the shredded cheese, salsa, and sour cream in separate bowls.
- Warm the Taco Shells: Warm the taco shells according to the package instructions, usually by heating them in the oven for a few minutes.
- Assemble the Tacos: To assemble the tacos, start by placing a layer of shredded lettuce in each taco shell. Add a spoonful of diced tomatoes and cheese. Place a meatball “eyeball” on top of each taco, then finish with a dollop of salsa and sour cream.
Extra Tips:
For added flavor, consider adding a sprinkle of chopped cilantro or a squeeze of lime juice to each taco. You can also substitute the ground beef with ground turkey or chicken for a lighter option.
To make the presentation even more eerie, use a food-safe marker to draw red veins on the mozzarella balls before placing the olive slices. Remember, the key is to have fun and get creative with your presentation to make your Monster Eyeball Tacos the highlight of your Halloween feast!
Mummy Hot Dogs
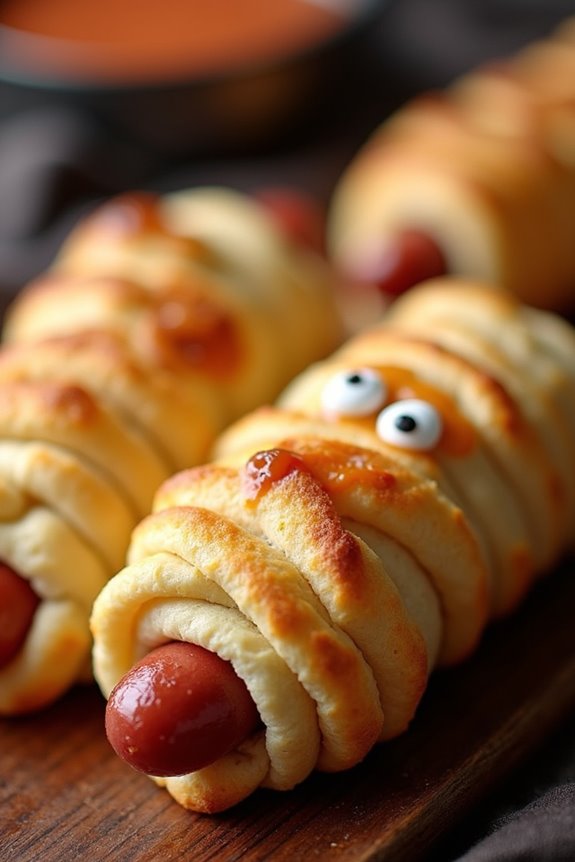
Mummy Hot Dogs are a fun and festive treat perfect for any Halloween party. These adorable snacks aren’t only easy to make but also a hit with both kids and adults. The concept is simple: hot dogs wrapped in crescent roll dough to resemble mummies, with little mustard or ketchup eyes to complete their spooky look.
They’re delicious, creative, and add a playful touch to your Halloween festivities. This recipe is great for serving 4-6 people, making it a perfect choice for small gatherings or family parties. With just a few ingredients and some creativity, you can whip up these tasty Mummy Hot Dogs in no time.
They’re best served warm and make for a perfect finger food that your guests can enjoy as they mingle and celebrate the holiday.
Ingredients:
- 1 can of crescent roll dough
- 8 hot dogs
- Mustard or ketchup (for eyes)
Cooking Instructions:
- Preheat the Oven: Start by preheating your oven to 375°F (190°C). This guarantees that your Mummy Hot Dogs will bake evenly and achieve a golden brown color.
- Prepare the Dough: Unroll the crescent roll dough and separate it into 8 rectangles. Pinch together any perforations to seal the dough completely, as you want a single, smooth piece for wrapping.
- Cut the Dough: Using a knife or pizza cutter, slice each rectangle into thin strips, about 1/4 inch wide. These strips will be the mummy’s “bandages.”
- Wrap the Hot Dogs: Take one hot dog and begin wrapping it with the dough strips, leaving a small gap near the top for the “face.” Overlap the strips slightly to mimic the look of a mummy’s bandages. Repeat this step for each hot dog.
- Bake: Place the wrapped hot dogs on a baking sheet lined with parchment paper or a silicone mat. Avoid overcrowding to guarantee they bake evenly. Bake in the preheated oven for 13-17 minutes, or until the dough is golden brown and cooked through.
- Add Eyes: Once baked, remove the Mummy Hot Dogs from the oven and let them cool slightly. Use a small dab of mustard or ketchup to create eyes on the exposed part of the hot dog.
Extra Tips:
For an extra spooky touch, consider using mini hot dogs and wrapping them with smaller strips of dough to create “baby mummies.” You can also experiment with different types of sausages or add cheese slices under the dough for additional flavor.
If you’re making these ahead of time, reheat them in the oven briefly before serving to maintain their crispiness. Enjoy your Mummy Hot Dogs warm for the best taste and texture!
Creepy Crawly Pudding Cups
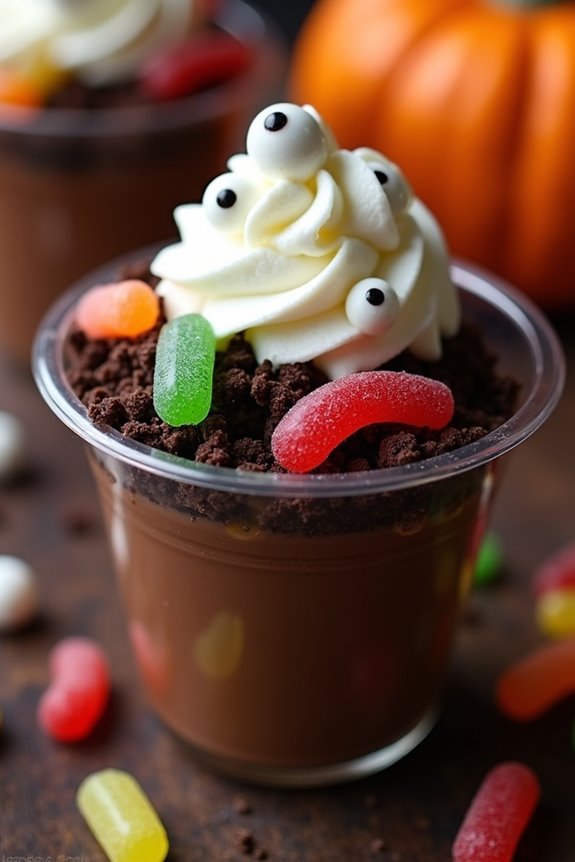
Creepy Crawly Pudding Cups are a fun and spooky treat perfect for your Halloween party. These delightful desserts aren’t only easy to make but also a hit among both kids and adults. The combination of rich chocolate pudding, crunchy cookie crumbs, and gummy worms creates an irresistible texture and flavor that will be the talk of your celebration.
Not only are they delicious, but their presentation is sure to add a festive and eerie touch to your Halloween table setup. These pudding cups are also incredibly versatile, allowing you to get creative with decorations and serving options. You can use different types of candy and toppings to personalize each cup, making it a unique and interactive dessert experience.
Whether you’re looking for a treat to serve at a Halloween party or a fun activity for the family, Creepy Crawly Pudding Cups are a perfect choice.
Ingredients (Serves 4-6):
- 2 cups chocolate pudding (store-bought or homemade)
- 12 chocolate sandwich cookies, crushed
- 1 pack gummy worms
- 1/2 cup whipped cream
- 1/4 cup candy eyeballs (optional)
- 6 clear plastic cups
Instructions:
- Prepare the Chocolate Pudding: If you’re making the pudding from scratch, follow the package instructions or your recipe to make 2 cups of chocolate pudding. Allow it to cool to room temperature if it’s freshly made.
- Crush the Cookies: Place the chocolate sandwich cookies in a resealable plastic bag and crush them using a rolling pin until they resemble fine crumbs. These will serve as the “dirt” layer in your pudding cups.
- Assemble the Cups: Begin by adding a layer of chocolate pudding at the bottom of each cup. Spoon a generous layer of crushed cookies on top of the pudding to create the appearance of soil.
- Add the Gummy Worms: Insert gummy worms into the cookie crumbs, positioning them so that they look like they’re crawling out of the dirt. Use as many or as few as you like based on your desired level of creepiness.
- Decorate with Whipped Cream and Candy Eyeballs: Add a dollop of whipped cream on top of the pudding and cookie layers. If desired, place candy eyeballs on the whipped cream for an extra spooky effect.
- Chill and Serve: Place the assembled cups in the refrigerator for at least 30 minutes before serving. This will allow the flavors to meld together and the pudding to set further.
Extra Tips:
- For an added twist, consider using a flavored pudding, such as dark chocolate or cookies and cream, to enhance the taste experience.
- If you’re serving these at a party, prepare the pudding cups a few hours in advance to save time. Just add the gummy worms and whipped cream right before serving for the best presentation.
- For a healthier alternative, you can substitute the chocolate pudding with a Greek yogurt-based chocolate mousse and use reduced-fat cookies.
- To make it more interactive for kids, set up a “build-your-own” pudding cup station with a variety of toppings like crushed nuts, sprinkles, and mini marshmallows.
Vampire Bite Cupcakes
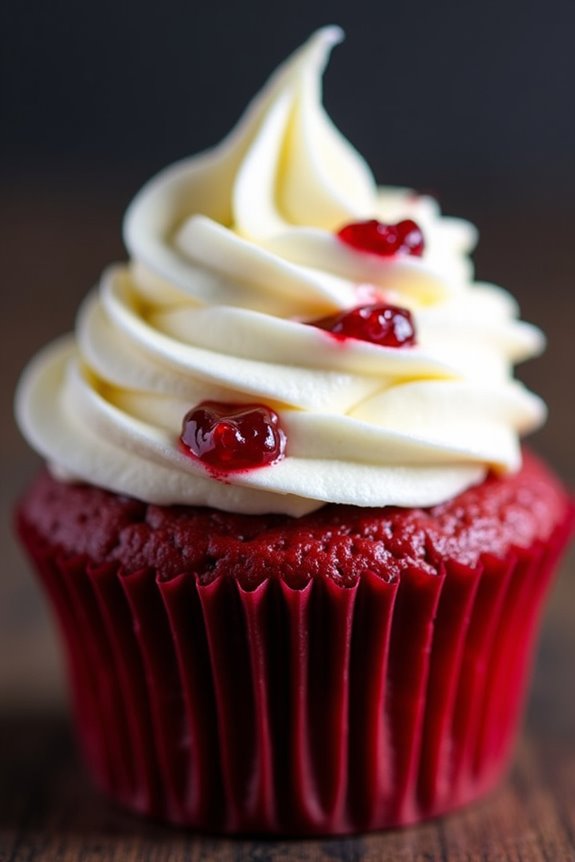
Vampire Bite Cupcakes are the perfect spooky treat to serve at your Halloween party. These delicious cupcakes have a rich red velvet base, a creamy frosting, and a surprise “bloody” filling that makes them both fun and slightly eerie. The combination of flavors and the unexpected “bite” effect will be certain to captivate your guests and keep them coming back for more.
The magic of these cupcakes lies in their presentation. The “bite marks” are created by strategically placing a cherry or raspberry filling inside the cupcake, resembling dripping blood. The final touch is a swirl of cream cheese frosting that tops off the cupcakes beautifully. Whether you’re hosting a Halloween party for kids or adults, these Vampire Bite Cupcakes will be a hit and add a ghoulish charm to your dessert spread.
Ingredients (Serving size: 4-6 people)
- 1 1/4 cups all-purpose flour
- 1 cup granulated sugar
- 1/2 cup unsalted butter, softened
- 2 large eggs
- 1 teaspoon vanilla extract
- 1/2 cup buttermilk
- 1 tablespoon red food coloring
- 1 teaspoon baking powder
- 1/2 teaspoon baking soda
- 1/4 teaspoon salt
- 1/4 cup cocoa powder
- 1 cup cherry or raspberry preserves
- 8 oz cream cheese, softened
- 1/4 cup unsalted butter, softened (for frosting)
- 2 cups powdered sugar
- 1 teaspoon vanilla extract (for frosting)
Instructions
- Prepare the Oven and Muffin Tin: Preheat your oven to 350°F (175°C) and line a muffin tin with paper cupcake liners. This will guarantee the cupcakes bake evenly and are easy to remove from the tin.
- Mix the Dry Ingredients: In a medium bowl, combine the flour, baking powder, baking soda, cocoa powder, and salt. Whisk them together to make sure they’re well combined and free of lumps.
- Cream the Butter and Sugar: In a large bowl, beat together the softened butter and sugar using an electric mixer until the mixture is light and fluffy. This usually takes about 3 minutes.
- Add the Wet Ingredients: Add the eggs one at a time, beating well after each addition. Then mix in the vanilla extract and red food coloring.
- Combine Wet and Dry Ingredients: Gradually add the dry ingredients to the wet ingredients, alternating with the buttermilk. Begin and end with the flour mixture. Mix until just combined; don’t overmix.
- Fill the Cupcake Liners: Scoop the batter into the prepared muffin tin, filling each liner about two-thirds full. This guarantees the cupcakes have room to rise without spilling over.
- Bake the Cupcakes: Place the tin in the preheated oven and bake for 18-20 minutes, or until a toothpick inserted in the center of a cupcake comes out clean. Allow the cupcakes to cool completely on a wire rack.
- Prepare the “Blood” Filling: Once the cupcakes are cool, use a small knife or a cupcake corer to remove a small section from the top of each cupcake. Fill the hole with a teaspoon of cherry or raspberry preserves and place the removed piece of cake back on top to cover the filling.
- Make the Frosting: In a medium bowl, beat together the cream cheese and butter until smooth. Gradually add the powdered sugar and vanilla extract, beating until the frosting is smooth and creamy.
- Decorate the Cupcakes: Frost each cupcake with the cream cheese frosting. You can use a piping bag with a decorative tip for a more polished look.
- Add Bite Marks: To create the “vampire bite” effect, dip a toothpick into the preserves and dot two small “bite” marks on the frosting of each cupcake.
Extra Tips
For the best results, confirm all of your refrigerated ingredients are at room temperature before starting. This will help the ingredients blend more smoothly and create a better texture for both the cupcakes and frosting.
If you’re short on time, the cupcakes can be baked a day in advance and stored in an airtight container. Just remember to fill them and frost them on the day of the party for maximum freshness.
You can also get creative with the “blood” filling by using a mix of preserves and a touch of red food dye for a more intense color.
Franken-Kabobs
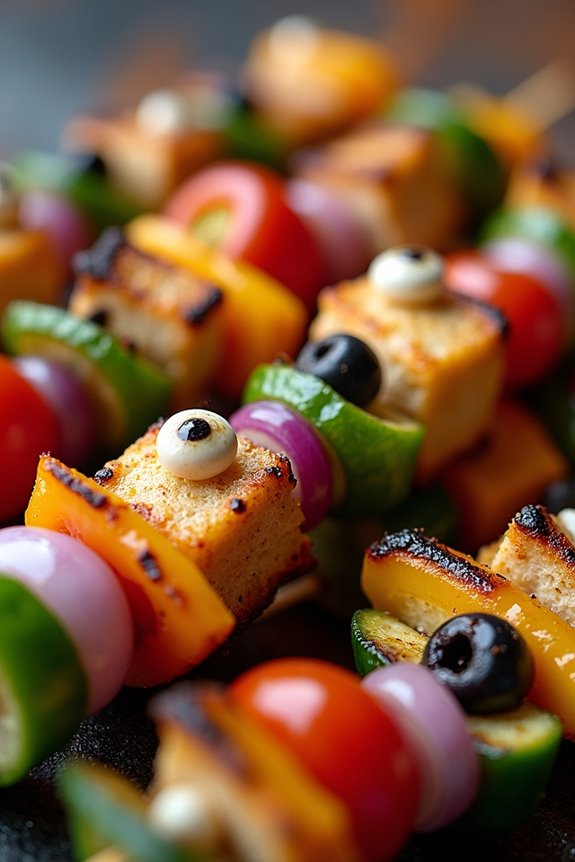
Franken-Kabobs are a fun and spooky addition to any Halloween party spread. These creative and delicious skewers are designed to resemble the iconic Frankenstein’s monster, with a mix of vibrant veggies, tender meats, and a few clever edible decorations to bring the character to life. Perfect for both kids and adults, these kabobs aren’t only visually appealing but also packed with flavor, making them an irresistible party snack.
The combination of colors and textures makes them a standout dish, and they’re easy to prepare ahead of time, leaving you free to enjoy your party. The Frankenstein theme is carried throughout the kabobs using green vegetables to mimic the monster’s skin, while olives and other ingredients are used for facial features. The skewers can be customized to suit different tastes, whether you prefer chicken, beef, or a vegetarian option.
Serve these Franken-Kabobs with a selection of dips to add even more flavor and fun to your gathering. Whether you’re throwing a big bash or a small get-together, these kabobs are sure to be a hit with all your guests.
Ingredients (serving size: 4-6 people):
- 12 wooden skewers
- 1 pound chicken breast, cut into 1-inch cubes
- 1 green bell pepper, cut into 1-inch squares
- 1 zucchini, sliced into thick rounds
- 1 cup cherry tomatoes
- 1 cup black olives
- 1/2 cup cubed cheddar cheese
- 1/2 cup cubed mozzarella cheese
- 1 small red onion, cut into wedges
- 1/4 cup olive oil
- 2 tablespoons soy sauce
- 1 teaspoon garlic powder
- Salt and pepper to taste
- Edible candy eyes (available at baking supply stores)
Cooking Instructions:
- Prepare the Marinade: In a mixing bowl, combine olive oil, soy sauce, garlic powder, salt, and pepper. Stir well to guarantee all ingredients are evenly mixed.
- Marinate the Chicken: Add the chicken cubes to the marinade, making sure they’re fully coated. Cover the bowl with plastic wrap and refrigerate for at least 30 minutes to allow the flavors to penetrate the meat.
- Prepare the Skewers: Soak the wooden skewers in water for 30 minutes. This prevents them from burning during grilling.
- Assemble the Kabobs: Thread the marinated chicken, green bell pepper, zucchini, cherry tomatoes, black olives, cheddar cheese, mozzarella cheese, and red onion onto the skewers. Alternate the ingredients to create a visually appealing pattern that resembles Frankenstein’s monster. Use olives as eyes and place candy eyes on top of the olives for a fun effect.
- Grill the Kabobs: Preheat a grill or grill pan over medium-high heat. Place the kabobs on the grill, turning occasionally, until the chicken is cooked through and the vegetables are tender, about 10-15 minutes.
- Serve: Remove the kabobs from the grill and arrange them on a serving platter. Serve immediately with your choice of dipping sauces.
Extra Tips:
For added flavor, you can include additional herbs such as rosemary or thyme in the marinade. If you’re opting for a vegetarian version, consider using tofu or tempeh as a substitute for chicken.
To enhance the Frankenstein theme, consider adding a bit of green food coloring to the marinade to give the chicken a greenish hue. For a more interactive experience, you can let guests assemble their own kabobs, providing a variety of ingredients and letting their creativity shine.
Skeleton Bone Cookies
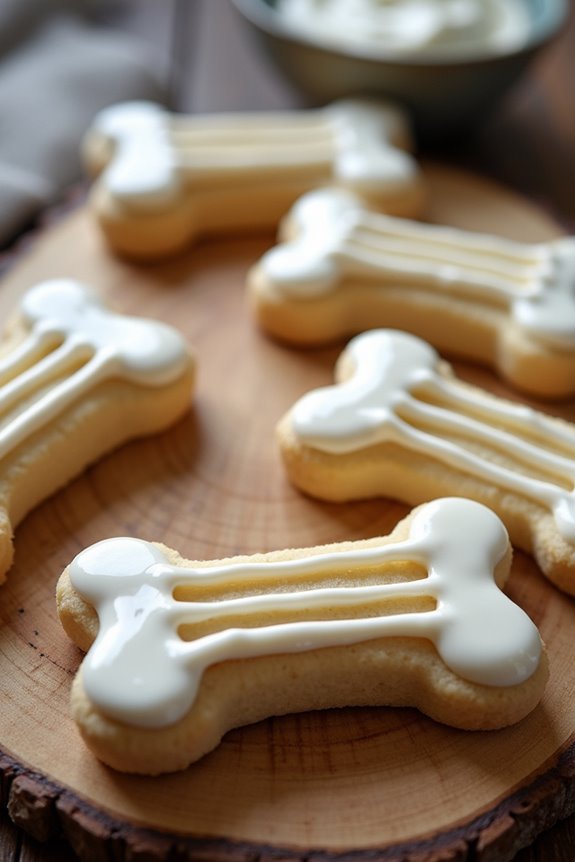
Skeleton Bone Cookies are the perfect spooky treat for your Halloween party. These cookies not only look impressively eerie, but they also taste delicious with their sweet and slightly crunchy texture. Shaped like bones, they add an extra element of fun to your Halloween festivities. With a bit of creativity and some basic baking ingredients, you can whip up these creepy confections that are certain to delight guests of all ages.
The beauty of Skeleton Bone Cookies lies in their simplicity. By using a basic sugar cookie recipe, you can easily form these cookies into bone shapes before baking. Afterward, a bit of royal icing gives them a ghostly white finish, enhancing their skeletal appearance. This recipe serves 4-6 people, making it perfect for a small gathering or family Halloween celebration.
Ingredients:
- 2 cups all-purpose flour
- 1/2 teaspoon baking powder
- 1/4 teaspoon salt
- 1/2 cup unsalted butter, softened
- 3/4 cup granulated sugar
- 1 large egg
- 1 teaspoon vanilla extract
- 1 1/2 cups powdered sugar
- 2-3 tablespoons milk
- 1/2 teaspoon almond extract (optional)
Cooking Instructions:
- Preheat and Prepare: Preheat your oven to 350°F (175°C). Line two baking sheets with parchment paper or silicone baking mats.
- Mix Dry Ingredients: In a medium bowl, whisk together the flour, baking powder, and salt. Set this mixture aside.
- Cream Butter and Sugar: In a large mixing bowl, beat the softened butter and granulated sugar together with an electric mixer until light and fluffy, about 2-3 minutes.
- Add Egg and Vanilla: Add the egg and vanilla extract to the butter-sugar mixture. Mix well until fully combined and smooth.
- Combine Dry and Wet Ingredients: Gradually add the dry ingredients to the wet mixture, mixing on low speed until a dough forms. Avoid overmixing to guarantee tender cookies.
- Shape the Cookies: Take small portions of dough and roll them into thin logs about 3 inches long. Pinch the ends to form bone shapes. Place them on the prepared baking sheets.
- Bake: Bake in the preheated oven for 10-12 minutes, or until the edges are lightly golden. Be careful not to overbake, as the cookies should remain soft in the center.
- Cool: Remove the cookies from the oven and let them cool on the baking sheets for a few minutes before transferring them to wire racks to cool completely.
- Make the Icing: In a small bowl, whisk together the powdered sugar, milk, and almond extract (if using) until smooth. Adjust consistency with more milk or sugar as needed.
- Decorate: Once the cookies are completely cool, use a piping bag or a small zip-top bag with a corner snipped off to pipe the icing onto the cookies, following the bone shape. Let the icing set completely before serving.
Extra Tips: To guarantee your Skeleton Bone Cookies hold their shape during baking, make sure your dough isn’t too warm. If it becomes sticky or hard to handle, refrigerate it for 20-30 minutes before shaping.
For an added touch of spookiness, consider adding a few drops of food coloring to the icing to create cracks or details on the bones. Keep in mind that these cookies can be prepared a day in advance and stored in an airtight container to maintain freshness.
Bloody Berry Punch
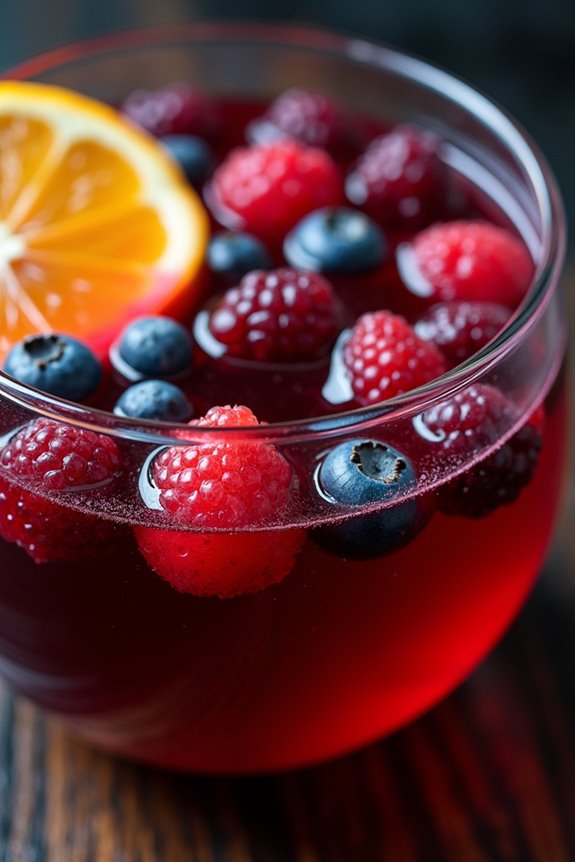
Bloody Berry Punch is the perfect beverage to serve at your Halloween party, offering a deliciously eerie touch to your festivities. This punch isn’t only visually striking with its deep red hue, but it also packs a flavorful punch with a mix of berries and citrus that’s sure to delight your guests.
Whether you’re hosting a small gathering or a larger party, this Bloody Berry Punch will make a spooktacular centerpiece for your beverage table. The rich, fruity flavors of the punch are complemented by a hint of citrus, making it both invigorating and tantalizingly sweet.
While the name may sound a bit sinister, the drink itself is family-friendly and can easily be modified for an adult version if desired. Prepare to impress your guests with this bewitching concoction that’s easy to make and guaranteed to be a hit at any Halloween celebration.
Ingredients for 4-6 Servings:
- 4 cups cranberry juice
- 2 cups pomegranate juice
- 1 cup orange juice
- 1 cup club soda or lemon-lime soda
- 1 cup mixed fresh or frozen berries (such as strawberries, raspberries, and blueberries)
- 1 orange, thinly sliced
- 1 lemon, thinly sliced
- Ice cubes
- Optional: 1 cup vodka or rum for an adult version
Instructions:
- Prepare the Base: In a large punch bowl or pitcher, combine the cranberry juice, pomegranate juice, and orange juice. Stir well to confirm all the juices are thoroughly mixed.
- Add the Fizz: Slowly pour in the club soda or lemon-lime soda. Stir gently to combine, being careful not to lose too much of the carbonation, which adds a delightful fizz to the punch.
- Incorporate the Fruits: Add the mixed berries, orange slices, and lemon slices to the punch. These not only enhance the flavor but also add a festive, colorful appearance to the drink.
- Chill the Punch: Add ice cubes to the punch to keep it cool. If you’re using frozen berries, they’ll also help maintain the chill.
- (Optional) Adult Version: If you prefer an alcoholic version, add 1 cup of vodka or rum and stir gently to combine. Confirm to label the punch appropriately if serving at a mixed-age party.
- Serve: Ladle the punch into glasses, making sure each serving includes some of the vibrant fruit slices and berries. Enjoy the invigorating taste and spooky appearance of your Bloody Berry Punch.
Extra Tips: To enhance the spookiness, consider freezing some of the berries in ice cube trays filled with a bit of cranberry juice, creating berry-filled ice cubes that will add a gory twist as they melt.
You can also use dry ice (handled with care) for a foggy, witch’s cauldron effect. Remember to adjust the sweetness by choosing between club soda for a less sweet option or lemon-lime soda for a sweeter taste. This punch is versatile, so feel free to experiment with different fruit combinations to suit your taste and theme.