

As Halloween approaches, I’m excited to share a collection of 13 spine-tingling snacks that are perfect for your spooky celebration. Picture yourself enjoying Monster Eyeball Deviled Eggs or nibbling on Witch’s Finger Breadsticks. Each recipe is a whimsical mix of creativity and a touch of the eerie. Are you prepared to make your Halloween gathering an unforgettable night filled with ghoulish treats? Let’s explore these bewitching creations together!
Monster Eyeball Deviled Eggs
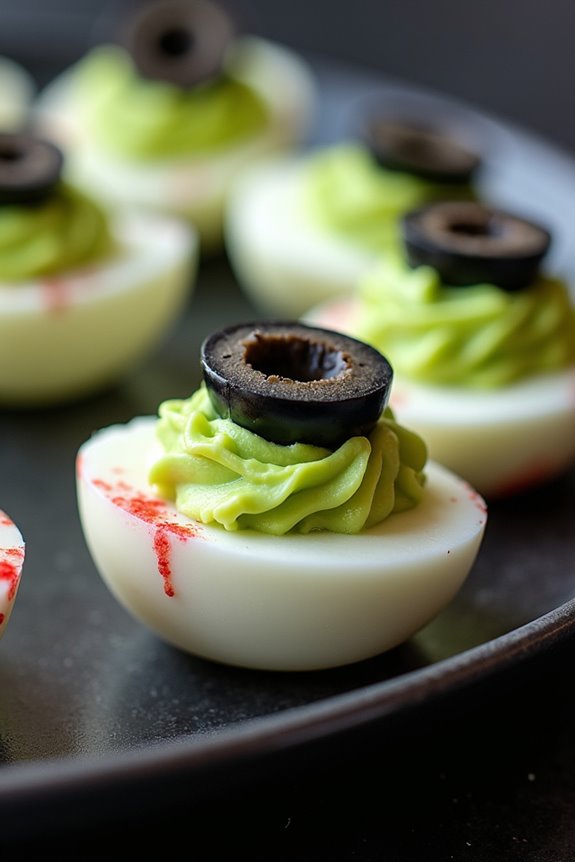
Monster Eyeball Deviled Eggs are a spooky and delicious addition to any Halloween snack spread. These creepy yet tasty treats are sure to delight both kids and adults at your Halloween party. The deviled eggs are designed to look like eerie monster eyeballs, with the vibrant yolk mixture forming the iris and a black olive slice serving as the ominous pupil. This fun and festive dish transforms the classic deviled egg into a playful and ghoulish appetizer.
The recipe combines the creamy texture of deviled eggs with a creative twist, making them the perfect conversation starter at your Halloween gathering. Not only are they visually appealing, but they’re also packed with flavor, thanks to a mix of mayonnaise, mustard, and a hint of paprika. With minimal ingredients and a straightforward preparation process, Monster Eyeball Deviled Eggs are an easy and time-efficient snack that will impress your guests and add a touch of frightful fun to your holiday menu.
Ingredients for 4-6 servings:
- 6 large eggs
- 3 tablespoons mayonnaise
- 1 teaspoon yellow mustard
- 1/4 teaspoon salt
- 1/4 teaspoon pepper
- 1/4 teaspoon paprika
- 6 black olives
- Green food coloring
- Red food coloring
Cooking Instructions:
- Boil the Eggs: Place the eggs in a single layer in a saucepan and cover them with cold water, about an inch above the eggs. Bring the water to a boil over medium-high heat. Once boiling, remove from heat and cover the saucepan. Let the eggs sit in the hot water for 10-12 minutes.
- Prepare the Eggs: After the eggs have cooked, drain the hot water and transfer them to a bowl of ice water to cool for at least 5 minutes. Once cooled, gently crack and peel the eggs.
- Halve the Eggs: Slice each egg in half lengthwise. Carefully remove the yolks and place them in a separate bowl, setting the egg whites aside.
- Make the Filling: Mash the egg yolks with a fork until crumbly. Add mayonnaise, mustard, salt, pepper, and paprika. Mix until smooth and creamy. Add a few drops of green food coloring to create a vibrant ‘iris’ color, mixing well to achieve an even shade.
- Fill the Egg Whites: Spoon or pipe the yolk mixture back into the hollowed-out egg white halves, filling them generously.
- Create the Monster Eyeballs: Slice the black olives into thin rings. Place one olive ring on top of each filled egg yolk, pressing gently to secure it as the ‘pupil.’ Add a drop of red food coloring around the edge of the yolk mixture to mimic bloodshot eyes.
- Chill and Serve: Refrigerate the completed Monster Eyeball Deviled Eggs for at least 30 minutes before serving to allow the flavors to meld and to keep them fresh.
Extra Tips: For an extra spooky effect, use a toothpick dipped in red food coloring to draw thin lines from the olive to the edge of the yolk mixture, simulating blood vessels. If you prefer a different flavor, consider adding a pinch of garlic powder or a splash of hot sauce to the yolk mixture for a little kick. Additionally, if you don’t have a piping bag, a resealable plastic bag with a corner snipped off works well for filling the eggs neatly. Serve these eerie eyeballs on a dark platter to enhance their spooky appeal at your Halloween festivities.
Witch’s Finger Breadsticks

Halloween is the perfect time to get creative in the kitchen and whip up some spooky treats that will delight both kids and adults alike. Witch’s Finger Breadsticks are a fun and eerie addition to any Halloween party spread. These breadsticks not only look the part with their ghoulish appearance but also taste deliciously savory. With a touch of garlic and Parmesan, they’re bound to be a hit among your guests.
The eerie fingers are shaped from pizza dough, which is easy to work with and bakes up to a crispy texture. Topped with almond slices to mimic fingernails and a touch of green food coloring for that extra spooky effect, these breadsticks are a visual treat. They’re perfect as an appetizer or a party snack and are sure to get everyone in the Halloween spirit.
Ingredients for Witch’s Finger Breadsticks (Serves 4-6):
- 1 pound pizza dough
- 1/4 cup all-purpose flour (for dusting)
- 1/4 cup unsalted butter, melted
- 2 teaspoons garlic powder
- 1/4 cup grated Parmesan cheese
- 24 whole blanched almonds
- Green food coloring
- Salt to taste
- 1 tablespoon dried oregano (optional)
Cooking Instructions:
- Preheat and Prepare: Preheat your oven to 375°F (190°C). Line a baking sheet with parchment paper to guarantee the breadsticks don’t stick.
- Prepare the Dough: Lightly dust your work surface with flour. Roll out the pizza dough to about 1/2-inch thickness. Cut the dough into 24 strips, roughly 4 inches long each.
- Shape the Fingers: Roll each strip slightly to create a more finger-like appearance. Pinch one end of each strip slightly to form a fingertip shape. Press an almond into the fingertip end to resemble a fingernail.
- Add the Details: Use a knife to make small horizontal cuts along the dough to mimic knuckles on each finger. Be gentle to avoid slicing through the dough.
- Color and Flavor: Mix the melted butter with garlic powder and a few drops of green food coloring. Brush this mixture over the fingers to give them a greenish hue and enhance flavor.
- Bake the Breadsticks: Arrange the fingers on the prepared baking sheet. Sprinkle Parmesan cheese and salt over them, and optionally add a sprinkle of dried oregano for extra flavor. Bake in the preheated oven for 20-25 minutes or until golden brown and crispy.
- Cool and Serve: Remove from the oven and let them cool slightly on a wire rack. Serve warm for the best taste.
Extra Tips:
To make these Witch’s Finger Breadsticks even more fun, consider adding a dipping sauce like marinara or ranch for an extra burst of flavor.
If you want to make the fingers more realistic, you can use a small amount of red food coloring at the base of the almond to mimic blood.
Remember to keep an eye on the breadsticks as they bake, as oven temperatures can vary, and you want them just golden brown without burning. Enjoy your spooky culinary creation!
Ghostly Popcorn Balls
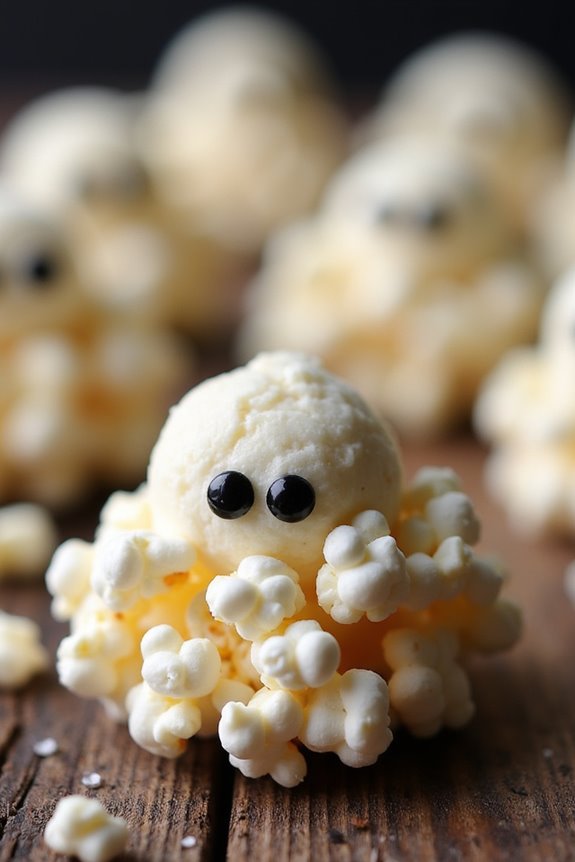
Ghostly Popcorn Balls are a delightful Halloween treat that combines the classic taste of popcorn with a spooky twist. Perfect for parties or family gatherings, these popcorn balls aren’t only fun to make but also a hit with both children and adults. The light and airy texture of popcorn, mixed with a sticky, sweet coating, creates a perfect balance of flavors. The ghostly appearance is achieved with a simple yet effective decorating technique, making these treats both tasty and visually appealing.
Creating Ghostly Popcorn Balls is a great activity to involve kids in the kitchen, as they can help shape the popcorn balls and add the ghostly decorations. The recipe is straightforward and doesn’t require any complicated ingredients, making it an accessible choice for any home cook. Whether you’re hosting a spooky soirée or just want to add some festive fun to your Halloween, these popcorn balls are bound to impress.
Plus, they can be made ahead of time, so you can focus on the rest of your party planning.
Ingredients for 4-6 Servings:
- 12 cups popped popcorn
- 1/2 cup unsalted butter
- 1 cup granulated sugar
- 1/2 cup light corn syrup
- 1/4 teaspoon salt
- 1 teaspoon vanilla extract
- Mini marshmallows (for decorating)
- Black gel icing (for decorating)
Cooking Instructions:
- Prepare the Popcorn: Begin by popping your popcorn. You can use an air popper or microwave method to achieve 12 cups of popcorn. Once popped, place the popcorn in a large mixing bowl, making sure to remove any unpopped kernels.
- Make the Syrup: In a medium saucepan, combine the butter, sugar, corn syrup, and salt over medium heat. Stir continuously until the mixture comes to a boil. Allow it to boil for about 2-3 minutes, then remove it from the heat and stir in the vanilla extract.
- Coat the Popcorn: Pour the hot syrup over the popcorn in the large mixing bowl. Using a spatula or wooden spoon, gently stir the popcorn until evenly coated with the syrup.
- Form the Balls: Once the popcorn mixture is cool enough to handle, but before it hardens, lightly butter your hands and form the popcorn into balls, each about the size of a small orange. This should yield approximately 8-10 popcorn balls.
- Decorate: While the popcorn balls are still slightly tacky, press two mini marshmallows onto each ball to form the ghost’s eyes. Use the black gel icing to dot eyes onto the marshmallows, completing the ghostly look.
- Let Set: Place the decorated popcorn balls on a sheet of wax paper and allow them to set completely at room temperature before serving.
Extra Tips:
To guarantee your Ghostly Popcorn Balls hold their shape, work quickly when forming them. If the syrup mixture begins to harden too fast, briefly heat it again to soften. Remember to butter your hands well to prevent sticking while shaping the balls.
For added fun, you can customize your ghost faces with different expressions using the black gel icing. Additionally, if you want to experiment with flavors, consider adding a dash of cinnamon or nutmeg to the syrup for a seasonal twist. Enjoy your spooky creations!
Spooky Spider Cookies
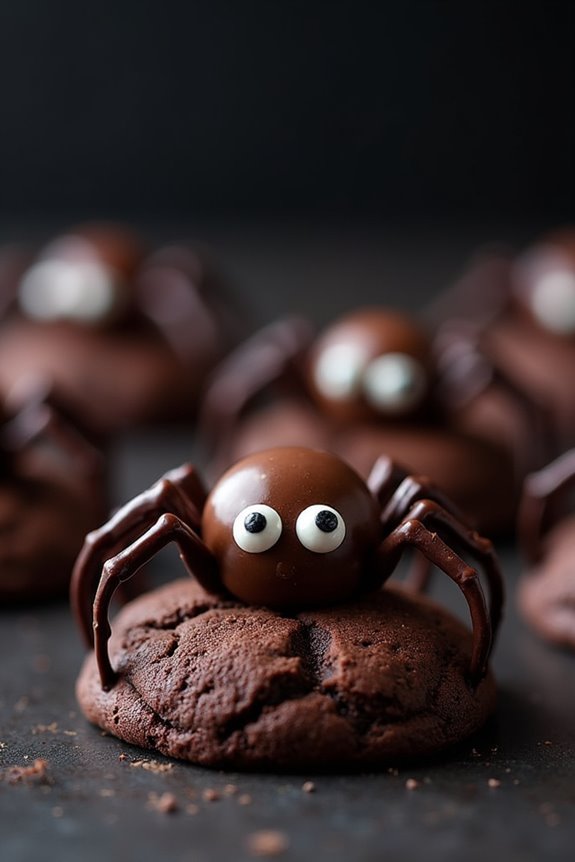
Get ready to add some frightful fun to your Halloween festivities with these Spooky Spider Cookies! These deliciously eerie treats are perfect for a Halloween party or a spooktacular dessert for your family. The combination of rich chocolate cookies with creepy candy spiders on top is sure to delight both kids and adults. Not only are they fun to make, but they’re also a great way to get everyone in the Halloween spirit.
The cookies are made from a simple chocolate dough that’s both chewy and rich, providing the perfect base for the spooky decorations. You’ll be using candy eyes and miniature chocolate truffles or peanut butter cups to create the spider bodies, while chocolate icing or melted chocolate will form the spider legs. These cookies serve 4-6 people, making them an excellent choice for a small gathering or family treat.
Ingredients for Spooky Spider Cookies:
- 1 cup all-purpose flour
- 1/2 cup unsweetened cocoa powder
- 1/2 teaspoon baking soda
- 1/4 teaspoon salt
- 1/2 cup (1 stick) unsalted butter, at room temperature
- 1/2 cup granulated sugar
- 1/4 cup brown sugar, packed
- 1 large egg
- 1 teaspoon vanilla extract
- 12 miniature chocolate truffles or peanut butter cups
- 24 candy eyes
- Chocolate icing or melted chocolate (for spider legs)
Cooking Instructions:
- Preheat and Prepare: Preheat your oven to 350°F (175°C). Line a baking sheet with parchment paper or a silicone baking mat.
- Mix Dry Ingredients: In a medium bowl, whisk together the flour, cocoa powder, baking soda, and salt. Set aside.
- Cream Butter and Sugars: In a large bowl, using an electric mixer, cream the butter, granulated sugar, and brown sugar together until light and fluffy, about 2-3 minutes.
- Add Egg and Vanilla: Beat in the egg and vanilla extract until well combined.
- Combine Mixtures: Gradually add the dry ingredients to the wet ingredients, mixing until just combined. Don’t overmix.
- Shape Cookies: Roll the dough into 1-inch balls and place them onto the prepared baking sheet, spacing them about 2 inches apart.
- Bake: Bake in the preheated oven for 8-10 minutes, or until the cookies are set but still soft in the center.
- Press Candy: Remove the cookies from the oven and immediately press a chocolate truffle or peanut butter cup into the center of each cookie. Allow the cookies to cool on the baking sheet for 5 minutes before transferring them to a wire rack to cool completely.
- Decorate: Once the cookies are cool, use the chocolate icing or melted chocolate to draw 8 spider legs around each candy, then attach 2 candy eyes to each candy body using a dab of icing or melted chocolate.
Extra Tips:
When making Spooky Spider Cookies, make sure your butter is at room temperature for the best consistency in your dough. If you find the dough too sticky to handle, chill it in the refrigerator for about 20 minutes before shaping into balls.
For an extra spooky effect, consider using colored candy eyes or adding a small amount of red gel icing for a bloodshot look. If you’re using melted chocolate for the legs, work quickly, as it can harden fast.
Store any leftover cookies in an airtight container to keep them fresh. Enjoy your creepy creations!
Pumpkin Patch Dirt Cups
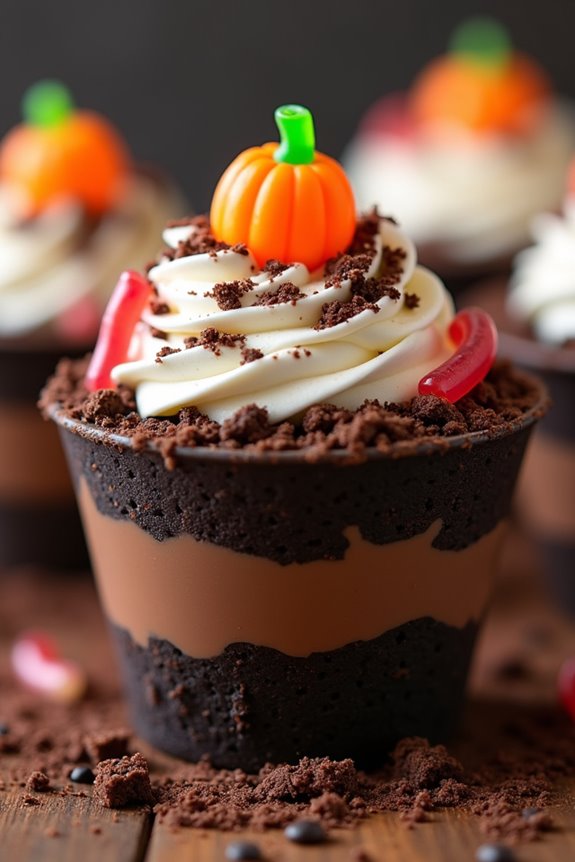
Pumpkin Patch Dirt Cups are a delightful and festive treat perfect for Halloween. This easy-to-make dessert combines the rich flavors of chocolate pudding and crushed cookies with a playful, autumn twist. It’s a great way to bring the spirit of Halloween to your table, and it’s bound to be a hit with both kids and adults alike.
The “dirt” layer is made from crushed chocolate cookies, while the “pumpkin patch” is created with adorable candy pumpkins and gummy worms. This creative snack isn’t only fun to make but also a joy to eat.
The Pumpkin Patch Dirt Cups are an ideal choice for Halloween parties, school events, or simply a cozy night in with family. The best part is that they require minimal preparation and no baking, making them a quick and easy option for busy schedules.
Layered in individual cups, these treats offer a perfect portion size and a delightful presentation. Follow the recipe below to create a batch that serves 4-6 people, guaranteeing everyone gets a taste of this spooky and sweet delight.
Ingredients (Serving Size: 4-6 people):
- 1 package (3.9 oz) instant chocolate pudding mix
- 2 cups cold milk
- 1 package (14 oz) chocolate sandwich cookies
- 1 package (8 oz) whipped topping, thawed
- 1 bag (7 oz) candy pumpkins
- 1 bag (7 oz) gummy worms
- 4-6 clear plastic cups
Instructions:
- Prepare the Pudding: In a medium-sized bowl, combine the instant chocolate pudding mix with cold milk. Whisk the mixture for about 2 minutes until it thickens. Once thickened, let it sit for 5 minutes to further firm up.
- Crush the Cookies: Place the chocolate sandwich cookies in a large resealable plastic bag. Using a rolling pin or the bottom of a heavy glass, crush the cookies into fine crumbs. Reserve about 1/4 cup of the crumbs for topping.
- Layer the Cups: Begin by adding a layer of cookie crumbs to the bottom of each clear plastic cup. Then, spoon a layer of chocolate pudding over the cookie crumbs in each cup.
- Add the Whipped Topping: Once the pudding layer is set, add a generous layer of whipped topping over it. Spread it evenly with the back of a spoon or a spatula.
- Final Layer and Decorate: Top the whipped topping with another layer of cookie crumbs. Place candy pumpkins and gummy worms on top to create the “pumpkin patch” look. Sprinkle the reserved cookie crumbs on top for added texture.
- Chill the Cups: Place the assembled cups in the refrigerator for at least 30 minutes to allow the flavors to meld and the dessert to set.
Extra Tips:
For an extra festive touch, consider using Halloween-themed cups or adding a small plastic spider for decoration. Remember to thaw the whipped topping in advance to guarantee smooth layering.
If you’re making these cups ahead of time, keep them covered in the refrigerator to maintain freshness. Adjust the number of candy pumpkins and gummy worms based on personal preference or dietary needs. Enjoy these Pumpkin Patch Dirt Cups as a fun and creative addition to your Halloween celebrations!
Creepy Crawly Nachos
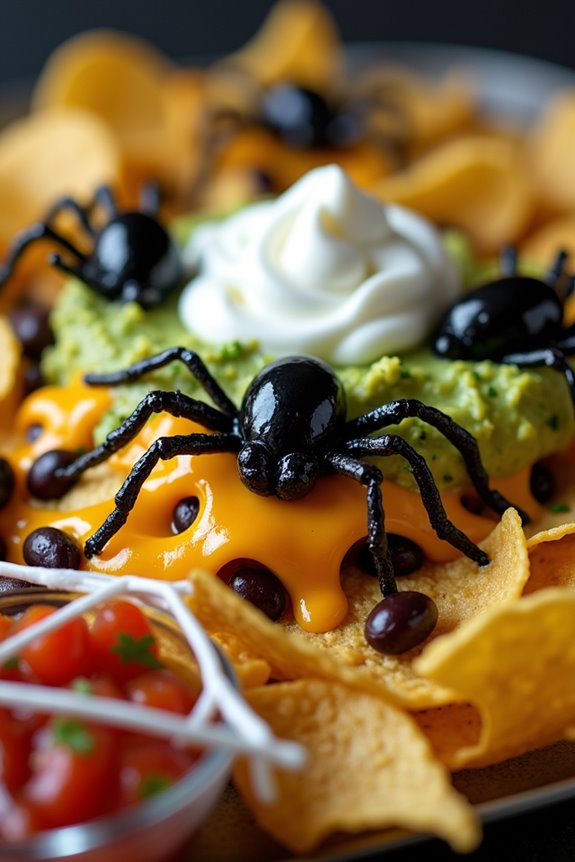
Halloween is a time for fun, frights, and of course, festive treats! What better way to celebrate this spooky holiday than with a plate of Creepy Crawly Nachos? This dish is a delightful twist on the classic nachos, incorporating Halloween-themed elements to create a visually striking and deliciously eerie snack. Perfect for a Halloween party or a night of trick-or-treating, these nachos are guaranteed to be a hit with both kids and adults alike.
The Creepy Crawly Nachos feature all the traditional components of nachos but with a few spooky additions. Expect layers of crunchy tortilla chips smothered in melted cheese, topped with black bean “spiders” and olive “eyeballs” to give them that creepy, crawly look. A healthy dollop of guacamole and salsa adds to the flavor and color, making these nachos not only a treat for the taste buds but also a feast for the eyes. Serve up this dish for 4-6 people and watch as your guests marvel at this ghoulishly good creation.
Ingredients for 4-6 people:
- 1 bag of tortilla chips
- 2 cups shredded cheddar cheese
- 1 can (15 oz) black beans, drained and rinsed
- 1 cup sliced black olives
- 2 jalapeños, seeded and sliced
- 1 cup guacamole
- 1 cup salsa
- 1/2 cup sour cream
- 1/4 cup chopped fresh cilantro
- 1 tablespoon lime juice
- Salt and pepper to taste
Cooking Instructions:
- Preheat the Oven: Begin by preheating your oven to 350°F (175°C). This will guarantee your nachos are crispy and the cheese melts evenly.
- Prepare the Baking Sheet: Line a large baking sheet with parchment paper or lightly grease it. Spread half of the tortilla chips evenly on the sheet.
- Layer the Cheese and Toppings: Sprinkle half of the shredded cheddar cheese over the tortilla chips. Next, add half of the black beans and a few jalapeño slices. Repeat with another layer of chips, the remaining cheese, beans, and jalapeños.
- Bake the Nachos: Place the nachos in the preheated oven and bake for about 10-15 minutes, or until the cheese is fully melted and bubbly.
- Create the Creepy Crawly Look: While the nachos bake, use the black olives to create “spiders” by placing one whole olive as the body and slicing another olive to create legs. Set aside.
- Garnish: Once removed from the oven, immediately top the nachos with your olive spiders. Add dollops of guacamole and salsa around the nachos. Use a piping bag or a ziplock bag with a corner cut off to drizzle sour cream over the nachos to mimic spider webs.
- Finish with Freshness: Sprinkle the nachos with chopped cilantro and a squeeze of lime juice for added freshness. Season with salt and pepper to taste.
Extra Tips:
For an even spookier presentation, consider using blue corn tortilla chips to enhance the Halloween theme. You can also customize the heat level by adjusting the number of jalapeños or adding a dash of hot sauce to the salsa.
If you want your nachos extra crunchy, serve them immediately after baking to avoid sogginess. Remember, presentation is key for these Creepy Crawly Nachos, so take your time arranging the toppings to maximize the visual appeal!
Mummy Hot Dogs
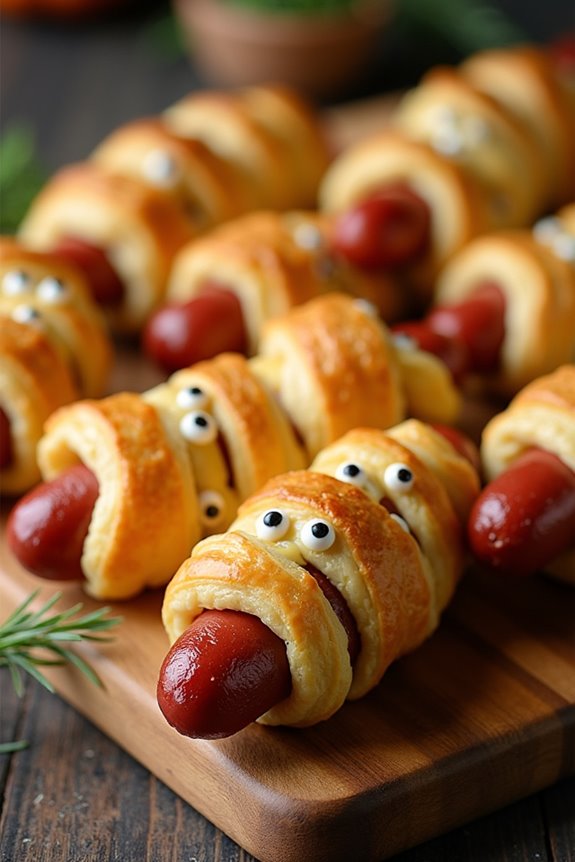
Mummy Hot Dogs are a spooktacular treat perfect for any Halloween celebration. These delightful snacks aren’t only fun to make but also a hit with both kids and adults alike. With their playful appearance, they bring a festive touch to your Halloween spread and are incredibly easy to prepare.
Made with just a few simple ingredients, Mummy Hot Dogs are an excellent choice for a party appetizer or a fun family dinner. The key to these ghoulishly tasty treats is wrapping the hot dogs in crescent roll dough, creating the look of a mummy. You can add small edible eyes or dots of mustard to complete the look.
Whether you’re hosting a Halloween party or looking to make a themed meal for your family, these Mummy Hot Dogs are sure to be a crowd-pleaser. Let’s plunge into the ingredients and instructions to create these festive snacks for 4-6 people.
Ingredients (serving size: 4-6 people):
- 8 hot dogs
- 1 can of refrigerated crescent roll dough
- Mustard or ketchup (for decoration)
- Optional: small edible eyes or black sesame seeds
Cooking Instructions:
- Preheat the Oven: Start by preheating your oven to 375°F (190°C). This guarantees the oven is hot enough to cook the crescent dough to a golden brown.
- Prepare the Crescent Roll Dough: Open the can of refrigerated crescent roll dough and unroll it on a clean surface. Use a knife or a pizza cutter to slice the dough into thin strips, about 1/4 inch wide.
- Wrap the Hot Dogs: Take a hot dog and start wrapping it with a strip of dough, leaving a small gap at the top for the “face.” Continue wrapping the dough around the hot dog, slightly overlapping the strips to create a mummy effect. Repeat for all hot dogs.
- Bake the Mummies: Arrange the wrapped hot dogs on a baking sheet lined with parchment paper or a lightly greased baking tray. Place them in the preheated oven and bake for 12-15 minutes, or until the dough is golden brown.
- Add Finishing Touches: Once baked, remove the Mummy Hot Dogs from the oven and let them cool slightly. Use mustard or ketchup to draw eyes on each mummy, or place small edible eyes or black sesame seeds for a spooky effect.
Extra Tips: For a vegetarian option, you can substitute regular hot dogs with veggie dogs. If you’re short on time, you can use pre-made dough sheets instead of crescent rolls – just cut them into strips as needed.
To make the mummies even more fun, try using different condiments for the eyes, like mayonnaise or sriracha, for added flavor and creativity. When wrapping the dough, avoid wrapping too tightly, as the dough will expand while baking. Happy Halloween snacking!
Gory Jello Shots
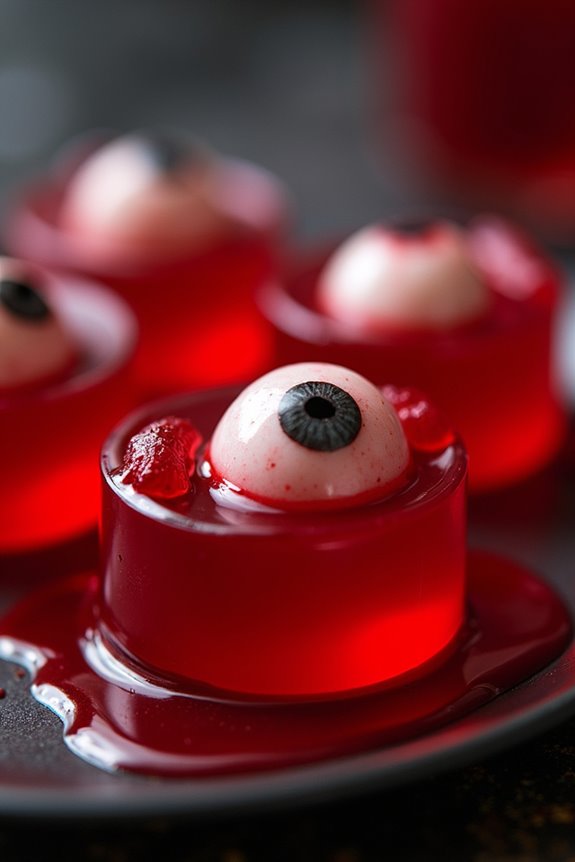
Halloween is the perfect time to get creative with your culinary skills, and what better way to spook your guests than with some Gory Jello Shots? These blood-red, gelatinous treats aren’t only visually striking, but they also pack a punch with a dash of alcohol. Perfect for adult Halloween parties, these shots are easy to make and can be prepared in advance, allowing you more time to enjoy the festivities.
The combination of cherry or raspberry jello, vodka, and a splash of grenadine creates a creepy concoction that looks like it came straight out of a horror movie. To enhance their gory appeal, you can add extras like lychee eyeballs or gummy worms, making them even more frightful. With a serving size of 4-6 people, these Gory Jello Shots are sure to be a hit at any Halloween gathering.
Ingredients for 4-6 People:
- 1 package (3 oz) cherry or raspberry flavored jello
- 1 cup boiling water
- 1 cup vodka
- 2 tablespoons grenadine
- Lychee fruits (optional, for eyeball effect)
- Gummy worms (optional, for added gore)
- Red food coloring (optional for extra bloodiness)
Cooking Instructions:
- Dissolve the Jello: In a medium-sized mixing bowl, pour one package of cherry or raspberry jello. Add 1 cup of boiling water into the bowl. Stir the mixture continuously until the jello powder is completely dissolved.
- Add the Vodka: Once the jello is completely dissolved, pour in 1 cup of vodka. Stir well to guarantee the vodka is evenly mixed with the jello.
- Add Grenadine: Stir in 2 tablespoons of grenadine to give the jello shots an extra bloody appearance and a sweet flavor. Mix until fully incorporated.
- Enhance the Horror: If desired, add a few drops of red food coloring for a deeper red shade. Place a lychee fruit in each shot cup for a creepy eyeball effect or drop in gummy worms for added gore.
- Pour into Cups: Carefully pour the jello mixture into shot glasses or small plastic cups. Leave some space at the top of each cup to make them easier to handle.
- Chill and Set: Place the filled cups in the refrigerator and let them chill for at least 2-4 hours, or until fully set.
Extra Tips:
For a non-alcoholic version, simply replace the vodka with cold water or a clear soda like lemon-lime. This recipe is versatile, so feel free to experiment with different jello flavors or use molds to create interesting shapes.
If you’re using lychee fruits, consider stuffing them with a blueberry or a small grape to create a more realistic eyeball effect. To make serving easier, you can use disposable shot glasses or cups with lids, especially for outdoor gatherings.
Enjoy your Gory Jello Shots responsibly, and have a spooky Halloween!
Frankenstein Rice Krispie Treats
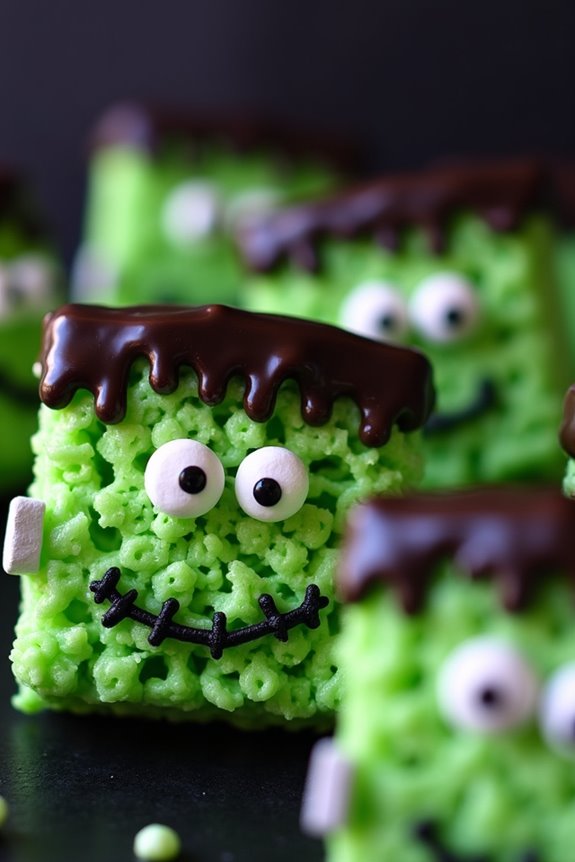
Frankenstein Rice Krispie Treats are a fun and festive way to celebrate Halloween. These spooky treats combine the classic chewy and crispy texture of Rice Krispies with a monster-themed twist. Perfect for parties or just as a fun family activity, these treats are easy to make and will undoubtedly be a hit with kids and adults alike.
With a few simple ingredients and a little creativity, you can transform ordinary Rice Krispie treats into delightful Frankenstein monsters.
To make these ghoulish goodies, you’ll start with the basic Rice Krispie treat recipe but add a dash of imagination and some colorful decorations. The treats are dyed a vibrant green, mimicking the iconic skin of Frankenstein’s monster. Candy eyes and chocolate hair complete the look, making them both adorable and creepy at the same time.
Here’s how to make Frankenstein Rice Krispie Treats for 4-6 people.
Ingredients:
- 5 cups Rice Krispies cereal
- 4 cups mini marshmallows
- 3 tablespoons unsalted butter
- Green food coloring
- Black decorating gel
- Candy eyes
- Chocolate chips or chocolate frosting
- Mini marshmallows (for bolts)
Cooking Instructions:
- Prepare Your Ingredients: Begin by gathering all your ingredients and line a 9×13-inch baking dish with parchment paper or grease it lightly with butter to prevent sticking.
- Melt the Butter and Marshmallows: In a large saucepan, melt 3 tablespoons of butter over low heat. Once melted, add 4 cups of mini marshmallows and stir continuously until they’re fully melted and the mixture is smooth.
- Add Food Coloring: Remove the saucepan from heat and add green food coloring to the melted marshmallow mixture. Stir well until you achieve the desired shade of green.
- Mix in Rice Krispies: Gradually add 5 cups of Rice Krispies cereal to the green marshmallow mixture. Stir until the cereal is evenly coated.
- Press into Pan: Transfer the mixture to the prepared baking dish. Use a buttered spatula or clean hands to press the mixture evenly into the pan. Allow it to cool and set.
- Cut and Decorate: Once set, cut the Rice Krispie treats into rectangles. Use black decorating gel to draw hair at the top of each rectangle and attach candy eyes below the hairline. Use the gel or melted chocolate to draw a mouth and other details. Attach mini marshmallows on either side of the face to represent bolts.
Extra Tips:
For an even more monstrous effect, consider adding additional decorations such as gummy worms for scars or using white chocolate chips to create stitches.
If you’re short on time, you can also use store-bought Rice Krispie treats and simply decorate them as described.
Make sure your hands are buttered or dampened with water when pressing the mixture into the pan to prevent sticking.
Finally, let the treats cool completely before cutting to guarantee they hold their shape. Enjoy bringing Frankenstein’s monster to life with these delightful snacks!
Batty Cheese Ball
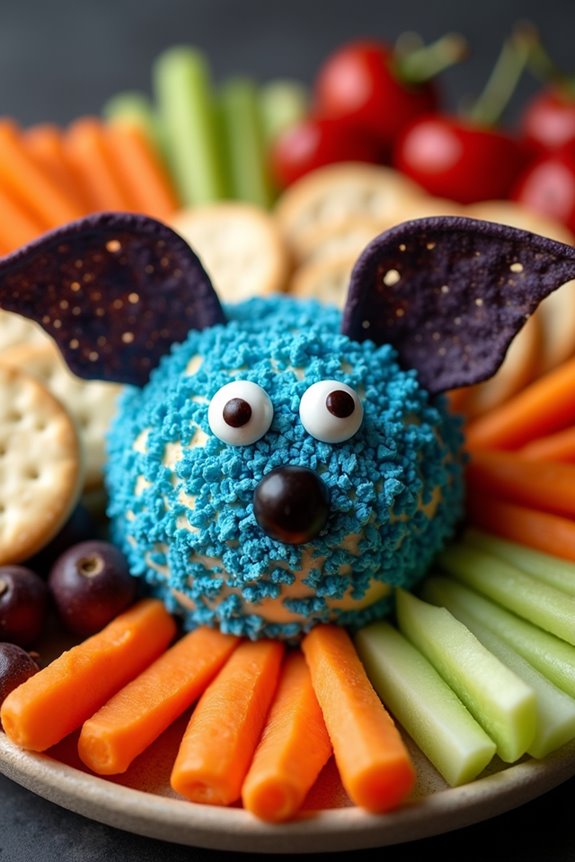
The Batty Cheese Ball is a fun and festive addition to your Halloween snack table. This spooky appetizer isn’t only visually appealing but also deliciously creamy and flavorful, making it a hit with both kids and adults. Shaped like a bat, this cheese ball is perfect for adding a touch of whimsy to your Halloween celebrations.
The combination of cheeses, spices, and decorative elements create an irresistible snack that will have your guests coming back for more. This recipe is designed to serve 4-6 people, making it ideal for small gatherings. The Batty Cheese Ball is easy to prepare and can be made ahead of time, allowing you to focus on other party preparations.
Whether you’re hosting a Halloween party or simply want to surprise your family with a themed snack, this recipe is sure to impress. Gather your ingredients and follow the steps below to create this delightful Halloween treat.
Ingredients:
- 16 oz cream cheese, softened
- 2 cups shredded sharp cheddar cheese
- 1 tablespoon Worcestershire sauce
- 1 teaspoon garlic powder
- 1 teaspoon onion powder
- 1/2 teaspoon smoked paprika
- 1/4 teaspoon salt
- 1/4 teaspoon black pepper
- 1 cup crushed blue corn tortilla chips
- 2 large tortilla chips (for wings)
- 2 candy eyes
- 1 black olive (sliced)
- Crackers or vegetables, for serving
Instructions:
- Prepare the Cheese Mixture: In a large mixing bowl, combine the softened cream cheese, shredded cheddar cheese, Worcestershire sauce, garlic powder, onion powder, smoked paprika, salt, and black pepper. Mix well until all ingredients are fully combined and the mixture is smooth.
- Shape the Cheese Ball: Transfer the cheese mixture onto a piece of plastic wrap. Using your hands, shape the mixture into an oval or bat-like shape. Wrap it tightly in the plastic wrap and refrigerate for at least 1 hour, or until firm.
- Coat the Cheese Ball: Once the cheese ball is firm, remove it from the refrigerator and unwrap it. Roll the cheese ball in the crushed blue corn tortilla chips until fully coated, pressing gently to make certain the chips stick to the surface.
- Decorate the Bat: Place the cheese ball on a serving platter. Insert two large tortilla chips into the sides of the cheese ball to create the bat wings. Add candy eyes and black olive slices to form the bat’s eyes and nose, pressing them gently into the cheese ball to secure them.
- Serve: Surround the Batty Cheese Ball with crackers or vegetables of your choice for dipping. Serve immediately or refrigerate until ready to serve.
Extra Tips:
To make your Batty Cheese Ball even more visually striking, consider using different colored tortilla chips or adding additional decorative elements like sliced almonds for fangs.
If you prefer a spicier cheese ball, you can add a pinch of cayenne pepper or a dash of hot sauce to the cheese mixture. Additionally, make sure the cheese ball is well-chilled before serving, as this helps maintain its shape and makes it easier to spread on crackers or vegetables. Enjoy this playful and delicious Halloween snack!
Vampire Teeth Apples
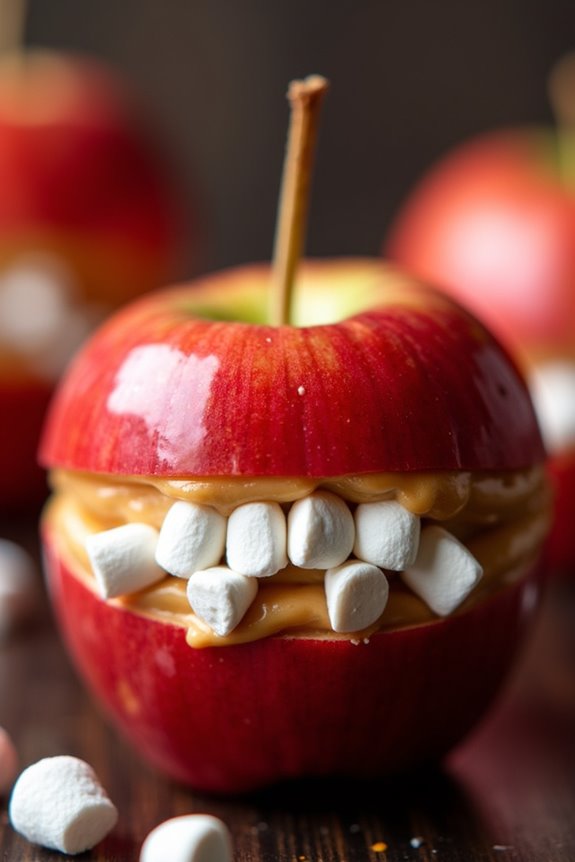
Vampire Teeth Apples are a fun and spooky treat that’s perfect for Halloween parties. Not only do they look delightfully creepy, but they’re also a healthier option compared to the usual sugary Halloween candies.
These treats are made using fresh apples, peanut butter, and marshmallows to create a dish that resembles a vampire’s toothy grin. They’re easy to make, require no cooking, and can be assembled in just a few minutes, making them perfect for even the busiest Halloween host.
This recipe is designed to serve 4-6 people, making it great for small gatherings or as a part of a larger spread of Halloween snacks. The combination of crisp apples, creamy peanut butter, and sweet marshmallows creates a delicious balance of flavors and textures.
Even kids can get involved in making Vampire Teeth Apples, as the process is simple and safe. Plus, it’s a great opportunity to encourage them to enjoy fruit in a fun and engaging way.
Ingredients:
- 4 medium-sized red apples
- 1 cup of creamy peanut butter
- 1 cup of mini marshmallows
- 1 tablespoon of lemon juice (optional)
Instructions:
- Prepare the Apples:
- Wash the apples thoroughly to remove any wax or dirt.
- Cut each apple into quarters and remove the core and seeds.
- Slice each quarter into two or three wedges. You should aim for 16 wedges in total from each apple.
- (Optional) To prevent the apple slices from browning, lightly brush them with lemon juice.
- Assemble the Vampire Teeth:
- Take one apple wedge and spread a thin layer of peanut butter on one side.
- Place mini marshmallows along the edge of the peanut butter-coated side to mimic teeth.
- Spread peanut butter on another apple wedge and press the two peanut butter sides together gently, ensuring the marshmallows are positioned like teeth between the two apple slices.
- Repeat the Process:
- Continue the process with the remaining apple slices until all the Vampire Teeth Apples are assembled.
- Serve:
- Arrange the Vampire Teeth Apples on a platter or tray and serve immediately for the freshest flavor and appearance.
Extra Tips:
For a nut-free version, you can substitute the peanut butter with sunflower seed butter or any other nut-free spread.
If you want to add a bit of variety, try using different types of apples like Granny Smith for a tart contrast. To enhance the spooky effect, consider adding a few drops of red food coloring to the peanut butter to create a “bloody” look.
Finally, if you’re preparing these treats in advance, keep them fresh by storing them in an airtight container in the refrigerator and serving them within a few hours.
Skeleton Veggie Platter
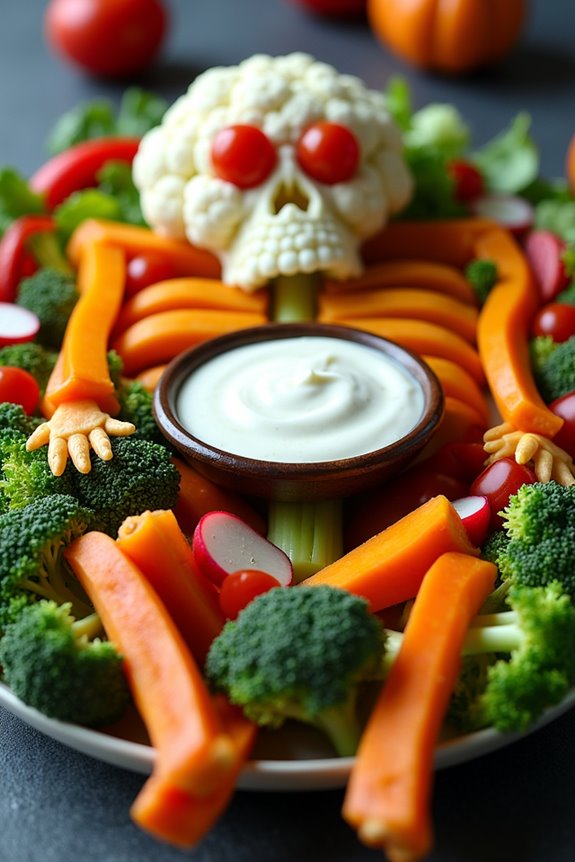
The Skeleton Veggie Platter is a fun and spooky way to serve healthy snacks during Halloween. This dish isn’t only visually appealing but also packed with nutrients, making it a great addition to any Halloween party. The idea is to arrange a variety of fresh vegetables in the shape of a skeleton on a large platter, creating a festive and colorful display.
It’s an excellent way to encourage children and adults alike to consume more vegetables while enjoying the holiday spirit. This platter serves 4-6 people and can be customized with whatever vegetables you have on hand. It’s a creative and interactive dish that allows you to get artistic with your food presentation.
The key is to use a variety of colors and shapes to mimic the skeleton’s body parts, such as using long strips of bell pepper for ribs and cherry tomatoes for eyes. Pair the platter with a delicious dip to enhance the flavors of the fresh veggies and make it even more enjoyable.
Ingredients (for 4-6 servings):
- 1 large head of cauliflower
- 2 large carrots
- 1 cucumber
- 1 red bell pepper
- 1 yellow bell pepper
- 1 cup cherry tomatoes
- 1 small bunch of celery
- 1 small bunch of radishes
- 1 cup broccoli florets
- 1 cup ranch dressing (or dip of choice)
Cooking Instructions:
- Prepare the Vegetables: Wash all vegetables thoroughly. Cut the cauliflower into small florets, slice the carrots into thin sticks, and chop the cucumber into half-moon slices.
- Arrange the Skeleton: On a large platter, start by placing the cauliflower florets at the top to form the skull. Use two cherry tomatoes for the eyes and a slice of cucumber for the mouth.
- Create the Ribcage: For the ribcage, use strips of red and yellow bell peppers. Arrange them in an alternating pattern below the cauliflower skull.
- Form the Spine and Limbs: Use celery sticks to form the spine and arms, positioning them below the ribcage. Use carrot sticks to form the legs.
- Add Details: Use broccoli florets for the hips and radishes for the feet and hands. Add more cherry tomatoes around for decoration.
- Serve with Dip: Place a bowl of ranch dressing or your favorite dip in the center of the skeleton, where the heart would be, for easy dipping.
Extra Tips:
To make the Skeleton Veggie Platter even more appealing, try using a round serving platter to give a more complete look to the skeleton. Consider using a variety of dips, such as hummus or guacamole, to cater to different tastes.
You can also add edible eyes or use small, round slices of olives to create features on the skeleton’s face. Remember, the key is to have fun with the arrangement and get creative with the vegetables you use.
Haunted Cupcake Graveyard
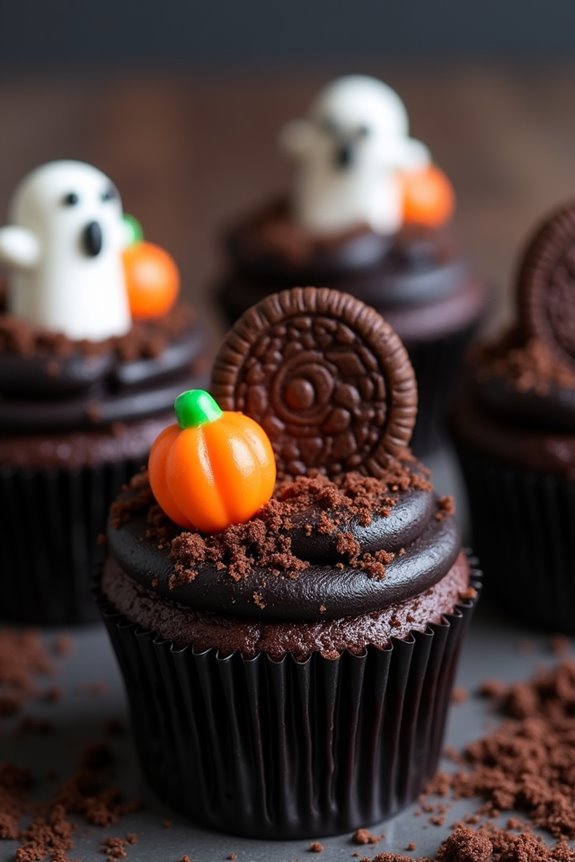
Transform your Halloween party into a spine-chilling spectacle with the Haunted Cupcake Graveyard. This deliciously eerie dessert combines rich chocolate cupcakes with a hauntingly creative graveyard scene that will captivate both young and old. The blend of creamy frosting, spooky decorations, and a touch of Halloween magic will make this dish the centerpiece of your ghostly gathering. Perfect for a group of 4-6 people, these cupcakes are as fun to make as they’re to eat.
The Haunted Cupcake Graveyard isn’t only visually impressive but also easy to assemble. The base of the dish is a moist chocolate cupcake, topped with velvety frosting and adorned with a variety of edible Halloween decorations. This recipe encourages creativity, allowing you to design your own graveyard scene with cookie tombstones, candy pumpkins, and ghostly figures. Whether you’re hosting a Halloween bash or enjoying a cozy evening with family, these cupcakes will add a delightful and spooky touch to your celebration.
Ingredients (serving size: 4-6 people):
- 1 cup all-purpose flour
- 1 cup granulated sugar
- 1/2 cup unsweetened cocoa powder
- 1 teaspoon baking soda
- 1/2 teaspoon salt
- 1/2 cup vegetable oil
- 1 cup buttermilk
- 1 large egg
- 1 teaspoon vanilla extract
- 1 cup butter (softened, for frosting)
- 3 cups powdered sugar (for frosting)
- 2 tablespoons milk (for frosting)
- 1 teaspoon vanilla extract (for frosting)
- Black food coloring
- Chocolate sandwich cookies (for dirt)
- Oval-shaped cookies (for tombstones)
- Candy pumpkins
- Ghost-shaped candies or marshmallows
Cooking Instructions:
- Preheat and Prepare: Preheat your oven to 350°F (175°C) and line a muffin tin with cupcake liners to prepare for baking.
- Mix Dry Ingredients: In a large mixing bowl, combine the all-purpose flour, granulated sugar, unsweetened cocoa powder, baking soda, and salt. Stir well to ascertain all dry ingredients are evenly blended.
- Combine Wet Ingredients: In a separate bowl, whisk together the vegetable oil, buttermilk, egg, and vanilla extract until smooth and well combined.
- Create Batter: Gradually add the wet ingredients to the dry ingredients, stirring constantly until you achieve a smooth, lump-free batter.
- Fill and Bake: Pour the batter evenly into the prepared cupcake liners, filling each about 2/3 full. Place the muffin tin in the preheated oven and bake for 18-20 minutes, or until a toothpick inserted into the center comes out clean.
- Prepare Frosting: While the cupcakes are baking, prepare the frosting by beating the softened butter with an electric mixer until fluffy. Gradually add the powdered sugar and continue mixing until combined. Add milk and vanilla extract, beating until the frosting reaches a creamy consistency. Add a few drops of black food coloring and mix until the color is uniform.
- Cool and Frost: Once the cupcakes are baked, remove them from the oven and allow them to cool completely on a wire rack. Once cool, generously frost each cupcake with the black frosting.
- Decorate: Crush the chocolate sandwich cookies to create “dirt” and sprinkle it over the frosted cupcakes. Insert an oval-shaped cookie into each cupcake to represent a tombstone. Add candy pumpkins and ghost-shaped candies to complete your haunted graveyard scene.
Extra Tips:
For added fun, personalize your tombstones with spooky messages using an edible marker. If you prefer a different flavor, vanilla or pumpkin cupcakes can also serve as the base for your graveyard.
To guarantee your frosting is the perfect shade of black, start with a small amount of food coloring and gradually add more until you achieve the desired darkness. Finally, get creative with other edible decorations like gummy worms or licorice bats to enhance your graveyard’s spooky appeal.