

Halloween is just around the corner, and it’s time to get creative in the kitchen. Transform your table with spooky yet delightful treats that will impress all your guests. Picture serving Creepy Crawly Deviled Eggs or a Pumpkin Patch Cheese Ball that’s almost too cute to eat. With Monster Mouths Apple Slices and Mummy Wrapped Jalapeño Poppers, your spread will definitely be the talk of the town. And guess what? That’s just the beginning of the enchanting culinary adventure waiting for you.
Creepy Crawly Deviled Eggs
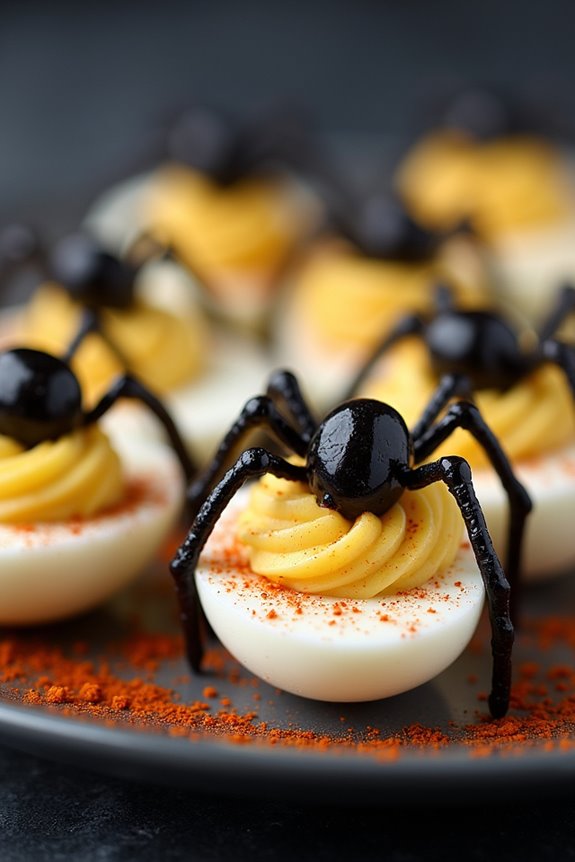
Creepy Crawly Deviled Eggs are a perfect Halloween treat that combines classic flavors with a spine-tingling twist. These deviled eggs are transformed into eerie delights that resemble creepy crawly critters, making them an ideal addition to any spooky gathering or Halloween party.
The creamy yolk mixture, paired with cleverly arranged toppings, creates a visually stunning and delicious appetizer that will thrill your guests. This recipe elevates traditional deviled eggs by using black olives and paprika to create spider-like decorations on top of each egg.
The process is simple, yet the results are striking and certain to impress. With just a few ingredients and some creative assembly, you’ll have a platter of Creepy Crawly Deviled Eggs ready to serve. This dish serves 4-6 people, making it an excellent choice for small gatherings or as part of a larger spread.
Ingredients:
- 6 large eggs
- 3 tablespoons mayonnaise
- 1 teaspoon Dijon mustard
- 1/2 teaspoon white vinegar
- Salt and pepper, to taste
- Paprika, for garnish
- Black olives, pitted (about 10-12 olives)
Instructions:
- Boil the Eggs: Place the eggs in a saucepan and cover them with cold water by about an inch. Bring the water to a boil over medium-high heat. Once boiling, cover the saucepan, remove it from heat, and let it sit for 12 minutes.
- Cool and Peel: After 12 minutes, transfer the eggs to a bowl of ice water to stop the cooking process. Let them cool for about 5 minutes before peeling the shells off gently.
- Prepare the Filling: Slice the eggs in half lengthwise and carefully remove the yolks. Place the yolks in a mixing bowl and mash them with a fork until smooth.
- Mix the Filling: Add mayonnaise, Dijon mustard, white vinegar, salt, and pepper to the mashed yolks. Mix until the filling is creamy and well combined.
- Assemble the Eggs: Spoon the yolk mixture back into the egg white halves, mounding it slightly.
- Create the Creepy Crawlies: Cut the black olives in half. Use one half for the body of the spider and slice the other half into thin strips for the legs. Arrange the olive pieces on top of the yolk mixture to resemble a spider, with the half olive as the body and the strips as legs.
- Garnish: Lightly dust the tops of the eggs with paprika for a pop of color.
Extra Tips:
When preparing the Creepy Crawly Deviled Eggs, verify that the eggs are fully cooled before peeling to prevent them from sticking to the shell. For best results, use fresh eggs and verify they’re cooked to perfection without overcooking, as this can lead to a rubbery texture.
Adjust the seasoning of the yolk mixture according to your taste preference, and feel free to experiment with additional spices or herbs if desired. These deviled eggs can be made a few hours in advance and stored in the refrigerator until ready to serve, making them a convenient option for party preparation.
Monster Mouths Apple Slices
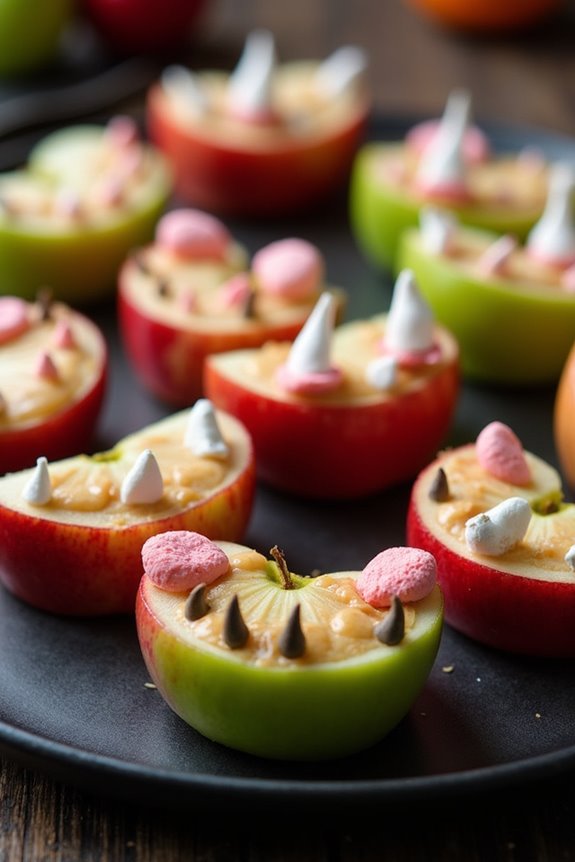
Monster Mouths Apple Slices are a fun and spooky treat that will delight kids and adults alike at any Halloween gathering. These apple slices are transformed into eerie monster mouths with the clever use of seeds, nuts, and fruit, creating a healthy snack that’s as delicious as it’s festive. With just a few simple ingredients, you can whip up this Halloween-themed creation in no time, making it a perfect addition to your Halloween menu.
The recipe isn’t only simple but also customizable, allowing you to get creative with the ingredients and make each monster mouth unique. Whether you’re hosting a Halloween party or looking for a playful snack for the kids, these Monster Mouths Apple Slices are sure to impress. Let’s explore the ingredients you’ll need for serving 4-6 people and how to bring these monster treats to life.
Ingredients for Monster Mouths Apple Slices (Serves 4-6):
- 3 large apples
- 1 cup of smooth peanut butter (or any nut butter of your choice)
- 1/2 cup of sunflower seeds
- 1/4 cup of slivered almonds
- 1/2 cup of mini marshmallows
- 2 tablespoons of lemon juice
- Red food coloring (optional)
Cooking Instructions:
- Prepare the Apples: Wash the apples thoroughly under running water. Cut each apple into quarters and remove the core from each section. Slice each quarter into two to three thinner wedges, giving you a total of 24-36 slices depending on the apple size.
- Prevent Browning: To prevent the apple slices from turning brown, immediately brush each slice with lemon juice. This step is essential for maintaining the fresh appearance of your monster mouths.
- Add the Mouth: Spread a generous amount of peanut butter on one side of each apple slice. This will act as the “glue” to hold the seeds and other ingredients in place.
- Create the Teeth: Press sunflower seeds into the peanut butter along the curved edge of the apple slice to resemble sharp teeth. You can alternate with slivered almonds for variety and a more jagged appearance.
- Add the Tongue and Lips: For a tongue, place a mini marshmallow inside the “mouth” and press gently so it sticks to the peanut butter. If desired, mix a little red food coloring into some extra peanut butter and drape it onto the marshmallow for a more ghoulish effect.
- Assemble the Monster Mouths: Carefully press two apple slices together, peanut butter sides facing inwards, to form a complete monster mouth. Gently squeeze so the seeds and marshmallows stay in place.
- Serve and Enjoy: Arrange the completed monster mouths on a platter and serve immediately for the freshest taste.
Extra Tips: To make these Monster Mouths Apple Slices even more exciting, consider using a variety of apple types for different flavors and textures. Granny Smith apples give a tart contrast, while Honeycrisp apples offer a sweeter option. If any guests have nut allergies, substitute the peanut butter with sunflower seed butter or cream cheese.
These snacks should be made fresh, as the apples can brown over time, so plan to prepare them shortly before serving.
Pumpkin Patch Cheese Ball
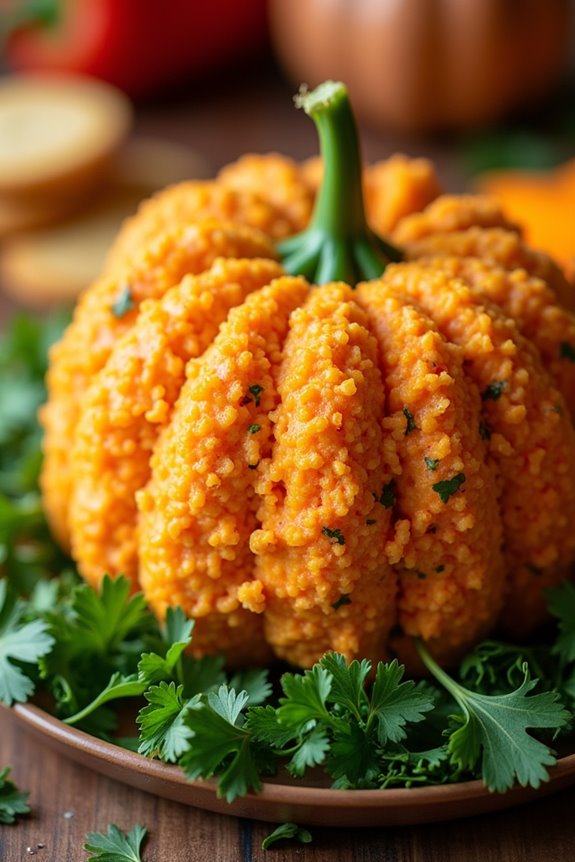
Pumpkin Patch Cheese Ball is a festive and delicious appetizer that’s perfect for any Halloween celebration. This charming dish is designed to look like a mini pumpkin patch, complete with a delightful cheese ball shaped like a pumpkin. It’s a fun and creative way to add some spooky flair to your holiday spread, while also offering a savory treat that your guests are sure to love.
The cheese ball combines a creamy blend of cheeses, seasonings, and nuts, all wrapped up in a vibrant orange coating that resembles a pumpkin. Not only is the Pumpkin Patch Cheese Ball visually appealing, but it’s also incredibly easy to make. It’s an ideal dish to prepare ahead of time, allowing you to focus on other aspects of your Halloween party planning.
Whether you’re hosting a large gathering or a smaller, more intimate affair, this cheese ball is sure to be a hit. Serve it with a variety of crackers, pretzels, or fresh veggies for a complete appetizer spread that caters to different tastes and preferences.
Ingredients for 4-6 People:
- 16 oz cream cheese, softened
- 2 cups sharp cheddar cheese, shredded
- 1 package ranch seasoning mix
- 1/2 cup chopped green onions
- 1/2 cup chopped pecans (optional)
- 1/4 cup finely chopped parsley
- 1/4 cup crushed tortilla chips
- 1 small bell pepper stem (for the pumpkin top)
- Crackers or veggies for serving
Cooking Instructions:
- Prepare the Cheese Mixture: In a large mixing bowl, combine the softened cream cheese, shredded cheddar cheese, and ranch seasoning mix. Stir until well combined and the mixture is creamy and smooth.
- Add Flavorings: Fold in the chopped green onions and chopped pecans (if using). Mix well to guarantee even distribution throughout the cheese mixture.
- Shape the Cheese Ball: Using your hands, form the cheese mixture into a ball. Place the ball on a piece of plastic wrap and mold it into a pumpkin shape. Wrap tightly and refrigerate for at least 2 hours or until firm.
- Coat the Cheese Ball: Once firm, remove the cheese ball from the fridge and unwrap it. Roll it in crushed tortilla chips until completely coated, pressing lightly to adhere the chips.
- Decorate: Insert the bell pepper stem into the top of the cheese ball to form the pumpkin’s stem. Sprinkle finely chopped parsley around the base of the cheese ball to resemble pumpkin vines.
- Serve: Arrange the Pumpkin Patch Cheese Ball on a platter with an assortment of crackers and fresh veggies. Enjoy your spooky creation!
Extra Tips:
For an added touch of realism, score vertical lines along the sides of the cheese ball using a butter knife to mimic a pumpkin’s natural grooves. If you want to make the cheese ball ahead of time, it’s best to form and wrap it, storing it in the fridge for up to two days before coating with the tortilla chips. This guarantees the chips remain crisp and fresh.
Additionally, feel free to customize the cheese ball by adding other ingredients like bacon bits or sun-dried tomatoes for extra flavor and texture.
Mummy Wrapped Jalapeño Poppers

Mummy Wrapped Jalapeño Poppers are a spooky and delicious treat perfect for any Halloween gathering. These delightful bites are made by stuffing fresh jalapeños with a creamy cheese mixture and then wrapping them in crescent roll dough to resemble little mummies.
When baked, the dough turns golden brown, creating a crispy exterior that perfectly complements the gooey, spicy filling. They aren’t only delicious but also visually appealing, making them a fantastic addition to your Halloween spread.
This recipe is ideal for serving 4-6 people and is certain to be a hit with guests of all ages. The combination of spicy, creamy, and flaky textures makes these poppers irresistible. Whether you’re hosting a Halloween party or just looking for a fun snack to enjoy with your family, Mummy Wrapped Jalapeño Poppers are bound to bring smiles and satisfy taste buds.
Ingredients:
- 12 fresh jalapeños
- 8 oz cream cheese, softened
- 1 cup shredded cheddar cheese
- 1 tsp garlic powder
- 1 tsp onion powder
- 1 tsp smoked paprika
- Salt and pepper to taste
- 1 can (8 oz) refrigerated crescent roll dough
- 24 candy eyeballs (optional)
Cooking Instructions:
1. Prepare the Jalapeños: Preheat your oven to 375°F (190°C). Slice each jalapeño in half lengthwise and remove the seeds and membranes using a small spoon or paring knife.
Be sure to wear gloves or wash your hands thoroughly after handling the jalapeños to avoid irritation.
2. Make the Filling: In a medium bowl, mix together the softened cream cheese, shredded cheddar cheese, garlic powder, onion powder, smoked paprika, salt, and pepper until well combined.
3. Stuff the Jalapeños: Fill each jalapeño half with the cheese mixture, using a small spoon or piping bag for a neat finish.
4. Wrap with Dough: Unroll the crescent roll dough and separate it into triangles. Cut each triangle into thin strips. Wrap the strips around each stuffed jalapeño half, leaving a small gap at the top for the “eyes” if you’re using candy eyeballs.
5. Bake: Place the wrapped jalapeños on a parchment-lined baking sheet. Bake in the preheated oven for 12-15 minutes until the dough is golden brown and the cheese is bubbly.
6. Add Candy Eyes: (Optional) Once the poppers are out of the oven and slightly cooled, place candy eyeballs on the exposed cheese to create a mummy face.
Extra Tips:
For an extra kick, consider leaving a few seeds in the jalapeños or adding a dash of hot sauce to the cheese mixture.
To guarantee even cooking, try to select jalapeños that are similar in size. If you don’t have candy eyeballs, you can create eyes using small dots of mustard or ketchup.
These poppers are best served warm, so try to time their baking close to when you plan to serve them. Enjoy your creepy and cheesy creation!
Spooky Spider Pizza
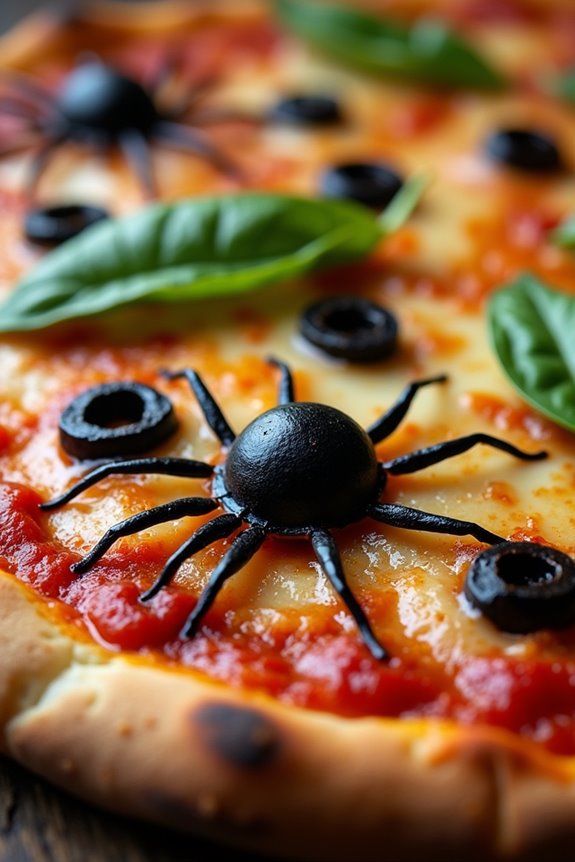
This recipe is designed to serve 4-6 people, making it ideal for a small Halloween gathering or family dinner. The crust is crispy and flavorful, topped with a rich tomato sauce, gooey mozzarella cheese, and strategically placed olive spiders. The combination of these elements creates a pizza that’s both visually stunning and mouthwateringly tasty.
Ingredients:
- 1 pre-made pizza dough (or homemade if preferred)
- 1 cup tomato pizza sauce
- 2 cups shredded mozzarella cheese
- 1/2 cup black olives
- 1/2 cup pepperoni slices (optional)
- 1 tablespoon olive oil
- 1 teaspoon dried oregano
- 1 teaspoon garlic powder
- Salt and pepper to taste
- Fresh basil leaves for garnish (optional)
Cooking Instructions:
- Preheat the Oven: Begin by preheating your oven to 475°F (245°C). This will guarantee that your pizza crust comes out crispy and golden brown.
- Prepare the Dough: Roll out the pizza dough on a lightly floured surface to your desired thickness. Transfer the dough to a baking sheet or pizza stone that has been lightly brushed with olive oil.
- Assemble the Pizza: Spread the tomato pizza sauce evenly over the surface of the dough, leaving a small border around the edges for the crust. Sprinkle the shredded mozzarella cheese all over the sauce.
- Create the Spiders: Take the black olives and cut some in half lengthwise to create the spider bodies, and slice others into thin rings for the legs. Arrange the olive halves on the pizza as the spider bodies, and use the thin rings to form legs extending from each body.
- Optional Toppings: If you’re using pepperoni, place the slices on the pizza as desired. Sprinkle the pizza with dried oregano, garlic powder, salt, and pepper for added flavor.
- Bake the Pizza: Place the assembled pizza in the preheated oven and bake for 12-15 minutes, or until the cheese is bubbly and the crust is golden brown.
- Garnish and Serve: Once cooked, remove the pizza from the oven and allow it to cool for a few minutes. Garnish with fresh basil leaves if desired, then slice and serve your Spooky Spider Pizza.
Extra Tips: For an even spookier appearance, consider using a mix of green and black olives to create different types of spiders. If you prefer a homemade dough, prepare it in advance to save time on the day of your event.
Additionally, you can experiment with different cheeses or add vegetables like bell peppers or mushrooms to customize the pizza to your taste. Remember, the key is to balance spookiness with deliciousness, so have fun and get creative!
Ghostly White Chocolate Pretzels
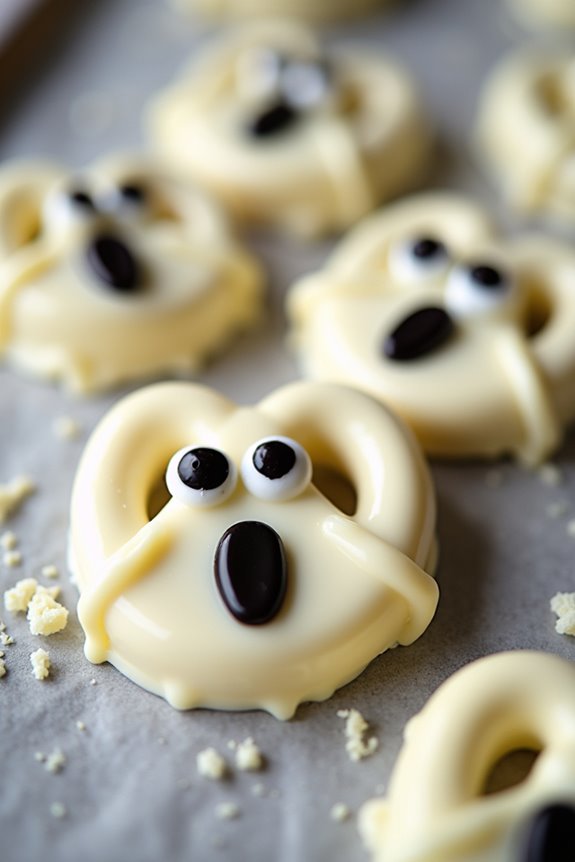
Creating these eerie snacks involves minimal ingredients and effort, making them an ideal choice for busy hosts or last-minute preparations. The contrast of white chocolate with the dark eyes and mouth gives them a classic ghostly look, while the pretzel’s shape adds an unexpected twist. Below is a detailed recipe to make Ghostly White Chocolate Pretzels that serves 4-6 people.
Ingredients
- 24 large pretzel rods
- 12 ounces of white chocolate chips
- 2 tablespoons of coconut oil
- 1 tube of black decorating gel
- Wax paper or parchment paper
Cooking Instructions
- Prepare the Work Area: Clear a space on your countertop and line it with wax paper or parchment paper. This will be where the coated pretzels will cool and harden.
- Melt the Chocolate: In a microwave-safe bowl, combine the white chocolate chips and coconut oil. Microwave on high for 30 seconds, then stir. Continue microwaving in 15-second intervals, stirring in between until the chocolate is fully melted and smooth.
- Coat the Pretzels: Take a pretzel rod and dip it into the melted white chocolate, leaving an inch or so at the bottom uncoated for handling. Use a spoon to help cover the pretzel evenly if necessary. Allow excess chocolate to drip back into the bowl.
- Create the Ghostly Features: Place the coated pretzel onto the prepared wax paper. While the chocolate is still soft, use the black decorating gel to draw two eyes and a mouth towards the top of the coated section to form a ghost face.
- Cool and Harden: Let the pretzels rest on the wax paper until the chocolate hardens completely. This can take about 20 minutes at room temperature, or you can speed up the process by placing them in the refrigerator for about 10 minutes.
- Serve and Enjoy: Once the chocolate is fully set, arrange the Ghostly White Chocolate Pretzels on a platter and serve as a ghoulish treat for your Halloween guests.
Extra Tips
When melting the white chocolate, be cautious not to overheat it as this can cause the chocolate to seize and become unusable.
If the chocolate becomes too thick during dipping, you can reheat it gently in the microwave to restore its smooth consistency.
For an additional spooky touch, consider adding a sprinkle of edible glitter or colored sugar before the chocolate sets.
These pretzels can be stored in an airtight container for up to a week, making them a convenient make-ahead option for your Halloween party.
Witch’s Brew Stew
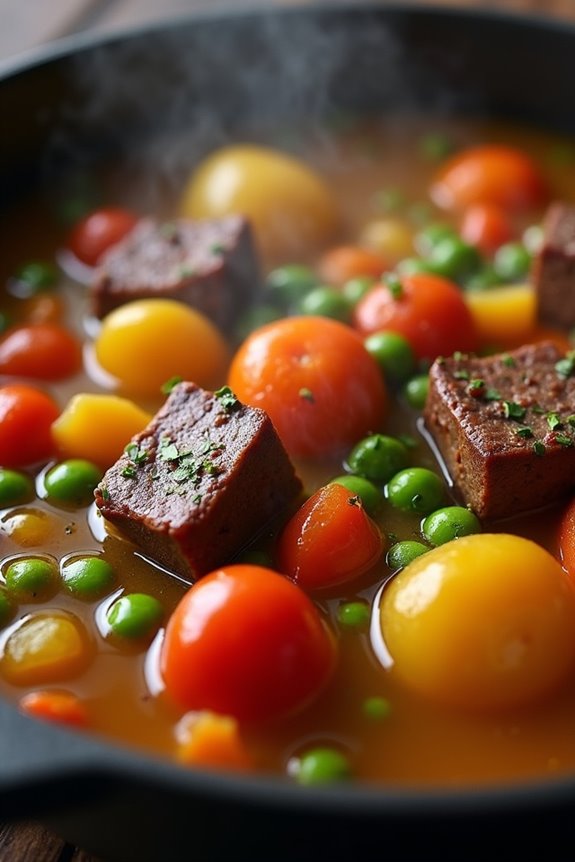
Transform your Halloween night into a magical feast with this savory Witch’s Brew Stew. This dish is perfect for a hauntingly delicious dinner that will enchant both young and old. With its hearty ingredients and rich flavors, this stew will warm your bones on a chilly October evening.
The combination of tender meats, fresh vegetables, and aromatic herbs will have your guests spellbound, making it an ideal centerpiece for your Halloween feast. Witch’s Brew Stew isn’t just about the taste; it’s also about the presentation. Serve it in a cauldron-like pot, and let the steam rise like a mystical fog around your table.
The vibrant colors and fragrant aromas will captivate your senses, turning your dinner into an unforgettable Halloween experience. Best of all, this recipe is simple enough for anyone to create, yet complex enough to impress even the most discerning palates.
Ingredients for Serving Size: 4-6 People
- 2 tablespoons olive oil
- 1 lb beef stew meat, cubed
- 1 large onion, chopped
- 3 cloves garlic, minced
- 4 cups beef broth
- 2 cups water
- 2 potatoes, peeled and diced
- 3 carrots, sliced
- 2 stalks celery, chopped
- 1 can (14.5 oz) diced tomatoes
- 1 cup frozen peas
- 1 teaspoon dried thyme
- 1 teaspoon dried rosemary
- Salt and pepper to taste
- 2 tablespoons flour
- ¼ cup cold water
Cooking Instructions
- Prepare the Ingredients: Begin by gathering and preparing all your ingredients. Chop the onions, mince the garlic, dice the potatoes, slice the carrots, and chop the celery. This will guarantee a smooth cooking process.
- Brown the Meat: In a large pot, heat the olive oil over medium-high heat. Add the beef stew meat and cook until browned on all sides. This should take about 5-7 minutes. Remove the beef and set aside.
- Sauté the Vegetables: In the same pot, add the chopped onion and minced garlic. Sauté for 3-4 minutes until the onion becomes translucent and fragrant.
- Combine and Simmer: Return the browned beef to the pot. Add the beef broth, water, diced tomatoes, potatoes, carrots, and celery. Stir well to combine all ingredients.
- Season the Stew: Add the dried thyme, rosemary, salt, and pepper. Stir again to make certain the herbs and spices are evenly distributed throughout the stew.
- Cook the Stew: Bring the mixture to a boil, then reduce the heat to low. Cover the pot and let it simmer for about 1.5 to 2 hours, or until the beef is tender and the flavors have melded together.
- Thicken the Stew: In a small bowl, mix the flour with cold water to form a slurry. Gradually add this to the stew, stirring constantly until the stew thickens to your desired consistency.
- Add the Peas: About 10 minutes before serving, add the frozen peas to the stew. Cook until they’re heated through.
- Serve: Once the stew is ready, serve it hot in a large bowl or cauldron-like pot, and enjoy your Witch’s Brew Stew!
Extra Tips
For an extra touch of Halloween magic, consider serving the stew in hollowed-out pumpkins or bread bowls for an edible vessel that adds to the festive atmosphere.
You can also substitute beef with chicken or make it vegetarian by replacing the meat with mushrooms and using vegetable broth. Adjust the seasoning to your preference, and feel free to add a splash of red wine for a deeper flavor.
Bloody Finger Hot Dogs

Looking to spook up your Halloween party with some creepy yet delicious treats? Search no further than Bloody Finger Hot Dogs! These gruesome-looking snacks are sure to be a hit at any Halloween gathering. They aren’t only easy to make but also a fun way to get into the Halloween spirit. Perfect for serving 4-6 people, these hot dogs are designed to look like severed fingers, complete with ketchup “blood” for an added eerie effect.
The key to creating these frightful bites lies in the details. By carefully carving the hot dogs to resemble fingers, complete with knuckles and fingernails, you add a layer of authenticity to the dish. When paired with a deliciously warm bun and topped with tangy ketchup, these Bloody Finger Hot Dogs are both creepy and appetizing.
Whether you’re hosting a Halloween party or just craving a themed snack, these hot dogs will surely do the trick!
Ingredients (Serves 4-6 People)
- 10 hot dogs
- 10 hot dog buns
- Ketchup
- Mustard (optional)
- 1 small onion (optional, for extra effect)
Cooking Instructions
- Prepare the Hot Dogs: Begin by taking the hot dogs and using a small, sharp knife to make shallow cuts on one end to create the appearance of a fingernail. Then, make a few curved cuts in the middle of the hot dog to mimic knuckles. Repeat this process for each hot dog.
- Cook the Hot Dogs: You can cook the hot dogs by either boiling them in water for about 5-7 minutes or grilling them on a hot grill for about 4-5 minutes, turning occasionally until they’re heated through and have grill marks.
- Prepare the Buns: While the hot dogs are cooking, lightly toast the hot dog buns in an oven or on a grill for a minute or two to give them a nice, warm texture.
- Assemble the Hot Dogs: Place each cooked hot dog into a bun. Use ketchup to simulate blood by generously squirting it around the cut “fingernail” area and along the “knuckles.”
- Optional Decoration: For added effect, you can slice a small onion into thin slivers and place them at the base of each hot dog to resemble bones protruding from the severed finger.
Extra Tips
For an even more realistic look, consider removing a small section from the tip of the hot dog to create a more defined nail bed. You can also experiment with different sauces like barbecue sauce or mustard to add flavor variations.
If you’re making these ahead of time, keep the hot dogs warm in a slow cooker until ready to serve. Remember to have plenty of napkins on hand, as these can get delightfully messy with all the “blood” involved. Enjoy your spooky creation and have a scary good Halloween!
Frankenstein Rice Krispie Treats
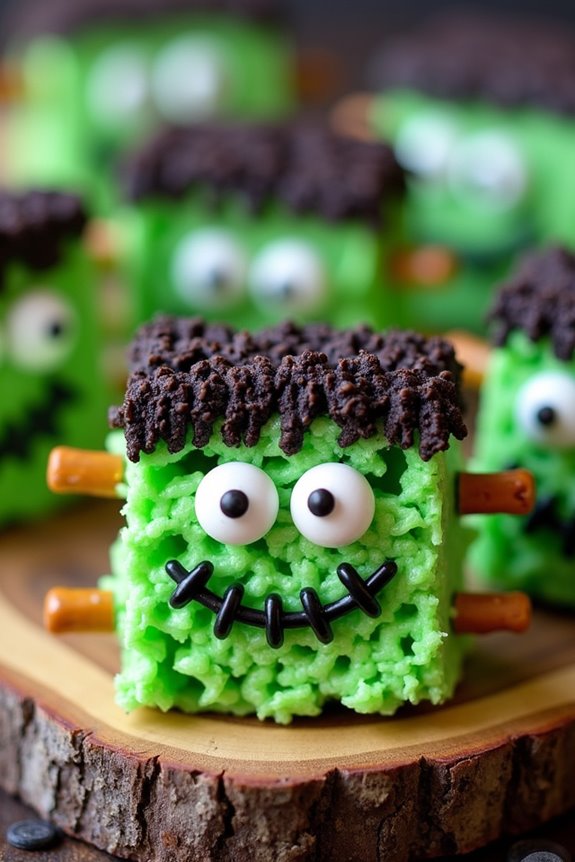
Frankenstein Rice Krispie Treats are a fun and festive way to celebrate Halloween, combining the classic taste of Rice Krispie treats with a spooky twist. These treats are perfect for a Halloween party or a fun family activity, allowing everyone to get creative with their decorating skills. The vibrant green color and monster-like features are sure to delight children and adults alike, making them a memorable addition to your Halloween spread.
The best part about these Frankenstein Rice Krispie Treats is how simple they’re to make. With just a handful of ingredients and a few easy steps, you can transform ordinary Rice Krispie treats into cute and creepy monsters. Whether you’re a seasoned baker or a kitchen novice, this recipe is accessible and fun, encouraging creativity with decorating. Plus, they can be prepared in advance, giving you more time to enjoy the Halloween festivities.
Ingredients (serving size: 4-6 people):
- 6 cups of Rice Krispies cereal
- 3 tablespoons of unsalted butter
- 1 (10 oz.) bag of mini marshmallows
- Green food coloring
- Black icing or gel for decorating
- Candy eyes
- Pretzel sticks (for bolts)
- Chocolate chips or black gel for hair
Cooking Instructions:
- Prepare the Mixture: In a large saucepan, melt the unsalted butter over low heat. Once melted, add the mini marshmallows and stir continuously until they’ve completely melted and formed a smooth mixture.
- Color the Mixture: Remove the saucepan from heat and add a few drops of green food coloring to the melted marshmallow mixture. Stir well until the color is evenly distributed throughout the mixture. Add more food coloring if necessary to achieve the desired shade of green.
- Combine with Cereal: Gradually add the Rice Krispies cereal to the green marshmallow mixture. Stir until all the cereal is well coated with the marshmallow mixture.
- Shape the Treats: Pour the mixture into a greased 9×13 inch baking dish. Use a spatula to press the mixture evenly into the dish. Allow the mixture to cool for about 10 minutes.
- Cut and Decorate: Once cooled, cut the treats into rectangles. Use black icing or gel to draw a Frankenstein face on each piece. Attach candy eyes and use chocolate chips or black gel to create hair. Break pretzel sticks in half and insert them into the sides of each treat to resemble bolts.
- Set and Serve: Allow the decorated treats to set for about 15 minutes before serving. Enjoy these spooky treats with your family and friends!
Extra Tips:
When making Frankenstein Rice Krispie Treats, it’s important to work fairly quickly when combining the marshmallow mixture with the cereal, as the mixture can harden as it cools. If you find the mixture is sticking to your hands while pressing it into the dish, try lightly greasing your hands with cooking spray.
Additionally, feel free to get creative with the decorations; using different candies or colored icing can give each Frankenstein a unique personality. Finally, store any leftover treats in an airtight container to keep them fresh for a couple of days.
Vampire Bite Cupcakes

Vampire Bite Cupcakes are the perfect treat to add a spooky twist to your Halloween festivities. These deliciously eerie cupcakes are sure to delight both kids and adults with their rich red velvet base and a surprise “bloody” filling that oozes out when bitten. Topped with a smooth cream cheese frosting and garnished with fang marks, these cupcakes not only taste amazing but also provide a fun and thematic addition to your Halloween spread.
Whether you’re hosting a party or simply want to surprise your family with a festive dessert, these cupcakes are destined to be a hit.
Creating Vampire Bite Cupcakes involves a few key components: the red velvet cupcake base, the raspberry “blood” filling, and the cream cheese frosting. The combination of flavors and textures makes for an irresistible treat. The process is straightforward, and with a little creativity, you can bring these ghoulish goodies to life in your own kitchen.
Here’s what you’ll need to make enough cupcakes to serve 4-6 people.
Ingredients:
- 1 ½ cups all-purpose flour
- 1 cup granulated sugar
- 1 tablespoon cocoa powder
- ½ teaspoon baking soda
- ½ teaspoon salt
- 1 large egg
- ¾ cup buttermilk
- ½ cup vegetable oil
- 1 teaspoon vanilla extract
- 1 tablespoon red food coloring
- 1 teaspoon white vinegar
- ½ cup raspberry jam (for filling)
- 1 package (8 oz) cream cheese, softened
- ½ cup unsalted butter, softened
- 2 cups powdered sugar
- 1 teaspoon vanilla extract
Cooking Instructions:
- Preheat and Prepare: Preheat your oven to 350°F (175°C) and line a cupcake tin with paper liners.
- Mix Dry Ingredients: In a medium bowl, whisk together the flour, sugar, cocoa powder, baking soda, and salt. Set aside.
- Combine Wet Ingredients: In a large bowl, beat together the egg, buttermilk, vegetable oil, vanilla extract, red food coloring, and white vinegar until well combined.
- Create Batter: Gradually add the dry ingredients to the wet ingredients, mixing until the batter is smooth and no lumps remain.
- Bake Cupcakes: Fill each cupcake liner about ⅔ full with the batter. Bake for 18-20 minutes or until a toothpick inserted into the center comes out clean. Allow the cupcakes to cool completely on a wire rack.
- Prepare Filling: Once the cupcakes are cool, use a small knife to cut a small cone-shaped piece out of the top of each cupcake. Fill each hole with raspberry jam and replace the cut piece to cover the filling.
- Make Frosting: In a large bowl, beat the cream cheese and butter together until smooth. Gradually add the powdered sugar and vanilla extract, beating until fluffy.
- Frost Cupcakes: Pipe or spread the cream cheese frosting on top of each cupcake, covering the filled hole.
- Decorate: Use a toothpick dipped in raspberry jam to create small “bite marks” on the frosting, allowing some jam to drip for a realistic blood effect.
Extra Tips:
To guarantee the best results with these Vampire Bite Cupcakes, make sure all your ingredients are at room temperature before starting, as this helps them mix together more evenly.
When adding the red food coloring, start with a small amount and gradually add more if needed to achieve the desired intensity of color.
If you want to add a bit of extra flair, consider using edible glitter or Halloween-themed sprinkles as a finishing touch.
These cupcakes are best enjoyed fresh, but they can be stored in an airtight container in the refrigerator for up to three days.
Graveyard Dirt Pudding Cups

The magic of Graveyard Dirt Pudding Cups lies in their simplicity and engaging presentation. With just a few ingredients, you can create a dessert that not only tastes fantastic but also captures the playful spirit of Halloween. Each cup is layered with creamy chocolate pudding and topped with cookie crumbs that mimic dirt, while gummy worms and tombstone cookies complete the eerie graveyard effect. This recipe is perfect for serving 4-6 people, making it ideal for small parties or family gatherings.
Ingredients (for 4-6 servings):
- 2 cups of cold milk
- 1 package (3.9 ounces) of instant chocolate pudding mix
- 1 package (14.3 ounces) of chocolate sandwich cookies
- 1/2 cup of whipped topping
- Gummy worms
- Tombstone-shaped cookies or graham crackers (optional)
Cooking Instructions:
- Prepare the Pudding: In a large bowl, whisk together the cold milk and chocolate pudding mix until thickened, about 2 minutes. Let it stand for 5 minutes to further set.
- Crush the Cookies: Place the chocolate sandwich cookies in a resealable plastic bag. Using a rolling pin or a heavy object, crush the cookies into fine crumbs to resemble dirt.
- Assemble the Cups: In each serving cup, layer the bottom with a generous spoonful of the chocolate pudding. Follow with a layer of cookie crumbs.
- Add More Layers: Repeat the layering process by adding another layer of pudding followed by more cookie crumbs on top. Confirm the top layer resembles a fresh dirt surface.
- Decorate the Graveyard: Insert a few gummy worms into the cookie crumb layer, allowing them to peek out like they’re crawling through the dirt. If using, place tombstone-shaped cookies or graham crackers into the top layer to mimic gravestones.
- Add Finishing Touches: Spoon a small dollop of whipped topping onto each cup for added creaminess and texture.
- Chill and Serve: Place the assembled cups in the refrigerator for at least 30 minutes to allow the flavors to meld and the pudding to set. Serve chilled.
Extra Tips:
For added creativity, you can personalize the tombstone cookies with edible markers to write spooky messages or names.
If you’re serving this at a party, consider setting up a “graveyard” station where guests can assemble their own pudding cups, allowing them to customize the amount of “dirt” and “worms” they prefer.
Additionally, if you want a more intense chocolate flavor, consider using dark chocolate pudding mix or adding a layer of melted chocolate between the pudding and cookie layers.