

As Halloween draws near, my excitement for crafting the perfect menu is in full swing. Quick and crowd-pleasing dishes are always a hit. Start with spooky spider deviled eggs and mummy jalapeño poppers to set the festive tone. Add a playful touch with whimsical witch’s broomstick cheese snacks. These 13 easy food ideas will transform your Halloween gathering into a delightful culinary adventure.
Spooky Spider Deviled Eggs
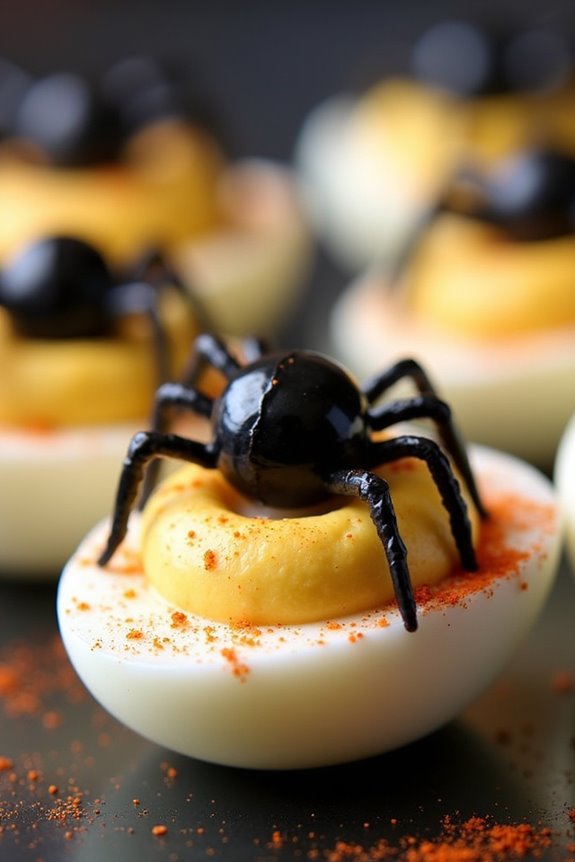
Get ready to add a creepy yet delicious touch to your Halloween party with Spooky Spider Deviled Eggs. These devilishly delightful treats aren’t only easy to make but also add a fun, thematic element to your table setting.
Perfect for a crowd, these deviled eggs are topped with black olive “spiders,” giving them that eerie, Halloween vibe that will be sure to impress your guests, both young and old. The creamy, tangy filling paired with the salty olives offers a delightful contrast of flavors that’s bound to be a crowd-pleaser.
Deviled eggs are a classic appetizer, but with a few tweaks and some creative decoration, they can become the star of your Halloween spread. This recipe is designed for a serving size of 4-6 people, making it a perfect addition to any gathering.
Whether you’re hosting a spooky soiree or simply enjoying a Halloween-themed dinner with the family, these Spooky Spider Deviled Eggs are bound to add a touch of fun and flavor to your celebration.
Ingredients for 4-6 People:
- 6 large eggs
- 1/4 cup mayonnaise
- 1 teaspoon Dijon mustard
- 1 teaspoon apple cider vinegar
- Salt, to taste
- Black pepper, to taste
- Paprika, for garnish
- 12-15 black olives (pitted)
Cooking Instructions:
- Boil the Eggs: Place the eggs in a saucepan and cover them with cold water. Bring the water to a boil over medium-high heat. Once the water reaches a rolling boil, cover the saucepan, remove it from heat, and let it stand for 10-12 minutes.
- Cool and Peel: After the eggs have cooked, transfer them to a bowl of ice water to cool for about 5 minutes. Once cooled, gently tap each egg on a hard surface to crack the shell and peel it off under running water to guarantee a smooth surface.
- Prepare the Filling: Slice each egg in half lengthwise. Carefully remove the yolks and place them in a mixing bowl. Set the egg whites aside on a serving platter.
- Mix the Filling: Mash the egg yolks with a fork until they reach a crumbly texture. Add the mayonnaise, Dijon mustard, apple cider vinegar, salt, and black pepper. Mix until smooth and creamy. Adjust seasoning to your taste.
- Fill the Egg Whites: Using a spoon or a piping bag, fill each egg white half with the yolk mixture, creating a small mound on top.
- Create the Spiders: Cut the black olives in half. Use one half for the body of the spider and slice the other half into thin strips to create legs. Place one half of the olive on top of each deviled egg, then arrange the sliced strips around it to resemble spider legs.
- Garnish and Serve: Lightly sprinkle paprika over the eggs for added color and flavor. Serve chilled or at room temperature, and watch your guests delight in the spooky presentation.
Extra Tips:
When making Spooky Spider Deviled Eggs, be sure to use fresh eggs, as they’re easier to peel. If you’re short on time, consider preparing the eggs and filling a day in advance, storing them separately in the refrigerator.
Assemble the spiders just before serving to guarantee the olives stay fresh and the egg filling remains creamy. For an extra punch of flavor, consider adding a dash of hot sauce or a pinch of garlic powder to the yolk mixture. Enjoy your spooky, savory creation!
Mummy Jalapeño Poppers
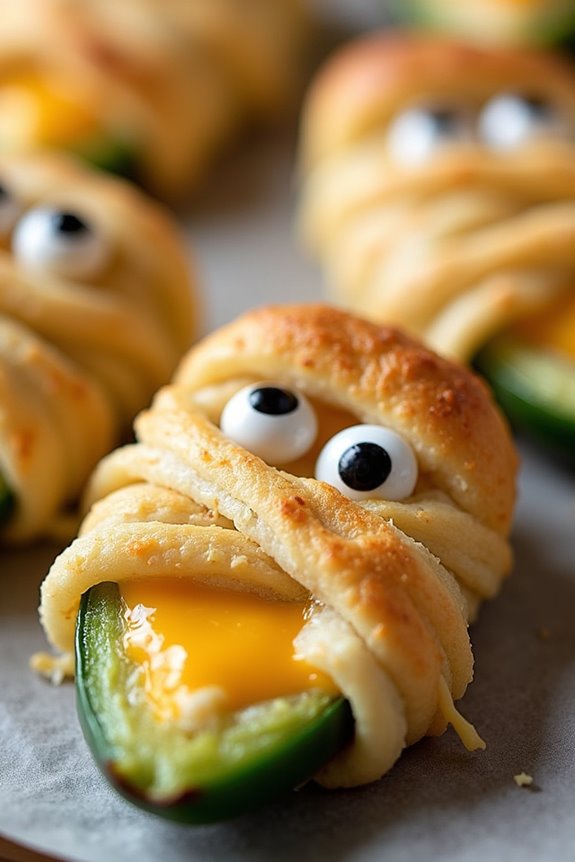
Mummy Jalapeño Poppers are a fun and spooky appetizer perfect for any Halloween celebration. These tasty treats combine the spicy kick of jalapeños with creamy cheese, all wrapped in a golden crescent roll to resemble a mummy.
They’re not only delicious but also visually entertaining, making them a hit at parties or family gatherings. The combination of flavors and textures will delight your guests and add a festive flair to your Halloween spread.
Creating Mummy Jalapeño Poppers is simple and requires just a few ingredients. The preparation involves filling jalapeño halves with a cheesy mixture, then wrapping them in crescent dough to create the mummy effect.
You’ll bake them until they’re golden brown, and then finish with edible eyes to complete the spooky look. This recipe yields enough for 4-6 people, making it ideal for a small gathering.
Ingredients:
- 12 large jalapeño peppers
- 8 oz cream cheese, softened
- 1 cup shredded cheddar cheese
- 1 tsp garlic powder
- 1 tsp onion powder
- 1/2 tsp salt
- 1 tube crescent roll dough
- 24 candy eyes
Instructions:
- Preheat and Prepare Jalapeños: Preheat your oven to 375°F (190°C). Slice each jalapeño in half lengthwise and remove the seeds and membranes. Be sure to wear gloves or wash your hands thoroughly after handling the peppers to avoid irritation.
- Make the Filling: In a mixing bowl, combine the softened cream cheese, shredded cheddar, garlic powder, onion powder, and salt. Mix until smooth and well combined.
- Fill the Jalapeños: Using a spoon, fill each jalapeño half with the cheese mixture, making sure the mixture is packed in evenly.
- Wrap with Dough: Open the tube of crescent roll dough and separate into strips. Wrap each filled jalapeño with a strip of dough, leaving a small gap for the eyes. Aim for a crisscross pattern to resemble mummy bandages.
- Bake: Place the wrapped jalapeños on a baking sheet lined with parchment paper. Bake in the preheated oven for 12-15 minutes or until the dough is golden brown and cooked through.
- Add the Eyes: Remove from the oven and immediately press two candy eyes into the exposed cheese area of each popper to complete the mummy look.
Extra Tips: If you prefer a milder version, choose larger jalapeños and make certain all seeds and membranes are removed. For a smokier flavor, consider roasting the jalapeños before stuffing them.
You can also substitute the cheddar with other cheeses like pepper jack for added spice. Be creative with the dough wrapping technique to give each mummy a unique appearance. Serve them warm to enjoy the gooey cheese and crispy dough at their best!
Witch’s Broomstick Cheese Snacks

Witch’s Broomstick Cheese Snacks are a fun and festive treat perfect for any Halloween gathering. These delightful snacks aren’t only visually appealing but also incredibly easy to make. Using simple ingredients, you can whip up these spooky broomsticks in no time, adding a touch of magic to your party spread.
They’re perfect for both kids and adults, offering a delicious combination of salty and cheesy flavors that everyone will enjoy. These snacks resemble tiny broomsticks, crafted with string cheese and pretzel sticks, making them an ideal finger food. The preparation process is straightforward, meaning you can easily involve your little witches and wizards in creating this enchanting snack.
Whether you’re hosting a Halloween party or just looking for a fun kitchen activity, Witch’s Broomstick Cheese Snacks are sure to be a hit.
Ingredients for serving size of 4-6 people:
- 6 pieces of string cheese
- 12 pretzel sticks
- Fresh chives (or any other herb for tying)
- 1 tablespoon of butter (optional for taste)
Cooking Instructions:
- Prepare the String Cheese: Start by unwrapping the string cheese sticks. Cut each piece of string cheese into four equal parts to create the broom bristles. You should have about 24 small pieces of string cheese.
- Create the Broom Bristles: Take each small piece of string cheese and carefully use a knife to make vertical cuts halfway up the cheese, creating the appearance of broom bristles. Be gentle to guarantee the cheese doesn’t break apart.
- Attach the Pretzel Sticks: Insert a pretzel stick into the uncut end of each piece of string cheese. Push it in gently so that it holds firmly as the broomstick handle.
- Tie with Chives: Cut the chives into small pieces, approximately 3-4 inches in length. Take one piece of chive and tie it around the top of the bristles, just below where the pretzel stick is inserted. This will give the appearance of the broom’s binding and help keep the string cheese in place.
- Optional Butter Glaze: If desired, melt a tablespoon of butter and lightly brush it over the cheese and pretzel to add flavor and sheen. This step is optional but can enhance the taste and presentation.
- Serve and Enjoy: Arrange your Witch’s Broomstick Cheese Snacks on a platter and serve them as a delightful Halloween treat.
Extra Tips:
For best results, verify the string cheese is chilled before cutting. This makes it easier to handle and less likely to break. If you can’t find fresh chives, any thin herb or even a small strip of green onion will work as a substitute.
Additionally, you can prepare these snacks a few hours in advance and store them in the refrigerator; just bring them to room temperature before serving for maximum flavor and texture.
Ghostly Guacamole Dip
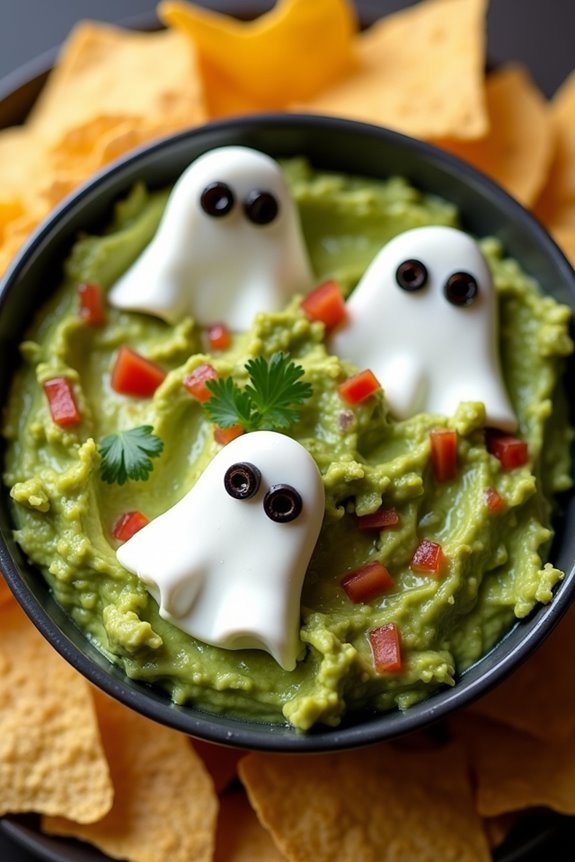
Ghostly Guacamole Dip is the perfect spooky snack to serve at your Halloween party. This creamy, delicious dip not only satisfies your taste buds but also adds a touch of festive flair to your table. The rich green hue of the guacamole pairs beautifully with the ghost-themed garnishes, creating an eerie yet appetizing centerpiece.
Whether you’re hosting a gathering of ghouls or simply enjoying a cozy night in with friends and family, this dip is guaranteed to be a hit. The combination of ripe avocados, zesty lime juice, and aromatic herbs creates a flavorful base for this dish, while the decorative ghost toppings take it to the next level.
It’s a fun and easy recipe to prepare, making it a great choice for both experienced chefs and novice cooks. Plus, it’s a healthy snack that everyone can enjoy, including those with dietary restrictions, as it’s naturally gluten-free and vegan-friendly. Get ready to impress your guests with this hauntingly delightful Ghostly Guacamole Dip.
Ingredients (Serves 4-6):
- 4 ripe avocados
- 1 lime, juiced
- 1 small red onion, finely chopped
- 2 Roma tomatoes, diced
- 1 clove garlic, minced
- 1 tablespoon fresh cilantro, chopped
- 1 teaspoon salt
- 1/2 teaspoon ground cumin
- 1/2 teaspoon cayenne pepper
- 4 small mozzarella balls
- 8 black olives, halved
- Tortilla chips for serving
Instructions:
- Prepare the Avocados: Cut the avocados in half, remove the pits, and scoop the flesh into a large mixing bowl. Use a fork to mash the avocados until you achieve a smooth yet slightly chunky texture.
- Add Flavor: Squeeze the lime juice over the mashed avocados to prevent browning. Stir in the finely chopped red onion, diced tomatoes, minced garlic, chopped cilantro, salt, ground cumin, and cayenne pepper. Mix until all ingredients are well combined.
- Create Ghostly Garnishes: Take the mozzarella balls and cut them in half. Place each half on top of the guacamole, gently pressing them in so they stay in place. These will serve as the “ghosts.”
- Add Eyes: Use a small knife to carve tiny holes into each mozzarella half. Insert black olive halves into these holes to create eyes for your ghostly figures.
- Serve: Transfer the guacamole to a serving bowl and arrange tortilla chips around the edge. Serve immediately to guarantee the guacamole maintains its vibrant color and fresh taste.
Extra Tips:
For a smoother texture, you can use a food processor to blend the avocados and other ingredients. Adjust the seasoning to your preference, adding more lime juice for tanginess or more cayenne pepper for heat.
If you want to prepare the dip in advance, store it in an airtight container with a layer of plastic wrap pressed directly onto the surface of the guacamole to prevent it from turning brown. Decorate with the ghost garnishes just before serving to keep them looking fresh and spooky.
Pumpkin Patch Pizza Bites

Transform your Halloween gathering into a spooktacular feast with these delightful Pumpkin Patch Pizza Bites. Perfectly sized for little hands and big appetites, these bites aren’t only adorable but also packed with flavor. The combination of a buttery, flaky crust and a gooey, cheesy center makes them irresistible. Ideal for serving as an appetizer or a fun snack, these pizza bites will surely be a hit at your Halloween party.
The theme of pumpkins is cleverly incorporated by shaping these pizza bites into mini pumpkins, using a simple dough recipe and a mix of classic pizza toppings. With the right balance of spices and a hint of sweetness from the pumpkin-shaped dough, these bites will capture the essence of fall. They’re easy to prepare and cook, making them a perfect addition to your Halloween menu. Gather your ingredients and follow this spooktacular recipe to create a whimsical dish that will delight both kids and adults.
Ingredients (Serves 4-6)
- 1 pre-made pizza dough (or homemade if preferred)
- 1 cup pizza sauce
- 2 cups shredded mozzarella cheese
- 1/2 cup mini pepperoni slices
- 1/4 cup finely chopped bell peppers (orange or red)
- 1/4 cup finely chopped black olives
- 2 tablespoons olive oil
- 1 teaspoon dried oregano
- 1 teaspoon garlic powder
- 1 egg (for egg wash)
- Green bell pepper (for pumpkin stems)
Cooking Instructions:
- Prepare the Dough: Preheat your oven to 375°F (190°C). Roll out the pizza dough on a lightly floured surface to about 1/8-inch thickness. Use a pumpkin-shaped cookie cutter to cut out pieces of dough. Gather the scraps, roll them out again, and cut more shapes until all the dough is used.
- Assemble the Bites: Place the pumpkin-shaped dough pieces on a baking sheet lined with parchment paper. Spread a small spoonful of pizza sauce in the center of each pumpkin shape, leaving a small border around the edges.
- Add the Toppings: Sprinkle a generous amount of mozzarella cheese over the sauce. Top with mini pepperoni slices, chopped bell peppers, and black olives. Be creative and arrange them to resemble jack-o-lantern faces if desired.
- Seal and Egg Wash: Place another pumpkin-shaped dough piece over the top of each assembled bite, pressing the edges gently to seal. Use a fork to crimp the edges for a decorative touch. Brush the tops with a lightly beaten egg to guarantee a golden finish.
- Bake the Bites: Insert a small piece of green bell pepper at the top of each pizza bite to resemble a pumpkin stem. Bake in the preheated oven for 12-15 minutes or until the dough is golden brown and the cheese is melted and bubbly.
- Serve and Enjoy: Remove from the oven and let cool slightly before serving. Enjoy these Pumpkin Patch Pizza Bites warm for the best flavor and texture.
Extra Tips:
For a more flavorful dough, consider incorporating a teaspoon of pumpkin pie spice into your dough mixture. If you’re short on time, you can use biscuit dough as a substitute for homemade or store-bought pizza dough.
Additionally, these bites can be prepared a day in advance and stored in the refrigerator; simply reheat them in the oven before serving to verify they’re warm and crispy. Get creative with toppings to suit your taste preferences or dietary needs, making these delightful bites truly your own.
Creepy Crawly Pasta Salad
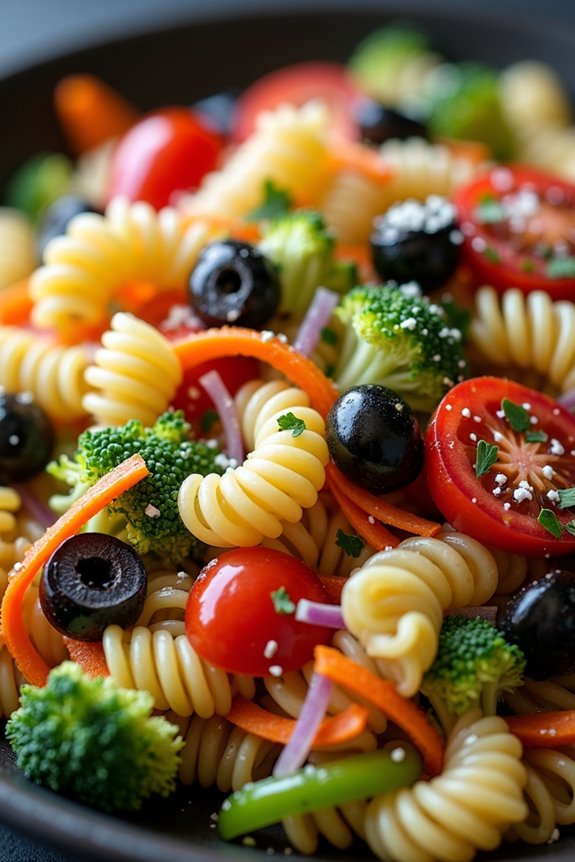
Get ready to spook your guests with a ghoulishly delightful Creepy Crawly Pasta Salad this Halloween! This dish is perfect for adding an eerie touch to your party spread, with its vibrant colors and fun textures. The combination of twisted pasta, colorful veggies, and a creepy crawly appearance won’t only please the eyes but also tantalize the taste buds.
Whether you’re hosting a Halloween bash or just preparing a festive meal at home, this Creepy Crawly Pasta Salad is sure to be a hit.
The secret to creating the perfect Creepy Crawly Pasta Salad lies in the creativity of its presentation and the blend of flavors. Using a variety of pasta shapes and a medley of vegetables, this dish creates an illusion of a crawling critter-filled salad. The dressing, made with a tangy vinaigrette, complements the fresh vegetables and adds a zesty kick.
This recipe is perfect for serving 4-6 people, making it an ideal choice for a small gathering or family meal.
Ingredients for 4-6 Servings:
- 12 ounces rotini or fusilli pasta
- 1 cup cherry tomatoes, halved
- 1 cup black olives, sliced
- 1 cup carrot ribbons
- 1 cup broccoli florets
- 1/2 cup red onion, thinly sliced
- 1/2 cup green bell pepper, diced
- 1/2 cup shredded mozzarella cheese
- 1/4 cup fresh parsley, chopped
- 1/2 cup Italian vinaigrette dressing
- Salt and pepper to taste
Cooking Instructions:
- Cook the Pasta: Begin by cooking the rotini or fusilli pasta in a large pot of salted boiling water. Follow the package instructions for al dente pasta, usually about 8-10 minutes. Once cooked, drain the pasta and rinse it with cold water to stop the cooking process and cool it down.
- Prepare the Vegetables: While the pasta is cooking, prepare your vegetables. Halve the cherry tomatoes, slice the black olives, and use a vegetable peeler to create carrot ribbons. Chop the broccoli into small florets, thinly slice the red onion, and dice the green bell pepper.
- Combine the Ingredients: In a large mixing bowl, combine the cooked and cooled pasta, cherry tomatoes, black olives, carrot ribbons, broccoli florets, red onion, green bell pepper, shredded mozzarella cheese, and chopped parsley.
- Dress the Salad: Pour the Italian vinaigrette dressing over the pasta salad. Toss everything together gently to guarantee the dressing evenly coats all the ingredients. Season with salt and pepper to taste.
- Chill Before Serving: For best results, refrigerate the salad for at least 30 minutes before serving. This allows the flavors to meld together and enhances the overall taste of the dish.
Extra Tips:
To make your Creepy Crawly Pasta Salad even more festive, consider adding edible decorations such as candy eyes to turn the veggies into spooky creatures.
You can also incorporate different colored pasta for an additional burst of color. For a protein boost, add some cooked chicken or pepperoni slices. If you prefer a creamier dressing, substitute the vinaigrette with a ranch or Caesar dressing.
Adjust the seasoning and ingredients to suit your taste preferences, and have fun getting creative with your Halloween dish!
Monster Eye Meatballs
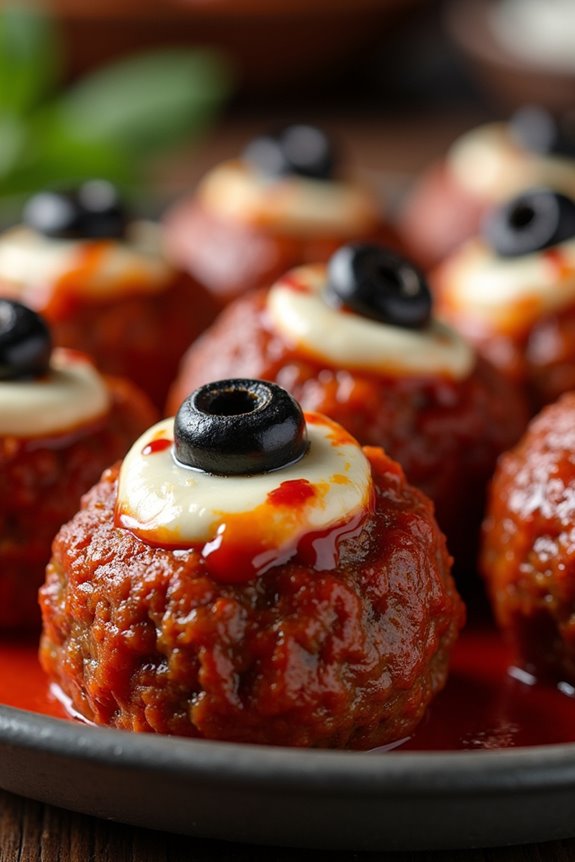
Halloween is the perfect time to get creative in the kitchen, and nothing screams spooky quite like a platter of Monster Eye Meatballs. These deliciously eerie appetizers are sure to be a hit at any Halloween party, combining the savory flavors of classic meatballs with a fun and creepy twist.
Made with ground beef and seasoned to perfection, each meatball is topped with an ‘eyeball’ made from mozzarella cheese, black olives, and a dollop of ketchup to complete the ghoulish effect. Whether you’re hosting a gathering for kids or adults, these Monster Eye Meatballs will definitely add a delightful fright to your festive menu.
This recipe is designed to serve 4-6 people, making it ideal for a small Halloween get-together. The preparation is straightforward, allowing you to spend more time enjoying the party and less time in the kitchen. The meatballs themselves are juicy and flavorful, while the cheesy, olive-topped ‘eyes’ add a touch of humor and creepiness to the dish.
Serve them on a platter with some marinara sauce for dipping, and watch them disappear before your eyes!
Ingredients:
- 1 pound ground beef
- 1/2 cup breadcrumbs
- 1/4 cup grated Parmesan cheese
- 1 egg
- 2 cloves garlic, minced
- 1 teaspoon Italian seasoning
- 1/2 teaspoon salt
- 1/4 teaspoon black pepper
- 1 cup marinara sauce
- 12 small mozzarella balls (bocconcini)
- 6 black olives, sliced into rounds
- Ketchup, for decoration
Instructions:
- Preheat the Oven: Preheat your oven to 375°F (190°C). This will guarantee your meatballs cook evenly and thoroughly.
- Prepare the Meatball Mixture: In a large bowl, combine the ground beef, breadcrumbs, Parmesan cheese, egg, minced garlic, Italian seasoning, salt, and pepper. Mix everything together until well combined. Make sure the ingredients are evenly distributed for consistent flavor in every bite.
- Shape the Meatballs: Take about two tablespoons of the meat mixture and roll it into a ball with your hands. Place each meatball on a baking sheet lined with parchment paper, making sure they’re evenly spaced.
- Bake the Meatballs: Place the baking sheet in the preheated oven and bake the meatballs for 15-20 minutes or until they’re browned and cooked through.
- Prepare the Monster Eyes: While the meatballs are baking, cut each mozzarella ball in half. Slice the olives into thin rounds. Set aside until the meatballs are ready.
- Assemble the Monster Eyes: Once the meatballs are done, remove them from the oven. Place a half mozzarella ball on top of each meatball to create the ‘eye’. Press a slice of olive into the center of the mozzarella to form the ‘pupil’.
- Add the Bloodshot Effect: Using a toothpick or small spoon, dot a small amount of ketchup around the mozzarella to create a bloodshot effect for a spookier appearance.
- Serve: Arrange the Monster Eye Meatballs on a serving platter. Serve warm with a side of marinara sauce for dipping.
Extra Tips:
For an extra touch of spookiness, you can use food coloring to tint the mozzarella balls with a light green hue, creating a more monstrous appearance. If you prefer a spicier version, consider adding a pinch of red pepper flakes to the meat mixture.
Additionally, if mozzarella balls are unavailable, sliced mozzarella cheese or small rounds of string cheese can be used as substitutes. Remember to let the meatballs cool slightly before handling them to avoid melting the cheese too quickly. Enjoy these frightfully fun bites as part of your Halloween festivities!
Bat Wing Chicken Tenders
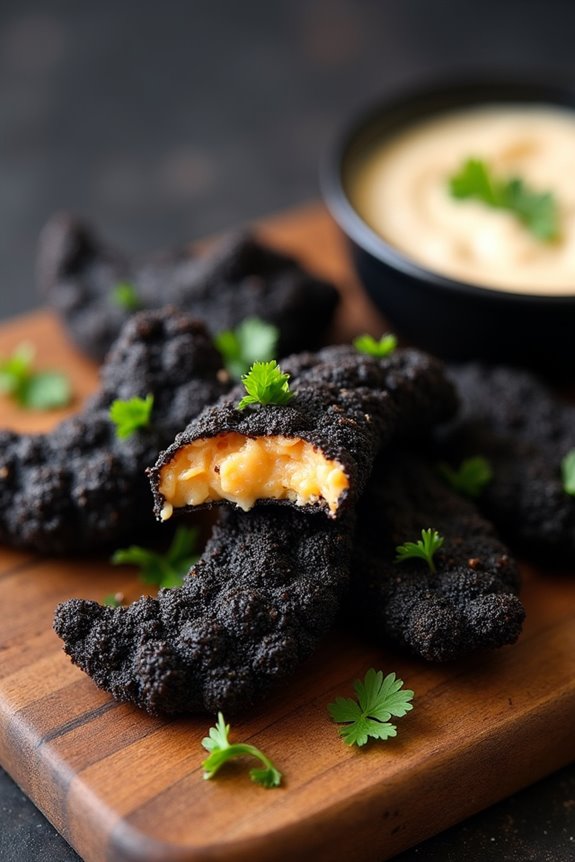
If you’re searching to add a spooky twist to your Halloween dinner menu, search no more than these Bat Wing Chicken Tenders. Perfect for both kids and adults, these tenders aren’t only delicious but also visually striking, making them a great addition to any Halloween-themed meal.
The secret to their bat-wing appearance lies in a special combination of spices and a unique cooking method that guarantees a crispy, blackened finish reminiscent of bat wings.
These Bat Wing Chicken Tenders are seasoned with savory spices and coated in a dark, crunchy exterior that will have your guests coming back for more. The tender chicken inside remains juicy and flavorful, providing a delightful contrast to the crispy crust. Whether you’re throwing a Halloween party or just want to make a festive meal for the family, these tenders are sure to be a hit.
Ingredients (serving size: 4-6 people):
- 1.5 lbs chicken tenders
- 1 cup buttermilk
- 2 cups all-purpose flour
- 1/4 cup cornstarch
- 2 teaspoons smoked paprika
- 2 teaspoons garlic powder
- 1 teaspoon onion powder
- 1 teaspoon cayenne pepper
- 1 teaspoon salt
- 1/2 teaspoon black pepper
- 1/4 cup activated charcoal powder
- Vegetable oil for frying
Cooking Instructions:
- Marinate the Chicken: In a large bowl, combine chicken tenders and buttermilk. Cover and marinate in the refrigerator for at least 1 hour, or overnight for best results. The buttermilk will tenderize the chicken and enhance its flavor.
- Prepare the Coating: In a separate bowl, mix together the flour, cornstarch, smoked paprika, garlic powder, onion powder, cayenne pepper, salt, black pepper, and activated charcoal powder. This mixture will give the chicken its bat-wing appearance and a deliciously seasoned flavor.
- Heat the Oil: Pour enough vegetable oil into a deep pan or fryer to cover the chicken tenders. Heat the oil to 350°F (175°C). Confirm the oil is hot enough to create a crispy coating.
- Coat the Chicken: Remove the chicken tenders from the buttermilk, allowing excess to drip off. Dredge each piece in the flour mixture, ensuring it’s completely coated. Press the flour mixture onto the tenders to confirm an even coating.
- Fry the Chicken: Carefully place the tenders into the hot oil, being mindful not to overcrowd the pan. Fry the chicken in batches for about 5-7 minutes, or until the coating is crispy and the chicken is cooked through. The internal temperature should reach 165°F (74°C).
- Drain and Serve: Once cooked, transfer the tenders to a paper towel-lined plate to drain excess oil. Serve immediately for the best texture.
Extra Tips:
For an extra crispy finish, double coat the chicken by dipping it back into the buttermilk and flour mixture before frying. If you want a milder flavor, reduce the amount of cayenne pepper.
Activated charcoal can be found in health food stores and gives the chicken its dark, spooky appearance without altering the taste. Be sure not to reuse the oil for other dishes, as the activated charcoal can affect the color and flavor of subsequent foods.
Eerie Eyeball Caprese Skewers
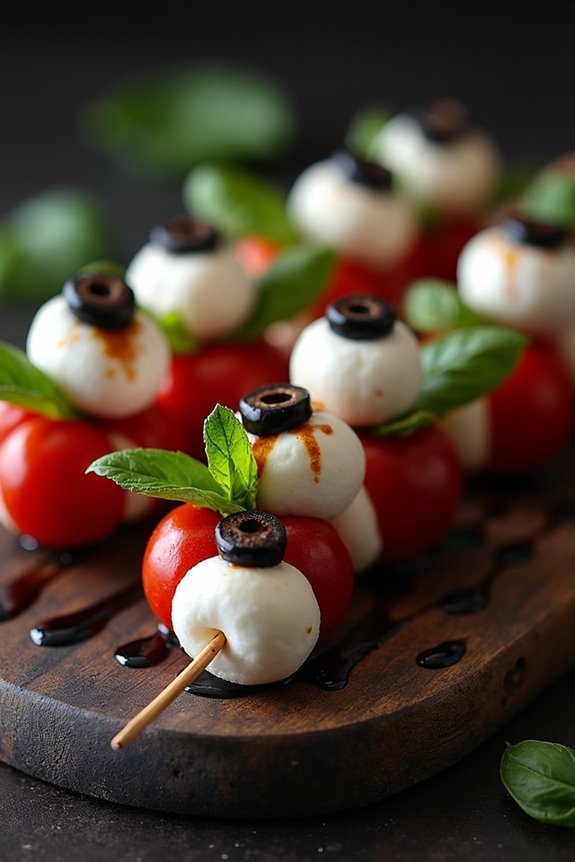
Eerie Eyeball Caprese Skewers are a fun and spooky addition to your Halloween party spread. These skewers take the traditional Caprese salad and give it a ghoulish twist that will delight both kids and adults. The dish is simple to prepare, yet visually striking, making it perfect for adding a festive touch to your Halloween celebrations.
With just a few simple ingredients, you can create these creepy appetizers that look like eyeballs but taste like a classic Italian favorite. The secret to crafting these eerie eyeballs lies in the careful assembly of mozzarella balls, cherry tomatoes, and black olives.
The mozzarella balls serve as the whites of the eyes, while the cherry tomatoes mimic the blood-red iris. A slice of black olive completes the illusion, creating a pupil that turns these tasty bites into spooky treats. These skewers aren’t only easy to assemble but also a healthy and invigorating option amidst the sugary sweets of Halloween.
Ingredients for 4-6 people:
- 24 small mozzarella balls (bocconcini)
- 12 cherry tomatoes
- 12 black olives
- Fresh basil leaves
- 2 tablespoons of balsamic glaze
- Salt and pepper to taste
- 12 wooden skewers
Cooking Instructions:
- Prepare the Ingredients: Drain the mozzarella balls and pat them dry with a paper towel to remove excess moisture. Slice each cherry tomato in half. Slice each black olive into thin rounds to create the “pupils”.
- Assemble the Skewers: Take one wooden skewer and start by sliding a mozzarella ball onto it. Follow with a basil leaf, then a half cherry tomato with the cut side facing up. Place a slice of black olive on top of the tomato to create the “pupil”. Repeat the process until each skewer has two mozzarella balls and two tomato-olive pairs.
- Finish with Balsamic Glaze: Once all skewers are assembled, lay them flat on a serving platter. Drizzle the balsamic glaze over the skewers, making sure each one gets a nice coating. Season with a pinch of salt and pepper to taste.
- Serve and Enjoy: Arrange the skewers on a platter in a visually appealing manner and serve them immediately. These skewers are best enjoyed fresh, so prepare them shortly before your guests arrive.
Extra Tips: To guarantee the olive slices stay in place, you can use a dab of balsamic glaze as edible glue. For an extra touch of authenticity, use food coloring to draw red veins on the mozzarella to mimic bloodshot eyes.
If you want a more intense flavor, marinate the mozzarella balls in olive oil and Italian herbs for a few hours before assembly. This dish is versatile; feel free to experiment with different types of olives or add a touch of garlic for extra flavor.
Bloody Mary Syringe Shots

Bloody Mary Syringe Shots are an intriguing twist on the classic cocktail, perfect for adding a dash of gory charm to your Halloween festivities. These shots are served in syringes, creating an eerie and playful presentation that’s bound to be a spooktacular hit at any party.
The robust flavors of a traditional Bloody Mary are maintained, with the added excitement of novelty syringes to enhance the overall Halloween experience.
The Bloody Mary Syringe Shots maintain the classic cocktail’s savory, spicy, and tangy flavors, with vodka, tomato juice, and an array of spices mingling together to create a deliciously potent mix. This recipe is perfect for serving 4-6 people, making it an ideal choice for small gatherings or as a part of a larger spread of Halloween-themed treats.
Prepare yourself to delight your guests with this chillingly creative concoction!
Ingredients (Serves 4-6):
- 2 cups tomato juice
- 1 cup vodka
- 2 tablespoons fresh lemon juice
- 1 tablespoon Worcestershire sauce
- 1 teaspoon Tabasco sauce
- 1 teaspoon horseradish
- 1/2 teaspoon celery salt
- 1/2 teaspoon ground black pepper
- 4-6 novelty syringes (without needles)
- Optional garnishes: celery stalks, olives, pickles, or cherry tomatoes
Cooking Instructions:
- Prepare the Base Mix: In a large pitcher, combine the tomato juice and vodka. Stir well to affirm they’re thoroughly mixed.
- Add Flavorings: Add the fresh lemon juice, Worcestershire sauce, Tabasco sauce, and horseradish. Stir the mixture until all ingredients are fully incorporated, contributing to the signature spicy and tangy flavor of the Bloody Mary.
- Season the Mix: Sprinkle in the celery salt and ground black pepper. Stir well, tasting to ascertain the seasoning is to your liking. Adjust the amounts if necessary for a more tailored flavor profile.
- Fill the Syringes: Carefully draw the prepared Bloody Mary mix into each syringe, filling them to capacity. This not only adds a fun and interactive element to your Halloween party but also guarantees portion control.
- Serve and Garnish: Present the Bloody Mary Syringe Shots on a platter or tray. Optionally, you can serve them with a side of garnishes like celery stalks, olives, pickles, or cherry tomatoes for guests to customize their experience.
Extra Tips:
When preparing Bloody Mary Syringe Shots, confirm that the syringes are food-safe and thoroughly cleaned before use.
It’s a good idea to chill the mixture for at least an hour before serving to enhance the flavors and provide a rejuvenating, cold shot.
If you prefer a more intense flavor, allow the mix to sit for a few hours or overnight in the refrigerator before filling the syringes.
When planning your presentation, consider providing small glasses for guests to squirt the mixture into before drinking, adding to the theatrical effect of the syringes.
Vampire Bite Bruschetta

Vampire Bite Bruschetta is a fun and spooky twist on the classic Italian appetizer, perfect for a Halloween gathering. This dish combines the rich flavors of roasted garlic, juicy tomatoes, and fresh basil, all topped with a drizzle of balsamic glaze. The “vampire bite” aspect comes from the playful presentation — the bruschetta is arranged to resemble a pair of vampire fangs. This creative and delicious dish is sure to be a hit at your Halloween party, providing both a visual treat and a flavorful bite.
The key to a successful Vampire Bite Bruschetta is to use the freshest ingredients available. The balance of the sweet tomatoes, aromatic basil, and tangy balsamic glaze creates a delightful combination that will have your guests coming back for more. The bruschetta isn’t only delicious but also easy to prepare, making it an ideal choice for a busy host or hostess. With just a little bit of preparation, you can create a memorable and festive appetizer that sets the tone for the rest of your Halloween celebration.
Ingredients (Serves 4-6):
- 1 French baguette
- 5 ripe tomatoes, diced
- 3 cloves garlic, minced
- 1/4 cup fresh basil leaves, chopped
- 1 tablespoon olive oil
- Salt and pepper to taste
- 1/4 cup balsamic glaze
- 1/2 cup ricotta cheese (optional for extra creaminess)
- Red food coloring (optional, for extra spooky effect)
Instructions:
- Prepare the Baguette: Preheat your oven to 375°F (190°C). Slice the baguette into 1/2-inch thick slices. Arrange the slices on a baking sheet and brush each one lightly with olive oil. Toast in the oven for about 8-10 minutes, or until they’re golden brown and crispy.
- Prepare the Tomato Mixture: In a medium bowl, combine the diced tomatoes, minced garlic, and chopped basil. Add olive oil, salt, and pepper, and mix everything together well. Let it sit for a few minutes to allow the flavors to meld.
- Assemble the Bruschetta: Once the baguette slices are toasted, remove them from the oven and let them cool slightly. Optionally spread a thin layer of ricotta cheese over each slice for added creaminess.
- Add the Tomato Topping: Spoon the tomato mixture generously over each slice of baguette. Confirm the topping is evenly distributed and covers the entire surface of the bread.
- Create the Vampire Bite Effect: For a spooky touch, you can add a drop of red food coloring to each bruschetta slice to mimic a “bite mark.” Be careful not to use too much, as a little goes a long way.
- Finish with Balsamic Glaze: Drizzle the balsamic glaze lightly over the bruschetta. This adds a sweet and tangy flavor that complements the tomato and basil mixture perfectly.
- Serve Immediately: Vampire Bite Bruschetta is best served fresh. Arrange them on a platter and serve as a festive appetizer for your Halloween guests.
Extra Tips: For the best flavor, allow the tomato mixture to sit for at least 15 minutes before using it, as this enhances the blend of flavors. If you prefer a softer bread texture, cover the baguette slices with aluminum foil during the last few minutes of toasting. For a more dramatic presentation, you can use a small pastry brush to apply the red food coloring in a fine line or dot pattern to resemble blood. Finally, if you want to prepare ahead of time, you can make the tomato mixture a few hours in advance and store it in the fridge until ready to use. Enjoy your spooky and delicious Vampire Bite Bruschetta!
Haunted Pumpkin Cheeseball
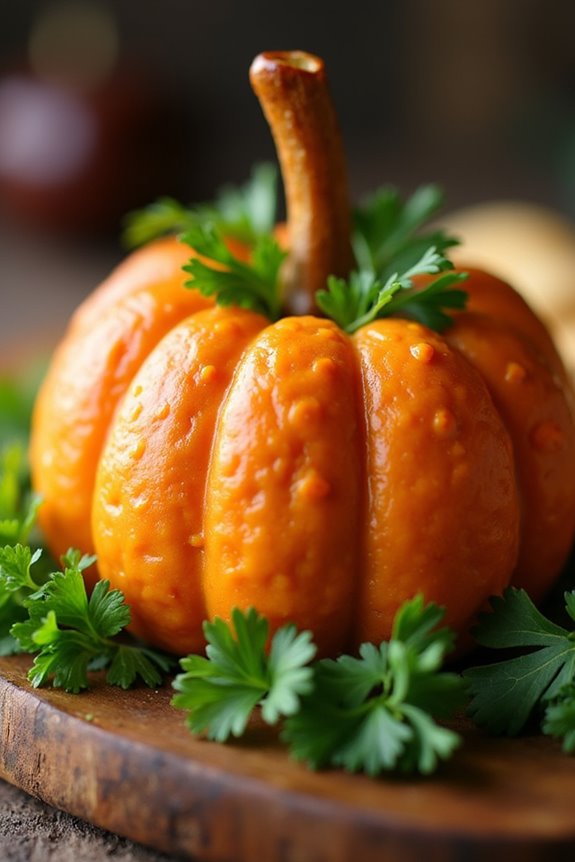
The Haunted Pumpkin Cheeseball is a fun and festive appetizer that’s perfect for any Halloween gathering. This dish combines creamy cheeses and savory spices to create a deliciously spooky treat that resembles a small pumpkin. Not only does it provide a delightful visual for your Halloween spread, but it’s also incredibly easy to make and can be prepared in advance.
The cheeseball is then adorned with a pretzel stick stem and parsley leaves for an authentic pumpkin look, making it a delightful centerpiece on your appetizer table. This dish is great for serving 4-6 people, making it ideal for small parties or family gatherings.
The Haunted Pumpkin Cheeseball pairs wonderfully with crackers, pretzels, or fresh vegetables, providing a versatile option for all your guests. Whether you’re throwing a big Halloween bash or a cozy get-together, this cheeseball will surely be a crowd-pleaser. Let’s explore how you can create this hauntingly delicious dish.
Ingredients (Serving Size: 4-6 people):
- 8 oz cream cheese, softened
- 2 cups shredded cheddar cheese
- 1 teaspoon garlic powder
- 1 teaspoon onion powder
- 1 teaspoon smoked paprika
- 1 teaspoon Worcestershire sauce
- 1/4 teaspoon salt
- 1/4 teaspoon black pepper
- 1 small pretzel stick
- Fresh parsley leaves
- Crackers, pretzels, or vegetables (for serving)
Cooking Instructions:
- Prepare the Cheese Mixture: In a large mixing bowl, combine the softened cream cheese, shredded cheddar cheese, garlic powder, onion powder, smoked paprika, Worcestershire sauce, salt, and black pepper. Mix thoroughly until all ingredients are well combined and the mixture is smooth.
- Shape the Cheeseball: Transfer the cheese mixture onto a piece of plastic wrap. Using your hands, mold the mixture into a ball shape. Wrap it tightly in the plastic wrap and refrigerate for at least 2 hours, or until the cheeseball is firm.
- Create the Pumpkin Shape: Once the cheeseball is firm, remove it from the refrigerator and unwrap it. Using your fingers or a small spoon, gently create vertical lines around the entire cheeseball to resemble the ridges of a pumpkin.
- Add the Finishing Touches: Insert a small pretzel stick into the top of the cheeseball to act as the pumpkin’s stem. Decorate around the stem with fresh parsley leaves to mimic pumpkin leaves.
- Serve: Place the Haunted Pumpkin Cheeseball on a serving platter surrounded by your choice of crackers, pretzels, or fresh vegetables.
Extra Tips:
For the best flavor, prepare the cheeseball a day in advance to allow the spices to meld and enhance the overall taste. If you want to add a bit of heat, consider mixing in a pinch of cayenne pepper or some finely chopped jalapeños.
To prevent the cheeseball from sticking to your hands while shaping it, lightly coat your hands with a bit of oil or wear disposable gloves. Finally, if you want a more vibrant pumpkin color, you can mix in a few drops of food coloring into the cheese mixture. Enjoy creating this spooktacular appetizer!
Sinister S’mores Bites
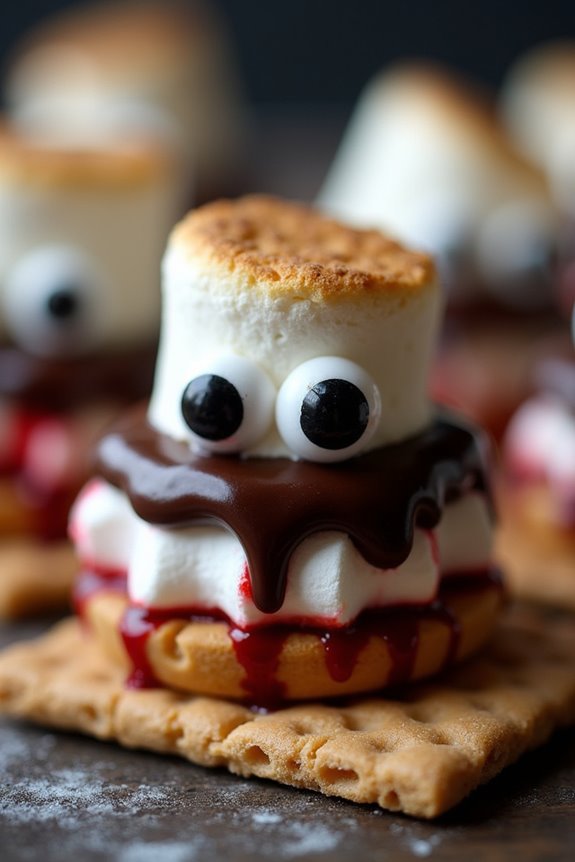
Sinister S’mores Bites are the perfect spooky treat to serve at your Halloween gathering. These bite-sized delights combine the classic flavors of a s’more with a dark, sinister twist that will leave your guests both intrigued and satisfied.
With a gooey marshmallow center, sandwiched between chocolatey goodness and crispy graham crackers, these s’mores bites aren’t only delicious but also fun to make. The addition of a few eerie accents, like edible eyes or colored marshmallow fluff, makes them a standout dish on your Halloween table.
The recipe is designed to serve 4-6 people, making it ideal for an intimate Halloween party or family gathering. The preparation is simple and requires just a few ingredients, most of which you might already have in your pantry. Gather your ingredients and get ready to create a spooky snack that will enchant your guests and add a festive flair to your Halloween celebrations.
Ingredients (Serving size: 4-6 people):
- 12 graham cracker squares
- 6 large marshmallows
- 6 squares of dark chocolate
- 1 tablespoon of butter
- Edible eyes or Halloween-themed sprinkles
- Red or black food coloring (optional)
Cooking Instructions:
- Prepare the Baking Tray: Preheat your oven to 350°F (175°C). Line a baking tray with parchment paper to prevent sticking and make cleanup easier.
- Assemble the S’mores: Break each graham cracker square in half, and place half of them on the prepared baking tray. Top each cracker with a square of dark chocolate.
- Add the Marshmallows: Position a large marshmallow on top of each chocolate square. For a spooky effect, you can dip the marshmallows in a mixture of melted butter and a few drops of red or black food coloring before placing them on the chocolate.
- Bake the S’mores Bites: Place the tray in the preheated oven and bake for 3-5 minutes, or until the marshmallows puff up and the chocolate begins to melt.
- Finish Assembling: Remove the tray from the oven and quickly top each marshmallow with the remaining graham cracker halves, pressing down gently to create a sandwich.
- Decorate: While the s’mores bites are still warm, press edible eyes or sprinkles into the soft marshmallows to create a spooky appearance. Allow the treats to cool for a few minutes before serving.
Extra Tips:
For an extra sinister touch, consider adding a drop of red food coloring to the marshmallows before baking to create a bloodshot effect.
If you prefer a crispier graham cracker, toast them in the oven for 2 minutes before assembling the s’mores. These bites are best enjoyed fresh out of the oven, but you can prepare them in advance and reheat them for a few seconds in the microwave before serving.
Adjust the amount of chocolate and marshmallow to suit your taste preferences, and feel free to experiment with different types of chocolate for a unique flavor.