

As Halloween sneaks up on us, I’m bubbling with excitement to curate a lineup of appetizers that will dazzle everyone at the party. Think Mummy Jalapeño Poppers with gooey cheese and Ghostly Guacamole Bites that are almost too cute to eat. These 15 easy Halloween appetizers are here to bring magic and fun to any gathering. Simple yet bursting with flavor, these recipes promise a delightful experience. Ready to explore these spooktacular treats?
Mummy Jalapeño Poppers
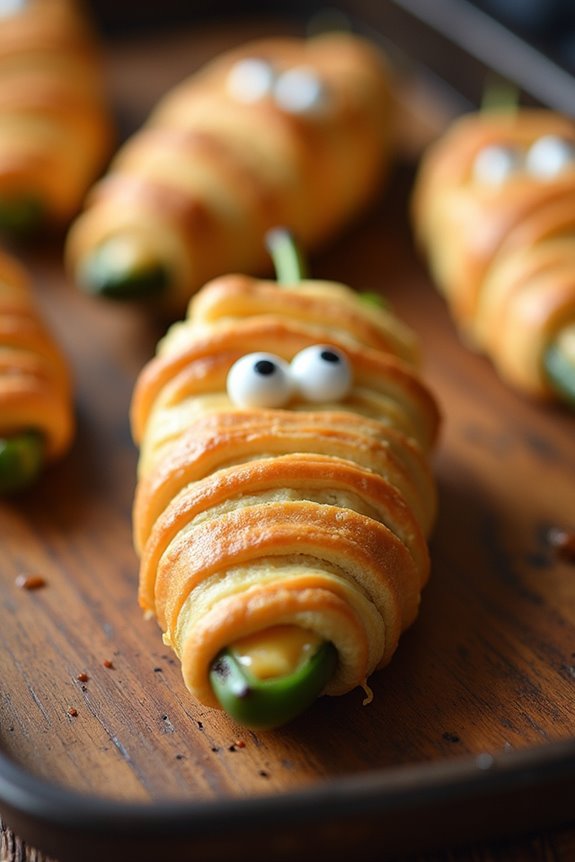
Mummy Jalapeño Poppers are a fun and spooky twist on the classic jalapeño popper, perfect for your Halloween celebrations. These delicious appetizers aren’t only visually appealing but also pack a delightful combination of creamy, spicy, and crunchy textures. Wrapped in crescent dough to resemble mummies, these poppers are sure to be a hit at your Halloween party or any festive gathering.
In this recipe, jalapeño peppers are halved and stuffed with a rich mixture of cream cheese, cheddar cheese, and spices, then wrapped in strips of crescent dough to create a mummy-like appearance. The finishing touch of edible eyes adds a playful element to these tasty treats. Preparing these poppers is straightforward, making it an ideal choice for both novice and experienced cooks alike. This recipe serves 4-6 people, perfect for a small crowd or family gathering.
Ingredients:
- 6 large jalapeño peppers
- 8 oz (1 package) cream cheese, softened
- 1 cup shredded cheddar cheese
- 1/2 teaspoon garlic powder
- 1/2 teaspoon onion powder
- Salt and pepper to taste
- 1 can (8 oz) refrigerated crescent dough
- 24 small edible candy eyes
- Cooking spray or parchment paper
Cooking Instructions:
- Preheat and Prepare: Preheat your oven to 375°F (190°C). Line a baking sheet with parchment paper or lightly spray it with cooking spray to prevent sticking.
- Prepare Jalapeños: Cut the jalapeño peppers in half lengthwise and remove the seeds and membranes using a small spoon or a jalapeño corer. This will help reduce the heat level and make room for the filling.
- Make the Filling: In a medium bowl, combine the softened cream cheese, shredded cheddar cheese, garlic powder, onion powder, salt, and pepper. Mix well until all ingredients are thoroughly combined.
- Stuff the Peppers: Fill each jalapeño half with the cheese mixture, pressing gently to guarantee the filling stays in place.
- Wrap the Mummies: Open the can of crescent dough and unroll it onto a clean surface. Cut the dough into thin strips, about 1/4 inch wide. Wrap each jalapeño half with the dough strips, leaving a small opening for the eyes. Confirm the dough covers most of the filling but still resembles a mummy wrapping.
- Add Eyes: Place two edible candy eyes on each wrapped jalapeño to give it a spooky mummy look.
- Bake: Arrange the mummies on the prepared baking sheet and bake in the preheated oven for 12-15 minutes, or until the dough is golden brown and cooked through.
- Cool and Serve: Allow the poppers to cool for a few minutes before serving. They can be enjoyed warm or at room temperature.
Extra Tips:
If you prefer a less spicy version, opt for larger jalapeños, as they tend to be milder. You can also soak the jalapeño halves in cold water for about 15 minutes before stuffing to further reduce the heat.
Feel free to experiment with different types of cheese in the filling, like pepper jack or mozzarella, to customize the flavor to your liking. Additionally, if you can’t find edible candy eyes, you can use small pieces of black olives or slices of green onions as a substitute.
Enjoy your delicious and festive Mummy Jalapeño Poppers!
Spooky Spider Deviled Eggs
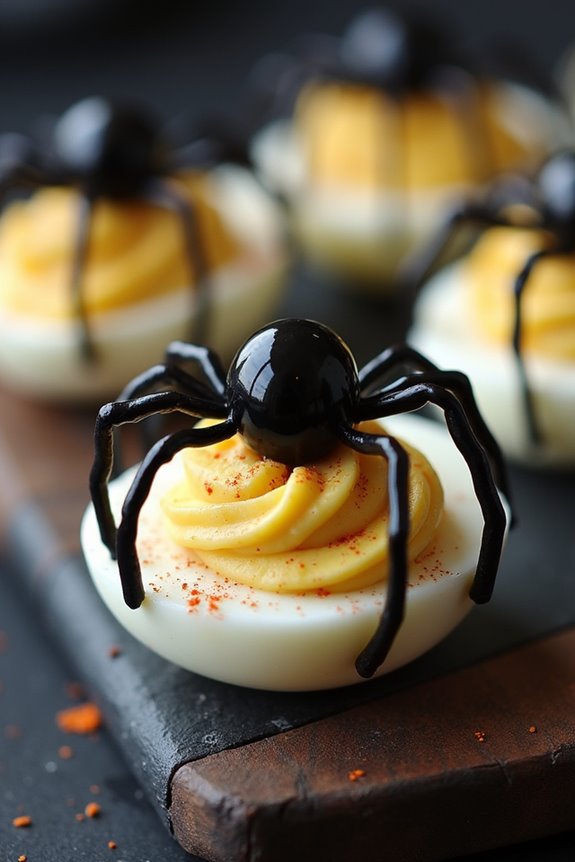
Spooky Spider Deviled Eggs are a perfect Halloween appetizer that combines the classic taste of deviled eggs with a creepy, festive twist. These eggs are sure to be a hit at any Halloween gathering, providing both a delicious snack and a spooky decoration for your table. The key to these deviled eggs is the creative use of black olives to form little spider decorations, giving them an eerie appearance that’s still appetizing.
Begin by hard-boiling the eggs and preparing the creamy filling, which is a traditional mixture of egg yolks, mayonnaise, mustard, and a hint of vinegar for tang. The real magic happens when you cut black olives to craft the spiders that adorn each egg half. This simple yet effective touch adds a fun Halloween theme that will delight both kids and adults. The result is a spooky, savory treat that’s delicious and visually enchanting.
Ingredients for Spooky Spider Deviled Eggs (serving size: 4-6 people):
- 6 large eggs
- 1/4 cup mayonnaise
- 1 teaspoon Dijon mustard
- 1 teaspoon white vinegar
- Salt and pepper, to taste
- Paprika, for garnish
- 15-20 black olives
Cooking Instructions:
- Boil the Eggs: Place the eggs in a saucepan and cover them with cold water. Bring to a boil over medium-high heat. Once boiling, cover the saucepan and remove from heat. Let the eggs sit for 10-12 minutes.
- Cool and Peel: Drain the hot water and transfer the eggs to a bowl of ice water to cool. Once cool, peel the eggs carefully to avoid damaging the whites.
- Prepare the Filling: Halve the eggs lengthwise and gently remove the yolks. Place the yolks in a bowl and mash them with a fork. Add mayonnaise, Dijon mustard, white vinegar, salt, and pepper. Mix until smooth and creamy.
- Fill the Egg Whites: Spoon or pipe the yolk mixture back into the hollowed egg whites, ensuring each is filled generously.
- Create the Spiders: Slice the black olives in half. Use one half as the spider’s body and slice the other half into thin strips for legs. Place one olive half on top of each filled egg and arrange 8 olive strips around it to resemble spider legs.
- Garnish and Serve: Lightly sprinkle paprika over the eggs for a touch of color and flavor. Arrange on a platter and serve chilled.
Extra Tips: To make the peeling process easier, use eggs that are a week or two old, as fresher eggs tend to be harder to peel. When slicing the olives for the spider legs, use a sharp knife for clean, even cuts. If you want to add a bit of color to your deviled eggs, consider adding a drop of food coloring to the yolk mixture. This can make for a more vibrant and festive presentation. Additionally, feel free to adjust the seasoning in the filling to your taste, adding a pinch of cayenne or a squirt of sriracha for a kick.
Ghostly Guacamole Bites
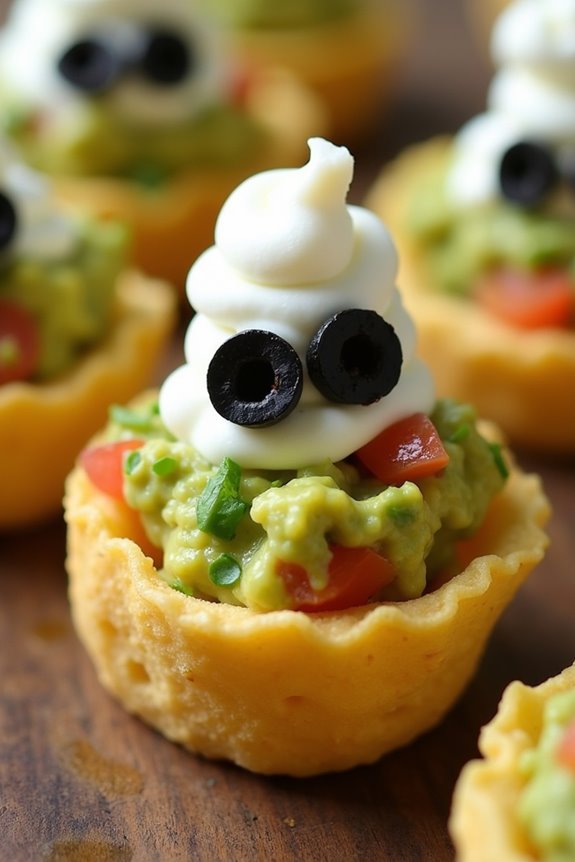
Transform your Halloween party into a spooktacular event with these delightful Ghostly Guacamole Bites. These eerie appetizers are a perfect blend of creamy guacamole, crunchy tortilla chips, and ghostly flair, making them a hit among both kids and adults. The combination of fresh avocados, zesty lime, and savory seasonings guarantees a deliciously haunting treat that’s as fun to make as it’s to eat.
The whimsical appearance of these bites is bound to capture the essence of Halloween, adding a playful touch to your festive table spread. Whether you’re hosting a Halloween bash or simply looking for a creative snack, Ghostly Guacamole Bites provide a perfect balance of flavor and fright. Easy to assemble and delightful to devour, this recipe will surely become a favorite tradition for years to come.
Ingredients for 4-6 servings:
- 3 ripe avocados
- 1 lime, juiced
- 1/2 teaspoon salt
- 1/2 teaspoon ground cumin
- 1/2 teaspoon cayenne pepper
- 1/2 medium onion, finely chopped
- 2 roma tomatoes, diced
- 1 tablespoon chopped cilantro
- 1 clove garlic, minced
- 1 package of round tortilla chips
- Black olives, sliced (for eyes)
- Sour cream (for ghostly decoration)
Cooking Instructions:
- Prepare the Guacamole: Start by halving the avocados, removing the pits, and scooping the flesh into a mixing bowl. Mash the avocados with a fork until you reach your desired consistency, leaving some chunks for texture.
- Season the Guacamole: Add the lime juice, salt, ground cumin, and cayenne pepper to the mashed avocados. Stir in the finely chopped onion, diced tomatoes, chopped cilantro, and minced garlic. Mix everything thoroughly to combine all the flavors.
- Assemble the Bites: Lay out the round tortilla chips on a serving platter. Using a spoon, place a generous dollop of guacamole on each chip.
- Create the Ghosts: To decorate, use slices of black olives to form eyes on top of the guacamole. For the ghostly mouth, you can use a small piping bag or a plastic bag with a corner snipped off to pipe a small amount of sour cream underneath the olive eyes.
- Serve Immediately: These Ghostly Guacamole Bites are best served fresh to keep the tortilla chips crispy and the guacamole vibrant.
Extra Tips:
For the best results, prepare the guacamole just before serving to prevent browning. If you need to prepare it in advance, cover the surface of the guacamole with plastic wrap by pressing it directly onto the mixture to minimize air exposure.
Additionally, feel free to adjust the seasoning to your taste, adding more lime juice or cayenne pepper for extra zing. If you’re looking for a bit more variety, consider adding extras like diced jalapeños or roasted corn to the guacamole. Enjoy your hauntingly delicious creations!
Pumpkin Cheese Ball

Halloween appetizers are the perfect way to kick off the spooky festivities, and a Pumpkin Cheese Ball is a delightful and festive addition to your spread. This eye-catching dish not only adds a touch of whimsy to your Halloween party but also offers a savory and creamy treat for your guests. Shaped like a pumpkin, this cheese ball combines rich flavors with a playful presentation, making it a surefire hit among both kids and adults alike.
Creating a Pumpkin Cheese Ball is surprisingly simple and requires only a few ingredients that come together to create a deliciously creamy and flavorful appetizer. The cheese ball is coated in crushed nacho chips or cheese-flavored crackers to mimic the texture of a pumpkin, while the combination of cream cheese, cheddar cheese, and a hint of spices guarantees a tasty experience. Whether you serve it with crackers, pretzels, or fresh vegetables, this dish is sure to be a crowd-pleaser.
Ingredients for 4-6 servings:
- 16 oz cream cheese, softened
- 2 cups shredded sharp cheddar cheese
- 1 tablespoon Worcestershire sauce
- 1 teaspoon garlic powder
- 1 teaspoon onion powder
- 1/2 teaspoon paprika
- Salt and pepper to taste
- 2 cups crushed nacho-flavored chips or cheese crackers
- 1 bell pepper stem (for decoration)
- Crackers or veggies for serving
Instructions:
- Prepare the Cheese Mixture: In a large mixing bowl, combine the softened cream cheese and shredded cheddar cheese. Mix thoroughly until the cheeses are well blended. You can use a hand mixer for ease.
- Add Flavorings: Stir in the Worcestershire sauce, garlic powder, onion powder, paprika, salt, and pepper. Mix well to guarantee that all spices are evenly distributed throughout the cheese mixture.
- Shape the Cheese Ball: Form the cheese mixture into a ball shape using your hands. If the mixture is too sticky, you can refrigerate it for about 20 minutes to make it easier to handle.
- Coat the Cheese Ball: Roll the cheese ball in the crushed nacho chips or cheese crackers until it’s completely covered. This not only gives the cheese ball a pumpkin-like appearance but also adds a crunchy texture.
- Add the Stem: To complete the pumpkin look, place the bell pepper stem on top of the cheese ball as a decorative touch.
- Chill: Refrigerate the cheese ball for at least 1-2 hours before serving. This will help the flavors meld together and make it easier to slice or spread.
- Serve: Arrange the cheese ball on a platter with crackers or fresh vegetables for dipping and serve it to your guests.
Extra Tips:
To guarantee the perfect texture and flavor, make sure the cream cheese is fully softened before mixing, as it will blend more easily with the cheddar cheese. If you want to add a bit more kick to your Pumpkin Cheese Ball, consider incorporating a dash of hot sauce or a pinch of cayenne pepper.
The cheese ball can also be made a day in advance, which allows the flavors to develop further. Just be sure to wrap it tightly in plastic wrap and store it in the refrigerator until you’re ready to serve.
Witch’s Broomstick Breadsticks

Witch’s Broomstick Breadsticks are a spooktacular addition to any Halloween party spread. These fun and creative appetizers aren’t only visually appealing, but they’re also deliciously crispy and savory, making them a guaranteed hit for kids and adults alike.
Whether you’re hosting a Halloween party or just want to get into the spooky spirit with your family, these breadsticks are easy to make and can be prepared ahead of time for a stress-free celebration.
These breadsticks are shaped like miniature broomsticks, perfect for conjuring up some witchy vibes. The recipe uses pre-made dough, which simplifies the process and allows you to focus on the fun part: shaping and decorating. With just a few basic ingredients and a little creativity, you can whip up a batch of these delightful breadsticks in no time.
This recipe serves 4-6 people, making it ideal for a small gathering or family dinner.
Ingredients:
- 1 package of refrigerated breadstick dough
- 6 slices of pepperoni or salami
- 6 pretzel sticks
- 2 tablespoons of unsalted butter, melted
- 1 tablespoon of grated Parmesan cheese
- 1 teaspoon of garlic powder
- 1 teaspoon of Italian seasoning
Instructions:
- Preheat the Oven: Start by preheating your oven to 375°F (190°C). This will guarantee that your breadsticks bake evenly and achieve a golden-brown color.
- Prepare the Dough: Roll out the refrigerated breadstick dough on a clean surface. Use a knife or dough cutter to divide the dough into 12 strips, each about 6 inches long.
- Shape the Broomsticks: Take each strip and fold it in half over a pretzel stick, leaving about 1 inch of the pretzel exposed at one end. Press the dough gently to secure it around the pretzel.
- Create the Broom Bristles: Use a pair of kitchen scissors to make small cuts at the end of the dough, opposite the pretzel, to resemble broom bristles. Each slice should be about 3/4 inch deep.
- Add the Toppings: Arrange the breadsticks on a baking sheet lined with parchment paper. Brush the melted butter over each breadstick, then sprinkle the grated Parmesan cheese, garlic powder, and Italian seasoning evenly over the top.
- Bake the Breadsticks: Place the baking sheet in the preheated oven and bake for 10-12 minutes, or until the breadsticks are golden brown and crispy.
- Garnish and Serve: Once baked, let the breadsticks cool for a few minutes. Roll up each slice of pepperoni or salami and place it around the exposed pretzel end to form the broom handle. Serve warm.
Extra Tips:
For a more rustic look, you can twist the dough strips before wrapping them around the pretzel sticks. If you prefer a spicier kick, try using hot pepperoni or adding a pinch of red pepper flakes to the seasoning mix.
These breadsticks can be made ahead of time and reheated in the oven for a few minutes before serving. Additionally, if you’re planning for a larger gathering, simply double the ingredients to accommodate more guests.
Enjoy your spooky and delicious Witch’s Broomstick Breadsticks!
Bloody Mary Shrimp Shots
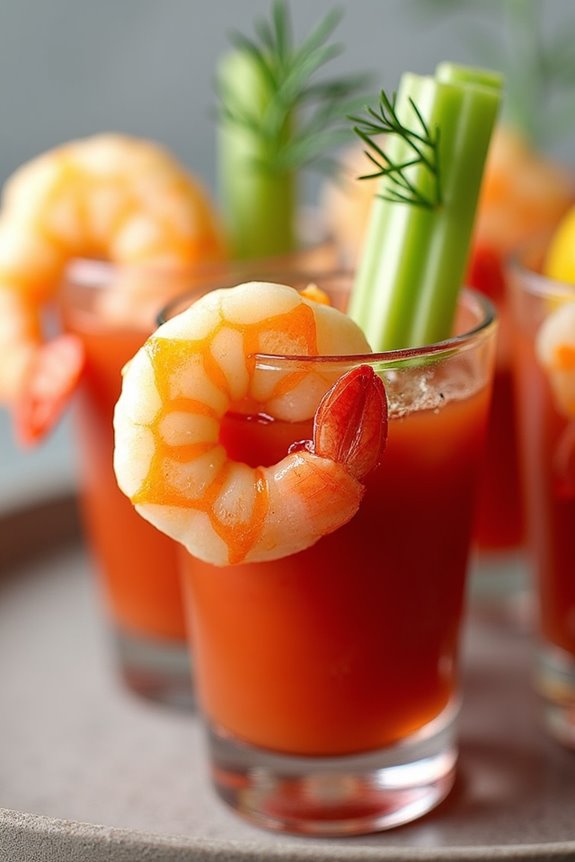
Bloody Mary Shrimp Shots are a delightful and spooky appetizer perfect for any Halloween gathering. This dish combines the classic flavors of a Bloody Mary cocktail with succulent shrimp, served in individual shot glasses for a fun and festive presentation. The zesty and spicy tomato cocktail sauce pairs perfectly with the fresh, tender shrimp, creating a burst of flavor in every bite.
Not only is this dish visually striking with its bright red hue, but it’s also incredibly easy to prepare, making it an ideal addition to your Halloween menu. These Bloody Mary Shrimp Shots aren’t only simple to make but also customizable to suit your guests’ preferred level of spiciness. Using high-quality shrimp and fresh ingredients will elevate the dish, ensuring it’s as delicious as it’s eye-catching.
Serve these shots as a starter at your Halloween party, and watch as your guests are impressed by both the presentation and the taste.
Ingredients (Serves 4-6):
- 24 large shrimp, peeled and deveined
- 1 cup tomato juice
- 1 tablespoon horseradish
- 1 tablespoon Worcestershire sauce
- 1 tablespoon lemon juice
- 1 teaspoon hot sauce (adjust to taste)
- 1 teaspoon celery salt
- 1 teaspoon black pepper
- 1 tablespoon vodka (optional)
- Lemon wedges for garnish
- Celery stalks for garnish
- Fresh dill for garnish
Cooking Instructions:
1. Prepare the Shrimp: Begin by bringing a large pot of salted water to a boil. Add the shrimp and cook for 2-3 minutes, or until they turn pink and opaque. Immediately transfer the shrimp to an ice bath to stop the cooking process and keep them tender.
Once cooled, drain and pat the shrimp dry with a paper towel.
2. Make the Bloody Mary Mixture: In a medium bowl, combine the tomato juice, horseradish, Worcestershire sauce, lemon juice, hot sauce, celery salt, black pepper, and vodka (if using). Stir well until all ingredients are thoroughly mixed.
Adjust the seasoning to taste, adding more hot sauce or lemon juice if desired.
3. Assemble the Shots: Pour the Bloody Mary mixture into individual shot glasses, filling them about 3/4 of the way full. Carefully place a cooked shrimp into each glass, allowing the tail to hang over the edge for easy handling.
4. Garnish and Serve: Garnish each shot with a lemon wedge, a small piece of celery stalk, and a sprig of fresh dill. Arrange the shrimp shots on a platter and serve immediately, ensuring they remain chilled until your guests are ready to enjoy them.
Extra Tips: For the best flavor, prepare the Bloody Mary mixture a few hours in advance and let it chill in the refrigerator. This allows the flavors to meld and intensify.
If you’re serving a crowd, feel free to double the recipe and use larger shot glasses or small cups. Additionally, consider offering a variety of garnishes like olives or pickles to give your guests more options to customize their shots. Remember, the vodka is optional, so feel free to omit it for a non-alcoholic version that’s just as flavorful.
Frankenstein Avocado Toast
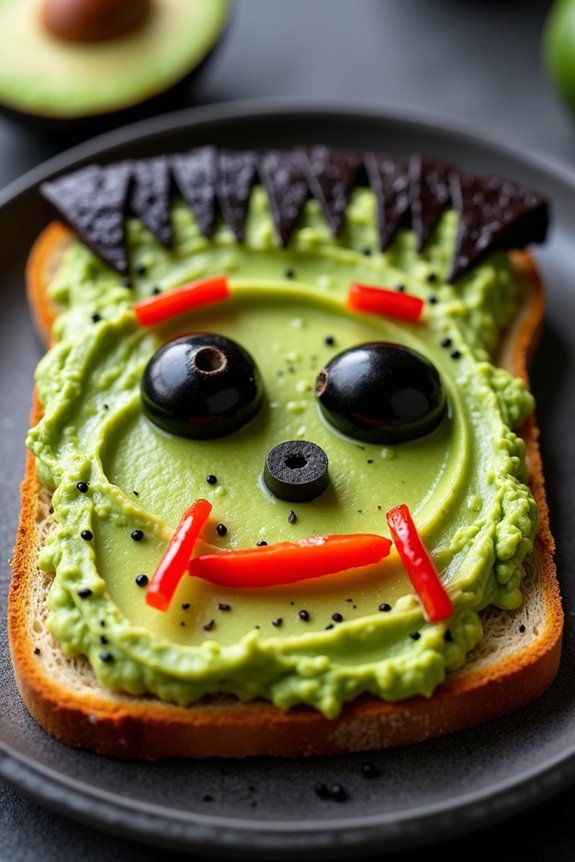
Frankenstein Avocado Toast is a spooktacular treat perfect for Halloween gatherings. This fun and delicious appetizer combines the creamy richness of avocados with the eerie charm of Frankenstein’s monster.
It’s a delightful way to bring the spirit of Halloween to your table while still offering a healthy and satisfying snack. With just a few simple ingredients and a little bit of creativity, you can whip up these ghoulishly green treats in no time.
This recipe is designed to serve 4-6 people, making it ideal for a small party or family gathering. The toast is topped with mashed avocado and creatively decorated to resemble Frankenstein’s iconic face, complete with olives for eyes and bell peppers for the bolts.
It’s a playful and tasty way to celebrate the season, whether you’re hosting a Halloween bash or just looking for a festive snack.
Ingredients:
- 4-6 slices of whole grain bread
- 3 ripe avocados
- 1 lime
- Salt to taste
- Black olives (pitted)
- Red bell pepper
- Cucumber slices
- Black sesame seeds
- Olive oil (optional)
Instructions:
1. Prepare the Bread: Toast the slices of whole grain bread until they’re golden brown and crispy. This provides a sturdy base for your Frankenstein creation.
2. Mash the Avocado: Cut the avocados in half, remove the pits, and scoop the flesh into a bowl. Add the juice of one lime and a pinch of salt. Mash until smooth and creamy. Adjust seasoning to taste.
3. Assemble the Toast: Spread a generous layer of the mashed avocado mixture evenly over each slice of toasted bread.
4. Create Frankenstein’s Face: Use black olives to create the eyes by slicing them in half or into rings. Place them on the avocado spread. Slice the red bell pepper into thin strips to create the mouth and bolts on the sides of the face.
Use cucumber slices to add extra features like scars or hair. Sprinkle black sesame seeds on the top of the toast to mimic stitches.
5. Drizzle (Optional): For added flavor, drizzle a small amount of olive oil over the top of each toast.
Extra Tips:
When mashing the avocados, verify they’re ripe for a smoother consistency. If your avocados aren’t ripe enough, they might be difficult to mash and won’t spread as easily.
To prevent the avocado from browning quickly, keep the lime juice handy. You can also prepare the avocado mixture in advance and store it in the refrigerator with plastic wrap pressed directly onto its surface to minimize oxidation.
Additionally, feel free to get creative with the decorations, using other vegetables or toppings to personalize your Frankenstein Avocado Toast to your liking.
Monster Meatball Sliders
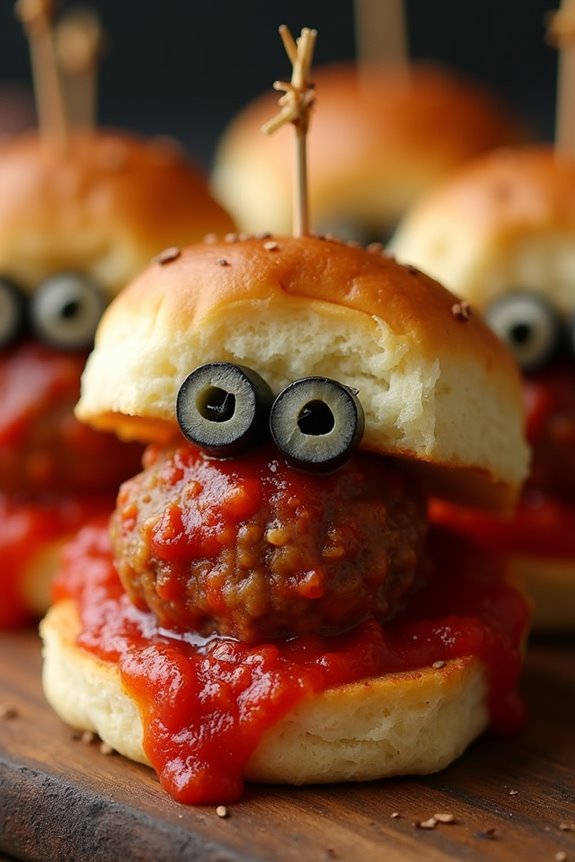
Monster Meatball Sliders are the perfect spooky treat to serve at your Halloween party. These sliders aren’t only delicious but also fun to make and eat. Featuring juicy meatballs topped with a rich tomato sauce, melted cheese, and nestled in soft slider buns, they make a delightful appetizer that can be dressed up with edible “eyes” to give them a monster-like appearance.
Whether you’re hosting a big bash or a small gathering, these Monster Meatball Sliders are sure to be a hit among guests of all ages. The key to these sliders is in the details: perfectly seasoned meatballs, a tangy homemade sauce, and creative toppings that bring the monsters to life.
You can prepare the meatballs and sauce ahead of time, allowing you to focus on assembling and serving them fresh when your spooky guests arrive. Whether you choose to prepare them in the oven or on the stovetop, these sliders will be a monstrous success.
Ingredients (Serves 4-6):
- 1 pound ground beef
- 1/2 cup breadcrumbs
- 1/4 cup grated Parmesan cheese
- 1/4 cup finely chopped onion
- 2 cloves garlic, minced
- 1 large egg
- 1 tablespoon Worcestershire sauce
- Salt and pepper to taste
- 1 cup marinara sauce
- 6 slider buns
- 6 slices mozzarella cheese
- Black olives (for eyes)
- Toothpicks
Instructions:
- Preheat the Oven: Set your oven to 375°F (190°C) to prepare for baking the meatballs.
- Prepare the Meatball Mixture: In a large bowl, combine the ground beef, breadcrumbs, Parmesan cheese, chopped onion, minced garlic, egg, Worcestershire sauce, salt, and pepper. Mix until all ingredients are thoroughly combined.
- Shape the Meatballs: Form the mixture into golf ball-sized meatballs, ensuring they’re uniform in size for even cooking.
- Bake the Meatballs: Place the meatballs on a baking sheet lined with parchment paper. Bake in the preheated oven for 20-25 minutes, or until they’re cooked through and browned on the outside.
- Heat the Marinara Sauce: While the meatballs are baking, heat the marinara sauce in a saucepan over medium heat. Once the meatballs are done, add them to the sauce and let them simmer for about 5 minutes to absorb the flavors.
- Assemble the Sliders: Slice the slider buns in half and place a slice of mozzarella cheese on the bottom half of each bun. Place a sauced meatball on top of the cheese, then cover with the top half of the bun.
- Create Monster Eyes: Slice black olives into small rounds. Use toothpicks to attach two olive slices on top of each slider bun to create “eyes”.
- Serve: Arrange the sliders on a platter and serve warm.
Extra Tips:
For a fun presentation, consider using different types of cheese or adding green pesto to give your Monster Meatball Sliders an extra eerie look.
If you want to save time, you can prepare the meatballs and sauce a day in advance and simply assemble the sliders just before serving. If you prefer a spicier meatball, add a pinch of red pepper flakes or a dash of hot sauce to the meat mixture.
Remember to secure the olive eyes with toothpicks carefully to avoid them falling off during serving.
Vampire Bat Wings

Vampire Bat Wings are an eerie yet delicious appetizer that will perfectly complement your Halloween spread. These wings aren’t only spooky in name but also in appearance, with a dark glaze that mimics the color of bat wings. The secret to their unique flavor lies in the combination of soy sauce, honey, and spices that create a savory yet sweet taste, guaranteeing your guests come back for more.
Whether you’re hosting a Halloween party or just want to add a bit of fun to your dinner table, these Vampire Bat Wings are sure to be a hit. Perfect for a gathering of 4-6 people, this dish is an excellent way to get into the Halloween spirit. The preparation is straightforward, making it an ideal choice even if you’re short on time.
With a few simple ingredients and some basic cooking skills, you’ll be able to whip up a batch of these tasty wings in no time. Serve them as an appetizer or a main dish, and watch as they disappear faster than a vampire at sunrise.
Ingredients for 4-6 servings:
- 3 pounds chicken wings
- 1/2 cup soy sauce
- 1/4 cup honey
- 2 tablespoons balsamic vinegar
- 2 tablespoons dark brown sugar
- 1 tablespoon minced garlic
- 1 teaspoon ground ginger
- 1 teaspoon cayenne pepper
- 1/4 teaspoon black food coloring (optional)
- Sesame seeds for garnish
- Chopped green onions for garnish
Cooking Instructions:
- Prepare the Chicken Wings: Start by rinsing the chicken wings under cold water and pat them dry with paper towels. This guarantees the wings are clean and will help the marinade adhere better.
- Make the Marinade: In a large mixing bowl, combine the soy sauce, honey, balsamic vinegar, dark brown sugar, minced garlic, ground ginger, and cayenne pepper. If you want to enhance the color of the wings, add a small amount of black food coloring to the mixture. Stir until all ingredients are well combined.
- Marinate the Wings: Place the chicken wings in a large resealable plastic bag or a shallow dish. Pour the marinade over the wings, ensuring they’re evenly coated. Seal the bag or cover the dish and refrigerate for at least 1 hour, or overnight for best results. This will allow the flavors to fully penetrate the wings.
- Preheat the Oven: When ready to cook, preheat your oven to 400°F (200°C). Line a baking sheet with aluminum foil and place a wire rack on top. This setup allows the wings to cook evenly and prevents them from sitting in excess marinade.
- Bake the Wings: Arrange the marinated wings in a single layer on the wire rack. Bake in the preheated oven for 35-40 minutes, turning once halfway through, until the wings are cooked through and have developed a nice caramelized glaze.
- Garnish and Serve: Once the wings are done, remove them from the oven and let them cool slightly. Transfer to a serving platter and sprinkle with sesame seeds and chopped green onions for a touch of color and extra flavor.
Extra Tips:
For the best results, verify the wings are well marinated by allowing them to rest in the marinade overnight if possible. This will intensify the flavors and make the wings more succulent.
If you’re short on time, try using a marinade injector to infuse flavor directly into the meat. Additionally, keep an eye on the wings during baking to prevent burning, especially if you’ve added the optional black food coloring.
Adjust the level of cayenne pepper to suit your taste preference, particularly if you’re serving to guests who may prefer milder or spicier food.
Creepy Crudité Platter
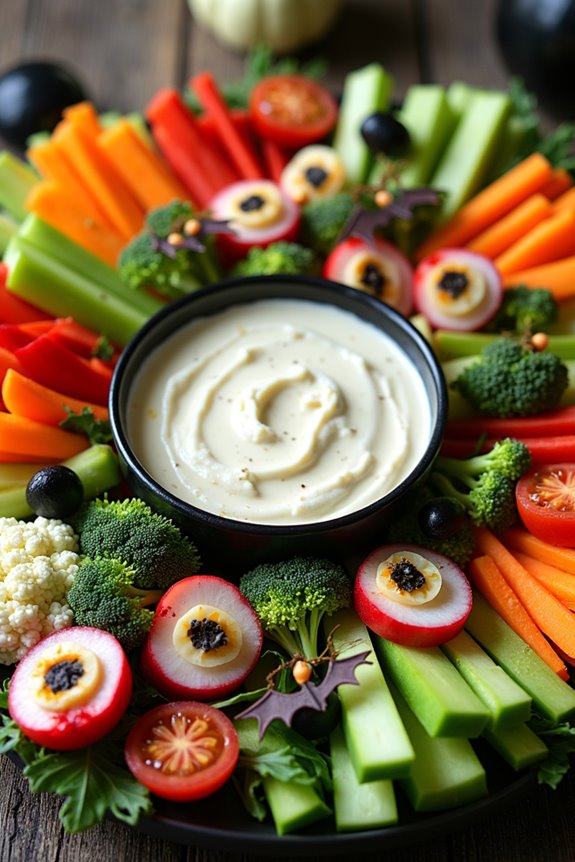
This Halloween, elevate your appetizer spread with a Creepy Crudité Platter that’s as delicious as it’s spooky. Perfect for a gathering of 4-6 people, this platter combines fresh, colorful vegetables with a ghoulish presentation. With a little creativity, your favorite veggies transform into eerie edible delights that will impress both kids and adults.
Arrange them artfully on a platter to create an eye-catching centerpiece for your Halloween festivities.
The beauty of a crudité platter is its versatility. You can choose a variety of fresh, seasonal vegetables and pair them with your favorite dips. The key to achieving the “creepy” effect lies in the presentation. Use cookie cutters to shape veggies into Halloween-themed designs, and get creative with the arrangement to mimic a spooky scene.
This platter isn’t only easy to prepare but also a healthy alternative that balances out the candy-heavy holiday.
Ingredients for 4-6 people:
- 1 medium cucumber
- 1 red bell pepper
- 1 yellow bell pepper
- 2 medium carrots
- 1 small bunch of radishes
- 1 small head of broccoli
- 1 small head of cauliflower
- 1 cup cherry tomatoes
- 1 cup black olives
- 1 cup of your favorite dip (e.g., hummus, ranch, or tzatziki)
Instructions:
- Prepare the Vegetables:
- Wash all vegetables thoroughly under cold water. Use a vegetable brush if necessary to remove any dirt.
- Peel the cucumber and carrots, and slice them into thin sticks. These can serve as “witch’s fingers” or other creepy shapes.
- Cut the bell peppers in half, remove the seeds, and slice them into strips. Use Halloween-themed cookie cutters to create shapes like bats or pumpkins from the pepper slices.
- Shape the Vegetables:
- Slice the radishes into thin rounds. These can be arranged as “eyes” on your platter.
- Break the broccoli and cauliflower into bite-sized florets, resembling “brain” textures.
- Keep cherry tomatoes whole to act as “eyeballs,” or slice them in half for a more gory effect.
- Assemble the Platter:
- Choose a large, flat platter or cutting board as a base.
- Begin by placing the dip in a small bowl in the center of the platter, as it will act as the focal point.
- Arrange the vegetable sticks and florets around the dip, grouping them by color and shape to create a visually appealing display.
- Add the olives and sliced radishes strategically to enhance the eerie theme, perhaps as “pupils” on the tomato “eyeballs.”
- Final Touches:
- Make sure to fill any gaps on the platter with extra veggies or olives to make it look abundant.
- For an extra spooky effect, consider adding edible decorations like black sesame seeds or edible glitter.
Extra Tips:
To make your Creepy Crudité Platter even more festive, consider using a Halloween-themed platter or adding small decorations like plastic spiders or skeleton hands (just make sure they’re not edible!).
You can also experiment with different dipping sauces, perhaps adding food coloring to a white dip to create a slime-like effect. Remember to keep the platter chilled until serving to maintain the freshness and crispness of the vegetables. Enjoy the creativity and have a boo-tiful Halloween!
Eyeball Caprese Bites
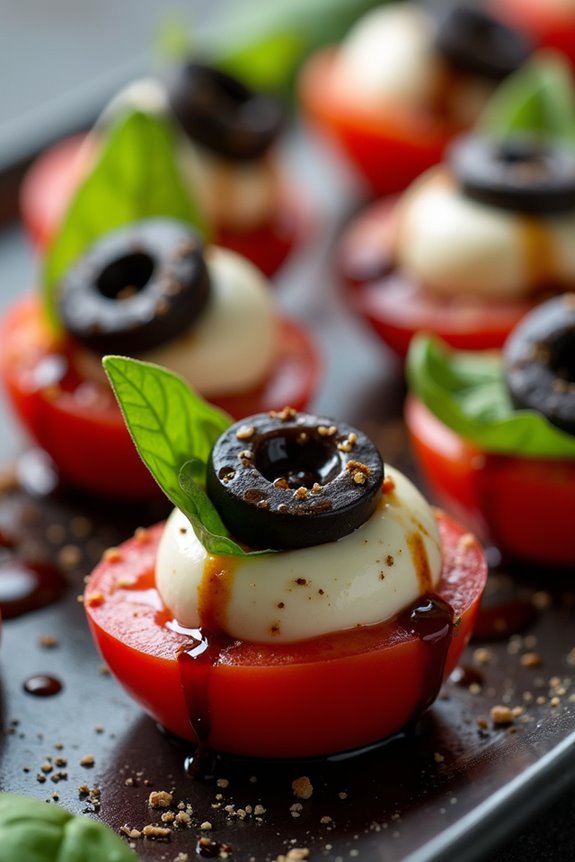
Eyeball Caprese Bites are a whimsical twist on the classic Caprese salad, perfect for adding a spooky yet delicious touch to your Halloween festivities. These bite-sized appetizers not only look fun and eerie, resembling creepy eyeballs, but also pack a fresh and flavorful punch with the combination of ripe tomatoes, creamy mozzarella, and fragrant basil.
They’re simple to assemble, making them an ideal choice for a Halloween gathering where you want to impress your guests with minimal effort.
To create these spooky snacks, you’ll need to start by gathering some fresh ingredients. The mozzarella balls act as the eyeballs, and the addition of black olives creates the pupils, while cherry tomatoes form the outer layer of the eye. A touch of balsamic glaze and fresh basil leaves complete the presentation, enhancing the flavors and adding an extra layer of sophistication.
With just a few steps, you’ll have a platter full of tasty, ghoulish treats that will be the highlight of your Halloween spread.
Ingredients for 4-6 people:
- 12 mini mozzarella balls
- 12 cherry tomatoes
- 6 black olives
- 12 fresh basil leaves
- 2 tablespoons balsamic glaze
- Salt and freshly ground black pepper, to taste
- 12 toothpicks or small skewers
Cooking Instructions:
- Prepare the Tomatoes and Olives: Begin by slicing the cherry tomatoes in half. Cut each black olive into six small rings to make the pupils. Set these aside for assembly.
- Assemble the Eyeballs: Take a mini mozzarella ball and place one olive ring on top, pressing gently so it adheres. This forms the pupil of the eyeball.
- Combine with Tomatoes: Place the mozzarella and olive combination onto the cut side of a cherry tomato half. Secure them together using a toothpick or small skewer, ensuring the pupil is facing upward.
- Add the Finishing Touches: Insert a fresh basil leaf onto the skewer, placing it underneath the tomato and mozzarella to act as the iris of the eye. Repeat this process for all eyeball bites.
- Season and Serve: Lightly drizzle the assembled Caprese bites with balsamic glaze, and season with salt and freshly ground black pepper to taste. Arrange them on a serving platter for a spooky presentation.
Extra Tips:
Ensure the mozzarella balls are well-drained before you start assembling to prevent them from slipping off the skewers. You can prepare these Eyeball Caprese Bites a few hours in advance and store them in the refrigerator.
Just wait to add the balsamic glaze until right before serving to keep them from getting soggy. For a more striking appearance, you might try using different colors of cherry tomatoes or flavored mozzarella balls.
Additionally, if you want to add a bit more spookiness, consider using a small piece of roasted red pepper or sun-dried tomato inside the olive ring for a more bloodshot eye effect. Enjoy your hauntingly delicious appetizer!
Skeleton Veggie Tray
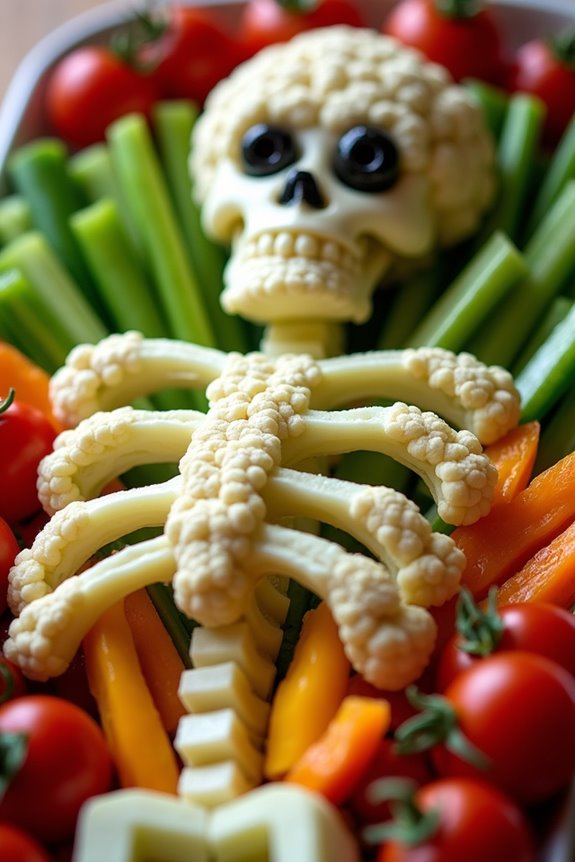
Get ready to create a spooky yet healthy Halloween appetizer with this Skeleton Veggie Tray! This fun and festive dish isn’t only visually appealing but also packed with a variety of fresh and crunchy vegetables. Perfect for parties or gatherings, this appetizer caters to both kids and adults looking for a nutritious snack amidst the indulgence of Halloween treats.
The Skeleton Veggie Tray is a creative way to encourage everyone to eat their veggies, and it can be customized with your favorite dips and vegetables. This recipe serves 4-6 people and involves arranging an array of colorful vegetables into the shape of a skeleton. The key to this dish is in the presentation, where you use the natural shapes and colors of the vegetables to mimic different parts of a skeleton.
This no-cook dish is quick to assemble, making it an ideal last-minute addition to your Halloween spread. Follow the detailed steps below to create your very own Skeleton Veggie Tray that promises to be a hit at your spooky celebration!
Ingredients:
- 1 large head of cauliflower
- 1 bunch of celery
- 1 cucumber
- 1 red bell pepper
- 1 yellow bell pepper
- 1 cup cherry tomatoes
- 1 cup baby carrots
- 1 cup sugar snap peas
- 1 small bunch of green onions
- 1 black olive (for eyes)
- 1 cup of ranch dip or hummus
Instructions:
- Prep the Vegetables: Wash all the vegetables thoroughly. Separate the cauliflower into small florets, slice the celery and cucumber into sticks, and cut the bell peppers into strips. Halve the cherry tomatoes and trim the ends of the sugar snap peas.
- Create the Skeleton Head: On a large platter, arrange the cauliflower florets in a circular shape to form the skull. Use a small bowl of ranch dip or hummus as the “brain” and place it at the top of the skull. Cut a black olive in half to create eyes, and position them on the cauliflower.
- Assemble the Body: Use the celery sticks to create the skeleton’s spine and arms, arranging them below the cauliflower head. Use cucumber sticks for the ribs, placing them horizontally on either side of the spine.
- Add the Legs: For the legs, use more celery and cucumber sticks, positioning them below the ribs.
- Fill in with Color: Use yellow and red bell pepper strips to form the skeleton’s hands and feet. Arrange cherry tomatoes as joints at the shoulders, elbows, and knees. Place baby carrots around the body to add more color and dimension.
- Add Final Touches: Scatter sugar snap peas and green onion stems around the skeleton to fill any gaps and add more texture. Serve the skeleton with a side of ranch dip or hummus for dipping.
Extra Tips:
When creating your Skeleton Veggie Tray, feel free to get creative with the vegetables you use. If you have a favorite vegetable not listed, substitute it in to suit your taste.
Make sure that all pieces are bite-sized and easy for guests to grab and dip. Consider using a large, flat platter to give you plenty of space to arrange the skeleton without crowding. This appetizer can be prepared a few hours in advance; just cover it with plastic wrap and store it in the fridge until your guests arrive to keep the veggies fresh and crisp.
Poison Apple Brie Bites

Poison Apple Brie Bites are a perfect Halloween appetizer that combines a hauntingly delicious blend of sweet and savory flavors. These bites are a unique twist on the classic baked brie, featuring the rich creaminess of brie cheese paired with the tartness of green apples, all enveloped in a flaky puff pastry. The “poison” element comes from a drizzle of blackberry or raspberry preserves, giving the appearance of a sinister, yet delicious treat. Ideal for a spooky gathering, these bites are sure to impress your guests with both their taste and presentation.
Perfect for serving 4-6 people, Poison Apple Brie Bites aren’t only visually appealing but also incredibly easy to prepare. This recipe requires minimal ingredients and effort, making it an excellent choice for those looking to create an impressive dish without spending hours in the kitchen. Whether you’re hosting a Halloween party or simply enjoying a night in with family and friends, these bites will add a festive touch to your celebration.
Ingredients (Serving size: 4-6 people):
- 1 sheet of puff pastry (thawed)
- 1 wheel of brie cheese (8 oz)
- 1 green apple
- 1/4 cup of blackberry or raspberry preserves
- 1 egg (beaten)
- 1 tablespoon of lemon juice
- 1 tablespoon of flour (for dusting)
- Optional: black food coloring for the preserves
Cooking Instructions:
- Prepare the Ingredients: Preheat your oven to 375°F (190°C). Lightly flour a clean surface and roll out the thawed puff pastry sheet to smooth out any folds. Peel, core, and thinly slice the green apple, then toss the slices in lemon juice to prevent browning.
- Assemble the Bites: Cut the brie cheese into small, bite-sized pieces. Lay the puff pastry on the floured surface and cut it into 12 equal squares. Place a piece of brie and a slice of apple in the center of each square.
- Wrap the Bites: Fold the corners of the pastry square over the apple and brie, pinching the edges together to seal. Make sure the pastry is tightly sealed so the cheese doesn’t leak out during baking.
- Add the “Poison”: If desired, mix a few drops of black food coloring with the preserves to achieve a darker hue. Spoon a small amount of preserves over each wrapped bite for a “poisoned” look.
- Bake the Bites: Place the bites on a baking sheet lined with parchment paper. Brush each bite with the beaten egg for a golden finish. Bake in the preheated oven for 15-20 minutes or until the pastry is golden brown and crispy.
- Cool and Serve: Allow the bites to cool slightly before serving. They can be served warm or at room temperature.
Extra Tips: For a spookier presentation, serve the Poison Apple Brie Bites on a dark platter and garnish with additional apple slices or sprigs of rosemary. If you prefer a sweeter flavor, consider using red apples or adding a sprinkle of cinnamon to the apple slices. Remember, the key to a successful dish is ensuring the puff pastry is sealed properly to prevent cheese leakage. Enjoy these bites with a glass of your favorite wine or a festive Halloween cocktail!
Devilish Deviled Crab Cakes

Devilish Deviled Crab Cakes are the perfect Halloween appetizer to tantalize the taste buds and set the mood for a spooky soirée. These bite-sized morsels are packed with succulent crab meat, a devilishly delightful blend of spices, and a crispy exterior that adds a satisfying crunch.
Whether you’re hosting a haunted house party or a cozy family gathering, these crab cakes are bound to be a hit, bringing a touch of elegance and a dash of devilish flair to your Halloween spread.
Crafted to serve 4-6 people, this recipe combines the rich flavors of fresh crab with the zesty kick of cayenne pepper and Dijon mustard. The crab cakes are baked to golden perfection, guaranteeing a healthier option without sacrificing taste or texture.
Serve them with a side of tangy tartar sauce or a spicy dipping sauce to elevate the flavor profile and give your guests a frightfully delicious treat they’ll remember long after the Halloween festivities have ended.
Ingredients:
- 1 pound fresh crab meat, picked over for shells
- 1/2 cup mayonnaise
- 1 tablespoon Dijon mustard
- 2 teaspoons Worcestershire sauce
- 1 teaspoon hot sauce
- 1/2 teaspoon cayenne pepper
- 1 teaspoon Old Bay seasoning
- 1/4 cup finely chopped green onions
- 1/4 cup finely chopped red bell pepper
- 1/4 cup breadcrumbs
- 2 large eggs, beaten
- Salt and pepper to taste
- 1 cup panko breadcrumbs for coating
- Olive oil spray or 2 tablespoons olive oil
Cooking Instructions:
- Prepare the Crab Mixture: In a large mixing bowl, combine the crab meat, mayonnaise, Dijon mustard, Worcestershire sauce, hot sauce, cayenne pepper, Old Bay seasoning, green onions, and red bell pepper. Mix gently to combine, making certain the crab meat remains chunky.
- Bind the Ingredients: Add the breadcrumbs and beaten eggs to the crab mixture. Season with salt and pepper to taste, and mix until the ingredients are just combined. Be careful not to overmix, as this can break down the crab meat.
- Shape the Crab Cakes: Using your hands or a large spoon, shape the crab mixture into 8-10 equal-sized patties. Place the patties on a baking sheet lined with parchment paper.
- Coat the Crab Cakes: Pour the panko breadcrumbs onto a plate. Gently press each crab cake into the breadcrumbs to coat all sides, making sure an even layer of crumbs is achieved for a crispy finish.
- Bake the Crab Cakes: Preheat your oven to 375°F (190°C). Spray the crab cakes lightly with olive oil spray or brush with olive oil. Bake in the preheated oven for 15-20 minutes, or until the cakes are golden brown and heated through.
- Serve and Enjoy: Remove the crab cakes from the oven and let them cool slightly before serving. Pair with your choice of dipping sauce and garnish with additional chopped green onions if desired.
Extra Tips:
For the best results, use fresh, high-quality crab meat. If fresh crab is unavailable, canned or frozen crab can be substituted. Just be sure to drain and dry it well to prevent excess moisture in the crab cakes.
When forming the patties, handle them gently to maintain their shape, and make certain a good chill in the refrigerator before baking to help them hold together better.
Adjust the level of cayenne pepper and hot sauce according to your heat preference to make these devilish delights as mild or as spicy as you dare.
Goblin Guacamole Dip
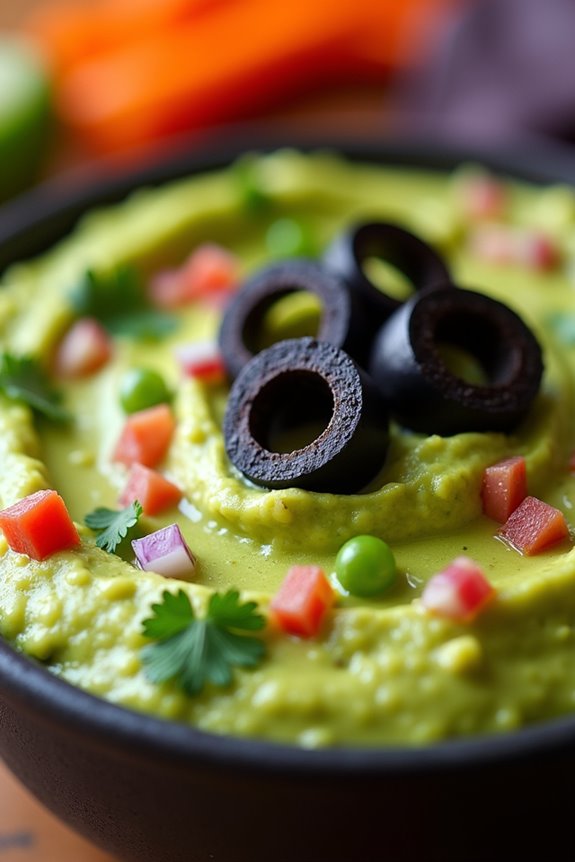
Goblin Guacamole Dip is the perfect Halloween appetizer to add a spooky yet delicious twist to your spread. This eerie green dip, with its smooth and creamy texture, is sure to be a crowd-pleaser at any Halloween gathering. The blend of fresh avocados, zesty lime juice, and a touch of spice creates a delightful balance of flavors that will have your guests coming back for more.
Whether you’re hosting a party or just looking for a festive snack, Goblin Guacamole Dip is a must-try. Not only is this dip easy to prepare, but it also pairs wonderfully with a variety of dippers, such as tortilla chips, vegetable sticks, or even spooky-shaped crackers. The fun presentation and vibrant color make it an eye-catching addition to your Halloween table.
Plus, it’s a healthy option that’s both vegan and gluten-free, guaranteeing that all your guests can enjoy it. So gather your ingredients and get ready to whip up a batch of Goblin Guacamole Dip that will bewitch everyone at your celebration.
Ingredients (Serves 4-6)
- 4 ripe avocados
- 1 small red onion
- 2 medium tomatoes
- 2 cloves garlic
- 1 jalapeño pepper
- 1/4 cup fresh cilantro
- 2 limes
- Salt to taste
- Black olives (for garnish)
Cooking Instructions
- Prepare the Avocados: Start by cutting the avocados in half, removing the pits, and scooping the flesh into a mixing bowl. Use a fork to mash the avocados until you achieve a creamy consistency, leaving a few chunks for texture.
- Chop the Vegetables: Finely dice the red onion, tomatoes, and jalapeño pepper. Mince the garlic cloves. Add these chopped ingredients to the mashed avocados, stirring them in gently.
- Add Fresh Flavor: Chop the cilantro finely and add it to the avocado mixture. Squeeze the juice of two limes over the mixture, making sure that the juice is evenly distributed to prevent the avocados from browning.
- Season the Dip: Add salt to taste, mixing everything thoroughly to make sure the flavors are well combined. Adjust the seasoning as needed.
- Garnish and Serve: Transfer the Goblin Guacamole Dip to a serving bowl and garnish with sliced black olives to give it an extra spooky touch. Serve immediately with your choice of dippers.
Extra Tips
To keep your Goblin Guacamole Dip looking fresh and vibrant, cover it with plastic wrap pressed directly onto the surface to minimize exposure to air. This helps prevent browning if you need to prepare it a little in advance.
Additionally, if you want to increase the spookiness factor, consider serving the dip in a hollowed-out gourd or pumpkin for a truly Halloween-themed presentation. Remember to taste and adjust the seasoning to suit your preference, and feel free to add more jalapeño if you want an extra kick of heat.