

When Halloween comes knocking, it’s not just the candy that gets all the attention.
I love crafting savory appetizers that offer a delicious counterbalance to all the sweet treats.
Think spider deviled eggs that are as creepy as they are tasty, or mummy jalapeño poppers with a spicy kick.
Ready to explore some more hauntingly delightful bites?
Let’s get started on these ghoulishly good recipes!
Spider Deviled Eggs
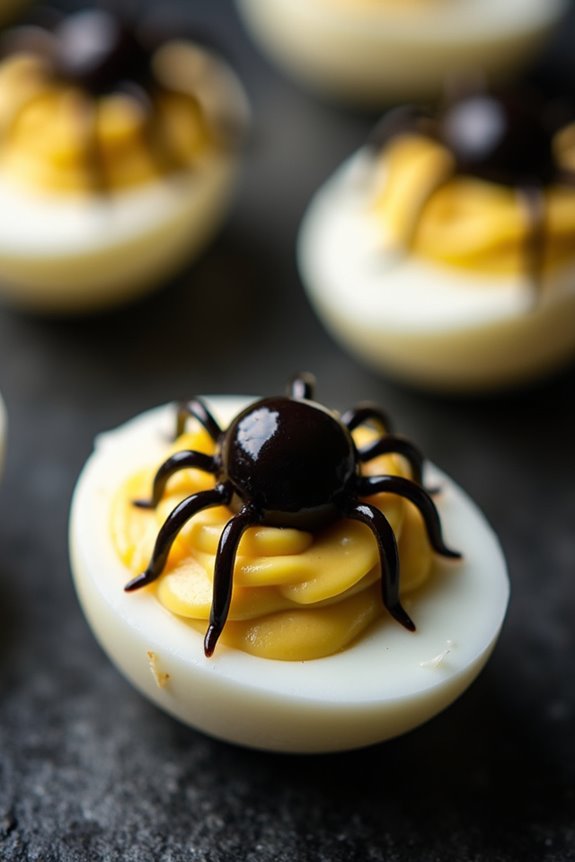
Get ready to spook your guests with these creepy yet delicious Spider Deviled Eggs, the perfect savory appetizer for your Halloween gathering. This creative twist on the classic deviled eggs will surely be a hit, featuring a devilishly creamy filling and a decorative olive “spider” perched on top. Not only are these delicious and fun to make, but they’re also easy to prepare, allowing you to focus on other Halloween festivities.
The visual appeal of this dish lies in its unique presentation, where each deviled egg becomes a miniature canvas for edible artistry. The combination of smooth egg yolk filling and the tangy bite of olives creates a tantalizing flavor that complements the eerie appearance. Ideal for serving 4-6 people, this recipe is sure to add a ghoulish charm to your Halloween spread.
Ingredients for Spider Deviled Eggs (serves 4-6):
- 6 large eggs
- 1/4 cup mayonnaise
- 1 teaspoon Dijon mustard
- 1 teaspoon white vinegar
- Salt and pepper, to taste
- 12 black olives
Cooking Instructions:
- Boil the Eggs: Place the eggs in a saucepan and cover them with water. Bring the water to a boil over medium-high heat. Once boiling, turn off the heat, cover the pan, and let the eggs sit for 10-12 minutes.
- Cool and Peel: After the eggs have cooked, transfer them to a bowl of ice water to cool for about 5 minutes. Once cooled, gently peel the shells off the eggs.
- Prepare the Filling: Slice each egg in half lengthwise and carefully remove the yolks, placing them in a mixing bowl. Set the egg whites aside on a serving platter.
- Mix the Filling: Mash the egg yolks with a fork. Add mayonnaise, Dijon mustard, white vinegar, salt, and pepper. Mix until the filling is smooth and creamy.
- Fill the Egg Whites: Spoon or pipe the yolk mixture back into the hollow of each egg white half.
- Create the Olive Spiders: Slice the black olives in half. Place one half on top of the yolk filling to form the body of the spider. Slice the other half into thin strips to create the legs and arrange them around the body on the egg.
- Serve: Arrange the Spider Deviled Eggs on a platter and serve them chilled.
Extra Tips:
To make your Spider Deviled Eggs even more visually appealing, consider using a piping bag to fill the egg whites with the yolk mixture for a professional look. For a bit more flavor, you can add a pinch of smoked paprika or cayenne pepper to the yolk mixture.
Additionally, if you’re serving these at a party, prepare them a few hours in advance and refrigerate until ready to serve, ensuring they stay fresh and tasty.
Mummy Jalapeño Poppers
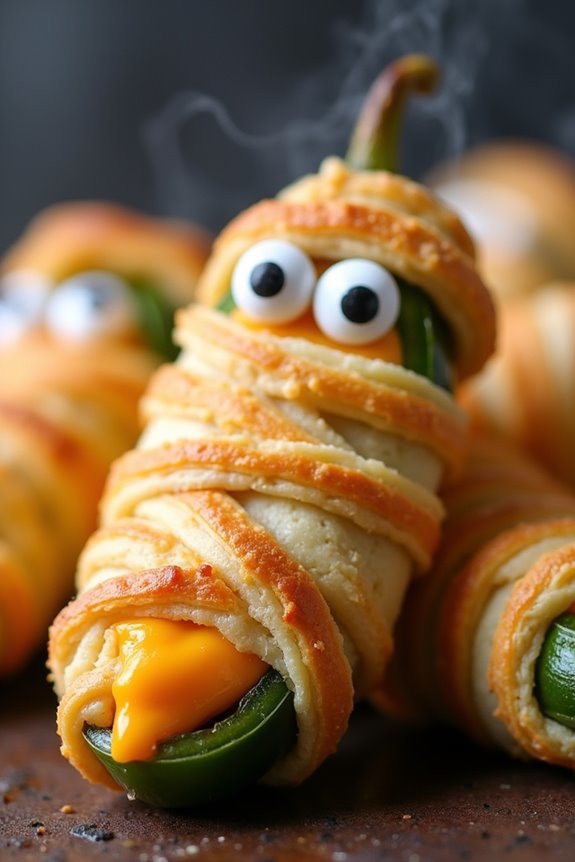
Mummy Jalapeño Poppers are a playful and delicious appetizer, perfect for adding some spooky fun to your Halloween festivities. These tasty bites are a twist on the classic jalapeño poppers, wrapped in crescent roll dough to resemble mummies, complete with edible eyes. The creamy and spicy filling is balanced by the buttery, flaky crust, making them a crowd-pleaser for kids and adults alike.
Whether you’re hosting a Halloween party or just want to make a festive snack, these Mummy Jalapeño Poppers are guaranteed to be a hit. The combination of creamy cheese, spicy jalapeños, and the whimsical presentation will make this dish stand out on any snack table. Not only are they fun to make and eat, but they also capture the spirit of Halloween with their clever mummy design.
Preparing them is straightforward, and the result is a delightful appetizer that will leave your guests impressed and coming back for more. Here’s how you can make your own batch of Mummy Jalapeño Poppers for 4-6 people.
Ingredients:
- 12 large jalapeños
- 8 oz cream cheese, softened
- 1 cup shredded cheddar cheese
- 1/2 teaspoon garlic powder
- 1/4 teaspoon onion powder
- 1/4 teaspoon salt
- 1 package refrigerated crescent roll dough
- 24 candy eyeballs
- Cooking spray
Instructions:
- Prepare the Jalapeños: Preheat your oven to 400°F (200°C). Slice each jalapeño in half lengthwise and remove the seeds and membranes using a spoon. This will reduce the spiciness and create space for the filling.
- Make the Filling: In a medium-sized bowl, combine the softened cream cheese, shredded cheddar cheese, garlic powder, onion powder, and salt. Mix until all ingredients are well combined and the mixture is smooth.
- Stuff the Jalapeños: Fill each jalapeño half with the cheese mixture. Be careful not to overfill them, as the filling will expand slightly while cooking.
- Wrap with Dough: Unroll the crescent roll dough and cut it into thin strips. Wrap each jalapeño half with dough strips, leaving a small gap for eyes. Make sure they resemble mummy bandages by overlapping the dough in a crisscross pattern.
- Bake the Poppers: Place the wrapped jalapeños on a baking sheet lined with parchment paper. Lightly spray them with cooking spray to help them brown. Bake in the preheated oven for 15-20 minutes or until the dough is golden brown.
- Add the Eyes: Once out of the oven, let the poppers cool slightly. Place two candy eyeballs on each popper to complete the mummy look.
Extra Tips:
When working with jalapeños, consider wearing gloves to prevent the oils from irritating your skin. If you prefer a milder popper, make certain all seeds and membranes are removed.
You can adjust the cheese filling by adding other spices or herbs to suit your taste. Additionally, candy eyeballs can be found in the baking aisle or crafted with small dots of cream cheese and black olives for an edible alternative.
Enjoy these poppers fresh out of the oven for the best flavor and texture.
Witch’s Broomstick Cheese Sticks
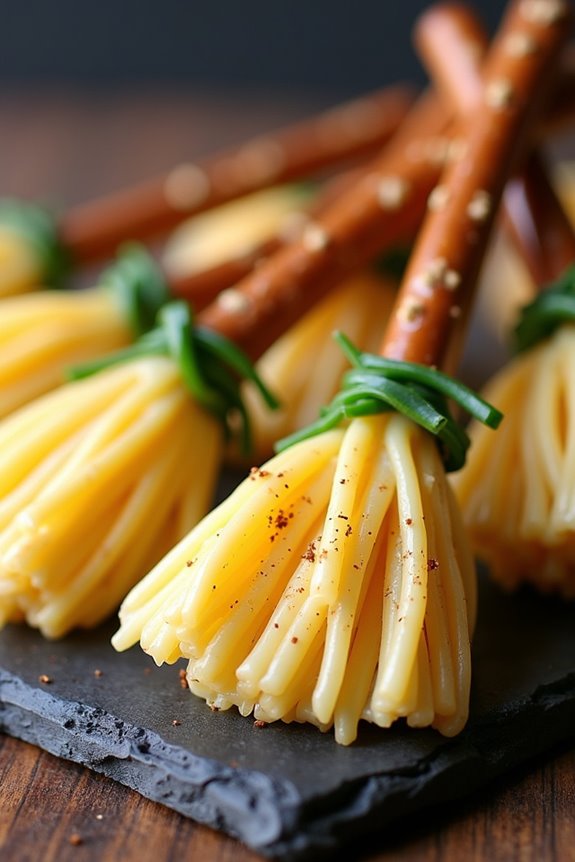
Looking for a playful yet savory appetizer to serve at your Halloween gathering? These Witch’s Broomstick Cheese Sticks are sure to enchant your guests. Perfect for spooking up your snack table, they combine the creamy texture of mozzarella cheese with the crispness of pretzel sticks, creating a deliciously bewitching treat.
This appetizer not only adds a whimsical flair to your Halloween spread but also offers a delightful contrast of flavors that will have your guests reaching for more. Served as a light snack, these cheese sticks are both fun to make and easy to assemble, making them an ideal choice for busy hosts.
With just a few simple ingredients, you can whip up these delightful brooms in no time, guaranteeing you have more moments to enjoy the festivities. Designed to serve 4-6 people, this recipe promises to be a hit with both kids and adults alike.
Ingredients for 4-6 people:
- 12 pieces of string cheese
- 12 pretzel sticks
- Fresh chives or thin strips of spring onion
- Paprika (optional for garnish)
Cooking Instructions:
- Prepare the Cheese: Take each string cheese and cut it in half, resulting in two shorter sticks. Gently fray one end of each piece by pulling apart the cheese strands, mimicking the bristles of a broom.
- Assemble the Brooms: Insert a pretzel stick into the unfrayed end of each piece of cheese. Push it in gently to guarantee it holds but be careful not to break the pretzel.
- Tie the Brooms: Take a chive or a thin strip of spring onion and wrap it around the top of the frayed end of the cheese, just below the inserted pretzel stick. Tie it securely in a knot to hold the cheese strands in place.
- Garnish (Optional): If desired, lightly sprinkle paprika over the cheese bristles to give the brooms a bit of color and an extra hint of flavor.
- Serve Immediately: Arrange the Witch’s Broomstick Cheese Sticks on a platter and serve them fresh for a delightful Halloween treat.
Extra Tips:
For an extra touch of Halloween magic, consider using flavored string cheese such as jalapeño or garlic for a spicy twist. If you find the chives difficult to tie, you can briefly soak them in warm water to make them more pliable.
Additionally, be cautious when inserting the pretzel sticks into the cheese, as they may break if too much force is applied. Serve these cheese sticks fresh for the best texture, as the pretzels can become soft if left out for too long. Enjoy your spooky and savory creation!
Monster Meatballs
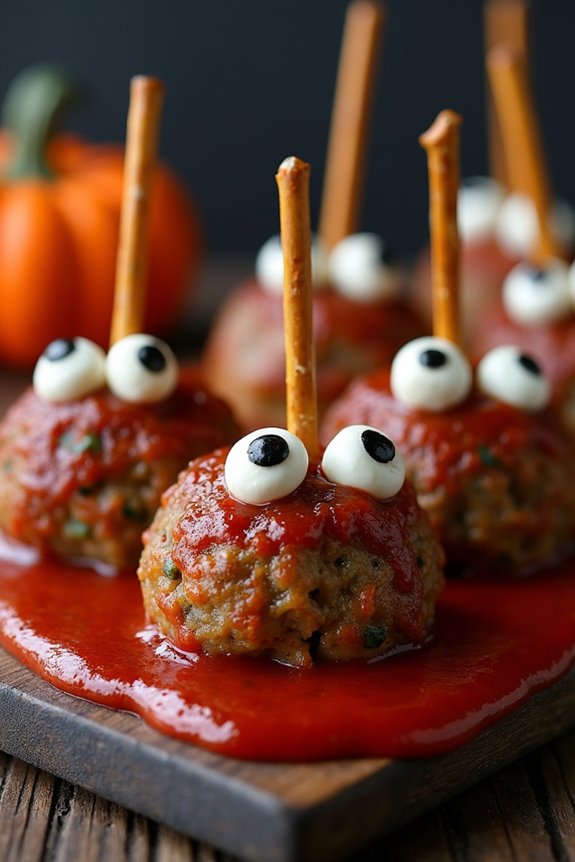
Get ready to spook your guests with these deliciously sinister Monster Meatballs, perfect for your Halloween appetizers spread. These meatballs aren’t only fun to look at, but they’re also packed with flavor. Made with a blend of ground beef and pork, they’re seasoned with Italian herbs and spices, then baked to perfection.
To complete the monster look, each meatball is adorned with edible “eyes” and “fangs,” making them a playful addition to any Halloween gathering.
These Monster Meatballs are designed for a serving size of 4-6 people, making them ideal for a small party or family gathering. The combination of meats, along with the savory, aromatic herbs, creates a juicy, tender meatball that pairs wonderfully with a simple marinara sauce or can be enjoyed on its own.
Transform your Halloween appetizer table with this ghoulish dish that’s sure to be a hit with both kids and adults alike.
Ingredients:
- 1/2 pound ground beef
- 1/2 pound ground pork
- 1/2 cup breadcrumbs
- 1/4 cup grated Parmesan cheese
- 1/4 cup milk
- 1 egg
- 2 cloves garlic, minced
- 1 teaspoon dried oregano
- 1 teaspoon dried basil
- 1/2 teaspoon salt
- 1/4 teaspoon black pepper
- 1/4 cup chopped fresh parsley
- Olives or mozzarella balls for eyes
- Sliced almonds or small pretzel sticks for fangs
- Marinara sauce for serving (optional)
Cooking Instructions:
- Preheat and Prep: Preheat your oven to 400°F (200°C). Line a baking sheet with parchment paper or lightly grease it with cooking spray to prevent sticking.
- Mix Ingredients: In a large bowl, combine the ground beef, ground pork, breadcrumbs, Parmesan cheese, milk, egg, minced garlic, oregano, basil, salt, pepper, and parsley. Mix thoroughly until all ingredients are well incorporated, being careful not to overwork the mixture.
- Shape the Meatballs: Using your hands, form the mixture into 1.5-inch balls. Place each meatball on the prepared baking sheet, spacing them evenly apart.
- Bake the Meatballs: Place the baking sheet in the oven and bake the meatballs for 20-25 minutes, or until they’re cooked through and browned on the outside. An internal temperature of 160°F (71°C) is recommended for safety.
- Decorate the Meatballs: Once baked, remove the meatballs from the oven and let them cool slightly. Insert olive slices or mozzarella balls into the top of each meatball to create “eyes.” Use sliced almonds or pretzel sticks to create “fangs” by gently pressing them into the meatballs.
- Serve: Arrange the monster meatballs on a platter and serve them with a side of marinara sauce for dipping, if desired.
Extra Tips:
For a more cohesive monster look, consider using food-safe markers to add details to the mozzarella ball eyes, like little black dots for pupils.
If you want to make the meatballs spicier, add a pinch of red pepper flakes to the mixture. You can also prepare the meatballs ahead of time and store them in the refrigerator for up to a day before baking.
This makes them a convenient and stress-free option for party planning. Enjoy creating these quirky, tasty creatures that will surely be the talk of your Halloween celebration!
Pumpkin-Shaped Cheese Ball

Get ready to impress your guests with this delightful Pumpkin-Shaped Cheese Ball, the perfect savory addition to your Halloween appetizer spread. This recipe combines the rich and creamy texture of cheese with a blend of spices to create a flavorful centerpiece that not only tastes amazing but also captures the spirit of the season.
The cheese ball is molded into a charming pumpkin shape, making it as visually appealing as it’s delicious. It’s sure to be a conversation starter at your Halloween gathering!
This festive dish is designed to serve 4-6 people, making it ideal for a small party or family gathering. The cheese ball is made from a combination of cream cheese, shredded cheddar, and a variety of spices, all wrapped up in a coating of crushed pretzels.
A pretzel stick and a few green bell pepper strips complete the pumpkin look, adding a touch of autumn flair. Serve with crackers, vegetable sticks, or slices of crusty bread for a truly delectable experience.
Ingredients (Serves 4-6):
- 16 oz cream cheese, softened
- 2 cups shredded sharp cheddar cheese
- 1 tablespoon Worcestershire sauce
- 1 teaspoon garlic powder
- 1 teaspoon onion powder
- 1/2 teaspoon smoked paprika
- 1/4 teaspoon salt
- 1/4 teaspoon black pepper
- 1 cup crushed pretzels
- 1 pretzel stick
- Strips of green bell pepper
Cooking Instructions:
- Prepare the Cheese Mixture: In a large mixing bowl, combine the softened cream cheese, shredded cheddar cheese, Worcestershire sauce, garlic powder, onion powder, smoked paprika, salt, and black pepper. Mix thoroughly until all ingredients are well combined and the mixture is smooth.
- Shape the Cheese Ball: Transfer the cheese mixture onto a sheet of plastic wrap. Use the wrap to help you mold the cheese into a round ball. Twist the top of the plastic wrap to tightly secure the cheese ball and place it in the refrigerator for at least 2 hours to firm up.
- Coat the Cheese Ball: Once chilled, remove the cheese ball from the refrigerator and unwrap it. Roll the cheese ball in the crushed pretzels until it’s fully coated, pressing gently to guarantee the pretzels adhere to the surface.
- Create the Pumpkin Shape: Using the palm of your hand, gently press down on the top of the cheese ball to flatten it slightly, giving it a pumpkin-like shape. Insert the pretzel stick into the top center as the pumpkin stem.
- Add Finishing Touches: Place the strips of green bell pepper around the pretzel stick to resemble leaves. Arrange the finished cheese ball on a serving platter and surround it with your choice of crackers, vegetable sticks, or bread slices.
Extra Tips:
To make the cheese ball even more flavorful, consider adding finely chopped chives or a dash of hot sauce to the cheese mixture for an extra kick.
If you’re short on time, the cheese ball can be made a day in advance and stored in the refrigerator until ready to serve. Just wait to coat it with pretzels until right before serving to guarantee they remain crunchy.
For a smoother texture, let the cheese ball sit at room temperature for about 15 minutes before serving. Enjoy this creative and tasty addition to your Halloween festivities!
Bat Wings With Spicy BBQ Sauce
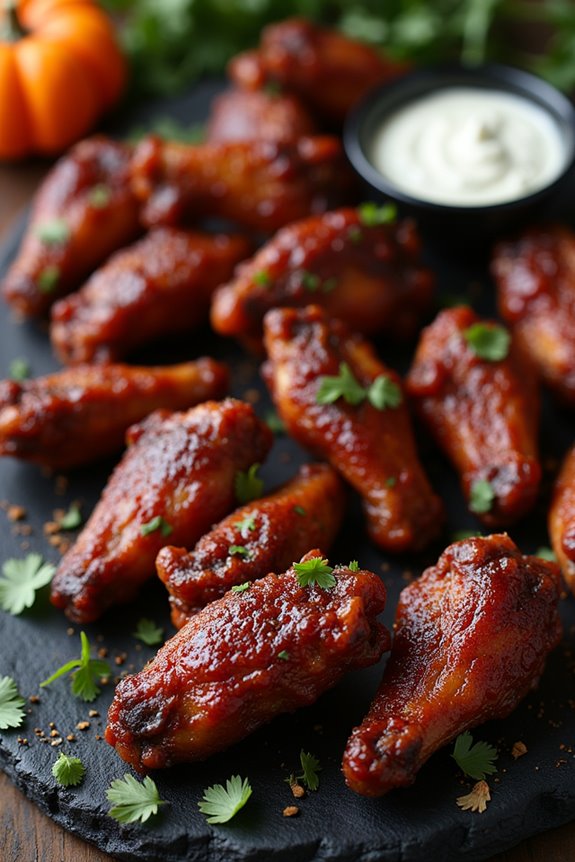
Bat Wings With Spicy BBQ Sauce are a festive and delicious way to kick off your Halloween celebrations. These delectable wings aren’t only visually appealing, with their dark, crispy coating resembling bat wings, but they’re also packed with flavor. The spicy BBQ sauce offers a perfect balance of heat and sweetness, making these wings a hit at any Halloween gathering.
Whether you’re hosting a party or just looking for a spooky treat to enjoy at home, these wings are bound to impress.
The key to making these Bat Wings With Spicy BBQ Sauce is in the preparation and cooking process, guaranteeing that the wings are perfectly cooked and well-coated with the sauce. The blackened appearance is achieved using a combination of soy sauce and dark spices, which also contribute to the rich and savory flavor. The homemade spicy BBQ sauce adds an extra layer of taste, complementing the wings beautifully.
The following recipe serves 4-6 people, making it perfect for a small gathering or family dinner.
Ingredients:
- 3 pounds of chicken wings
- 1/2 cup soy sauce
- 2 tablespoons olive oil
- 1 tablespoon smoked paprika
- 1 tablespoon garlic powder
- 1 tablespoon onion powder
- 1 teaspoon black pepper
- 1 teaspoon cayenne pepper
- 1 cup BBQ sauce
- 2 tablespoons hot sauce
- 2 tablespoons honey
- 1 tablespoon Worcestershire sauce
Cooking Instructions:
- Prepare the Wings: Rinse the chicken wings under cold water and pat them dry with paper towels. This will help the marinade adhere better to the wings.
- Marinate the Wings: In a large bowl, combine soy sauce, olive oil, smoked paprika, garlic powder, onion powder, black pepper, and cayenne pepper. Add the chicken wings to the bowl and toss them until they’re evenly coated. Cover the bowl with plastic wrap and let it marinate in the refrigerator for at least 1 hour, or overnight for best results.
- Preheat the Oven: Preheat your oven to 400°F (200°C). Line a baking sheet with aluminum foil and place a wire rack on top. This will allow the wings to cook evenly and become crispy.
- Bake the Wings: Arrange the marinated wings on the wire rack in a single layer. Bake them in the preheated oven for 35-40 minutes, turning halfway through, until they’re cooked through and the skin is crispy.
- Make the Spicy BBQ Sauce: While the wings are baking, prepare the spicy BBQ sauce. In a saucepan over medium heat, combine BBQ sauce, hot sauce, honey, and Worcestershire sauce. Stir the mixture and let it simmer for about 10 minutes until it thickens slightly.
- Coat the Wings: Once the wings are done baking, remove them from the oven and let them cool for a few minutes. Then, transfer the wings to a large bowl and pour the spicy BBQ sauce over them. Toss the wings until they’re fully coated with the sauce.
- Serve: Arrange the bat wings on a platter and serve immediately. They can be garnished with fresh parsley or cilantro for an added touch of color and flavor.
Extra Tips:
For an even spicier kick, you can increase the amount of cayenne pepper in the marinade or add more hot sauce to the BBQ sauce. If you prefer a milder version, reduce the hot sauce to suit your taste.
To guarantee the wings are extra crispy, make sure not to overcrowd them on the baking rack, allowing for proper air circulation. If you have a smoker, consider smoking the wings for an hour before baking for an added layer of smoky flavor.
Enjoy these Bat Wings With Spicy BBQ Sauce as the perfect appetizer for a spooky Halloween night!
Ghostly Stuffed Mushrooms

Get ready to delight your guests with a spooky and delicious treat this Halloween with Ghostly Stuffed Mushrooms. These savory bites are perfect for setting the eerie mood while satisfying taste buds. With their rich, creamy filling and ghostly appearance, these mushrooms are sure to be a hit at any Halloween gathering. The combination of herbs, cheese, and garlic creates an enticing aroma that will fill your kitchen and excite your guests.
The dish is simple to prepare, making it an ideal choice for both beginner and seasoned cooks looking for a whimsical appetizer during the Halloween season. The mushroom caps serve as perfect little vessels for the savory filling, while their ghostly appearance adds a playful touch to your Halloween spread. Whether you’re hosting a party or simply looking to add a festive flair to your dinner table, Ghostly Stuffed Mushrooms are a must-try.
Ingredients (Serves 4-6 people):
- 20 large button mushrooms
- 3 cloves garlic, minced
- 1 small onion, finely chopped
- 1 tablespoon olive oil
- 1/2 cup cream cheese, softened
- 1/4 cup grated Parmesan cheese
- 1/4 cup breadcrumbs
- 1 tablespoon chopped fresh parsley
- Salt and pepper to taste
- Black sesame seeds or poppy seeds for eyes (optional)
Cooking Instructions:
- Prepare the Mushrooms: Gently wipe the mushrooms with a damp paper towel to clean them. Carefully remove the stems and set them aside, making sure not to break the caps.
- Cook the Filling: Finely chop the mushroom stems. In a skillet over medium heat, heat the olive oil and sauté the chopped onion and garlic until they become translucent. Add the chopped mushroom stems to the skillet and continue to cook until they’re soft and any released moisture has evaporated.
- Mix the Filling: In a mixing bowl, combine the cooked mushroom mixture with cream cheese, Parmesan cheese, breadcrumbs, and parsley. Mix well until all ingredients are thoroughly incorporated. Season with salt and pepper to taste.
- Stuff the Mushrooms: Preheat your oven to 375°F (190°C). Line a baking sheet with parchment paper. Using a spoon, fill each mushroom cap with the prepared filling, creating a small mound on top of each cap.
- Bake the Mushrooms: Arrange the stuffed mushrooms on the prepared baking sheet. Bake in the preheated oven for 20-25 minutes, or until the tops are golden brown and the mushrooms are tender.
- Decorate for Halloween: If desired, carefully place black sesame seeds or poppy seeds onto the tops of the stuffed mushrooms to create eyes, giving them a ghostly appearance.
Extra Tips:
To guarantee the mushrooms are evenly cooked and maintain their shape, try to select mushrooms of similar size. If the mushrooms release too much moisture during baking, you can place them on a wire rack over the baking sheet to allow excess liquid to drain.
Feel free to experiment with the filling by adding your favorite herbs or spices for a personal touch. These mushrooms are best served warm, but they can be reheated gently in the oven if needed. Enjoy your ghostly creations!
Bloody Mary Shrimp Shooters
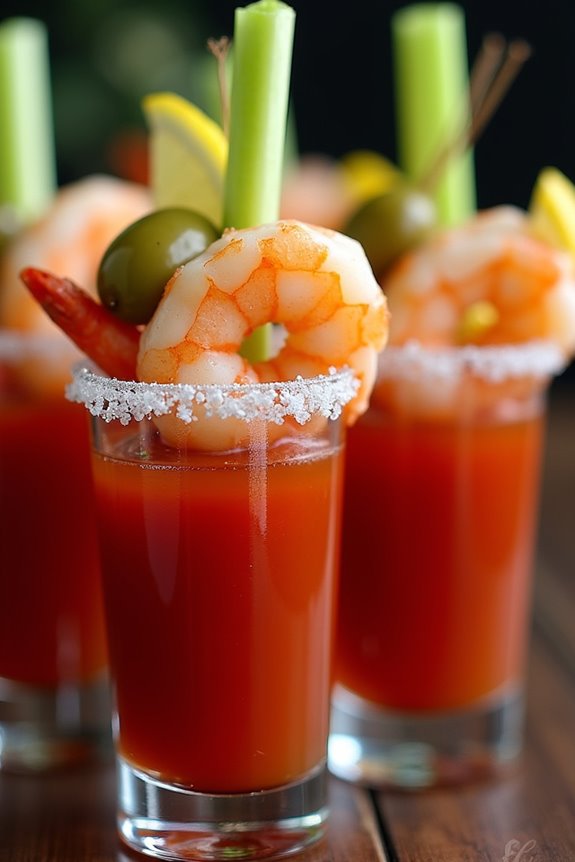
Bloody Mary Shrimp Shooters are a spooky and sophisticated addition to any Halloween gathering. This appetizer brings together the classic flavors of a Bloody Mary cocktail with succulent shrimp, creating a delightful blend of spice and seafood. The presentation in shot glasses or small cups adds an interactive element that guests will enjoy, as they sip and savor each bite. For those looking to add a touch of creativity and flavor to their Halloween menu, these shooters are sure to impress.
These savory shooters are perfect for a crowd, providing a revitalizing and flavorful start to your Halloween festivities. With a balance of tangy, spicy, and umami notes, the Bloody Mary Shrimp Shooters offer a taste experience that’s both familiar and novel. The shrimp, lightly poached and chilled, pairs beautifully with the zesty Bloody Mary mix. The addition of garnishes like celery sticks, olives, and lemon wedges not only enhances the flavor but also adds a visual flair that fits the Halloween theme.
Ingredients (serving size: 4-6 people):
- 1 pound large shrimp, peeled and deveined
- 2 cups tomato juice
- 1/4 cup vodka
- 1 tablespoon Worcestershire sauce
- 1 tablespoon prepared horseradish
- 1 teaspoon hot sauce
- 1 teaspoon celery salt
- 1 teaspoon black pepper
- 1 tablespoon lemon juice
- Celery sticks for garnish
- Lemon wedges for garnish
- Green olives for garnish
- Ice cubes
- Salt for rimming glasses (optional)
Cooking Instructions:
- Prepare the Shrimp: In a medium pot, bring salted water to a boil. Add the shrimp and cook for 2-3 minutes until they turn pink and opaque. Remove the shrimp with a slotted spoon and immediately transfer to an ice bath to stop the cooking. Once cooled, drain and refrigerate until ready to serve.
- Make the Bloody Mary Mix: In a large pitcher, combine the tomato juice, vodka, Worcestershire sauce, horseradish, hot sauce, celery salt, black pepper, and lemon juice. Stir well to combine all the ingredients. Taste and adjust the seasoning if necessary. Refrigerate the mix to chill for at least 30 minutes.
- Prepare the Glasses: If desired, rim the shot glasses or small serving cups with salt. To do this, rub a lemon wedge around the rim of each glass, then dip the rim into a small plate of salt.
- Assemble the Shooters: Fill each glass about halfway with the chilled Bloody Mary mix. Add a few ice cubes to each glass if desired. Place a shrimp on top or hang it on the edge of the glass for presentation.
- Garnish and Serve: Garnish each shooter with a celery stick, a lemon wedge, and a green olive. Serve immediately, allowing guests to enjoy the interactive experience of sipping and eating the appetizer.
Extra Tips:
To make the dish even more flavorful, consider marinating the shrimp in a bit of lemon juice, garlic, and olive oil before cooking. This adds an extra layer of taste that complements the Bloody Mary mix.
When making the Bloody Mary mix, feel free to adjust the level of spiciness by adding more or less hot sauce to suit your guests’ preferences. For a non-alcoholic version, simply omit the vodka and replace it with an equal amount of tomato juice.
Finally, for a festive touch, consider using colored shot glasses or adding a drop of red food coloring to the mix for a more eerie presentation.
Creepy Cauliflower Brain Dip
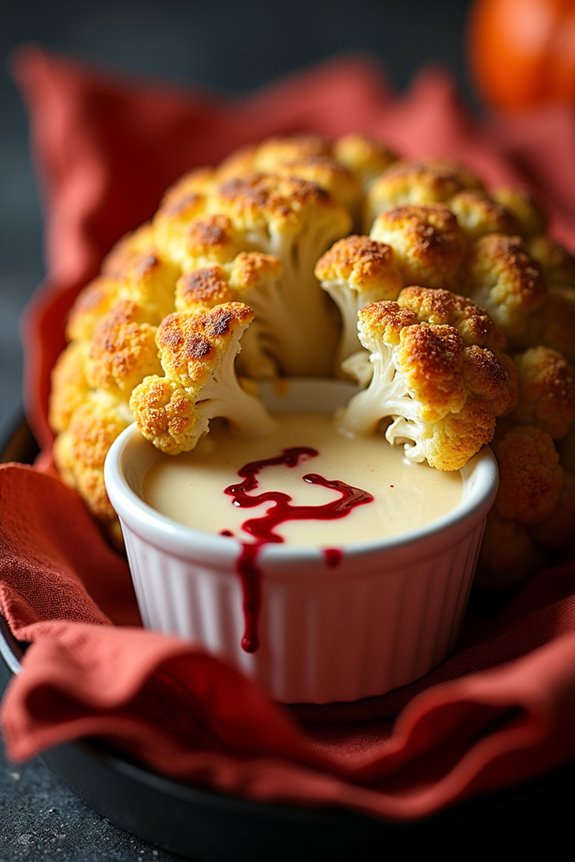
Creepy Cauliflower Brain Dip is a spine-chilling yet delicious addition to your Halloween appetizer spread. This dish isn’t only visually intriguing, mimicking the eerie look of a brain, but it also offers a healthy twist to the usual party dips. The earthy flavor of roasted cauliflower pairs beautifully with creamy cheeses and aromatic herbs, making it a perfect centerpiece for your spooky celebration.
Whether you’re hosting a haunted house or a small get-together, this appetizer is sure to impress your guests with both its taste and appearance. To achieve the creepy brain-like look, the cauliflower is carefully carved and roasted to perfection. A blend of cheeses and spices is then used to create a savory dip that’s both rich and satisfying. Not only is this dish a feast for the eyes, but it also offers a nutritious option for those seeking a lighter appetizer.
For added theatrics, consider serving this dip in a skull-shaped bowl or accompanied by gory garnishes. This recipe is designed to serve 4-6 people, making it ideal for smaller gatherings or as part of a larger appetizer selection.
Ingredients:
- 1 large head of cauliflower
- 2 tablespoons olive oil
- 1 teaspoon smoked paprika
- 1/2 teaspoon garlic powder
- Salt and pepper to taste
- 1 cup cream cheese, softened
- 1/2 cup sour cream
- 1 cup shredded cheddar cheese
- 2 tablespoons chopped fresh chives
- 1 tablespoon lemon juice
- Red food coloring (optional)
Cooking Instructions:
- Prepare the Cauliflower: Begin by preheating your oven to 400°F (200°C). Remove the outer leaves and trim the stem of the cauliflower so that it can stand upright on a baking sheet. Be careful not to remove too much of the stem as it helps the cauliflower maintain its shape.
- Season and Roast the Cauliflower: Place the cauliflower on a baking sheet lined with parchment paper. Drizzle with olive oil and sprinkle with smoked paprika, garlic powder, salt, and pepper. Rub the seasonings evenly over the cauliflower. Roast in the preheated oven for 30-40 minutes until the cauliflower is tender and golden brown.
- Prepare the Cheese Dip: While the cauliflower is roasting, in a mixing bowl, combine the cream cheese, sour cream, shredded cheddar cheese, chopped chives, and lemon juice. Mix until smooth and well combined. For an extra creepy effect, add a few drops of red food coloring to give the dip a blood-like appearance.
- Assemble the Brain Dip: Once the cauliflower is roasted, let it cool slightly before handling. Carefully cut the cauliflower into florets, ensuring they resemble the texture of a brain. Arrange the florets on a platter to form a brain shape.
- Serve: Pour the cheese dip over the arranged cauliflower florets, allowing it to seep into the crevices. Serve immediately with crackers, breadsticks, or vegetable sticks for dipping.
Extra Tips: For a more dramatic presentation, consider placing the cauliflower brain dip on a dark platter or tray lined with red napkins to enhance the eerie effect. If you prefer a spicier dip, add a pinch of cayenne pepper to the cheese mixture. To save time, the cheese dip can be prepared a day in advance and refrigerated until ready to use. Confirm the dip is brought to room temperature or gently warmed before pouring over the cauliflower.
Eyeball Caprese Skewers
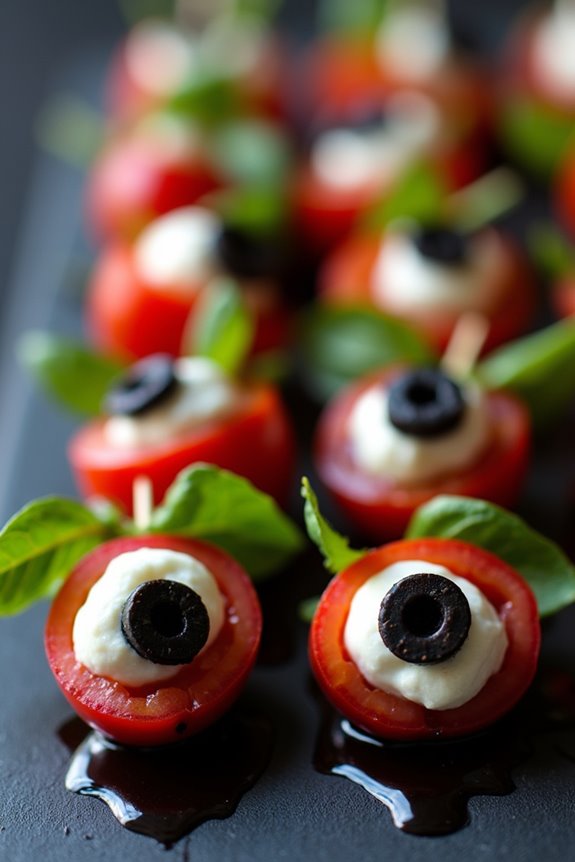
If you’re seeking to add a touch of spookiness to your Halloween appetizer spread, search no further than Eyeball Caprese Skewers. This dish combines the classic flavors of a Caprese salad with a festive twist that’s sure to impress your guests.
These skewers not only appear delightfully creepy with their “eyeball” appearance but also taste invigoratingly delicious, making them a perfect addition to any Halloween party.
The key to making Eyeball Caprese Skewers is in the presentation. By using small mozzarella balls, cherry tomatoes, fresh basil leaves, and a few clever additions, you can create an appetizer that’s both visually appealing and packed with flavor.
The skewers are easy to assemble and can be prepared in advance, allowing you to enjoy the Halloween festivities without any last-minute stress in the kitchen. This recipe serves 4-6 people, making it ideal for small gatherings or as part of a larger appetizer spread.
Ingredients:
- 12 small mozzarella balls (bocconcini or ciliegine)
- 12 cherry tomatoes
- 12 fresh basil leaves
- 12 black olives (pitted)
- 1 tablespoon balsamic glaze
- Salt and pepper to taste
- 12 wooden skewers or toothpicks
Instructions:
- Prepare the Ingredients: Rinse the cherry tomatoes and basil leaves under cold water and pat them dry with a paper towel. Drain the mozzarella balls and black olives, setting them aside in separate bowls.
- Assemble the “Eyeballs”: Slice each black olive into thin rings. Place one olive ring on top of each mozzarella ball, pressing gently to adhere. This will create the “eyeball” effect.
- Assemble the Skewers: Take a wooden skewer or toothpick and slide on one cherry tomato, followed by one basil leaf, and then one mozzarella “eyeball”. Repeat this process until all skewers are assembled.
- Drizzle and Season: Arrange the skewers on a serving platter. Drizzle each skewer with a small amount of balsamic glaze. Lightly season with salt and pepper to taste.
- Chill and Serve: Place the platter in the refrigerator for about 15 minutes to allow the flavors to meld. Serve chilled for the best taste experience.
Extra Tips:
For an extra spooky effect, use a small amount of cream cheese as “glue” to attach the olive slices to the mozzarella balls if they don’t stick well on their own.
You can also use different colored olives or add a small piece of roasted red pepper inside the olive ring to create a more realistic “pupil” for the eyeball. Additionally, feel free to experiment with different herbs or add a small drizzle of extra virgin olive oil for added flavor.
Vampire Bat Cheese Crisps
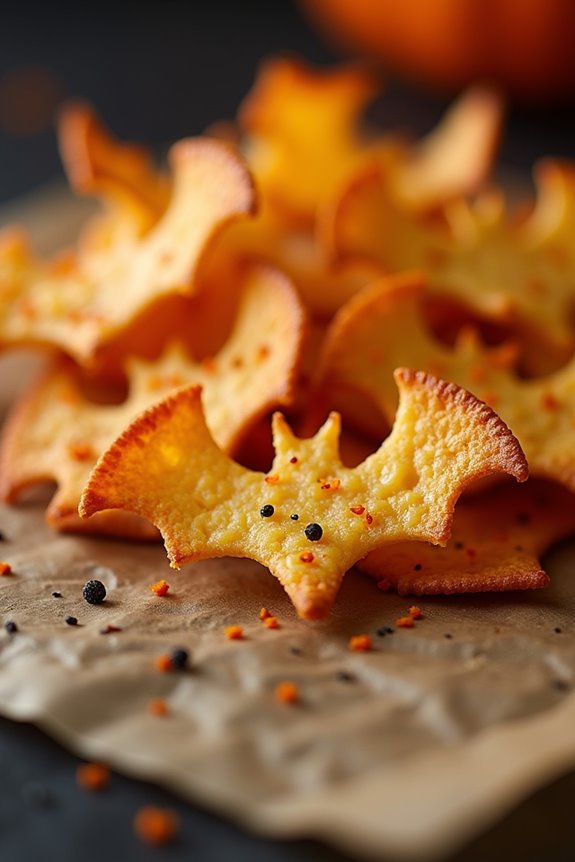
These cheese crisps are easy to prepare and require minimal ingredients, making them a convenient choice for any host. They can be served alone or paired with dips, enhancing their flavor profile and presentation.
Perfect for a serving size of 4-6 people, this recipe guarantees everyone gets to enjoy these savory delights. The combination of cheeses and the fun bat shapes make these crisps a sure-fire hit at any Halloween gathering.
Ingredients:
- 1 cup of sharp cheddar cheese, shredded
- 1 cup of Parmesan cheese, grated
- 1 teaspoon of garlic powder
- 1 teaspoon of smoked paprika
- 1/2 teaspoon of black pepper
- Bat-shaped cookie cutters
- Parchment paper
Instructions:
- Preheat the Oven: Start by preheating your oven to 375°F (190°C). This will guarantee that the crisps bake evenly and develop a perfect crunchy texture.
- Prepare the Cheese Mixture: In a medium-sized mixing bowl, combine the shredded cheddar cheese, grated Parmesan cheese, garlic powder, smoked paprika, and black pepper. Mix the ingredients thoroughly to guarantee that the flavors are well distributed throughout the cheese.
- Shape the Crisps: Lay out a sheet of parchment paper on a flat surface. Using the bat-shaped cookie cutters, press firmly into the cheese mixture to shape the crisps. Carefully remove the excess cheese around the cutters to leave behind only the bat-shaped forms.
- Bake the Crisps: Place the parchment paper with the bat-shaped cheese onto a baking sheet. Bake in the preheated oven for 8-10 minutes, or until the crisps are golden brown and crispy. Keep a close eye on them to prevent burning, as cheese can turn quickly.
- Cool and Serve: Once baked, remove the cheese crisps from the oven and allow them to cool on the parchment paper for a few minutes. This will help them firm up and become crunchier. Serve them as they’re or alongside a dip of your choice.
Extra Tips:
For best results, guarantee that the cheese is freshly shredded and grated, as pre-packaged cheese can contain anti-caking agents that might affect the crispiness.
If you want to add a bit more flavor, try incorporating herbs like rosemary or thyme into the cheese mixture. Additionally, if you don’t have bat-shaped cookie cutters, you can use any Halloween-themed shape.
Remember to store any leftover crisps in an airtight container to maintain their crunch. Enjoy the spooky season with these delicious Vampire Bat Cheese Crisps!