

Hey there, sweet tooth lovers! 🎃
If you’re anything like me, Halloween is the perfect excuse to indulge in all things sugary and spooky. Crafting a Halloween candy charcuterie board is my latest obsession, and I’m thrilled to share my fun and festive ideas with you. From candy corn to mini chocolate bars, we’ve got a treasure trove of treats that’ll make your taste buds tingle. Let’s get creative and make this Halloween extra sweet! 🍬
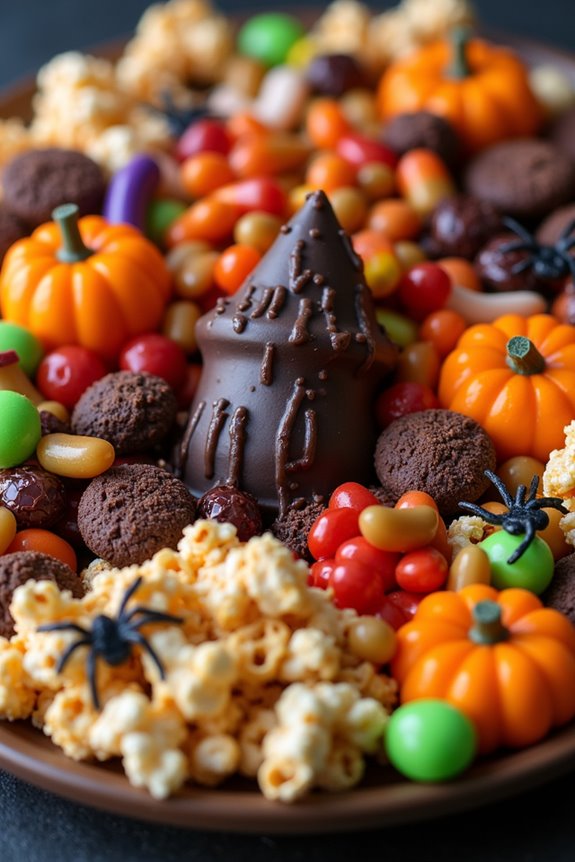
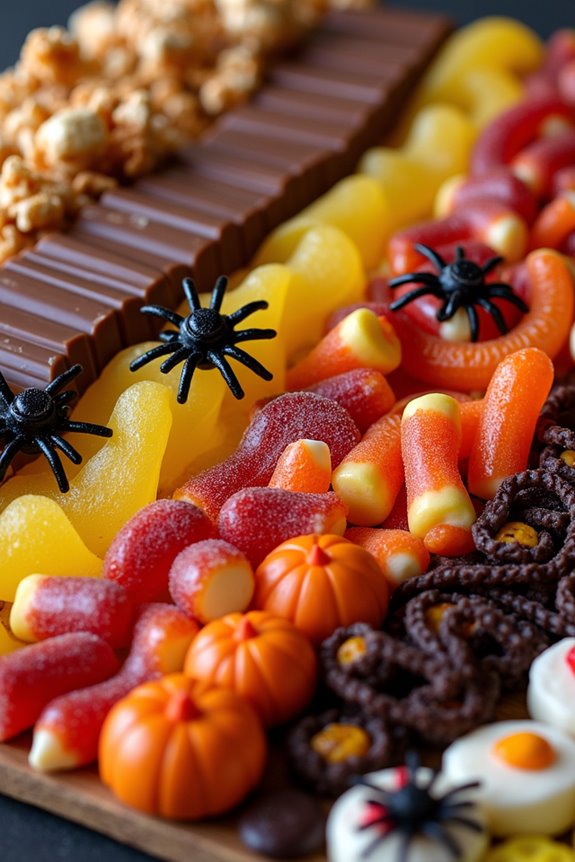
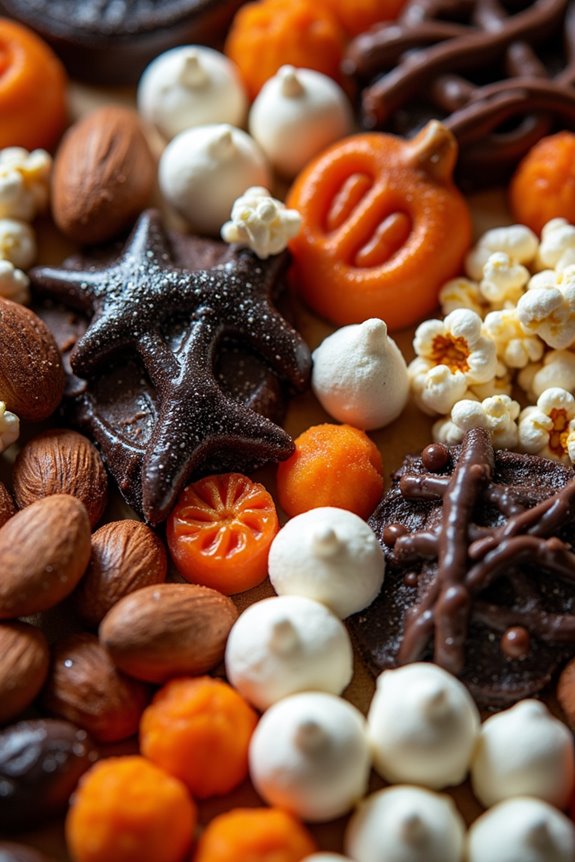
Spooky Sweet Symphony

The Spooky Sweet Symphony Halloween Candy Charcuterie Board is a delightful fusion of sweet treats and spooky themes, perfect for any Halloween gathering. This dish combines a variety of candies and chocolates arranged artistically on a board, making it not only visually appealing but also a treat for the taste buds.
Whether you’re hosting a Halloween party or simply looking to enjoy an assortment of candies in a creative way, this charcuterie board is guaranteed to be a hit among both kids and adults.
To start crafting your Spooky Sweet Symphony, you’ll need a variety of candies that reflect the Halloween spirit. Think of a mix of colors, shapes, and flavors to keep things exciting and diverse. The key is to balance the board with both store-bought candies and homemade treats if desired.
Choose candies that are popular during Halloween, and don’t be afraid to incorporate some savory elements to offset the sweetness. This recipe serves 4-6 people, making it ideal for small gatherings or family events.
Ingredients:
- 1 cup candy corn
- 1 cup gummy worms
- 1 cup mini chocolate bars (assorted)
- 1 cup chocolate-covered pretzels
- 1/2 cup pumpkin spice almonds
- 1/2 cup caramel popcorn
- 1/2 cup marshmallow ghosts
- 1/2 cup licorice ropes (cut into small pieces)
- 1/2 cup jelly beans (assorted colors)
- 1/4 cup candy eyeballs
- 1/4 cup dried apricots
- 1/4 cup roasted pumpkin seeds
- 6-8 small Halloween-themed cookies
- Decorative Halloween-themed props (e.g., fake spiders, mini pumpkins)
Instructions:
- Choose Your Board: Begin with a large wooden or slate board as your base. This will serve as the canvas for your candy arrangement. Confirm the board is clean and dry before use.
- Create a Focal Point: Start by placing a small bowl or dish in the center of the board. Fill this bowl with candy corn to create a focal point that draws attention.
- Arrange Candies by Type: Next, group candies by type around the central bowl. Place mini chocolate bars, gummy worms, and chocolate-covered pretzels in separate sections, ensuring there’s a mix of textures and flavors.
- Add Savory Elements: Incorporate the pumpkin spice almonds, roasted pumpkin seeds, and caramel popcorn in small clusters around the board. These elements add a savory contrast to the sweet candies.
- Fill in the Gaps: Use marshmallow ghosts, jelly beans, and licorice ropes to fill in any gaps on the board. This will confirm the board looks full and enticing.
- Include Decorative Elements: Add the decorative Halloween-themed props such as fake spiders and mini pumpkins to enhance the festive theme. These props are purely decorative and shouldn’t be consumed.
- Finish with Final Touches: Place the small Halloween-themed cookies and dried apricots sporadically across the board for added variety. Scatter candy eyeballs over the entire board for a spooky touch.
- Serve and Enjoy: Once everything is arranged to your liking, the board is ready to serve. Encourage guests to pick and choose their favorite treats.
Extra Tips:
When assembling your Spooky Sweet Symphony, keep in mind that color coordination can enhance the visual appeal. Try grouping candies of similar colors together to create an aesthetically pleasing pattern.
Additionally, consider adding a few small dishes of dipping sauces or melted chocolate for an extra layer of indulgence. If you’re preparing the board in advance, cover it with plastic wrap and store it in a cool, dry place to maintain freshness.
Finally, have fun with the arrangement—creativity is key to creating a memorable Halloween candy charcuterie board!
Haunted House of Treats
Step into the eerie atmosphere of Halloween with a spooky and delightful Haunted House of Treats Charcuterie Board. This festive board is an eclectic mix of sweet and sinister, perfect for a Halloween gathering of 4-6 people. Combining classic Halloween candies with some ghastly-themed treats, this board will surely captivate the eyes and taste buds of your guests.
The Haunted House of Treats isn’t just about the candy, but also the creative arrangement that brings the board to life, making it a focal point of your Halloween festivities.
The key to a successful candy charcuterie board lies in variety and presentation. To create an eye-catching display, consider a mix of colors, textures, and flavors. By incorporating traditional Halloween favorites like candy corn and chocolate, alongside unique finds such as gummy eyeballs and licorice spiders, you can craft a board that’s both visually enticing and deliciously satisfying.
Arranging the candies with a haunted house theme adds an element of fun and surprise, leaving your guests in awe of your creativity.
Ingredients (Serving Size: 4-6 people)
- 1 cup candy corn
- 1 cup mini chocolate bars (Snickers, Milky Way, or similar)
- 1 cup gummy worms
- 1 cup gummy eyeballs
- 1 cup licorice spiders
- 1 cup pumpkin-shaped candies
- 1 cup assorted jellybeans
- 1/2 cup chocolate-covered pretzels
- 1/2 cup sour candies (skulls or ghosts)
- 1/2 cup caramel popcorn
- 1/4 cup candy-coated chocolates (e.g., M&M’s)
- Decorative elements (small plastic spiders, mini pumpkins)
Cooking Instructions
- Prepare the Board: Start with a large, flat surface such as a wooden board or a platter. This will serve as the base for your haunted house theme. Confirm it’s clean and dry.
- Arrange the Base Layer: Begin by placing larger items like mini chocolate bars and pumpkin-shaped candies around the edges of the board. This will help form the ‘walls’ of your haunted house.
- Fill the Gaps: Add medium-sized treats such as gummy eyeballs, gummy worms, and licorice spiders. These should be placed strategically to fill any gaps and create intrigue.
- Add Smaller Candies: Sprinkle smaller candies like candy corn, assorted jellybeans, and candy-coated chocolates throughout the board. This will add pops of color and fill in any remaining spaces.
- Incorporate Themed Elements: Place sour candies shaped like skulls or ghosts, and chocolate-covered pretzels as pathways or spooky elements around your house.
- Finish with Caramel Popcorn: Scatter caramel popcorn across the board for added texture and a hint of sweetness. This also serves as a filler to balance the candy elements.
- Decorate with Props: Finally, enhance your haunted house theme by adding small decorative elements like plastic spiders or mini pumpkins. These can be interspersed between the candies for a thematic touch.
Extra Tips
To elevate your Haunted House of Treats, consider using a mix of store-bought and homemade candies for added variety and personal touch.
You can also use small dishes or cupcake liners to separate different types of candies, which can help in maintaining a clean presentation. Remember, symmetry isn’t necessary; a slightly chaotic, whimsical arrangement adds to the haunted theme.
Don’t forget to have fun with it – the more creative, the better!
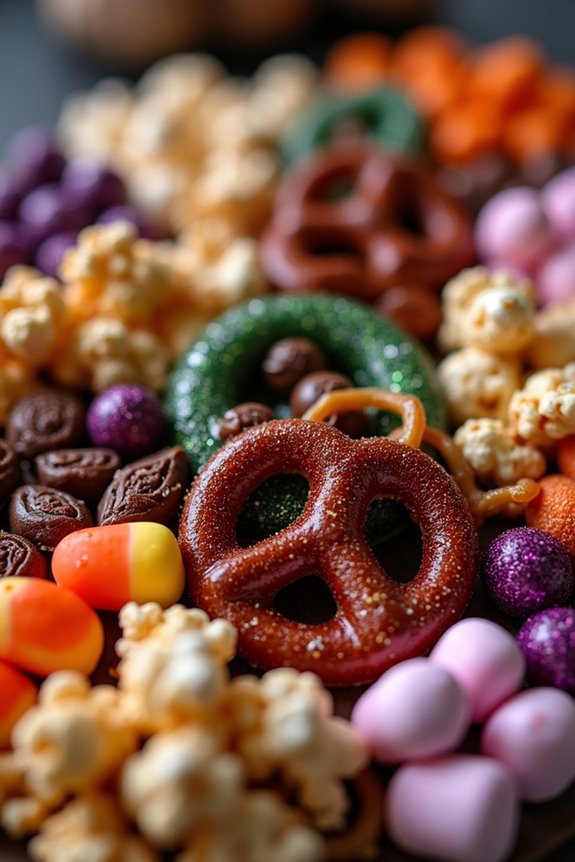
Wickedly Colorful Candyland
Imagine a vibrant, sweet escape to a land of candy where every color of the rainbow is brought together in a delightful array. The Wickedly Colorful Candyland Charcuterie Board is perfect for a Halloween gathering, offering a whimsical and spooky twist to the traditional charcuterie experience.
This board is a visual feast as much as it’s a treat for the taste buds, combining a variety of textures and flavors to keep your guests enchanted and entertained throughout the night.
Creating this candy charcuterie board involves curating a selection of Halloween-themed candies, seasonal treats, and colorful confections that will captivate both kids and adults alike. The goal is to create a harmonious, yet playful array of sweets that invite exploration and enjoyment.
Whether you’re hosting a small gathering or a larger party, this board serves 4-6 people and is sure to be the highlight of your Halloween celebration.
Ingredients (for 4-6 people)
- 1 bag of gummy worms
- 1 bag of assorted candy corn
- 1 bag of mini chocolate bars
- 1 bag of peanut butter cups
- 1 bag of jelly beans (mixed colors)
- 1 bag of sour gummy bears
- 1 packet of candy eyes
- 1 package of Halloween-themed cookies
- 1 package of marshmallows
- 1 small pumpkin or gourd (for decoration)
- 1 bag of lollipops
- 1 small bag of popcorn (optional)
Instructions
- Select Your Board: Begin by choosing a large wooden or slate board as the base. Confirm it’s clean and dry, offering ample space for the candy arrangement.
- Prepare the Base Layer: Arrange the larger items first. Place the Halloween-themed cookies and marshmallows in small clusters around the board, leaving space for other candies in between.
- Add the Candies: Begin adding the bags of candies. Place the gummy worms, sour gummy bears, and jelly beans in small piles, confirming an even distribution of color across the board. Scatter the mini chocolate bars and peanut butter cups in between for a mix of textures.
- Decorate with Candy Eyes: Use the candy eyes to add a spooky element. Randomly place them on top of the candies, making sure they peek out in a playful manner.
- Incorporate Seasonal Elements: Add the small pumpkin or gourd as a decorative centerpiece. It adds a natural element and ties the theme together.
- Finish with Lollipops and Popcorn: Place the lollipops around the edge of the board for easy access. If using popcorn, sprinkle it lightly across the board to add a crunchy texture.
- Final Touches: Step back and assess your board. Make minor adjustments to balance the colors and confirm there’s a variety on all sides.
Extra Tips
When arranging your Wickedly Colorful Candyland Charcuterie Board, consider the height and texture of each item. Varying the height of candies can add dimension and visual interest.
Use small bowls or ramekins for items like jelly beans or candy corn to contain them and prevent them from mixing too much. Additionally, remember to regularly check the board during your event to refill any depleted sections, keeping it appealing and inviting throughout the night.
Monster Mash-Up Medley
Introducing the Monster Mash-Up Medley, a Halloween candy charcuterie board that’s sure to be a hit at any spooky celebration! This playful and colorful assortment is designed to delight both the eyes and the taste buds, offering a fun and festive way to indulge in a variety of sweet treats.
The Monster Mash-Up Medley combines classic Halloween candies with a few unexpected additions, creating a delightful and whimsical display that will keep guests coming back for more. Perfect for a gathering of 4-6 people, this charcuterie board is versatile and easy to assemble, making it the ideal centerpiece for your Halloween festivities.
With a mix of gummy treats, chocolates, and other sweet surprises, the Monster Mash-Up Medley is both a feast for the senses and an opportunity to get creative with your candy presentation. Whether you’re hosting a Halloween party or just enjoying a cozy night in with friends and family, this charcuterie board is sure to bring a touch of ghoulish charm to your celebrations.
Ingredients:
- 1 cup assorted gummy worms
- 1 cup candy corn
- 1 cup mini chocolate bars (such as Snickers, Milky Way, or Kit Kat)
- 1 cup marshmallow ghosts or pumpkins
- 1/2 cup chocolate covered pretzels
- 1/2 cup Halloween-themed M&M’s
- 1/2 cup caramel popcorn
- 1/2 cup dried cranberries or raisins
- 1/2 cup jelly beans (preferably in Halloween colors)
- 1/2 cup mini peanut butter cups
- Optional: Edible candy eyes for decoration
Instructions:
- Prepare the Base: Start by selecting a large wooden or slate board as the base for your charcuterie display. This will serve as the canvas for your candy assortment.
- Arrange the Candies: Begin by placing the larger items, such as the mini chocolate bars and marshmallow ghosts or pumpkins, evenly across the board to create a balanced layout. This will form the foundation of your display.
- Fill in the Gaps: Next, add the smaller candies like gummy worms, M&M’s, and jelly beans around the larger items, making sure to distribute them evenly to create a visually appealing mix of colors and shapes.
- Add Variety: Incorporate the chocolate-covered pretzels, caramel popcorn, and dried cranberries or raisins into the display, placing them in small clusters around the board to add texture and contrast.
- Finalize the Presentation: Ultimately, sprinkle the candy corn and mini peanut butter cups throughout the board to fill in any remaining gaps. If desired, add edible candy eyes for an extra touch of Halloween flair.
- Serve and Enjoy: Once your Monster Mash-Up Medley is complete, place it on your serving table and enjoy the delighted reactions of your guests as they sample the assorted treats.
Extra Tips:
For an added layer of fun, consider incorporating themed decorations such as small plastic spiders or festive napkins to accompany your charcuterie board.
Additionally, using a variety of candy textures and flavors will keep your guests intrigued and satisfied with each bite. If you have leftover candies, store them in airtight containers to maintain their freshness for future snacking.
Finally, feel free to customize the candy selection based on personal preferences or dietary needs, ensuring everyone can enjoy the Halloween festivities.
Ghostly Gourmet Gathering

Creating a Ghostly Gourmet Gathering Halloween Candy Charcuterie Board is a fun and festive way to celebrate the spooky season. This deliciously eerie board combines a variety of sweet treats and candies, arranged artistically to delight both the eyes and the taste buds. Perfect for a Halloween party or a cozy night in with family and friends, this charcuterie board is certain to be a hit with ghosts and goblins of all ages.
The key to crafting the ultimate Halloween candy charcuterie board is diversity in flavors, textures, and colors. By mixing chocolates, gummies, hard candies, and some salty snacks, you create a balanced and visually appealing spread. This particular charcuterie board serves 4-6 people and can be customized to suit your preferences. Whether you prefer classic Halloween candies or want to incorporate some homemade treats, you can make this board your own spooky masterpiece.
Ingredients (serving size: 4-6 people):
- 1 cup of assorted mini chocolate bars (e.g., Snickers, Milky Way, Reese’s)
- 1 cup of gummy worms or gummy bears
- 1 cup of candy corn or candy pumpkins
- 1 cup of assorted hard candies (e.g., lollipops, Jolly Ranchers)
- 1/2 cup of pretzel sticks or pretzel twists
- 1/2 cup of popcorn (preferably caramel or lightly salted)
- 1/2 cup of marshmallow ghosts or pumpkins
- 1/2 cup of chocolate-covered nuts or raisins
- Small handful of Halloween-themed cookies or biscuits
- Optional: Edible glitter or Halloween-themed sprinkles for decoration
Cooking Instructions:
- Prepare Your Base: Start by selecting a large wooden or slate board as the canvas for your charcuterie. Verify it’s clean and dry before you begin arranging your candies.
- Place the Main Elements: Begin by placing the larger items on the board. Arrange the mini chocolate bars and gummy candies in separate sections to create a visually interesting layout.
- Add the Smaller Candies: Fill in the gaps between the larger items with candy corn, hard candies, and chocolate-covered nuts or raisins. This will add layers of texture and color to your board.
- Add Salty Elements: Scatter pretzel sticks and popcorn around the board. These salty snacks provide a nice contrast to the sweetness of the candies.
- Finish with Decorative Touches: Add marshmallow ghosts or pumpkins for a Halloween touch. Position any Halloween-themed cookies or biscuits strategically to enhance the festive feel.
- Optional Decorations: If desired, sprinkle edible glitter or Halloween-themed sprinkles over the board for an extra spooky flair.
Extra Tips:
When assembling your Ghostly Gourmet Gathering Halloween Candy Charcuterie Board, consider the visual balance and spacing of the items. Use contrasting colors to make the board pop, and remember that less is often more.
Don’t overcrowd the board; instead, leave some space around each section to make it easier for guests to pick their favorites. Feel free to adjust the ingredients based on dietary preferences or allergies, and have fun experimenting with different flavors and textures.
Finally, serve your charcuterie board alongside small plates and napkins, making it easy for your guests to indulge in the spooky spread.
Enchanted Forest Feast

Transport yourself to a whimsical world with the Enchanted Forest Feast, a Halloween candy charcuterie board that’s as visually enchanting as it’s delicious. Perfect for a spooky gathering or a cozy night in, this board combines the magic of the forest with the sweetness of Halloween candies.
With an array of textures and flavors, this candy board is sure to charm both adults and children alike. This charcuterie board is designed to serve 4-6 people and is a wonderful way to showcase creativity. It features a variety of candies and snacks that evoke the mystical elements of an enchanted forest.
From gummy worms that wiggle like forest creatures to chocolate truffles resembling enchanted stones, every bite takes you deeper into the magical woods.
Ingredients:
- 1 cup gummy worms
- 1 cup chocolate-covered almonds
- 1 cup mini marshmallows
- 1 cup assorted chocolate truffles
- 1/2 cup candy corn
- 1/2 cup green apple-flavored licorice ropes
- 1/2 cup rock candy sticks
- 1/2 cup pretzel sticks
- 1/4 cup edible glitter (optional)
- 1 cup assorted fruit-flavored gummy candies
- 1 wooden or bamboo serving board
Instructions:
- Prepare the Board: Begin by selecting a wooden or bamboo serving board for an organic, forest-like feel. Clean and dry the board thoroughly.
- Arrange the Base Layer: Lay down the pretzel sticks as the base of the forest floor, spreading them evenly across the board. This will create a nice crunchy texture and serve as a foundation for the other candies.
- Add the Forest Elements: Scatter the gummy worms and chocolate-covered almonds across the board, mimicking creatures and stones found in the forest. Place the rock candy sticks sporadically to resemble mystical crystals.
- Incorporate Sweet Details: Fill in the gaps with mini marshmallows to resemble fluffy forest clouds or mushrooms. Add the candy corn and fruit-flavored gummy candies to bring vibrant colors into the mix.
- Feature the Main Attractions: Position the assorted chocolate truffles in prominent spots on the board to act as enchanted stones or treasures hidden within the forest.
- Add Touches of Magic: If desired, sprinkle edible glitter over the entire board to add a magical sparkle, enhancing the enchanted theme.
- Finish with Licorice Ropes: Drape the green apple-flavored licorice ropes artistically across the board, representing vines or creeping forest plants.
Extra Tips:
When assembling your Enchanted Forest Feast, consider the visual appeal as much as the taste. Balance the colors and shapes to create a visually stimulating presentation.
To add an extra layer of mystique, use a dark-colored board or cover the serving area with a dark cloth to make the colors pop. Remember to keep the candies and snacks fresh by preparing the board shortly before serving.
If you’re expecting a larger group, simply double the ingredients to accommodate more guests. Enjoy the enchantment!
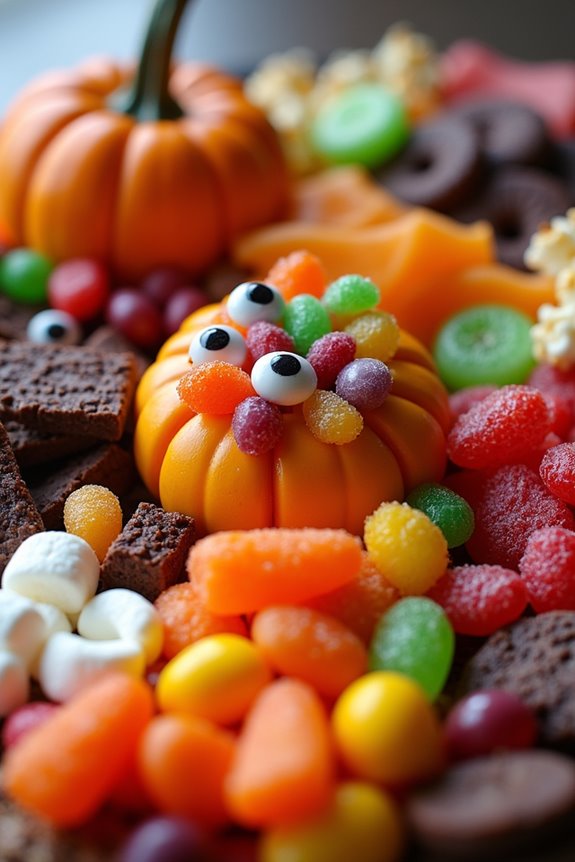
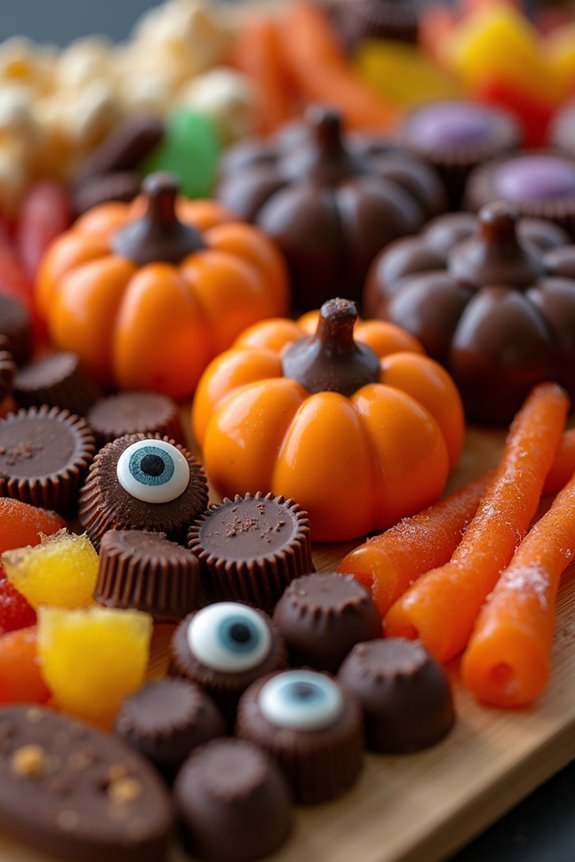
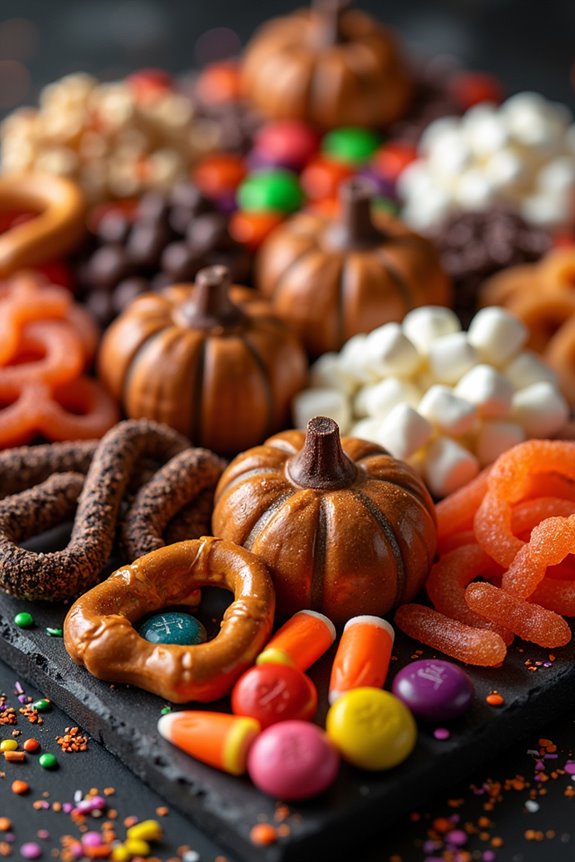
Pumpkin Patch Party
Celebrate Halloween with a Pumpkin Patch Party-themed candy charcuterie board that combines the festive spirit of the holiday with a delectable assortment of sweet treats. This board is filled with a colorful array of candies and snacks, artfully arranged to mimic a charming pumpkin patch scene. Perfect for Halloween gatherings, this candy board not only serves as a delightful centerpiece but also offers guests a variety of flavors and textures to enjoy.
Whether you’re hosting a party or simply want to create a fun and festive treat for your family, this candy charcuterie board is guaranteed to impress.
Creating a Pumpkin Patch Party candy charcuterie board is all about creativity and balance. Aim to include a mix of flavors—such as sweet, sour, and salty—and a variety of textures to keep things interesting. Use a large wooden board or tray as your canvas, and arrange your candies in clusters to represent different elements of a pumpkin patch, such as pumpkins, leaves, and even a scarecrow.
The key is to make it visually appealing and fun for guests to explore.
Ingredients (serves 4-6 people):
- 1 cup candy pumpkins
- 1 cup candy corn
- 1 cup chocolate-covered pretzels
- 1 cup gummy worms
- 1 cup Reese’s Pieces or M&Ms
- 1 cup caramel popcorn
- 1 cup mini marshmallows
- 1 cup assorted jelly beans
- 6-8 pieces of black licorice sticks
- 1 cup chocolate coins
- 1 cup wafer cookies
- 1 cup apple slices (optional for a fresh element)
Instructions:
- Select Your Board: Choose a large, flat wooden board or tray to serve as the base for your candy charcuterie. Confirm it’s clean and dry.
- Create a Focal Point: Place the candy pumpkins in the center of the board to act as the focal point of your pumpkin patch.
- Arrange the Candy Corn and Chocolate: Surround the candy pumpkins with a layer of candy corn and chocolate-covered pretzels, which will represent the soil of the pumpkin patch.
- Add Gummy Worms and Licorice: Scatter gummy worms throughout the board to mimic garden critters. Use black licorice sticks to create “fences” or “vines” around the patch.
- Distribute Small Candies: Fill in the gaps with Reese’s Pieces or M&Ms, caramel popcorn, and mini marshmallows for added color and texture.
- Introduce Variety with Jelly Beans and Wafer Cookies: Place assorted jelly beans in small clusters as additional “pumpkins” or decorations. Arrange wafer cookies to resemble pathways or borders.
- Finish with Chocolate Coins and Optional Apple Slices: Add chocolate coins around the edges for a touch of gold, and include apple slices for a fresh, crisp contrast if desired.
Extra Tips:
When assembling your candy charcuterie board, consider using small bowls or cups for some of the smaller candies to keep them contained and organized. This will also add height and dimension to your presentation.
Feel free to adjust the candies based on personal preference or dietary needs, such as using sugar-free options or including gluten-free snacks. Remember, the goal is to have fun and be creative, so don’t be afraid to experiment with different themes or color palettes to suit your Halloween celebration.
Trick-or-Treat Treasure Trove
Halloween is the perfect time to indulge in sweet treats and create a festive atmosphere, and what better way to do this than with a Trick-or-Treat Treasure Trove Halloween Candy Charcuterie Board? This delightful assortment of candies and snacks isn’t only visually appealing but also a fun way to enjoy a variety of flavors and textures.
Whether you’re hosting a Halloween party or just want to surprise your family with a spooky treat, this charcuterie board is certain to be a hit with both kids and adults alike.
Creating a Trick-or-Treat Treasure Trove is all about variety and creativity. By combining different types of candies, chocolates, and small snacks, you can create a colorful and irresistible display. The key is to mix different shapes, sizes, and colors to make the board visually appealing and to offer a wide range of flavors.
From gummy worms to chocolate bars, and candy corn to pretzel sticks, there’s something for everyone. So, gather your favorite Halloween candies and get ready to assemble a sweet masterpiece that will delight your guests.
Ingredients for Trick-or-Treat Treasure Trove (Serves 4-6):
- 1 cup gummy worms
- 1 cup candy corn
- 1 cup mini chocolate bars (assorted flavors)
- 1 cup chocolate-covered pretzels
- 1 cup peanut butter cups (mini)
- 1 cup caramel popcorn
- 1 cup spooky-themed marshmallows
- 1/2 cup jelly beans
- 1/2 cup licorice twists
- 1/2 cup candy pumpkins
- 1/2 cup assorted nuts (optional)
- Decorative Halloween-themed items (e.g., plastic spiders, small pumpkins)
Instructions:
- Prepare Your Workspace: Start by selecting a large wooden board or platter as the base for your charcuterie board. Verify it’s clean and dry. You might want to cover it with a piece of parchment paper if you’re concerned about sticky candies.
- Organize the Candies: Begin by placing the larger items like mini chocolate bars, peanut butter cups, and chocolate-covered pretzels on the board first. Spread them out to create a balanced look.
- Add Texture and Color: Fill in the gaps with smaller candies such as gummy worms, candy corn, and jelly beans. Aim to alternate colors and textures to make the board visually appealing.
- Add Salty Elements: Incorporate a savory element by adding caramel popcorn and assorted nuts around the candies. This will add a nice contrast to the sweetness of the candies.
- Finish with Thematic Decorations: Finish by placing spooky-themed marshmallows and candy pumpkins around the board. Add decorative Halloween-themed items like plastic spiders or mini pumpkins for an extra festive touch.
- Final Adjustments: Step back and look at your board to confirm it looks balanced and inviting. Adjust any items as needed to fill any empty spaces.
Extra Tips:
When creating your Trick-or-Treat Treasure Trove, consider the dietary preferences and allergies of your guests. You can offer a nut-free version by substituting nuts with extra candies or popcorn.
Additionally, feel free to customize the board with your favorite candies or seasonal specialties. Remember, the goal is to have fun and create a board that reflects the spooky spirit of Halloween!
To keep the candies fresh, assemble the board just before serving or cover it with plastic wrap if you need to prepare it in advance.
Bewitching Bites Bonanza
Get ready to dazzle your Halloween guests with a visually stunning and delightfully spooky Halloween Candy Charcuterie Board, perfect for a Bewitching Bites Bonanza! This creative and colorful platter is a playful twist on the traditional charcuterie board, designed to satisfy every sweet tooth with a selection of Halloween-themed candies and treats. The board is a perfect centerpiece for any Halloween party, filled with an assortment of candies, chocolates, and festive snacks that are sure to entice both children and adults alike.
To create this enchanted ensemble, you’ll need to gather a variety of candies and snacks that offer a mix of textures, flavors, and colors. Think along the lines of gummy worms, chocolate pumpkins, candy corn, and caramel popcorn—anything that evokes the spirit of the spooky season. Arranging these treats on a large wooden board or platter won’t only make it easy for guests to grab and go, but it will also serve as a striking visual display that complements your Halloween decor.
Here’s how you can create this bewitching masterpiece for a serving size of 4-6 people.
Ingredients:
- 1 cup candy corn
- 1 cup gummy worms
- 1 cup chocolate-covered pretzels
- 1 cup caramel popcorn
- 1 cup mini marshmallows
- 1 cup chocolate pumpkins or Halloween-themed chocolates
- 1 cup assorted Halloween-colored candies (e.g., M&M’s, Skittles)
- 1 cup chocolate eyeballs
- 1 cup ghost-shaped marshmallows
- 1 cup peanut butter cups
- 1 cup licorice twists (preferably black and orange)
- Small decorative pumpkins or Halloween-themed decorations (optional)
Instructions:
- Prepare Your Board: Choose a large wooden board or platter as your base. If you don’t have one, a large tray or even a clean tabletop can work. Confirm it’s clean and dry before you begin arranging the candies.
- Create a Focal Point: Start by placing the larger items like chocolate pumpkins or Halloween-themed chocolates in the center of the board to create a focal point. This will help anchor your design and make the arrangement more visually appealing.
- Arrange by Color and Texture: Gradually work your way out from the center, arranging similar colored candies together. For instance, place all the candy corn in one section, gummy worms in another, and so on. This helps create a cohesive look and makes it easier for guests to choose their favorites.
- Fill in the Gaps: Use smaller candies like M&M’s or Skittles to fill in any gaps between the larger items. This not only makes the board look fuller but also guarantees a mix of flavors in every section.
- Add Vertical Elements: For a touch of drama, consider adding vertical elements like licorice twists standing upright or small decorative pumpkins. These can add height and dimension to your board.
- Final Touches: Once all your candies are arranged, take a step back and make any necessary adjustments for balance and symmetry. If you have any Halloween-themed decorations, use them sparingly to enhance the board’s festive look.
Extra Tips:
To make your Candy Charcuterie Board even more delightful, consider adding a few non-candy elements like small bowls of nuts or dried fruits for those who prefer a less sweet option. Confirm that all your candies are fresh and check for any dietary restrictions among your guests, such as allergies to peanuts or gluten.
Feel free to get creative with your board; the more variety, the better! Finally, encourage your guests to take photos of your masterpiece—it’s bound to be the talk of the party.
Eerie Elegance Ensemble
Transform your spooky celebrations with the Eerie Elegance Ensemble, a Halloween candy charcuterie board that marries frightful fun with sophisticated flair. This unique culinary creation is perfect for gatherings with both the young and young-at-heart.
The board itself is a visual delight, featuring an array of candy treats artfully arranged to capture the essence of Halloween while offering a variety of textures and flavors to tantalize the taste buds.
To assemble this tantalizing treat, you’ll need to carefully select a variety of candies that not only taste delicious but also contribute to the overall theme. Think of candies in autumnal hues, ghostly whites, and jet blacks to create an eerie yet elegant display.
This board is a wonderful blend of sweet and spooky, with the potential to become the centerpiece of your Halloween festivities, serving 4-6 people.
Ingredients:
- 1 cup candy corn
- 1 cup chocolate-covered pretzels
- 1 cup gummy worms
- 1 cup mini marshmallows
- 1 cup assorted chocolate truffles
- 1 cup caramel popcorn
- 1/2 cup Halloween-themed cookies (such as ghost or pumpkin shapes)
- 1/2 cup candy eyeballs
- 1/2 cup black licorice twists
- 1/2 cup assorted fruit-flavored jelly beans
- 1/4 cup edible glitter or sprinkles (optional)
- 1 large wooden or slate board for serving
Instructions:
- Prepare Your Space: Begin by clearing a large, flat surface where you can comfortably arrange your candy board. Place your wooden or slate serving board in the center.
- Layering the Base: Start by placing a generous amount of candy corn and caramel popcorn across the board. These will act as the base and provide a pop of color and texture.
- Create the Focal Points: Position the chocolate truffles in small clusters around the board. These will act as focal points, adding a touch of elegance.
- Add Decorative Elements: Scatter the candy eyeballs and mini marshmallows throughout the board. These will add a spooky touch and break up the denser areas of candy.
- Include Gummy Elements: Arrange the gummy worms and black licorice twists in a serpentine pattern across the board to mimic eerie, crawling creatures.
- Place the Cookies: Position the Halloween-themed cookies in strategic spots to add character and thematic elements to the board.
- Fill the Gaps: Use the chocolate-covered pretzels and jelly beans to fill any gaps, ensuring a balanced distribution of colors and flavors.
- Add Final Touches: If using, sprinkle the edible glitter or sprinkles lightly over the top for an extra touch of magic.
Extra Tips:
When creating your Eerie Elegance Ensemble, consider the balance of flavors and textures—aim to have a mix of chewy, crunchy, and smooth candies.
Additionally, when planning your board, think about the visual impact of contrasting colors and shapes to maintain an engaging and festive presentation.
For an authentic feel, try to incorporate candies or treats that evoke nostalgia or are unique to the Halloween season.
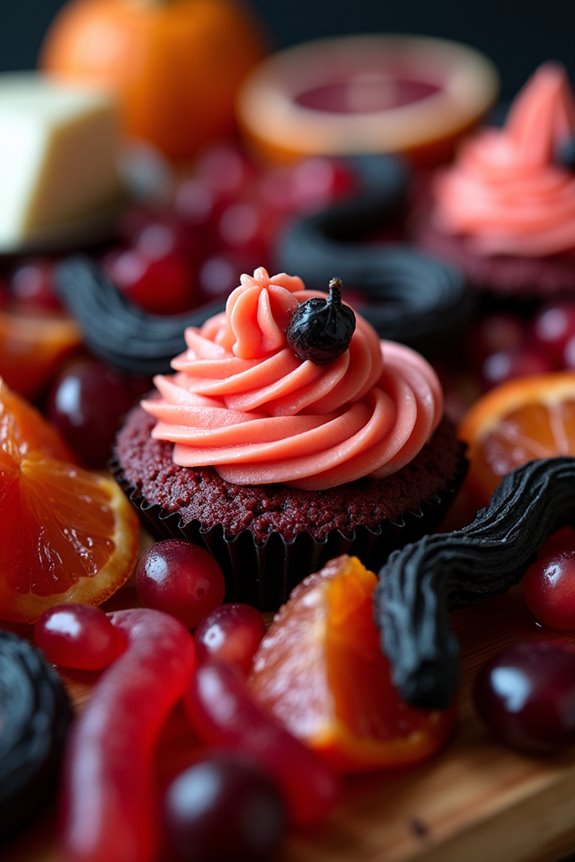
Vampy Vampires’ Delight
Creating a Halloween candy charcuterie board is a delightful and creative way to celebrate the spooky season. The Vampy Vampires’ Delight is a themed board that brings together a mix of sweet and eerie treats, perfect for a Halloween party or a family gathering. With a combination of vibrant colors and unique flavors, this board is sure to be a hit with both kids and adults.
The key to this charcuterie board is to balance a variety of candies and snacks that both look and taste delicious while maintaining the vampire theme. The Vampy Vampires’ Delight features a selection of red, black, and dark purple candies that mimic the classic vampire aesthetic. This board includes a range of textures and flavors—from chewy gummies to rich chocolates, guaranteeing an exciting experience for the palate.
By incorporating fruit, candy, and savory elements, this board achieves a harmonious blend of flavors while staying true to the eerie, gothic theme of vampires. Here’s how to put together this festive board for 4-6 people.
Ingredients:
- 1 cup black licorice twists
- 1 cup red gummy worms
- 1 cup cherry-flavored jelly beans
- 1 cup dark chocolate-covered almonds
- 1 cup red velvet mini cupcakes
- 1 cup grape-flavored lollipops
- 1 cup dried cranberries
- 1 cup blood orange slices
- 1 cup brie cheese, cut into small wedges
- 1 cup raspberry jam
- 1 cup salted pretzel sticks
- 1 cup pomegranate seeds
Instructions:
- Prepare the Board: Choose a large wooden or slate board as your base. Clean and dry it thoroughly to make sure it’s ready for the candy arrangement.
- Arrange the Base Elements: Start by placing small bowls or ramekins on the board. Fill them with raspberry jam and pomegranate seeds, as these will serve as the ‘bloody’ elements of the board.
- Add the Candies: Begin arranging the black licorice twists, red gummy worms, and cherry-flavored jelly beans around the bowls. Distribute them evenly to create a visually appealing pattern.
- Incorporate Chocolates and Cupcakes: Add the dark chocolate-covered almonds and red velvet mini cupcakes in clusters around the board. This will add both texture and richness to the display.
- Include Fruit and Cheese: Place the blood orange slices and brie cheese wedges strategically around the board. The fruit adds freshness, while the cheese offers a savory balance to the sweetness.
- Finish with Savory Elements: Scatter the salted pretzel sticks and dried cranberries across the board. These will provide a nice contrast to the sweet candies and a satisfying crunch.
- Garnish and Serve: As a final touch, garnish the board with grape-flavored lollipops. This adds height and whimsy to the arrangement. Serve the board immediately or cover it with plastic wrap until ready to serve.
Extra Tips:
When creating your Vampy Vampires’ Delight board, feel free to experiment with different candies and snacks that fit the color scheme and theme. You can swap out ingredients based on dietary preferences or availability.
Make sure the board has a mix of textures and flavors to keep things interesting for your guests. Pre-cutting the fruits and cheese will make it easier for guests to enjoy the board without any hassle. If you’re serving this outdoors, cover it with a mesh food cover to protect it from insects.
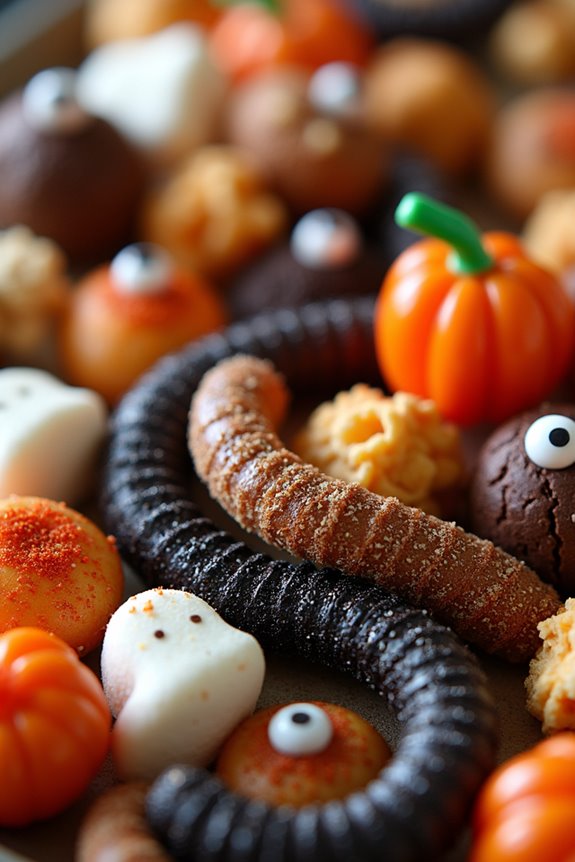
Creepy Crawly Confectionery

Create a spooktacular centerpiece for your Halloween party with a Creepy Crawly Confectionery Charcuterie Board. This festive and fun candy board is packed with eerie sweets and treats that delight both kids and adults. Ideal for serving 4-6 people, it brings together an assortment of candies, chocolates, and gummy critters to create an edible display that’s visually striking and deliciously satisfying.
The key to crafting a perfect Creepy Crawly Confectionery board is in the variety and placement of the treats. By mixing textures and flavors, and arranging them in an eye-catching manner, you’ll create a board that’s as much a treat for the eyes as it’s for the taste buds. Whether you’re hosting a Halloween bash or simply indulging in some spooky snacking, this charcuterie board will add a touch of eerie elegance to any gathering.
Ingredients for 4-6 people:
- 1 cup gummy worms
- 1 cup gummy spiders
- 1 cup chocolate-covered pretzels
- 1/2 cup candy corn
- 1/2 cup mini marshmallows
- 1/2 cup black licorice strings
- 1/2 cup peanut butter cups
- 1/2 cup mini chocolate bars
- 1/2 cup assorted jelly beans
- 1/2 cup pumpkin-shaped chocolates
- 1/2 cup eyeball gumballs
- 1/2 cup skittles or M&M’s
Instructions:
- Prepare Your Board: Choose a large, flat serving board or platter to arrange your candies. A wooden board works well and adds a rustic touch, perfect for the Halloween theme.
- Start with Large Items: Begin by placing the larger items like the chocolate-covered pretzels and mini chocolate bars around the board to create a base. This will help anchor the smaller candies and add visual interest.
- Add Gummy Critters: Next, scatter the gummy worms and spiders across the board. Try to intertwine them for a creepy, crawling effect.
- Fill in Gaps with Smaller Candies: Use the candy corn, mini marshmallows, and jelly beans to fill in the spaces between the larger items. This will create a colorful mosaic of treats.
- Arrange Themed Treats: Place thematic candies like the eyeball gumballs and pumpkin-shaped chocolates in prominent spots to draw the eye. These fun shapes add to the Halloween aesthetic.
- Incorporate Texture and Height: Add black licorice strings and stack peanut butter cups to add texture and height, giving the board a more dynamic appearance.
- Finish with a Splash of Color: Finally, sprinkle Skittles or M&M’s over the board to add a pop of color and tie everything together.
Extra Tips:
When creating your Creepy Crawly Confectionery board, consider the color palette of your candies. Try to balance darker tones like blacks and browns with bright pops of orange, green, and purple for a truly Halloween feel.
Additionally, keep in mind the flavors—mix sweet, sour, and salty treats to cater to various tastes. If you want to guarantee freshness, prepare the board a few hours before your event and cover it loosely with plastic wrap until you’re ready to serve.
Enjoy the process of arranging your candies, and remember that there are no hard rules—let your creativity shine!
Moonlit Magic Munchies
Transform your Halloween gathering into an enchanting experience with our Moonlit Magic Munchies Charcuterie Board. This whimsical display is a delightful mix of sweet and savory treats, crafted to captivate the eyes and taste buds alike.
Designed to serve 4-6 people, this board is perfect for an intimate gathering or a cozy family night. The blend of Halloween-themed candies and snacks creates a spellbinding spread that will leave your guests bewitched, making it an unforgettable part of your festive celebration.
The Moonlit Magic Munchies Charcuterie Board combines a variety of textures and flavors, from crunchy and salty to chewy and sweet. With a focus on thematic elements, such as moon-shaped candies, starry gummies, and mystical chocolates, this board is both a visual and culinary delight.
As you arrange these treats, let your creativity shine, drawing inspiration from the shimmering phases of the moon and the mysterious allure of the night sky. This recipe will guide you through the creation of a magical masterpiece that captures the spirit of Halloween.
Ingredients (serving size: 4-6 people):
- 1 cup of mini pretzels
- 1/2 cup of dried apricots
- 1/2 cup of mixed nuts (almonds, cashews, and walnuts)
- 1/2 cup of dark chocolate-covered almonds
- 1/2 cup of assorted gummy candies (preferably star and moon shapes)
- 1/2 cup of candy corn or mellowcreme pumpkins
- 1/2 cup of assorted chocolates (preferably wrapped in Halloween-themed foil)
- 1/2 cup of popcorn (lightly salted)
- 1/4 cup of marshmallow ghosts or pumpkins
- 1/4 cup of edible glitter or shimmer dust (optional for decoration)
- 1/4 cup of caramel sauce or chocolate sauce for drizzling
Instructions:
- Prepare the Base: Begin by selecting a large, flat serving board or platter. Confirm it’s clean and dry, as you’ll be arranging various candies and snacks on it. If desired, you can line the board with parchment paper for easier cleanup.
- Arrange the Items: Start by placing the larger items such as mini pretzels, popcorn, and mixed nuts in small clusters around the board. This will create a foundation for the other items and add height and variety to your layout.
- Add the Candies: Scatter the gummy candies, chocolates, and candy corn throughout the board. Try to distribute these items evenly to create a balanced look. Use the different shapes and colors to mimic a night sky filled with stars and a glowing moon.
- Incorporate the Dried Fruits: Tuck the dried apricots into any open spaces, adding both color and a chewy texture to the board. They also complement the sweetness of the candies and chocolates, providing a slight tartness.
- Final Touches: If using, sprinkle edible glitter or shimmer dust lightly over the entire board for a mystical, moonlit effect. Finally, drizzle caramel or chocolate sauce over one or two clusters of snacks to enhance their flavor and add a touch of indulgence.
- Serve and Enjoy: Present the board to your guests with small plates and napkins. Encourage everyone to mix and match the different elements for a personalized snacking experience.
Extra Tips:
For the Moonlit Magic Munchies Charcuterie Board, it’s all about balance and creativity. Feel free to substitute any candies or snacks based on personal preferences or dietary restrictions.
For a nut-free version, replace mixed nuts with pumpkin seeds or sunflower seeds. If you want to add a bit more protein, include slices of cured meats or cheese cubes.
Remember that the presentation is key, so play around with the arrangement until you achieve a visually appealing look. Keep the board out of direct sunlight or heat to prevent chocolates and gummies from melting.
Most importantly, have fun and let your imagination run wild as you create this magical snack board!
Ghoulishly Glitzy Goodies
Halloween is the perfect time to get creative with your treats, and a Ghoulishly Glitzy Goodies Charcuterie Board is an exciting way to offer a variety of sweets that embody the spooky spirit of the season. This board combines an array of candies, chocolates, and other treats, all artfully arranged to resemble a ghastly yet glamorous feast.
It’s an entertaining way to present Halloween snacks, offering something for everyone while looking like a masterpiece of culinary art. The key to a successful Ghoulishly Glitzy Goodies Charcuterie Board is diversity in flavors, colors, and textures. You’ll want to include a mix of sweet, sour, and savory elements, along with a variety of shapes and sizes to keep the board visually interesting.
The addition of edible glitter or metallic-colored candies can give the board that extra touch of glam that will dazzle your guests. It’s not just about the taste; it’s about creating an enchanting experience that embodies the essence of Halloween.
Ingredients (serving size: 4-6 people):
- 1 cup of assorted Halloween-themed gummies (bats, pumpkins, ghosts)
- 1 cup of chocolate-covered pretzels
- 1 cup of mini chocolate bars (variety pack)
- 1/2 cup of candy corn
- 1/2 cup of caramel popcorn
- 1/2 cup of assorted jelly beans
- 1/4 cup of edible glitter
- 1/4 cup of metallic-colored dragées or sugar pearls
- 1/2 cup of yogurt-covered raisins
- 1/2 cup of spooky marshmallow shapes
- 1/4 cup of licorice twists
- 1/2 cup of sour gummy worms
Cooking Instructions:
- Prepare the Base: Begin by selecting a large, flat serving board or platter. This will be the canvas for your charcuterie masterpiece. Make sure it’s clean and dry before you start arranging your treats.
- Arrange Larger Items: Start with the larger items such as the chocolate-covered pretzels, mini chocolate bars, and caramel popcorn. Place these items in clusters around the board to create a base layer.
- Add Texture and Color: Next, add the medium-sized items like the Halloween-themed gummies, yogurt-covered raisins, and sour gummy worms. Distribute these evenly across the board, filling in gaps and adding texture.
- Fill with Smaller Treats: Use the smaller items such as candy corn, jelly beans, and licorice twists to fill in any remaining spaces. This will add pops of color and a variety of shapes to the board.
- Add the Glitzy Touch: Sprinkle the edible glitter over the board for a magical, shimmering effect. Then, scatter the metallic-colored dragées or sugar pearls across the top for a touch of elegance.
- Final Touches: Finally, position the spooky marshmallow shapes strategically on the board for a festive touch. These can be placed on top of clusters or used to border certain sections of the board.
Extra Tips:
When assembling your Ghoulishly Glitzy Goodies Charcuterie Board, consider using a mix of flavors that appeal to different palates. Balance the sweetness with some salty elements like the pretzels to keep the board interesting.
Feel free to adjust the quantities and ingredients based on your guests’ preferences and any dietary restrictions. To keep the board looking fresh, assemble it shortly before your event begins, and store any leftover candies in an airtight container to maintain their texture and taste.
Fright Night Flavor Fest
Get ready to thrill your guests with this spooky and sweet Halloween Candy Charcuterie Board, aptly named the Fright Night Flavor Fest. This delightful setup is perfect for a Halloween party or a cozy night in with family or friends. With a combination of candies, chocolates, and themed treats, this board will satisfy every sweet tooth and add an eerie touch to your evening.
The vibrant colors and varied textures will make it as pleasing to the eyes as it’s to the palate. The Fright Night Flavor Fest is designed to serve 4-6 people, making it an ideal centerpiece for your Halloween celebration.
The key to a successful candy charcuterie board is variety, so feel free to get creative with the selection. Choose a mix of flavors, shapes, and sizes to keep things interesting, and make sure to include a few classic Halloween favorites. Whether you’re hosting a party or simply enjoying a festive movie night, this candy board is sure to be a hit.
Ingredients:
- 1 cup candy corn
- 1 cup gummy worms
- 1 cup chocolate-covered pretzels
- 1 cup miniature peanut butter cups
- 1 cup assorted Halloween-themed chocolates (e.g., Halloween M&M’s or chocolate pumpkins)
- 1 cup caramel popcorn
- 1 cup spooky-shaped marshmallows
- 1 cup jelly beans
- 1 cup licorice ropes
- 1 cup sour candies (such as sour gummy bats or sour patch kids)
- Optional: 1/4 cup edible glitter or sprinkles for decoration
Instructions:
- Select Your Board: Begin by choosing a large, flat serving board or platter. This will be your canvas for arranging the candies.
- Create a Focal Point: Place a small bowl or decorative piece in the center of the board. This could hold smaller items like jelly beans or can serve as a decorative centerpiece.
- Arrange the Candies: Start by placing the larger items like chocolate-covered pretzels and caramel popcorn around the board. This creates a foundation and helps to fill the space.
- Add Variety and Color: Distribute the candies around the board, making sure to mix colors and types for visual appeal. For instance, place the candy corn in small piles at different points on the board, and scatter the gummy worms in a way that looks like they’re slithering.
- Fill in the Gaps: Use smaller candies like jelly beans and sour candies to fill in any gaps on the board. This will add texture and make the board look full and abundant.
- Add Final Touches: Sprinkle edible glitter or sprinkles over the board for extra sparkle. You can also add small Halloween decorations like plastic spiders or eyeball candies to enhance the spooky theme.
Extra Tips:
When creating your Fright Night Flavor Fest board, consider the balance of flavors. Including a mix of sweet, sour, salty, and chocolatey treats will cater to different taste preferences.
Be mindful of any potential allergens if you’re serving guests; for example, label any items that contain nuts. Finally, make sure that all candies are unwrapped and ready to eat for a seamless snacking experience. Enjoy your Halloween festivities with this delicious and creative candy charcuterie board!