

Halloween is the perfect time to let your creativity shine, especially when it comes to crafting eye-catching charcuterie boards. Picture a Spooky Spider Web Board with black charcoal cheese paired with prosciutto or a Haunted Harvest Selection adorned with figs and seasonal cheeses. These boards are not just delicious; they set the perfect eerie mood for your gathering. Let’s explore how to create these spine-tingling displays that are sure to impress your guests. Get ready to balance the spooky with the scrumptious.
Spooky Spider Web Board
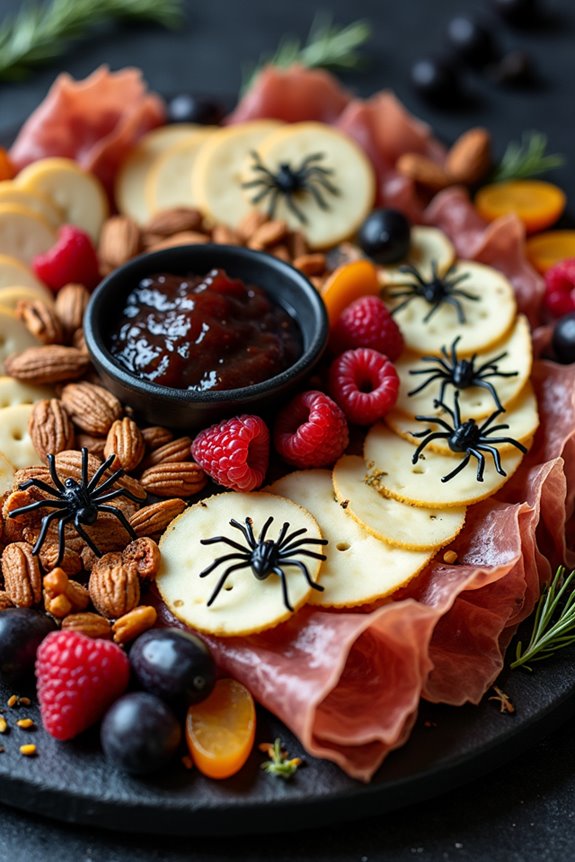
Create a hauntingly delicious centerpiece for your Halloween festivities with the Spooky Spider Web Board. This charcuterie board isn’t only a treat for the taste buds but also a feast for the eyes, making it an ideal addition to any Halloween party spread. By incorporating a variety of cheeses, cured meats, snacks, and fruits, you’ll craft a flavorful and visually striking display that resembles a spooky spider web.
To construct this eerie masterpiece, we’ll assemble an assortment of dark and moody elements that evoke the essence of Halloween. From creepy crackers and ghoulish garnishes to spectral spreads, this board will cater to a serving size of 4-6 people, guaranteeing everyone has a chance to indulge in the spooky spirit. Follow the instructions below to bring this charcuterie creation to life.
Ingredients (for 4-6 people):
- 8 ounces of black charcoal cheese or any dark-colored cheese
- 8 ounces of white cheddar cheese
- 4 ounces of prosciutto
- 4 ounces of salami
- 1 cup of mixed olives (black and green)
- 1 cup of black grapes
- 1 cup of raspberries
- 1/2 cup of dried apricots
- 1/2 cup of roasted mixed nuts
- 1/2 cup of dark chocolate-covered almonds
- 1/2 cup of pretzel sticks
- 1 jar of fig jam
- 1 package of assorted crackers
- 1 package of mini breadsticks
- Fresh rosemary sprigs for garnish
- Edible plastic spider decorations
Instructions:
- Prepare the Base: Choose a large wooden board or platter as the base for your charcuterie. Ascertain it has enough space to accommodate all the ingredients while allowing for a visually appealing arrangement.
- Arrange the Cheese: Slice the black charcoal cheese and white cheddar cheese into thin, bite-sized pieces. Place the cheeses in alternating colors around the outer edge of the board to create a contrast, resembling the structure of a spider web.
- Add Meats: Fold the prosciutto and salami into small, decorative shapes and place them alongside the cheeses. Position them in small clusters to create visual interest and balance the board.
- Incorporate Fruits and Nuts: Scatter the black grapes and raspberries in small bunches across the board. Add the dried apricots and roasted mixed nuts in between the fruit for a pop of color and texture.
- Include Snacks: Position the pretzel sticks, dark chocolate-covered almonds, and mini breadsticks at various points on the board. This will add both crunch and sweetness, enhancing the board’s overall appeal.
- Add Condiments and Garnishes: Place a small bowl of fig jam on the board for guests to pair with the cheeses and meats. Decorate the board with fresh rosemary sprigs for a touch of greenery and an aromatic element.
- Create the Spider Web Effect: Arrange the assorted crackers in a circular pattern, mimicking the strands of a spider web. Finally, scatter edible plastic spider decorations across the board to enhance the spooky theme.
Extra Tips:
To make your Spooky Spider Web Board even more visually striking, consider using a black tablecloth or serving tray to amplify the eerie effect. You can also experiment with different types of dark-colored cheeses, such as aged Gouda or blue cheese, to add depth to the flavor profile.
For an added touch of Halloween spirit, consider using themed cookie cutters to shape your cheeses or meats. Remember, the key to a successful charcuterie board is balance, so aim to incorporate a variety of textures and flavors to keep your guests intrigued and satisfied.
Haunted Harvest Selection
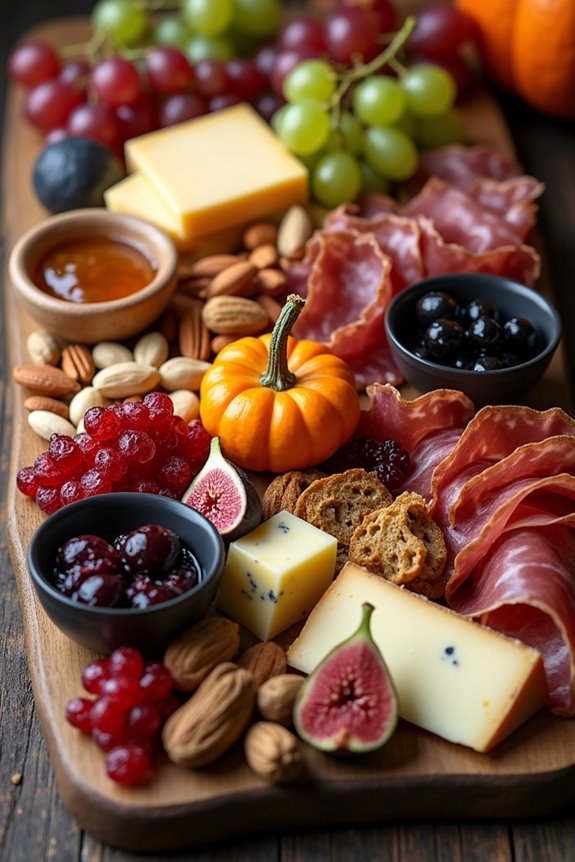
Immerse yourself in the spirit of Halloween with a Haunted Harvest Selection Charcuterie Board that’s both a visual and flavorful treat. This board features a delightful mix of seasonal ingredients that pay homage to the spooky season while satisfying your taste buds. Perfect for a gathering of 4-6 people, this charcuterie board combines the eerie charm of Halloween with the rustic flavors of a fall harvest.
This board is designed to be a feast for the senses, with a balance of sweet, salty, and savory elements. The vibrant colors and textures will captivate your guests, while the delicious array of cheeses, meats, fruits, and nuts will keep them coming back for more. Whether you’re hosting a Halloween party or just enjoying a cozy night in, this Haunted Harvest Selection will be a standout centerpiece on your table.
Ingredients (serving size: 4-6 people):
- 8 ounces of aged cheddar cheese
- 8 ounces of blue cheese
- 8 ounces of smoked gouda
- 8 ounces of prosciutto
- 8 ounces of salami
- 1 cup of dried apricots
- 1 cup of dried cranberries
- 1 cup of mixed nuts (almonds, walnuts, pecans)
- 1 small bunch of red grapes
- 1 small bunch of green grapes
- 1 cup of black olives
- 1 cup of green olives
- 6-8 fresh figs, halved
- 1 small pumpkin or gourd (for decoration)
- 1 loaf of artisan bread or assorted crackers
- Honey and fig jam for dipping
Instructions:
- Prepare the Cheese and Meats: Begin by slicing the cheese into bite-sized cubes or wedges. Roll the prosciutto and slice the salami. Arrange these on the board, making sure they’re spread out to allow easy access for guests.
- Arrange the Fruits and Nuts: Place the red and green grapes on opposite sides of the board to balance the color. Add the dried apricots and cranberries in small piles around the cheeses. Sprinkle the mixed nuts in any remaining gaps, making sure there’s a variety of textures across the board.
- Add the Olives and Figs: Fill small bowls with black and green olives, placing them on the board. Halve the figs and distribute them evenly across the board to add a splash of color and freshness.
- Decorate with Pumpkin or Gourd: Place a small pumpkin or gourd in the center of the board to enhance the Halloween theme. This serves as both a decorative and thematic element.
- Include Bread and Spreads: Slice the artisan bread or arrange crackers around the edges of the board. Provide small bowls of honey and fig jam for guests to use as spreads.
- Final Touches: Confirm everything is evenly distributed and that there’s a good mix of colors and textures. Adjust as necessary to create a visually appealing arrangement.
Extra Tips:
To enhance the Halloween theme, consider adding a few decorative elements like fake spiders or cobwebs to the table around the board.
Experiment with different cheeses and meats to suit your taste preferences or dietary restrictions. If possible, prepare the board a couple of hours in advance to allow the flavors to meld together, but be sure to cover it with plastic wrap to keep it fresh.
Finally, remember to provide small plates and napkins for guests to easily enjoy the assortment without making a mess.
Witch’s Brew Cheese Platter
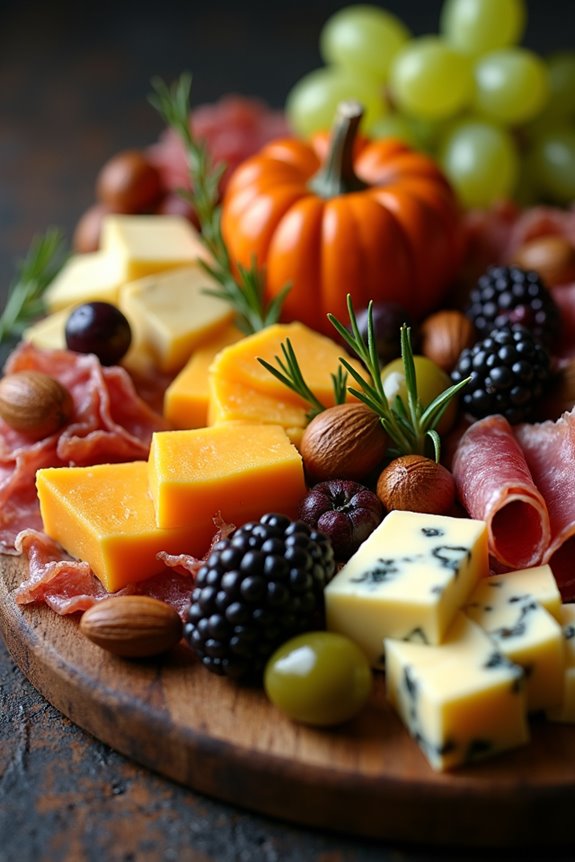
Immerse yourself in the spooky and delicious world of Halloween with the Witch’s Brew Cheese Platter. This creative charcuterie board is perfect for a Halloween party or a cozy gathering at home. It combines a variety of cheeses, meats, fruits, and snacks, all presented in a fun, eerie style that will delight your guests. With a mix of textures and flavors, this platter will surely cast a spell on everyone who takes a bite.
The Witch’s Brew Cheese Platter isn’t just about taste, but also about presentation. The key is to arrange the ingredients to create a spooky scene that evokes the mysterious ambiance of a witch’s cauldron. From bright green grapes to dark chocolate-covered almonds, each element is carefully chosen to fit the Halloween theme. This recipe serves 4-6 people, guaranteeing there’s enough for everyone to enjoy.
Ingredients:
- 200g aged cheddar cheese
- 200g brie cheese
- 200g blue cheese
- 150g salami slices
- 150g prosciutto slices
- 1 cup green grapes
- 1 cup blackberries
- 1/2 cup dried apricots
- 1/2 cup dark chocolate-covered almonds
- 1/2 cup green olives
- 1/2 cup pickles
- 1 small pumpkin or decorative gourd
- 1 package of assorted crackers
- Fresh rosemary and thyme sprigs for garnish
Instructions:
- Prepare the Base: Start by selecting a large wooden board or platter as your base. This gives you ample space to arrange your ingredients and also adds a rustic, witchy feel to the presentation.
- Slice the Cheeses: Cut the aged cheddar and blue cheese into bite-sized cubes, and slice the brie into wedges. Arrange these cheeses in separate sections on the board, leaving space between each type for other ingredients.
- Add the Meats: Fold the salami and prosciutto slices into quarters and place them in piles next to the cheeses. This not only saves space but also adds height and texture to your board.
- Place the Fruits: Scatter the green grapes and blackberries around the board, filling in gaps between the cheese and meat. Try to keep them in small clusters to create a more organic, natural look.
- Include the Snacks: Next, add the dried apricots, dark chocolate-covered almonds, green olives, and pickles. Position these items in small piles or bowls around the board to add variety and color.
- Add Decorative Elements: If using a small pumpkin or decorative gourd, place it in one corner of the board as a centerpiece. Surround it with sprigs of fresh rosemary and thyme to enhance the visual appeal.
- Finish with Crackers: Finally, arrange the assorted crackers around the edge of the board, allowing guests to easily grab them. You can also place a few crackers in the center if space allows.
Extra Tips:
When preparing the Witch’s Brew Cheese Platter, consider the order in which you place the ingredients. Start with the largest items, like the cheeses and meats, then fill in with smaller items such as fruits and snacks. This method guarantees a balanced presentation.
Use a variety of shapes and colors to create visual interest, and don’t be afraid to get creative with your arrangement. Ultimately, if you have any leftover ingredients, store them in airtight containers to preserve their freshness for later use. Enjoy crafting this enchanting platter and sharing it with friends and family!
Ghastly Ghost Crackers
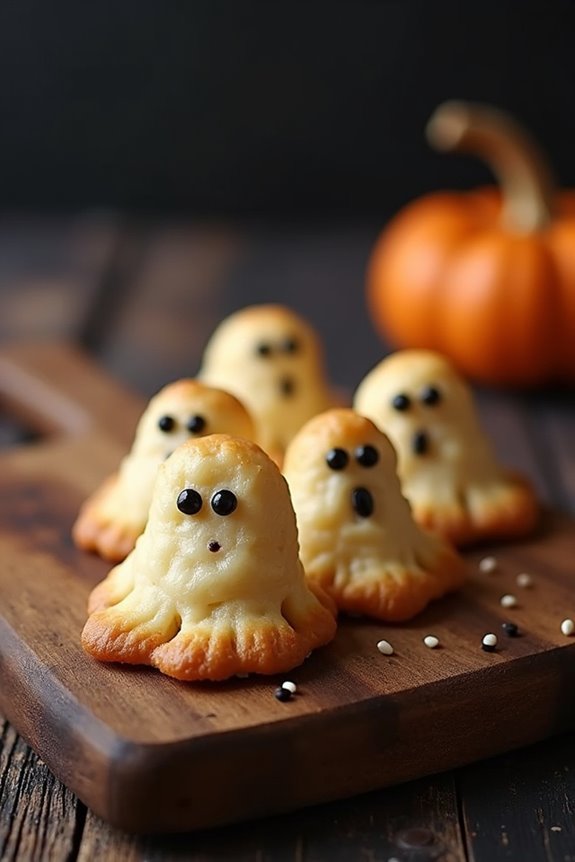
As Halloween approaches, it’s the perfect time to get creative with your snacks. Ghastly Ghost Crackers are a spooktacular addition to your Halloween charcuterie board. These whimsical, ghost-shaped crackers aren’t only fun to make but also delicious to eat. They’re perfect for adding a touch of haunt to your Halloween spread and are sure to delight both kids and adults alike.
Ghastly Ghost Crackers are made using simple ingredients you likely already have in your pantry. The key to these crackers is shaping them into ghostly figures and adding a sprinkle of spooky flair. This recipe serves 4-6 people, making it ideal for a small gathering or family snack time. Serve them alongside cheeses, meats, or dips for a complete charcuterie experience.
Ingredients:
- 1 1/2 cups all-purpose flour
- 1/2 teaspoon baking powder
- 1/2 teaspoon salt
- 1/2 teaspoon garlic powder
- 1/4 teaspoon onion powder
- 1/4 cup cold unsalted butter, cubed
- 1/2 cup cold water
- Black sesame seeds (for eyes)
Cooking Instructions:
- Prepare the Dough: In a large mixing bowl, combine the all-purpose flour, baking powder, salt, garlic powder, and onion powder. Whisk these dry ingredients together until well mixed.
- Incorporate Butter: Add the cubed cold butter into the flour mixture. Using a pastry cutter or your fingers, blend the butter into the flour until the mixture resembles coarse crumbs.
- Add Water: Gradually add cold water to the flour and butter mixture, stirring with a fork until a dough forms. The dough should be slightly sticky but manageable.
- Chill the Dough: Wrap the dough in plastic wrap and refrigerate it for at least 30 minutes. This will make it easier to roll out and shape.
- Preheat the Oven: Preheat your oven to 375°F (190°C) and line two baking sheets with parchment paper.
- Roll Out the Dough: On a lightly floured surface, roll out the dough to about 1/8-inch thickness.
- Cut Ghost Shapes: Using a ghost-shaped cookie cutter, cut out ghost shapes from the dough. Place the ghost shapes onto the prepared baking sheets.
- Add Eyes: Press two black sesame seeds onto each ghost cracker to create eyes.
- Bake the Crackers: Bake in the preheated oven for 10-12 minutes or until the edges start to turn golden brown. Keep an eye on them to avoid over-baking.
- Cool and Serve: Once baked, allow the crackers to cool on a wire rack. Serve them on your Halloween charcuterie board with an assortment of cheeses and meats.
Extra Tips:
For an extra spooky touch, consider brushing the crackers with a little olive oil before baking and sprinkling with a pinch of sea salt.
If you don’t have a ghost-shaped cutter, you can use a knife to create ghost shapes freehand. Additionally, these crackers can be made a day in advance and stored in an airtight container. They’ll keep their crunch and spooky charm, making them convenient for pre-party preparations.
Frightening Fruit Medley
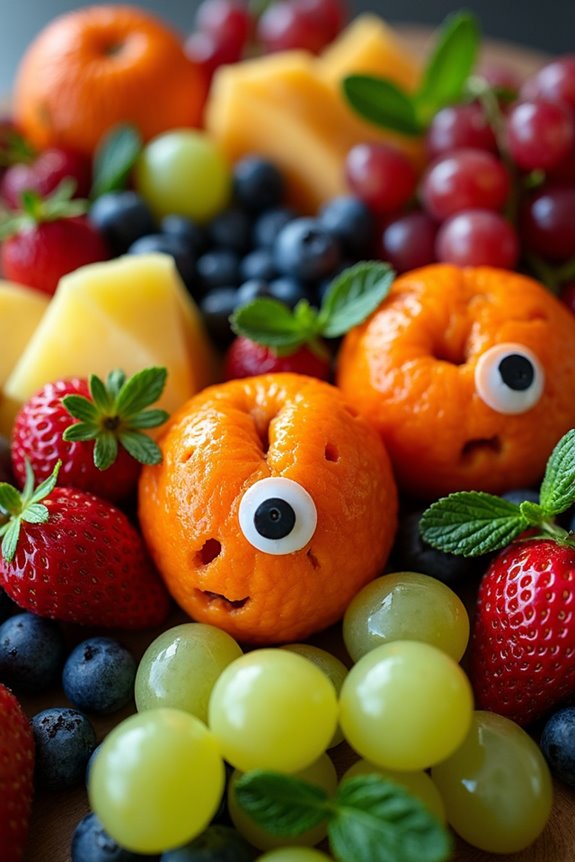
Get ready to spook your guests with a Frightening Fruit Medley, the perfect addition to your Halloween charcuterie board. This dish combines a variety of fruits arranged in a fun and festive way to bring a pop of color and a healthy twist to your holiday spread. The combination of fresh, seasonal fruits paired with a touch of creativity makes this medley both delicious and visually appealing.
Crafting this Frightening Fruit Medley is as enjoyable as it’s rewarding. The key lies in the selection of fruits that are both vibrant in color and diverse in flavor, ensuring each bite is as tantalizing as the last. The medley is enhanced by adding a few spooky elements like carved fruit shapes and creative placements, making it a standout centerpiece for any Halloween gathering.
Ingredients for 4-6 people:
- 1 medium-sized honeydew melon
- 1 small cantaloupe
- 1 pint of strawberries
- 1 bunch of green grapes
- 1 bunch of black grapes
- 2 oranges
- 1 small pineapple
- 1 cup of blueberries
- Edible eyes (store-bought or homemade)
- 1 lemon (for juice)
- Fresh mint leaves (for garnish)
Instructions:
- Prepare the Fruits:
- Wash all the fruits thoroughly under cold water.
- Cut the honeydew melon and cantaloupe in half, then scoop out the seeds. Use a melon baller to create small, round fruit balls from the flesh. Set them aside.
- Hull the strawberries and slice them in half lengthwise. Keep a few whole for decoration.
- Separate the grapes from the stems, keeping them in clusters for easy serving.
- Carve the Pineapple and Oranges:
- Peel and core the pineapple, then cut it into bite-sized chunks.
- Slice the oranges into rounds, then cut small triangles along the edges to create a jack-o’-lantern look. Arrange them for visual appeal.
- Assemble the Medley:
- Arrange the honeydew and cantaloupe balls, strawberries, grapes, and pineapple chunks on a large platter or serving board.
- Place the orange slices strategically to add a pop of color and a festive touch.
- Scatter blueberries throughout the board for contrast and flavor.
- Add Spooky Touches:
- Insert edible eyes into various fruits to create a spooky effect. Use a dab of lemon juice as adhesive if necessary.
- Garnish the entire board with fresh mint leaves for added fragrance and color.
- Final Touches:
- Squeeze the lemon over the fruits lightly to keep them fresh and vibrant.
- Serve immediately or cover tightly with plastic wrap and refrigerate until ready to serve.
Extra Tips:
For an even more ghoulish display, consider using small cookie cutters to carve out ghost or bat shapes from thin slices of melon or pineapple.
To prevent the fruits from browning, especially when preparing in advance, always squeeze a bit of lemon juice over the cut surfaces.
Additionally, when assembling the charcuterie board, try to balance the colors and textures by alternating between the different fruits to make the presentation more appealing.
This dish isn’t only a feast for the eyes but also a treat for the taste buds, perfect for both kids and adults at your Halloween party.
Phantom Meat Arrangement
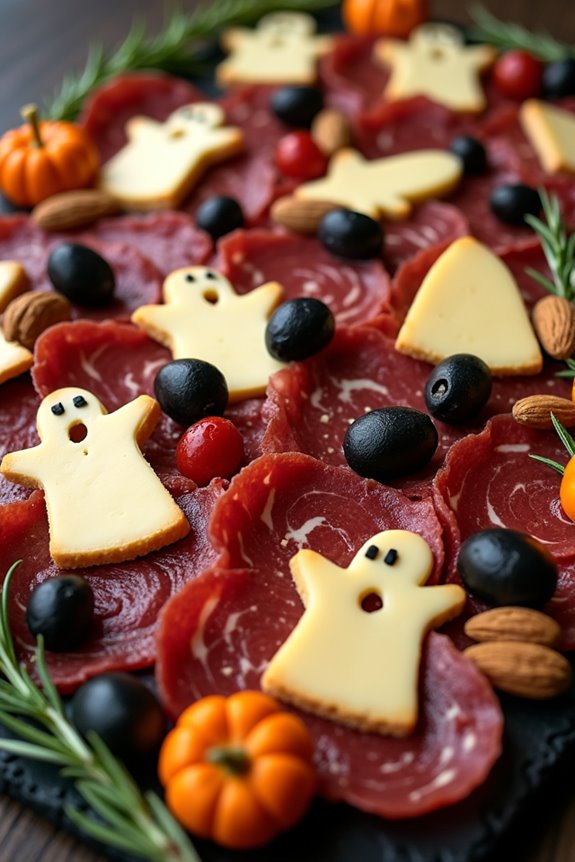
Get into the Halloween spirit with this spooky and delicious Phantom Meat Arrangement, a charcuterie board that’s sure to be the centerpiece of your next festive gathering. This eerie yet appetizing display combines a variety of cured meats, cheeses, and creative garnishes to create a ghostly presentation. Perfect for 4-6 people, this dish will allure both the eyes and the taste buds, making it a memorable treat for your Halloween festivities.
The Phantom Meat Arrangement is an artful assembly of flavors and textures. By carefully selecting meats such as prosciutto, salami, and chorizo, and pairing them with an assortment of cheeses and eerie embellishments like black olives, dried figs, and ghostly crackers, you can craft a visual feast that captures the essence of Halloween.
The key is in the presentation—using cookie cutters to create ghost shapes and arranging the items to mimic a haunting scene will guarantee your guests are enchanted by both the look and the flavors of this charcuterie board.
Ingredients for Phantom Meat Arrangement (serving size: 4-6 people):
- 100g prosciutto
- 100g salami
- 100g chorizo
- 150g cheddar cheese
- 150g brie cheese
- 150g blue cheese
- 1 cup black olives
- 1 cup dried figs
- 1/2 cup almonds
- 1/2 cup walnuts
- Assorted crackers (ghost-shaped if possible)
- Fresh rosemary sprigs for garnish
- Halloween-themed cookie cutters (ghosts, bats)
- Small pumpkins or gourds for decoration
Cooking Instructions:
- Prepare the Meats: Start by thinly slicing the prosciutto, salami, and chorizo. If the meats aren’t pre-sliced, use a sharp knife to guarantee even, thin slices for easy layering.
- Shape the Cheeses: Use Halloween-themed cookie cutters to cut the cheddar cheese into ghost or bat shapes. Slice the brie and blue cheese into bite-sized pieces that are easy to pick up with a toothpick.
- Arrange the Meats: On a large wooden board or platter, begin by arranging the prosciutto, salami, and chorizo in overlapping rows or spirals. This will create a base for your charcuterie board.
- Add the Cheese and Olives: Place the shaped cheddar cheese around the board to create visual interest. Add the brie and blue cheese in small clusters. Scatter black olives in between the meats and cheeses to add a dark, mysterious touch.
- Incorporate the Garnishes: Fill in the spaces with dried figs, almonds, and walnuts. These won’t only add texture but also complement the flavors of the meats and cheeses.
- Finalize with Crackers and Decor: Arrange the ghost-shaped crackers around the perimeter of the board. Garnish with fresh rosemary sprigs for a touch of color and aromatic flair. Add small pumpkins or gourds for additional decoration.
Extra Tips:
For an extra spooky effect, consider using a black slate board as the base for your Phantom Meat Arrangement to make the colors pop. Be mindful of food pairings; for instance, the sweetness of dried figs pairs well with blue cheese, while the saltiness of olives complements the creamy brie.
Serve with a selection of mustards or chutneys on the side for added flavor. Finally, verify all items are bite-sized for easy snacking, allowing guests to enjoy each element without the need for utensils.
Bewitching Breadsticks
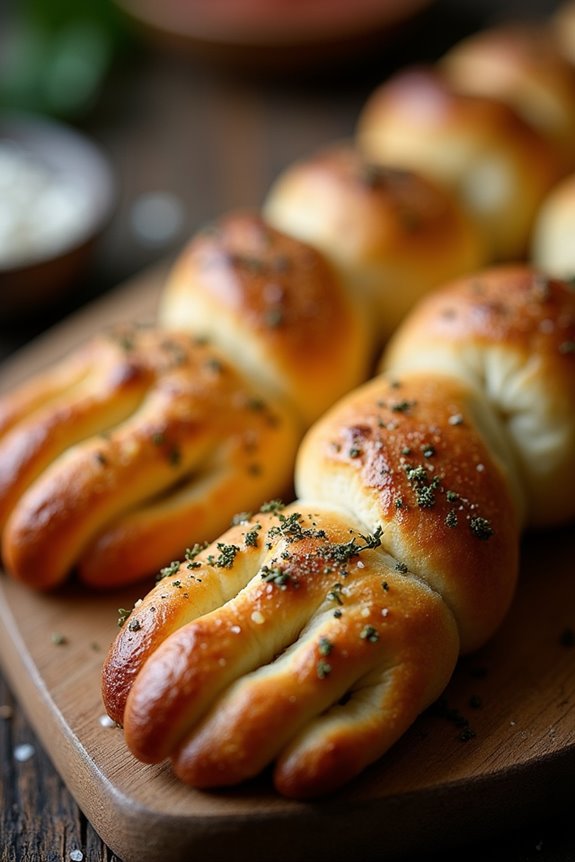
Release your inner witch this Halloween with these delightfully spooky Bewitching Breadsticks, a perfect addition to your Halloween charcuterie board. These breadsticks aren’t only easy to make but also a fun way to add a touch of whimsy and spookiness to your festivities. Shaped like witchy fingers and flavored with a hint of garlic and herbs, they’re sure to be a hit among both kids and adults.
Whether you’re hosting a party or simply enjoying a cozy night in, these breadsticks offer a unique twist on a classic snack. The Bewitching Breadsticks are crafted using a simple bread dough that’s shaped into eerie finger-like forms and then baked to golden perfection. The addition of almond slices as fingernails adds an extra creepy touch, making these breadsticks not just a treat for the taste buds but also a visual delight.
With a serving size suitable for 4-6 people, this recipe guarantees that everyone can enjoy a taste of Halloween magic.
Ingredients for Bewitching Breadsticks (serving size: 4-6)
- 2 cups all-purpose flour
- 1 packet (2 1/4 teaspoons) active dry yeast
- 1 teaspoon sugar
- 3/4 cup warm water (about 110°F)
- 1 teaspoon salt
- 2 tablespoons olive oil
- 1 teaspoon garlic powder
- 1 teaspoon dried oregano
- 1/2 teaspoon dried basil
- 1/4 cup sliced almonds
- 1 egg (beaten for egg wash)
- Sea salt for sprinkling
Cooking Instructions
- Activate the Yeast: In a small bowl, combine the warm water, sugar, and yeast. Stir gently and let it sit for about 5-10 minutes until it becomes frothy. This step guarantees that the yeast is active and ready to help the dough rise.
- Prepare the Dough: In a large mixing bowl, combine the flour and salt. Make a well in the center and add the activated yeast mixture and olive oil. Mix until a dough begins to form.
- Knead the Dough: Turn the dough out onto a floured surface and knead for about 8-10 minutes until it becomes smooth and elastic. This process helps develop the gluten structure, giving the breadsticks a nice chew.
- First Rise: Place the kneaded dough in a lightly oiled bowl, cover it with a damp cloth, and let it rise in a warm place for about 1 hour or until it doubles in size.
- Shape the Breadsticks: Punch down the risen dough and divide it into 12 equal pieces. Roll each piece into a finger-like shape, about 5 inches long. Pinch one end to form a pointed tip and use a knife to make several shallow cuts along the length to resemble knuckles.
- Decorate with Almonds: Press a sliced almond into the pointed end of each breadstick to resemble a fingernail. This step adds to the spooky appearance, making them look like witch fingers.
- Second Rise: Place the shaped breadsticks on a baking sheet lined with parchment paper. Cover with a damp cloth and let them rise for another 20-30 minutes.
- Preheat the Oven: During the second rise, preheat your oven to 375°F (190°C).
- Egg Wash and Season: Brush each breadstick with the beaten egg to give them a shiny crust. Sprinkle with garlic powder, oregano, basil, and a pinch of sea salt for added flavor.
- Bake: Place the breadsticks in the preheated oven and bake for 15-20 minutes or until they’re golden brown.
Extra Tips
For an extra spooky touch, consider adding a few drops of green food coloring to the dough to give the breadsticks a more ghoulish appearance. If you prefer a softer breadstick, bake them for a slightly shorter time.
These breadsticks are best enjoyed fresh out of the oven but can be reheated in the oven at a low temperature if needed. Feel free to experiment with other herbs and spices to suit your taste preferences, or serve them with a side of marinara sauce for dipping. Happy Halloween!
Creepy Crudités Selection
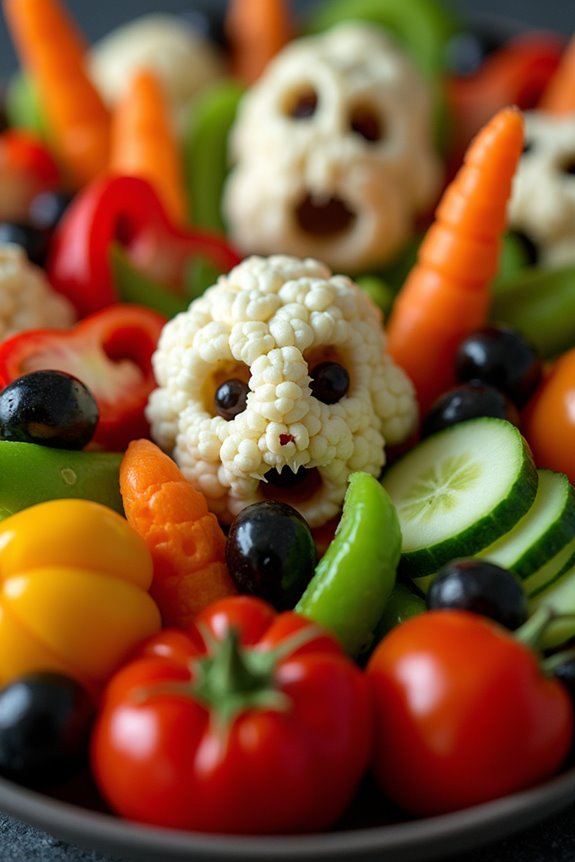
Elevate your Halloween charcuterie board with our Creepy Crudités Selection, a chilling array of fresh and eerie vegetables artfully arranged to bring a spooky touch to your festive spread.
This dish features a collection of vibrant and crunchy vegetables, each carefully prepared to resemble creepy creatures or eerie objects, perfect for adding a touch of frightful fun to your Halloween gathering.
Whether you’re hosting a haunted house party or simply enjoying a festive night in, this dish is sure to delight guests of all ages with its creative presentation and delicious flavors.
Our Creepy Crudités Selection serves 4-6 people and includes a variety of vegetables that are easy to find and prepare.
From ghostly cauliflower florets to sinister-looking carrot fingers, each piece is designed to add a thematic touch to your Halloween feast.
Serve these spooky veggies with a side of blood-red hummus or ghoulish green guacamole to enhance the eerie atmosphere and provide a savory dip that complements the crunchy textures.
Follow our recipe to create a memorable and Instagram-worthy Halloween charcuterie experience.
Ingredients:
- 1 small head of cauliflower
- 2 large carrots
- 1 cucumber
- 1 red bell pepper
- 1 yellow bell pepper
- 1 bunch of radishes
- 1 cup cherry tomatoes
- 1 cup sugar snap peas
- 1 cup black olives
- 1 cup hummus or guacamole for dipping
Instructions:
- Prepare the Cauliflower:
- Break the cauliflower into small florets, resembling ghostly figures. Rinse them thoroughly under cold water and pat dry with a kitchen towel.
- Carve the Carrots:
- Peel the carrots and cut them into finger-length sticks. Using a small paring knife, carve shallow lines to mimic knuckles, creating a creepy finger effect.
- Slice the Cucumber:
- Slice the cucumber into thick rounds. Use a small knife or a carving tool to cut out eyes and mouths, transforming them into eerie faces.
- Cut the Bell Peppers:
- Slice the red and yellow bell peppers into strips. Reserve a few strips to cut into fangs or horns for added effect.
- Prepare the Radishes:
- Trim the tops and bottoms of the radishes. Use a peeler or knife to create small slits, turning them into bloodshot eyes.
- Arrange the Crudités:
- On a large platter, artfully arrange the prepared vegetables, alternating colors and shapes to create visual interest.
Add cherry tomatoes, sugar snap peas, and black olives to fill in gaps and enhance the spooky theme.
7. Serve with Dips:
– Place bowls of hummus or guacamole alongside the platter, offering guests a choice of savory dips to accompany their creepy crudités.
Extra Tips:
To make your Creepy Crudités Selection even more festive, consider adding small decorative touches like plastic spiders or mini pumpkins around the platter.
If you want to add a bit more flavor, sprinkle the vegetables with a light dusting of smoked paprika or garlic powder before serving.
For a touch of humor, use a food-safe marker to draw little faces on the radishes and cherry tomatoes.
Remember to keep any leftover vegetables stored in the refrigerator to maintain freshness throughout your Halloween event.
Eerie Edible Eyes
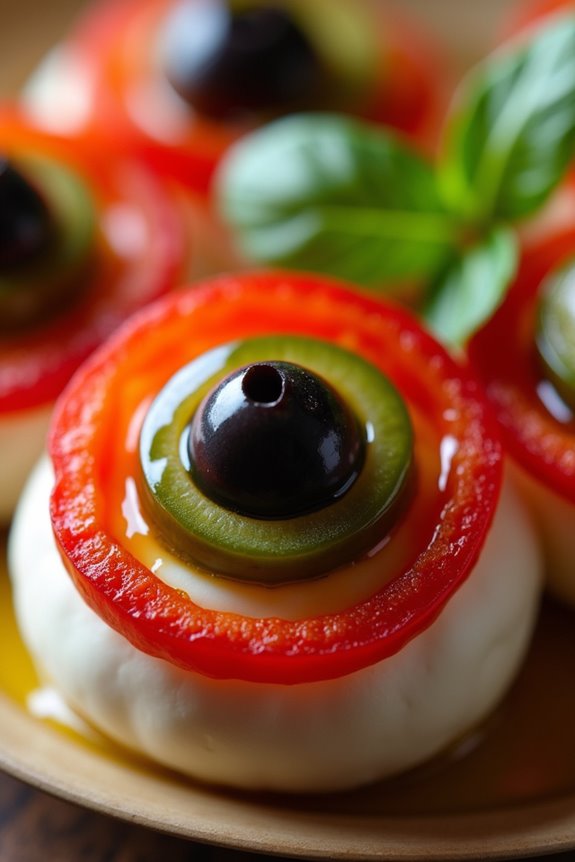
Transform your Halloween charcuterie board into a spooky spectacle with these Eerie Edible Eyes. This creative and creepy culinary creation will certainly be the star of your Halloween spread, delighting guests with its ghoulish appearance and delicious taste.
The eyes are made using a combination of mozzarella balls, olives, and roasted red peppers, offering a burst of flavor alongside their eerie appearance. Perfectly suited for a themed gathering, these easy-to-make snacks will add a touch of frightful fun to your party.
Crafting these Eerie Edible Eyes isn’t only simple but also an engaging activity that you can enjoy with family or friends as you prepare for your Halloween celebration. The dish requires minimal ingredients and preparation time, making it an ideal choice for hosts looking to impress without spending hours in the kitchen.
Plus, these edible eyes are sure to satisfy both children and adults alike, making them a versatile addition to any festive menu.
Ingredients (Serving Size: 4-6 People):
- 12 small fresh mozzarella balls (bocconcini)
- 12 black or green olives (pitted)
- 1 jar of roasted red peppers
- 1 teaspoon of olive oil
- 1 tablespoon of balsamic glaze (optional)
- Fresh basil leaves for garnish (optional)
Cooking Instructions:
- Prepare the Mozzarella Balls: Drain the mozzarella balls from their liquid and pat them dry with a paper towel. This step guarantees that the cheese holds its shape and doesn’t slip when assembled.
- Slice the Olives: Take the pitted olives and slice them into small rounds. These will form the pupils of your eerie eyes. Confirm each slice is thin enough to sit flat on the mozzarella without sliding off.
- Create the Iris: Cut the roasted red peppers into small, ring-shaped pieces. Each piece should be slightly larger than the olive slices to create a visible ‘iris’ around the ‘pupil’.
- Assemble the Eyes: Place a red pepper ring on top of each mozzarella ball. Then, place an olive slice in the center of the red pepper ring, creating the appearance of an eye.
- Finish with Olive Oil: Lightly drizzle a small amount of olive oil over the assembled eyes to add a touch of shine and flavor.
- Optional Garnish and Serve: For extra flair, add a small basil leaf under each mozzarella ball for a pop of color. If desired, drizzle a bit of balsamic glaze over the eyes for added depth of flavor. Arrange the Eerie Edible Eyes on your charcuterie board and serve immediately.
Extra Tips:
For an even spookier effect, consider using both black and green olives to create a variety of eye colors, adding more visual interest to the dish.
If you prefer a smoky flavor, try using smoked mozzarella balls instead of plain ones. Additionally, be sure to prepare these eyes close to serving time to maintain the freshness and texture of the mozzarella.
Storing them in the refrigerator for too long may cause the cheese to harden or the red peppers to lose their vibrant color.
Mysterious Midnight Sweets

Celebrate Halloween with a spooky and delectable Mysterious Midnight Sweets Charcuterie Board. This eerie yet delightful assortment of sweet treats is perfect for any Halloween gathering. Designed to cater to 4-6 people, this board combines an array of sweets with dark and mysterious elements, bound to enchant your guests.
Each treat is carefully selected to evoke the essence of Halloween, with a balance of textures and flavors that will satisfy any sweet tooth. The Mysterious Midnight Sweets Charcuterie Board brings together an intriguing mix of dark chocolates, candied nuts, and hauntingly decorated cookies, all arranged to create a visual masterpiece.
With the addition of fresh fruits and a few surprise elements, this board offers a unique and festive way to indulge in Halloween treats. Whether you’re hosting a party or enjoying a quiet night in, this board will add a touch of magic to your Halloween celebration.
Ingredients (serving size: 4-6 people):
- 8 oz dark chocolate truffles
- 1 cup candied pecans
- 1 cup dried cherries
- 6 black velvet cupcakes with blood-red frosting
- 12 Halloween-themed sugar cookies (e.g., bats, ghosts, pumpkins)
- 1 cup blackberries
- 1 cup red grapes
- 1/2 cup chocolate-covered almonds
- 1/2 cup assorted Halloween candies (e.g., candy corn, gummy worms)
- 4-6 licorice sticks (black or red)
- Edible glitter or gold leaf (optional, for decoration)
Instructions:
- Prepare the Board: Begin by selecting a large serving board or platter. Confirm it’s clean and dry, as this will be the canvas for your sweet creations.
- Arrange the Cupcakes: Place the black velvet cupcakes with blood-red frosting in a cluster towards one side of the board. This will serve as a focal point and add height to your arrangement.
- Add the Dark Chocolates and Cookies: Arrange the dark chocolate truffles and Halloween-themed sugar cookies around the cupcakes. Allow some of the cookies to overlap the cupcakes slightly for added dimension.
- Scatter the Candied Pecans and Dried Cherries: Scatter the candied pecans and dried cherries around the board, filling in gaps and adding texture. These will provide a delightful crunch and a tart contrast to the sweet elements.
- Incorporate Fresh Fruits: Place clusters of blackberries and red grapes on opposite sides of the board. The fresh fruits add color and a revitalizing element to the mix.
- Include Chocolate-Covered Almonds and Candies: Sprinkle the chocolate-covered almonds and assorted Halloween candies throughout the board. This will add a surprise element and keep the board visually interesting.
- Add Licorice Sticks: Arrange the licorice sticks in a fan shape or twist them around other items on the board. Their unique shape and color make them an eye-catching addition.
- Decorate with Edible Glitter: If using, lightly dust the board with edible glitter or gold leaf for a magical touch. This will enhance the mysterious theme and make the sweets sparkle under dim lighting.
Extra Tips:
When assembling the Mysterious Midnight Sweets Charcuterie Board, consider varying the colors and textures to keep it visually appealing. Use a mix of high and low elements to create depth.
If possible, prepare the board just before serving to confirm the fruits are fresh and the cookies remain crisp. Feel free to adjust the ingredients based on availability or dietary preferences, such as using gluten-free cookies or vegan candies.
Finally, encourage guests to mix and match different elements to experience a variety of flavors with each bite.
Sinister Seafood Spread
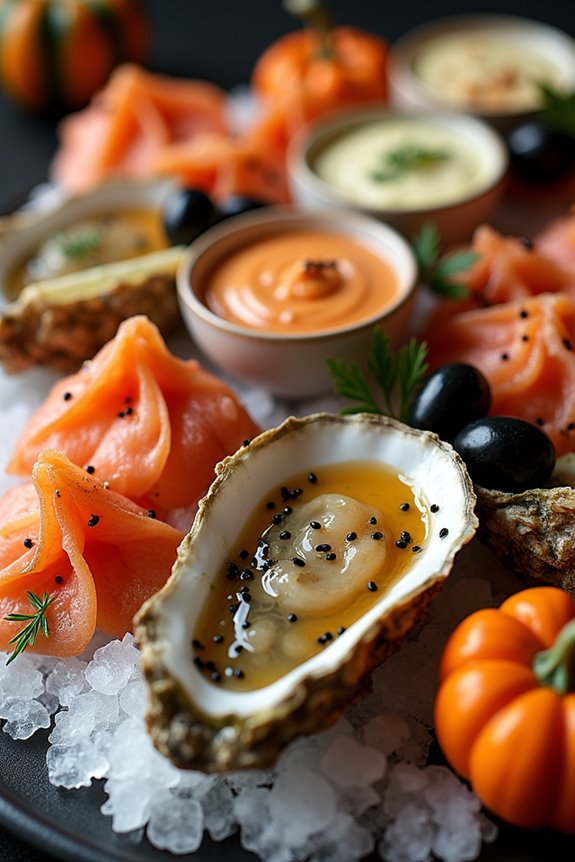
Elevate your Halloween charcuterie board with a delightfully eerie Sinister Seafood Spread. This dish combines an assortment of fresh seafood with hauntingly whimsical presentation, making it a perfect centerpiece for your spooky festivities. The spread features a tantalizing mix of flavors and textures, from the briny taste of shrimp and oysters to the rich, buttery notes of smoked salmon and the delicate sweetness of crab claws. Complement these with a selection of sauces and garnishes to create a truly memorable culinary experience that will impress your guests and leave them spellbound.
To craft this spread, select the freshest seafood available and pay attention to presentation, as it plays a significant role in the overall aesthetic of the dish. Arrange the seafood in a way that evokes the essence of Halloween, perhaps incorporating themed decorations such as small pumpkins, faux spider webs, or dry ice for a mysterious, foggy effect. The seafood is best served chilled on a platter with an ice bed to maintain its freshness throughout the evening. Not only will this Sinister Seafood Spread delight the senses, but it will also serve as a conversation starter at your Halloween gathering.
Ingredients (serving size: 4-6 people):
- 12 large shrimp, peeled and deveined
- 12 fresh oysters on the half shell
- 200g smoked salmon
- 8-10 crab claws
- 100g lump crab meat
- 1 lemon, cut into wedges
- 1 small bunch of dill
- 4-6 small black olives
- Assorted crackers
- Cocktail sauce
- Lemon aioli
- Black sesame seeds (for garnish)
Instructions:
- Prepare the Seafood: Begin by confirming all seafood is clean and ready to serve. Peel and devein the shrimp, then lightly poach them in salted water for 2-3 minutes until they turn pink. Shock them in an ice bath immediately afterward to stop the cooking process and preserve their texture.
- Arrange the Platter: On a large serving platter, create an ice bed by spreading crushed ice evenly. This will keep the seafood chilled. Arrange the oysters on the half shell around the perimeter of the platter. Place the poached shrimp, crab claws, and lump crab meat in clusters around the oysters.
- Add Smoked Salmon and Garnishes: Roll or fold the smoked salmon into rose shapes and nestle them between the seafood items. Add lemon wedges and sprigs of dill around the platter for a fresh, zesty touch. Place small black olives randomly to add a spooky, eye-like appearance.
- Serve with Sauces and Crackers: In small bowls, serve cocktail sauce and lemon aioli for dipping. Sprinkle a few black sesame seeds over the aioli for a Halloween-inspired look. Arrange assorted crackers on the side of the platter or in a separate basket.
- Final Touches: Just before serving, you can add a few decorative items like small pumpkins or faux spider webs around the platter for added Halloween ambiance. If desired, place a small dish of dry ice in the center and add a bit of water to create a foggy, mysterious effect.
Extra Tips:
When creating your Sinister Seafood Spread, it’s vital to maintain the freshness and temperature of the seafood. Always keep the seafood chilled over ice until serving, and make sure to use fresh ingredients for the best flavor.
Consider offering a variety of sauces to cater to different tastes, such as a spicy sriracha mayo or a tangy mignonette sauce. If using dry ice, handle it with care and confirm that it doesn’t come into direct contact with the food.
This spread isn’t only a feast for the palate but also for the eyes, so have fun with the presentation and let your creativity flow!