

As Halloween creeps around the corner, it’s the perfect time to get creative in the kitchen with some festive baking. These 13 Halloween cookies are not just treats but tiny canvases for your imagination. From spooky spider cookies to ghostly meringue delights, each one is a blend of fun and flavor. Whether you’re crafting monster eyeball cookies or whimsical witch hat treats, there’s a recipe here to enchant every cookie lover. Let’s sprinkle some magic into your Halloween celebrations with these enchanting cookie creations!
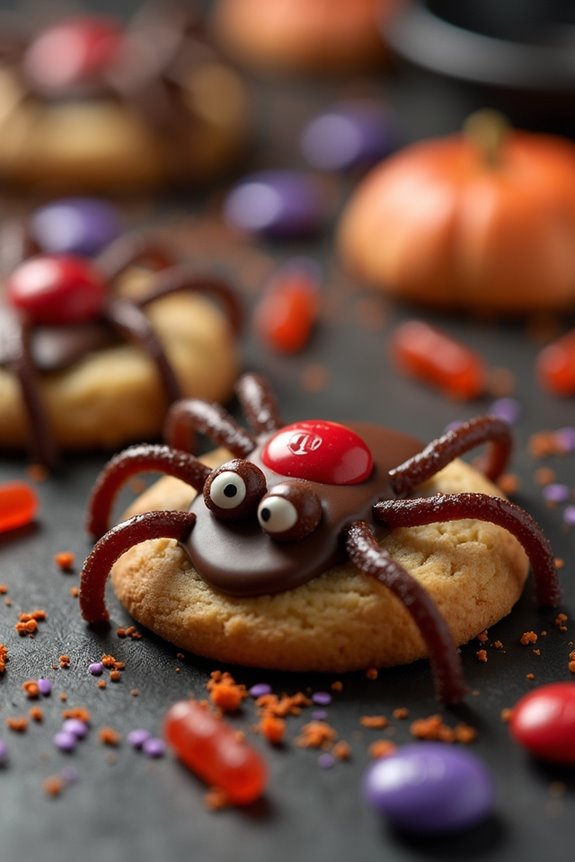
Spooky Spider Cookies
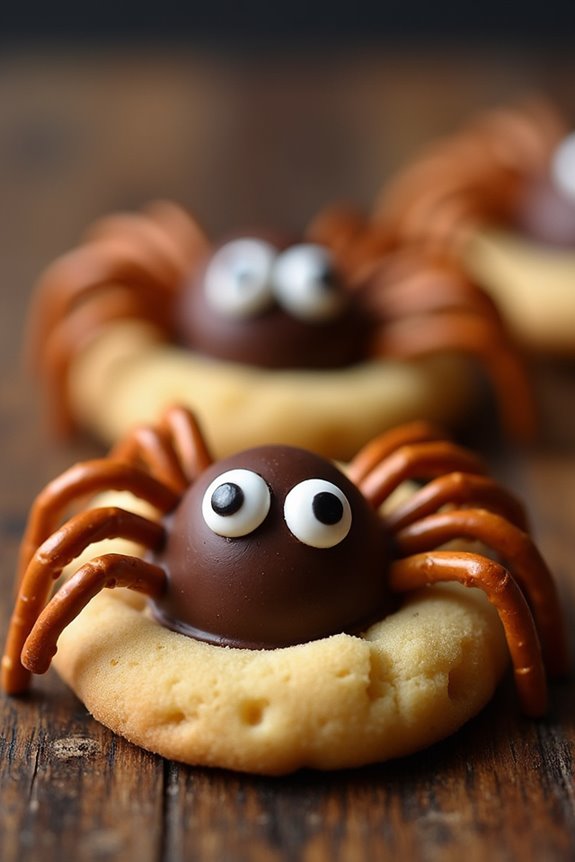
Spooky Spider Cookies are a perfect treat for Halloween, combining the fun and fright of the holiday with a delicious, sweet snack. These cookies bring a creepy-crawly twist to your festivities, delighting both kids and adults with their playful design. Made with classic cookie dough and adorned with chocolate and pretzels to mimic spider legs and eyes, these cookies are as fun to make as they’re to eat.
Whether you’re hosting a Halloween party or just want to surprise your family with a spooky snack, these cookies are bound to be a hit.
The process of making Spooky Spider Cookies is simple and enjoyable, making it a great activity to involve the whole family. The cookie dough is straightforward to prepare, and the decoration process allows for creativity. The key is to guarantee that the cookies aren’t only delicious but also resemble little, edible spiders.
With the right ingredients and some attention to detail, you can create a batch of these cookies that will impress your guests and add to the Halloween spirit.
Ingredients (Serves 4-6)
- 1 cup unsalted butter, softened
- 1 cup granulated sugar
- 1 cup brown sugar, packed
- 2 large eggs
- 1 teaspoon vanilla extract
- 3 cups all-purpose flour
- 1 teaspoon baking soda
- 1/2 teaspoon baking powder
- 1/2 teaspoon salt
- 1 cup chocolate chips
- 24 chocolate truffles or chocolate-covered malt balls
- 48 candy eyes
- 48 small pretzel sticks
Instructions
- Preheat the Oven: Begin by preheating your oven to 350°F (175°C). Line two baking sheets with parchment paper to guarantee the cookies don’t stick and are easy to remove.
- Prepare Cookie Dough: In a large bowl, cream together the softened butter, granulated sugar, and brown sugar until light and fluffy. Add in the eggs one at a time, beating well after each addition. Mix in the vanilla extract.
- Combine Dry Ingredients: In a separate bowl, whisk together the flour, baking soda, baking powder, and salt. Gradually add this dry mixture to the wet ingredients, mixing until just combined. Fold in the chocolate chips.
- Shape the Cookies: Scoop tablespoon-sized portions of the dough and roll them into balls. Place the dough balls onto the prepared baking sheets, leaving about 2 inches of space between each.
- Bake the Cookies: Bake in the preheated oven for 10-12 minutes, or until the edges are golden brown. Remove from the oven and immediately press a chocolate truffle or malt ball into the center of each cookie.
- Add Spider Legs and Eyes: While the cookies are still warm, press 4 pretzel sticks into each side of the truffle to create the spider’s legs. Place two candy eyes on each truffle to complete the spider look.
- Cool and Serve: Allow the cookies to cool on the baking sheet for 5 minutes, then transfer to a wire rack to cool completely. Serve and enjoy the spooky treats!
Extra Tips
To guarantee your Spooky Spider Cookies have the perfect texture, be careful not to overmix the dough once you add the dry ingredients. Overmixing can lead to dense cookies.
Also, make sure to press the chocolate truffles into the cookies while they’re still warm so that they adhere properly. If you don’t have candy eyes, you can use small dots of melted chocolate or icing to create the eyes.
Finally, if you want to add an extra spooky touch, you can lightly dust the cookies with cocoa powder for a more eerie effect.
Ghostly Meringue Cookies
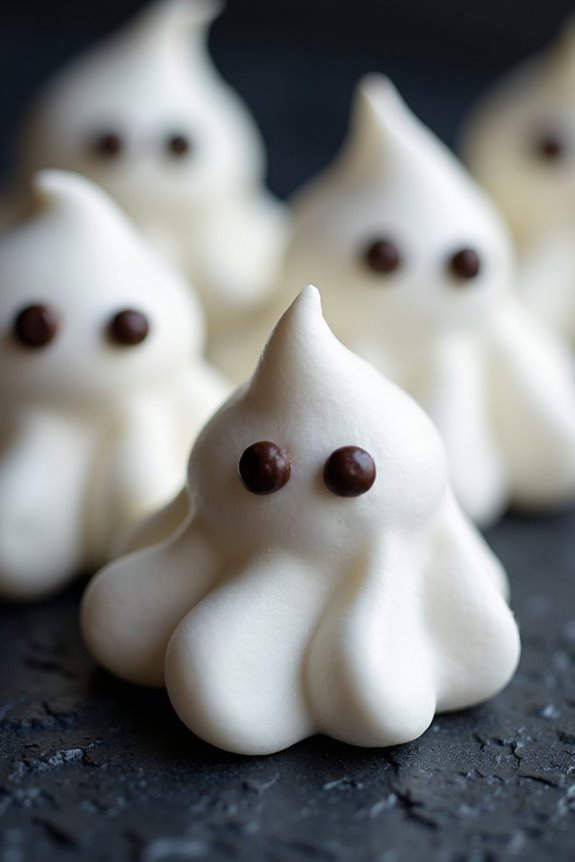
Ghostly Meringue Cookies are a spooktacular treat perfect for any Halloween celebration. These light and airy cookies, shaped like friendly ghosts, aren’t only delightful to look at but also melt-in-your-mouth delicious. Made primarily from whipped egg whites and sugar, meringue cookies are a classic dessert that can be customized with different shapes and flavors.
For Halloween, these cookies are transformed into ghostly figures, complete with eyes made of chocolate chips or edible ink. The process of making meringue requires some attention to detail, but the result is a batch of cookies that will haunt your taste buds in the best way possible.
The key to successful Ghostly Meringue Cookies lies in achieving the perfect consistency for the meringue. This involves whipping the egg whites to stiff peaks and gently folding in sugar to create a smooth and glossy mixture. Once the meringue is ready, it’s piped into ghost shapes onto a baking sheet and baked at a low temperature to guarantee they maintain their shape and texture.
These cookies are a fun and festive addition to any Halloween treat table and are sure to impress both kids and adults alike with their whimsical appearance and delightful taste.
Ingredients (Serving size: 4-6 people):
- 4 large egg whites
- 1 cup granulated sugar
- 1/4 teaspoon cream of tartar
- 1/2 teaspoon vanilla extract
- Mini chocolate chips for eyes
Cooking Instructions:
- Preheat the Oven: Begin by preheating your oven to 225°F (110°C). Line two baking sheets with parchment paper to prevent the meringues from sticking.
- Prepare the Egg Whites: In a large, clean mixing bowl, add the egg whites and cream of tartar. Make sure there’s no yolk or grease, as this can prevent the egg whites from whipping properly.
- Whip the Egg Whites: Using an electric mixer, beat the egg whites on medium speed until foamy. Gradually increase the speed to high and continue beating until soft peaks form.
- Add Sugar Gradually: With the mixer still on high, add the granulated sugar one tablespoon at a time. This slow addition helps the sugar dissolve completely, guaranteeing a smooth meringue. Continue to beat until stiff, glossy peaks form.
- Incorporate Vanilla: Gently fold in the vanilla extract to add a hint of flavor to the meringue.
- Pipe the Meringue: Transfer the meringue mixture to a piping bag fitted with a large round tip. Pipe ghost shapes onto the prepared baking sheets, leaving some space between each ghost.
- Create the Eyes: Gently press two mini chocolate chips into each ghost to form eyes. Make sure they’re evenly spaced to give your ghosts a friendly face.
- Bake the Meringues: Place the baking sheets in the preheated oven. Bake for 1.5 to 2 hours, or until the meringues are firm to the touch and can be easily lifted from the parchment paper. Avoid opening the oven door frequently, as this can cause the meringues to crack.
- Cool Completely: Once baked, turn off the oven and allow the meringues to cool inside the oven with the door slightly ajar. This gradual cooling helps prevent cracking.
Extra Tips:
For best results, make sure the mixing bowl and beaters are completely clean and dry before whipping the egg whites. Any grease or moisture can hinder the meringue from reaching its full volume.
It’s also important to add the sugar slowly to help it dissolve properly, resulting in a smoother texture. Additionally, on humid days, meringues may take longer to bake and could be slightly sticky, so consider extending the baking time slightly if necessary.
These Ghostly Meringue Cookies can be stored in an airtight container for several days, making them a convenient make-ahead treat for your Halloween festivities.
Witch Hat Treats

Witch Hat Treats are a delightful addition to your Halloween cookie collection, providing both a whimsical appearance and a delicious bite. These fun and festive cookies combine the classic flavors of chocolate and peanut butter, creating a treat that’s as tasty as it’s visually appealing. Perfect for a Halloween party or a cozy night in with loved ones, these Witch Hat Treats are sure to be a hit with both kids and adults alike.
The balance of sweetness and rich flavors make these cookies a memorable and enjoyable experience for everyone. Creating these Witch Hat Treats isn’t only simple but also a fun activity you can enjoy with your family or friends. The process involves using pre-made cookies and chocolates, which speeds up the preparation time and allows for more focus on creativity and presentation.
With just a few key ingredients and easy-to-follow steps, you can make a batch of 4-6 servings of these charming Halloween cookies that will surely enchant your guests.
Ingredients:
- 1 package of fudge-striped cookies (12 cookies)
- 12 chocolate kisses
- 1/2 cup of creamy peanut butter
- 1/4 cup powdered sugar
- 6 drops of green food coloring
- Halloween sprinkles (optional, for decoration)
Cooking Instructions:
- Prepare the Peanut Butter Mixture: In a small bowl, mix together the creamy peanut butter, powdered sugar, and green food coloring until well combined. The mixture should be smooth and evenly colored.
- Assemble the Cookie Base: Place the fudge-striped cookies striped side down on a flat surface, such as a baking sheet or large plate. This will be the base of your witch hats.
- Attach the Chocolate Kisses: Using a small spoon or a piping bag, apply a dab of the peanut butter mixture onto the flat bottom of each chocolate kiss. Press each chocolate kiss firmly onto the center of the fudge-striped cookie, ensuring it sticks well to create the pointed part of the witch hat.
- Decorate the Hats: If desired, use the remaining peanut butter mixture to pipe a small ring around the base of each chocolate kiss, where it meets the cookie. Add Halloween sprinkles for an extra festive touch.
- Chill: Place the assembled witch hats in the refrigerator for about 15-20 minutes, allowing the peanut butter mixture to set and hold everything together firmly.
Extra Tips:
For a more personalized touch, consider experimenting with different colors of food coloring for the peanut butter mixture to match your Halloween theme. You can also use different types of sprinkles or edible glitter to make each Witch Hat Treat unique.
If you find that the peanut butter mixture is too thick to pipe easily, add a few drops of milk and mix until it reaches your desired consistency. Enjoy these treats with a glass of milk or a cup of hot cocoa for the perfect Halloween indulgence!
Pumpkin Patch Sugar Cookies
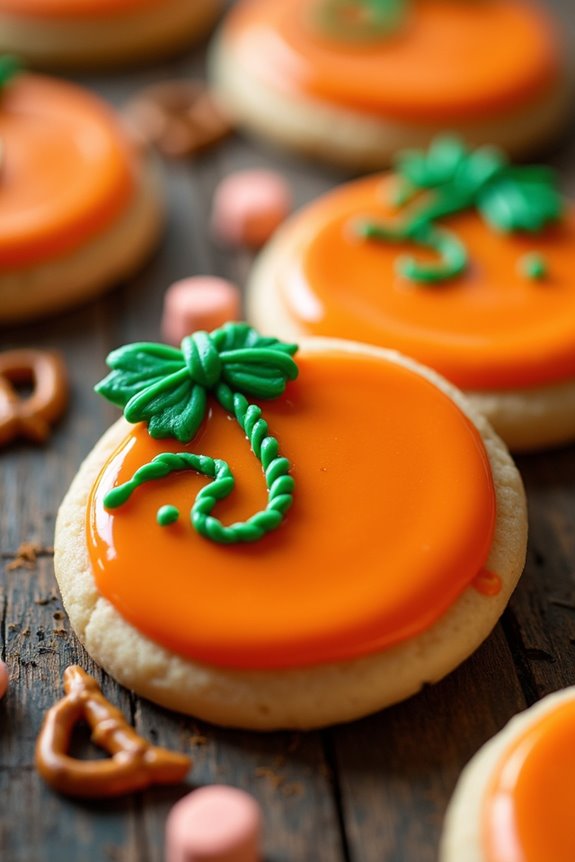
Celebrate the spirit of Halloween with these delightful Pumpkin Patch Sugar Cookies. These festive treats aren’t only visually appealing but also deliciously sweet, making them perfect for any spooky gathering or family event. The soft, buttery sugar cookie base is topped with a vibrant orange icing and adorned with charming pumpkin decorations, bringing a playful touch to the season’s festivities.
Whether you’re hosting a Halloween party or simply looking for a fun baking project, these cookies are sure to be a hit with both kids and adults alike. Crafting these Pumpkin Patch Sugar Cookies involves simple ingredients and straightforward steps, guaranteeing that bakers of all skill levels can enjoy the process.
The recipe yields a batch large enough to serve 4-6 people, making it ideal for small gatherings or as a delightful treat to share with loved ones. With a little creativity and attention to detail, you can create a batch of cookies that not only taste great but also look like they came straight from a pumpkin patch.
Ingredients (Serves 4-6 people):
- 2 1/2 cups all-purpose flour
- 1/2 teaspoon baking powder
- 1/4 teaspoon salt
- 1 cup unsalted butter, softened
- 1 cup granulated sugar
- 1 large egg
- 1 teaspoon vanilla extract
- Orange food coloring
- Green food coloring
- 2 cups powdered sugar
- 3-4 tablespoons milk
- Miniature marshmallows (for decoration)
- Miniature pretzel sticks (for decoration)
Cooking Instructions:
- Prepare Dry Ingredients: In a medium bowl, whisk together the flour, baking powder, and salt. This will guarantee that the baking powder is evenly distributed throughout the flour.
- Mix Wet Ingredients: In a large mixing bowl, beat the softened butter and granulated sugar until the mixture is light and fluffy. Add in the egg and vanilla extract, and continue to beat until everything is well combined.
- Combine Ingredients: Gradually add the dry ingredients to the wet ingredients, mixing until a dough forms. If the dough is too sticky, you can add a little more flour, one tablespoon at a time.
- Chill Dough: Wrap the dough in plastic wrap and refrigerate for at least one hour. Chilling the dough will make it easier to roll out and cut into shapes.
- Preheat Oven and Roll Dough: Preheat your oven to 350°F (175°C). Roll out the chilled dough on a floured surface to about 1/4 inch thickness. Use a round cookie cutter to cut out the cookies and place them on a baking sheet lined with parchment paper.
- Bake Cookies: Bake in the preheated oven for 8-10 minutes or until the edges are lightly golden. Remove from the oven and let them cool completely on a wire rack.
- Prepare Icing: In a small bowl, mix powdered sugar with milk until you reach the desired consistency for icing. Divide the icing into two separate bowls. Add orange food coloring to one bowl and green food coloring to the other, mixing each until the color is uniform.
- Decorate Cookies: Once cookies are completely cooled, spread the orange icing over each cookie, leaving a small space at the top for the green icing. Add a small amount of green icing at the top to resemble the pumpkin’s stem. Use miniature marshmallows and pretzel sticks to create pumpkin vines and leaves as desired.
Extra Tips:
For an extra touch of Halloween magic, you can use edible markers to draw fun faces on the pumpkins after the icing has set. To guarantee your cookies are evenly baked, always make sure your dough is rolled out to a uniform thickness.
If you want to add a hint of spice, consider incorporating a pinch of cinnamon or nutmeg into your dough for a warm, autumnal flavor. Finally, these cookies can be made a day in advance and stored in an airtight container, allowing the flavors to meld and intensify. Enjoy crafting these delightful treats and have a spooky, sweet Halloween!
Monster Eyeball Cookies
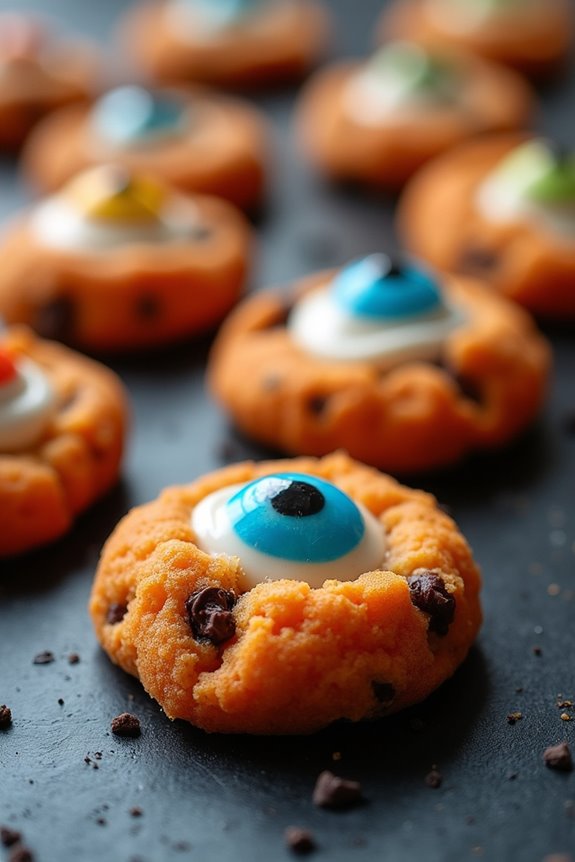
Monster Eyeball Cookies are a spooktacular treat perfect for Halloween celebrations. These eerie cookies, complete with creepy candy eyeballs and vibrant colors, will be a hit at any Halloween party. Not only are they visually striking, but they also pack a deliciously sweet flavor with a hint of chocolate.
The cookies are soft, chewy, and fun to make, especially with kids who enjoy getting creative in the kitchen. This recipe yields enough cookies to serve 4-6 people, making it ideal for small gatherings or family fun nights. You’ll start with a basic sugar cookie dough, enhance it with colors, and embellish it with candy decorations to create those ghoulish eyeballs.
The combination of easy preparation and impressive results makes these Monster Eyeball Cookies a fantastic addition to your Halloween menu.
Ingredients:
- 1 cup unsalted butter, softened
- 1 cup granulated sugar
- 1 large egg
- 1 teaspoon vanilla extract
- 2 ½ cups all-purpose flour
- ½ teaspoon baking powder
- ¼ teaspoon salt
- Gel food coloring (green, purple, or orange)
- ½ cup mini chocolate chips
- Candy eyeballs
Instructions:
- Preheat and Prepare: Preheat your oven to 350°F (175°C). Line a baking sheet with parchment paper or a silicone baking mat to prevent sticking.
- Mix Butter and Sugar: In a large mixing bowl, cream together the softened butter and granulated sugar until the mixture is light and fluffy. This should take about 2-3 minutes using an electric mixer at medium speed.
- Add Egg and Vanilla: Beat in the egg and vanilla extract until fully combined, confirming the mixture is smooth and creamy.
- Combine Dry Ingredients: In a separate bowl, whisk together the all-purpose flour, baking powder, and salt. Gradually add this dry mixture to the wet ingredients, mixing until just combined. Avoid overmixing to keep the dough tender.
- Divide and Color Dough: Divide the dough into three equal parts. Add a few drops of gel food coloring to each portion, mixing until the desired vibrant color is achieved. You can use green, purple, or orange for a Halloween theme.
- Shape and Decorate Cookies: Roll tablespoon-sized amounts of dough into balls and place them on the prepared baking sheet, spacing them a few inches apart. Press a few mini chocolate chips into each ball to create texture similar to that of an eyeball. Gently press a candy eyeball on top of each cookie.
- Bake: Bake in the preheated oven for 10-12 minutes, or until the cookies are just set and the edges are slightly golden. Remove from the oven and allow them to cool on the baking sheet for 5 minutes before transferring to a wire rack to cool completely.
Extra Tips:
For best results, verify your butter is at room temperature before starting, as this will help achieve a smooth and consistent dough. If you want to experiment with flavors, consider adding a few drops of almond extract or a pinch of cocoa powder for a twist.
Additionally, make sure not to overbake the cookies; they should remain soft and chewy. Feel free to get creative with the candy eyeballs, using different sizes or colors to add character to your cookies. Store any leftovers in an airtight container to keep them fresh and enjoy the spooky season with these delightful treats!
Candy Corn Swirl Cookies

Halloween is the perfect time to get creative in the kitchen, and what better way to celebrate than with some festive Candy Corn Swirl Cookies? These delightful treats combine the classic flavors and colors of candy corn with a buttery cookie base, resulting in a delicious dessert that’s sure to be a hit at any Halloween party.
With their eye-catching swirls of orange, yellow, and white, these cookies are as fun to make as they’re to eat. Candy Corn Swirl Cookies aren’t only a visual treat but also a culinary delight that brings the spirit of Halloween to your dessert table. This recipe makes enough cookies to serve 4-6 people, making it perfect for a small gathering or family celebration.
The key to these cookies is creating the vibrant, colorful dough and swirling it together to mimic the iconic appearance of candy corn. Let’s plunge into this spooky and sweet baking adventure!
Ingredients for Candy Corn Swirl Cookies (Serves 4-6):
- 2 1/2 cups all-purpose flour
- 1 teaspoon baking powder
- 1/2 teaspoon salt
- 1 cup unsalted butter, softened
- 1 cup granulated sugar
- 1 large egg
- 1 teaspoon vanilla extract
- Orange food coloring
- Yellow food coloring
Cooking Instructions:
- Prepare the Dough: In a medium-sized bowl, whisk together the flour, baking powder, and salt. In a larger bowl, cream the softened butter and sugar together until light and fluffy.
- Add the egg and vanilla extract to the butter mixture and beat until well combined.
- Combine Ingredients: Gradually add the dry ingredients to the wet ingredients, mixing until a soft dough forms. Divide the dough into three equal portions.
- Color the Dough: Leave one portion of the dough plain. Add orange food coloring to the second portion and yellow food coloring to the third portion. Knead the color into each dough portion until evenly distributed.
- Create the Swirl: Roll out each dough portion into a long, flat rectangle of the same size. Layer the orange dough on top of the yellow dough, and then place the plain dough on top of the orange dough. Lightly press them together.
- Roll and Chill: Starting from one long side, tightly roll the layered dough into a log, creating a spiral effect. Wrap the log in plastic wrap and refrigerate for at least 1 hour to firm up.
- Preheat and Slice: Preheat your oven to 350°F (175°C). Remove the dough log from the refrigerator and slice into 1/4 inch thick rounds using a sharp knife.
- Bake the Cookies: Place the slices on a baking sheet lined with parchment paper, spacing them about 2 inches apart. Bake in the preheated oven for 10-12 minutes, or until the edges are just beginning to turn golden. Allow the cookies to cool on a wire rack.
Extra Tips:
For the best results, make sure your butter is softened to room temperature, as this will help in achieving a smooth dough consistency. If the dough becomes too soft while working with it, re-chill it briefly to make it easier to handle.
Additionally, for a more vibrant color, adjust the amount of food coloring to your preference. Store the cookies in an airtight container to keep them fresh for longer. Enjoy your Candy Corn Swirl Cookies with a glass of milk or at a Halloween gathering for a spooky treat!
Black Cat Sandwich Cookies
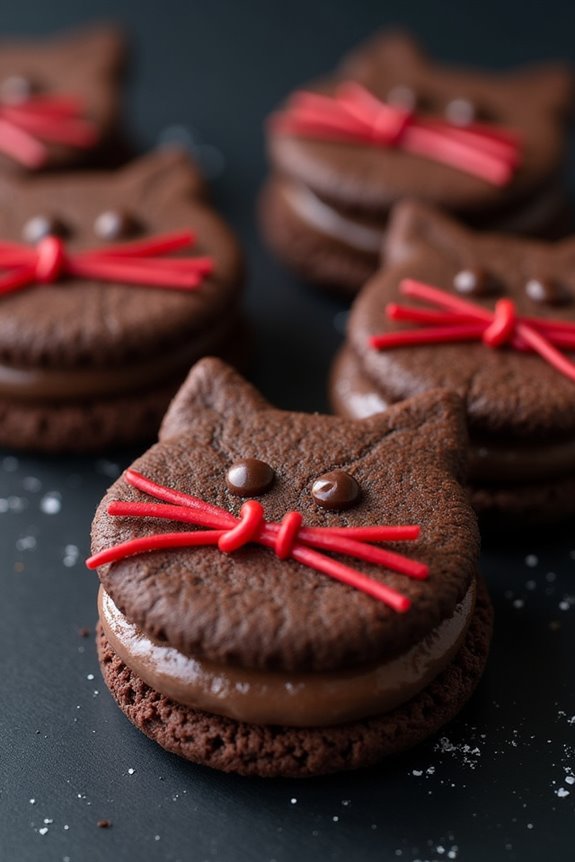
Celebrate Halloween with these delightful Black Cat Sandwich Cookies that are certain to be a hit at any spooky gathering. These cookies aren’t only fun to make but also delicious to eat, with a rich chocolate flavor and a creamy filling that will delight both kids and adults alike.
Shaped like adorable black cats, these sandwich cookies are a perfect addition to your Halloween treats. This recipe makes about 12-16 sandwich cookies, perfect for serving 4-6 people. The cookies themselves are made from a simple chocolate cookie dough, while the filling is a smooth, sweet cream that adds just the right amount of contrast to the rich chocolate.
Whether you’re hosting a Halloween party or just want to enjoy a festive treat, these Black Cat Sandwich Cookies are a wonderful choice.
Ingredients:
- 1 cup unsalted butter, softened
- 1 cup granulated sugar
- 1 large egg
- 1 teaspoon vanilla extract
- 2 cups all-purpose flour
- 1/2 cup cocoa powder
- 1/2 teaspoon baking soda
- 1/4 teaspoon salt
- 1/2 cup heavy cream
- 1 cup powdered sugar
- 1/2 teaspoon black food coloring gel
- Mini chocolate chips (for eyes)
- Red licorice strings (for whiskers)
Cooking Instructions:
- Prepare the Dough: In a large mixing bowl, cream together 1 cup of softened butter and 1 cup of granulated sugar until light and fluffy. Add in 1 large egg and 1 teaspoon of vanilla extract, mixing well after each addition.
- Mix Dry Ingredients: In a separate bowl, sift together 2 cups of all-purpose flour, 1/2 cup of cocoa powder, 1/2 teaspoon of baking soda, and 1/4 teaspoon of salt. Gradually add the dry ingredients into the wet mixture, stirring until a soft dough forms.
- Chill the Dough: Divide the dough into two discs, wrap in plastic wrap, and chill in the refrigerator for at least 1 hour. This will make it easier to roll out and cut shapes.
- Preheat Oven: Preheat your oven to 350°F (175°C) and line a baking sheet with parchment paper.
- Cut the Cookies: Roll out one disc of dough on a lightly floured surface to about 1/4-inch thickness. Use a cat-shaped cookie cutter to cut out cookies and place them on the prepared baking sheet.
- Bake the Cookies: Bake in the preheated oven for 8-10 minutes, or until edges are firm. Let cookies cool on the baking sheet for a few minutes before transferring them to a wire rack to cool completely.
- Prepare the Filling: In a medium bowl, whip 1/2 cup of heavy cream until soft peaks form. Gradually add in 1 cup of powdered sugar and 1/2 teaspoon of black food coloring gel, whipping until the filling is smooth and fluffy.
- Assemble the Cookies: Spread the cream filling on the flat side of one cat cookie, then sandwich with another cookie. Use mini chocolate chips to create eyes and cut small pieces of red licorice for whiskers, gently pressing them into the cream filling.
- Serve and Enjoy: Repeat until all cookies are assembled. Serve immediately or store in an airtight container.
Extra Tips:
For best results, make certain that the butter is at room temperature before you start the recipe to guarantee that it creams properly with the sugar.
When rolling out the dough, you can use cocoa powder instead of flour to dust your work surface; this prevents the dough from sticking without altering the chocolate flavor.
If you want to make these cookies ahead of time, the unbaked dough can be frozen for up to a month. Just make sure to thaw it completely in the refrigerator before rolling out and cutting into shapes.
Enjoy your spooky Black Cat Sandwich Cookies!
Frankenstein Brownie Bites
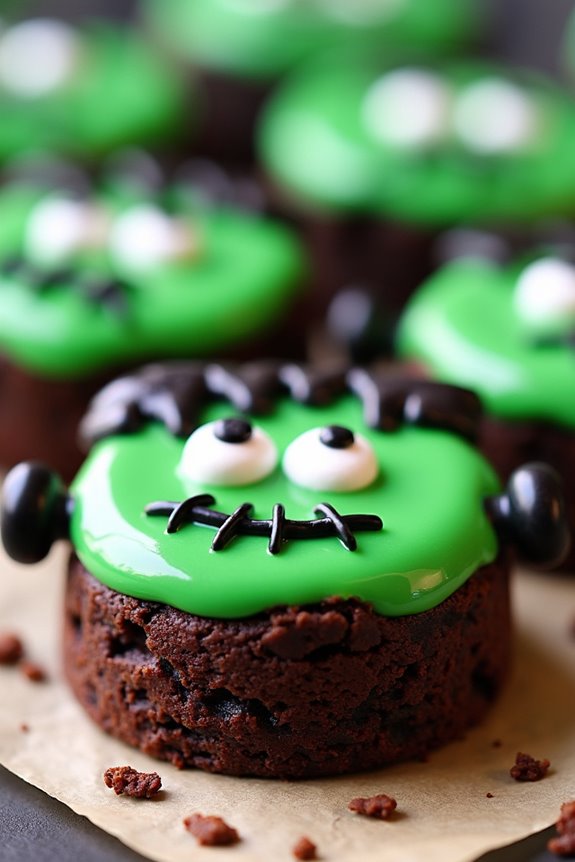
Frankenstein Brownie Bites are a spooky and delightful treat perfect for Halloween festivities. These bite-sized goodies combine the rich, fudgy texture of brownies with a whimsical Frankenstein design, making them a standout addition to any Halloween party spread. Not only are they fun to look at, but they’re also delicious to eat, providing the perfect balance of chocolatey goodness and festive flair.
Ideal for serving 4-6 people, these Frankenstein Brownie Bites are easy to make and will surely be a hit with both kids and adults alike. Whether you’re hosting a Halloween party or simply want to surprise your family with a themed dessert, these brownie bites are sure to please. Let’s plunge into the recipe and bring Frankenstein to life in your kitchen!
Ingredients:
- 1 box of brownie mix (approximately 18-20 oz)
- 2 large eggs (as per brownie mix instructions)
- 1/2 cup vegetable oil (as per brownie mix instructions)
- 1/4 cup water (as per brownie mix instructions)
- 1 cup green candy melts
- 1/2 cup chocolate chips
- Black decorating gel
- Candy eyes
- Mini marshmallows
- Toothpicks or lollipop sticks
Instructions:
- Prepare the Brownie Mix: Preheat your oven according to the brownie mix instructions. In a mixing bowl, combine the brownie mix, eggs, vegetable oil, and water. Stir until well combined and smooth.
- Bake the Brownies: Pour the brownie batter into a greased 9×13-inch baking pan, spreading it evenly. Bake according to the package instructions, typically around 20-25 minutes, or until a toothpick inserted comes out mostly clean. Allow the brownies to cool completely once baked.
- Cut Brownie Squares: Once cooled, carefully remove the brownies from the pan. Cut the brownies into small squares, approximately 1.5 to 2 inches on each side, to form the base of your Frankenstein heads.
- Melt Green Candy: In a microwave-safe bowl, melt the green candy melts according to the package instructions, usually by microwaving in 30-second intervals and stirring until smooth.
- Decorate the Brownies: Dip the top of each brownie square into the melted green candy, letting any excess drip off. Place the brownie bites onto a parchment-lined tray.
- Add Frankenstein Features: While the green candy is still wet, stick two candy eyes onto each brownie. Use the black decorating gel to draw a mouth and stitches for added detail.
- Create Frankenstein’s Bolts: Cut mini marshmallows in half, and attach one half to each side of the brownie using a small amount of melted chocolate or green candy as glue. Insert a toothpick or lollipop stick into each brownie for easy handling and serving.
- Allow to Set: Let the decorated brownie bites sit until the candy coating is completely set, approximately 30 minutes.
Extra Tips:
For best results, verify that the brownies are fully cooled before cutting and decorating to prevent crumbling. If you want a more vibrant green color, consider adding a drop of green food coloring to the melted candy. If the chocolate or candy melts harden while decorating, simply reheat them briefly in the microwave. Feel free to get creative with the expressions on your Frankensteins – each one can have its own unique personality!
Bloody Finger Shortbread
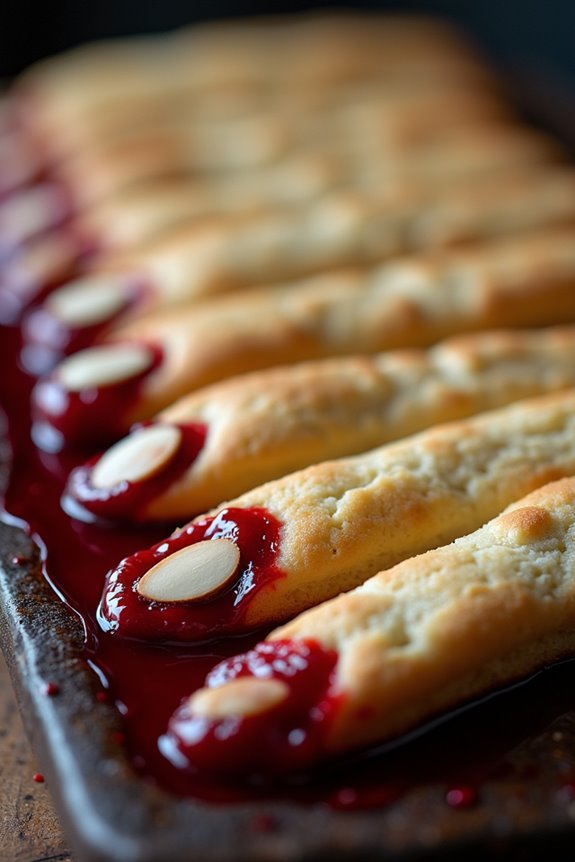
Halloween is the perfect time to indulge in spooky treats, and Bloody Finger Shortbread cookies are sure to be a hit at any festive gathering. These eerie cookies not only look the part but also taste delicious with their buttery shortbread base and sweet raspberry “blood” jam. Shaped like severed fingers with a sliced almond as the nail, they provide both a creepy aesthetic and a delightful crunch.
Perfect for a Halloween party, they’re easy to make and a fun project to involve kids in the kitchen. This recipe yields 12-18 fingers, making it ideal for a serving size of 4-6 people. The preparation involves crafting a simple shortbread dough, shaping it into fingers, adding the jam for a gory effect, and baking until golden. The combination of the buttery shortbread and the sweet-tart jam creates a treat that’s as tasty as it’s terrifying.
Gather your ingredients and follow the instructions to create these spooky delights that are sure to impress your guests.
Ingredients:
- 1 cup (2 sticks) unsalted butter, softened
- 1 cup powdered sugar
- 1 teaspoon vanilla extract
- 2 2/3 cups all-purpose flour
- 1/2 teaspoon salt
- 1/4 cup raspberry jam
- 18-24 sliced almonds
- Red food coloring (optional)
Instructions:
- Preheat and Prepare Dough: Preheat your oven to 325°F (165°C) and line a baking sheet with parchment paper. In a large mixing bowl, cream together the softened butter and powdered sugar until smooth and fluffy. Add in the vanilla extract and mix until well combined.
- Mix Dry Ingredients: In a separate bowl, whisk together the flour and salt. Gradually add the dry ingredients to the butter mixture, mixing until a dough forms. If the dough feels too dry, add a teaspoon of milk until it comes together.
- Shape the Fingers: Scoop about 1 tablespoon of dough and roll it into a finger-like shape. Make it slightly thicker in the middle and taper towards the ends. Use a small knife to make three shallow cuts in the center to create knuckle wrinkles.
- Add Nails and Blood: Press a sliced almond into the tip of each finger to create a nail. Use a small spoon or a piping bag to place a small amount of raspberry jam around the base of the almond for a bloody effect. If desired, mix a drop of red food coloring with the jam for a more vibrant color.
- Chill and Bake: Place the shaped fingers on the prepared baking sheet, spaced slightly apart. Chill in the refrigerator for 20 minutes to help them hold their shape during baking. Bake in the preheated oven for 20-25 minutes, or until the edges are lightly golden brown.
- Cool and Serve: Allow the cookies to cool on the baking sheet for 5 minutes before transferring them to a wire rack to cool completely. Serve once cool, enjoying the spooky appearance and delicious taste.
Extra Tips:
For a more gruesome look, you can use a toothpick to add more detail to the knuckles and enhance the blood effect by drizzling extra raspberry jam on the fingers after baking. If you don’t have raspberry jam, strawberry or cherry jam can be a good substitute.
To make the fingers look more realistic, slightly bend them at the knuckle before baking. These cookies can be stored in an airtight container for up to a week, making them a great make-ahead treat for your Halloween festivities.
Bat-Shaped Chocolate Cookies
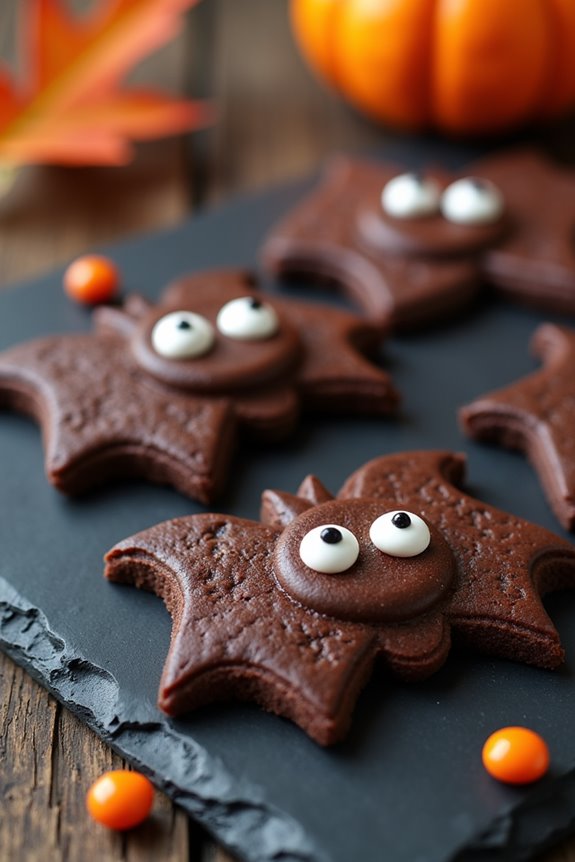
Bat-Shaped Chocolate Cookies are a spooky and delicious treat perfect for Halloween festivities. These cookies are rich in chocolate flavor and are shaped like bats to match the Halloween theme. Whether you’re hosting a party, going trick-or-treating, or just want a fun activity to do with your kids, these cookies are bound to be a hit.
They aren’t only fun to make but also delightful to eat, with a crispy exterior and a soft, chewy center. Creating these bat-shaped cookies is a wonderful way to engage with the Halloween spirit. The process involves cutting dough into bat shapes, baking, and decorating to your liking.
The cocoa powder in the dough gives these cookies their distinctive dark color, which is perfect for bat cookies. This recipe serves 4-6 people, making it suitable for small gatherings or family treats. Enjoy crafting these whimsical cookies and indulge in their chocolatey goodness.
Ingredients for Bat-Shaped Chocolate Cookies:
- 1 ½ cups all-purpose flour
- ½ cup unsweetened cocoa powder
- ½ teaspoon baking powder
- ¼ teaspoon salt
- ½ cup unsalted butter, softened
- ¾ cup granulated sugar
- 1 large egg
- 1 teaspoon vanilla extract
- Additional flour for rolling out dough
- Decorative icing or candy eyes (optional)
Cooking Instructions:
- Preheat the Oven: Begin by preheating your oven to 350°F (175°C). This guarantees it reaches the correct temperature by the time your cookies are ready to bake.
- Prepare the Dry Ingredients: In a medium bowl, whisk together the flour, cocoa powder, baking powder, and salt. This step guarantees that the dry ingredients are evenly mixed and that the cocoa powder is well distributed.
- Cream the Butter and Sugar: In a large mixing bowl, beat the softened butter and granulated sugar together until light and fluffy. This usually takes about 3 minutes with an electric mixer. Beating them well incorporates air, which helps the cookies rise.
- Add Egg and Vanilla: Add the egg and vanilla extract to the butter-sugar mixture. Mix until fully combined. This adds moisture and flavor to your cookie dough.
- Combine Dry and Wet Ingredients: Gradually add the dry ingredients to the wet mixture, mixing on low speed until just combined. Avoid over-mixing as this can make the cookies tough.
- Roll Out the Dough: Lightly flour your work surface and roll out the dough to about ¼ inch thickness. Use a bat-shaped cookie cutter to cut out the cookie shapes and place them on a baking sheet lined with parchment paper.
- Bake the Cookies: Place the cookies in the preheated oven and bake for 10-12 minutes. They should be set but still soft in the center.
- Cool and Decorate: Allow the cookies to cool on the baking sheet for 5 minutes before transferring them to a wire rack to cool completely. Once cooled, decorate with icing or attach candy eyes for a fun touch.
Extra Tips:
For the best results, verify that your butter is at room temperature before beginning the recipe. This will help it cream more efficiently with the sugar.
If you find the dough too sticky to work with, refrigerate it for about 30 minutes before rolling it out. This helps firm it up, making it easier to handle.
Be creative with your decorations; you can use melted chocolate, edible glitter, or even colored sugar to make your bat cookies unique and festive!
Creepy Crawly Critter Cookies
Creepy Crawly Critter Cookies are the perfect Halloween treat to spook and delight both children and adults alike. These cookies aren’t only delicious but also a fun activity for the whole family to enjoy together. The combination of sweet sugar cookies decorated with chocolate and candies to resemble spiders, beetles, and other creepy crawlies makes for a festive and delightful addition to your Halloween spread.
Whether you’re hosting a Halloween party or just looking to get into the spooky spirit, these critter cookies are sure to impress.
The beauty of Creepy Crawly Critter Cookies lies in their versatility. You can use your creativity to design any type of critter you like, using different candies and toppings to bring your vision to life. This recipe provides a simple sugar cookie base and some basic decorating ideas, but feel free to let your imagination run wild.
The key is to have fun and embrace the whimsical nature of Halloween. The recipe serves 4-6 people, making it ideal for small gatherings or family fun.
Ingredients:
- 2 1/2 cups all-purpose flour
- 1 cup unsalted butter, softened
- 1 cup granulated sugar
- 1 large egg
- 1 teaspoon vanilla extract
- 1/2 teaspoon baking powder
- 1/4 teaspoon salt
- 1 cup semi-sweet chocolate chips
- Assorted candies (e.g., M&Ms, gummy worms, licorice strings)
- 1 tube black decorating gel
Instructions:
- Prepare the Dough: In a large mixing bowl, cream together the softened butter and granulated sugar until light and fluffy. Beat in the egg and vanilla extract until well combined.
- Mix Dry Ingredients: In a separate bowl, whisk together the flour, baking powder, and salt. Gradually add the dry ingredients to the wet mixture, mixing until a dough forms.
- Chill the Dough: Divide the dough in half, wrap each portion in plastic wrap, and refrigerate for at least 1 hour. This makes the dough easier to handle and helps the cookies hold their shape.
- Preheat the Oven: Preheat your oven to 350°F (175°C) and line two baking sheets with parchment paper.
- Roll and Cut Cookies: On a floured surface, roll out the dough to about 1/4-inch thickness. Use round cookie cutters or a glass to cut out cookie shapes and place them on the prepared baking sheets.
- Bake the Cookies: Bake the cookies in the preheated oven for 10-12 minutes, or until the edges are lightly golden. Allow them to cool completely on a wire rack.
- Melt the Chocolate: In a microwave-safe bowl, melt the chocolate chips in 30-second intervals, stirring in between, until smooth.
- Decorate the Cookies: Use the melted chocolate to stick candies onto the cookies, forming spider bodies, eyes, and legs. Use black decorating gel to add details like spiderwebs or antennae.
- Set the Decorations: Allow the decorated cookies to set at room temperature until the chocolate has hardened, about 30 minutes.
Extra Tips:
When making Creepy Crawly Critter Cookies, be sure to have a variety of candies and toppings on hand to give you plenty of creative options.
If you’re working with kids, set up a decorating station with all the candies and tools within easy reach to make the process smooth and fun. You can also prepare the dough ahead of time and freeze it, allowing you to bake and decorate the cookies on the day of your event.
For a more vibrant look, consider using colored sprinkles or edible glitter to add extra flair to your creepy critters.
Skeleton Hand Pies
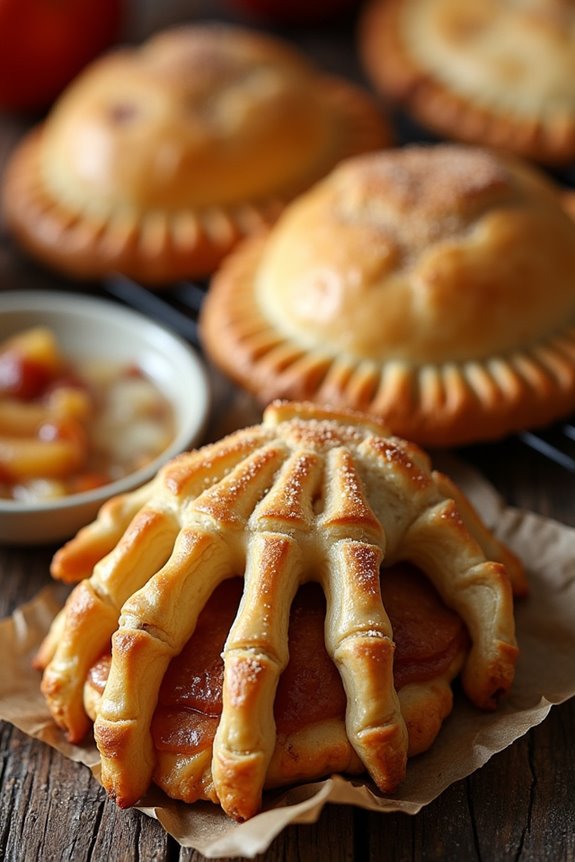
Skeleton Hand Pies are a spooky and delicious treat, perfect for Halloween festivities. These eerie pastries are shaped like skeletal hands, with a filling that can vary from sweet to savory, depending on your preference. Whether you’re hosting a Halloween party or simply want to add a festive touch to your dessert table, these hand pies will undoubtedly delight both kids and adults alike.
Creating Skeleton Hand Pies involves crafting dough and filling it with your choice of delectable ingredients. The dough is shaped to resemble a skeleton’s hand, complete with fingers and knuckles, making it an eye-catching centerpiece for your Halloween spread. With a few simple ingredients and some creativity in shaping, you can whip up a batch of these hauntingly tasty treats. This recipe serves 4-6 people.
Ingredients:
- 2 cups all-purpose flour
- 1/2 teaspoon salt
- 1 cup unsalted butter, chilled and diced
- 1/4 cup ice water
- 1 cup apple pie filling (or filling of choice)
- 1 egg, beaten (for egg wash)
- 1 tablespoon sugar (optional, for sprinkling)
- Black food gel (optional, for detailing)
Instructions:
1. Prepare the Dough: In a large mixing bowl, combine the all-purpose flour and salt. Cut in the chilled, diced butter using a pastry cutter or fork until the mixture resembles coarse crumbs. Gradually add the ice water, one tablespoon at a time, mixing until the dough begins to come together.
Form the dough into a ball, wrap it in plastic wrap, and refrigerate for at least 30 minutes.
2. Preheat the Oven: Set your oven to 375°F (190°C) to make sure it’s at the right temperature by the time the hand pies are ready to be baked.
3. Roll Out the Dough: On a lightly floured surface, roll out the chilled dough to a thickness of about 1/4 inch. Use a sharp knife or a hand-shaped cookie cutter to cut out hand shapes from the dough. Make sure to create pairs of hands for each pie.
4. Fill the Hand Pies: Place a tablespoon of your chosen filling (such as apple pie filling) in the center of one hand shape. Place another hand shape on top and gently press the edges to seal, using a fork to crimp around the edges to make certain they’re secure.
5. Add Details and Egg Wash: Use a knife to gently score knuckles and other skeletal details on the top of each hand pie. Brush the tops with beaten egg and, if desired, sprinkle with sugar for added sweetness and crunch.
6. Bake: Place the hand pies on a baking sheet lined with parchment paper. Bake in the preheated oven for 20-25 minutes or until golden brown.
7. Cool and Decorate: Allow the pies to cool slightly on a wire rack. If desired, use black food gel to add further detailing to enhance the skeletal appearance.
Extra Tips: When shaping the dough into hands, try to make the fingers a bit thicker to prevent them from breaking during baking. If the dough becomes too soft while working, return it to the refrigerator for a few minutes to firm up.
Additionally, make sure your filling isn’t too wet, as excess moisture can make the dough soggy. For a savory twist, consider using fillings such as seasoned ground beef or cheese and vegetable mixtures.
Haunted House Gingerbread Cookies
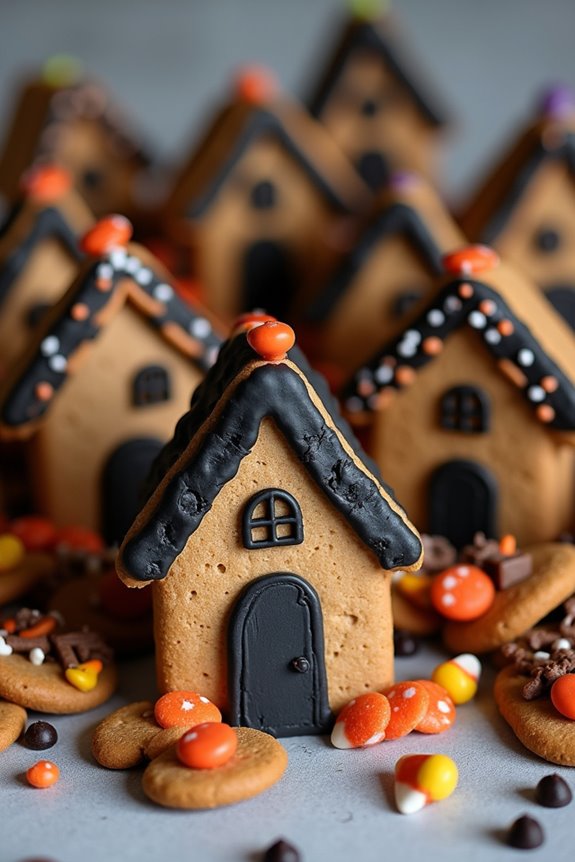
Halloween is the perfect time to get creative in the kitchen, and there’s no better way to celebrate than by baking Haunted House Gingerbread Cookies. These cookies aren’t only delicious but also serve as a delightful canvas for your spooky imagination.
Whether you’re hosting a Halloween party or just looking for a fun activity with family and friends, these gingerbread cookies are sure to impress. With a touch of spice and a whole lot of charm, they capture the essence of Halloween in every bite.
Creating these Haunted House Gingerbread Cookies is a fun and interactive experience that can be enjoyed by people of all ages. The recipe is designed for a serving size of 4-6 people, making it perfect for a small group gathering.
With the right ingredients and a little patience, you’ll have a batch of cookies that will both delight and intrigue your guests. So, gather your spooky decorations and let’s get started on this Halloween baking adventure.
Ingredients (for 4-6 people):
- 3 cups all-purpose flour
- 3/4 teaspoon baking soda
- 1 tablespoon ground ginger
- 1 tablespoon ground cinnamon
- 1/2 teaspoon ground cloves
- 1/2 teaspoon salt
- 1/4 teaspoon ground nutmeg
- 1/2 cup unsalted butter, room temperature
- 1/2 cup packed dark-brown sugar
- 1 large egg
- 1/2 cup unsulfured molasses
- Black decorating icing (for detailing)
- Assorted Halloween-themed candy (e.g., candy corn, mini chocolate chips, licorice strings)
- Royal icing (for assembling and decorating)
Instructions:
1. Prepare the Dough**: In a large bowl, whisk together the flour, baking soda, ginger, cinnamon, cloves, salt, and nutmeg. In a separate bowl, using an electric mixer**, beat the butter and brown sugar until light and fluffy.
Add the egg and molasses, beating until combined. Gradually add the dry ingredients to the wet mixture, mixing until a dough forms. Divide the dough in half, flatten into disks, wrap in plastic, and refrigerate for at least 1 hour.
2. Preheat and Roll: Preheat your oven to 350°F (175°C). Line baking sheets with parchment paper. On a lightly floured surface, roll out one disk of dough to about 1/4 inch thickness.
Use a haunted house cookie cutter to cut out shapes. Transfer the shapes to prepared baking sheets, spacing them about 1 inch apart.
3. Bake the Cookies: Bake the cookies in the preheated oven for about 8-10 minutes, or until the edges are firm. Let the cookies cool on the baking sheets for 5 minutes, then transfer to a wire rack to cool completely.
4. Decorate the Cookies: Once the cookies are completely cooled, use the black decorating icing to add spooky details like windows, doors, and roof shingles.
Use the royal icing to attach Halloween-themed candies for added decoration. Be creative with your designs, turning each cookie into a unique haunted house.
5. Assemble and Enjoy: Allow the icing to set completely before serving the cookies. Arrange them on a platter or use them as part of a Halloween-themed centerpiece.
Extra Tips:
When making Haunted House Gingerbread Cookies, it’s important to keep the dough chilled, as this prevents it from becoming too sticky to handle.
If you find the dough is warming up too quickly as you roll and cut it, place it back in the refrigerator for a few minutes. When decorating, using a piping bag with a fine tip will help you make precise details.
Don’t hesitate to get creative with the decorations – the spookier, the better! You can experiment with different candies and icing colors to bring out the Halloween spirit in your cookies.