

Get ready to be enchanted by these delightful Halloween cookie ideas that are as fun to make as they are to eat. Picture crafting spooky spider cookies or ghostly meringue bites with ease. These recipes are quick to whip up yet look incredibly impressive, adding a festive flair to your celebrations. Whether you’re planning a Halloween bash or simply want to surprise your loved ones, there’s something special here for everyone. Curious about how easy these treats are to create?
Spooky Spider Cookies
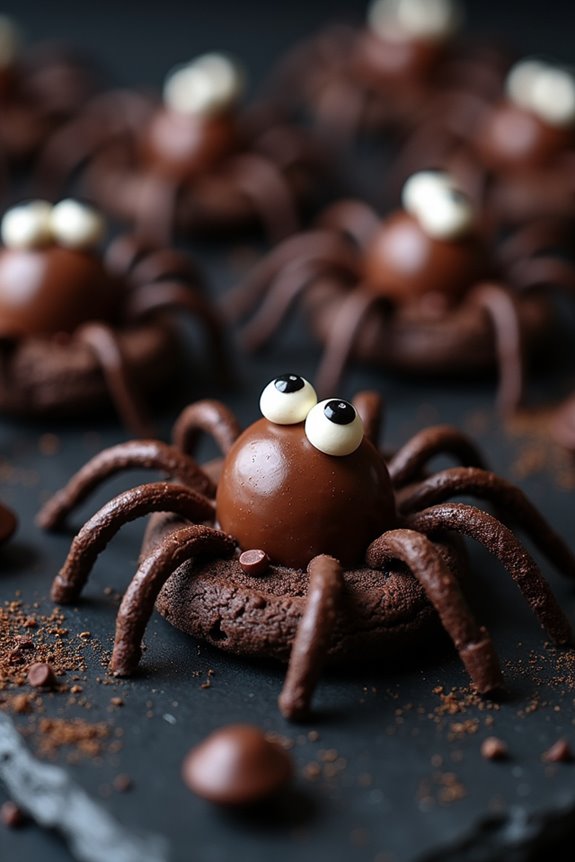
Halloween is the perfect time to get creative in the kitchen, and nothing says spooky like a batch of Spooky Spider Cookies. These delightful treats aren’t only visually appealing but also deliciously decadent, making them a hit at any Halloween gathering. With a combination of rich chocolate cookies, gooey chocolate centers, and candy legs, these cookies are guaranteed to be the highlight of your Halloween spread. Perfect for parties or a festive treat at home, they cater to both the young and the young at heart.
Whether you’re an experienced baker or a novice, this recipe is straightforward and fun to follow. The ingredients are easy to find, and the steps are simple enough for kids to join in the fun. The final result is a batch of cookies that resemble creepy-crawly spiders, adding a touch of whimsy to your Halloween dessert table.
So gather your ingredients and get ready to bake up a storm with these Spooky Spider Cookies!
Ingredients for 4-6 Servings:
- 1 cup unsalted butter, softened
- 1 cup granulated sugar
- 1 cup packed brown sugar
- 2 large eggs
- 1 teaspoon vanilla extract
- 2 cups all-purpose flour
- 1 cup unsweetened cocoa powder
- 1 teaspoon baking soda
- 1/2 teaspoon salt
- 24 round chocolate truffles or chocolate-covered candies
- 1/2 cup mini chocolate chips
- 48 candy eyes
- 1 tube black decorating gel or melted chocolate for spider legs
Cooking Instructions:
- Preheat the Oven: Begin by preheating your oven to 350°F (175°C). Line two baking sheets with parchment paper or silicone baking mats for easy cleanup.
- Cream the Butter and Sugars: In a large mixing bowl, cream together the softened butter, granulated sugar, and brown sugar until light and fluffy. This should take about 2-3 minutes using an electric mixer.
- Add Eggs and Vanilla: Add the eggs one at a time, beating well after each addition. Stir in the vanilla extract until fully incorporated.
- Mix Dry Ingredients: In a separate bowl, whisk together the all-purpose flour, unsweetened cocoa powder, baking soda, and salt.
- Combine Wet and Dry Ingredients: Gradually add the dry ingredients to the wet mixture, mixing until just blended. Be careful not to overmix.
- Shape the Cookies: Roll the dough into 1-inch balls and place them on the prepared baking sheets, spacing them about 2 inches apart.
- Bake the Cookies: Bake in the preheated oven for 10-12 minutes, or until the cookies are set but still soft in the center.
- Add the Spider Bodies: Remove the cookies from the oven and immediately press a chocolate truffle or chocolate-covered candy into the center of each cookie.
- Cool and Decorate: Allow the cookies to cool on the baking sheets for about 5 minutes before transferring them to a wire rack. Once cooled, use the black decorating gel or melted chocolate to draw legs on each side of the chocolate body. Add two candy eyes to each spider using a dab of gel to adhere them.
Extra Tips:
For a more realistic spider appearance, consider using a toothpick or a small brush to perfect the legs and guarantee they look spindly and creepy. You can also experiment with different candy eyes to give your spiders various expressions.
If you don’t have black decorating gel, melted chocolate in a piping bag or a zip-top bag with the corner snipped off works perfectly. Finally, if you’re making these cookies ahead of time, store them in an airtight container to keep them fresh and chewy. Enjoy the spooky fun!
Ghostly Meringue Bites
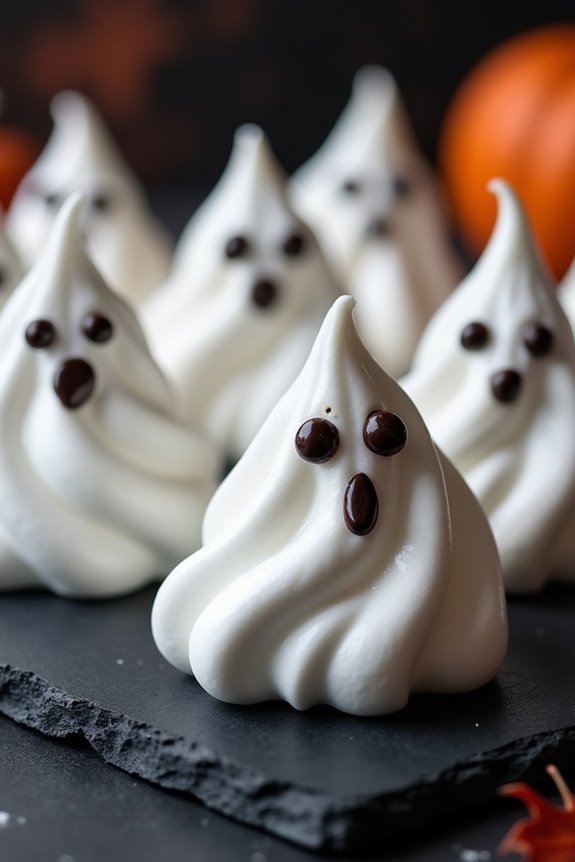
Ghostly Meringue Bites are a delightful addition to any Halloween spread, offering a sweet treat that’s as fun to make as it’s to eat. These light and airy cookies are shaped like little ghosts, perfect for adding a touch of spooky charm to your dessert table. The simplicity of the ingredients contrasts beautifully with the intricate decoration, making this a favorite among both novice bakers and seasoned pros.
Whether you’re hosting a Halloween party or just want to surprise your family with a themed treat, these Ghostly Meringue Bites are sure to be a hit.
The key to successful meringue lies in the proper whipping of the egg whites and the gradual addition of sugar to create a stiff, glossy peak. Once you’ve mastered this technique, forming the ghostly shapes is a breeze. A little bit of creativity with a piping bag, and you’ll have a tray full of adorable ghostly figures ready to bake.
Once baked to perfection, a touch of dark chocolate or edible ink is all you need to give each ghost its own personality. Enjoy these cookies as they melt in your mouth, leaving a sweet, sugary aftertaste that perfectly complements their ghostly appearance.
Ingredients for 4-6 servings:
- 4 large egg whites
- 1 cup granulated sugar
- 1/4 teaspoon cream of tartar
- 1/4 teaspoon vanilla extract
- Dark chocolate or edible ink for decoration
Instructions:
- Preheat your oven to 225°F (110°C) and line a baking sheet with parchment paper. This low temperature is essential to guarantee the meringue dries out rather than bakes.
- In a clean, dry bowl, beat the egg whites on medium speed with an electric mixer until they become frothy.
- Add the cream of tartar and continue to beat on medium speed until soft peaks form. This step helps stabilize the egg whites.
- Gradually add in the sugar, a tablespoon at a time, while increasing the mixer speed to high. Beat until stiff peaks form and the meringue is glossy. This process can take several minutes, so patience is key.
- Gently fold in the vanilla extract using a spatula to avoid deflating the mixture.
- Transfer the meringue to a piping bag fitted with a round tip. Pipe ghost shapes onto the prepared baking sheet by squeezing a mound for the body and pulling upwards to create a peak for the ghost’s head.
- Bake in the preheated oven for 1.5 to 2 hours, or until the meringues are dry and can be easily lifted from the parchment paper. Turn off the oven and let the meringues cool inside with the door slightly ajar.
- Once cooled, use melted dark chocolate or edible ink to draw eyes and mouths on the ghosts. Allow the decoration to set before serving.
Extra Tips:
For the best results, make sure that your mixing bowl and beaters are completely clean and free of any grease, as any fat can prevent the egg whites from whipping properly.
If you’re short on time, you can prepare the meringues a day in advance and store them in an airtight container. Experiment with different piping tips to create a variety of ghost shapes and sizes.
Finally, be sure to bake the meringues on a dry day, as humidity can affect their texture, making them chewy instead of crisp.
Monster Eyeball Treats
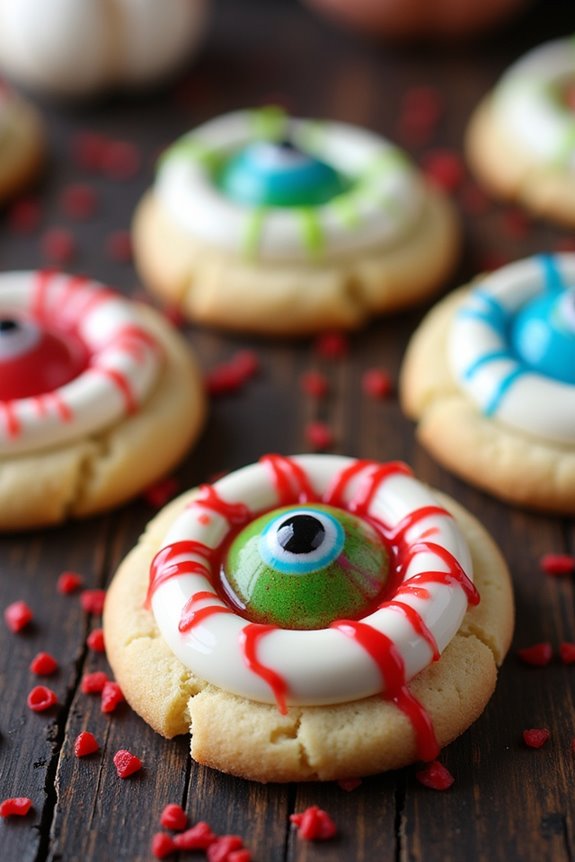
Monster Eyeball Treats are a spooky and fun addition to any Halloween celebration. These cookies aren’t only delicious but also add a touch of the eerie and whimsical to your holiday table. They’re perfect for parties, trick-or-treat bags, or even just a fun family baking activity. With a gooey center and a creepy appearance, these treats are sure to be a hit with both kids and adults alike.
The base of the Monster Eyeball Treats is a soft sugar cookie, which is then decorated to resemble an eyeball using colorful icing and candy. The combination of textures and flavors makes these cookies irresistible. Plus, you can get creative with the decorations, using different colors and types of candy to give each cookie its own unique “eye-catching” look.
Follow this recipe to make enough Monster Eyeball Treats to serve 4-6 people, and get ready to amaze your guests with these spooky delights.
Ingredients:
- 1 cup unsalted butter, softened
- 1 cup granulated sugar
- 1 large egg
- 1 teaspoon vanilla extract
- 2 ½ cups all-purpose flour
- 1 teaspoon baking powder
- ½ teaspoon salt
- ½ cup white chocolate chips, melted
- Assorted food coloring (red, green, blue, and black)
- Candy eyeballs or round candies for decoration
- Red and black gel icing for detailing
Cooking Instructions:
- Prepare the Dough: In a large bowl, cream together the softened butter and granulated sugar until light and fluffy. Add in the egg and vanilla extract, mixing until well combined.
- Mix Dry Ingredients: In a separate bowl, whisk together the all-purpose flour, baking powder, and salt. Gradually add the dry ingredients to the wet mixture, stirring until a smooth dough forms.
- Chill the Dough: Wrap the dough in plastic wrap and chill in the refrigerator for at least 30 minutes. This will make the dough easier to handle and help the cookies maintain their shape during baking.
- Preheat the Oven: While the dough is chilling, preheat your oven to 350°F (175°C) and line a baking sheet with parchment paper.
- Shape the Cookies: Once the dough is chilled, roll it into small balls, approximately 1 inch in diameter, and place them on the prepared baking sheet, spaced about 2 inches apart.
- Bake the Cookies: Bake the cookies in the preheated oven for 10-12 minutes or until the edges are lightly golden. Remove from the oven and let them cool on the baking sheet for a few minutes before transferring to a wire rack to cool completely.
- Decorate the Cookies: Once cooled, use a small brush to paint the melted white chocolate over the top of each cookie. Use food coloring to create different shades for the iris, and place a candy eyeball or round candy in the center. Use red and black gel icing to add veins and pupils for an extra spooky effect.
- Final Touches: Allow the decorations to set for at least 15 minutes before serving.
Extra Tips:
For the most vibrant colors, gel food coloring is recommended over liquid food coloring, as it provides a more concentrated hue. If you don’t have candy eyeballs, you can use small chocolate chips or round candies as a substitute.
For easy cleanup, place a sheet of wax paper under the cookies when decorating. Finally, you can prepare the cookie dough in advance and freeze it for up to two months, making it easy to have fresh Monster Eyeball Treats whenever you desire.
Witch Hat Cookies

Witch Hat Cookies are a delightful and whimsical treat that’s perfect for Halloween festivities. These cookies not only look enchanting but also taste delicious, making them a hit among both children and adults. The combination of chocolate, cookies, and colorful decorations brings a magical touch to your Halloween dessert table.
Making Witch Hat Cookies is a fun and creative activity that you can enjoy with family or friends, adding a little bit of magic to your Halloween celebrations. These cookies are simple to make and don’t require any baking skills, making them accessible for anyone wanting to add a homemade touch to their Halloween treats.
The process involves decorating store-bought fudge cookies with chocolate kisses to create the iconic witch hat shape. With a few steps and a little patience, you’ll have a batch of charming Witch Hat Cookies ready to delight your guests.
Ingredients (Serves 4-6 people):
- 12 fudge-striped cookies
- 12 chocolate kisses
- 1/4 cup of orange icing (or any Halloween-themed color)
- 1 tube of black decorating gel
- 1/4 cup of confectioners’ sugar (optional for dusting)
Cooking Instructions:
- Prepare Your Workspace: Start by setting up a clean workspace. Lay out the fudge-striped cookies, chocolate kisses, and decorative icing tools.
- Decorate the Cookies: Place the fudge-striped cookies with the chocolate side facing up on a flat surface. This will be the base of your witch hat.
- Attach the Chocolate Kiss: Use a small dollop of orange icing to attach a chocolate kiss to the center of each cookie. The icing acts as glue to hold the kiss in place, forming the pointed top of the witch hat.
- Add Decorative Details: Use the black decorating gel to draw a band around the base of the chocolate kiss where it meets the cookie. This adds a stylish touch and enhances the witch hat appearance.
- Optional Dusting: If desired, lightly dust the cookies with confectioners’ sugar to give them a magical, mystical glow.
- Allow to Set: Let the cookies sit for about 10-15 minutes to allow the icing to set and secure the chocolate kiss firmly to the cookie.
Extra Tips:
For a more personalized touch, experiment with different colors of icing or edible glitter to make your witch hats unique.
If you’re serving these cookies at a party, consider arranging them on a platter with other Halloween-themed treats for a festive display. Additionally, if you find the icing too thick to work with, you can thin it slightly with a drop of water to achieve the desired consistency.
Remember to have fun and get creative with your designs – after all, Halloween is all about imagination and delight!
Creepy Crawly Critter Bites
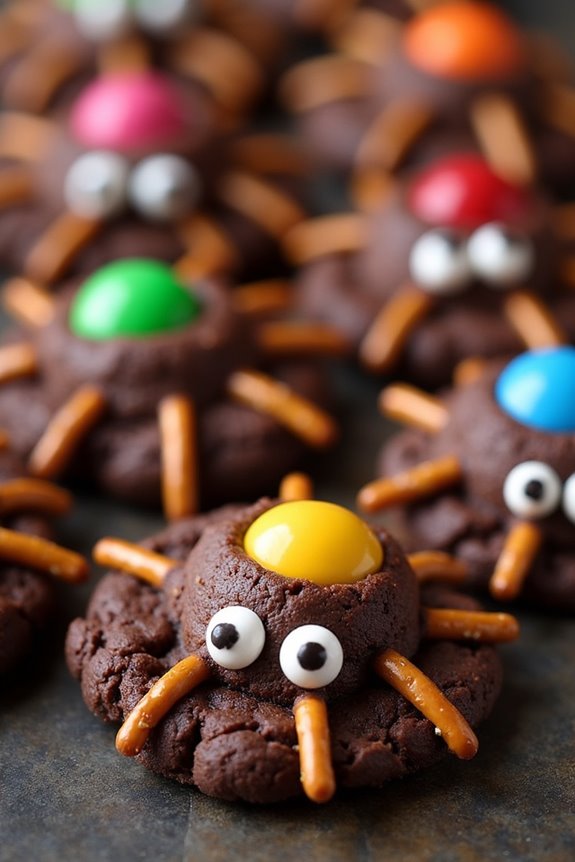
Halloween is the perfect time to let your imagination run wild in the kitchen, and Creepy Crawly Critter Bites are just the treat to spookify your dessert table. These deliciously eerie cookies aren’t only fun to make but are also a delightful combination of sweet and crunchy textures that will satisfy both the young and the young at heart.
Made with a rich chocolate base and topped with ‘critters’ crafted from colorful candies and pretzels, these cookies will be the highlight of any Halloween gathering. Perfect for a party of 4-6 people, these cookies are easy to make and even more fun to decorate.
The process involves preparing a simple chocolate cookie dough, baking it to perfection, and then getting creative with the decorations. The result is a batch of delectable cookies that look like critters crawling across a spooky landscape, sure to delight your guests and bring a touch of whimsy to your Halloween festivities.
Ingredients (serving size: 4-6 people):
- 1 cup unsalted butter, softened
- 1 cup granulated sugar
- 1 cup packed brown sugar
- 2 large eggs
- 1 teaspoon vanilla extract
- 2 ½ cups all-purpose flour
- ½ cup unsweetened cocoa powder
- 1 teaspoon baking soda
- ½ teaspoon salt
- 1 cup mini chocolate chips
- 24 pretzel sticks
- Assorted colored candy-coated chocolates (e.g., M&Ms)
- Black decorating gel
Instructions:
1. Preheat and Prepare: Preheat your oven to 350°F (175°C). Line two baking sheets with parchment paper to prevent the cookies from sticking and guarantee even baking.
2. Mix the Wet Ingredients: In a large mixing bowl, cream together the softened butter, granulated sugar, and brown sugar until the mixture is light and fluffy. This should take about 2-3 minutes with an electric mixer on medium speed.
Add in the eggs one at a time, beating well after each addition, and then mix in the vanilla extract.
3. Combine the Dry Ingredients: In a separate bowl, whisk together the flour, cocoa powder, baking soda, and salt. Gradually add this dry mixture to the wet ingredients, mixing until just combined.
Be careful not to overmix, as this can make the cookies tough.
4. Add Chocolate Chips****: Fold in the mini chocolate chips with a spatula until evenly distributed throughout the dough.
5. Shape the Cookies: Using a tablespoon, scoop the dough onto the prepared baking sheets, leaving about 2 inches between each cookie to allow for spreading during baking.
6. Bake: Place the baking sheets in the preheated oven and bake for 10-12 minutes, or until the edges are set and the centers are still slightly soft.
This will guarantee a chewy texture.
7. Cool and Decorate: Allow the cookies to cool on the baking sheets for 5 minutes before transferring them to a wire rack.
Once cooled, use the black decorating gel to create spider or critter bodies on the cookies. Break pretzel sticks into pieces for legs and use candy-coated chocolates for eyes and other features.
Get creative with your designs!
Extra Tips:
When baking Creepy Crawly Critter Bites, keep an eye on the baking time to guarantee the cookies remain soft and chewy. If you prefer a crispier texture, you can extend the baking time by a couple of minutes.
When decorating, make sure the cookies are completely cool to prevent the gel and candies from melting. Feel free to experiment with different candy colors and shapes to create a variety of critter designs.
These cookies can also be made a day in advance and stored in an airtight container, making them a convenient option for busy Halloween preparations.
Pumpkin Patch Delights
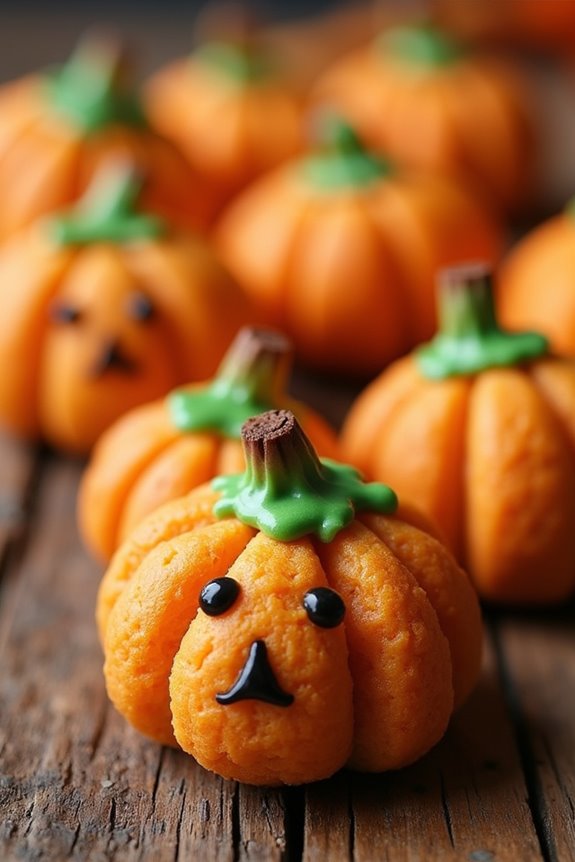
Halloween is the perfect time to indulge in creative and festive treats, and Pumpkin Patch Delights are a must-have addition to your spooky celebrations. These delightful cookies aren’t only delicious but also visually appealing, resembling mini pumpkin patches with their vibrant orange hue and cute pumpkin designs.
The combination of pumpkin puree and warm spices like cinnamon and nutmeg gives these cookies a cozy autumn flavor that’s sure to be a hit with both kids and adults. With a soft and chewy texture, they’re perfect for enjoying with a hot cup of cider or cocoa on a chilly Halloween night.
Crafting these cookies is a fun and rewarding experience, allowing you to get creative with decorating while embracing the spirit of the season. Whether you’re hosting a Halloween party, handing out treats to trick-or-treaters, or simply enjoying some homemade goodies with your family, Pumpkin Patch Delights will bring smiles to everyone’s faces.
This recipe yields enough cookies to serve 4-6 people, making it ideal for small gatherings or for ensuring there are plenty of treats to go around.
Ingredients (serves 4-6):
- 1 3/4 cups all-purpose flour
- 1 teaspoon baking soda
- 1/2 teaspoon salt
- 1/2 teaspoon ground cinnamon
- 1/4 teaspoon ground nutmeg
- 1/2 cup unsalted butter, softened
- 3/4 cup granulated sugar
- 1/2 cup brown sugar, packed
- 1 large egg
- 1 teaspoon vanilla extract
- 3/4 cup canned pumpkin puree
- Orange food coloring (optional)
- Green and black decorating gel or icing
Cooking Instructions:
- Preheat the Oven: Preheat your oven to 350°F (175°C) and line two baking sheets with parchment paper or silicone baking mats to prevent the cookies from sticking.
- Combine Dry Ingredients: In a medium bowl, whisk together the flour, baking soda, salt, cinnamon, and nutmeg until well combined. Set aside.
- Cream Butter and Sugars: In a large mixing bowl, beat the softened butter with an electric mixer on medium speed until creamy. Add the granulated sugar and brown sugar, and continue to beat until the mixture is light and fluffy.
- Mix in Wet Ingredients: Add the egg and vanilla extract to the butter-sugar mixture, mixing until fully incorporated. Then, blend in the pumpkin puree until the mixture is smooth.
- Incorporate Dry Ingredients: Gradually add the dry ingredient mixture to the wet ingredients, mixing on low speed until just combined. If desired, add a few drops of orange food coloring to achieve a bright pumpkin hue.
- Shape the Cookies: Using a tablespoon, scoop the dough and roll it into balls. Place them on the prepared baking sheets, leaving about 2 inches between each cookie to allow for spreading.
- Bake the Cookies: Bake in the preheated oven for 12-15 minutes, or until the edges are set and the tops are slightly firm. The cookies should be soft in the center, so avoid over-baking.
- Cool and Decorate: Allow the cookies to cool on the baking sheets for 5 minutes before transferring them to wire racks to cool completely. Once cooled, use green and black decorating gel or icing to draw pumpkin stems and faces on the cookies to create your pumpkin patch design.
Extra Tips:
For an extra burst of flavor, consider adding a pinch of ground cloves or allspice to the dry ingredients. If you want your cookies to be extra soft, slightly underbake them, allowing them to firm up as they cool.
Remember that food coloring is optional; the natural color from the pumpkin puree can also give these cookies a lovely autumn hue. Finally, if you find the dough too sticky to handle, chill it in the refrigerator for about 30 minutes before shaping, which will make it easier to work with. Enjoy these delightful cookies as a festive treat for your Halloween celebrations!
Black Cat Chocolate Cookies
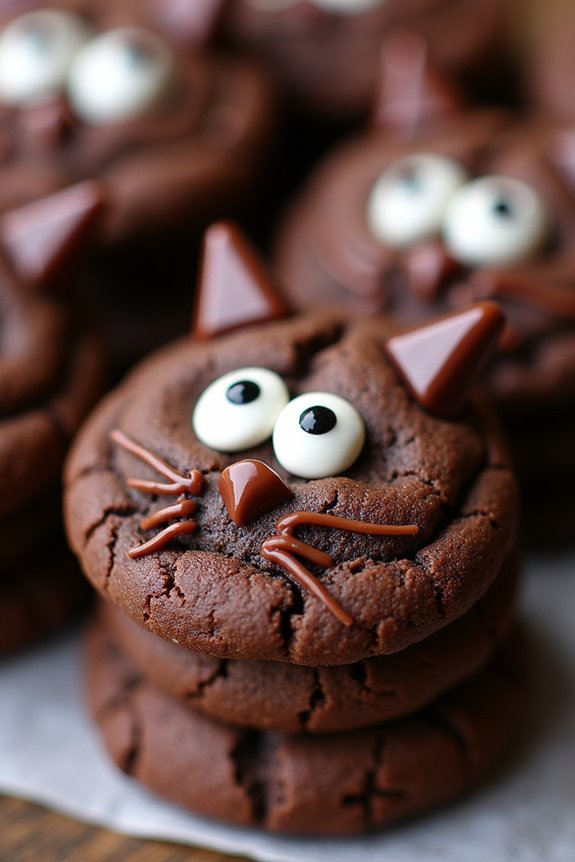
Celebrate Halloween with these delightful Black Cat Chocolate Cookies! These cookies aren’t only deliciously rich and chocolaty, but they also add a fun and spooky element to your Halloween festivities. Perfect for a family gathering or a party, these cookies are shaped like little black cats and are sure to be a hit with both children and adults alike.
Whether you’re a seasoned baker or a novice in the kitchen, this recipe is easy to follow and results in a batch of cookies that are as cute as they’re tasty. The secret to these cookies is in the combination of high-quality cocoa powder and chocolate chips, which together create a deep, intense chocolate flavor.
The dough is easy to work with, allowing you to shape each cookie into a distinct cat shape. Once baked, the cookies can be decorated with candy eyes or other decorative elements to bring your edible black cats to life. This recipe yields around 24 cookies, making it perfect for serving 4-6 people.
Ingredients (Serving size: 4-6 people)
- 1 cup unsalted butter, softened
- 1 cup granulated sugar
- 1 cup packed brown sugar
- 2 large eggs
- 1 teaspoon vanilla extract
- 2 ¾ cups all-purpose flour
- ¾ cup unsweetened cocoa powder
- 1 teaspoon baking soda
- ½ teaspoon baking powder
- ½ teaspoon salt
- 1 cup semi-sweet chocolate chips
- Candy eyes or white chocolate chips for decoration
Instructions
- Preheat and Prepare: Preheat your oven to 350°F (175°C). Line two baking sheets with parchment paper or silicone baking mats to prevent the cookies from sticking and guarantee even baking.
- Cream Butter and Sugars: In a large mixing bowl, cream together the softened butter, granulated sugar, and brown sugar until the mixture is light and fluffy. This should take about 2-3 minutes with an electric mixer.
- Add Wet Ingredients: Beat in the eggs one at a time, making sure each egg is fully incorporated before adding the next. Mix in the vanilla extract.
- Combine Dry Ingredients: In a separate bowl, whisk together the flour, cocoa powder, baking soda, baking powder, and salt. This helps evenly distribute the leavening agents and cocoa.
- Form the Dough: Gradually add the dry ingredients to the wet mixture, mixing at low speed until just combined. Stir in the chocolate chips by hand until evenly distributed.
- Shape the Cookies: Take about 1 ½ tablespoons of dough and shape it into a small ball. Flatten it slightly on the prepared baking sheet. Use additional dough to form ears by pinching two small pieces and attaching them to the top of each ball to create a cat shape.
- Bake: Place the cookies in the preheated oven and bake for 10-12 minutes. The cookies should be slightly firm around the edges but still soft in the center.
- Decorate: While the cookies are still warm, gently press candy eyes or white chocolate chips into each cookie to form the eyes of the cat.
- Cool and Serve: Allow the cookies to cool on the baking sheets for about 5 minutes before transferring them to a wire rack to cool completely.
Extra Tips
For an extra touch of Halloween flair, consider adding a small amount of black food coloring to the dough to enhance the color of the cookies. If you don’t have candy eyes, you can use white chocolate chips or small pieces of white frosting to create the eyes.
Be sure to space the cookies adequately on the baking sheet as they’ll expand during baking. Finally, these cookies store well in an airtight container for up to a week, making them an excellent make-ahead treat for your Halloween celebrations!
Batty Brownie Bites
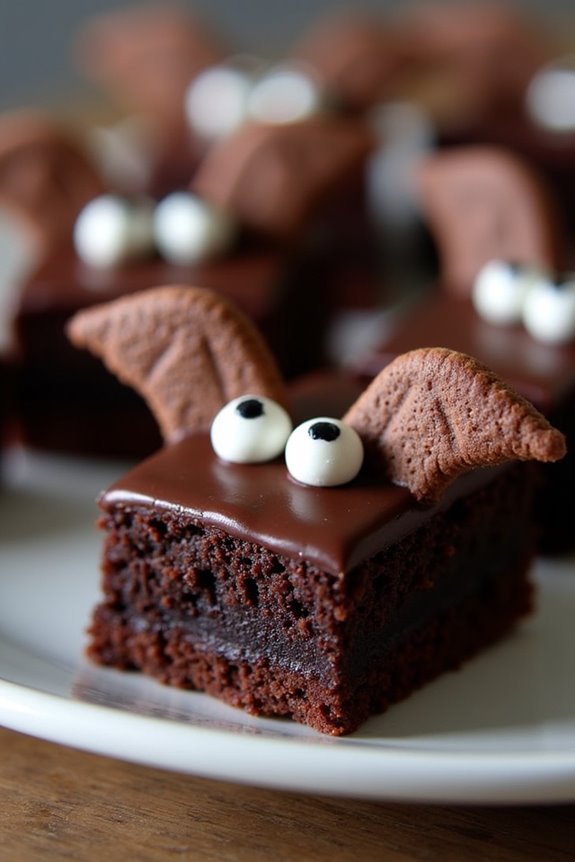
Get ready to transform your kitchen into a Halloween haven with these delightful Batty Brownie Bites. These bite-sized treats are perfect for both kids and adults, bringing a touch of spookiness to your Halloween celebrations. The rich, fudgy brownies are adorned with chocolate wings and candy eyes, creating a fun and festive dessert that’s both delicious and visually appealing.
Perfect for serving at a Halloween party or enjoying with your family at home, these Batty Brownie Bites are sure to be a hit. The recipe yields enough to serve 4-6 people, making it ideal for small gatherings. Each bite is packed with chocolatey goodness, ensuring that every guest will be coming back for more. Let’s plunge into the recipe and get ready to bake up some Halloween magic!
Ingredients (serving size: 4-6 people):
- 1 cup all-purpose flour
- 1/2 cup unsweetened cocoa powder
- 1/4 teaspoon baking powder
- 1/4 teaspoon salt
- 1/2 cup unsalted butter, melted
- 1 cup granulated sugar
- 2 large eggs
- 1 teaspoon vanilla extract
- 1/2 cup semi-sweet chocolate chips
- 24 chocolate wafer cookies (for wings)
- 48 candy eyes
Cooking Instructions:
- Preheat the Oven: Start by preheating your oven to 350°F (175°C). Prepare a 9×9 inch baking pan by lining it with parchment paper, leaving some overhang on the sides to lift the brownies out easily once baked.
- Mix Dry Ingredients: In a medium-sized bowl, whisk together the all-purpose flour, cocoa powder, baking powder, and salt. This combination will form the dry base for your brownie batter.
- Combine Wet Ingredients: In a separate large bowl, mix the melted butter and granulated sugar until well combined. Add in the eggs and vanilla extract, whisking until the mixture is smooth and creamy.
- Blend Batter: Gradually add the dry ingredients to the wet ingredients, stirring gently until just combined. Be careful not to overmix, as this can affect the texture of your brownies. Fold in the semi-sweet chocolate chips.
- Bake the Brownies: Pour the brownie batter into the prepared baking pan, spreading it evenly. Place the pan in the preheated oven and bake for 20-25 minutes, or until a toothpick inserted into the center comes out with a few moist crumbs.
- Cool and Cut: Allow the brownies to cool completely in the pan on a wire rack. Once cooled, lift the brownies out of the pan using the parchment paper overhang and cut them into bite-sized squares.
- Decorate: For each brownie bite, break a chocolate wafer cookie in half to create bat wings. Press the wings into the sides of each brownie bite. Use a dab of melted chocolate or icing to attach two candy eyes on top of each brownie.
Extra Tips:
When making Batty Brownie Bites, make sure your butter is fully melted but not hot, as hot butter can cook the eggs prematurely. If you don’t have candy eyes, you can use small dots of white icing with chocolate chips for a similar effect.
Additionally, feel free to get creative with the decorations by adding sprinkles or using different types of cookies for the wings. Enjoy these bites fresh or store them in an airtight container at room temperature for up to three days.
Haunted House Sugar Cookies
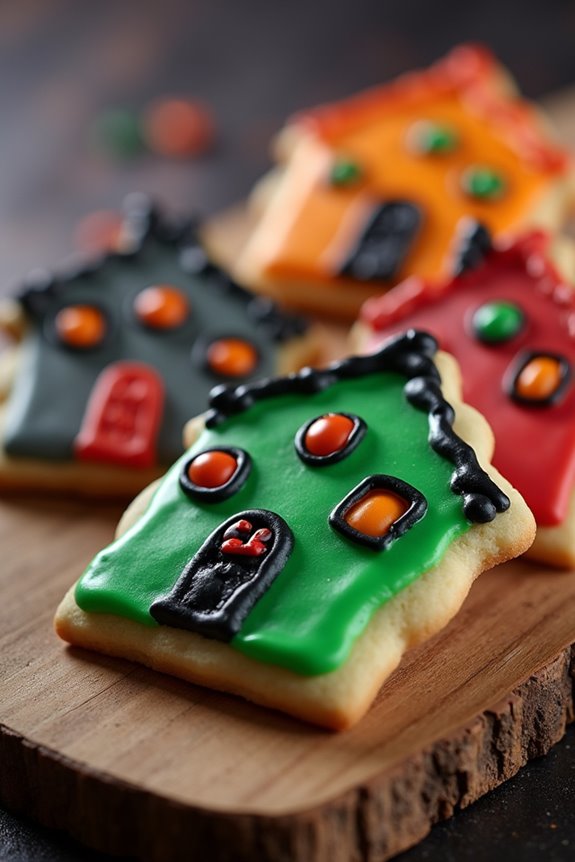
Haunted House Sugar Cookies are a fun and delicious way to celebrate Halloween. These spooky treats are perfect for a Halloween party or as a festive activity with family and friends. The cookies are shaped like haunted houses and decorated with icing and candies to add a ghoulish touch. Not only are they visually appealing, but they also taste delightful with a buttery, sweet flavor that’s sure to please kids and adults alike.
To make Haunted House Sugar Cookies, you’ll need to start with a classic sugar cookie dough. This dough serves as the base for your haunted houses and is easy to work with for cutting out intricate shapes. Once the cookies are baked and cooled, you can release your creativity by decorating them with colorful icing and various candies to mimic windows, doors, and other spooky details. This recipe will yield enough cookies to serve 4-6 people, making it perfect for a small gathering or family dessert.
Ingredients:
- 3 cups all-purpose flour
- 1 teaspoon baking powder
- 1/2 teaspoon salt
- 1 cup unsalted butter, softened
- 1 cup granulated sugar
- 1 large egg
- 1 teaspoon vanilla extract
- 1/2 teaspoon almond extract
- Assorted food coloring
- 2 cups powdered sugar
- 2-4 tablespoons milk
- Assorted candies for decoration (such as candy corn, mini chocolate chips, licorice strings)
Instructions:
- Prepare the Dough: In a medium bowl, whisk together the flour, baking powder, and salt. In a large bowl, cream the softened butter and granulated sugar until light and fluffy. Beat in the egg, vanilla extract, and almond extract until well combined. Gradually add the dry ingredients to the wet ingredients, mixing until the dough is formed.
- Chill the Dough: Divide the dough into two portions, flatten into disks, and wrap them in plastic wrap. Refrigerate for at least 1 hour or until firm to make rolling easier.
- Roll and Cut the Dough: Preheat your oven to 350°F (175°C). On a lightly floured surface, roll out one portion of the dough to about 1/4-inch thickness. Use haunted house-shaped cookie cutters (or cut freehand with a knife) to create your cookie shapes. Place the cutouts on lined baking sheets, leaving some space between each cookie.
- Bake the Cookies: Bake the cookies in the preheated oven for 8-10 minutes or until the edges are lightly golden. Allow them to cool on the baking sheet for a few minutes before transferring to a wire rack to cool completely.
- Prepare the Icing: In a bowl, mix the powdered sugar and milk until smooth. Add more milk if necessary to reach the desired consistency. Divide the icing into separate bowls and add different food colorings to each to create a palette for decorating.
- Decorate the Cookies: Once the cookies have cooled, use the colored icing and candies to decorate your haunted houses. Use piping bags or small brushes to apply the icing, and let your imagination run wild with spooky designs.
Extra Tips:
For the best results, verify that your butter is softened but not melted when preparing the dough. This will help achieve the right texture for rolling and cutting.
When decorating, use a toothpick or a small brush for precision when adding intricate details with icing. If you plan to use candies for decoration, consider using edible adhesive or a dot of icing to keep them in place.
Finally, for a more vibrant color, use gel food coloring instead of liquid to prevent altering the icing consistency. Enjoy your creative and delicious Haunted House Sugar Cookies!
Frankentreats
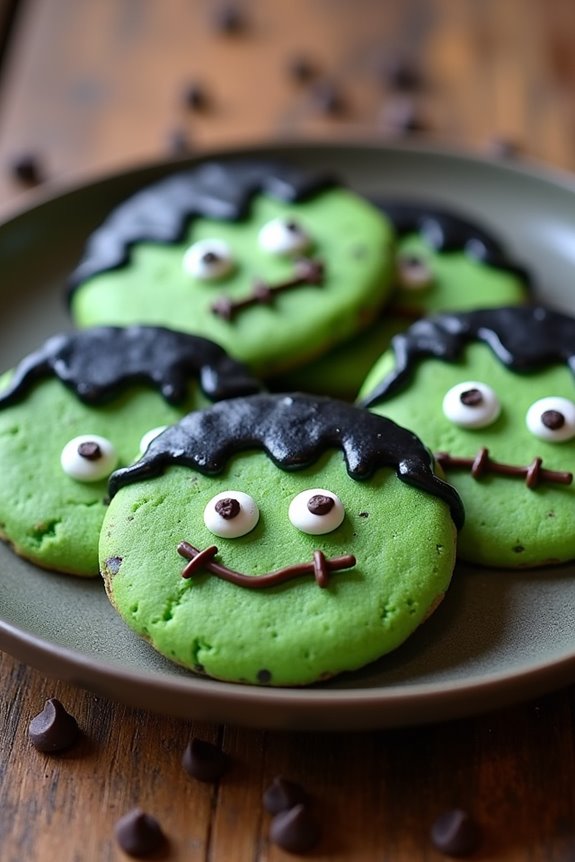
This Halloween, add a little spooky fun to your baking with these delightfully creepy Frankentreats!
These Halloween cookies are a delicious nod to everyone’s favorite monster: Frankenstein. With a rich, buttery base and vibrant green color, these cookies are sure to be a hit at your Halloween party or as a fun treat for the family.
Whether you’re an experienced baker or a novice in the kitchen, this recipe is simple to follow and perfect for creating a memorable festive dessert.
The Frankentreats aren’t only visually appealing but also packed with flavor. The soft and chewy cookies are accented with chocolate chips and decorated with icing to resemble Frankenstein’s monster.
Kids will love helping out with this recipe, especially when it comes to decorating the cookies. This recipe yields 24 cookies, perfect for serving 4-6 people with a few cookies each.
Gather your ingredients and get ready to bring these monstrous treats to life!
Ingredients:
- 2 ½ cups all-purpose flour
- 1 teaspoon baking soda
- ½ teaspoon salt
- 1 cup unsalted butter, softened
- ¾ cup granulated sugar
- ¾ cup packed brown sugar
- 1 teaspoon vanilla extract
- 2 large eggs
- Green food coloring
- 1 cup mini chocolate chips
- Black decorating gel
- Candy eyeballs
- ½ cup chocolate frosting
Cooking Instructions:
- Preheat the oven: Start by preheating your oven to 350°F (175°C). Line two baking sheets with parchment paper or silicone baking mats.
- Mix the dry ingredients: In a medium-sized bowl, whisk together the flour, baking soda, and salt. Set this mixture aside.
- Cream the butter and sugars: In a large mixing bowl, cream together the softened butter, granulated sugar, and brown sugar with an electric mixer on medium speed until the mixture is light and fluffy.
- Add eggs and vanilla: Beat in the eggs one at a time, mixing well after each addition. Stir in the vanilla extract.
- Combine dry and wet ingredients: Gradually add the dry ingredients to the wet mixture, mixing on low speed until just combined.
- Color and add chocolate chips: Add green food coloring to the dough and mix until the desired shade of green is achieved. Stir in the mini chocolate chips.
- Shape the cookies: Drop tablespoon-sized balls of dough onto the prepared baking sheets, leaving about 2 inches of space between each cookie.
- Bake the cookies: Bake in the preheated oven for 10-12 minutes, or until the edges are lightly golden. Be careful not to overbake as the cookies will continue to set as they cool.
- Cool and decorate: Allow cookies to cool on the baking sheets for 5 minutes before transferring them to a wire rack. Once completely cooled, use black decorating gel to draw a scar and a mouth on each cookie. Attach candy eyeballs with a small dab of chocolate frosting.
Extra Tips:
For perfectly uniform cookies, use a cookie scoop to portion out the dough.
If you want to make your Frankentreats even more festive, consider adding a pinch of black or purple sprinkles for extra texture and color.
Additionally, don’t hesitate to get creative with your decorations; you can use different types of candies or edible markers to create unique facial expressions for your Frankenstein cookies.
Enjoy creating these ghoulish treats and have a spook-tacular Halloween!
Candy Corn Crunchies
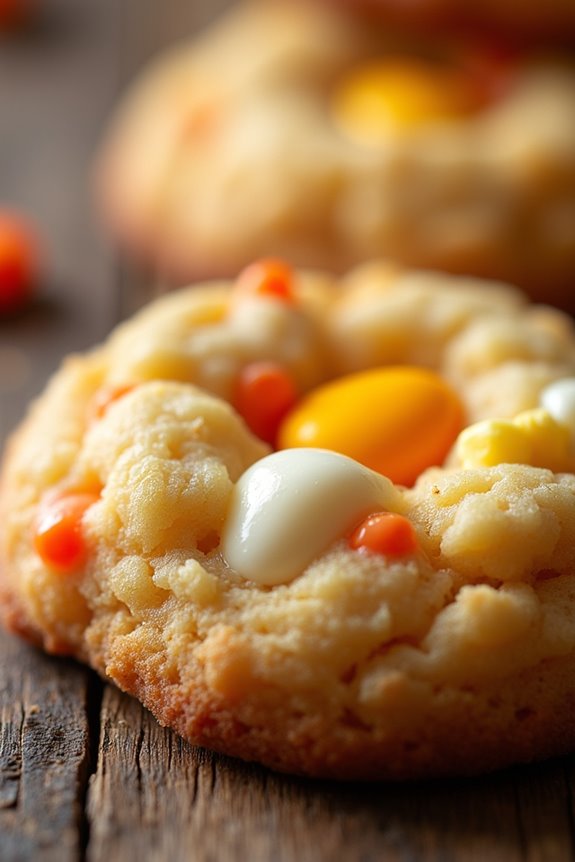
Halloween is the perfect time to whip up some spooky treats, and what better way to celebrate than with a batch of Candy Corn Crunchies? These delightful cookies combine the sweet and buttery flavor of traditional sugar cookies with the unmistakable crunch and vibrant colors of candy corn. Perfect for Halloween parties or just a festive treat at home, these cookies are sure to be a hit with both kids and adults alike.
The combination of textures from the soft cookie and the crunchy candy corn bits make for a truly delightful experience. Candy Corn Crunchies aren’t only delicious but also a fun baking project that can involve the whole family. With Halloween around the corner, these cookies are a great way to get into the festive spirit.
They’re easy to make and require only a few ingredients, making them an ideal choice for a quick and tasty dessert. The recipe yields about 24 cookies, which is perfect for a gathering of 4-6 people. Now, let’s plunge into the ingredients and instructions needed to create these spooky Halloween treats.
Ingredients (Serves 4-6 people):
- 1 cup (2 sticks) unsalted butter, softened
- 1 cup granulated sugar
- 1 large egg
- 2 teaspoons vanilla extract
- 2 ½ cups all-purpose flour
- ½ teaspoon baking powder
- ¼ teaspoon salt
- 1 cup candy corn, roughly chopped
- ½ cup chopped walnuts (optional)
Instructions:
- Preheat the Oven: Preheat your oven to 350°F (175°C) and line two baking sheets with parchment paper to prevent the cookies from sticking.
- Mix the Wet Ingredients: In a large mixing bowl, cream together the softened butter and granulated sugar until light and fluffy. This should take about 2-3 minutes using an electric mixer on medium speed. Add in the egg and vanilla extract, and continue to beat until well combined.
- Combine Dry Ingredients: In a separate bowl, whisk together the all-purpose flour, baking powder, and salt. Gradually add the dry ingredients to the wet ingredients, mixing on low speed until just combined. Be careful not to overmix the dough.
- Incorporate Candy Corn: Gently fold in the roughly chopped candy corn and chopped walnuts (if using) into the dough until evenly distributed. The candy corn adds a festive touch and a delightful crunch to the cookies.
- Shape the Cookies: Using a tablespoon or cookie scoop, drop rounded tablespoons of dough onto the prepared baking sheets, spacing them about 2 inches apart to allow for spreading.
- Bake the Cookies: Bake in the preheated oven for 10-12 minutes or until the edges are lightly golden brown. The centers may appear slightly underbaked, but they’ll firm up as they cool.
- Cool and Serve: Allow the cookies to cool on the baking sheets for 5 minutes before transferring them to a wire rack to cool completely. Serve at room temperature and enjoy the Halloween festivities!
Extra Tips:
To guarantee your Candy Corn Crunchies turn out perfectly, it’s important not to overbake them as the candy corn can melt and create a sticky mess if left in the oven for too long.
If you find the candy corn pieces melting too much, try placing them more towards the center of the cookie dough ball rather than on the edges. Also, for extra flavor, consider adding a hint of cinnamon or nutmeg to the dough for a warm, autumnal twist.
Finally, these cookies can be stored in an airtight container for up to a week, making them an ideal make-ahead treat for your Halloween celebrations.
Jack-O’-Lantern Smiles
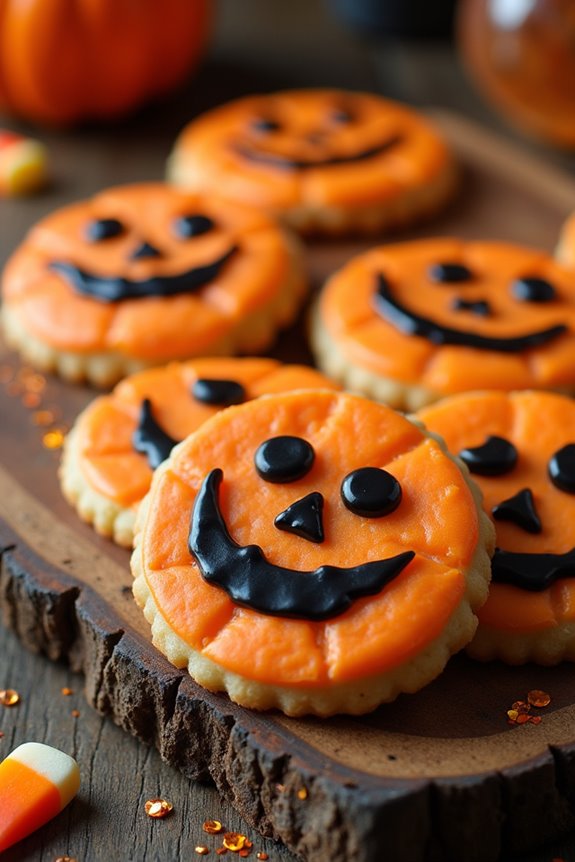
The secret to achieving the perfect Jack-O’-Lantern Smile is in the decorating. Using a simple icing, these cookies can be transformed into adorable pumpkins with grinning faces.
Make certain you have all the tools and decorations ready before you start baking, as this will make the process smoother and more enjoyable. Whether you’re hosting a Halloween party or simply enjoying a cozy night in, these cookies are a wonderful way to embrace the spooky spirit of the season.
Ingredients (Serves 4-6 people):
- 2 1/2 cups all-purpose flour
- 1/2 teaspoon baking powder
- 1/4 teaspoon salt
- 1/2 cup unsalted butter, softened
- 1 cup granulated sugar
- 1 large egg
- 1 teaspoon vanilla extract
- Orange food coloring
- Black icing or gel for decorating
Cooking Instructions:
- Preheat the Oven: Start by preheating your oven to 350°F (175°C). This will make certain that your cookies bake evenly once they’re ready to go in.
- Prepare the Dough: In a medium-sized bowl, whisk together the all-purpose flour, baking powder, and salt. Set aside.
- Cream the Butter and Sugar: In a larger mixing bowl, cream the softened butter and granulated sugar together using an electric mixer until light and fluffy. This should take about 2-3 minutes.
- Add Wet Ingredients: Beat in the egg and vanilla extract to the butter mixture until well combined. If desired, add a few drops of orange food coloring to achieve your preferred shade of orange for the cookies.
- Combine Ingredients: Gradually add the dry ingredients to the wet mixture, mixing until a soft dough forms.
- Roll Out the Dough: On a lightly floured surface, roll out the dough to about 1/4 inch thickness. Use a round cookie cutter to cut out circles from the dough.
- Bake the Cookies: Place the dough circles on a baking sheet lined with parchment paper. Bake in the preheated oven for 8-10 minutes, or until the edges begin to turn golden. Allow the cookies to cool completely on a wire rack.
- Decorate the Cookies: Once cooled, use black icing or gel to draw Jack-O’-Lantern faces onto the cookies. Get creative with different expressions!
Extra Tips:
To make the Jack-O’-Lantern Smiles even more festive, consider adding some additional decorations like edible glitter or candy corn for added fun.
If you don’t have a round cookie cutter, you can use the rim of a glass to cut out the dough circles. Make certain that the cookies are completely cooled before decorating to avoid the icing from melting.
Store the cookies in an airtight container to maintain freshness if you want to prepare them a day in advance. Enjoy these cookies with a glass of milk or a warm cup of cider for the ultimate Halloween treat!
Mummy Wrapped Delicacies
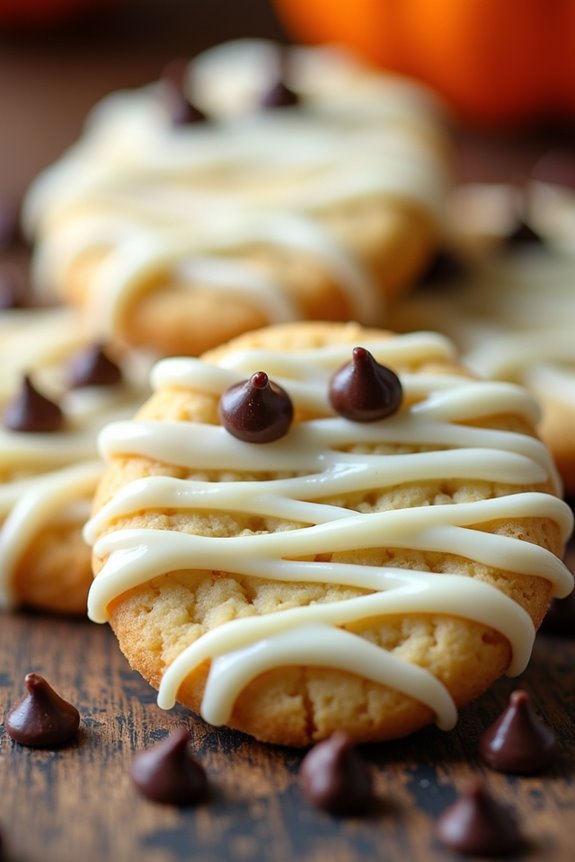
Mummy Wrapped Delicacies are a fun and spooky treat perfect for Halloween festivities. These delicious cookies are designed to resemble mummies, making them a hit with both kids and adults alike. With a combination of buttery shortbread and sweet white chocolate drizzles, these cookies aren’t only visually appealing but also incredibly tasty. The process of making these cookies is simple and enjoyable, allowing you to get creative with the decoration to bring your mummies to life.
This recipe yields about 24 cookies, which is ideal for serving 4-6 people, perfect for a small Halloween gathering or family treat. Each cookie is wrapped in white chocolate to mimic the appearance of mummy bandages, and small chocolate chips are used to create spooky eyes. Follow the steps below to create these delightful Mummy Wrapped Delicacies that will surely be a highlight of your Halloween celebration.
Ingredients:
- 2 cups all-purpose flour
- 1 cup unsalted butter, softened
- 1/2 cup powdered sugar
- 1 teaspoon vanilla extract
- 1/4 teaspoon salt
- 1 cup white chocolate chips
- 1 tablespoon vegetable oil
- Mini chocolate chips for eyes
Cooking Instructions:
- Preheat Oven: Preheat your oven to 350°F (175°C) and line a baking sheet with parchment paper.
- Prepare the Dough: In a large mixing bowl, cream together the softened butter and powdered sugar until light and fluffy. Add the vanilla extract and mix until combined. Gradually add the flour and salt, mixing until a dough forms.
- Shape the Cookies: Roll the dough into small logs, about 3 inches long and 1/2 inch thick, to resemble mummy bodies. Place them on the prepared baking sheet, leaving space between each cookie.
- Bake: Bake the cookies in the preheated oven for 12-15 minutes, or until the edges are lightly golden. Remove from the oven and allow them to cool completely on a wire rack.
- Melt the White Chocolate: In a microwave-safe bowl, combine the white chocolate chips and vegetable oil. Microwave in 30-second intervals, stirring in between, until the chocolate is melted and smooth.
- Decorate the Mummies: Using a fork, drizzle the melted white chocolate over the cooled cookies to create mummy bandages. Place two mini chocolate chips on each cookie for eyes while the chocolate is still wet.
- Set the Chocolate: Allow the chocolate to set completely by placing the cookies in the refrigerator for about 10 minutes.
Extra Tips:
For a more detailed mummy appearance, you can use a piping bag with a small round tip to drizzle the white chocolate, allowing you to create more precise bandage lines.
If you prefer a different flavor, try using dark chocolate instead of white chocolate for a unique twist.
Additionally, if you’re in a hurry, you can use pre-made sugar cookie dough as a quick alternative to making the dough from scratch.
Remember to store any leftover cookies in an airtight container to keep them fresh. Enjoy your Mummy Wrapped Delicacies with a glass of milk or a warm cup of cider for the perfect Halloween treat!
Graveyard Cookie Bars
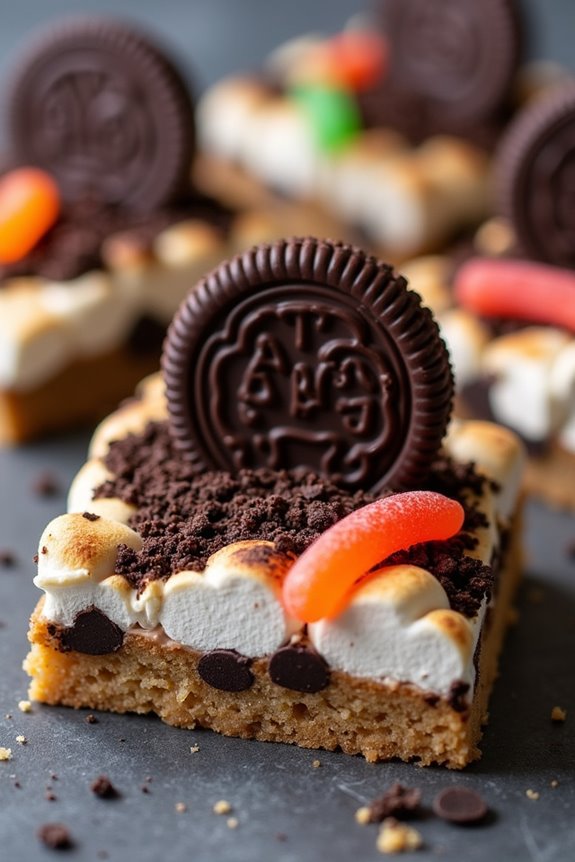
Graveyard Cookie Bars are a spooktacular treat perfect for any Halloween gathering. These deliciously eerie desserts combine the classic flavors of chocolate chip cookie dough with a hauntingly fun presentation. With a crumbly cookie base and ghostly decorations, these bars are bound to be a hit among both kids and adults. They aren’t only delightful to look at but also absolutely scrumptious to eat.
The preparation of Graveyard Cookie Bars involves creating a cookie dough base, layering it with rich chocolate and marshmallow toppings, and adorning with festive Halloween-themed decorations. Molded into a graveyard scene, each bar captures the spirit of Halloween, making them perfect for parties or a special family treat. This recipe serves 4-6 people, so it’s ideal for small gatherings or as a fun family activity.
Ingredients:
- 1 cup unsalted butter, softened
- 1 cup granulated sugar
- 1 cup brown sugar
- 2 large eggs
- 1 teaspoon vanilla extract
- 3 cups all-purpose flour
- 1 teaspoon baking soda
- 1/2 teaspoon salt
- 1 cup chocolate chips
- 1 cup mini marshmallows
- 12 chocolate sandwich cookies
- 6 rectangular chocolate cookies (e.g., Milano cookies)
- Black decorating gel
- Assorted Halloween candies (e.g., gummy worms)
Cooking Instructions:
- Preheat and Prepare Pan: Preheat your oven to 350°F (175°C). Line a 9×13 inch baking pan with parchment paper, leaving some overhang on the sides for easy removal.
- Make Cookie Dough: In a large mixing bowl, cream together the softened butter, granulated sugar, and brown sugar until light and fluffy. Add in the eggs one at a time, beating well after each addition. Mix in the vanilla extract.
- Combine Dry Ingredients: In a separate bowl, whisk together the flour, baking soda, and salt. Gradually add the dry ingredients to the wet mixture, mixing until just combined. Stir in the chocolate chips.
- Spread Dough: Press the cookie dough evenly into the prepared baking pan. Scatter the mini marshmallows over the top of the cookie dough.
- Bake: Bake in the preheated oven for 25-30 minutes, or until the edges are golden brown and the marshmallows are slightly toasted. Remove from the oven and let cool completely in the pan on a wire rack.
- Create Graveyard Scene: Crush the chocolate sandwich cookies in a resealable bag using a rolling pin. Sprinkle the crushed cookies over the cooled bars to create a “dirt” look.
- Decorate: Write spooky messages or RIP on the chocolate cookies with black decorating gel. Stand these cookies upright in the bars to resemble tombstones. Add gummy worms and other Halloween candies around the tombstones for an added creepy effect.
- Serve: Once decorated, carefully lift the bars out of the pan using the parchment paper overhang. Cut into squares and serve.
Extra Tips: When decorating, feel free to get creative with your design. You can use additional decorations like candy pumpkins, edible eyes, or skeleton figurines to enhance the graveyard theme.
If you prefer your bars chewier, reduce the baking time slightly, watching them closely to avoid overbaking. Remember to let the bars cool completely before adding the decorations to guarantee they adhere properly and maintain the intended spooky effect.
Vampire Fang Bites
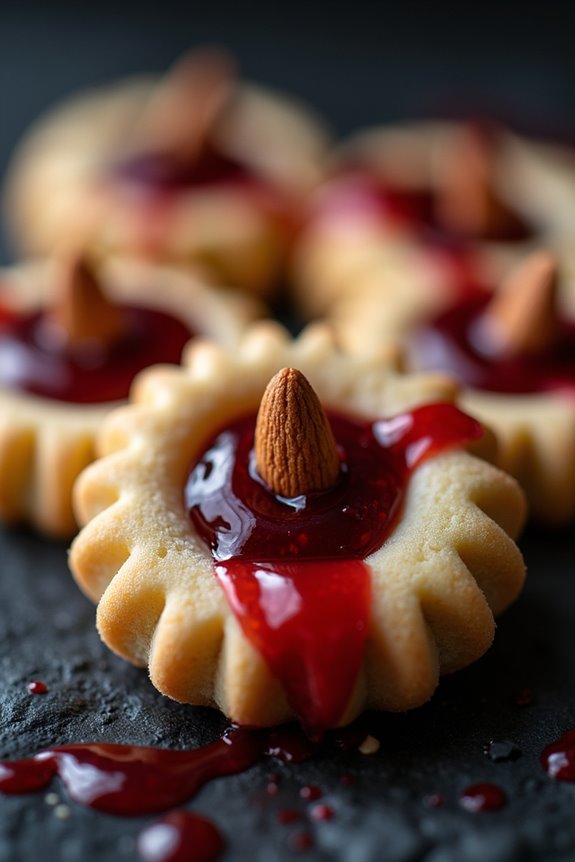
The cookies themselves are a buttery, tender shortbread, while the filling provides a bright pop of color and a sweet-tart contrast. The fangs are shaped using a simple template and a steady hand, and the final assembly is a breeze.
This recipe makes enough for 4-6 people, ensuring everyone gets a taste of these frightful delights. Gather your ingredients and get ready to bake up a storm of spooky fun with this easy-to-follow recipe.
Ingredients for 4-6 servings:
- 1 cup unsalted butter, softened
- 3/4 cup powdered sugar
- 1 teaspoon vanilla extract
- 2 cups all-purpose flour
- 1/4 teaspoon salt
- 1/2 cup raspberry or strawberry jam
- Red food coloring (optional)
- Slivered almonds
Cooking Instructions:
- Preheat the Oven: Start by preheating your oven to 350°F (175°C). Line two baking sheets with parchment paper.
- Prepare the Cookie Dough: In a large mixing bowl, cream together the softened butter and powdered sugar until light and fluffy. Add in the vanilla extract and mix well. Gradually incorporate the all-purpose flour and salt, mixing until the dough comes together.
- Shape the Fangs: Roll small portions of dough into logs about 3 inches long and 1/2 inch wide. Gently flatten the logs with your fingers, and use a knife to cut the ends into a pointed fang shape. Place the fangs onto the prepared baking sheets, leaving some space between each one.
- Bake the Cookies: Bake in the preheated oven for 10-12 minutes, or until the edges are lightly golden. Be careful not to overbake, as you want the cookies to remain pale with slightly golden edges. Once baked, allow the cookies to cool on the sheets for 5 minutes before transferring them to a wire rack to cool completely.
- Prepare the Filling: In a small saucepan, heat the raspberry or strawberry jam over low heat until it becomes smooth and slightly thickened. For a more dramatic effect, add a few drops of red food coloring to intensify the color. Let the mixture cool slightly.
- Assemble the Vampire Fangs: Once the cookies are cooled, use a small spoon to spread a thin layer of the jam filling onto the flat side of each cookie. Press two slivered almonds into the jam on each cookie to resemble fangs. Allow the jam to set before serving.
Extra Tips:
For a more realistic look, you can gently brush the ends of the slivered almonds with a bit of the jam to create a blood-dripping effect.
If you don’t have slivered almonds, you can use sliced almonds or even small candy pieces to create the fang effect. Store the cookies in an airtight container for up to a week, but for the freshest taste, serve them within a few days.
If you’re looking to add even more spookiness, consider pairing these cookies with a glass of red fruit punch for a complete vampire-themed refreshment.