

Halloween is almost here, and I couldn’t be more thrilled to share some enchanting cupcake ideas with you. Picture ghostly vanilla delights adorned with chocolate chip eyes or witchy wonders topped with charming chocolate-dipped hats. Each cupcake is a deliciously eerie masterpiece, from monster mash chocolate to bloodshot eyeball surprises. Are you intrigued yet? Let’s explore these spooktacular treats that will enchant your taste buds and add a magical touch to your Halloween celebrations!
Ghostly Vanilla Cupcakes
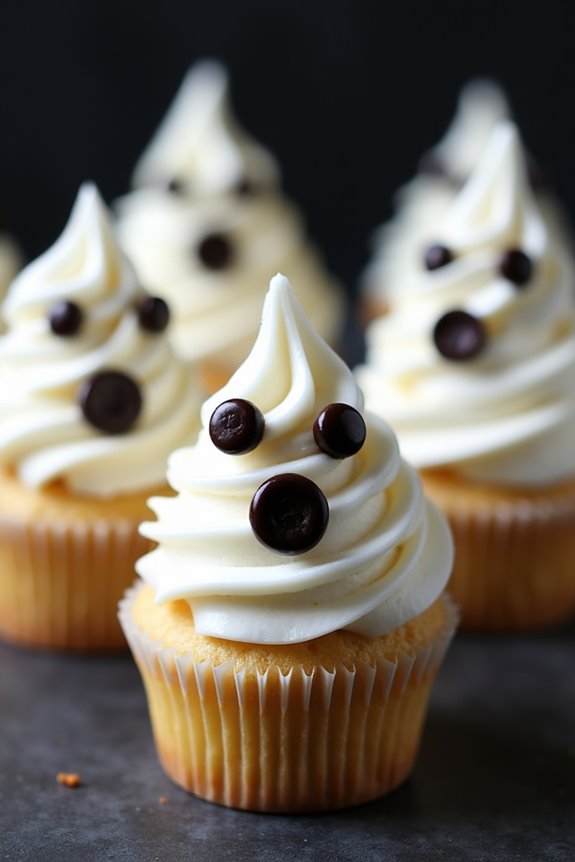
Get ready to spook your taste buds with these delightful Ghostly Vanilla Cupcakes! Perfect for a Halloween party, these cupcakes combine the classic flavors of vanilla with a hauntingly fun design. The cupcakes are light and fluffy, and the ghost decorations add a playful touch that’s sure to be a hit with both kids and adults.
Whether you’re hosting a Halloween bash or simply want to indulge in a festive treat, these cupcakes are bound to impress. The recipe yields 12 cupcakes, making it ideal for serving 4-6 people, depending on whether your guests are looking for seconds.
To create the ghostly effect, you’ll be using a creamy vanilla frosting and some clever decorating techniques to bring your spooky visions to life. Let’s jump into the ingredients and instructions to craft these eerie delights.
Ingredients (Serving Size: 4-6 people)
- 1 ½ cups all-purpose flour
- 1 ½ teaspoons baking powder
- ¼ teaspoon salt
- ½ cup unsalted butter, softened
- 1 cup granulated sugar
- 2 large eggs
- 2 teaspoons vanilla extract
- ½ cup whole milk
- 1 ½ cups vanilla frosting
- Black decorating gel
- Mini chocolate chips
Instructions
- Preheat and Prep: Start by preheating your oven to 350°F (175°C). Line a 12-cup muffin tin with cupcake liners to keep your cupcakes from sticking.
- Mix Dry Ingredients: In a medium bowl, whisk together the flour, baking powder, and salt. This will make certain that your dry ingredients are evenly distributed throughout the batter.
- Cream Butter and Sugar: In a large bowl, cream together the softened butter and granulated sugar using an electric mixer on medium speed until the mixture is light and fluffy.
- Add Eggs and Vanilla: Beat in the eggs one at a time, ensuring each egg is fully incorporated before adding the next. Mix in the vanilla extract to add a rich flavor to your batter.
- Combine Wet and Dry Ingredients: Gradually add the dry ingredients to the butter mixture, alternating with the milk. Start and end with the flour mixture, mixing until just combined. Be careful not to overmix, as this can make the cupcakes dense.
- Fill and Bake: Divide the batter evenly among the cupcake liners, filling each about two-thirds full. Bake in the preheated oven for 18-20 minutes, or until a toothpick inserted into the center comes out clean.
- Cool the Cupcakes: Allow the cupcakes to cool in the pan for 5 minutes, then transfer them to a wire rack to cool completely before frosting.
- Decorate: Once cooled, frost each cupcake with a generous amount of vanilla frosting. Use a spoon or spatula to create soft peaks resembling ghost shapes. Add two mini chocolate chips to each cupcake for eyes, and use the black decorating gel to draw a small, oval mouth.
Extra Tips: To enhance the ghostly theme, consider adding a drop of food coloring to the frosting to create a subtle glow-in-the-dark effect under blacklight.
If you prefer a more robust vanilla flavor, you can use vanilla bean paste instead of vanilla extract. For an even spookier look, sprinkle a bit of crushed chocolate cookies around the base of each ghost to mimic a dirt effect.
Wicked Witch Hat Cupcakes
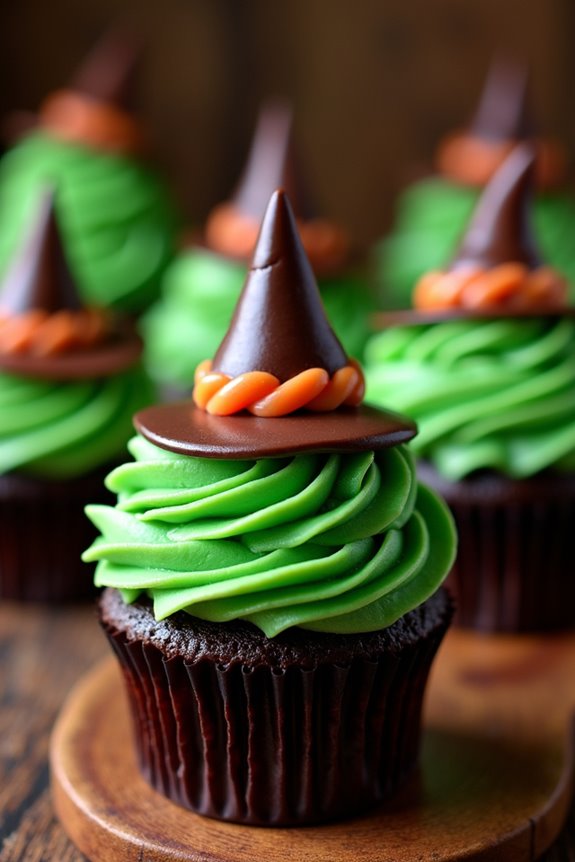
The magic lies in the decoration, where you can let your creativity run wild. The witch hats are made using chocolate-dipped sugar cones, and a bit of licorice or candy can be used to create the hat’s band.
Whether you’re hosting a Halloween party or simply want to surprise your family with a spooky treat, these Wicked Witch Hat Cupcakes are guaranteed to impress.
Ingredients (Serves 4-6 People)
- 1 ½ cups all-purpose flour
- 1 cup granulated sugar
- ½ cup unsweetened cocoa powder
- 1 teaspoon baking soda
- ½ teaspoon baking powder
- ½ teaspoon salt
- 1 large egg
- ½ cup buttermilk
- ½ cup vegetable oil
- 1 teaspoon vanilla extract
- ½ cup boiling water
- 6 sugar cones
- 2 cups green frosting
- 1 cup chocolate chips (for dipping)
- 12-18 licorice strings or candy strips
Cooking Instructions
- Prepare the Oven and Cupcake Liners: Preheat your oven to 350°F (175°C). Line a standard 12-cup muffin tin with cupcake liners.
- Mix Dry Ingredients: In a large bowl, whisk together the flour, sugar, cocoa powder, baking soda, baking powder, and salt.
- Combine Wet Ingredients: In another bowl, mix the egg, buttermilk, vegetable oil, and vanilla extract. Gradually incorporate the wet mixture into the dry ingredients, stirring until combined.
- Incorporate Boiling Water: Slowly add the boiling water to the batter, mixing continuously. The batter will be thin, but this is normal.
- Bake the Cupcakes: Divide the batter evenly among the cupcake liners, filling each about two-thirds full. Bake for 18-22 minutes, or until a toothpick inserted comes out clean. Let them cool completely on a wire rack.
- Prepare the Witch Hats: While the cupcakes cool, melt the chocolate chips in a microwave-safe bowl, stirring every 30 seconds until smooth. Dip the sugar cones into the melted chocolate, coating them completely. Let them set on parchment paper.
- Frost the Cupcakes: Once the cupcakes are completely cool, pipe the green frosting on top using a star or round tip to resemble a witch’s face.
- Assemble the Hats: Once the chocolate on the cones has set, place each cone on top of a cupcake. Use the licorice or candy strips to wrap around the base of the cone to create a hat band.
Extra Tips
For added flavor, you can infuse the green frosting with a hint of mint extract.
If you find it difficult to keep the cones upright on the cupcakes, try inserting a toothpick through the base of the cone into the cupcake for extra stability.
Be cautious with the boiling water when mixing into the batter, as it’s essential for achieving the perfect cupcake texture.
Feel free to customize your witch hats with additional decorations like edible glitter or candy eyes to give each witch a unique personality.
Monster Mash Cupcakes
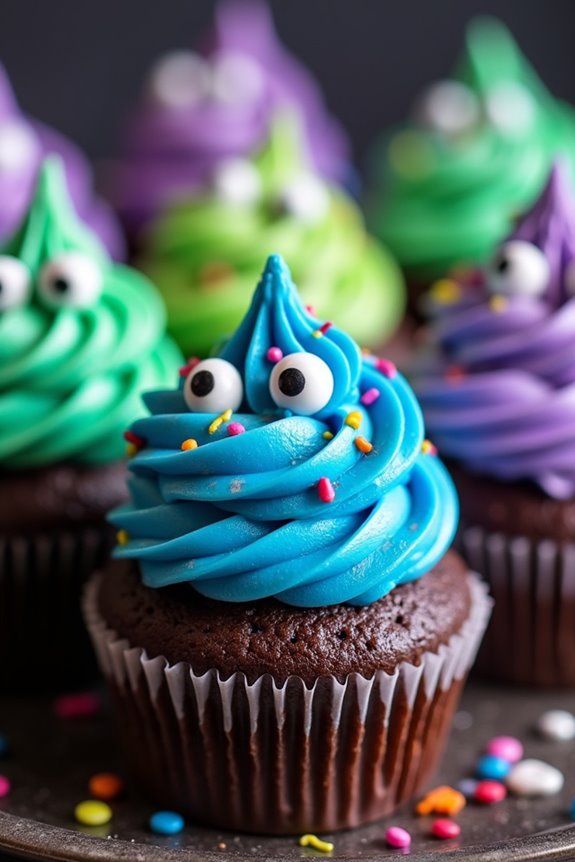
Monster Mash Cupcakes are the perfect treat to bring a touch of whimsical fright to your Halloween celebrations. These cupcakes aren’t only fun to make but also delightfully delicious. With a moist chocolate base and a colorful, monster-themed frosting, they’re sure to be a hit with both children and adults.
The recipe allows for creative decorating, making it a fantastic activity for the whole family to enjoy together. Whether you’re hosting a Halloween party or simply want to surprise your loved ones with a spooky dessert, these cupcakes are a fantastic choice.
This recipe yields 12 cupcakes, serving 4-6 people. The key to creating the perfect Monster Mash Cupcakes is in the details—choosing vibrant colors for the frosting, adding candy eyes, and experimenting with different textures. The base of the cupcakes is a classic chocolate flavor, which pairs wonderfully with the sweet, colorful frosting.
You can use gel food coloring to achieve the desired monster hues, and don’t forget to stock up on fun decorations like edible eyes and sprinkles to bring your monsters to life.
Ingredients:
- 1 cup all-purpose flour
- 1 cup granulated sugar
- 1/3 cup unsweetened cocoa powder
- 1 teaspoon baking powder
- 1/2 teaspoon baking soda
- 1/4 teaspoon salt
- 1/2 cup milk
- 1/3 cup vegetable oil
- 1 large egg
- 1 teaspoon vanilla extract
- 1/2 cup boiling water
Frosting and Decoration:
- 1/2 cup unsalted butter (softened)
- 2 cups powdered sugar
- 2-3 tablespoons milk
- 1 teaspoon vanilla extract
- Gel food coloring (various colors)
- Edible candy eyes
- Assorted sprinkles
Instructions:
- Preheat and Prepare: Preheat your oven to 350°F (175°C) and line a muffin tin with cupcake liners.
- Mix Dry Ingredients: In a large mixing bowl, combine the flour, sugar, cocoa powder, baking powder, baking soda, and salt. Whisk together until evenly combined.
- Combine Wet Ingredients: In a separate bowl, mix the milk, vegetable oil, egg, and vanilla extract. Beat until well blended.
- Combine Mixtures: Gradually add the wet ingredients to the dry ingredients, stirring until just combined. The batter will be thick.
- Add Boiling Water: Carefully stir in the boiling water until the batter is smooth and thin. This step is essential for guaranteeing the cupcakes are moist.
- Fill Cupcake Liners: Pour the batter into the prepared cupcake liners, filling each about two-thirds full.
- Bake: Place the muffin tin in the preheated oven and bake for 18-22 minutes, or until a toothpick inserted into the center of a cupcake comes out clean.
- Cool: Once baked, remove the cupcakes from the oven and let them cool in the pan for 5 minutes before transferring to a wire rack to cool completely.
- Prepare Frosting: In a large bowl, beat the softened butter until creamy. Gradually add the powdered sugar, milk, and vanilla extract, beating until smooth and fluffy.
- Color and Decorate: Divide the frosting into separate bowls and add gel food coloring to each to create various monster colors. Frost each cupcake with your colored frosting and decorate with candy eyes and sprinkles to create fun monster faces.
Extra Tips:
For the best results, make sure your cupcakes are completely cooled before frosting to prevent the frosting from melting. If you want to add more texture, consider using a piping bag with a star tip to create ruffled “fur” on your monster cupcakes.
You can also experiment with adding different candies, such as gummy worms or licorice, to make your monsters even more unique. Remember, the creativity is in your hands, so have fun and let your imagination run wild while designing your Monster Mash Cupcakes!
Creepy Crawly Spider Cupcakes
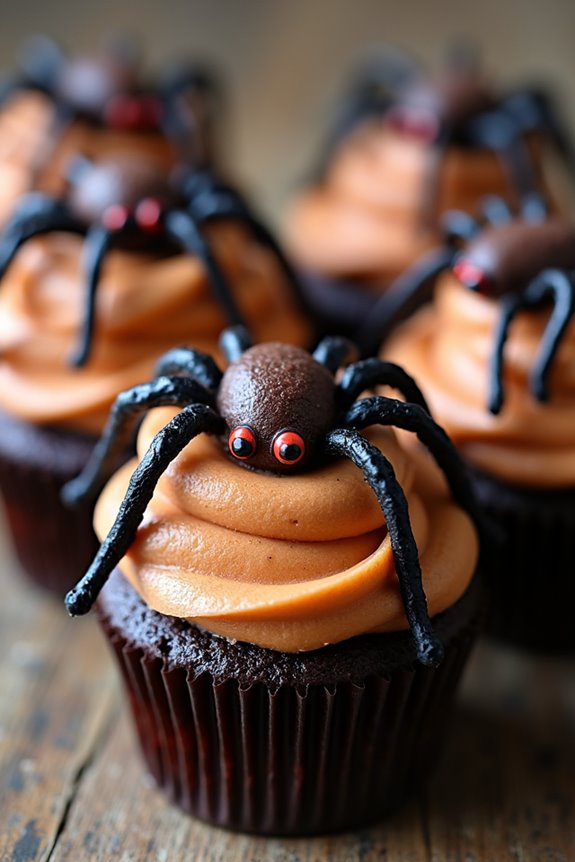
Creepy Crawly Spider Cupcakes are the perfect treat to add a spooky touch to your Halloween festivities. These delightful cupcakes feature a moist chocolate base, topped with a rich, creamy frosting and decorated with edible spider embellishments. Not only are they delicious, but they also add a fun, eerie vibe to your Halloween dessert spread.
Whether you’re hosting a Halloween party or simply want to indulge in some themed baking, these Creepy Crawly Spider Cupcakes are bound to be a hit with both kids and adults alike.
Creating these spooky cupcakes is a fun and creative process that lets you experiment with different decorations to achieve the perfect creepy crawly look. The chocolate cupcakes serve as an ideal canvas for crafting the spiders, while the frosting acts as the glue to hold everything together.
Using licorice strands for legs and small candies for spider bodies, you can easily transform regular cupcakes into a swarm of edible arachnids. These cupcakes not only taste great but also provide a visual treat that will leave your guests impressed.
Ingredients (Serves 4-6 people):
- 1 cup all-purpose flour
- 1 cup granulated sugar
- 1/2 cup unsweetened cocoa powder
- 1 teaspoon baking soda
- 1/2 teaspoon baking powder
- 1/4 teaspoon salt
- 1/2 cup buttermilk
- 1/4 cup vegetable oil
- 1 large egg
- 1 teaspoon vanilla extract
- 1/2 cup boiling water
- 1 cup butter, softened (for frosting)
- 3 cups powdered sugar (for frosting)
- 1/3 cup unsweetened cocoa powder (for frosting)
- 1/4 cup milk (for frosting)
- Black licorice strands
- Small round candies (e.g., chocolate candies or jelly beans)
- Edible candy eyes (optional)
Cooking Instructions:
- Preheat and Prepare: Preheat your oven to 350°F (175°C). Line a muffin tin with paper cupcake liners to prepare for baking.
- Mix Dry Ingredients: In a large mixing bowl, sift together the flour, granulated sugar, cocoa powder, baking soda, baking powder, and salt. Ascertain all dry ingredients are well combined.
- Combine Wet Ingredients: In a separate bowl, whisk together the buttermilk, vegetable oil, egg, and vanilla extract until smooth.
- Create Batter: Gradually add the wet ingredients to the dry ingredients, stirring gently until just combined. Carefully stir in the boiling water until the batter is smooth and thin.
- Fill and Bake: Divide the batter evenly among the prepared cupcake liners, filling each about two-thirds full. Bake in the preheated oven for 18-20 minutes, or until a toothpick inserted into the center of a cupcake comes out clean. Let them cool completely on a wire rack.
- Prepare Frosting: While the cupcakes are cooling, prepare the frosting by beating the softened butter in a large bowl until creamy. Gradually add the powdered sugar and cocoa powder, alternating with milk, and beat until the frosting is smooth and spreadable.
- Frost the Cupcakes: Once the cupcakes are completely cooled, spread a generous amount of chocolate frosting on top of each cupcake.
- Decorate with Spiders: Cut the black licorice strands into small pieces to create spider legs. Arrange eight legs in a radial pattern on top of each frosted cupcake. Use small round candies as the spider’s body, placing them in the center of the licorice legs. Optionally, add edible candy eyes to bring your spiders to life.
Extra Tips:
When creating the spider legs, aim for uniform length and thickness to give your spiders a realistic look. If you have trouble finding black licorice, black fondant can also be used to craft the legs.
For an added touch of creepiness, consider using red or green gel icing to create a ‘web’ pattern on top of the frosting before adding the spiders. If you want a more colorful batch, try using different colored small candies for the spider bodies.
Remember to let the cupcakes cool completely before frosting to prevent the frosting from melting and sliding off. Enjoy the process and don’t be afraid to get creative with your designs!
Bloodshot Eyeball Cupcakes
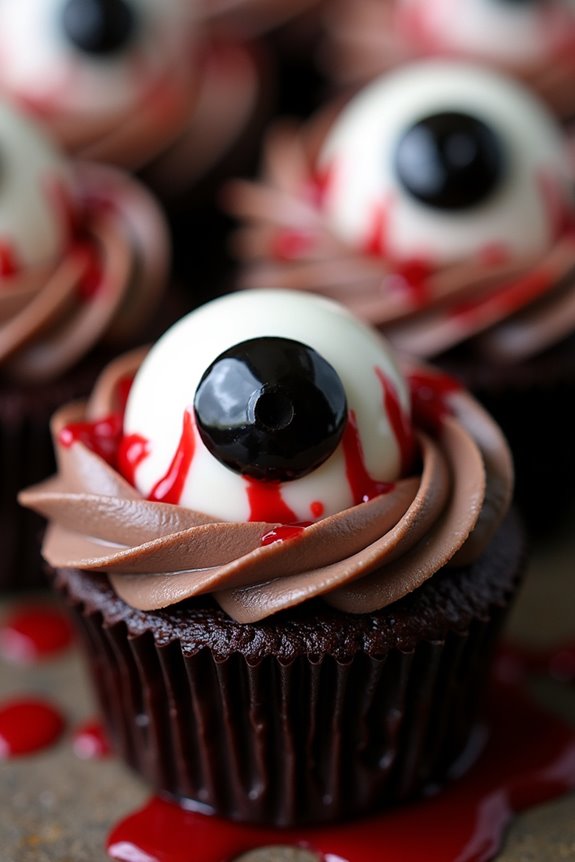
Bloodshot Eyeball Cupcakes are the perfect treat for a spooky Halloween celebration. These eerie cupcakes aren’t only delicious but also visually striking, giving the impression of bloodshot eyes staring right back at you. The combination of a moist chocolate cupcake base with a creepy, yet tasty, fondant eyeball on top will surely make your Halloween party a hit among kids and adults alike.
Preparing these cupcakes is a fun and creative process that allows you to combine the art of baking with the excitement of Halloween-themed decorating. The recipe includes a rich, chocolatey cupcake base topped with a smooth and creamy frosting, along with red gel icing to mimic blood vessels and a realistic-looking fondant eyeball. Follow the recipe below to create a serving size of 4-6 people, guaranteeing that everyone at your gathering gets to enjoy this festive and slightly ghoulish dessert.
Ingredients:
- 1 cup all-purpose flour
- 1 cup granulated sugar
- 1/2 cup unsweetened cocoa powder
- 1 teaspoon baking soda
- 1/2 teaspoon baking powder
- 1/2 teaspoon salt
- 1/2 cup buttermilk
- 1/4 cup vegetable oil
- 1 large egg
- 1 teaspoon vanilla extract
- 1/2 cup hot water
- 1 cup unsalted butter, softened (for frosting)
- 4 cups confectioners’ sugar (for frosting)
- 1/4 cup milk (for frosting)
- Red gel icing
- White fondant
- Black fondant or chocolate chips (for pupil)
Cooking Instructions:
- Preheat the Oven: Start by preheating your oven to 350°F (175°C). Line a cupcake tin with 12 cupcake liners.
- Mix Dry Ingredients: In a large mixing bowl, whisk together the flour, sugar, cocoa powder, baking soda, baking powder, and salt until well combined.
- Combine Wet Ingredients: In another bowl, combine the buttermilk, vegetable oil, egg, and vanilla extract. Mix well until fully incorporated.
- Create Batter: Gradually add the wet mixture into the dry ingredients, stirring until just combined. Pour in the hot water and mix until the batter is smooth.
- Bake the Cupcakes: Divide the batter evenly among the cupcake liners, filling each about 2/3 full. Bake in the preheated oven for 18-20 minutes or until a toothpick inserted in the center comes out clean. Allow cupcakes to cool completely on a wire rack.
- Prepare the Frosting: In a large bowl, beat the softened butter until creamy. Gradually add the confectioners’ sugar, alternating with milk, beating until the frosting is smooth and fluffy.
- Decorate the Cupcakes: Once the cupcakes have cooled, frost each one with the prepared frosting. Roll out the white fondant and cut out circles to represent the whites of the eyes. Place a circle on top of each frosted cupcake.
- Add the Eyeballs: Use the black fondant or chocolate chips to create pupils and place them in the center of each fondant circle. Use the red gel icing to draw thin lines from the pupil outward, creating a bloodshot effect.
- Finish Decorating: Optionally, you can add additional details like red candy or sprinkles to enhance the gory appearance of your bloodshot eyeball cupcakes.
Extra Tips:
When making Bloodshot Eyeball Cupcakes, make sure your fondant is pliable by kneading it well before rolling it out. If the fondant becomes too sticky, dust your work surface with a little cornstarch or powdered sugar.
The red gel icing can be tricky to control, so consider using a toothpick or a small piping bag for precise lines. Finally, if you want to add more flavor, consider filling the cupcakes with a cherry or raspberry jam to mimic a “bloody” surprise when bitten into.
Mummy Wrap Chocolate Cupcakes
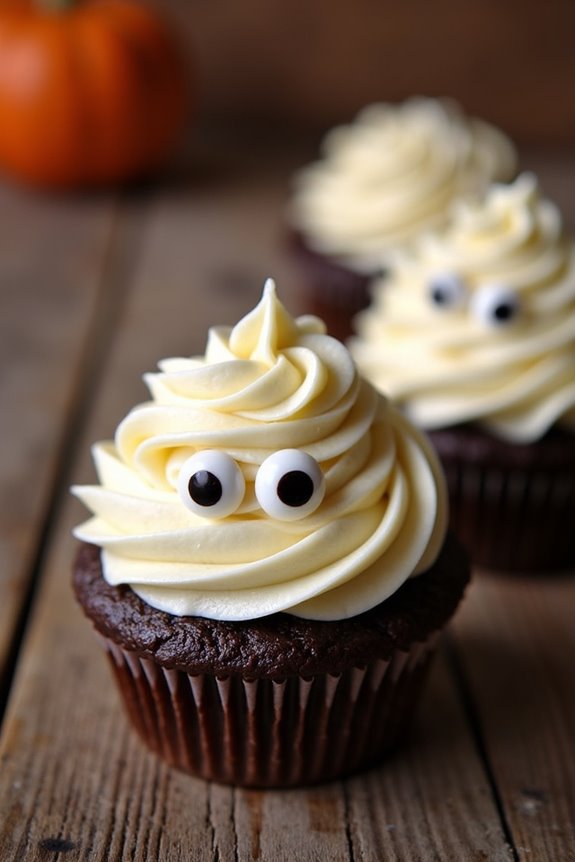
Mummy Wrap Chocolate Cupcakes are a spooktacular treat for any Halloween gathering. These delightful cupcakes aren’t only delicious but also fun to decorate, making them a perfect activity for kids and adults alike. With a rich chocolate base and a creative mummy wrap design made from frosting, these cupcakes are sure to be a hit at your Halloween party.
The combination of the moist chocolate cake and sweet frosting is irresistible, while the mummy decorations add a playful touch that captures the Halloween spirit. To achieve the mummy look, you’ll need to prepare a smooth and creamy frosting that can be easily piped onto the cupcakes.
Once the cupcakes are baked to perfection and cooled, you’ll use the frosting to create a bandage-like effect, complete with candy eyes peeking through. This recipe provides a delightful balance of flavors and textures, guaranteeing that every bite is as enjoyable as the last.
Whether you’re a seasoned baker or a novice, these Mummy Wrap Chocolate Cupcakes are simple to make and are assured to impress your guests with their spooky charm.
Ingredients (serving size: 4-6 people):
- 1 cup all-purpose flour
- 1 cup granulated sugar
- 1/2 cup unsweetened cocoa powder
- 1 teaspoon baking powder
- 1/2 teaspoon baking soda
- 1/4 teaspoon salt
- 1/2 cup vegetable oil
- 1/2 cup buttermilk
- 1 large egg
- 1 teaspoon vanilla extract
- 1/2 cup hot water
- 1 cup unsalted butter, softened (for frosting)
- 4 cups powdered sugar (for frosting)
- 4 tablespoons milk (for frosting)
- 1 teaspoon vanilla extract (for frosting)
- Candy eyes
Cooking Instructions:
- Preheat and Prepare: Start by preheating your oven to 350°F (175°C). Line a cupcake pan with paper liners to guarantee easy removal and clean-up.
- Mix Dry Ingredients: In a large bowl, whisk together the flour, sugar, cocoa powder, baking powder, baking soda, and salt until well combined.
- Combine Wet Ingredients: In a separate bowl, mix the vegetable oil, buttermilk, egg, and vanilla extract until smooth.
- Blend and Add Water: Gradually add the wet mixture to the dry ingredients, stirring gently. Once combined, slowly add the hot water, mixing until the batter is smooth and well incorporated.
- Fill and Bake: Pour the batter evenly into the lined cupcake pan, filling each cup about two-thirds full. Bake in the preheated oven for 18-20 minutes, or until a toothpick inserted into the center comes out clean.
- Cool Completely: Allow the cupcakes to cool in the pan for a few minutes before transferring them to a wire rack to cool completely.
- Prepare Frosting: To make the frosting, beat the softened butter in a large bowl until creamy. Gradually add the powdered sugar, milk, and vanilla extract, beating until the frosting is smooth and fluffy.
- Decorate as Mummies: Transfer the frosting to a piping bag fitted with a flat nozzle or a ziplock bag with a small corner snipped off. Pipe the frosting onto the cooled cupcakes in a criss-cross pattern to resemble mummy bandages. Place candy eyes on each cupcake to complete the mummy look.
Extra Tips:
When creating the mummy design, confirm that the cupcakes are completely cool, as warm cupcakes can cause the frosting to melt. If you don’t have buttermilk, you can substitute it with a mixture of milk and vinegar or lemon juice (1/2 cup milk + 1/2 tablespoon vinegar/lemon juice, let sit for 5 minutes).
Additionally, if you want to add a bit of crunch to your cupcakes, consider sprinkling some chocolate chips or nuts into the batter before baking. Enjoy your Mummy Wrap Chocolate Cupcakes with a glass of milk or a hot cup of cocoa for the ultimate Halloween treat!
Graveyard Dirt Cupcakes
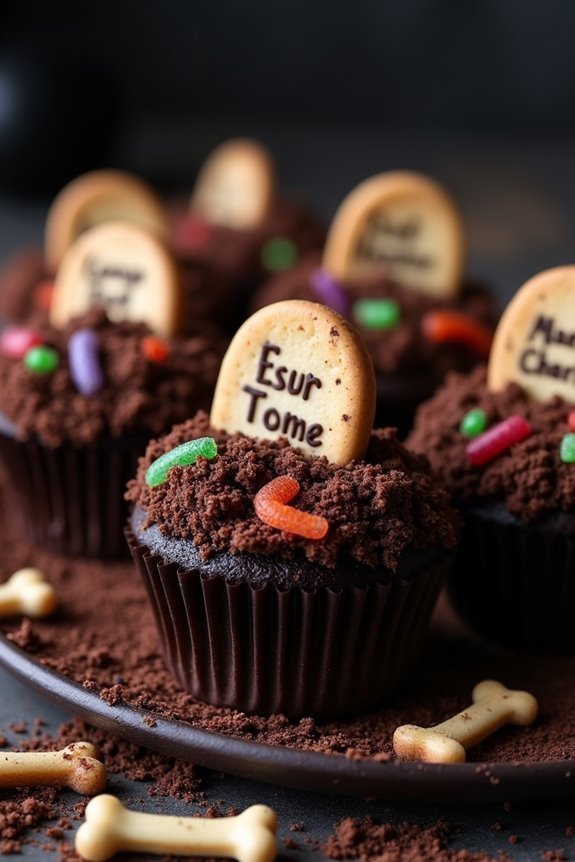
Graveyard Dirt Cupcakes are a spooktacular treat perfect for any Halloween gathering. These deliciously eerie cupcakes are fun to make and even more fun to eat. Imagine a cupcake that looks like a miniature graveyard, complete with chocolate “dirt” and cookie “tombstones.” They’re a hit with both kids and adults, combining the rich flavors of chocolate with a ghoulishly creative presentation. Ideal for a Halloween party or a themed dinner, these cupcakes are certain to be the talk of the event.
The magic of Graveyard Dirt Cupcakes lies in their simplicity and creativity. Start with a basic chocolate cupcake recipe, add a layer of crushed chocolate cookies to mimic the look of dirt, and finish with spooky decorations. You can add gummy worms, candy bones, or personalized tombstone messages to give them a unique touch. The best part is that these cupcakes can be customized according to your preferences, so feel free to get creative and make them as spooky or as fun as you like.
Ingredients (Serves 4-6):
- 1 cup all-purpose flour
- 1/2 cup unsweetened cocoa powder
- 1 teaspoon baking powder
- 1/2 teaspoon baking soda
- 1/4 teaspoon salt
- 1/2 cup unsalted butter, softened
- 1 cup granulated sugar
- 2 large eggs
- 1 teaspoon vanilla extract
- 1/2 cup buttermilk
- 1 cup chocolate sandwich cookies, crushed (for “dirt”)
- 12 oval-shaped cookies (for “tombstones”)
- Assorted gummy worms and candy decorations
Instructions:
- Prepare the Oven and Muffin Tin: Preheat your oven to 350°F (175°C). Line a muffin tin with cupcake liners to prevent sticking and make removal easy.
- Mix Dry Ingredients: In a medium bowl, whisk together the flour, cocoa powder, baking powder, baking soda, and salt. This will guarantee even distribution of the dry ingredients.
- Cream Butter and Sugar: In a large mixing bowl, beat the softened butter and sugar together with an electric mixer on medium speed until light and fluffy, about 3 minutes. This will create a smooth and creamy base for your cupcakes.
- Add Eggs and Vanilla: Add the eggs one at a time, beating well after each addition. Stir in the vanilla extract. This will help to incorporate air for a lighter batter.
- Combine Wet and Dry Ingredients: Gradually add the dry ingredient mixture to the wet ingredients, alternating with the buttermilk. Begin and end with the flour mixture, mixing just until combined. Avoid over-mixing to keep the cupcakes tender.
- Fill and Bake: Spoon the batter into the prepared cupcake liners, filling each about 2/3 full. Bake in the preheated oven for 18-20 minutes, or until a toothpick inserted into the center of a cupcake comes out clean. Allow the cupcakes to cool completely on a wire rack.
- Decorate the Cupcakes: Once cooled, spread a thin layer of frosting on each cupcake. Press the crushed chocolate cookies into the frosting to create a “dirt” effect. Insert an oval-shaped cookie into each cupcake to serve as a tombstone, and decorate with gummy worms and candy bones as desired.
- Personalize Tombstones: Use icing to write spooky messages or names on the tombstone cookies. Let your creativity run wild!
Extra Tips:
When making Graveyard Dirt Cupcakes, make sure to crush the chocolate cookies finely so they resemble dirt. Use a food processor for best results.
If you don’t have buttermilk on hand, you can make a substitute by mixing 1/2 tablespoon of lemon juice or vinegar with 1/2 cup of milk and let it sit for 5 minutes.
For an extra spooky touch, consider adding a drop or two of black food coloring to the frosting to create an even darker base for your graveyard. Enjoy your hauntingly delicious creation!
Pumpkin Patch Cupcakes
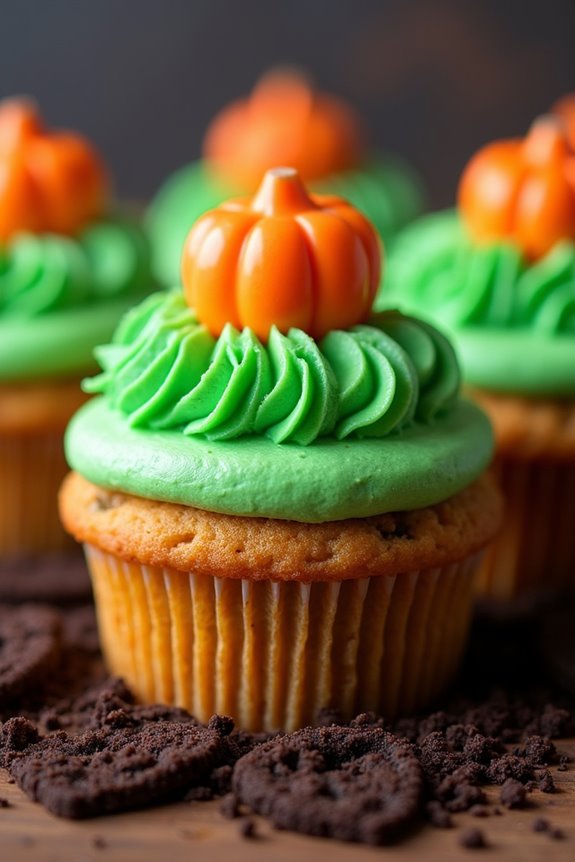
Embrace the festive spirit of Halloween with these delightful Pumpkin Patch Cupcakes. These cupcakes not only taste amazing but also look like a mini pumpkin patch, making them perfect for Halloween parties or family gatherings. The moist pumpkin-flavored cake pairs beautifully with creamy frosting, while decorative toppings transform each cupcake into a tiny autumn scene. Perfect for kids and adults alike, these cupcakes will surely be a hit at any spooky celebration.
Creating these Pumpkin Patch Cupcakes is an enjoyable process that allows for creativity and fun. The combination of warm spices and pumpkin puree in the batter creates a flavorful base, while the green-tinted frosting and candy pumpkins bring the theme to life. Whether you’re a seasoned baker or a novice in the kitchen, these cupcakes are easy to make and offer a delightful treat that embodies the essence of fall.
Ingredients (Serves 4-6):
- 1 cup all-purpose flour
- 1 teaspoon baking powder
- 1/2 teaspoon baking soda
- 1/2 teaspoon ground cinnamon
- 1/4 teaspoon ground nutmeg
- 1/4 teaspoon salt
- 1/2 cup pumpkin puree
- 1/2 cup granulated sugar
- 1/4 cup brown sugar
- 1/4 cup vegetable oil
- 1 large egg
- 1 teaspoon vanilla extract
- 1/2 cup buttermilk
- 1 cup green-tinted buttercream frosting
- 12 mini candy pumpkins
- 1/4 cup crushed chocolate cookies (for “dirt”)
Instructions:
- Preheat and Prep: Preheat your oven to 350°F (175°C). Line a cupcake pan with 12 cupcake liners.
- Mix Dry Ingredients: In a medium bowl, whisk together the flour, baking powder, baking soda, cinnamon, nutmeg, and salt. Set aside.
- Combine Wet Ingredients: In a large mixing bowl, combine the pumpkin puree, granulated sugar, brown sugar, and vegetable oil. Mix until smooth. Add the egg and vanilla extract, and mix well.
- Incorporate Dry Ingredients: Slowly add the dry ingredient mixture to the wet ingredients, alternating with the buttermilk, beginning and ending with the dry ingredients. Mix just until combined to avoid overmixing.
- Bake: Divide the batter evenly among the cupcake liners, filling each about two-thirds full. Bake in the preheated oven for 18-20 minutes, or until a toothpick inserted into the center comes out clean. Remove from the oven and let cool completely on a wire rack.
- Frosting: Once cupcakes are cooled, pipe or spread the green-tinted buttercream frosting onto each cupcake to resemble grass.
- Decorate: Sprinkle crushed chocolate cookies on top of the frosting to create a dirt effect. Place a mini candy pumpkin on each cupcake to complete the pumpkin patch look.
Extra Tips:
To enhance the pumpkin flavor, consider adding a pinch of cloves or ginger to the batter for an extra layer of warmth and spice. If you don’t have buttermilk, you can make a quick substitute by mixing 1/2 cup of milk with 1/2 tablespoon of lemon juice or vinegar and letting it sit for a few minutes.
For a more polished look, use a piping bag with a grass tip to apply the frosting, and get creative with additional decorations like edible leaves or candy corn for added festivity.
Vampire Bite Red Velvet Cupcakes
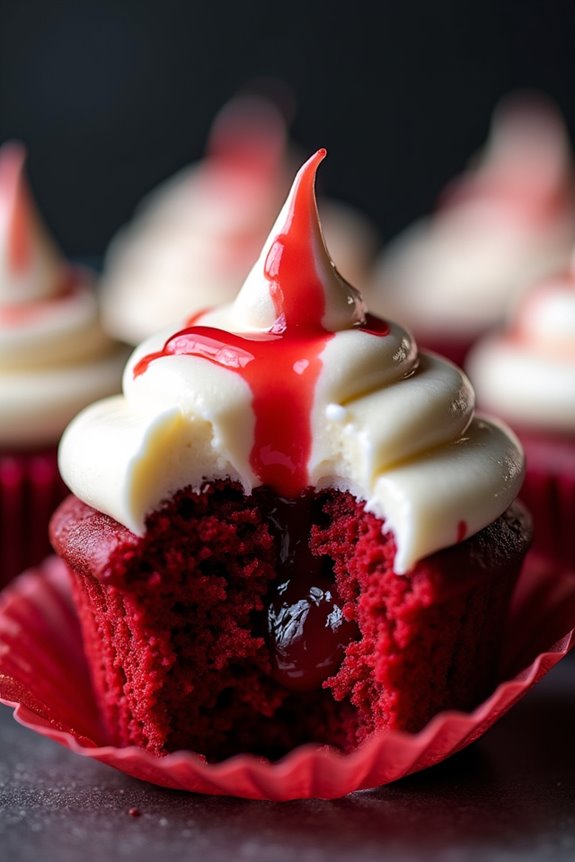
Transform your Halloween gathering with these devilishly delicious Vampire Bite Red Velvet Cupcakes. With their deep red hue and eerie bite marks, these spooky treats are sure to captivate both the eyes and taste buds of your guests. The moist red velvet base, combined with a rich cream cheese frosting and a sinister cherry filling, makes these cupcakes not only visually striking but also irresistibly tasty.
Perfect for a serving size of 4-6 people, these cupcakes are simple to whip up and provide a delightful twist to the classic red velvet recipe. Whether you’re hosting a Halloween party or just treating your family, these Vampire Bite cupcakes are the ideal way to celebrate the eerie season. Follow the recipe below to create these hauntingly good cupcakes.
Ingredients (Serves 4-6):
- 1 cup all-purpose flour
- 1 tablespoon cocoa powder
- 1/2 teaspoon baking soda
- 1/4 teaspoon salt
- 1/2 cup granulated sugar
- 1/2 cup buttermilk
- 1/2 cup vegetable oil
- 1 egg
- 1 tablespoon red food coloring
- 1 teaspoon vanilla extract
- 1 teaspoon white vinegar
- 1/2 cup cherry pie filling
- 8 ounces cream cheese, softened
- 1/4 cup unsalted butter, softened
- 2 cups powdered sugar
- 1 teaspoon vanilla extract
Instructions:
- Preheat the Oven: Begin by preheating your oven to 350°F (175°C) and lining a cupcake tray with paper liners. This guarantees that your cupcakes bake evenly and are easy to remove from the tray.
- Prepare the Dry Ingredients: In a medium-sized bowl, sift together the flour, cocoa powder, baking soda, and salt. This guarantees that the dry ingredients are well combined and free of lumps.
- Mix the Wet Ingredients: In a separate large bowl, whisk together the granulated sugar, buttermilk, vegetable oil, egg, red food coloring, and vanilla extract until smooth and well combined.
- Combine the Mixtures: Gradually add the dry ingredients to the wet ingredients, mixing gently until just combined. Be careful not to overmix, as this can make the cupcakes dense.
- Add Vinegar: Stir in the white vinegar. This will react with the baking soda to help the cupcakes rise and become fluffy.
- Bake the Cupcakes: Divide the batter evenly among the cupcake liners, filling each about 2/3 full. Bake in the preheated oven for 18-20 minutes, or until a toothpick inserted into the center comes out clean.
- Prepare the Frosting: While the cupcakes are baking, prepare the cream cheese frosting. In a large bowl, beat the softened cream cheese and butter together until smooth. Gradually add the powdered sugar and vanilla extract, beating until the frosting is creamy and fluffy.
- Create Vampire Bite Marks: Once the cupcakes have cooled completely, use a small knife to cut two small, shallow holes on the top of each cupcake. Fill the holes with a small amount of cherry pie filling to resemble vampire bite marks.
- Frost the Cupcakes: Use a piping bag or a spatula to spread the cream cheese frosting over each cupcake, being careful not to cover the cherry filling.
- Decorate: Optional – drizzle some of the cherry pie filling over the frosting for added effect, mimicking blood drips.
Extra Tips:
- For a more dramatic effect, you can use a toothpick to slightly drag the cherry filling down from the bite marks to create a dripping blood effect.
- If you don’t have buttermilk on hand, you can make a substitute by adding 1/2 tablespoon of lemon juice or vinegar to a 1/2 cup of milk and letting it sit for a few minutes.
- Ascertain your cream cheese and butter are at room temperature before making the frosting; this will help achieve a smooth, spreadable consistency.
- These cupcakes can be made a day in advance and stored in the refrigerator; just bring them to room temperature before serving for the best taste and texture.
Frankenstein’s Monster Cupcakes
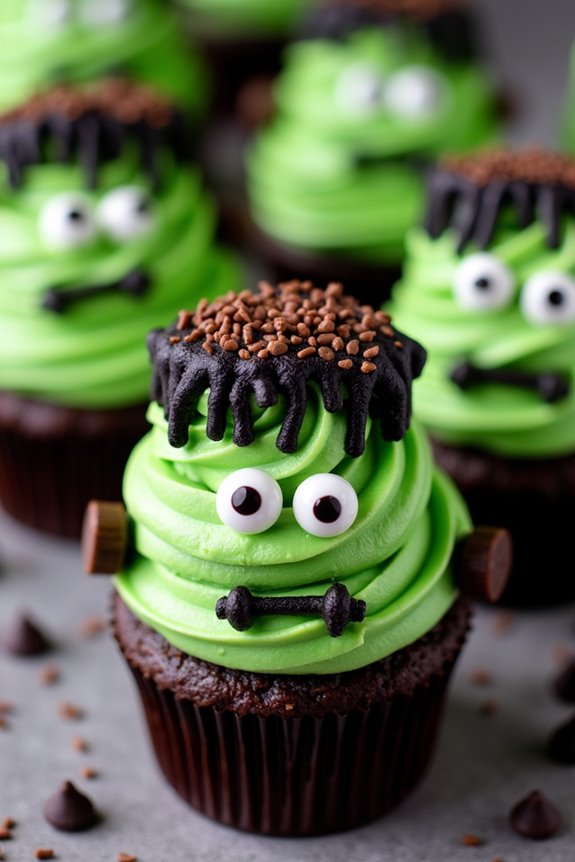
Frankenstein’s Monster Cupcakes are a spooky and delicious treat perfect for any Halloween gathering. These cupcakes aren’t just fun to make but also allow you to get creative with decorating, making them a delightful activity for both kids and adults.
By using vibrant green frosting and clever decorations, you can bring these iconic Halloween creatures to life, transforming a simple cupcake into a monstrous masterpiece. The base of these cupcakes can be any flavor you prefer, but a rich chocolate cupcake pairs wonderfully with the bright colors and eerie theme.
The key to these cupcakes is in the decoration, which features green-tinted frosting to mimic Frankenstein’s skin, along with various candies and toppings to create facial features. Whether you’re hosting a Halloween party or simply enjoying the holiday at home, these cupcakes will surely be a monstrous hit!
Ingredients (Serves 4-6 people)
- 1 1/2 cups all-purpose flour
- 1 cup granulated sugar
- 1/2 cup unsweetened cocoa powder
- 1 teaspoon baking soda
- 1/2 teaspoon salt
- 1 cup water
- 1/3 cup vegetable oil
- 1 tablespoon white vinegar
- 1 teaspoon vanilla extract
- Green food coloring
- 2 cups vanilla frosting
- Mini chocolate chips
- Black licorice strings
- Candy eyes
- Chocolate sprinkles
Cooking Instructions
- Preheat the Oven: Preheat your oven to 350°F (175°C). Line a muffin tin with cupcake liners.
- Mix the Dry Ingredients: In a large mixing bowl, combine the flour, sugar, cocoa powder, baking soda, and salt. Whisk them together until well combined.
- Add the Wet Ingredients: Add the water, vegetable oil, vinegar, and vanilla extract to the dry ingredients. Mix until the batter is smooth and well combined.
- Bake the Cupcakes: Pour the batter evenly into the prepared cupcake liners, filling each about two-thirds full. Bake in the preheated oven for 18-22 minutes, or until a toothpick inserted into the center of a cupcake comes out clean. Allow them to cool completely on a wire rack.
- Prepare the Frosting: While the cupcakes are cooling, add green food coloring to the vanilla frosting until you achieve the desired shade of green. Mix well to guarantee an even color.
- Decorate the Cupcakes: Once the cupcakes are completely cool, spread the green frosting over the top of each one. Use mini chocolate chips to create Frankenstein’s bolts on the sides of the cupcakes.
Add candy eyes to each cupcake for the monster’s eyes. Cut small pieces of black licorice to form the mouth and hair. Sprinkle chocolate sprinkles on the top to complete the hair effect.
Extra Tips
For the best results, verify the cupcakes are completely cooled before frosting to prevent the frosting from melting. If your frosting is too soft, refrigerate it for a few minutes to firm it up before decorating.
Feel free to get creative with your decorations; you can use different candies or edible markers to add stitches or scars. If you’re short on time, store-bought cupcakes can be used as a base, allowing you to focus on the fun part—decorating!
Black Cat Chocolate Cupcakes
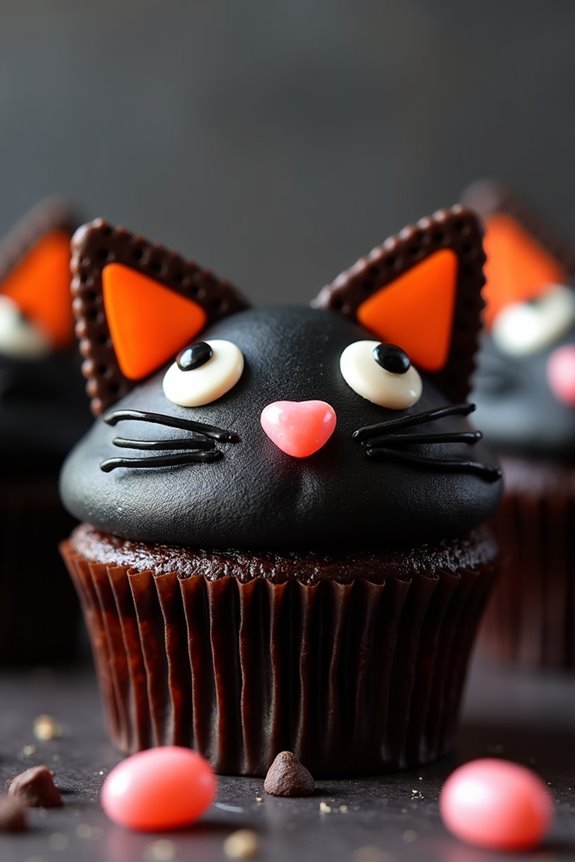
Get ready to indulge in the spookiest, yet delightful, Halloween treat – Black Cat Chocolate Cupcakes. These cupcakes are perfect for a Halloween party or a fun family baking session. Rich, moist, and deeply chocolatey, these cupcakes are topped with a velvety black frosting and adorned with candy features to resemble cute little black cats. Not only are they delicious, but they also add a festive touch to any Halloween gathering.
Whether you’re a seasoned baker or a complete novice, these cupcakes are simple to make and a joy to decorate. Each cupcake transforms into a cute cat face using simple candies and chocolate pieces. The rich chocolate flavor of the cupcakes complements the sweet frosting, making them an irresistible treat for both kids and adults. Here’s how to make these delightful Black Cat Chocolate Cupcakes for a serving size of 4-6 people.
Ingredients:
- 1 cup all-purpose flour
- 1/2 cup unsweetened cocoa powder
- 1 teaspoon baking powder
- 1/2 teaspoon baking soda
- 1/4 teaspoon salt
- 1/2 cup unsalted butter, softened
- 1 cup granulated sugar
- 2 large eggs
- 1 teaspoon vanilla extract
- 1/2 cup buttermilk
- 1 cup chocolate chips
- 1 cup black frosting (store-bought or homemade)
- 12 chocolate wafers (for ears)
- 24 small candy eyes
- 12 small pink jelly beans or candies (for noses)
- 24 black licorice strips (for whiskers)
Instructions:
- Preheat and Prep: Preheat your oven to 350°F (175°C) and line a cupcake pan with 12 paper liners.
- Mix Dry Ingredients: In a medium bowl, whisk together the flour, cocoa powder, baking powder, baking soda, and salt. Set aside.
- Cream Butter and Sugar: In a large mixing bowl, beat the softened butter and sugar together until light and fluffy, about 3-4 minutes.
- Add Eggs and Vanilla: Add the eggs one at a time, beating well after each addition. Mix in the vanilla extract.
- Combine Wet and Dry: Gradually add the dry ingredients to the wet ingredients, alternating with the buttermilk, starting and ending with the flour mixture. Mix until just combined.
- Stir in Chocolate Chips: Gently fold in the chocolate chips until evenly distributed.
- Fill and Bake: Divide the batter evenly among the cupcake liners, filling each about two-thirds full. Bake for 18-20 minutes, or until a toothpick inserted into the center comes out clean.
- Cool Completely: Let the cupcakes cool in the pan for 5 minutes before transferring them to a wire rack to cool completely.
- Decorate: Once cooled, frost each cupcake with black frosting. Place two chocolate wafers on the top edge of each cupcake for ears. Add candy eyes, a pink jelly bean for the nose, and two strips of black licorice for whiskers on each side to create the cat face.
Extra Tips:
When working with black frosting, it can sometimes stain, so be careful with your clothing and work surfaces. If you’re making the frosting from scratch, consider using gel food coloring to achieve a deep black color without altering the consistency.
For an added touch of fun, you can use different colored candies to create unique cat expressions or add a dash of edible glitter for a magical shine. These cupcakes are best served fresh, but they can be stored in an airtight container for a day or two if needed. Enjoy your spooktacular treats!