

Halloween mornings are the perfect chance to sprinkle some magic into your breakfast routine. Picture waking up to ghostly pancakes with a spooky glaze or savoring monster muffins adorned with fun, eerie decorations. These Halloween-themed breakfasts are not just treats for your taste buds but also a feast for your creativity. Ready to be inspired by these delightful creations? Let’s explore them together.
Ghostly Pancakes With Ghoulish Glaze

Ghostly Pancakes With Ghoulish Glaze are a spooktacular way to start your Halloween morning with a delightful twist. These pancakes aren’t only light and fluffy but also creatively designed to resemble ghostly apparitions, complete with a hauntingly sweet glaze. Perfect for a Halloween breakfast or brunch, this recipe is sure to delight kids and adults alike, adding a touch of fun and fright to your morning meal.
The key to these ghostly pancakes is in the details, from the pancake shapes to the eerie glaze that drapes over them like a shroud. You’ll use simple pancake batter to create the base, but it’s the addition of a few clever decorations that will bring these edible ghosts to life. The ghoulish glaze, made from a blend of powdered sugar and milk, adds a glossy finish, while chocolate chips serve as the spooky eyes and mouths. With a little bit of creativity, you’ll have a breakfast that’s both delicious and festive, setting the perfect tone for Halloween day.
Ingredients (Serves 4-6):
- 2 cups all-purpose flour
- 2 tablespoons granulated sugar
- 2 teaspoons baking powder
- 1/2 teaspoon baking soda
- 1/2 teaspoon salt
- 2 cups buttermilk
- 2 large eggs
- 1/4 cup unsalted butter, melted
- 1 teaspoon vanilla extract
- 1 cup powdered sugar
- 2-3 tablespoons milk
- Chocolate chips, for decoration
Cooking Instructions:
1. Prepare Pancake Batter: In a large mixing bowl, whisk together the flour, sugar, baking powder, baking soda, and salt. In another bowl, combine the buttermilk, eggs, melted butter, and vanilla extract.
Pour the wet ingredients into the dry ingredients and stir until just combined. Be careful not to overmix; a few lumps are okay.
2. Cook the Pancakes: Heat a non-stick skillet or griddle over medium heat. Lightly grease with butter or non-stick spray.
Pour about 1/4 cup of batter onto the skillet for each pancake. Use a spoon to shape the batter into ghost-like figures. Cook until bubbles form on the surface and the edges look set, about 2-3 minutes. Flip the pancakes and cook for an additional 2 minutes or until golden brown. Transfer to a warm plate and repeat with remaining batter.
3. Make the Ghoulish Glaze: In a small bowl, combine the powdered sugar and 2 tablespoons of milk. Stir until smooth.
Add more milk, a teaspoon at a time, until the glaze reaches a pourable consistency.
4. Decorate the Pancakes: Drizzle the ghoulish glaze over the warm pancakes, allowing it to drip over the edges like a ghostly shroud.
Place chocolate chips on the pancakes to create eyes and mouths, giving your ghostly pancakes their haunting faces.
Extra Tips:
For the best results, make sure all your ingredients are at room temperature before you begin. This helps the batter come together smoothly and results in fluffier pancakes.
If you want to add some color to your ghostly creations, consider using food coloring in the glaze or adding seasonal sprinkles. If you’re cooking for a large group, you can keep the pancakes warm in a 200°F oven while you finish cooking the rest.
These pancakes are best served fresh, but if you have leftovers, they can be stored in an airtight container in the refrigerator for up to two days and reheated in a toaster or microwave. Enjoy your spooky breakfast feast!
Monster Muffins With Creepy Crawly Toppings
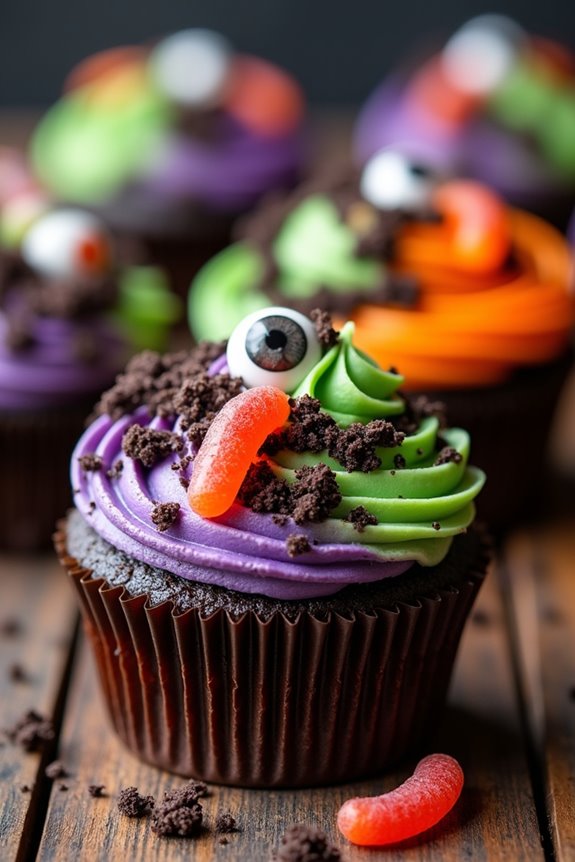
Embrace the spooky spirit of Halloween right from the breakfast table with these delightfully eerie Monster Muffins with Creepy Crawly Toppings. These muffins aren’t only a visual treat but also a delight to the taste buds. Perfect for a Halloween breakfast, they’re sure to bring smiles and a fun start to the day for both kids and adults.
The moist and fluffy muffins come to life with a combination of vibrant, naturally dyed frostings and imaginative toppings that create a sense of delicious dread. This recipe makes enough for 4-6 people, allowing everyone at the table to enjoy a monstrously delicious muffin or two.
The base of the muffin is a simple yet flavorful vanilla or chocolate recipe that serves as a blank canvas for you to express your creativity. With toppings like gummy worms, candy eyeballs, and colored frosting, these muffins become a playful culinary art project that embodies the spirit of Halloween.
Ingredients (serving size: 4-6 people):
- 2 cups all-purpose flour
- 1 cup granulated sugar
- 1/2 cup unsalted butter, melted
- 2 large eggs
- 1 cup milk
- 2 teaspoons baking powder
- 1 teaspoon vanilla extract
- 1/2 teaspoon salt
- 1 cup chocolate chips (optional)
- 1/2 cup assorted colored frostings (green, purple, orange)
- 1/4 cup candy eyeballs
- 1/4 cup gummy worms
- 1/4 cup crushed chocolate cookies (for “dirt” topping)
Cooking Instructions:
- Preheat Oven and Prepare Muffin Tin: Preheat your oven to 350°F (175°C). Line a muffin tin with paper liners or lightly grease each muffin cup to prevent sticking.
- Mix Dry Ingredients: In a large mixing bowl, whisk together the flour, sugar, baking powder, and salt until well combined.
- Combine Wet Ingredients: In a separate bowl, mix the melted butter, eggs, milk, and vanilla extract until smooth.
- Combine Wet and Dry Ingredients: Gradually add the wet ingredients to the dry ingredients, gently folding them together with a spatula. Be careful not to overmix. If using, fold in the chocolate chips at this stage.
- Fill Muffin Cups: Spoon the batter into the prepared muffin tin, filling each cup about two-thirds full to allow room for rising.
- Bake the Muffins: Place the muffin tin in the preheated oven and bake for 18-20 minutes, or until a toothpick inserted into the center of a muffin comes out clean. Allow the muffins to cool in the tin for a few minutes before transferring them to a wire rack to cool completely.
- Decorate with Frosting and Toppings: Once the muffins are cool, use a piping bag or a spoon to apply colored frosting on top of each muffin. Add candy eyeballs, gummy worms, and sprinkle crushed chocolate cookies to create the creepy crawly effect.
Extra Tips:
For a more intense Halloween flair, consider using natural food colorings made from fruit and vegetable powders to dye the frostings. When applying the decorations, allow your imagination to run wild—think of the muffins as monsters or little gardens full of creatures.
If you have dietary restrictions, substitute the all-purpose flour with a gluten-free blend or use a non-dairy milk alternative. These muffins are best enjoyed fresh, but they can be stored in an airtight container for up to two days.
Witchy Waffles With Bewitching Berry Syrup

Witchy Waffles With Bewitching Berry Syrup is the perfect Halloween breakfast treat to kick off a spooky day. These waffles aren’t only delicious but also bring a touch of magic to the breakfast table with their vibrant colors and flavors. The waffles are delightfully fluffy and infused with a hint of vanilla, while the berry syrup adds a sweet and tart contrast that’s simply irresistible.
Whether you’re hosting a Halloween brunch or just want to surprise your family with a whimsical breakfast, these waffles are sure to be a hit. To create this enchanting breakfast, you’ll need to prepare the waffle batter with a little spooky twist. The syrup, made with a blend of fresh berries, is simmered until thick and glossy, perfectly complementing the waffles.
This recipe serves 4-6 people, making it ideal for a small gathering or a family breakfast. Gather your ingredients and get ready to cast a spell on your taste buds with these Witchy Waffles and Bewitching Berry Syrup.
Ingredients (Serves 4-6):
*For the Waffles:*
- 2 cups all-purpose flour
- 1 tablespoon baking powder
- 1/2 teaspoon salt
- 2 tablespoons sugar
- 2 large eggs
- 1 3/4 cups milk
- 1/2 cup vegetable oil
- 1 teaspoon vanilla extract
- Green food coloring (optional)
For the Bewitching Berry Syrup:
- 1 cup fresh or frozen blueberries
- 1 cup fresh or frozen raspberries
- 1/2 cup sugar
- 1 tablespoon lemon juice
- 1 teaspoon cornstarch mixed with 2 tablespoons water
Cooking Instructions:
- Prepare the Waffle Batter:
- In a large mixing bowl, whisk together the flour, baking powder, salt, and sugar.
- In a separate bowl, beat the eggs, then blend in the milk, vegetable oil, and vanilla extract.
- Gradually pour the wet ingredients into the dry ingredients, stirring until just combined. Add a few drops of green food coloring to achieve a witchy hue, if desired.
- Cook the Waffles:
- Preheat your waffle iron according to the manufacturer’s instructions. Lightly grease the waffle iron with cooking spray or a brush of oil.
- Pour enough batter into the center of the waffle iron to cover the surface (about 1/2 cup, but this may vary depending on the size of your waffle iron).
- Close the lid and cook until the waffles are crisp and golden brown. Carefully remove the waffles and keep them warm while you prepare the syrup.
- Make the Bewitching Berry Syrup:
- In a medium saucepan, combine the blueberries, raspberries, sugar, and lemon juice. Cook over medium heat until the berries break down and release their juices, stirring occasionally.
- Add the cornstarch mixture and continue to cook, stirring constantly, until the syrup thickens to your desired consistency.
- Remove from heat and allow to cool slightly before serving.
- Serve:
- Place the waffles on a serving plate and drizzle generously with the bewitching berry syrup. Serve immediately for a fresh, flavorful experience.
Extra Tips:
To guarantee your waffles are perfectly crisp on the outside and soft on the inside, avoid over-mixing the batter, as this can lead to dense waffles. If you prefer a thicker syrup, simply let it simmer a bit longer until it reaches the desired thickness.
For added flavor, you can sprinkle a little cinnamon or nutmeg into the waffle batter. Finally, if you’re serving these waffles to a crowd, keep them warm in a low oven (around 200°F) while you finish cooking the rest of the batch. Enjoy your magical breakfast!
Pumpkin Parfaits With Spooky Granola
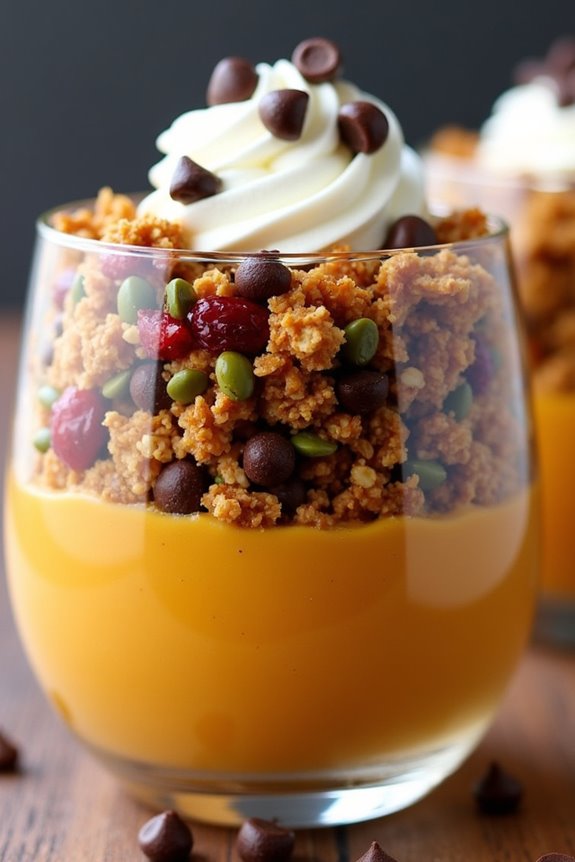
Celebrate Halloween morning with a treat that’s as delicious as it’s festive: Pumpkin Parfaits with Spooky Granola. These parfaits are the perfect blend of creamy pumpkin, tangy yogurt, and crunchy granola, all layered together for a breakfast that feels like a dessert.
The spooky granola, featuring dark chocolate chips, dried cranberries, and pumpkin seeds, adds a touch of Halloween magic to your morning. Whether you’re hosting a Halloween brunch or simply looking to add a little seasonal flair to your breakfast routine, these parfaits are sure to delight both kids and adults alike.
This recipe makes it easy to prepare a special breakfast for a group, serving 4-6 people. The combination of pumpkin puree and Greek yogurt creates a smooth and rich base, while the granola adds texture and flavor.
With just a few simple steps, you’ll have a visually stunning and tasty dish that’s perfect for the spooky season. The best part? You can prepare the elements ahead of time, making it a stress-free addition to your Halloween festivities.
Ingredients:
- 2 cups pumpkin puree
- 2 cups Greek yogurt
- 2 tablespoons maple syrup
- 1 teaspoon vanilla extract
- 1 teaspoon pumpkin pie spice
- 2 cups granola
- 1/2 cup dark chocolate chips
- 1/2 cup dried cranberries
- 1/2 cup pumpkin seeds
- 1/4 cup honey
- Whipped cream (optional, for topping)
Instructions:
- Prepare the Pumpkin Mixture: In a medium bowl, mix together the pumpkin puree, Greek yogurt, maple syrup, vanilla extract, and pumpkin pie spice. Stir until well combined and smooth. This mixture will be the creamy base for your parfaits.
- Prepare the Spooky Granola: In a separate bowl, combine the granola, dark chocolate chips, dried cranberries, and pumpkin seeds. Drizzle the honey over the mixture and toss until evenly coated. This will be your spooky granola layer.
- Assemble the Parfaits: Begin by placing a layer of the pumpkin mixture at the bottom of each serving glass or bowl. Follow with a layer of the spooky granola. Repeat the layers until all ingredients are used, finishing with a layer of granola on top.
- Add a Finishing Touch: If desired, top each parfait with a dollop of whipped cream and a sprinkle of extra pumpkin seeds or chocolate chips for an extra festive touch.
Extra Tips:
For a creamier texture, consider using full-fat Greek yogurt. You can also customize the spooky granola by adding other Halloween-themed treats such as candy corn or mini marshmallows.
If you’re preparing these parfaits ahead of time, keep the granola separate until just before serving to maintain its crunchiness. Additionally, adjust the sweetness of the pumpkin mixture to taste by adding more or less maple syrup, depending on your preference.
Mummy Toast With Eerie Egg Eyes
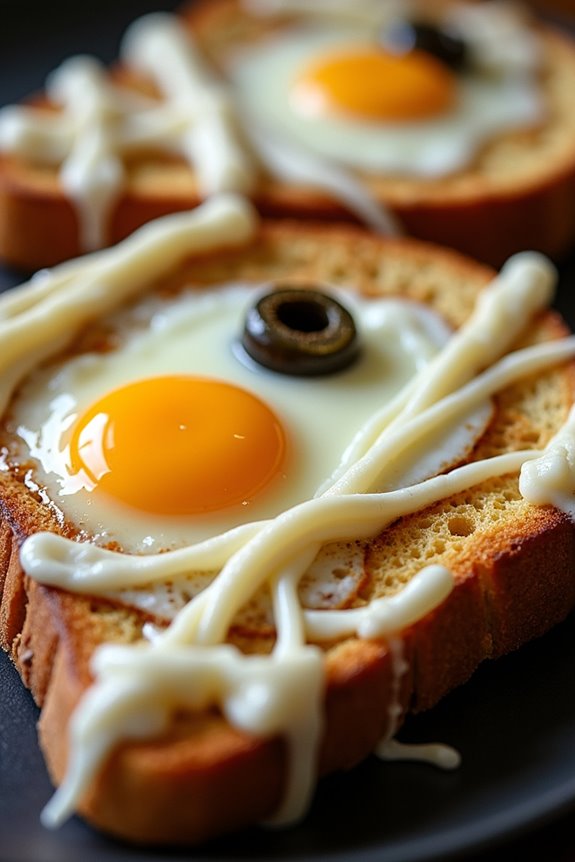
Mummy Toast With Eerie Egg Eyes is a delightful and spooky breakfast treat perfect for Halloween morning or a themed brunch. This creative dish combines the savory flavors of toast, cheese, and eggs with an imaginative presentation that will thrill kids and adults alike. The toast is transformed into a mummy’s face using stringy strips of cheese, while the eggs are turned into eerie eyes, complete with olive slices for pupils.
Whether you’re hosting a Halloween party or just want to surprise your family with a fun breakfast, this recipe is sure to be a hit. This dish isn’t only fun to make but also quite simple, requiring only a few ingredients that you probably already have in your kitchen.
The preparation involves toasting bread, melting cheese, and frying eggs, making it a quick yet satisfying breakfast option. The combination of gooey cheese, crispy toast, and perfectly cooked eggs creates a delicious and comforting meal to start the day. Let’s plunge into the recipe so you can create this spooky masterpiece at home.
Ingredients for Mummy Toast With Eerie Egg Eyes (serves 4-6):
- 6 slices of whole wheat or white bread
- 12 slices of mozzarella cheese (or any preferred cheese)
- 6 large eggs
- 12 black or green olive slices
- 2 tablespoons of butter
- Salt and pepper to taste
Cooking Instructions:
- Preheat and Prepare: Preheat your oven to 350°F (175°C). While the oven is heating, lightly butter one side of each slice of bread and place them on a baking sheet, buttered side up.
- Create the Mummy Look: Cut the cheese slices into thin strips, about 1/4 inch wide. Lay the strips diagonally across each slice of bread to mimic a mummy’s bandages, leaving some gaps to create the appearance of a mummy face.
- Bake the Toast: Place the baking sheet in the preheated oven and bake for about 5-7 minutes or until the cheese is melted and bubbly. Keep an eye on them to guarantee they don’t burn.
- Prepare the Eerie Egg Eyes: While the toast is baking, heat a non-stick skillet over medium heat. Add a small pat of butter and crack the eggs into the pan, cooking them sunny-side up. Season with a pinch of salt and pepper.
- Assemble the Mummy Toast: Once the cheese is melted and bubbly, remove the toast from the oven. Carefully place one sunny-side-up egg on each slice of toast, positioning it so that the yolk resembles an eye.
- Add the Pupils: Place a slice of olive on each egg yolk to create the “pupil” of the eye. Adjust the olives as needed to achieve a spooky stare.
- Serve and Enjoy: Serve the Mummy Toast immediately while the eggs are warm and the cheese is still gooey. Enjoy the spooky and delicious breakfast with a side of fresh fruit or your favorite breakfast beverage.
Extra Tips:
To enhance the spooky appearance, try using different types of cheese for various colors and textures. You can use tomato slices for a bloodshot eye effect or add a sprinkle of paprika for some added color.
If you prefer scrambled eggs, you can scramble them and arrange them artistically on top of the toast instead. For a more robust flavor, consider adding some cooked bacon strips or sautéed mushrooms as additional toppings.
Finally, involve kids in the preparation process by letting them place the cheese strips and olives, making it a fun family activity.
Vampire Bat Bagels With Bloody Berry Jam

Looking to add a spooky twist to your breakfast table this Halloween? These Vampire Bat Bagels With Bloody Berry Jam aren’t only fun but also deliciously eerie. Perfect for a festive morning or as a treat for a Halloween brunch, these bagels are transformed into bat shapes and paired with a homemade berry jam that looks like it came straight from a vampire’s lair. The combination of the chewy bagels with the sweet and tart jam is sure to be a hit with both kids and adults.
The key to this recipe is creativity and attention to detail. By using simple ingredients like bagels and berries, you can create a dish that’s both visually appealing and tantalizing to the taste buds. With a little imagination, store-bought bagels are transformed into vampire bats using cream cheese and blueberries for eyes, while the homemade jam mimics the look of bloody drips.
Whether you’re hosting a Halloween party or just want to surprise your family with a themed breakfast, this dish is a must-try.
Ingredients:
_For the Vampire Bat Bagels:_
- 4 whole wheat bagels
- 8 tablespoons cream cheese
- 12 blueberries (for eyes)
- 12 almond slices (for fangs)
_For the Bloody Berry Jam:_
- 2 cups mixed berries (e.g., strawberries, raspberries, blackberries)
- 1/2 cup granulated sugar
- 2 tablespoons lemon juice
- 1 tablespoon cornstarch
- 1/4 cup water
_Serving Size: 4-6 people_
Instructions:
- Prepare the Bagels: Slice the bagels in half and toast them until they’re golden brown. This will help keep their shape and add a nice crunch.
- Make the Bloody Berry Jam: In a medium saucepan, combine the mixed berries, sugar, and lemon juice. Cook over medium heat until the berries start to break down and release their juices, about 5-7 minutes.
- Thicken the Jam: In a small bowl, mix the cornstarch with water to create a slurry. Add the slurry to the berry mixture, stirring constantly until the jam thickens, about 2-3 minutes. Remove from heat and let it cool slightly.
- Assemble the Vampire Bat Bagels: Spread 1 tablespoon of cream cheese on each bagel half. Place two blueberries for eyes and two almond slices for fangs on each bagel half to create the bat face.
- Serve: Drizzle or spread the cooled Bloody Berry Jam over each bagel half. Serve immediately, while the jam is still slightly warm, for the best flavor and effect.
Extra Tips:
When creating the vampire bat faces, feel free to use other small fruits or nuts to make them more personalized and fun. You can substitute the almond slices with slivers of apple skin if there are nut allergies to bear in mind.
For a richer jam, consider adding a pinch of cinnamon or a splash of vanilla extract while cooking the berries. If you prefer a smoother jam, simply blend the berries before adding the cornstarch slurry.
These little touches can elevate your Vampire Bat Bagels to the next level of deliciousness and spookiness.
Haunted House Hash Browns With Scary Sauce

Get ready to delight and spook your breakfast guests with our Haunted House Hash Browns with Scary Sauce! This Halloween-themed breakfast dish isn’t only a treat for the eyes but also a delight for the taste buds. The golden, crispy hash browns shaped into mini haunted houses are sure to be a hit among kids and adults alike.
Paired with a tangy, spicy ‘scary’ sauce, this dish brings a playful and delicious twist to your Halloween morning. Perfect for a family brunch or a festive gathering, this recipe serves 4-6 people and is designed to be both easy to prepare and fun to present.
Whether you’re a seasoned chef or a beginner in the kitchen, this recipe promises to be a crowd-pleaser. So, gather your spooky ingredients and get ready to create a breakfast that’s both frightful and delightful!
Ingredients (Serves 4-6):
- 6 medium-sized potatoes
- 1 medium onion
- 2 tablespoons of all-purpose flour
- 2 eggs
- Salt and pepper, to taste
- 1/4 cup vegetable oil
- 1/2 cup of sour cream
- 2 tablespoons of sriracha sauce
- 1 tablespoon of ketchup
- 1 teaspoon of lime juice
- 1 teaspoon of garlic powder
- Fresh parsley for garnish
Cooking Instructions:
1. Prepare the Potatoes: Start by peeling the potatoes and grating them into a large bowl. Squeeze out any excess moisture using a clean kitchen towel. This step is essential to achieve crispy hash browns.
2. Mix the Ingredients: Finely chop the onion and add it to the grated potatoes. Stir in the flour, eggs, salt, and pepper. Mix well until the mixture is thoroughly combined.
3. Shape into Haunted Houses: Take a handful of the potato mixture and form it into small, flat shapes resembling haunted houses. Be creative with the shapes to make them look spooky and fun.
4. Cook the Hash Browns: Heat the vegetable oil in a large skillet over medium heat. Once the oil is hot, carefully place the shaped hash browns into the skillet. Cook each side for about 3-4 minutes, or until they’re golden brown and crispy.
Remove them from the skillet and place them on paper towels to drain excess oil.
5. Prepare the Scary Sauce: In a small bowl, mix together the sour cream, sriracha sauce, ketchup, lime juice, and garlic powder. Stir until smooth and well combined.
6. Serve: Arrange the hash brown haunted houses on a serving platter. Drizzle with the scary sauce or Serve it on the side for dipping. Garnish with fresh parsley for a touch of color and flavor.
Extra Tips: To guarantee your hash browns are extra crispy, make sure to remove as much moisture as possible from the grated potatoes.
Also, avoid overcrowding the skillet; this can lower the oil temperature and result in soggy hash browns. If you’re serving these to children, you can adjust the heat of the scary sauce by reducing the amount of sriracha. Enjoy this spooky and delicious breakfast treat with your family and friends!
Frankenstein French Toast With Electric Green Drizzle
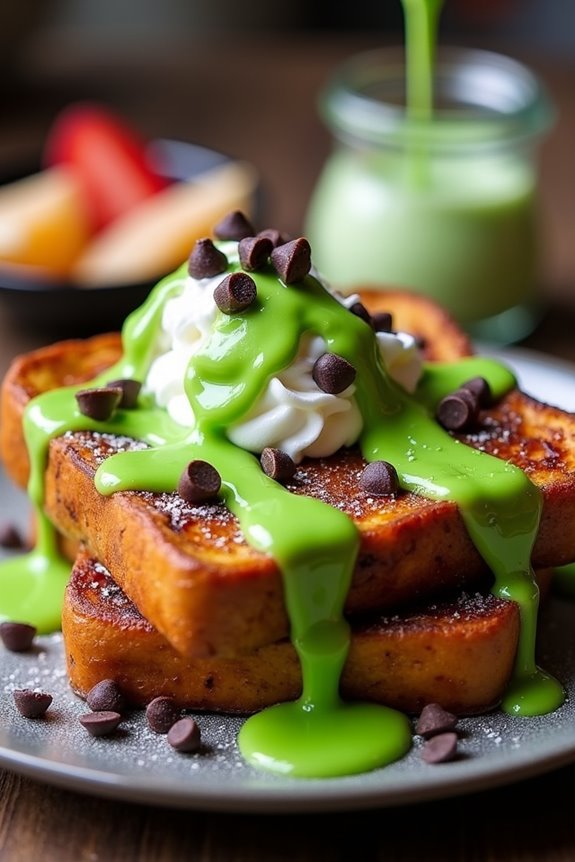
Frankenstein French Toast With Electric Green Drizzle is a spooky and delightful twist on the traditional breakfast favorite. This monster-inspired dish is perfect for Halloween morning, offering both a visually striking and delicious treat. The vibrant green hue of the drizzle, achieved with a simple and safe food coloring, will captivate the young and young at heart.
Coupled with the classic flavors of cinnamon and vanilla, this breakfast will become a festive highlight of your Halloween celebration. The recipe is designed to serve 4-6 people, making it ideal for a family breakfast or a small gathering of friends. The French toast is soft and fluffy on the inside, with a slightly crispy exterior, while the electric green drizzle adds a sweet and slightly tangy contrast.
Whether it’s the first thing you serve on Halloween morning or a post-trick-or-treating treat, this Frankenstein French Toast will surely add some magic to your day.
Ingredients (Serves 4-6)
- 8 slices of thick-cut bread (brioche or challah recommended)
- 4 large eggs
- 1 cup whole milk
- 1 teaspoon vanilla extract
- 1 teaspoon ground cinnamon
- 1 tablespoon sugar
- A pinch of salt
- Butter or oil for frying
- 1 cup powdered sugar
- 2 tablespoons milk (for drizzle)
- Green food coloring
- Optional: whipped cream, chocolate chips, or fruit for garnish
Cooking Instructions
- Prepare the Batter: In a large mixing bowl, whisk together the eggs, whole milk, vanilla extract, ground cinnamon, sugar, and a pinch of salt until well combined. This mixture will serve as the base for your French toast.
- Heat the Pan: Place a large skillet or griddle over medium heat and add a pat of butter or a splash of oil to coat the pan.
- Coat the Bread: Dip each slice of bread into the egg mixture, making sure both sides are evenly soaked but not too saturated, as this can make the bread overly soggy.
- Cook the French Toast: Place the coated bread slices onto the heated skillet. Cook for about 3-4 minutes on each side, or until golden brown and cooked through. Adjust the heat as necessary to prevent burning.
- Make the Green Drizzle: While the French toast is cooking, prepare the drizzle. In a small bowl, combine the powdered sugar and milk until smooth. Add a few drops of green food coloring and mix until the desired shade is achieved.
- Serve: Arrange the cooked French toast on a serving platter. Drizzle the electric green icing over the top of each slice. For extra fun, garnish with whipped cream, chocolate chips, or fruit as desired.
Extra Tips
To guarantee the best texture for your Frankenstein French Toast, use day-old bread or let your fresh bread slices air out for a few hours before starting. This helps the bread absorb the egg mixture without becoming too mushy.
When making the green drizzle, start with a small amount of food coloring and gradually increase until you reach the desired intensity of green to avoid an overly artificial taste. Finally, feel free to experiment with additional spices like nutmeg or cardamom in the batter for a unique flavor twist.
Goblin Green Smoothie Bowls With Frightful Fruit Faces
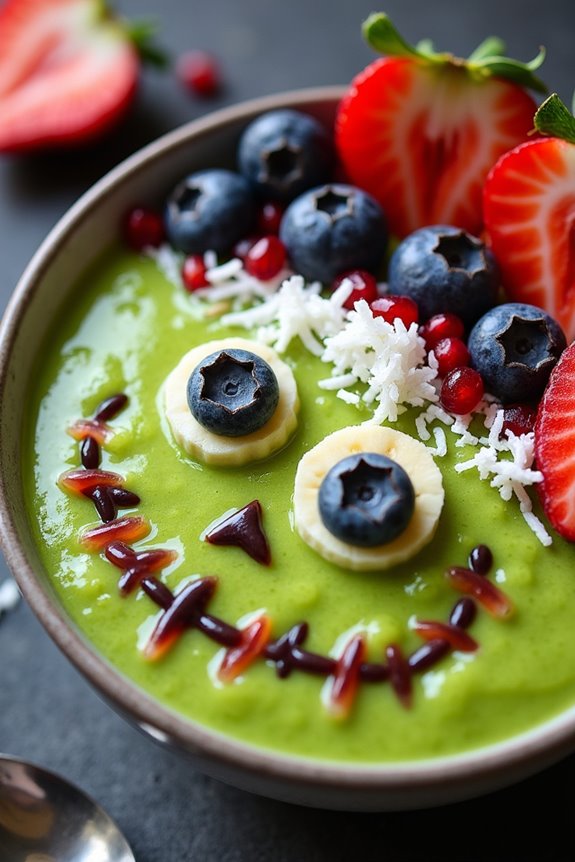
Goblin Green Smoothie Bowls With Frightful Fruit Faces are a perfect way to kick off Halloween morning with a nutritious yet spooky twist. These smoothie bowls are vibrant, fun, and packed with healthy ingredients. They not only cater to the Halloween theme with their ghastly green color but also provide a revitalizing and energizing start to the day.
The base of the smoothie is a delicious blend of spinach, bananas, and avocados, giving it a creamy texture and packed with vitamins. Topped with creatively cut fruits, these bowls become little canvases for crafting frightful faces that kids and adults alike will enjoy making and eating.
Perfect for a serving size of 4-6 people, this recipe is ideal for a Halloween breakfast gathering. You can let your imagination run wild as you create creepy, wild, or silly faces using assorted fruits and nuts. Each bowl isn’t only a treat for the taste buds but also a visual delight. The ease of preparation makes it a great option for busy mornings, allowing you to prepare a healthy and festive breakfast in a jiffy.
Ingredients:
- 3 cups fresh spinach
- 3 ripe bananas
- 2 ripe avocados
- 1 cup almond milk (or any milk of choice)
- 2 tablespoons honey or maple syrup
- 1 teaspoon vanilla extract
- 1 cup ice cubes
- 1 kiwi, peeled and sliced
- 1/2 cup blueberries
- 1/2 cup strawberries, sliced
- 1/4 cup pumpkin seeds
- 1/4 cup shredded coconut
- 1/4 cup pomegranate seeds
Instructions:
- Prepare the Smoothie Base: In a blender, combine the spinach, bananas, avocados, almond milk, honey or maple syrup, vanilla extract, and ice cubes. Blend until smooth and creamy. The mixture should be thick enough to support the fruit toppings.
- Distribute into Bowls: Pour the blended smoothie evenly into bowls, filling each about three-quarters full. This will allow space for the fruit toppings and decorations.
- Create Frightful Faces: Now the fun part begins! Use kiwi slices for eyes, blueberries for pupils, and strawberry slices for mouth shapes. Arrange the pumpkin seeds as spooky teeth, and use shredded coconut and pomegranate seeds to add hair or other features. Get creative with the combinations to make each bowl unique.
- Serve Immediately: Once decorated, serve the smoothie bowls immediately to make sure they remain cold and fresh.
Extra Tips: To make the smoothie even more vibrant and green, consider adding a teaspoon of spirulina powder. This won’t only enhance the color but also add a boost of nutrients. If you prefer a sweeter bowl, you can adjust the amount of honey or maple syrup to taste.
Additionally, explore using different fruits like grapes or blackberries for more variety in your frightful faces. Finally, make sure to involve kids in the decoration process for a fun family activity that encourages creativity and healthy eating.
Skeleton Cinnamon Rolls With Bone-Chilling Icing
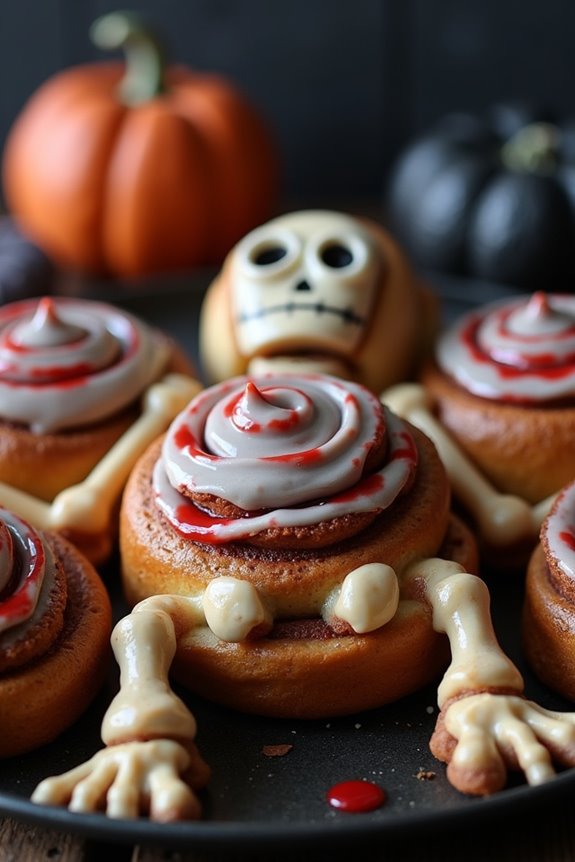
Skeleton Cinnamon Rolls With Bone-Chilling Icing are a spooky twist on a classic breakfast treat, perfect for a Halloween morning surprise. This playful recipe adds a fun, eerie element to your breakfast table, transforming ordinary cinnamon rolls into a skeleton-themed delight. The skeleton design is achieved by creatively arranging the rolls and using a bone-chilling icing to accentuate the spooky features.
This is a great way to get into the Halloween spirit, whether you’re preparing for a big day of festivities or just want to add some seasonal fun to your morning routine. The cinnamon rolls are soft, sweet, and infused with aromatic spices, while the icing adds a chilling yet delicious touch.
This recipe isn’t only a feast for the stomach but also a visual treat that will delight kids and adults alike. Serve these Skeleton Cinnamon Rolls as a centerpiece for your Halloween breakfast, and watch as everyone enjoys the playful spookiness of the dish. Easy to make and full of flavor, these cinnamon rolls are sure to become a Halloween tradition in your household.
Ingredients (Serves 4-6):
- 1 package of refrigerated cinnamon rolls (with icing)
- 1/2 cup powdered sugar
- 1-2 tablespoons milk
- Black food coloring
- Small tube of red decorating gel
- Cooking spray
Cooking Instructions:
- Preheat and Prepare: Preheat your oven according to the cinnamon roll package instructions. Lightly spray a baking sheet with cooking spray to prevent sticking.
- Arrange the Skeleton: Unroll each cinnamon roll slightly to form a skeleton “body”. Use one whole roll for the head, and stretch out the dough to form the spine, arms, and legs. Arrange the rolls on the baking sheet in a skeleton shape.
- Bake: Place the baking sheet in the oven and bake according to the package instructions, usually around 12-15 minutes, or until the rolls are golden brown.
- Prepare the Icing: While the rolls are baking, prepare the bone-chilling icing. In a small bowl, mix the icing that came with the cinnamon rolls with the powdered sugar and milk until smooth. Add a drop or two of black food coloring to create a greyish, bone-like color.
- Decorate: Once the cinnamon rolls are baked and slightly cooled, use the icing to outline the skeleton shape and add details like bones and facial features. Use the red decorating gel to add a spooky touch, such as blood drips or eerie eyes.
- Serve: Allow the decorated cinnamon rolls to set for a few minutes, then serve them warm. Enjoy your spooky breakfast treat!
Extra Tips:
For an even spookier effect, consider dimming the lights and using Halloween-themed table settings when serving your Skeleton Cinnamon Rolls. If you prefer less sweetness, adjust the amount of powdered sugar in the icing.
Be creative with the skeleton design, and feel free to add other decorative elements like candy eyes or colored sprinkles to enhance the Halloween theme. If baking with kids, let their imaginations run wild as they help decorate these chilling breakfast treats.
Jack-O’-Lantern Oatmeal With Pumpkin Spice

Start your Halloween morning with a delightful and festive Jack-O’-Lantern Oatmeal with Pumpkin Spice. This warm, comforting dish combines the hearty goodness of oatmeal with the seasonal flavors of pumpkin spice, making it a perfect breakfast treat for the autumn season.
The oatmeal is creatively decorated with healthy toppings to resemble a cheerful jack-o’-lantern face, ensuring that even the pickiest eaters will enjoy their first meal of the day. Perfect for families, this breakfast isn’t only nutritious and satisfying, but it also adds a touch of holiday magic to your morning routine.
Creating this Halloween-themed breakfast is as fun as it’s delicious. With the rich flavors of pumpkin spice and the visual appeal of a jack-o’-lantern, this oatmeal is sure to be a hit among both kids and adults alike.
Plus, it’s easy to prepare and can be customized with a variety of toppings to suit individual tastes. Whether you’re hosting a Halloween brunch or simply want to surprise your family with a festive meal, this Jack-O’-Lantern Oatmeal is a surefire way to bring smiles to the breakfast table.
Ingredients (Serving Size: 4-6 people):
- 2 cups rolled oats
- 4 cups milk (or almond milk for a dairy-free option)
- 1 cup canned pumpkin puree
- 1/4 cup maple syrup
- 2 teaspoons pumpkin spice
- 1/2 teaspoon vanilla extract
- 1/4 teaspoon salt
- Raisins (for decoration)
- Sliced almonds (for decoration)
- Chia seeds (for decoration)
- Edible black gel icing (optional, for decoration)
Cooking Instructions:
- Prepare the Oatmeal Base: In a large saucepan, combine the rolled oats and milk. Stir well and bring to a gentle boil over medium heat. Reduce the heat to low and let simmer, stirring occasionally, for about 5-7 minutes, or until the oatmeal is thick and creamy.
- Incorporate Pumpkin and Flavorings: Add in the pumpkin puree, maple syrup, pumpkin spice, vanilla extract, and salt. Stir until all ingredients are thoroughly combined. Continue to cook for an additional 3-5 minutes, allowing the flavors to meld together and the mixture to reach the desired consistency.
- Assemble the Jack-O’-Lantern Faces: Spoon the oatmeal into serving bowls. Use raisins to create the eyes and mouth of the jack-o’-lantern. Add sliced almonds to form eyebrows or teeth for extra character. Sprinkle chia seeds around the face for a fun texture. Optionally, use edible black gel icing to outline or add details to the face.
- Serve and Enjoy: Serve your Jack-O’-Lantern Oatmeal warm. Encourage your guests or family members to get creative with their own oatmeal decorations, making breakfast an interactive and enjoyable experience.
Extra Tips:
To enhance the flavor of your Jack-O’-Lantern Oatmeal, consider adding a pinch of ground cinnamon or nutmeg for extra warmth. If you prefer a sweeter oatmeal, drizzle a bit more maple syrup on top before serving.
For a nut-free version, substitute the sliced almonds with pumpkin seeds or sunflower seeds. This dish can be prepared in advance; simply store the oatmeal in the refrigerator and reheat when ready to serve.
Customize the toppings with your favorite fruits or nuts to make each bowl unique and cater to different tastes.
Zombie Zucchini Bread With Brainy Banana Frosting
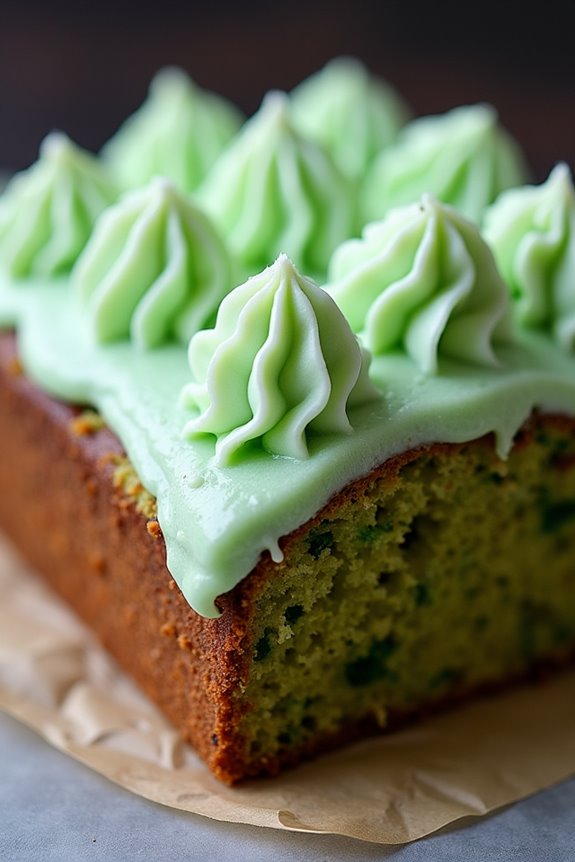
Zombie Zucchini Bread With Brainy Banana Frosting is a spooky twist on the classic zucchini bread, perfect for a Halloween-themed breakfast. This deliciously eerie treat combines the moistness of zucchini bread with the creamy, sweet notes of banana frosting, creating a delightful balance of flavors.
The green hue of the zucchini bread, paired with the gooey, brain-like appearance of the frosting, makes this dish an eye-catching centerpiece for any Halloween breakfast table. This recipe serves 4-6 people, making it ideal for a family breakfast or a small Halloween gathering.
The preparation process is straightforward, ensuring that even novice bakers can create this ghoulishly delicious dish. Whether you’re hosting a Halloween breakfast or simply want to surprise your family with a festive twist on a classic favorite, this Zombie Zucchini Bread with Brainy Banana Frosting is sure to impress.
Ingredients for Zombie Zucchini Bread:
- 2 cups all-purpose flour
- 1 teaspoon baking powder
- 1/2 teaspoon baking soda
- 1 teaspoon ground cinnamon
- 1/4 teaspoon nutmeg
- 1/4 teaspoon salt
- 1 cup granulated sugar
- 1/2 cup vegetable oil
- 2 large eggs
- 1 teaspoon vanilla extract
- 2 cups grated zucchini (about 2 medium zucchinis)
- 1 cup chopped walnuts (optional)
Ingredients for Brainy Banana Frosting:
- 2 ripe bananas
- 2 cups powdered sugar
- 1/4 cup unsalted butter, softened
- 1 teaspoon vanilla extract
- A few drops of green food coloring
Cooking Instructions:
- Preheat the Oven and Prepare the Pan: Preheat your oven to 350°F (175°C). Grease a 9×5-inch loaf pan with butter or non-stick cooking spray. Set it aside.
- Mix Dry Ingredients: In a medium-sized bowl, whisk together flour, baking powder, baking soda, cinnamon, nutmeg, and salt until well combined.
- Mix Wet Ingredients: In a large bowl, beat together the sugar and oil until creamy. Add the eggs one at a time, beating well after each addition. Stir in the vanilla extract.
- Combine Wet and Dry Ingredients: Gradually add the dry ingredients to the wet ingredients, stirring just until combined. Don’t overmix. Fold in the grated zucchini and walnuts (if using) until evenly distributed.
- Bake the Bread: Pour the batter into the prepared loaf pan. Bake in the preheated oven for 50-60 minutes, or until a toothpick inserted into the center comes out clean. Allow the bread to cool in the pan for 10 minutes before transferring it to a wire rack to cool completely.
- Prepare the Frosting: While the bread is cooling, mash the bananas in a medium bowl until smooth. Add the powdered sugar, butter, and vanilla extract, and beat until creamy. Add a few drops of green food coloring and mix until you achieve the desired “brainy” color.
- Frost the Bread: Once the zucchini bread is completely cooled, spread the banana frosting generously on top. Use the back of a spoon to create peaks and valleys, mimicking the look of a brain.
- Serve and Enjoy: Slice the frosted zucchini bread and serve it on a platter. Enjoy your spooky and delicious Halloween breakfast!
Extra Tips:
For an added Halloween touch, consider adding a few drops of green food coloring to the zucchini bread batter to enhance the ghoulish appearance.
Make sure the bread is completely cooled before applying the frosting to prevent it from melting. If you prefer a nut-free version, simply omit the walnuts. This dish is best enjoyed fresh but can be stored in an airtight container in the refrigerator for up to 3 days.
Bewitched Breakfast Burritos With Fiery Salsa

If you’re looking to add a little magic to your morning, these Bewitched Breakfast Burritos With Fiery Salsa are the perfect potion to start your day. Packed with savory ingredients and a spicy kick, these burritos are bound to enchant both family and friends. The combination of fluffy scrambled eggs, spicy sausage, and gooey cheese wrapped in a warm tortilla creates a spellbinding experience. Topped off with a fiery homemade salsa, these burritos bring a touch of Halloween spirit to your breakfast table.
Whether you’re preparing for a festive brunch or simply want to surprise your loved ones with a delightful treat, these burritos are versatile and easy to make. The dish can be prepped in advance and assembled quickly, making it ideal for busy mornings. The fiery salsa, made from fresh ingredients, adds an extra layer of flavor and can be adjusted to your preferred level of spiciness. With a serving size of 4-6 people, this recipe guarantees there’s enough to satisfy even the most ravenous appetites.
Ingredients (Serving Size: 4-6 people):
- 6 large flour tortillas
- 8 large eggs
- 1 cup shredded cheddar cheese
- 1 pound spicy breakfast sausage
- 1 red bell pepper, diced
- 1 small onion, diced
- 1 tablespoon olive oil
- Salt and pepper to taste
For the Fiery Salsa:
- 4 ripe tomatoes, diced
- 1 jalapeño pepper, finely chopped
- 1/2 red onion, finely chopped
- 2 cloves garlic, minced
- 1/4 cup fresh cilantro, chopped
- Juice of 1 lime
- Salt to taste
Cooking Instructions:
- Prepare the Fiery Salsa: In a medium bowl, combine the diced tomatoes, jalapeño, red onion, minced garlic, and cilantro. Squeeze in the lime juice and season with salt to taste. Mix well and set aside to allow flavors to meld.
- Cook the Sausage: In a large skillet, heat the olive oil over medium heat. Add the diced onion and red bell pepper; sauté until they become soft and translucent. Crumble the sausage into the skillet and cook until browned and cooked through, breaking it up with a spoon as it cooks. Once done, remove the mixture from the skillet and set aside.
- Scramble the Eggs: In a bowl, whisk the eggs with a pinch of salt and pepper. In the same skillet used for the sausage, pour in the egg mixture and cook over low heat, gently stirring until the eggs are softly scrambled and just set.
- Assemble the Burritos: Lay each tortilla flat and evenly distribute the sausage mixture across the center of each. Top with scrambled eggs and a sprinkle of cheddar cheese. Roll the tortillas tightly, tucking in the sides to secure the filling.
- Warm the Burritos: Return the skillet to medium heat and place the burritos seam-side down. Cook each side until the tortillas are golden brown and crisp.
- Serve: Slice the burritos in half and serve immediately with the fiery salsa on the side or spooned over the top for an extra kick.
Extra Tips:
For an even spicier salsa, consider adding additional jalapeños or a dash of your favorite hot sauce. If you prefer a milder version, remove the seeds and membranes from the jalapeño before chopping.
To save time in the morning, you can prepare the salsa and cook the sausage mixture the night before. Simply store them in airtight containers in the fridge and reheat when you’re ready to assemble the burritos.
Don’t be afraid to customize your burritos with additional ingredients like avocado, black beans, or a sprinkle of hot sauce for added flavor.
Spooky Spider Scones With Webbed Glaze
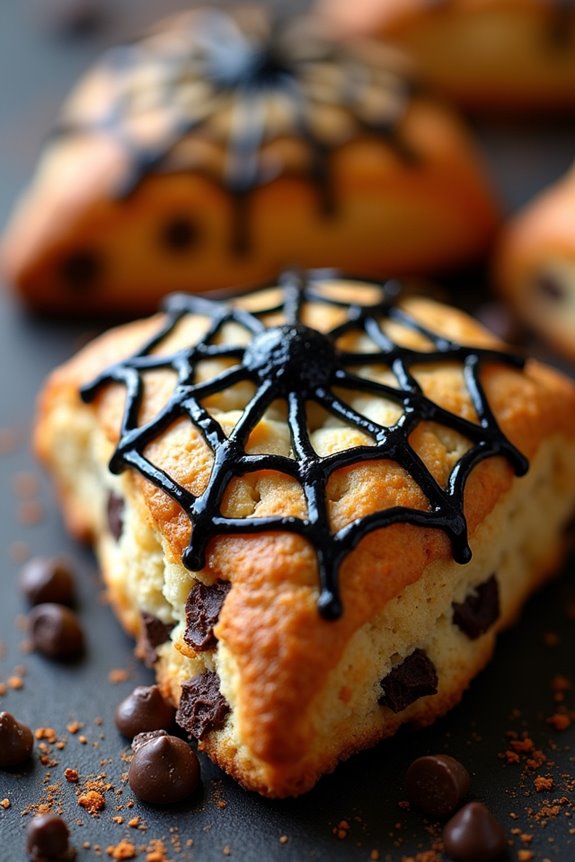
Add a touch of eerie elegance to your Halloween breakfast table with these Spooky Spider Scones With Webbed Glaze. These scones aren’t only a visual treat but also a delicious way to start your day. With a light, flaky texture, these scones are infused with a subtle hint of cinnamon spice, making them perfect for a crisp autumn morning.
The webbed glaze design adds a spooky twist, making them the perfect addition to your Halloween festivities. The Spooky Spider Scones With Webbed Glaze are designed to serve 4-6 people, making them ideal for a family breakfast or a festive brunch with friends.
These scones are easy to prepare and bake, guaranteeing that you can create a memorable and delicious Halloween breakfast without spending all morning in the kitchen. Let’s get started with the ingredients you’ll need.
Ingredients:
- 2 cups all-purpose flour
- 1/3 cup granulated sugar
- 1 tablespoon baking powder
- 1/2 teaspoon salt
- 1/2 teaspoon ground cinnamon
- 1/2 cup cold unsalted butter, cubed
- 2/3 cup milk
- 1 egg
- 1 teaspoon vanilla extract
- 1/2 cup chocolate chips
- 1 cup powdered sugar
- 2-3 tablespoons milk (for glaze)
- Black food coloring
Cooking Instructions:
- Preheat the Oven: Begin by preheating your oven to 400°F (200°C). Line a baking sheet with parchment paper to prevent the scones from sticking.
- Mix Dry Ingredients: In a large mixing bowl, combine the flour, granulated sugar, baking powder, salt, and ground cinnamon. Mix well to guarantee all ingredients are evenly distributed.
- Cut in Butter: Add the cold, cubed butter to the dry ingredients. Using a pastry cutter or your fingers, cut the butter into the mixture until it resembles coarse crumbs.
- Combine Wet Ingredients: In a separate bowl, whisk together the milk, egg, and vanilla extract. Pour this mixture into the dry ingredients and stir until just combined. The dough will be slightly sticky.
- Add Chocolate Chips: Gently fold in the chocolate chips, being careful not to overwork the dough.
- Shape the Scones: Turn the dough out onto a floured surface and gently knead it a few times. Pat the dough into a circle about 1-inch thick. Cut the circle into 8 wedges and place them on the prepared baking sheet.
- Bake: Bake the scones in the preheated oven for 15-18 minutes, or until they’re golden brown on top. Remove from the oven and let cool on a wire rack.
- Prepare the Glaze: While the scones are cooling, prepare the glaze. In a small bowl, mix the powdered sugar with 2-3 tablespoons of milk until smooth. Add a few drops of black food coloring and stir until you achieve a deep black color.
- Decorate with Webbed Glaze: Once the scones are cool, drizzle the black glaze over the scones in a web pattern. Use a toothpick to create the spider web design by dragging lines outward from the center.
Extra Tips:
When making these scones, make sure your butter is cold, as this will help create a flaky texture. If you don’t have a pastry cutter, you can use two knives to cut the butter into the dry ingredients.
Also, feel free to get creative with the glaze design; you can even add edible glitter or candy spiders for an extra spooky touch. Finally, these scones are best enjoyed fresh, but they can be stored in an airtight container for a day or two if needed.
Creepy Crawly Crepes With Mystery Filling

Celebrate the spooky season with a breakfast that’s as fun to look at as it’s delicious to eat. These Creepy Crawly Crepes with Mystery Filling are bound to delight and surprise your family or guests with their eerie appearance and mysterious, sweet-savory filling.
Made with a classic crepe batter, these crepes are transformed into a Halloween spectacle with the help of creative presentation and a tasty filling that keeps everyone guessing. Perfect for a Halloween breakfast or brunch, this dish is both visually stunning and a treat for the palate.
The mystery filling is a delightful blend of flavors that balances the delicate texture of the crepes. The filling combines cream cheese, pumpkin puree, and a hint of cinnamon and nutmeg for a seasonal twist.
To make things even more interesting, chocolate spiders are added for a fun, creepy element. Serve these crepes warm, topped with a drizzle of chocolate sauce and a scattering of chocolate chips that resemble tiny spiders crawling over the dish. This recipe is designed to serve 4-6 people, making it perfect for a small gathering or family breakfast.
Ingredients:
- 2 cups all-purpose flour
- 3 eggs
- 2 cups milk
- 1/4 cup melted butter
- 1/4 teaspoon salt
- 1 teaspoon vanilla extract
- 8 ounces cream cheese, softened
- 1 cup pumpkin puree
- 1/4 cup sugar
- 1/2 teaspoon cinnamon
- 1/4 teaspoon nutmeg
- Chocolate sauce for drizzling
- 1/2 cup mini chocolate chips
Instructions:
1. Prepare the Crepe Batter: In a large mixing bowl, whisk together the flour, eggs, milk, melted butter, salt, and vanilla extract until the mixture is smooth and free of lumps. Cover and let the batter rest for about 30 minutes in the refrigerator.
2. Make the Mystery Filling: In a medium-sized bowl, combine the softened cream cheese, pumpkin puree, sugar, cinnamon, and nutmeg. Mix until smooth and creamy. Set aside in the refrigerator while you prepare the crepes.
3. Cook the Crepes: Heat a non-stick skillet over medium heat and lightly grease it with butter or cooking spray. Pour about 1/4 cup of the batter into the pan, tilting to evenly coat the bottom. Cook for 1-2 minutes on each side, or until the crepe is lightly golden.
Transfer the cooked crepes to a plate and cover with a clean kitchen towel to keep warm. Repeat with the remaining batter.
4. Assemble the Crepes: Lay a warm crepe flat on a plate and spoon a generous amount of the mystery filling onto one half of the crepe. Fold the crepe over the filling, then fold it once more to form a triangle.
5. Decorate With Chocolate Spiders: Drizzle chocolate sauce over the crepe and sprinkle mini chocolate chips on top to resemble spiders. For an extra touch, use melted chocolate to pipe small spider legs extending from the chocolate chips.
6. Serve and Enjoy: Arrange the crepes on a serving platter and serve immediately while warm. Offer extra chocolate sauce on the side for added sweetness.
Extra Tips:
For the smoothest batter, consider using a blender to mix your crepe ingredients. This guarantees that the batter is perfectly lump-free and ready for cooking.
If you prefer a savory twist, substitute the pumpkin filling with sautéed mushrooms and cheese, and skip the chocolate spiders. Adjust the sweetness of the filling to your liking by adding more or less sugar.
Finally, be creative with your chocolate decoration — you can draw different creepy crawlies or even write spooky messages using a fine-tipped decorating pen.