

Halloween is just around the corner, and there’s nothing I adore more than crafting delightful snacks that are both festive and fuss-free. I’ve gathered 11 enchanting treats that you can whip up in no time, like Mummy Hot Dogs and Ghostly Cheese Sticks. Whether you’re planning to host or attend a spooky gathering, these bites are guaranteed to charm everyone. Ready to sprinkle some Halloween magic onto your table? Let’s discover these quick and creative recipes together!
Mummy Hot Dogs

Mummy Hot Dogs are a spooktacular treat perfect for any Halloween party. These adorable snacks aren’t only easy to make but also incredibly fun to eat. By wrapping hot dogs in crescent roll dough to resemble mummies, they add a delightful and festive touch to your Halloween spread. Ideal for both kids and adults, Mummy Hot Dogs are a playful way to satisfy your guests’ appetites while keeping with the spooky season theme.
The beauty of Mummy Hot Dogs lies in their simplicity and appeal. With just a few ingredients, you can whip up a batch in no time, making them a great last-minute addition to any party menu. They serve as a hearty finger food that guests can easily grab and enjoy as they mingle.
Plus, with a dab of mustard or ketchup to create eyes, these tasty treats are sure to elicit smiles and compliments from everyone who sees them.
Ingredients (serves 4-6 people):
- 8 hot dogs
- 1 can of refrigerated crescent roll dough (or crescent sheet)
- Mustard or ketchup for decorating
Cooking Instructions:
- Preheat the Oven: Begin by preheating your oven to 375°F (190°C). This will guarantee that your Mummy Hot Dogs cook evenly and have a nice, golden-brown finish.
- Prepare the Dough: Unroll the crescent roll dough on a clean surface. If you’re using crescent roll triangles, separate them and cut each triangle into thin strips about 1/4-inch wide. If using a crescent sheet, simply cut it into similar thin strips.
- Wrap the Hot Dogs: Take one hot dog and start wrapping it with the dough strips. Begin at one end and leave a small gap for the “face” of the mummy. Overlap the strips slightly as you wrap to create a bandage effect. Repeat this process for all the hot dogs.
- Bake the Mummy Dogs: Place the wrapped hot dogs on a baking sheet lined with parchment paper. Bake in the preheated oven for about 12-15 minutes or until the dough is golden brown.
- Add the Eyes: Once baked, remove the Mummy Hot Dogs from the oven and let them cool slightly. Use a small amount of mustard or ketchup to dot eyes onto the exposed part of the hot dog that serves as the mummy’s face.
- Serve: Arrange the Mummy Hot Dogs on a platter and serve them warm with additional mustard or ketchup on the side for dipping.
Extra Tips: For added flavor, consider brushing the dough with melted butter or a mixture of garlic powder and herbs before baking. This will give the Mummy Hot Dogs a tasty, savory finish.
If you’re catering to kids, using mini hot dogs or cocktail sausages can make them easier to handle and eat. Remember, you can also experiment with different types of sausages or dough to suit your taste preferences. Enjoy crafting these fun mummies and delight your guests with their spooky charm!
Ghostly Cheese Sticks

Elevate your Halloween party with a spooky twist on a classic snack—Ghostly Cheese Sticks. These cheesy delights aren’t only delicious but also add a hauntingly fun element to your festive spread. Perfect for guests of all ages, these ghostly snacks are quick to prepare and sure to be a hit among your family and friends.
Serve them as an appetizer or a late-night nibble while enjoying your favorite Halloween movies.
Ghostly Cheese Sticks are made using mozzarella string cheese, which is creatively transformed into eerie ghost figures with the help of edible markers. The cheese sticks are wrapped in flaky pastry, baked to golden perfection, and served with a side of marinara sauce, offering a delightful contrast of flavors and textures.
Let this spooky treat be the highlight of your Halloween festivities, leaving your guests both enchanted and satisfied.
Ingredients (Serves 4-6 people):
- 12 mozzarella string cheese sticks
- 1 sheet of puff pastry, thawed
- 1 egg, beaten
- 1 tablespoon water
- Black edible marker or black food gel
- Marinara sauce for dipping
Cooking Instructions:
- Preheat the Oven: Start by preheating your oven to 400°F (200°C). Line a baking sheet with parchment paper to prevent the cheese sticks from sticking.
- Prepare the Puff Pastry: Roll out the thawed puff pastry sheet on a lightly floured surface. Using a sharp knife or a pizza cutter, divide the pastry sheet into 12 strips, each about 1 inch wide.
- Wrap the Cheese: Take a mozzarella string cheese stick and wrap a strip of puff pastry around it, leaving about an inch exposed at the top for the ghost’s “head.” Repeat this process for all cheese sticks.
- Create the Ghosts: Using the black edible marker or black food gel, draw two eyes and a mouth on the exposed portion of each cheese stick to create a ghostly face.
- Prepare for Baking: In a small bowl, mix the beaten egg with 1 tablespoon of water to create an egg wash. Brush this mixture lightly over the wrapped cheese sticks to give them a golden brown finish when baked.
- Bake the Cheese Sticks: Place the prepared cheese sticks on the lined baking sheet. Bake in the preheated oven for about 12-15 minutes or until the pastry is golden brown and puffed.
- Serve: Allow the Ghostly Cheese Sticks to cool slightly before serving. Pair them with a bowl of marinara sauce for dipping.
Extra Tips:
When making Ghostly Cheese Sticks, guarantee your puff pastry is well-thawed before rolling it out to avoid tearing.
If you don’t have an edible marker, you can also use small pieces of black olive or peppercorns to create the ghost faces. Keeping the cheese sticks in the refrigerator until just before use will help them maintain their shape during baking.
Finally, feel free to add a dash of garlic powder or Italian herbs to the egg wash for added flavor. Enjoy your spooky snacks!
Witch’s Broomstick Snacks
Halloween parties are all about the thrill and the delight of spooky treats, and Witch’s Broomstick Snacks make for an enchanting addition to your table. These creative and delicious snacks aren’t only fun to make but are certain to impress both kids and adults alike.
Made with simple ingredients, they offer a salty-sweet combination that’s hard to resist. Perfect for a party of 4-6 people, these broomsticks are easy to assemble and are promised to add a magical touch to your Halloween festivities.
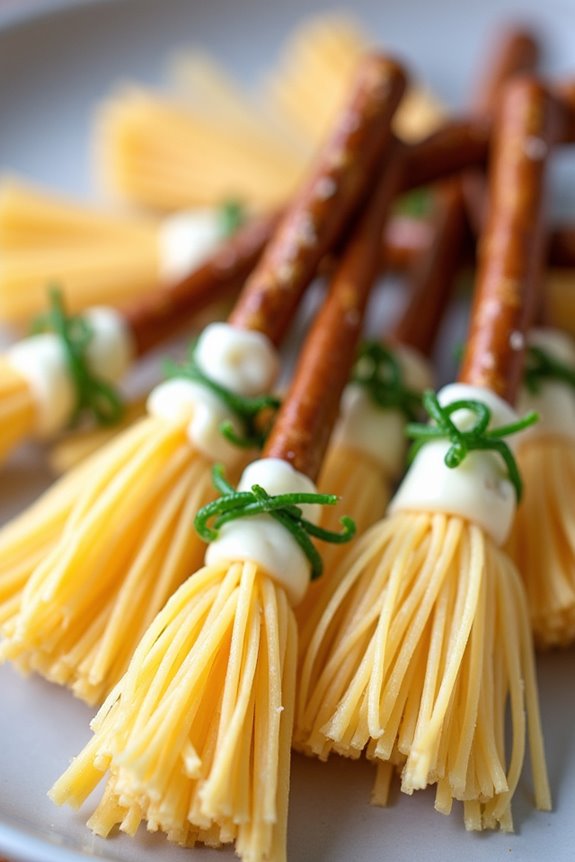
The Witch’s Broomstick Snacks are a whimsical treat that combines the crunch of pretzels with the creamy texture of cheese. Each broomstick is crafted using pretzel rods as handles, and the bristles are made from string cheese.
The final touch of chives ties everything together, creating an authentic broomstick look that will make your Halloween spread truly spellbinding. Enjoy the ease of preparation and the delightful presentation that these snacks bring to your party.
Ingredients for 4-6 servings:
- 12 pretzel sticks or rods
- 6 string cheese sticks
- Fresh chives
Cooking Instructions:
- Prepare the String Cheese: Begin by unwrapping the string cheese sticks. Using a knife, cut each string cheese in half to create two shorter pieces. This will form the bristles of the broomstick.
- Create the Broom Bristles: Take each half of the string cheese and make several lengthwise cuts about two-thirds of the way up from one end. These cuts will form the individual bristles of the broomstick, giving it an authentic look.
- Attach the Pretzel Sticks: Carefully insert one end of a pretzel stick into the uncut end of the string cheese piece. Push it in gently but firmly to confirm that it stays in place, creating the handle of your broomstick.
- Secure with Chives: Take a fresh chive and wrap it around the top of the string cheese, just below where the pretzel stick is inserted. This will help to secure the cheese around the pretzel and enhance the appearance of the broom bristles.
- Repeat the Process: Continue assembling the remaining broomsticks by repeating steps 2-4 until all pretzel rods and string cheese pieces are used.
- Serve and Enjoy: Arrange the Witch’s Broomstick Snacks on a platter and serve them to your guests. They can be enjoyed as they’re or paired with a dipping sauce of your choice.
Extra Tips:
For best results, use fresh chives as they’re flexible and easy to tie around the cheese. If you want to add a little extra flavor, consider sprinkling a bit of paprika or your favorite seasoning on the cheese bristles before serving.
Make sure to prepare these snacks close to serving time to maintain their freshness and crunch. If you’re preparing them in advance, keep them refrigerated until party time to confirm the cheese stays firm and the pretzels remain crisp.
Monster Eyeball Donuts
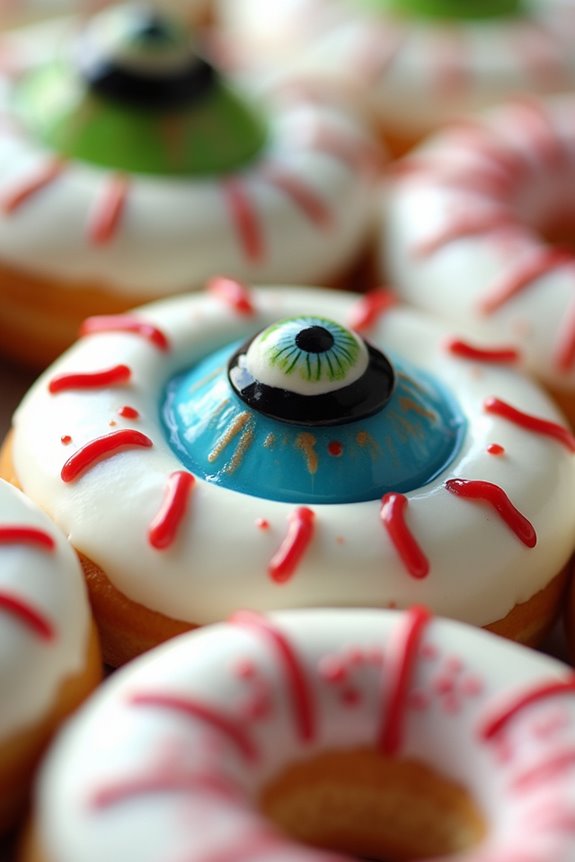
To make these Monster Eyeball Donuts, you’ll start with a basic donut recipe or use store-bought plain donuts for convenience. The decoration is where the creativity comes to life, using icing and candy to transform the plain donuts into monstrous eyeballs. This recipe serves 4-6 people, making it an ideal addition to any Halloween gathering or party buffet.
Ingredients:
- 6 plain donuts (homemade or store-bought)
- 1 cup white icing
- 12 candy eyeballs
- Red gel icing
- Assorted colored icing (green, blue, or any preferred color for the iris)
- Black gel icing
Instructions:
- Prepare the Donuts: If making homemade donuts, follow your favorite recipe to bake 6 plain donuts. Allow them to cool completely before decorating. If using store-bought donuts, simply remove them from their packaging.
- Base Icing: Spread a generous layer of white icing evenly over the top of each donut to create a blank canvas. This will act as the ‘whites’ of the monster eyeballs.
- Create the Iris: Using the colored icing, draw a circle in the center of each donut to represent the iris. Choose bright colors such as green or blue to make the eyeballs stand out.
- Add the Pupil: Using black gel icing, place a small dot in the center of the iris to form the pupil. For a more realistic look, verify the pupil is smaller than the iris.
- Attach Candy Eyeballs: Place two candy eyeballs on each donut for an extra creepy effect. Position them strategically to make the eyeballs look as monstrous as possible.
- Add Blood Vessels: Use red gel icing to draw thin lines radiating from the iris outward, resembling blood vessels. This will give the eyeballs a more grotesque and realistic appearance.
- Serve and Enjoy: Arrange the Monster Eyeball Donuts on a serving platter, and watch as your guests delight in these spooky treats.
Extra Tips:
For a fun variation, try using different flavors of donuts, such as chocolate or pumpkin spice, to add variety to the snack table.
Use a piping bag for more precise icing application to create intricate designs on the donuts. If you want to make the donuts ahead of time, store them in an airtight container to keep them fresh.
Feel free to get creative with the decorations by adding sprinkles or edible glitter for an extra touch of Halloween magic.
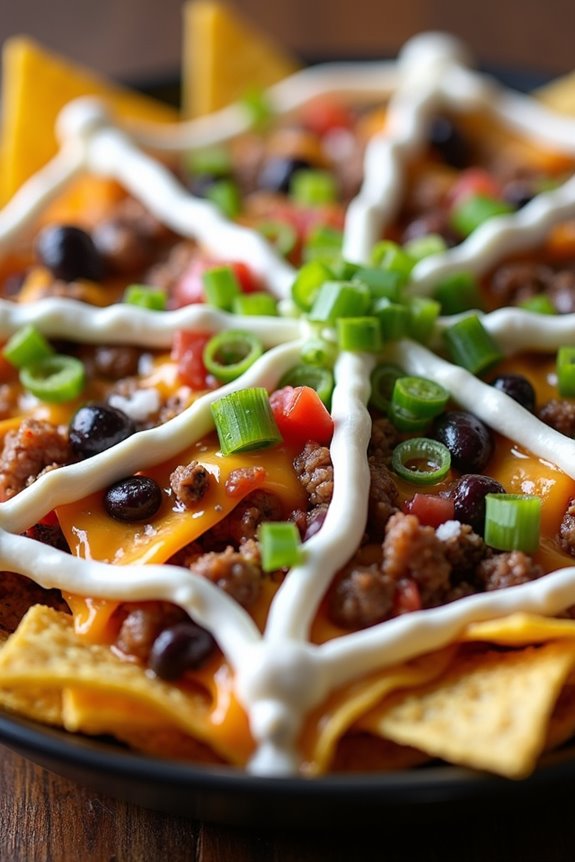
Spider Web Nachos
Perfect for a serving size of 4-6 people, Spider Web Nachos are simple to prepare, making them an ideal choice for those looking to impress without spending too much time in the kitchen.
It’s a versatile dish that can be customized with various toppings, depending on your guests’ preferences. Whether you’re hosting a creepy costume gathering or a cozy fall get-together, these nachos are sure to be a hit.
Ingredients:
- 1 bag of tortilla chips
- 1 pound ground beef
- 1 packet taco seasoning
- 1 cup shredded cheddar cheese
- 1 cup shredded Monterey Jack cheese
- 1 can (15 oz) black beans, drained and rinsed
- 1 cup salsa
- 1/2 cup sliced black olives
- 1/2 cup chopped green onions
- 1/2 cup sour cream
- 1 tablespoon lime juice
- 1/2 teaspoon salt
- 1/4 teaspoon black pepper
Cooking Instructions:
- Prepare the Beef: In a large skillet over medium heat, cook the ground beef until fully browned, breaking it apart with a spoon. Drain excess fat and return to the skillet.
- Season the Beef: Add the taco seasoning and 1/4 cup of water to the beef. Stir well to combine and cook for another 2-3 minutes until the sauce thickens and evenly coats the beef. Remove from heat.
- Preheat the Oven: Set your oven to 350°F (175°C) to preheat while you assemble the nachos.
- Assemble the Base: On a large baking sheet or oven-safe platter, spread out the tortilla chips in an even layer. Top with the seasoned beef, black beans, and salsa.
- Add the Cheese: Sprinkle the shredded cheddar and Monterey Jack cheeses evenly over the top of the nachos.
- Bake the Nachos: Place the assembled nachos in the preheated oven and bake for 10-12 minutes, or until the cheese is melted and bubbling.
- Create the Spider Web: In a small bowl, mix the sour cream with lime juice, salt, and pepper until smooth. Transfer to a squeeze bottle or piping bag with a small tip. Carefully create a spider web pattern over the top of the nachos with the sour cream mixture.
- Garnish and Serve: Scatter the black olives and green onions over the nachos. Serve immediately while hot, optionally adding more salsa on the side for dipping.
Extra Tips:
For an extra spooky touch, consider adding plastic spider decorations around the platter (ensure they’re removed before eating).
You can also substitute ground beef with ground turkey or a vegetarian alternative to accommodate dietary preferences.
If you prefer spicier nachos, add sliced jalapeños to the topping mix.
When creating the spider web, practice on a plate first to get the hang of the design.
Ultimately, if you don’t have a squeeze bottle or piping bag, a resealable plastic bag with a corner snipped off works in a pinch for piping the sour cream.
Pumpkin Patch Dirt Cups
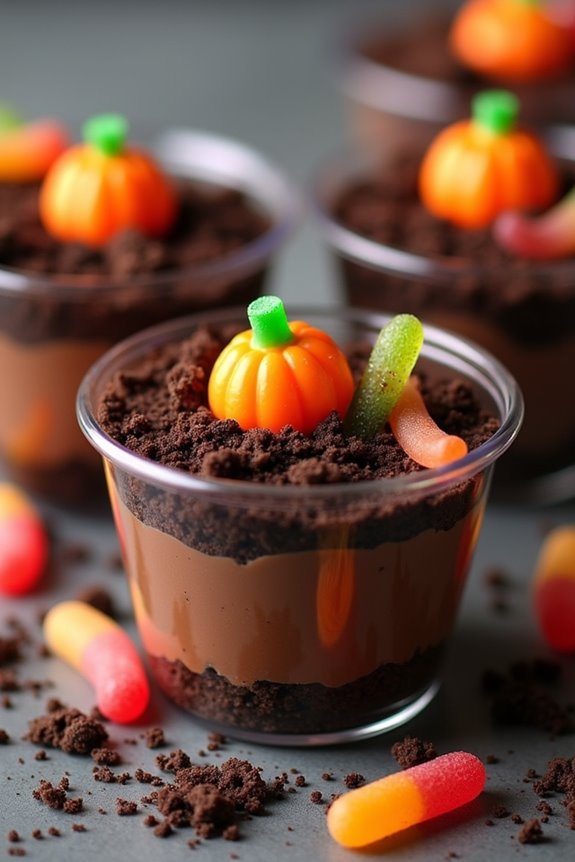
Pumpkin Patch Dirt Cups are a festive and delightful treat perfect for any Halloween party. These fun and edible creations mimic a mini pumpkin patch, complete with “dirt” and candy pumpkins. They aren’t only a hit with kids but also a sweet indulgence for adults.
With a combination of chocolate pudding, crushed cookies, and gummy worms, this dessert is as delicious as it’s visually appealing. These dirt cups are easy to make and can be prepared in advance, saving you time on the day of your event.
The recipe involves layering different components to create a dessert that looks like a tiny pumpkin patch when finished. It’s a great opportunity to get creative with your presentation, adding in any extra touches you think would enhance the theme of your party.
Ingredients for 4-6 servings:
- 2 cups of cold milk
- 1 package (3.9 ounces) chocolate instant pudding mix
- 1 package (14.3 ounces) chocolate sandwich cookies
- 1 cup whipped topping
- 1 package (7 ounces) candy pumpkins
- 1 package gummy worms
Cooking Instructions:
- Prepare the Pudding: In a large bowl, whisk together the cold milk and chocolate instant pudding mix. Continue whisking for about 2 minutes until the mixture thickens. Let it set for 5 minutes.
- Crush the Cookies: While the pudding is setting, place the chocolate sandwich cookies in a sealed plastic bag. Use a rolling pin or a heavy object to crush them into fine crumbs. These will serve as the “dirt” for the cups.
- Layer the Dirt Cups: In individual clear cups, start layering your dirt cups. Begin with a layer of pudding, then add a layer of crushed cookies. Repeat the layers until the cups are almost full, finishing with a layer of cookies on top to resemble dirt.
- Add the Toppings: Gently press a few candy pumpkins into the top layer of cookie crumbs to create a pumpkin patch effect. Add gummy worms by inserting them partially into the “dirt” to look like they’re crawling out.
- Chill the Cups: Place the completed dirt cups in the refrigerator for at least 30 minutes to allow them to set and for the flavors to meld together.
- Serve and Enjoy: Just before serving, add a dollop of whipped topping to each cup if desired, and enjoy your spooky and fun Pumpkin Patch Dirt Cups!
Extra Tips:
When making Pumpkin Patch Dirt Cups, feel free to get creative with your decorations. You can add edible tombstones made from cookies or use green icing to mimic grass.
If you’re preparing these for a larger crowd, consider making them in a large dish and serving with a spoon. For a richer flavor, you can substitute the whipped topping with cream cheese frosting. Always remember to prepare a few extras in case your guests can’t resist going back for seconds!
Creepy Crawly Pretzel Rods

Creepy Crawly Pretzel Rods are the perfect Halloween treat to spook and delight guests at any party. These eerie yet delicious snacks are the ideal combination of sweet and salty, making them an irresistible addition to your Halloween spread. With their spooky appearance and crunchy texture, Creepy Crawly Pretzel Rods are sure to be a hit with both kids and adults alike.
The recipe is simple and fun to make, allowing you to get creative with your decorations to make each rod look unique and festive. The process involves covering pretzel rods in a layer of melted chocolate before adding your favorite creepy crawly candy decorations. The result is a deliciously sweet and salty treat that looks as good as it tastes.
Perfect for a serving size of 4-6 people, these pretzel rods can be customized with different colors and designs to match your Halloween theme. Whether you’re hosting a party or just enjoying a spooky night in, these Creepy Crawly Pretzel Rods will add a fun and festive touch to your Halloween celebrations.
Ingredients:
- 12 pretzel rods
- 1 cup of semi-sweet chocolate chips
- 1 cup of white chocolate chips
- Assorted Halloween-themed sprinkles
- Candy eyeballs
- Gummy worms
- Parchment paper or wax paper
Instructions:
- Prepare Your Workstation: Line a baking sheet with parchment paper or wax paper. This will prevent the pretzel rods from sticking and make cleanup easier.
- Melt the Chocolate: In two separate microwave-safe bowls, melt the semi-sweet chocolate chips and white chocolate chips. Heat in 30-second intervals, stirring in between, until the chocolate is completely melted and smooth.
- Dip the Pretzel Rods: Take each pretzel rod and dip it into the melted chocolate, covering about two-thirds of the rod. Allow excess chocolate to drip off before placing it on the prepared baking sheet.
- Decorate: Quickly add the Halloween-themed sprinkles, candy eyeballs, and gummy worms to the chocolate-coated section of each pretzel rod before the chocolate sets. Be creative and have fun with the decorations!
- Set the Chocolate: Allow the decorated pretzel rods to sit at room temperature until the chocolate has completely set. Alternatively, you can place them in the refrigerator for about 15 minutes to speed up the process.
- Serve and Enjoy: Once the chocolate has hardened, serve your Creepy Crawly Pretzel Rods on a platter for your guests to enjoy.
Extra Tips: To make the process easier, use a tall glass for melting the chocolate, which allows for easy dipping of the pretzel rods. If you’re preparing these ahead of time, store them in an airtight container to keep them fresh and crunchy.
You can also experiment with different types of chocolate or colored candy melts to match different Halloween themes or color schemes. Remember, the key to these treats is creativity, so don’t hesitate to let your imagination run wild with the decorations!
Frankenstein Rice Krispie Treats

Frankenstein Rice Krispie Treats are a fun and spooky addition to any Halloween party. These delightful treats combine the classic, gooey goodness of Rice Krispie squares with a creative and monstrous twist. Shaped and decorated to resemble everyone’s favorite green monster, these treats are sure to be a hit with both kids and adults.
With their vibrant colors and playful appearance, Frankenstein Rice Krispie Treats add a touch of whimsy and frightful fun to your Halloween snack spread. Not only are these treats visually appealing, but they’re also incredibly easy to make. Perfect for a serving size of 4-6 people, these treats require minimal ingredients and preparation time.
Whether you’re hosting a Halloween party or looking for a fun activity to do with the kids, these Frankenstein Rice Krispie Treats are a perfect choice. Gather your ingredients and get ready to create some monstrously delicious snacks!
Ingredients:
- 4 cups Rice Krispies cereal
- 3 tablespoons unsalted butter
- 10 ounces marshmallows (about 40 large marshmallows or 6 cups mini marshmallows)
- Green food coloring
- 1 cup chocolate chips
- 1 tablespoon coconut oil (optional, for chocolate melting)
- Assorted candy decorations (e.g., candy eyes, small pretzel sticks, black licorice, etc.)
Instructions:
- Prepare the Pan: Lightly grease a 9×13-inch baking dish with butter or non-stick spray. This will prevent the Rice Krispie mixture from sticking to the pan.
- Melt the Butter and Marshmallows: In a large saucepan, melt the butter over low heat. Add the marshmallows and stir continuously until they’re completely melted and smooth. This might take about 5 minutes.
- Color the Mixture: Once the marshmallows are melted, remove the saucepan from the heat and add a few drops of green food coloring. Stir well until the color is evenly distributed. You can adjust the color intensity by adding more drops as needed.
- Mix with Rice Krispies: Add the Rice Krispies cereal to the green marshmallow mixture. Stir until the cereal is fully coated with the marshmallow mixture.
- Transfer to the Pan: Pour the mixture into the prepared baking dish. Using a spatula, press down the mixture evenly into the pan. Allow it to cool for about 10-15 minutes.
- Cut into Squares: Once cooled, cut the Rice Krispie treats into squares or rectangles, which will serve as the body of Frankenstein.
- Melt the Chocolate: In a microwave-safe bowl, melt the chocolate chips with the coconut oil. Heat in 30-second intervals, stirring after each, until smooth.
- Decorate: Dip the top of each Rice Krispie square into the melted chocolate to create Frankenstein’s hair. Use the candy decorations to add eyes, a mouth, and any other features you like. For the bolts, break small pretzel sticks in half and insert one on each side of the treat.
- Let Set: Allow the chocolate to set completely before serving. This can be sped up by placing the treats in the refrigerator for a few minutes.
Extra Tips: When adding the green food coloring, start with a few drops and gradually add more to achieve the desired shade of green. If you don’t have coconut oil, you can melt the chocolate chips on their own, but the oil helps create a smoother texture.
For extra fun, get creative with the decorating by using different candies and even edible markers to draw stitches or scars on your Frankenstein treats. These treats can be made a day in advance, just store them in an airtight container to keep them fresh.
Vampire Fang Cookies
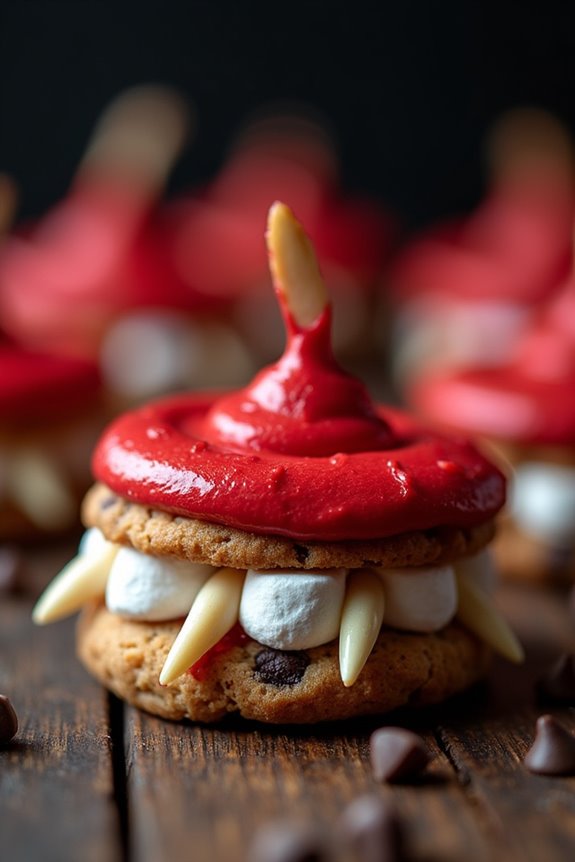
Halloween is the perfect time to let your creativity shine in the kitchen, and Vampire Fang Cookies are a fun and spooky treat that will delight both kids and adults. These cookies aren’t only delicious but also visually striking, making them an ideal addition to any Halloween party. The combination of sweet cookies and marshmallows, embellished with almonds to create fang-like teeth, makes them both a treat for the eyes and the taste buds.
These Vampire Fang Cookies are easy to make and can be prepared in advance, allowing you to focus on other party preparations. The recipe yields enough cookies to serve 4-6 people, making it perfect for a small gathering. With a few simple ingredients, you can create a batch of these eerie yet delightful cookies that your guests will remember long after the party is over.
Ingredients (Serves 4-6):
- 12 chocolate chip cookies (store-bought or homemade)
- 1 cup of red frosting or icing
- 1 cup of mini marshmallows
- 24 slivered almonds
Instructions:
- Prepare the Cookies: Begin by laying out the chocolate chip cookies on a flat surface. If they’re store-bought, verify they’re fresh and not too hard. If homemade, allow them to cool completely.
- Apply the Frosting: Spread a generous layer of red frosting on the flat side of each cookie. This will act as the “gums” for the vampire fangs. Make sure the frosting is thick enough to hold the marshmallows in place.
- Add the Marshmallows: Place mini marshmallows along the rounded edge of half the cookies, pressing them into the frosting. These will represent the teeth of the fangs. Make sure to leave a small space in the middle for the slivered almonds.
- Create the Fangs: Insert two slivered almonds vertically into each cookie, one on each side of the marshmallows, to serve as the vampire fangs. The pointed ends should be facing outwards, mimicking the appearance of sharp teeth.
- Assemble the Cookies: Top each marshmallow-covered cookie with another cookie, frosting-side down, to form a sandwich. Press gently to secure the marshmallows and almonds in place, making sure the fangs are visible.
- Chill the Cookies: Place the assembled cookies in the refrigerator for about 15-20 minutes. This will help the frosting set and keep the marshmallows and almonds in place.
Extra Tips:
When making Vampire Fang Cookies, feel free to get creative with the ingredients. If you prefer a different cookie flavor, such as sugar or oatmeal, feel free to substitute.
For a more dramatic appearance, consider using a darker red or even black frosting. Additionally, you can use edible red gel for added blood-like effects around the fangs.
If you’re short on time, using pre-packaged cookie dough is a great alternative to making cookies from scratch. Ascertain that your slivered almonds are fresh and not overly dry, as this will help them stay in place better.
Enjoy these spine-chilling treats and have a fang-tastic Halloween!
Bloody Popcorn
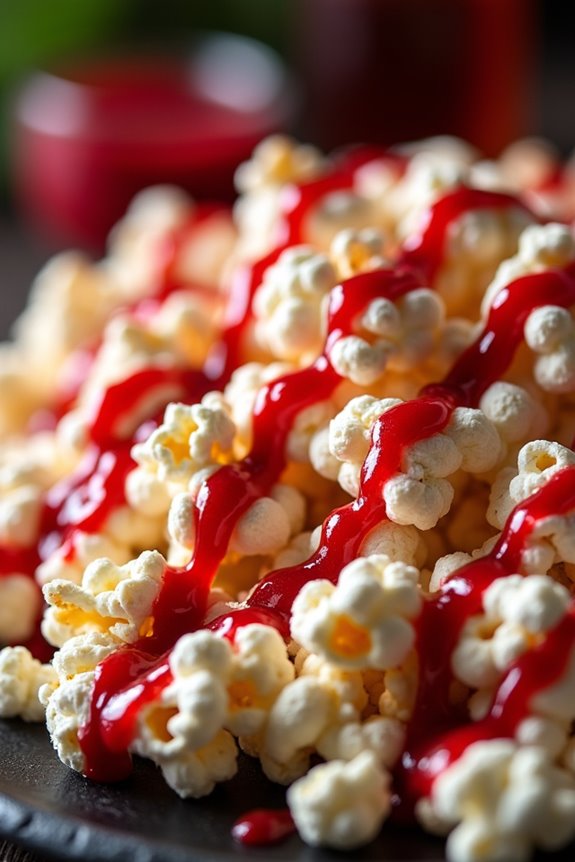
Halloween is just around the corner, and it’s the perfect time to get creative with your party snacks. One fun and spooky treat to serve at your Halloween gathering is Bloody Popcorn. This eerie dish takes a classic popcorn recipe and gives it a gory twist with the addition of a blood-red drizzle made from a sweet and tangy raspberry sauce. Not only does it look impressive, but it also adds a delicious fruity flavor that complements the salty popcorn perfectly.
Whether you’re hosting a Halloween bash or just enjoying a scary movie night at home, Bloody Popcorn is bound to be a hit.
Creating this festive snack is both simple and fun. You’ll start with freshly popped popcorn and then create a vibrant red sauce using raspberries, sugar, and a touch of lemon juice. The sauce is then drizzled over the popcorn, giving it a striking appearance that will catch everyone’s eye. This recipe makes enough for 4-6 people, so there’s plenty to go around. It’s a great option for those looking to add a bit of drama and flavor to their Halloween spread.
Ingredients (serves 4-6):
- 1/2 cup of popcorn kernels
- 2 tablespoons vegetable oil (for popping)
- 1 cup fresh or frozen raspberries
- 1/2 cup granulated sugar
- 1 tablespoon lemon juice
- 1/4 cup water
- 1 tablespoon unsalted butter
- A pinch of salt
Cooking Instructions:
- Prepare the Popcorn:
- Begin by popping the popcorn. In a large pot, heat 2 tablespoons of vegetable oil over medium heat. Add the popcorn kernels and cover the pot with a lid. Shake the pot occasionally to guarantee even popping. Once the popping slows to about 2-3 seconds between pops, remove the pot from heat and transfer the popcorn to a large bowl.
- Make the Raspberry Sauce:
- In a small saucepan, combine the raspberries, sugar, lemon juice, and water. Cook over medium heat until the raspberries begin to break down and the mixture comes to a gentle boil. Stir frequently to prevent sticking.
- Strain the Sauce:
- Once the raspberry mixture has boiled for about 5 minutes and thickened slightly, remove it from heat. Strain the mixture through a fine mesh sieve into a bowl to remove the seeds, pressing down with a spoon to extract as much liquid as possible.
- Finish the Sauce:
- Return the strained sauce to the saucepan. Add the butter and a pinch of salt, and cook over low heat, stirring until the butter has melted and the sauce is smooth.
- Drizzle the Popcorn:
- Drizzle the raspberry sauce over the bowl of popcorn, tossing to coat evenly. For a more dramatic effect, drizzle the sauce in a zigzag pattern over the popcorn.
- Serve:
- Allow the popcorn to set for a few minutes before serving to let the sauce cool slightly. Serve in a large bowl or divide into individual servings.
Extra Tips:
For a more intense color, you can add a few drops of red food coloring to the raspberry sauce while cooking. This will enhance the “bloody” appearance of the popcorn.
If you prefer a less sweet version, reduce the sugar in the raspberry sauce. Also, verify the popcorn is completely cooled before adding the sauce to maintain its crispiness.
Feel free to experiment by adding a pinch of cayenne pepper to the sauce for a spicy kick, or substitute with strawberries if raspberries aren’t available. Enjoy your spooky creation!
Witches’ Brew Punch
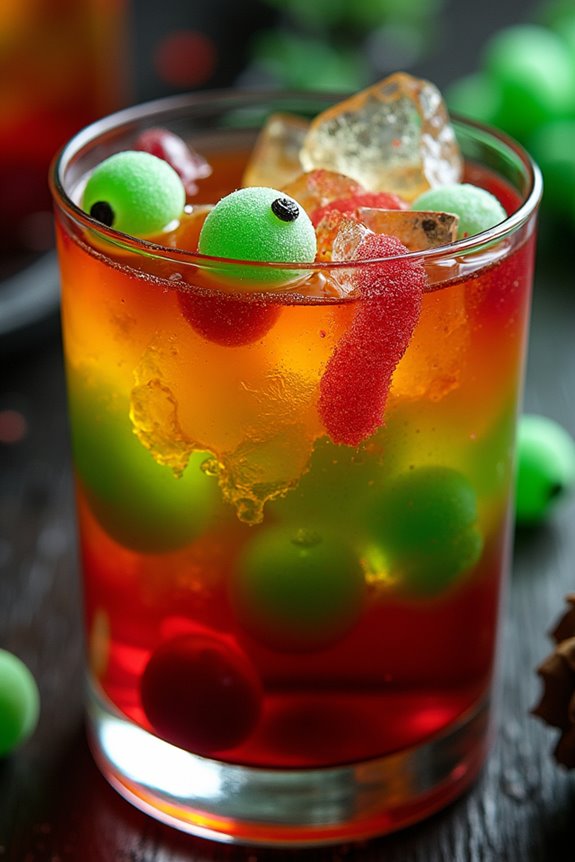
Witches’ Brew Punch is a perfect Halloween-themed drink that will add a spooky touch to your party. This vibrant and eerie punch isn’t only visually engaging but also deliciously revitalizing, making it an ideal choice for both kids and adults. The combination of fruity flavors mingled with a bit of fizz will surely enchant your guests and keep them coming back for more.
To create the magical and mysterious look of Witches’ Brew Punch, you’ll need a few simple ingredients that come together to create a cauldron of flavors. The punch can be served in a large bowl or a clear pitcher to showcase its bewitching appearance. It’s a fantastic way to incorporate the Halloween spirit into your party menu without too much effort. This recipe serves 4-6 people, making it perfect for a small gathering or as part of a larger spread.
Ingredients:
- 1 liter of lemon-lime soda
- 2 cups of pineapple juice
- 2 cups of orange juice
- 1 cup of grape juice
- 1 cup of green apple soda
- 1/2 cup of lime juice
- 1/4 cup of grenadine syrup
- 1/2 cup of frozen green grapes
- 1/2 cup of gummy worms
- Ice cubes
Instructions:
- Prepare the Base: In a large punch bowl or clear pitcher, combine the lemon-lime soda, pineapple juice, orange juice, grape juice, green apple soda, and lime juice. Stir gently to mix all the juices and soda thoroughly.
- Add the Grenadine: Slowly pour the grenadine syrup into the punch to create a layered effect. The grenadine will settle at the bottom, giving the punch a spooky, blood-like appearance.
- Chill the Punch: Add a generous amount of ice cubes to keep the punch cold. For an extra eerie touch, consider using a skull-shaped ice mold or similar themed ice trays.
- Garnish: Add frozen green grapes and gummy worms to the punch. The grapes will look like eyeballs floating in the brew, and the gummy worms will give a creepy-crawly vibe.
- Serve: Stir the punch gently before serving, making sure the grenadine is slightly mixed for a marbled effect. Pour into individual glasses, making sure each glass gets a few grapes and gummy worms for decoration.
Extra Tips:
To make your Witches’ Brew Punch even more authentic and fun, consider using dry ice to create a foggy, bubbling effect. However, make sure that dry ice is handled safely and doesn’t come into contact with the punch itself. Always supervise children around dry ice.
Additionally, for a non-alcoholic version suitable for all ages, make sure all sodas and juices are non-alcoholic, or you can create an adult version by adding a splash of vodka or rum. Adjust the sweetness by varying the amount of grenadine syrup to your taste preference.