

Are you ready to sprinkle some spooky magic into your Halloween baking? I’ve stumbled upon some enchanting cake ideas that are perfect for adding a touch of eerie elegance to your festivities. Think of a rich chocolate spiderweb cake or a haunted graveyard cake with edible gravestones. How about a monster mash cake bursting with vibrant colors or a mummy wrap cake that’s simply charming? Each cake offers its own delightful twist, making it nearly impossible to pick just one for your Halloween celebration.
Spooky Spiderweb Cake
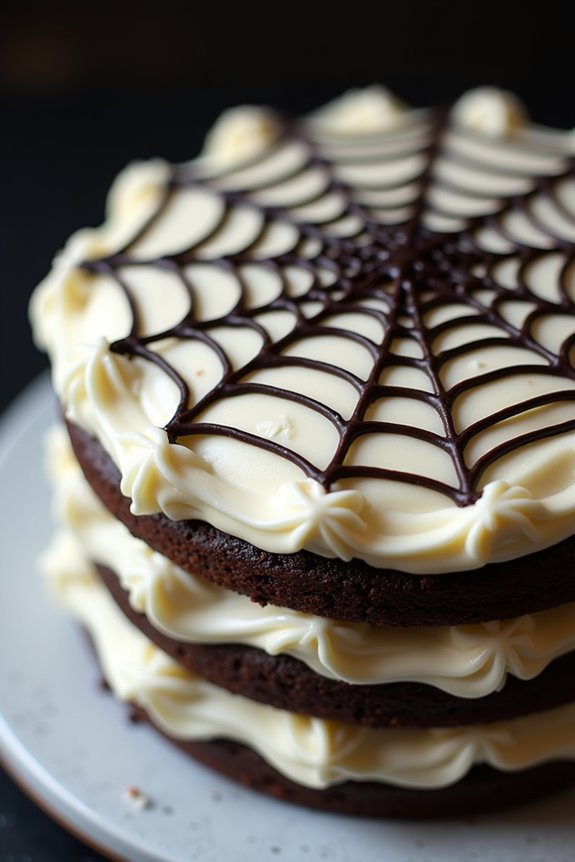
Spooky Spiderweb Cake is the perfect addition to your Halloween festivities. This cake isn’t only delicious but also visually striking, making it a centerpiece that will surely impress your guests. The combination of rich chocolate cake with a creamy vanilla frosting, all topped off with a spooky spiderweb design, guarantees that this dessert is as delightful to eat as it’s to look at.
Whether you’re hosting a Halloween party or simply want to indulge your family with a themed treat, the Spooky Spiderweb Cake is a fun and tasty way to celebrate the holiday.
Creating this cake involves a few simple steps, from baking the cake layers to crafting the intricate spiderweb design on top. The key is to have a steady hand and a bit of patience when it comes to decorating. Once you’ve mastered the basic technique, you can even customize the design to include edible spiders or other Halloween-themed decorations.
This recipe serves 4-6 people, making it ideal for a small gathering or family celebration.
Ingredients:
- 1 ¾ cups all-purpose flour
- ¾ cup unsweetened cocoa powder
- 1 ½ teaspoons baking powder
- 1 ½ teaspoons baking soda
- 1 teaspoon salt
- 2 cups granulated sugar
- 2 large eggs
- 1 cup whole milk
- ½ cup vegetable oil
- 2 teaspoons vanilla extract
- 1 cup boiling water
For the Frosting:
- 1 cup unsalted butter, softened
- 3 ½ cups powdered sugar
- 2 teaspoons vanilla extract
- ¼ cup heavy cream
For the Spiderweb Design:
- ½ cup dark chocolate, melted
- ½ cup white chocolate, melted
Instructions:
- Preheat and Prepare Pans: Preheat your oven to 350°F (175°C). Grease and flour two 9-inch round cake pans.
- Mix Dry Ingredients: In a large bowl, sift together the flour, cocoa powder, baking powder, baking soda, and salt. Set aside.
- Combine Wet Ingredients and Sugar: In another bowl, beat the sugar and eggs together until light and fluffy. Add the milk, vegetable oil, and vanilla extract, mixing well.
- Blend the Batter: Gradually add the dry ingredients to the wet ingredients, mixing until just combined. Stir in the boiling water until the batter is smooth and thin.
- Bake the Cake: Divide the batter evenly between the two prepared cake pans. Bake for 30-35 minutes or until a toothpick inserted into the center comes out clean. Allow the cakes to cool in the pans for 10 minutes, then transfer to a wire rack to cool completely.
- Prepare the Frosting: In a mixing bowl, beat the softened butter until creamy. Gradually add the powdered sugar, vanilla extract, and heavy cream, beating until smooth and fluffy.
- Frost the Cake: Once the cakes are completely cooled, spread a layer of frosting on the top of one cake layer, then place the second layer on top. Frost the top and sides of the cake evenly.
- Create the Spiderweb Design: Pour the melted dark chocolate into a piping bag or a resealable plastic bag with a small tip cut off. Pipe concentric circles on the top of the cake. Using a toothpick or a skewer, draw lines from the center of the cake to the edges to create a spiderweb effect. Repeat the process with the melted white chocolate for a contrasting design.
- Chill and Serve: Refrigerate the cake for at least 1 hour to set the frosting and chocolate. Slice and enjoy your Spooky Spiderweb Cake!
Extra Tips:
For a more dramatic effect, consider adding edible glitter or candy spiders on top of the spiderweb design. If you’re short on time, you can use store-bought cake mix and frosting to speed up the process.
Make sure to melt the chocolate slowly over a double boiler or in the microwave at low power to prevent it from seizing. If your chocolate is too thick for piping, stir in a teaspoon of vegetable oil to thin it out. Enjoy your spooky creation!
Haunted Graveyard Cake

A Haunted Graveyard Cake is a spooky and delicious centerpiece perfect for any Halloween gathering. This fun and creative cake combines rich chocolate flavors with eerie decorations that will intrigue and delight both children and adults. The cake is adorned with gravestones, creepy crawlies, and ghoulish details that bring a spooky graveyard to life.
Whether you’re hosting a Halloween party or just want to surprise your family with a festive treat, this cake will surely be a hit.
To create this Haunted Graveyard Cake, we’ll start with a moist and decadent chocolate cake as the base. The cake will be covered with a smooth layer of chocolate frosting to represent the eerie earth. Toppings and decorations like cookie gravestones, candy pumpkins, and gummy worms will transform the cake into a chilling graveyard scene.
Follow the recipe below to make a Haunted Graveyard Cake that serves 4-6 people.
Ingredients:
- 1 cup all-purpose flour
- 1 cup granulated sugar
- 1/2 cup unsweetened cocoa powder
- 1 tsp baking powder
- 1/2 tsp baking soda
- 1/4 tsp salt
- 1/2 cup unsalted butter, softened
- 2 large eggs
- 1 tsp vanilla extract
- 1/2 cup whole milk
- 1/2 cup boiling water
- 1 cup chocolate frosting
- 6-8 rectangular chocolate cookies (for gravestones)
- Assorted Halloween candies (gummy worms, candy pumpkins, etc.)
- Green icing for grass effect (optional)
- Black icing gel for gravestone inscriptions (optional)
Cooking Instructions:
- Preheat and Prepare: Preheat your oven to 350°F (175°C). Grease and flour a 9-inch round cake pan, then set it aside.
- Mix Dry Ingredients: In a medium bowl, whisk together the all-purpose flour, granulated sugar, unsweetened cocoa powder, baking powder, baking soda, and salt.
- Blend Wet Ingredients: In a separate large bowl, cream the softened butter until smooth. Beat in the eggs one at a time, then add the vanilla extract.
- Combine Mixtures: Gradually add the dry ingredients to the wet ingredients, alternating with the milk. Mix until just combined, then stir in the boiling water until smooth. The batter will be thin.
- Bake the Cake: Pour the batter into the prepared cake pan. Bake in the preheated oven for 25-30 minutes or until a toothpick inserted into the center comes out clean. Allow the cake to cool completely in the pan on a wire rack.
- Frost the Cake: Once the cake is cool, spread an even layer of chocolate frosting over the top and sides.
- Decorate the Graveyard: Place the chocolate cookies upright into the cake to resemble gravestones. Use black icing gel to write spooky names or “RIP” on the gravestones. Scatter gummy worms, candy pumpkins, and other Halloween candies around the gravestones. Use green icing to add grass effects if desired.
- Serve: Carefully slice and serve the Haunted Graveyard Cake, ensuring each piece has some of the spooky decorations.
Extra Tips:
For an even spookier effect, consider adding a light dusting of crushed chocolate cookies over the frosting to mimic soil. You can also use edible glitter or silver dragees to give the scene a moonlit shimmer.
If you want to make the cake ahead of time, bake and frost the cake, then store it in the refrigerator. Add the decorations just before serving to keep them fresh and vibrant. Enjoy this creative and festive dessert that captures the spirit of Halloween!
Creepy Crawly Bug Cake
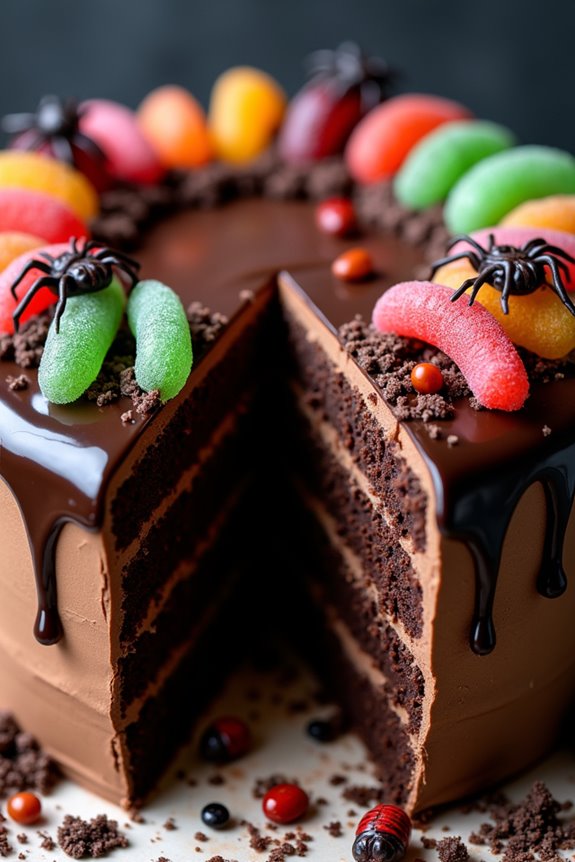
Creating a Creepy Crawly Bug Cake is a perfect way to add some spooky fun to your Halloween festivities. This cake isn’t only delicious but also visually striking, with a creepy crawly theme that will leave your guests both impressed and slightly spooked. The combination of rich chocolate cake, gooey chocolate frosting, and creative candy decorations makes it a standout dessert at any Halloween party.
This Creepy Crawly Bug Cake recipe is designed to serve 4-6 people, making it ideal for smaller gatherings or a family celebration. The cake itself is a moist chocolate sponge, while the frosting is a rich, dark chocolate ganache. The decoration is what truly brings this cake to life, using gummy worms, chocolate spiders, and other edible insects to create a realistic, yet fun, creepy crawly effect.
Ingredients
- 1 cup all-purpose flour
- 1 cup granulated sugar
- 1/2 cup unsweetened cocoa powder
- 1 teaspoon baking powder
- 1/2 teaspoon baking soda
- 1/2 teaspoon salt
- 1/2 cup unsalted butter, melted
- 2 large eggs
- 1 teaspoon vanilla extract
- 1/2 cup whole milk
- 1/2 cup boiling water
- 1 cup heavy cream
- 8 oz dark chocolate, chopped
- Gummy worms
- Chocolate spiders (store-bought or homemade)
- Edible insects (such as candy ants or jelly bugs)
Instructions
- Preheat and Prepare: Preheat your oven to 350°F (175°C). Grease and flour two 8-inch round cake pans. This will guarantee your cakes don’t stick and come out easily.
- Mix Dry Ingredients: In a large bowl, whisk together the flour, sugar, cocoa powder, baking powder, baking soda, and salt. This guarantees even distribution of the ingredients.
- Combine Wet Ingredients: In a separate bowl, beat together the melted butter, eggs, and vanilla extract until smooth. Gradually add in the milk and boiling water, mixing until well combined.
- Create Batter: Pour the wet ingredients into the dry ingredients and mix until just combined. Be careful not to overmix as this can result in a dense cake.
- Bake the Cakes: Divide the batter evenly between the prepared cake pans. Bake in the preheated oven for 25-30 minutes or until a toothpick inserted into the center comes out clean.
- Prepare Ganache: While the cakes are baking, heat the heavy cream in a saucepan until it begins to simmer. Remove from heat and pour over the chopped dark chocolate. Let it sit for a minute, then stir until smooth and glossy.
- Cool and Frost: Once the cakes are baked, transfer them to a wire rack to cool completely. Once cooled, spread a layer of chocolate ganache over the top of one cake, stack the other cake on top, and cover the entire cake with the remaining ganache.
- Decorate: Arrange gummy worms, chocolate spiders, and edible insects on top of the cake to create a creepy crawly effect.
Extra Tips
When making the ganache, verify that the cream is hot enough to melt the chocolate fully for a smooth finish. If you prefer a sweeter ganache, consider using a mix of milk and dark chocolate.
For the decorations, get creative! Use a variety of colorful gummy worms and candy insects to add visual interest and make the cake as creepy as possible. If you can’t find chocolate spiders, you can easily make your own by melting chocolate and using a piping bag to draw spider shapes onto parchment paper. Let them cool in the refrigerator until set.
Enjoy your spooky creation!
Mummy Wrap Cake
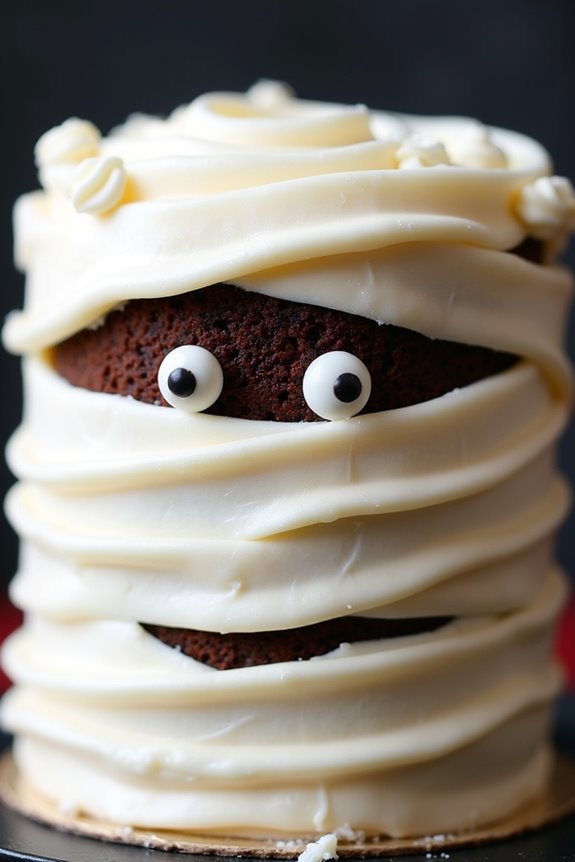
Mummy Wrap Cake is a spookily delightful treat that’s perfect for any Halloween gathering. This cake features layers of moist chocolate cake covered in a rich, creamy frosting, all wrapped up in fondant to create a mummified appearance. The combination of flavors and the eye-catching design make it a surefire hit with both kids and adults alike.
Whether you’re hosting a Halloween party or just want to surprise your family with a festive dessert, this Mummy Wrap Cake will definitely add a touch of fun to your celebration.
Creating this cake is a fun and rewarding process that allows for a lot of creativity. The cake itself is made from a basic chocolate cake recipe, but you can easily substitute your favorite cake flavor if you prefer. The mummy look is achieved by using white fondant to create bandage-like strips, while candy eyes give it a whimsical touch.
This recipe serves 4-6 people and is perfect for anyone looking to make a memorable and tasty Halloween treat.
Ingredients:
- 1 ½ cups all-purpose flour
- 1 cup granulated sugar
- ½ cup unsweetened cocoa powder
- 1 teaspoon baking powder
- ½ teaspoon baking soda
- ½ teaspoon salt
- 2 large eggs
- 1 cup whole milk
- ½ cup vegetable oil
- 1 teaspoon vanilla extract
- 1 cup boiling water
- 2 cups buttercream frosting (store-bought or homemade)
- 1 pound white fondant
- Black gel food coloring
- Edible candy eyes
Cooking Instructions:
- Prepare the Cake Batter: Preheat your oven to 350°F (175°C). In a large mixing bowl, combine the flour, sugar, cocoa powder, baking powder, baking soda, and salt. Stir the dry ingredients together until well mixed.
- Mix Wet Ingredients: Add the eggs, milk, vegetable oil, and vanilla extract to the dry mixture. Use an electric mixer to blend the ingredients on medium speed until smooth. Carefully stir in the boiling water until fully incorporated.
- Bake the Cake: Grease and flour two 9-inch round cake pans. Pour the batter evenly into the prepared pans. Bake for 30-35 minutes or until a toothpick inserted into the center comes out clean. Allow the cakes to cool in the pans for 10 minutes before transferring them to a wire rack to cool completely.
- Frost the Cake: Once the cakes are completely cooled, spread a layer of buttercream frosting on top of one cake layer. Place the second layer on top and cover the entire cake with a thin layer of frosting (crumb coat). Chill the cake for 15-20 minutes to set the frosting.
- Decorate with Fondant: Roll out the white fondant to about 1/8-inch thickness. Cut the fondant into strips of varying lengths and widths. Begin wrapping the strips around the cake to resemble mummy bandages, leaving small gaps.
- Add the Eyes: Color a small piece of fondant with black gel food coloring and roll small circles for the pupils. Attach the candy eyes to the front of the cake using a dab of buttercream frosting. Place the pupils in the center of the candy eyes.
- Final Touches: Arrange the fondant strips so they overlap slightly, creating a layered effect. Adjust the strips as needed to achieve your desired mummy look.
Extra Tips:
When working with fondant, keep it covered with plastic wrap or a damp cloth to prevent it from drying out while you work. If you don’t have candy eyes, you can create eyes using small fondant circles.
For added flavor, consider incorporating a flavored extract into the buttercream frosting, like almond or orange, to complement the chocolate cake. Be creative with your mummy wrap pattern; there’s no right or wrong way, so have fun with it!
Ghoulish Ghost Cake
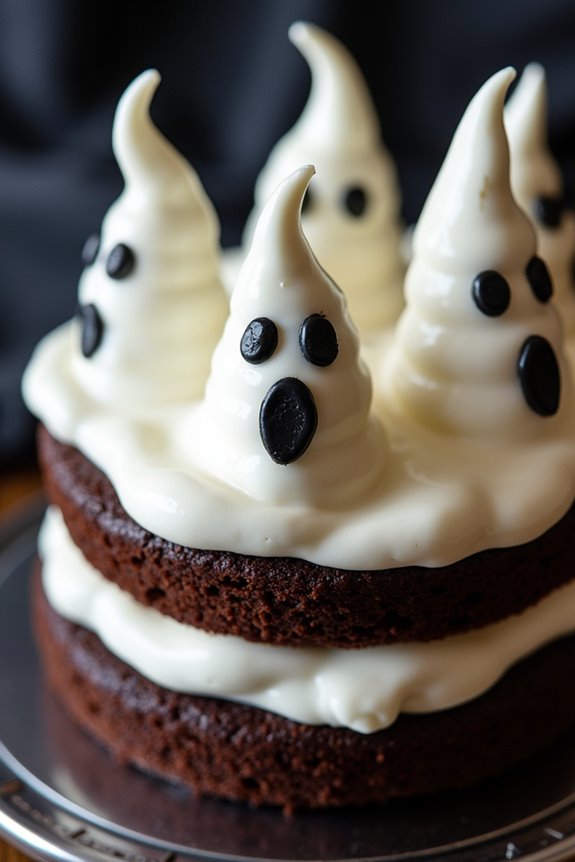
Transform your Halloween celebration into a spooky delight with a Ghoulish Ghost Cake that’s sure to be the star of your dessert table. This cake isn’t only festive but also deliciously moist and fluffy, with layers of rich chocolate cake enveloped in a creamy marshmallow frosting. The ghostly decorations add a bewitching touch, making it the perfect centerpiece for any Halloween party.
This recipe is designed to serve 4-6 people, making it ideal for a small gathering or a family treat. The cake is relatively simple to make, with each component coming together to create a hauntingly delightful dessert. With a little creativity and a few basic ingredients, you can conjure up this eerie yet enchanting cake that will leave your guests spellbound.
Ingredients:
- 1 ¾ cups all-purpose flour
- ¾ cup unsweetened cocoa powder
- 1 ½ teaspoons baking powder
- 1 ½ teaspoons baking soda
- 1 teaspoon salt
- 2 cups granulated sugar
- 2 large eggs
- 1 cup whole milk
- ½ cup vegetable oil
- 2 teaspoons vanilla extract
- 1 cup boiling water
- 2 cups mini marshmallows
- 1 ½ cups powdered sugar
- 1 teaspoon vanilla extract (for frosting)
- 3-4 tablespoons milk (for frosting)
- Black decorating gel or melted chocolate (for ghost faces)
Cooking Instructions:
- Preheat and Prepare Pans: Preheat your oven to 350°F (175°C). Grease and flour two 9-inch round cake pans to prevent the cake from sticking.
- Mix Dry Ingredients: In a large bowl, sift together the flour, cocoa powder, baking powder, baking soda, and salt. Confirm they’re well combined.
- Combine Wet Ingredients: In another bowl, beat together the sugar and eggs until light and fluffy. Add in the milk, vegetable oil, and vanilla extract, mixing until smooth.
- Combine and Mix: Gradually add the dry ingredients to the wet mixture, mixing gently. Once combined, slowly add in the boiling water, stirring until the batter is smooth and well combined. The batter will be thin.
- Bake the Cakes: Divide the batter evenly between the prepared pans. Bake for 30-35 minutes or until a toothpick inserted into the center comes out clean. Let the cakes cool in the pans for 10 minutes, then transfer to a wire rack to cool completely.
- Prepare Marshmallow Frosting: In a medium saucepan over low heat, melt the mini marshmallows, stirring constantly. Once melted, remove from heat and let cool slightly. In a separate bowl, beat together the powdered sugar, vanilla extract, and milk until smooth. Gradually add the melted marshmallows, beating until fluffy.
- Assemble the Cake: Place one cake layer on a serving plate and spread a generous amount of frosting on top. Layer the second cake on top and cover the entire cake with the remaining frosting.
- Decorate with Ghosts: Use a piping bag to create ghost shapes on the cake. Use black decorating gel or melted chocolate to draw spooky faces on each ghost.
Extra Tips:
When making the Ghoulish Ghost Cake, confirm your cakes are completely cooled before frosting to prevent the frosting from melting. If you find your frosting too runny, chill it briefly in the refrigerator to thicken before applying.
For the ghost faces, use a fine-tipped piping bag or a toothpick to achieve precise details. This cake keeps well in a cool environment, but for the freshest taste, serve it within a day of decorating.
Witch’s Cauldron Cake
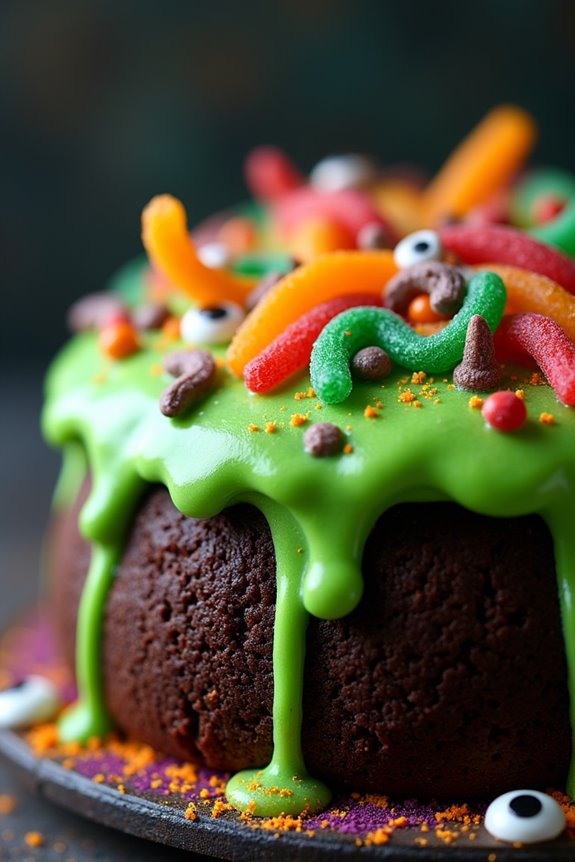
Transform your Halloween party into a spellbinding event with the Witch’s Cauldron Cake. This delightful concoction will entice your guests with its spooky appearance and delicious flavors. Imagine a bubbling cauldron brimming with a rich chocolate cake, oozing with decadent fillings, and topped with vibrant green frosting that resembles a witch’s brew. This cake is perfect for adding a touch of magic to your Halloween festivities and will surely delight both kids and adults alike.
This Witch’s Cauldron Cake isn’t only visually stunning but also incredibly fun to make. It consists of a moist chocolate cake base, filled with a creamy ganache, and topped with a whimsical green frosting. The bubbling effect is achieved with a clever use of candies and edible decorations, making it a perfect centerpiece for your Halloween dessert table.
Whether you’re a seasoned baker or just looking for a creative way to celebrate Halloween, this recipe is sure to cast a spell on anyone who takes a bite.
Ingredients (serving size: 4-6 people):
- 2 cups all-purpose flour
- 1 cup granulated sugar
- 1 cup unsweetened cocoa powder
- 1 1/2 teaspoons baking powder
- 1 1/2 teaspoons baking soda
- 1 teaspoon salt
- 2 large eggs
- 1 cup whole milk
- 1/2 cup vegetable oil
- 2 teaspoons vanilla extract
- 1 cup boiling water
- 1 cup heavy cream
- 8 ounces semi-sweet chocolate chips
- 2 cups unsalted butter, softened
- 4 cups powdered sugar
- Green food coloring
- Assorted Halloween candies (gummy worms, candy eyes, etc.)
- Edible glitter or shimmer dust (optional)
Cooking Instructions:
- Preheat and Prep: Preheat your oven to 350°F (175°C). Grease and flour two 9-inch round cake pans.
- Mix the Dry Ingredients: In a large mixing bowl, combine the flour, sugar, cocoa powder, baking powder, baking soda, and salt. Stir until well blended.
- Combine Wet Ingredients: In a separate bowl, whisk together the eggs, milk, vegetable oil, and vanilla extract. Gradually add the wet ingredients to the dry ingredients, mixing until smooth.
- Add Boiling Water: Carefully stir in the boiling water. The batter will be thin, but this is normal.
- Bake the Cakes: Divide the batter evenly between the prepared cake pans. Bake for 30-35 minutes, or until a toothpick inserted in the center comes out clean. Allow the cakes to cool in the pans for 10 minutes, then transfer to a wire rack to cool completely.
- Prepare the Ganache: Heat the heavy cream in a small saucepan until it just begins to simmer. Remove from heat and pour over the chocolate chips in a heatproof bowl. Let sit for 5 minutes, then stir until smooth. Allow the ganache to cool slightly.
- Frost the Cake: In a large bowl, beat the softened butter until creamy. Gradually add powdered sugar, beating until well combined. Add green food coloring, a few drops at a time, until the desired color is achieved.
- Assemble the Cake: Place one cake layer on a serving platter. Spread a layer of ganache over the top, then place the second cake layer on top. Cover the entire cake with the green frosting.
- Decorate the Cauldron: Use assorted Halloween candies to create a bubbling effect on top of the cake. Add gummy worms, candy eyes, and sprinkle with edible glitter or shimmer dust for an extra magical touch.
Extra Tips:
For an added eerie effect, consider placing a small bowl in the center of the cake filled with dry ice, just before serving, to create the illusion of a smoking cauldron. Be sure to handle dry ice with care and let guests know not to touch or consume it.
Also, when adding food coloring to the frosting, start with a small amount and gradually add more to achieve your desired shade. Remember to have fun with the decorations and get creative with your Halloween candies!
Pumpkin Patch Cake
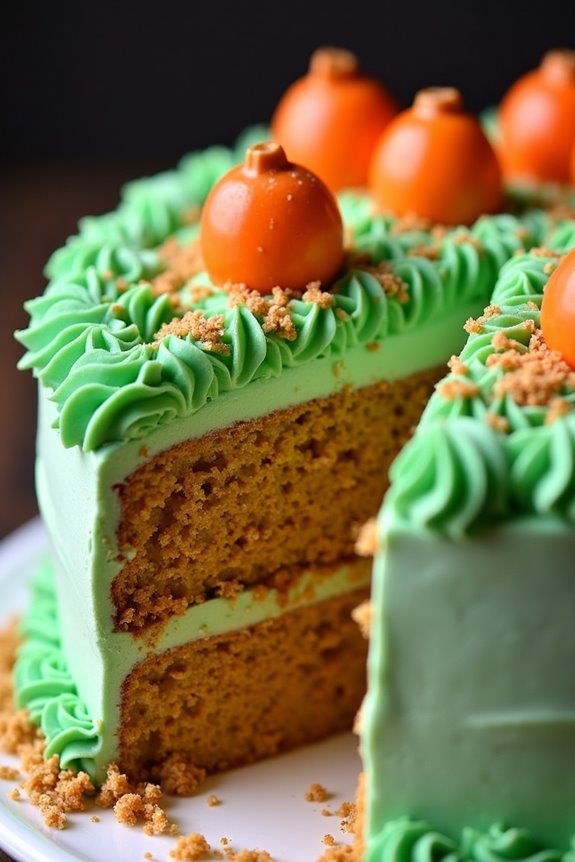
Creating a Pumpkin Patch Cake is a delightful way to celebrate Halloween with both visual and taste appeal. This cake brings the essence of fall into your kitchen with its rich pumpkin flavor and charming design. Imagine a moist, spiced cake topped with creamy frosting and adorned with miniature candy pumpkins nestled in a “patch” of green frosting or fondant.
It’s not just a dessert; it’s a centerpiece that will captivate both kids and adults at your Halloween gathering. This Pumpkin Patch Cake recipe is perfect for serving 4-6 people, making it an ideal choice for an intimate Halloween party or family celebration. The combination of warm spices, creamy frosting, and festive decorations guarantees that this cake will be the talk of the evening.
Whether you’re a seasoned baker or a novice in the kitchen, this recipe is straightforward and fun to make, with room for creative touches to make your cake uniquely yours.
Ingredients (serves 4-6):
- 1 ½ cups all-purpose flour
- 1 teaspoon baking powder
- ½ teaspoon baking soda
- ½ teaspoon salt
- 1 teaspoon ground cinnamon
- ½ teaspoon ground nutmeg
- ½ teaspoon ground ginger
- ½ cup unsalted butter, softened
- 1 cup granulated sugar
- 2 large eggs
- 1 cup canned pumpkin puree
- 1 teaspoon vanilla extract
- ½ cup buttermilk
- 1 ½ cups cream cheese frosting
- Green food coloring
- Miniature candy pumpkins or orange fondant
- Optional: Crushed graham crackers for “dirt”
Instructions:
- Preheat and Prepare: Preheat your oven to 350°F (175°C). Grease and flour a 9×9 inch square cake pan, or line it with parchment paper for easy removal.
- Mix Dry Ingredients: In a medium-sized bowl, whisk together the flour, baking powder, baking soda, salt, cinnamon, nutmeg, and ginger. This guarantees that all the spices are evenly distributed throughout the cake.
- Cream Butter and Sugar: In a large mixing bowl, beat the softened butter and sugar together until light and fluffy, about 3-4 minutes. This incorporates air into the mixture, which helps create a light cake texture.
- Add Eggs and Pumpkin: Add the eggs one at a time, mixing well after each addition. Stir in the pumpkin puree and vanilla extract until the mixture is smooth and well combined.
- Combine Wet and Dry Ingredients: Gradually add the dry ingredients to the wet ingredients, alternating with the buttermilk, beginning and ending with the dry mixture. Mix until just combined to avoid overmixing, which can make the cake dense.
- Bake the Cake: Pour the batter into the prepared cake pan and smooth the top with a spatula. Bake in the preheated oven for 25-30 minutes, or until a toothpick inserted into the center comes out clean. Allow the cake to cool completely in the pan on a wire rack.
- Prepare Frosting: While the cake cools, prepare the frosting by tinting a portion of the cream cheese frosting with green food coloring to create “grass.”
- Decorate the Cake: Once the cake is cool, spread a layer of plain cream cheese frosting over the top. Using a piping bag fitted with a grass tip, pipe the green frosting over the surface to mimic a grassy patch.
Place the candy pumpkins or small balls of orange fondant on top to simulate a pumpkin patch. For added effect, sprinkle crushed graham crackers around the pumpkins to represent soil.
Extra Tips:
When making the Pumpkin Patch Cake, make sure your butter is at room temperature for the best creaming results. This will help to achieve a light and fluffy cake texture.
If you don’t have buttermilk, you can make a substitute by mixing ½ cup of milk with ½ tablespoon of white vinegar or lemon juice and letting it sit for 5 minutes. For a more personalized touch, consider adding some edible glitter or candy spiders to your pumpkin patch for an extra spooky vibe.
Finally, this cake is best enjoyed fresh, but it can be stored in the refrigerator for up to 3 days. Let it come to room temperature before serving for the best flavor and texture.
Eerie Eyeball Cake
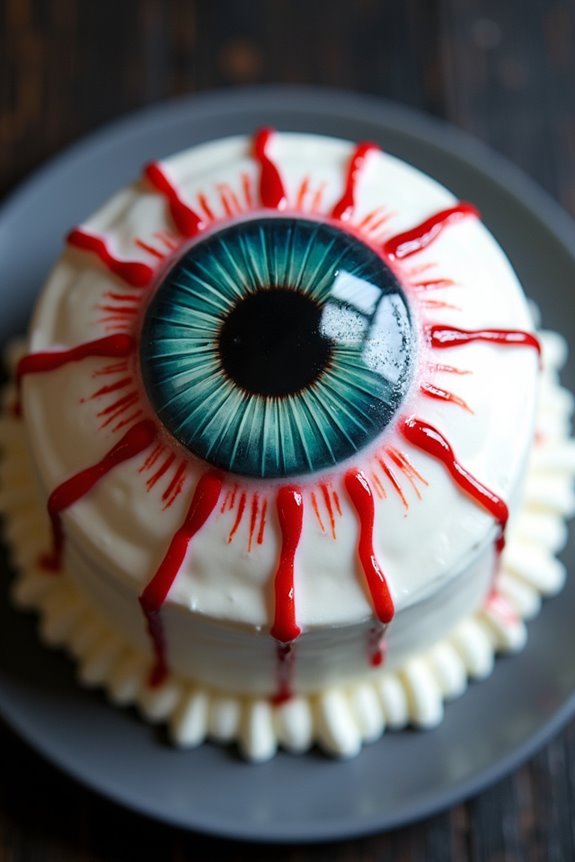
Eerie Eyeball Cake is the perfect Halloween centerpiece that will leave your guests both amazed and a little spooked. With its gory yet delightful appearance, this cake is as delicious as it’s terrifying. The key to crafting this eerie masterpiece is to balance the flavors and textures while guaranteeing that the design captures the essence of Halloween.
This cake combines rich layers of chocolate, a creamy filling, and a striking design that mimics a giant eyeball, complete with bloodshot veins and a colorful iris.
To make the Eerie Eyeball Cake, you’ll need to start by baking a moist chocolate cake as the foundation. The cake is then filled with a smooth vanilla or cream cheese frosting to create a striking contrast to the dark outer layer. Once the cake is assembled, it’s time to let your creativity shine by decorating it to resemble an oversized eyeball. The outer layer of the cake is covered with white fondant or frosting to simulate the sclera, and food coloring is used to create the details of the iris and pupil. Red gel icing or food coloring can add a bloodshot effect for that extra creepy touch.
Ingredients (Serves 4-6):
- 2 cups all-purpose flour
- 1 ¾ cups granulated sugar
- ¾ cup unsweetened cocoa powder
- 1 ½ teaspoons baking powder
- 1 ½ teaspoons baking soda
- 1 teaspoon salt
- 2 large eggs
- 1 cup whole milk
- ½ cup vegetable oil
- 2 teaspoons vanilla extract
- 1 cup boiling water
- 2 cups vanilla or cream cheese frosting
- White fondant
- Food coloring (blue, green, or brown for the iris; black for the pupil; red for bloodshot veins)
- Gel icing (optional, for bloodshot veins)
Instructions:
- Preheat & Prepare Pans: Preheat your oven to 350°F (175°C). Grease and flour two 9-inch round cake pans.
- Mix Dry Ingredients: In a large mixing bowl, combine the flour, sugar, cocoa powder, baking powder, baking soda, and salt.
- Add Wet Ingredients: Add the eggs, milk, oil, and vanilla extract to the dry ingredients. Mix until well combined.
- Incorporate Boiling Water: Gradually stir in the boiling water until the batter is smooth. The batter will be thin.
- Bake the Cake: Divide the batter evenly between the prepared cake pans. Bake for 30-35 minutes or until a toothpick inserted into the center comes out clean.
- Cool & Assemble: Allow the cakes to cool in the pans for 10 minutes, then remove them from the pans and transfer to a wire rack to cool completely. Once cooled, level the tops if necessary and spread a layer of frosting between the two cake layers.
- Cover with Fondant: Roll out the white fondant and cover the entire cake smoothly. Trim any excess fondant from the bottom.
- Create the Iris & Pupil: Use food coloring to paint the iris onto the center of the cake. Add a black circle in the middle for the pupil.
- Add Bloodshot Veins: Use red food coloring or gel icing to draw veins radiating from the iris towards the edges of the cake.
Extra Tips:
When creating the Eerie Eyeball Cake, use gel food coloring for more vivid colors and better control during the decoration process.
If you’re new to working with fondant, practice rolling and smoothing it out on a small surface first. Make sure your cake is completely cooled before applying the fondant to prevent melting or sliding.
To enhance the spooky atmosphere, consider adding a light dusting of cocoa powder around the iris for a more realistic effect.
Vampire Bat Cake
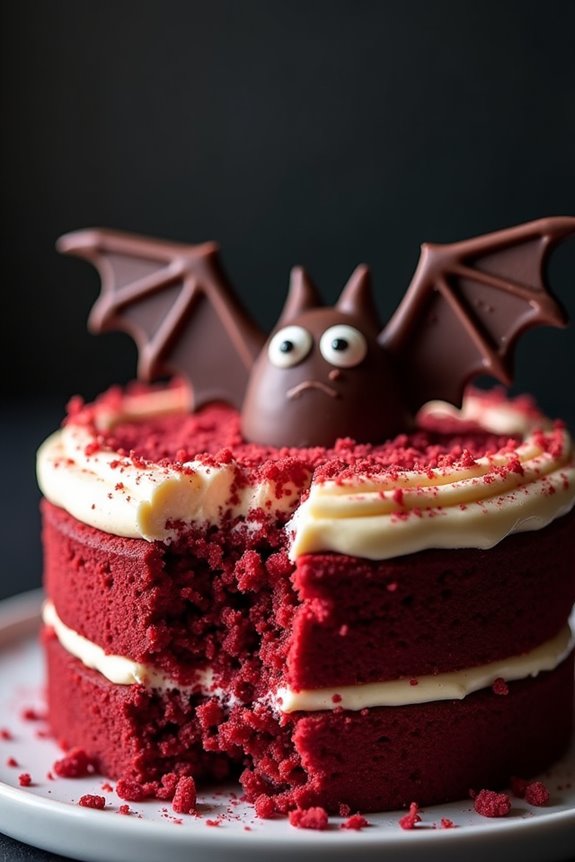
This Halloween, elevate your spooky celebrations with a Vampire Bat Cake, a delightfully eerie dessert that’s sure to be a hit at any party. With dark chocolate wings and a rich red velvet base, this cake captures the essence of Halloween while delivering a sumptuous taste. Perfect for a crowd of 4-6 people, this cake will leave your guests both satisfied and impressed by your creativity and culinary skills.
The Vampire Bat Cake not only looks visually striking with its bat-shaped silhouette and deep red color, but it also combines delicious flavors that make it irresistible. The combination of moist red velvet cake, creamy frosting, and dark chocolate decorations creates a balance that’s both decadent and fun. Follow this recipe to bring a hauntingly delightful centerpiece to your Halloween festivities.
Ingredients (Serving Size: 4-6 people):
- 1 ½ cups all-purpose flour
- 1 cup granulated sugar
- 1 tablespoon cocoa powder
- 1 teaspoon baking soda
- ½ teaspoon salt
- 1 cup buttermilk
- ½ cup vegetable oil
- 2 large eggs
- 1 tablespoon red food coloring
- 1 teaspoon vanilla extract
- 1 teaspoon white vinegar
- 1 cup unsalted butter (for frosting)
- 4 cups powdered sugar (for frosting)
- 1 teaspoon vanilla extract (for frosting)
- 2-3 tablespoons milk (for frosting)
- 8 oz dark chocolate (for bat wings and decorations)
- Candy eyes or white chocolate chips (for decoration)
Cooking Instructions:
- Preheat the Oven and Prepare the Pan: Preheat your oven to 350°F (175°C). Grease and flour a 9-inch round cake pan to prevent the cake from sticking.
- Mix the Dry Ingredients: In a large mixing bowl, whisk together the flour, sugar, cocoa powder, baking soda, and salt until well combined.
- Combine Wet Ingredients: In another bowl, mix the buttermilk, vegetable oil, eggs, red food coloring, vanilla extract, and white vinegar until smooth.
- Create the Batter: Gradually add the wet ingredients to the dry ingredients, stirring gently until the mixture is smooth and uniform. Avoid overmixing to guarantee a tender cake.
- Bake the Cake: Pour the batter into the prepared cake pan and bake for 25-30 minutes, or until a toothpick inserted into the center comes out clean. Allow the cake to cool completely on a wire rack.
- Prepare the Frosting: In a large bowl, beat the unsalted butter until creamy. Gradually add the powdered sugar, vanilla extract, and milk, beating until the frosting is smooth and spreadable.
- Shape the Cake: Once the cake is cool, carefully cut it into a bat shape using a template or freehand. Use the scraps to create ears or enhance the shape if necessary.
- Frost the Cake: Spread a thin layer of frosting over the entire cake to create a crumb coat. Chill for 15 minutes to set. Then, apply a thicker layer of frosting until the cake is fully covered.
- Create the Bat Wings: Melt the dark chocolate and pour it onto a baking sheet lined with parchment paper. Use a spatula to spread it into a thin layer and let it set. Once solidified, cut out wing shapes using a knife.
- Assemble and Decorate: Attach the chocolate wings to the sides of the cake using frosting. Add candy eyes or white chocolate chips to create eyes, and use any remaining melted chocolate to draw details on the wings or body.
Extra Tips:
For an even more dramatic effect, consider adding a few drops of black food coloring to your frosting for a darker, more sinister look. You can also use edible glitter or spray to give the cake a shimmery, mysterious finish.
If you don’t have a steady hand for cutting the bat shape, search online for printable bat templates to use as a guide. Make sure the cake is completely cool before frosting to avoid melting the frosting. Finally, don’t worry if your bat isn’t perfectly symmetrical; Halloween is all about embracing the spooky and the quirky!
Monster Mash Cake
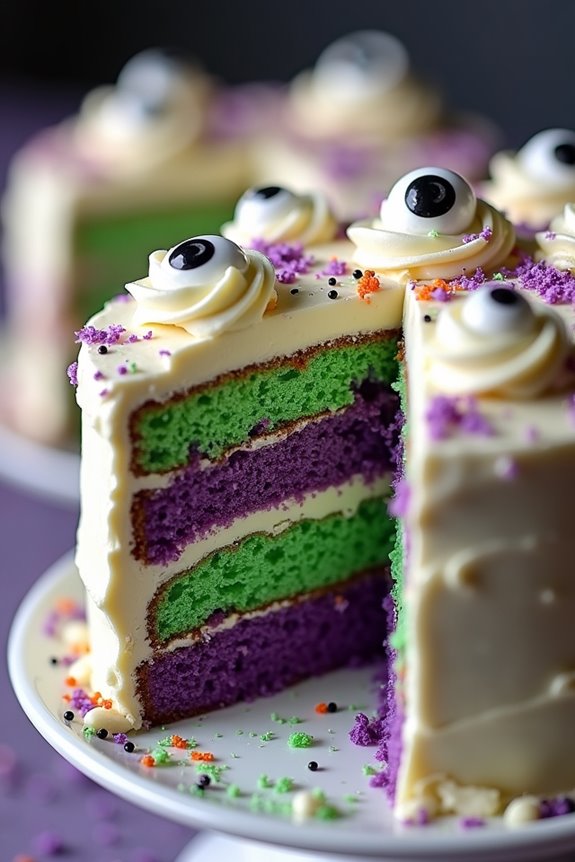
The Monster Mash Cake is a spooktacular treat perfect for any Halloween gathering. With its eerie green and purple layers, this cake is sure to enchant both kids and adults alike. The cake combines rich chocolate flavors with a whimsical color palette, making it not only delicious but also visually striking.
Decorated with candy eyes and spooky sprinkles, this cake will be the highlight of any Halloween dessert table. Creating the Monster Mash Cake is a fun and creative process that lets you experiment with colors and decorations. The recipe is designed to serve 4-6 people, making it an ideal choice for a small Halloween party or family gathering.
By following the step-by-step instructions, even novice bakers can achieve a professional-looking cake that will impress all your Halloween guests.
Ingredients (Serves 4-6 People):
- 1 ½ cups all-purpose flour
- 1 cup granulated sugar
- ½ cup cocoa powder
- 1 teaspoon baking powder
- ½ teaspoon baking soda
- ¼ teaspoon salt
- 2 large eggs
- 1 cup buttermilk
- ½ cup vegetable oil
- 2 teaspoons vanilla extract
- Green and purple gel food coloring
- 1 cup unsalted butter (softened)
- 4 cups powdered sugar
- 1 teaspoon vanilla extract
- 3-4 tablespoons milk
- Candy eyes
- Halloween sprinkles
Instructions:
- Preheat and Prepare Pans: Preheat your oven to 350°F (175°C). Grease and flour two 8-inch round cake pans to guarantee the cakes release easily after baking.
- Mix Dry Ingredients: In a large mixing bowl, whisk together the flour, sugar, cocoa powder, baking powder, baking soda, and salt until well combined.
- Combine Wet Ingredients: In another bowl, beat the eggs, buttermilk, vegetable oil, and vanilla extract until smooth. Gradually add the wet mixture to the dry ingredients, stirring gently until the batter is smooth and well mixed.
- Divide and Color Batter: Divide the batter evenly into two separate bowls. Add a few drops of green gel food coloring to one bowl and purple gel food coloring to the other. Stir well until the colors are evenly distributed.
- Bake the Cakes: Pour the green batter into one prepared cake pan and the purple batter into the other. Bake for 25-30 minutes, or until a toothpick inserted into the center comes out clean. Allow the cakes to cool in the pans for 10 minutes before transferring them to a wire rack to cool completely.
- Make the Frosting: In a large mixing bowl, beat the softened butter until creamy. Gradually add the powdered sugar, vanilla extract, and milk, beating until smooth and fluffy. If needed, add more milk to achieve the desired consistency.
- Assemble the Cake: Place one cake layer on a serving plate. Spread a layer of frosting on top, then place the second cake layer on top. Frost the entire cake with the remaining frosting.
- Decorate: Use candy eyes and Halloween sprinkles to decorate the cake as desired. Get creative to give your cake a spooky monster appearance.
Extra Tips:
When making the Monster Mash Cake, verify that your cake layers are completely cool before frosting to avoid melting the frosting. If you’re new to using gel food colors, start with a small amount and gradually add more to achieve the desired intensity.
For an extra fun touch, consider adding a few drops of black food coloring to the frosting for a more eerie look. Keep the cake covered at room temperature if serving the same day, or refrigerate if serving later to maintain freshness. Enjoy your monstrously delicious creation!
Skeleton Surprise Cake
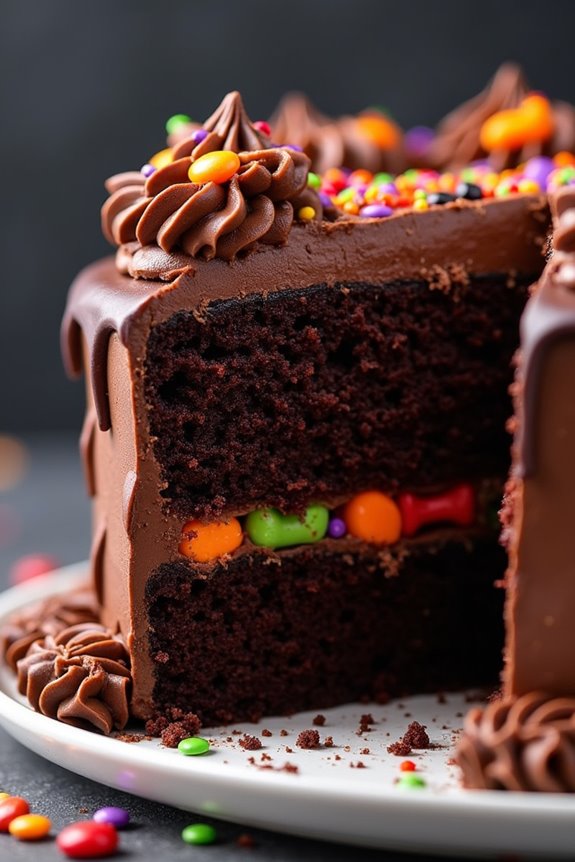
Nothing says Halloween quite like a spooky Skeleton Surprise Cake. This eerie yet delightful treat is perfect for those who enjoy a bit of whimsy with their sweets. The cake features a rich chocolate exterior with a surprise of bone-shaped candies hidden inside—revealed only upon slicing. The contrast between the dark, moist cake and the bright, crunchy candy bones is sure to be a crowd-pleaser at your Halloween gathering.
The Skeleton Surprise Cake not only tastes delicious but also provides a fun and spooky centerpiece for your Halloween dessert table. It’s a creative way to surprise your family and friends with a hidden treat inside a classic dessert. Perfect for serving 4-6 people, this cake is both a fantastic baking project and a conversation starter that will make your Halloween celebration unforgettable.
Ingredients (Serves 4-6 people):
- 1 cup all-purpose flour
- 1 cup granulated sugar
- 1/2 cup unsweetened cocoa powder
- 1 teaspoon baking powder
- 1/2 teaspoon baking soda
- 1/4 teaspoon salt
- 1/2 cup unsalted butter, softened
- 2 large eggs
- 1 teaspoon vanilla extract
- 1/2 cup buttermilk
- 1/2 cup hot water
- 1 cup bone-shaped candies
- 1 cup chocolate frosting
- Halloween-themed sprinkles (optional)
Cooking Instructions:
- Preheat and Prepare Pan: Preheat your oven to 350°F (175°C). Grease and flour a 9-inch round cake pan to prevent the cake from sticking.
- Mix Dry Ingredients: In a medium-sized bowl, whisk together the flour, cocoa powder, baking powder, baking soda, and salt. This guarantees all dry ingredients are evenly distributed.
- Cream Butter and Sugar: In a large bowl, cream the softened butter and sugar together using an electric mixer until light and fluffy. This should take about 3-4 minutes.
- Add Eggs and Vanilla: Beat in the eggs one at a time, ensuring each is fully incorporated before adding the next. Stir in the vanilla extract for added flavor.
- Combine with Dry Ingredients: Gradually add the dry ingredient mixture to the wet mixture, alternating with the buttermilk. Mix until just combined to avoid overmixing.
- Incorporate Hot Water: Carefully stir in the hot water until the batter is smooth and well combined. The batter will be thin, but this is normal.
- Bake the Cake: Pour the batter into the prepared cake pan and bake for 30-35 minutes, or until a toothpick inserted into the center comes out clean. Allow the cake to cool in the pan for 10 minutes, then transfer it to a wire rack to cool completely.
- Create the Surprise: Once the cake is cooled, use a sharp knife to cut a small circle out of the center of the cake, reaching about halfway down. Fill the cavity with bone-shaped candies.
- Frost and Decorate: Place the cut-out piece back over the candy-filled cavity and frost the entire cake with chocolate frosting. Decorate with Halloween-themed sprinkles if desired.
- Serve: Slice the cake to reveal the surprise inside and enjoy!
Extra Tips:
For a more dramatic effect, consider using white chocolate candy melts to create your own bone shapes if pre-made candies are unavailable.
Be sure to let the cake cool completely before attempting to cut and fill it, as this will prevent the cake from crumbling.
If you’re in a rush, you can use a boxed cake mix to save time; just be sure to follow steps for filling and frosting to maintain the surprise element.
Additionally, serving the cake with a scoop of vanilla ice cream can add an extra touch of indulgence to this spooky delight.
Bewitched Broomstick Cake
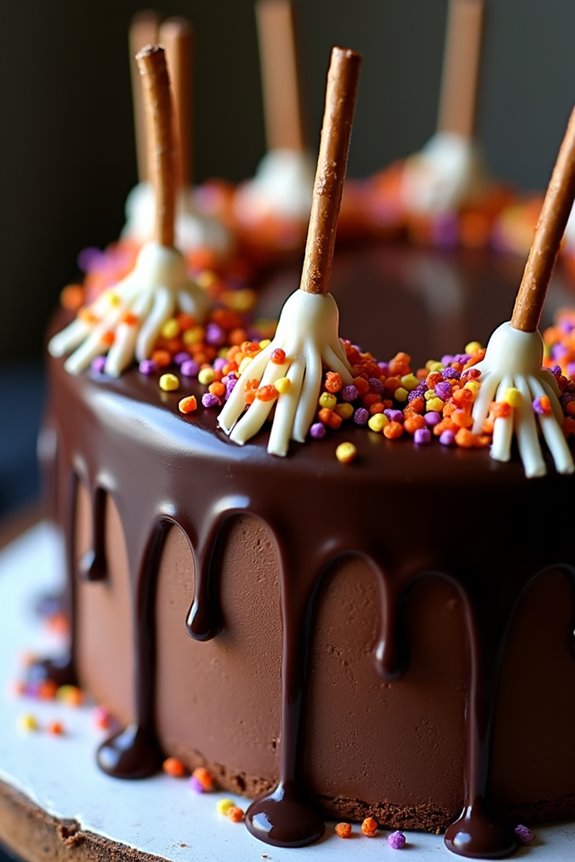
Halloween is the perfect time to let your culinary creativity run wild, and what better way to embrace the spooky season than with a Bewitched Broomstick Cake? This cake not only tastes delicious but also serves as a hauntingly delightful centerpiece for your Halloween festivities.
Imagine a rich, moist chocolate cake adorned with whimsical broomsticks that seem to have flown straight out of a witch’s coven. The combination of dark chocolate, velvety frosting, and playful decorations will enchant both children and adults alike.
Creating a Bewitched Broomstick Cake is simpler than you might think, and it allows for plenty of customization to suit your personal taste. The key is to have fun with the decorations, using ingredients like pretzel sticks and candy melts to form the broomsticks that will captivate your guests.
Perfect for serving 4-6 people, this cake will surely leave everyone spellbound and asking for seconds. Let your imagination take flight and enjoy the process of crafting this magical dessert!
Ingredients (Serving Size: 4-6 people):
- 1 ½ cups all-purpose flour
- 1 cup granulated sugar
- ½ cup unsweetened cocoa powder
- 1 teaspoon baking powder
- ½ teaspoon baking soda
- ½ teaspoon salt
- 2 large eggs
- ½ cup vegetable oil
- 1 cup buttermilk
- 1 teaspoon vanilla extract
- 1 cup boiling water
- 1 cup heavy cream
- 8 ounces semi-sweet chocolate chips
- 12 pretzel sticks
- ½ cup white candy melts
- Assorted Halloween sprinkles
Cooking Instructions:
- Preheat and Prepare Pans: Preheat your oven to 350°F (175°C). Grease and flour two 8-inch round cake pans to prevent the cake from sticking.
- Prepare Dry Ingredients: In a large mixing bowl, combine the all-purpose flour, granulated sugar, cocoa powder, baking powder, baking soda, and salt. Mix well to guarantee even distribution of the ingredients.
- Mix Wet Ingredients: In a separate bowl, whisk together the eggs, vegetable oil, buttermilk, and vanilla extract until smooth.
- Combine Mixtures: Gradually add the wet ingredients to the dry ingredients, mixing until just combined. Carefully pour in the boiling water, stirring until the batter is smooth and thin.
- Bake the Cakes: Divide the batter evenly between the prepared cake pans. Bake in the preheated oven for 30-35 minutes, or until a toothpick inserted into the center comes out clean. Allow the cakes to cool in the pans for 10 minutes before transferring them to wire racks to cool completely.
- Prepare Ganache: In a small saucepan, heat the heavy cream over medium heat until it begins to simmer. Remove from heat and pour over the semi-sweet chocolate chips in a heatproof bowl. Let it sit for 2 minutes, then stir until smooth and glossy.
- Assemble the Cake: Once the cakes are completely cooled, place one layer on a serving platter. Spread a generous layer of chocolate ganache over the top, then place the second layer on top. Pour the remaining ganache over the cake, allowing it to drip down the sides.
- Create Broomsticks: Melt the white candy melts according to package instructions. Dip one end of each pretzel stick into the melted candy, then roll in Halloween sprinkles to create the broom bristles. Set aside to harden.
- Decorate: Insert the broomsticks into the top of the cake at various angles, creating the illusion of flying broomsticks. Add additional sprinkles or decorations as desired.
Extra Tips:
To guarantee your Bewitched Broomstick Cake turns out perfectly, be sure to allow the cakes to cool completely before applying the ganache, as any residual heat can cause the frosting to melt.
Customize your broomsticks by experimenting with different colored candy melts or adding edible glitter for extra sparkle. If you’re short on time, store-bought cake mix and frosting can be used as a convenient alternative without sacrificing the whimsical appearance of the cake.
Zombie Apocalypse Cake
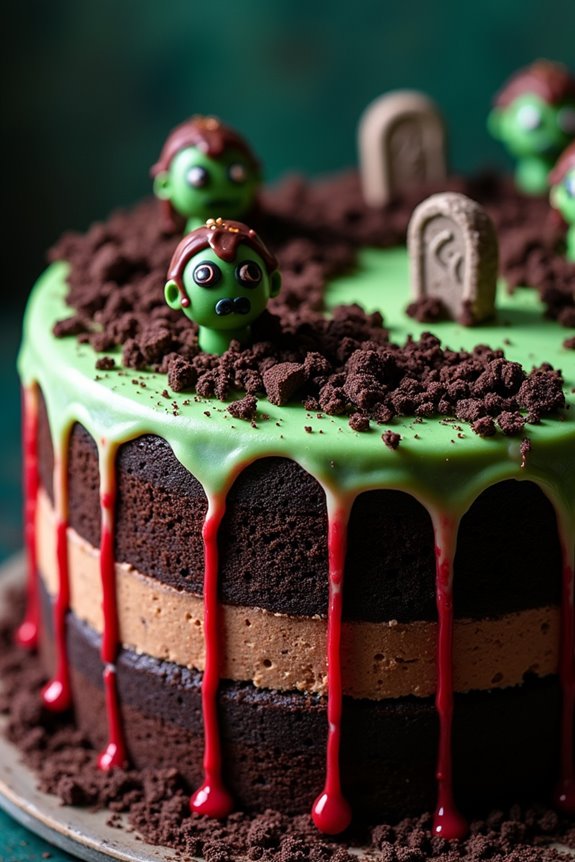
Get ready to thrill your Halloween guests with a spine-chilling Zombie Apocalypse Cake. This cake is designed to look like a scene straight out of a horror movie, complete with edible zombies, gravestones, and gory details that will give everyone goosebumps.
Perfect for a spooky celebration, this cake combines rich chocolate layers with a gruesome decoration that’s sure to be the centerpiece of your Halloween spread. The fun part is in the decoration, where you can let your creativity run wild and add your personal touch to the zombie apocalypse theme.
This cake serves 4-6 people and requires some basic baking and decorating skills. The key is to focus on creating a realistic, eerie atmosphere with the decorations, using a variety of edible components to bring the zombie apocalypse to life. The following recipe includes a list of ingredients and detailed instructions to guide you through baking and decorating your own Zombie Apocalypse Cake.
Ingredients
For the Cake:
- 1 1/2 cups all-purpose flour
- 1 cup granulated sugar
- 1/2 cup unsweetened cocoa powder
- 1 teaspoon baking powder
- 1/2 teaspoon baking soda
- 1/2 teaspoon salt
- 1/2 cup unsalted butter, melted
- 2 large eggs
- 1 teaspoon vanilla extract
- 3/4 cup buttermilk
For the Frosting:
- 1 cup unsalted butter, softened
- 3 cups powdered sugar
- 1/2 cup unsweetened cocoa powder
- 1/4 cup heavy cream
- 1 teaspoon vanilla extract
For the Decorations:
- Edible zombie figures
- Green and red food coloring
- Crushed chocolate cookies (for dirt)
- Edible gravestones
- Red decorating gel (optional for blood effect)
Instructions
- Preheat and Prepare the Baking Pan: Preheat your oven to 350°F (175°C). Grease and flour two 8-inch round cake pans to prevent the cake from sticking.
- Mix the Dry Ingredients: In a large mixing bowl, combine the flour, sugar, cocoa powder, baking powder, baking soda, and salt. Whisk them together until well combined.
- Combine Wet Ingredients: In another bowl, whisk together the melted butter, eggs, vanilla extract, and buttermilk until smooth.
- Create the Batter: Gradually mix the wet ingredients into the dry ingredients, stirring until just combined. Avoid overmixing to keep the cake light and fluffy.
- Bake the Cake Layers: Divide the batter evenly between the prepared pans. Bake in the preheated oven for 25-30 minutes, or until a toothpick inserted into the center comes out clean. Allow the cakes to cool in the pans for 10 minutes before transferring them to a wire rack to cool completely.
- Prepare the Frosting: In a large bowl, beat together the softened butter, powdered sugar, cocoa powder, heavy cream, and vanilla extract until smooth and fluffy.
- Assemble the Cake: Place one cake layer on a serving platter. Spread a layer of frosting on top, then place the second cake layer on top. Frost the top and sides of the cake with the remaining frosting.
- Decorate the Cake: Use green and red food coloring to create a spooky landscape on the frosting. Sprinkle crushed chocolate cookies on top to resemble dirt. Arrange edible zombie figures and gravestones on the cake. Use red decorating gel to add a blood effect if desired.
Extra Tips
For an even more terrifying look, consider adding some edible eyes or bones to the cake for a more realistic zombie graveyard.
If you can’t find edible zombie figures, you can make your own by molding fondant or marzipan. To make the cake even moister, consider brushing the layers with a simple syrup flavored with a hint of coffee.
Remember to have fun with the decorations; the more creative and grotesque, the better!