

Halloween is just around the corner, and I couldn’t be more excited to share some enchanting cake ideas with you. Whether you’re short on time or just love a little spooky fun, these cakes are perfect for your festive celebrations. Picture a spiderweb cake or a ghostly cupcake tower taking center stage at your party. I’ve whipped up these treats myself, and trust me, they’re a blast to make and even more delightful to eat. Let’s turn your kitchen into a Halloween haven with ease!
Spooky Spiderweb Cake
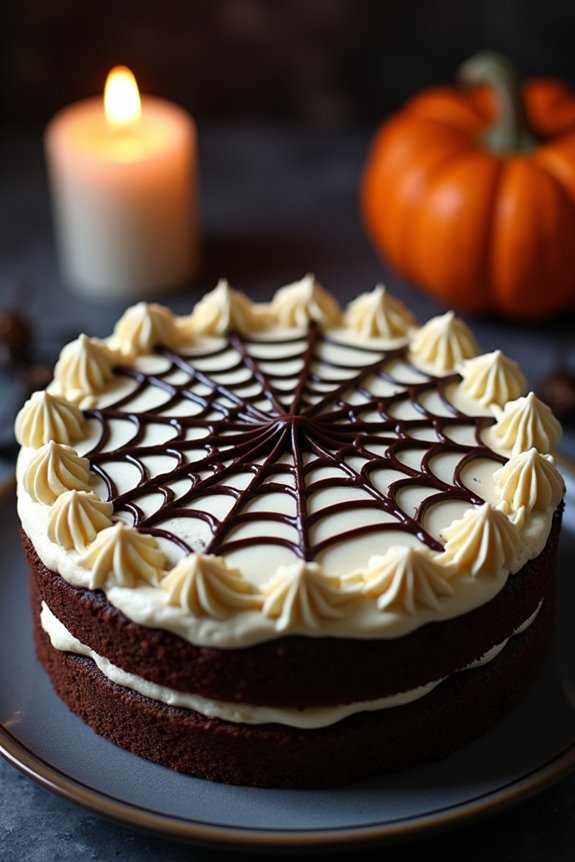
Get ready to enchant your guests with a Spooky Spiderweb Cake that’s perfect for any Halloween celebration. This cake not only tastes delicious but also adds a touch of eerie elegance to your dessert table. With a rich chocolate flavor, creamy frosting, and an eye-catching spiderweb design, this cake is sure to be a hit with both adults and kids alike.
Whether you’re a seasoned baker or a beginner, this recipe is straightforward and fun to make, allowing you to showcase your creativity in the kitchen.
The Spooky Spiderweb Cake combines moist chocolate layers with a smooth, vanilla frosting. The spiderweb effect is created using a simple technique with melted chocolate, making it easier than it looks. This cake serves 4-6 people, making it perfect for a small Halloween gathering. Gather your ingredients and follow the steps below to create this memorable Halloween treat.
Ingredients:
- 1 ½ cups all-purpose flour
- 1 cup granulated sugar
- ½ cup unsweetened cocoa powder
- 1 ½ teaspoons baking powder
- ½ teaspoon baking soda
- ½ teaspoon salt
- 2 large eggs
- 1 cup whole milk
- ½ cup vegetable oil
- 2 teaspoons vanilla extract
- 1 cup boiling water
- 2 cups confectioners’ sugar
- ½ cup unsalted butter, softened
- 2 tablespoons milk
- 4 oz dark chocolate, melted
- 1 tablespoon corn syrup
Instructions:
1. Prepare the Cake Batter: Preheat your oven to 350°F (175°C). Grease and flour two 8-inch round cake pans. In a large bowl, mix together the flour, granulated sugar, cocoa powder, baking powder, baking soda, and salt.
Add the eggs, milk, vegetable oil, and vanilla extract to the dry ingredients. Beat the mixture on medium speed for about 2 minutes. Stir in the boiling water until the batter is well combined (it will be thin).
2. Bake the Cake: Divide the batter evenly between the prepared cake pans. Bake in the preheated oven for 30-35 minutes, or until a toothpick inserted into the center comes out clean.
Allow the cakes to cool in the pans for 10 minutes before transferring them to a wire rack to cool completely.
3. Make the Frosting: In a medium bowl, beat the softened butter until creamy. Gradually add the confectioners’ sugar, beating until smooth.
Add 2 tablespoons of milk and continue to beat until the frosting is light and fluffy. Spread a layer of frosting on top of one cooled cake layer, then place the second layer on top. Use the remaining frosting to cover the top and sides of the cake.
4. Create the Spiderweb Design: Combine the melted dark chocolate and corn syrup in a small bowl to create a smooth chocolate glaze.
Transfer the glaze to a piping bag or a plastic zip-top bag with a small corner snipped off. Starting from the center of the cake, pipe concentric circles of chocolate glaze. Use a toothpick or a knife to gently drag lines outward from the center to the edge of the cake to create a spiderweb effect.
5. Final Touches: Allow the cake to set for about 20 minutes at room temperature or refrigerate it for a few minutes until the chocolate is firm.
Serve and enjoy your Spooky Spiderweb Cake!
Extra Tips:
For an even spookier look, consider adding edible spiders or other Halloween-themed decorations to your cake.
If you don’t have a piping bag, you can use a small spoon to drizzle the chocolate glaze over the cake. Be sure to use room-temperature eggs and butter for the best results.
This cake can be made a day in advance; just store it in an airtight container in the refrigerator and bring it back to room temperature before serving. Enjoy the creative process and have fun with your Halloween baking!
Ghostly Cupcake Tower
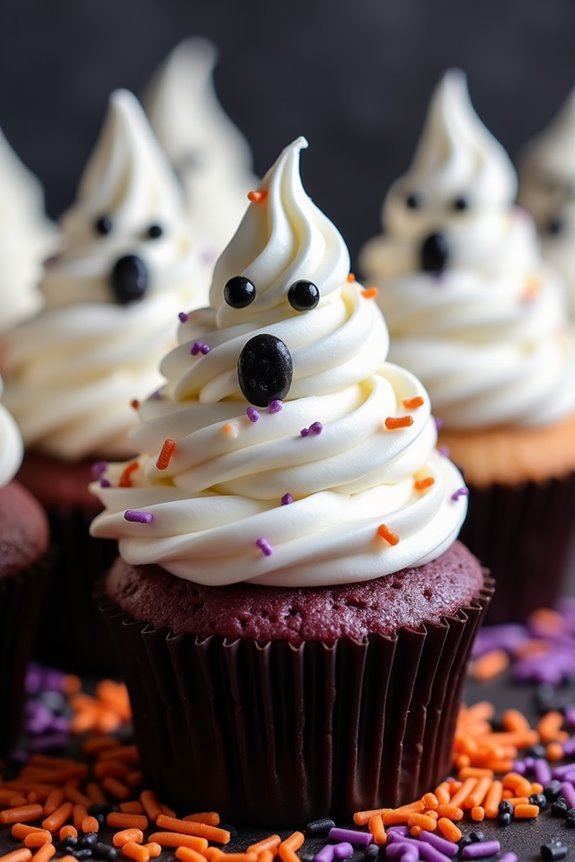
The Ghostly Cupcake Tower is a spooky and delightful treat that’s perfect for any Halloween gathering. This recipe combines rich chocolate cupcakes with a hauntingly delicious marshmallow frosting, all adorned with ghostly decorations. The tower isn’t only a feast for the taste buds but also a centerpiece that captures the spirit of Halloween with its eerie yet whimsical appearance.
Each bite offers a moist, chocolatey base topped with fluffy, ghost-shaped frosting, making it a hit with both kids and adults. Creating this tower involves a bit of artistry, as the cupcakes are stacked to resemble a haunted structure. The key to success is in the presentation – carefully crafted ghost figures and creative use of Halloween-themed decorations will make your Ghostly Cupcake Tower the star of the dessert table.
Whether you’re hosting a Halloween party or simply want to indulge in festive baking, this recipe will guide you through each step to guarantee a spooky yet scrumptious creation.
Ingredients for 4-6 Servings:
- 1 cup all-purpose flour
- 1 cup granulated sugar
- 1/2 cup unsweetened cocoa powder
- 1 teaspoon baking powder
- 1/2 teaspoon baking soda
- 1/4 teaspoon salt
- 1/2 cup whole milk
- 1/4 cup vegetable oil
- 1 large egg
- 1 teaspoon vanilla extract
- 1/2 cup boiling water
- 1 cup mini marshmallows
- 3 tablespoons butter
- 1 1/2 cups powdered sugar
- 1 teaspoon vanilla extract
- Black food coloring gel
- Candy eyes and Halloween-themed sprinkles
Instructions:
- Prepare the Batter: Preheat your oven to 350°F (175°C) and line a muffin tin with cupcake liners. In a large mixing bowl, combine the flour, sugar, cocoa powder, baking powder, baking soda, and salt. Mix well.
- Mix Wet Ingredients: In a separate bowl, combine the milk, vegetable oil, egg, and vanilla extract. Beat until well combined. Gradually add the wet ingredients to the dry ingredients, mixing until just combined.
- Add Boiling Water: Slowly stir in the boiling water until the batter is smooth. The batter will be thin, which is normal.
- Bake the Cupcakes: Pour the batter evenly into the prepared cupcake liners, filling each about two-thirds full. Bake for 18-20 minutes or until a toothpick inserted into the center comes out clean. Allow the cupcakes to cool completely on a wire rack.
- Prepare the Marshmallow Frosting: In a saucepan, melt the butter over low heat. Add the mini marshmallows and stir continuously until melted and smooth. Remove from heat and gradually stir in the powdered sugar and vanilla extract until the frosting is thick and fluffy.
- Decorate the Cupcakes: Using a piping bag with a large round tip, pipe the marshmallow frosting onto each cupcake in a swirling motion to create a ghostly shape. Use black food coloring gel to add small dots for the eyes and mouth on each ghost. Place candy eyes and Halloween-themed sprinkles as desired.
- Assemble the Cupcake Tower: Arrange the cupcakes on a tiered cake stand or stack them in a pyramid shape on a large platter to create the tower effect. Confirm that the cupcakes are stable and secure.
Extra Tips:
To guarantee your Ghostly Cupcake Tower remains stable, start by placing the largest cupcakes at the base and gradually work upwards with smaller ones. If you’re transporting the tower, consider assembling it on site to prevent any mishaps.
For a more dramatic effect, use a mix of colored cupcake liners in Halloween hues like orange, black, and purple. Remember, the marshmallow frosting sets quickly, so decorate the cupcakes immediately after piping. Finally, let your creativity shine by experimenting with different ghost expressions and additional spooky details.
Jack-o’-Lantern Pumpkin Cake
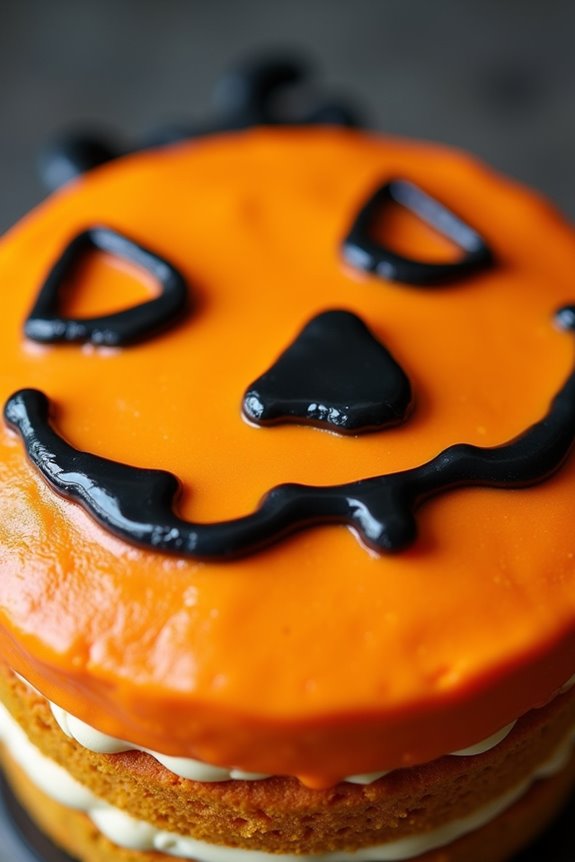
Celebrate Halloween with a delightful Jack-o’-Lantern Pumpkin Cake that isn’t only a visual treat but also a deliciously spiced dessert. This cake captures the essence of autumn with its pumpkin flavor, warm spices, and a touch of creativity. Perfect for parties or family gatherings, this cake is sure to impress both kids and adults alike. Enjoy the process of decorating the cake to resemble a classic Jack-o’-Lantern, complete with a cheerful or spooky face.
This recipe yields a cake suitable for 4-6 people, making it ideal for a small gathering. The moist pumpkin cake layers are complemented by a rich cream cheese frosting, and the vibrant orange icing gives it the perfect festive look. Whether you’re an experienced baker or a novice, this recipe guides you through each step to create a stunning centerpiece for your Halloween celebration.
Ingredients:
- 2 cups all-purpose flour
- 1 tsp baking powder
- 1 tsp baking soda
- 1/2 tsp salt
- 1 tsp ground cinnamon
- 1/2 tsp ground nutmeg
- 1/2 tsp ground ginger
- 1 cup canned pumpkin puree
- 1 cup granulated sugar
- 1/2 cup brown sugar, packed
- 1/2 cup vegetable oil
- 2 large eggs
- 1 tsp vanilla extract
- 8 oz cream cheese, softened
- 1/2 cup unsalted butter, softened
- 3 cups powdered sugar
- Orange gel food coloring
- Black gel food coloring
Cooking Instructions:
- Prepare the Oven and Cake Pans: Preheat your oven to 350°F (175°C). Grease and flour two 8-inch round cake pans to guarantee easy removal of the cakes after baking.
- Mix Dry Ingredients: In a medium bowl, whisk together the flour, baking powder, baking soda, salt, cinnamon, nutmeg, and ginger. Set aside.
- Combine Wet Ingredients: In a large mixing bowl, beat together the pumpkin puree, granulated sugar, brown sugar, oil, eggs, and vanilla extract until smooth and well combined.
- Combine Wet and Dry Mixtures: Gradually add the dry ingredients to the wet ingredients, mixing until just combined. Be careful not to overmix to keep the cake tender.
- Bake the Cake: Divide the batter evenly between the prepared cake pans. Bake for 25-30 minutes, or until a toothpick inserted into the center comes out clean. Allow the cakes to cool in the pans for 10 minutes before transferring them to a wire rack to cool completely.
- Prepare the Frosting: In a separate bowl, beat the softened cream cheese and butter until smooth and creamy. Gradually add the powdered sugar and continue to mix until well combined and fluffy. Add a few drops of orange gel food coloring and mix until you achieve the desired color.
- Assemble the Cake: Place one cake layer on a serving plate and spread a generous layer of the orange cream cheese frosting on top. Place the second layer on top and cover the entire cake with the remaining frosting.
- Decorate the Cake: Use black gel food coloring to draw a Jack-o’-Lantern face on the cake. You can use a piping bag or a small brush to create eyes, nose, and a mouth.
Extra Tips:
For a more defined shape, consider using a bundt cake pan to achieve a rounded pumpkin look. If you prefer a stronger pumpkin spice flavor, feel free to adjust the spices to your liking.
When decorating, practice your Jack-o’-Lantern design on parchment paper before applying it to the cake for a more polished look. For added flair, consider using candy or edible decorations to enhance the Jack-o’-Lantern features.
Monster Eyeball Cake
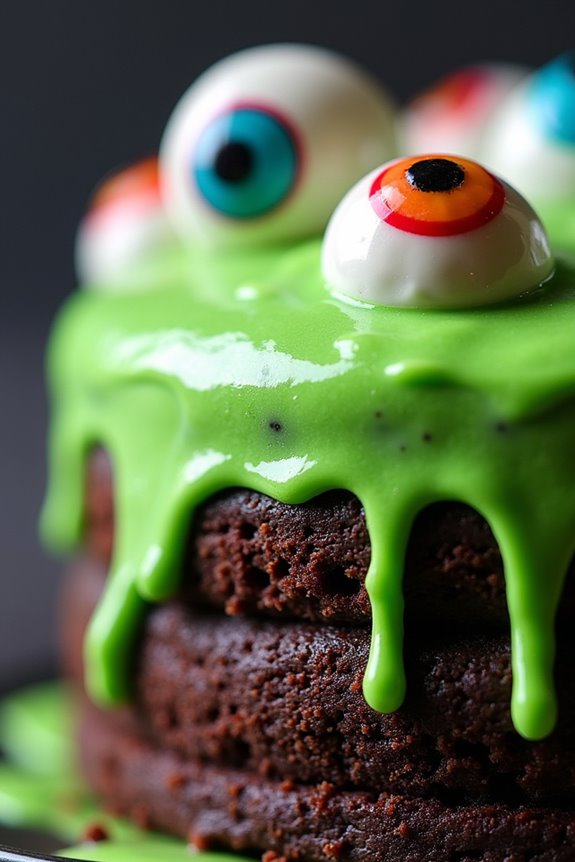
Explore the eerie and delicious world of Halloween baking with a Monster Eyeball Cake that’s sure to intrigue and impress your party guests. This spooky centerpiece combines the whimsical with the creepy, offering a balance of visual intrigue and delectable flavor. Perfect for serving at Halloween gatherings, this cake features layers of moist cake, covered with a rich frosting and topped with candy “eyeballs” for a ghoulish touch.
To create this spine-tingling dessert, you’ll need to prepare a basic cake, creamy frosting, and a few decorative elements that bring the monster theme to life. This recipe is designed to serve 4-6 people, guaranteeing that there’s plenty to go around at your next spooky soirée. Follow the instructions below for a Halloween treat that’s as delightful as it’s frightful.
Ingredients for a serving size of 4-6 people:
- 1 1/2 cups all-purpose flour
- 1 cup granulated sugar
- 1/2 cup unsweetened cocoa powder
- 1 1/2 teaspoons baking powder
- 1/2 teaspoon baking soda
- 1/4 teaspoon salt
- 2 large eggs
- 1/2 cup vegetable oil
- 1 cup buttermilk
- 1 teaspoon vanilla extract
- 1 cup heavy cream
- 1/2 cup powdered sugar
- 1 teaspoon vanilla extract (for frosting)
- Green food coloring
- Candy eyeballs or chocolate candies with eyeball designs
Cooking Instructions:
1. Preheat and Prepare Cake Pan:
Preheat your oven to 350°F (175°C). Grease and flour a 9-inch round cake pan, then set it aside. This guarantees that the cake won’t stick and will come out easily after baking.
2. Mix Dry Ingredients:
In a large bowl, sift together the all-purpose flour, granulated sugar, cocoa powder, baking powder, baking soda, and salt. This step guarantees that all dry ingredients are well combined, resulting in an even texture.
3. Combine Wet Ingredients:
In another bowl, whisk together the eggs, vegetable oil, buttermilk, and vanilla extract until smooth. Make sure all wet ingredients are at room temperature for the best consistency.
4. Mix the Batter:
Gradually add the wet ingredients to the dry ingredients, stirring gently until just combined. Be careful not to over-mix to keep the cake light and fluffy.
5. Bake the Cake:
Pour the batter into the prepared cake pan and smooth the top with a spatula. Bake in the preheated oven for 30-35 minutes, or until a toothpick inserted in the center comes out clean.
6. Cool the Cake:
Once baked, allow the cake to cool in the pan for about 10 minutes before transferring it to a wire rack to cool completely.
7. Prepare the Frosting:
In a medium bowl, beat the heavy cream, powdered sugar, and vanilla extract until stiff peaks form. Add a few drops of green food coloring until you reach the desired shade for your monster theme.
8. Assemble and Decorate:
Spread an even layer of green frosting over the cooled cake. Arrange the candy eyeballs on top, pressing them gently into the frosting to secure them in place.
Extra Tips:
For an added touch of spookiness, consider using a variety of candy eyeball sizes to create a more realistic monster effect. You can also add a drip effect using red gel icing to mimic “blood” for an extra eerie appearance.
If you don’t have buttermilk, you can make a substitute by mixing 1 cup of milk with 1 tablespoon of lemon juice or vinegar and letting it sit for 5 minutes.
Be sure to store any leftovers in an airtight container to keep the cake fresh.
Bloody Red Velvet Cake
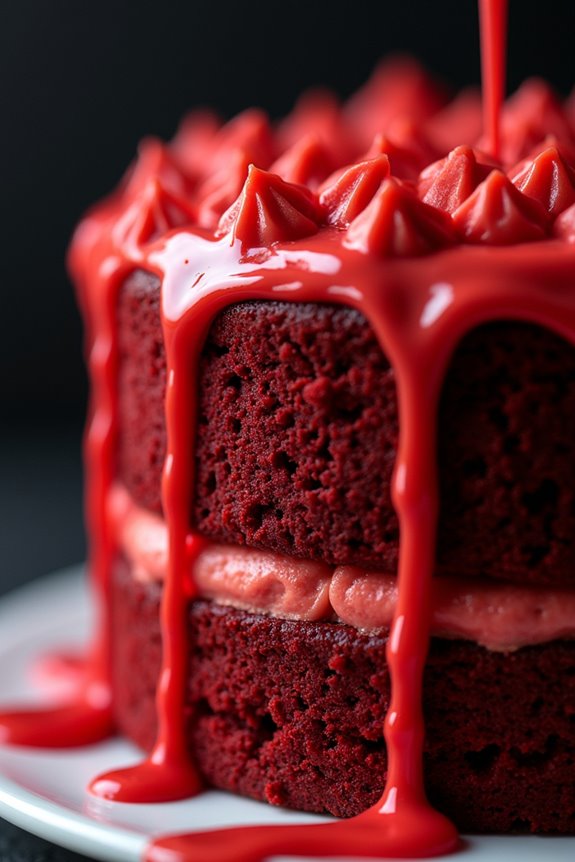
Indulge in the sinister delight of a Bloody Red Velvet Cake, an eerie twist on a classic dessert perfect for any Halloween gathering. This rich, moist cake is infused with a deep red hue, reminiscent of blood, and is generously slathered with a creamy, tangy cream cheese frosting. Its striking appearance is sure to captivate your guests and add a touch of spookiness to your Halloween festivities.
Ideal for parties or a fun family night, this cake offers the perfect combination of flavor and Halloween charm. The Bloody Red Velvet Cake is designed to serve 4-6 people, making it an excellent choice for small gatherings or as a show-stopping centerpiece for a dessert table.
The cake features a tender crumb, achieved through the use of buttermilk and a hint of cocoa, while the cream cheese frosting adds a luscious contrast. Whether you’re an experienced baker or a novice, this recipe is straightforward and satisfying to create, guaranteeing you’ll have a deliciously dark dessert ready to impress.
Ingredients:
- 2 ½ cups all-purpose flour
- 1 ½ cups granulated sugar
- 1 teaspoon baking soda
- 1 teaspoon salt
- 1 teaspoon cocoa powder
- 1 ½ cups vegetable oil
- 1 cup buttermilk, room temperature
- 2 large eggs, room temperature
- 2 tablespoons red food coloring
- 1 teaspoon vanilla extract
- 1 teaspoon white vinegar
For the Cream Cheese Frosting:
- 8 ounces cream cheese, softened
- ½ cup unsalted butter, softened
- 4 cups powdered sugar
- 1 teaspoon vanilla extract
Cooking Instructions:
- Preheat and Prepare Pans: Preheat your oven to 350°F (175°C). Grease and flour two 9-inch round cake pans and set them aside.
- Mix Dry Ingredients: In a medium bowl, sift together the flour, sugar, baking soda, salt, and cocoa powder. This guarantees that there are no lumps and the ingredients are well combined.
- Combine Wet Ingredients: In a large mixing bowl, whisk together the vegetable oil, buttermilk, eggs, food coloring, vanilla extract, and vinegar until smooth. The vinegar will react with the baking soda, helping the cake rise and become fluffy.
- Combine Mixtures: Gradually add the dry ingredients to the wet ingredients, mixing until just combined. Be careful not to over-mix, as this can make the cake dense.
- Bake the Cakes: Divide the batter evenly between the prepared cake pans. Bake in the preheated oven for 25-30 minutes, or until a toothpick inserted into the center comes out clean.
- Cool the Cakes: Allow the cakes to cool in the pans for about 10 minutes, then remove them from the pans and transfer to a wire rack to cool completely.
- Prepare the Frosting: In a medium bowl, beat the cream cheese and butter until smooth and creamy. Gradually add the powdered sugar, one cup at a time, beating well after each addition. Stir in the vanilla extract.
- Assemble the Cake: Once the cakes are completely cooled, place one layer on a serving plate. Spread a layer of cream cheese frosting on top, then place the second cake layer on top. Frost the top and sides of the cake with the remaining frosting.
- Serve: For an extra Halloween touch, drizzle some red gel icing or strawberry sauce on top of the cake to mimic blood.
Extra Tips:
For the most vibrant red hue, use gel food coloring rather than liquid, as it provides a more concentrated color without altering the consistency of the batter. If you don’t have buttermilk on hand, you can make a substitute by adding one tablespoon of white vinegar or lemon juice to one cup of milk and letting it sit for 5 minutes.
Remember to let the cake cool completely before frosting to prevent the frosting from melting. For an added spooky effect, consider adding Halloween-themed decorations like edible spiders or ghost figurines to your cake.
Witch Hat Cake Pops
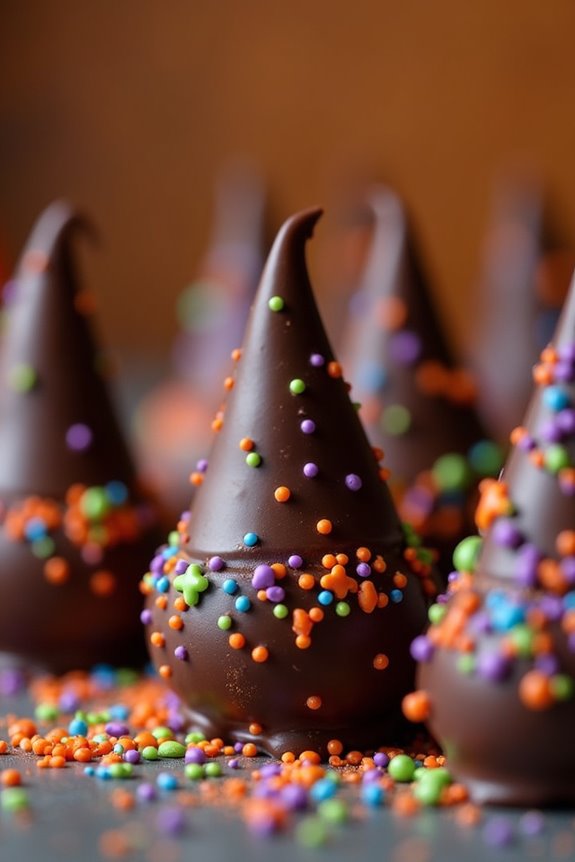
Witch Hat Cake Pops are a whimsical and delicious treat perfect for any Halloween celebration. These charming cake pops are shaped like witch hats, adding a delightful touch to your spooky festivities. They’re crafted by combining crumbled cake with frosting, forming them into cone shapes, and then decorating them with chocolate and festive sprinkles.
Whether you’re hosting a Halloween party or looking for a fun activity to do with kids, Witch Hat Cake Pops are guaranteed to be a hit.
Creating these cake pops is both an enjoyable and rewarding process. The key is to verify the cake and frosting mixture is the right consistency to hold its shape. Once the cones are formed, they’re coated with melted chocolate and adorned with colorful sprinkles or edible glitter to mimic the classic witch’s hat look.
This recipe will yield approximately 12-15 cake pops, making it ideal for serving 4-6 people. Gather your ingredients and let’s get started on creating these enchanting treats!
Ingredients
- 1 box of chocolate cake mix (plus ingredients to prepare it)
- 1 cup chocolate frosting
- 12-15 waffle ice cream cones
- 2 cups semi-sweet chocolate chips
- 1 tablespoon vegetable oil
- Assorted Halloween sprinkles or edible glitter
- 12-15 lollipop sticks
- Styrofoam block or cake pop stand
Instructions
- Bake the Cake: Begin by preparing the chocolate cake according to the package instructions. Allow the cake to cool completely. Once cooled, crumble the cake finely into a large mixing bowl.
- Mix with Frosting: Add the chocolate frosting to the crumbled cake. Mix thoroughly until the mixture is well combined and has a dough-like consistency that holds together when pressed.
- Shape the Cones: Take small portions of the cake mixture and shape them into a cone that fits into the opening of the waffle cone. Press gently but firmly to verify they maintain their shape.
- Insert Sticks: Carefully insert a lollipop stick into the base of each cone, verifying it reaches the center of the cake mix but not all the way through.
- Melt Chocolate: In a microwave-safe bowl, combine the chocolate chips and vegetable oil. Microwave in 30-second intervals, stirring in between, until fully melted and smooth.
- Dip the Cake Pops: Dip each cake pop cone into the melted chocolate, swirling to cover completely. Allow any excess chocolate to drip off.
- Decorate: While the chocolate is still wet, sprinkle the cake pops with Halloween-themed sprinkles or edible glitter.
- Set the Cake Pops: Place the finished cake pops upright in a Styrofoam block or cake pop stand to set. Allow them to cool completely until the chocolate hardens.
- Serve and Enjoy: Once the chocolate is set, your Witch Hat Cake Pops are ready to serve and enjoy!
Extra Tips
When making Witch Hat Cake Pops, verify the cake mixture isn’t too moist, as this can cause the cones to lose shape. If the mixture is too sticky, add a little more cake crumbs.
Use a high-quality melting chocolate for a smooth coating, and work quickly when decorating with sprinkles to verify they stick before the chocolate hardens. If you’re making these in advance, store them in an airtight container in a cool, dry place to prevent the chocolate from melting or becoming soft.
Creepy Crawly Bug Cake
Introducing the Creepy Crawly Bug Cake, a perfect treat to spook and delight your guests this Halloween. This cake brings the eerie charm of a haunted forest right into your kitchen, complete with edible bugs and a deliciously dark aesthetic.
Imagine slicing into a cake that looks like it’s been overrun by creepy crawlies, only to reveal rich layers of decadent chocolate and gooey filling. This cake isn’t just about the looks; it’s a delicious masterpiece that combines the richness of chocolate with the fun and fright of Halloween.
The Creepy Crawly Bug Cake is ideal for a Halloween party or a family gathering where you want to serve something both ghastly and gorgeous. It’s a versatile creation, allowing you to get creative with decorations while sticking to a tried-and-true chocolate cake recipe.
This cake will serve 4-6 people, making it perfect for an intimate gathering or a spooky dessert option at a potluck. So, gather your ingredients and prepare for a baking adventure that will have your guests squirming in delight.
Ingredients:
- 2 cups all-purpose flour
- 1 ¾ cups granulated sugar
- ¾ cup unsweetened cocoa powder
- 1 ½ teaspoons baking powder
- 1 ½ teaspoons baking soda
- 1 teaspoon salt
- 2 large eggs
- 1 cup whole milk
- ½ cup vegetable oil
- 2 teaspoons vanilla extract
- 1 cup boiling water
- 1 cup dark chocolate chips
- 1 cup heavy cream
- 1 ½ cups chocolate buttercream frosting
- Assorted gummy bugs or candy insects
- Black food coloring gel (optional)
Instructions:
- Prepare the Cake Batter: Preheat your oven to 350°F (175°C). Grease and flour two 9-inch round cake pans. In a large mixing bowl, combine the flour, sugar, cocoa powder, baking powder, baking soda, and salt. Whisk until well blended.
- Mix Wet Ingredients: Add the eggs, milk, vegetable oil, and vanilla extract to the dry ingredients. Using an electric mixer, beat on medium speed for about 2 minutes until the mixture is smooth and well combined.
- Incorporate Boiling Water: Carefully stir in the boiling water until the batter is thin and smooth. This step helps to dissolve the cocoa powder, enhancing the chocolate flavor.
- Bake the Cake: Divide the batter evenly between the prepared cake pans. Bake for 30-35 minutes, or until a toothpick inserted into the center comes out clean. Allow the cakes to cool in the pans for 10 minutes before transferring them to a wire rack to cool completely.
- Prepare the Ganache: In a small saucepan, heat the heavy cream over medium heat until it begins to simmer. Remove from heat and pour over the dark chocolate chips in a heat-proof bowl. Let sit for 5 minutes, then stir until smooth and glossy.
- Assemble the Cake: Place one layer of cake on a serving platter. Spread a thick layer of chocolate buttercream frosting on top. Place the second cake layer on top and cover the entire cake with a thin layer of frosting to create a crumb coat. Chill the cake for 15 minutes to set.
- Decorate: Once the cake is chilled, apply a thicker layer of frosting. Pour the chocolate ganache over the top, letting it drip down the sides. Use black food coloring gel to add a spooky hue if desired. Arrange the gummy bugs or candy insects on top of the cake for a creepy, crawly effect.
- Serve: Allow the cake to set for at least 30 minutes before serving to ascertain the ganache firms up. Slice and enjoy!
Extra Tips:
For a more pronounced creepy effect, consider using black cocoa powder for an even darker cake. If you’re feeling particularly adventurous, you can add some edible glitter to mimic a dewy forest floor.
Make sure to refrigerate the cake to keep the ganache and frosting firm, especially if you’re serving it outdoors. If you don’t have gummy bugs, you can always use chocolate molds to create your own edible insects.
This cake is as much about having fun in the kitchen as it’s about creating a delicious treat, so feel free to get creative with your decorations and presentation!
Graveyard Sheet Cake
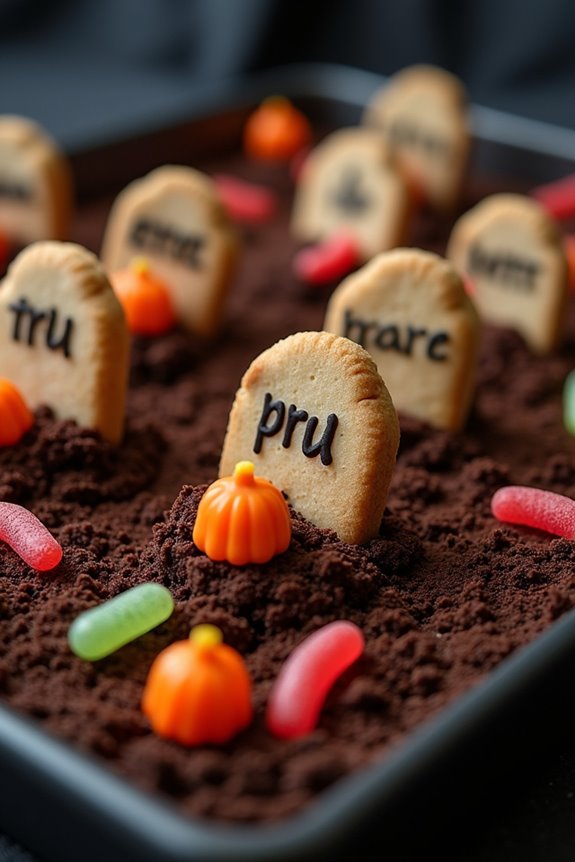
Get ready to spook your guests with a delicious and eerie Graveyard Sheet Cake this Halloween! This cake isn’t only a feast for the eyes but also a treat for the taste buds. The combination of moist chocolate cake, creamy frosting, and creative decorations will make it the highlight of your Halloween festivities.
Whether you’re hosting a Halloween party or just want to surprise your family with a themed dessert, this Graveyard Sheet Cake is sure to impress. The design is simple yet impactful, featuring a “graveyard” scene with tombstones, edible dirt, and creepy crawly details. The cake serves 4-6 people, making it perfect for a small gathering.
It’s a fun and creative way to get into the Halloween spirit, and it’s easy enough for bakers of all skill levels to tackle.
Ingredients (Serving size: 4-6 people)
- 1 box of chocolate cake mix
- 3 large eggs
- 1 cup of water
- 1/2 cup of vegetable oil
- 1 container (16 oz) of chocolate frosting
- 1 package of chocolate sandwich cookies
- 1 package of Milano or shortbread cookies
- Black decorating gel
- Candy pumpkins and gummy worms for decoration
Cooking Instructions
- Prepare the Cake Batter: Preheat your oven to 350°F (175°C). In a large mixing bowl, combine the chocolate cake mix, eggs, water, and vegetable oil. Mix until the batter is smooth and well combined.
- Bake the Cake: Pour the batter into a greased 9×13-inch baking sheet, spreading it evenly. Bake for 25-30 minutes or until a toothpick inserted in the center comes out clean. Allow the cake to cool completely in the pan.
- Create Edible Dirt: While the cake is cooling, prepare the “dirt” by crushing the chocolate sandwich cookies in a food processor or by placing them in a sealed bag and smashing them with a rolling pin until they resemble fine crumbs.
- Frost the Cake: Once the cake is completely cool, spread a generous layer of chocolate frosting over the top.
- Assemble the Graveyard Scene: Sprinkle the crushed cookies over the frosted cake to create the appearance of dirt. Stand the Milano or shortbread cookies upright to resemble tombstones. Use the black decorating gel to write spooky messages or “RIP” on the tombstones.
- Add Finishing Touches: Decorate the cake with candy pumpkins and gummy worms, placing them strategically around the tombstones to enhance the graveyard look.
Extra Tips
For a more realistic graveyard appearance, consider using green-tinted coconut flakes to mimic grass around the tombstones. You can also incorporate spooky Halloween-themed candies like candy bones or spiders for added detail.
If you want to personalize the tombstones further, use food-safe pens to add names or funny epitaphs. Adjust the decorations according to your theme or preference to make your Graveyard Sheet Cake uniquely festive.
Mummy Wrapped Cake
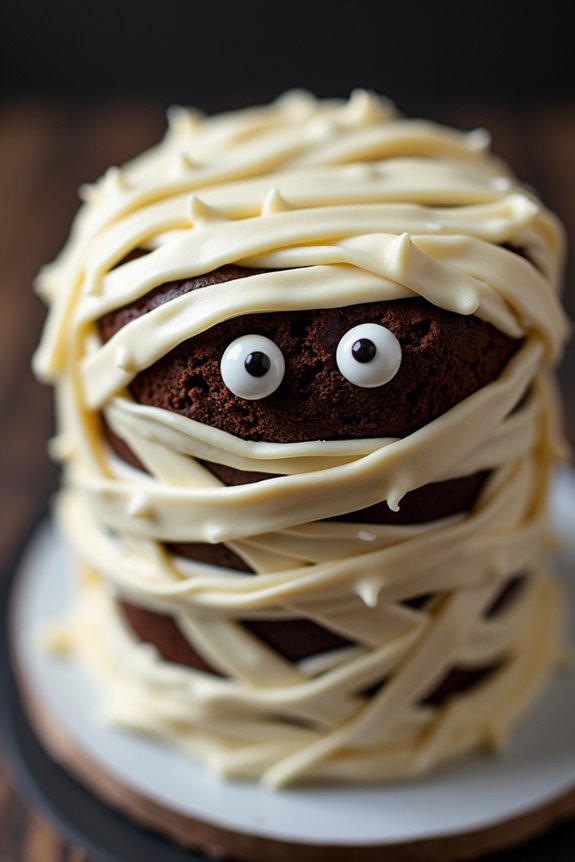
Mummy Wrapped Cake is a spooktacular delight perfect for your Halloween celebrations. This cake combines the moist, rich flavors of a classic chocolate cake with the fun, eerie appearance of a mummy. The exterior is wrapped in deliciously sweet fondant or frosting, mimicking the ancient Egyptian mummy wrappings, making it a fun project for anyone who loves to bake and decorate.
Whether you’re hosting a Halloween party or simply looking to surprise your family with a creative dessert, this Mummy Wrapped Cake is certain to be a hit.
Creating this eye-catching cake involves a few steps, but the final result is well worth the effort. You begin by baking your favorite chocolate cake in two round pans, which are then layered with a delectable filling. The real magic happens in the decoration: a layer of white fondant or frosting is carefully applied to create the mummy’s bandages, and candy eyes bring this spooky treat to life.
With a little patience and creativity, you’ll have a Halloween centerpiece that looks as good as it tastes.
Ingredients (Serving Size: 4-6 people)
- 1 3/4 cups all-purpose flour
- 1 cup granulated sugar
- 3/4 cup unsweetened cocoa powder
- 1 1/2 teaspoons baking powder
- 1 1/2 teaspoons baking soda
- 1 teaspoon salt
- 2 large eggs
- 1 cup whole milk
- 1/2 cup vegetable oil
- 2 teaspoons vanilla extract
- 1 cup boiling water
- 1/2 cup unsalted butter, softened
- 3 cups powdered sugar
- 1/4 cup heavy cream
- 1 teaspoon vanilla extract (for frosting)
- White fondant (or additional frosting)
- Candy eyes or chocolate chips
Cooking Instructions
- Preheat and Prepare Pans: Preheat your oven to 350°F (175°C). Grease and flour two 8-inch round cake pans to prevent the cake from sticking.
- Mix Dry Ingredients: In a large bowl, sift together the flour, sugar, cocoa powder, baking powder, baking soda, and salt.
- Combine Wet Ingredients: In another bowl, whisk together the eggs, milk, vegetable oil, and vanilla extract until well mixed.
- Create Cake Batter: Gradually add the wet ingredients to the dry ingredients, mixing until just combined. Slowly add the boiling water to the batter and mix until smooth. The batter will be thin, but this is normal.
- Bake the Cakes: Divide the batter evenly between the prepared cake pans. Bake in the preheated oven for 30-35 minutes, or until a toothpick inserted into the center comes out clean. Allow the cakes to cool in the pans for 10 minutes, then transfer to a wire rack to cool completely.
- Make the Frosting: In a medium bowl, beat the softened butter until creamy. Gradually add powdered sugar, beating until smooth. Add the heavy cream and vanilla extract, and beat until the frosting is light and fluffy.
- Assemble the Cake: Place one cake layer on a serving plate and spread a layer of frosting on top. Place the second cake layer on top, and frost the entire outside of the cake.
- Decorate the Cake: Roll out the white fondant on a surface dusted with powdered sugar, or use additional frosting to create mummy bandages. Cut into strips and wrap the cake, leaving gaps for the mummy’s eyes. Add candy eyes or chocolate chips to give your mummy a face.
Extra Tips
For best results, verify your cake is completely cool before applying the frosting or fondant to prevent melting. If you’re using fondant and it becomes too sticky, lightly dust your hands and work surface with powdered sugar.
To create the most realistic mummy bandages, vary the width of the fondant strips and layer them in a crisscross pattern. If you don’t have fondant, you can pipe strips of frosting using a flat tip to achieve a similar effect.
Finally, have fun with the decorating process—add personality to your mummy with different eye expressions or additional Halloween-themed candy decorations.
Vampire Bat Cake
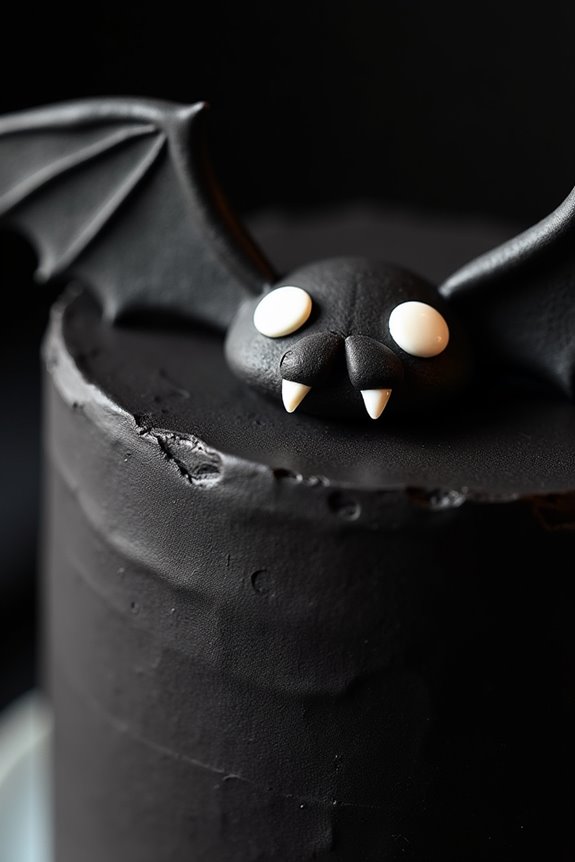
Get ready to delight your Halloween party guests with a spooky and delicious Vampire Bat Cake that’s sure to be the highlight of your dessert table. This eerie cake combines rich chocolate layers with a creamy frosting, all decorated to resemble a vampire bat with haunting features. Perfect for a serving size of 4-6 people, it’s both a visual treat and a tasty indulgence that adds a thematic touch to your Halloween spread.
The cake is made using a simple chocolate cake base, but the magic truly happens with the decorating process. Once the cake is baked and cooled, it’s covered in a smooth layer of chocolate frosting and adorned with creatively shaped fondant pieces to create the bat’s wings and facial features. With a little bit of creativity and some basic decorating skills, you’ll have an impressive centerpiece for your Halloween festivities.
Ingredients:
- 1 ¾ cups all-purpose flour
- ¾ cup cocoa powder
- 2 cups granulated sugar
- 1 ½ teaspoons baking powder
- 1 ½ teaspoons baking soda
- 1 teaspoon salt
- 2 large eggs
- 1 cup whole milk
- ½ cup vegetable oil
- 2 teaspoons vanilla extract
- 1 cup boiling water
- 1 cup unsalted butter, softened
- 3 ½ cups powdered sugar
- ½ cup heavy cream
- Black food coloring gel
- Red food coloring gel
- Pre-made black fondant
- Pre-made white fondant
Cooking Instructions:
- Prepare the Cake Batter: Preheat your oven to 350°F (175°C). Grease and flour two 9-inch round cake pans. In a large bowl, whisk together the flour, cocoa powder, sugar, baking powder, baking soda, and salt. Add the eggs, milk, vegetable oil, and vanilla extract, and beat until well combined. Carefully stir in the boiling water until the batter is smooth and thin.
- Bake the Cakes: Divide the batter evenly between the prepared pans. Bake in the preheated oven for 30-35 minutes, or until a toothpick inserted into the center comes out clean. Allow the cakes to cool in the pans for 10 minutes before transferring them to a wire rack to cool completely.
- Make the Frosting: In a large bowl, beat the butter until creamy. Gradually add the powdered sugar and heavy cream, beating until smooth and fluffy. Mix in a few drops of black food coloring gel to achieve the desired shade of black for your bat.
- Assemble the Cake: Once the cakes are completely cooled, place one cake layer on a serving platter. Spread a layer of frosting on top, then place the second cake layer over it. Cover the entire cake with the remaining black frosting, smoothing it out evenly.
- Decorate the Cake: Roll out the black fondant and cut out two bat wing shapes. Attach these to the sides of the cake. Use the white fondant to create fangs and eyes, and use the red food coloring gel to draw small lines on the fangs to mimic blood. Position these features on the front of the cake to complete the bat face.
Extra Tips: When working with fondant, it’s helpful to keep your hands and work surface lightly dusted with powdered sugar to prevent sticking. If you’d like to create a more textured look on the bat’s wings, use a toothpick or a small knife to etch details into the fondant before attaching it to the cake. For an added spooky effect, consider placing the cake on a dark cake board and surrounding it with Halloween-themed decorations like plastic spiders or candy eyes.
Haunted House Bundt Cake
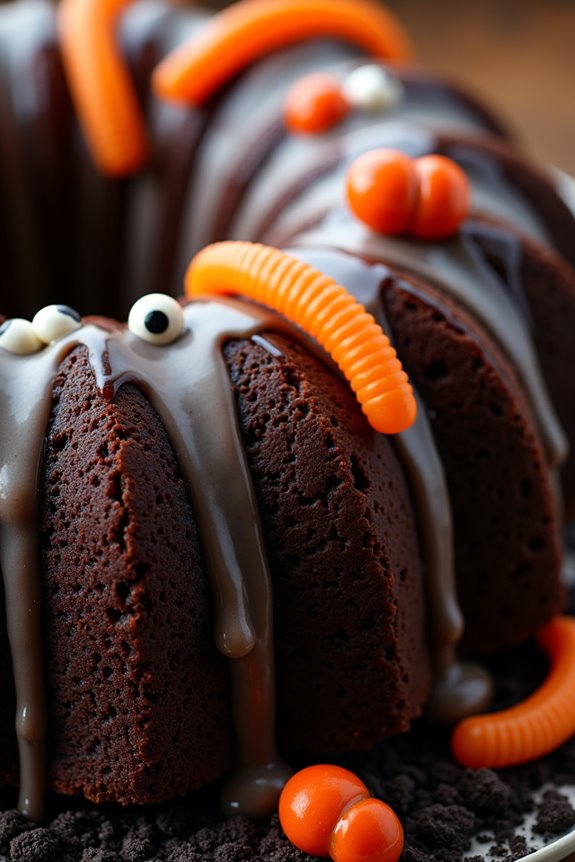
Transform your Halloween party into a spooky showcase with this ghostly Haunted House Bundt Cake. This cake isn’t only delicious but also serves as a centerpiece that will intrigue and delight your guests. With its rich chocolate flavor and eerie decorations, this cake brings the perfect amount of fright and fun to your Halloween festivities.
The intricate details of the bundt pan create a haunted house shape, making it a treat for both the eyes and the taste buds. The preparation of this cake is straightforward, yet it allows for creativity in its decoration. This recipe serves 4-6 people, making it ideal for a small gathering or a family treat.
By using a pre-designed haunted house bundt pan, you can achieve professional-looking results with minimal effort. The dark chocolate cake is complemented with a sweet vanilla glaze, and you can add additional decorations like candy ghosts, edible bats, or sprinkling some crushed Oreo cookies for a graveyard effect.
Ingredients:
- 2 cups all-purpose flour
- 1 cup unsweetened cocoa powder
- 1 1/2 teaspoons baking soda
- 1/2 teaspoon baking powder
- 1/2 teaspoon salt
- 1 3/4 cups granulated sugar
- 3 large eggs
- 1 cup buttermilk
- 1/2 cup vegetable oil
- 2 teaspoons vanilla extract
- 1 cup boiling water
- 1 cup powdered sugar
- 2 tablespoons milk
- Halloween-themed candies for decoration
Instructions:
- Preheat and Prepare Pan: Preheat your oven to 350°F (175°C). Thoroughly grease your haunted house bundt pan with butter or non-stick spray, making sure to get into all the nooks and crannies. Dust lightly with flour to prevent sticking.
- Mix Dry Ingredients: In a large bowl, sift together the flour, cocoa powder, baking soda, baking powder, and salt. Set aside.
- Combine Wet Ingredients: In another large bowl, beat the sugar and eggs together until light and fluffy. Add in the buttermilk, vegetable oil, and vanilla extract, mixing until well combined.
- Form the Batter: Gradually add the dry ingredients to the wet mixture, mixing until just combined. Slowly pour in the boiling water, and mix until the batter is smooth and well incorporated.
- Bake the Cake: Pour the batter into the prepared bundt pan, smoothing the top with a spatula. Bake in the preheated oven for 45-50 minutes, or until a toothpick inserted into the center comes out clean.
- Cool and Remove: Allow the cake to cool in the pan for 15 minutes. Carefully invert the pan onto a wire rack to release the cake, and let it cool completely.
- Prepare the Glaze: In a small bowl, whisk together the powdered sugar and milk until smooth to make the glaze. Drizzle over the cooled cake, allowing it to drip down the sides.
- Decorate: Once the glaze has set, decorate your cake with Halloween-themed candies. You can use candy eyes, gummy worms, or mini marshmallows to add spooky details.
Extra Tips: When greasing the bundt pan, be meticulous, as the intricate design can cause parts of the cake to stick. If your cake has any imperfections after removal, use the glaze and decorations to creatively cover them up.
The cake can be made a day in advance and stored in an airtight container, which allows the flavors to develop further. Feel free to experiment with different types of candy decorations to customize the haunted house cake to your liking.
Frankenstein’s Monster Cake
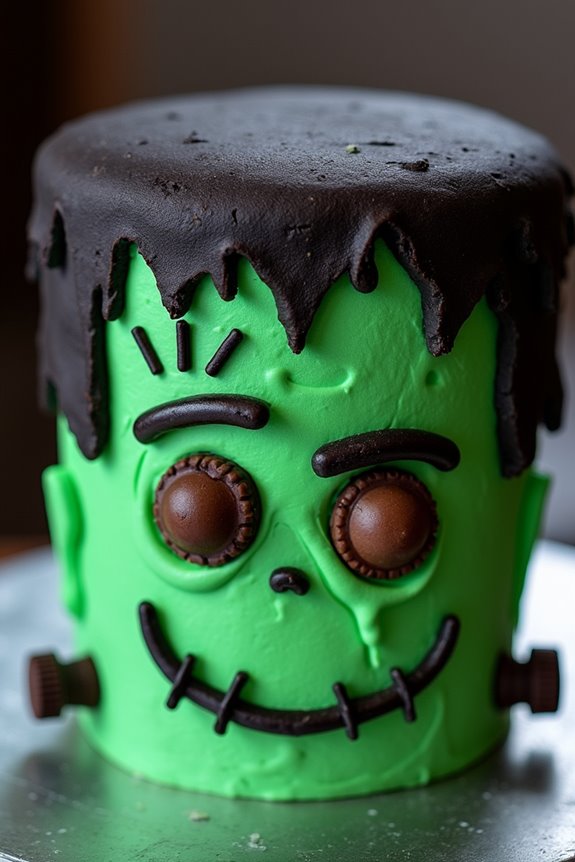
Frankenstein’s Monster Cake is a delightfully ghoulish treat that’s perfect for any Halloween celebration. This cake not only captures the iconic look of Frankenstein’s monster with its green, stitched-up appearance but also delivers a deliciously rich and moist flavor that will satisfy any sweet tooth.
Whether you’re hosting a spooky party or simply want a fun baking project, this cake is sure to impress your guests with both its appearance and taste.
The cake features layers of devil’s food cake, covered with vibrant green frosting to mimic the monster’s skin. Decorated with black licorice and chocolate wafers as bolts and stitches, the Frankenstein’s Monster Cake is as much a treat for the eyes as it’s for the palate.
This recipe serves 4-6 people, making it ideal for a small gathering or as a centerpiece for a Halloween-themed dessert table.
Ingredients (serving size: 4-6 people):
- 2 cups all-purpose flour
- 1 ¾ cups granulated sugar
- ¾ cup unsweetened cocoa powder
- 1 ½ teaspoons baking powder
- 1 ½ teaspoons baking soda
- 1 teaspoon salt
- 2 large eggs
- 1 cup whole milk
- ½ cup vegetable oil
- 2 teaspoons vanilla extract
- 1 cup boiling water
- 2 cups green buttercream frosting
- Black food coloring
- Black licorice strings
- Chocolate wafer cookies
Cooking Instructions:
- Prepare the Cake Batter: Preheat your oven to 350°F (175°C). Grease and flour two 9-inch round cake pans. In a large mixing bowl, combine the flour, sugar, cocoa powder, baking powder, baking soda, and salt. Whisk until well combined.
- Mix Wet Ingredients: In a separate bowl, beat the eggs, milk, vegetable oil, and vanilla extract until smooth. Gradually add the wet ingredients to the dry ingredients, mixing until the batter is well combined and smooth.
- Incorporate Boiling Water: Carefully stir in the boiling water. The batter will be thin, but this step is essential for a moist cake. Mix until uniform, and pour the batter evenly into the prepared cake pans.
- Bake the Cakes: Place the cake pans in the preheated oven and bake for 30-35 minutes, or until a toothpick inserted in the center comes out clean. Remove from the oven and let the cakes cool in the pans for 10 minutes before transferring them to a wire rack to cool completely.
- Prepare the Frosting: While the cakes are cooling, prepare the green buttercream frosting. If not already green, add a few drops of green food coloring to the frosting and mix until the desired shade is achieved.
- Assemble and Decorate: Once the cakes are completely cool, place one cake layer on a serving plate. Spread a layer of green frosting on top before placing the second cake layer on top. Frost the top and sides of the entire cake with the green frosting.
- Add Details: Use black food coloring to tint a small amount of the frosting for the hair. Pipe or spread the black frosting on the top of the cake to create a hairline. Cut black licorice into various lengths for stitches and press them onto the sides of the cake. Use chocolate wafer cookies to represent bolts by sticking them into the sides of the cake near the bottom.
Extra Tips: To guarantee an even and smooth frosting application, make sure your cakes are completely cool before you start frosting. If the cakes are too warm, the frosting may melt and slide off.
For a more dramatic effect, you can use candy eyes or fondant cutouts for additional facial features. Feel free to get creative with the decorations—this is a fun opportunity to let your artistic side shine!
Black Cat Silhouette Cake
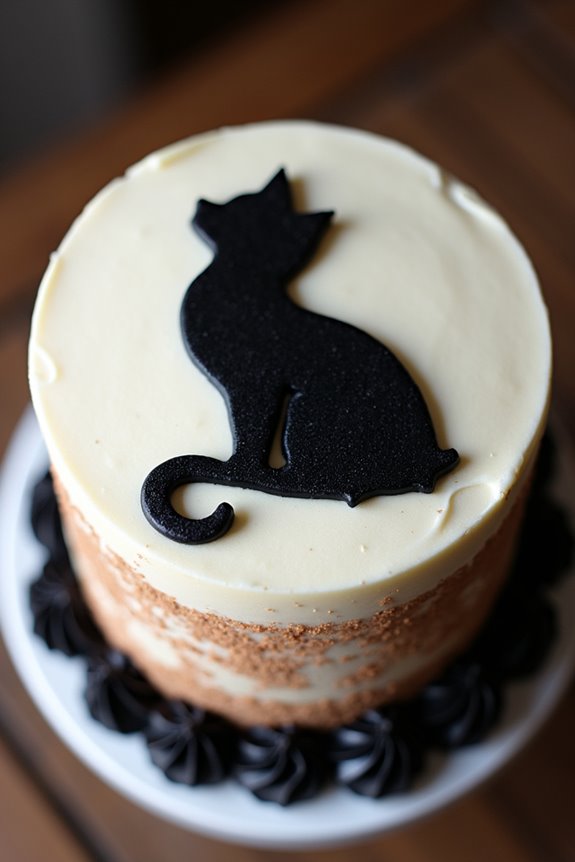
Celebrate Halloween with a stunning Black Cat Silhouette Cake that’s sure to be the highlight of your spooky gathering. This cake isn’t only visually striking but also deliciously moist and rich, making it a favorite among both kids and adults.
The cake is decorated with a simple yet elegant black cat silhouette, created using a stencil and cocoa powder, set against a backdrop of white frosting. It’s perfect for those who want to add a touch of sophistication to their Halloween dessert table.
This recipe makes a cake that serves 4-6 people, ensuring everyone at your party gets a slice of the Halloween magic. The base of the cake is a classic chocolate cake, layered with a smooth vanilla buttercream frosting. The contrast between the dark cocoa and the white frosting highlights the cat silhouette, making it stand out perfectly.
Whether you’re hosting a Halloween party or simply want to surprise your family with a themed treat, this Black Cat Silhouette Cake is the way to go.
Ingredients:
- 1 1/2 cups all-purpose flour
- 1 cup granulated sugar
- 1/2 cup unsweetened cocoa powder
- 1 teaspoon baking powder
- 1/2 teaspoon baking soda
- 1/2 teaspoon salt
- 1/2 cup unsalted butter, melted
- 2 large eggs
- 1 teaspoon vanilla extract
- 3/4 cup milk
- 1 cup heavy cream
- 1/2 cup confectioners’ sugar
- Black food coloring
- Cocoa powder for dusting
Instructions:
- Preheat the Oven: Begin by preheating your oven to 350°F (175°C). Grease and flour a round 9-inch cake pan to prevent the cake from sticking.
- Mix Dry Ingredients: In a large mixing bowl, combine the flour, granulated sugar, cocoa powder, baking powder, baking soda, and salt. Whisk them together until evenly distributed.
- Prepare Wet Ingredients: In another bowl, whisk together the melted butter, eggs, and vanilla extract. Gradually add the wet ingredients into the dry mixture, alternating with the milk, and mix until just combined.
- Bake the Cake: Pour the batter into the prepared cake pan and smooth out the top with a spatula. Bake in the oven for 25-30 minutes, or until a toothpick inserted into the center comes out clean. Let the cake cool completely on a wire rack.
- Prepare the Frosting: In a medium bowl, whip the heavy cream and confectioners’ sugar together until stiff peaks form. Mix in a few drops of black food coloring to achieve your desired shade of black for the cat silhouette.
- Frost the Cake: Once the cake is cool, apply a thin layer of the vanilla buttercream over the entire cake for a smooth base. Save some of the black-tinted whipped cream for the silhouette.
- Create the Silhouette: Using a cat silhouette stencil, place it gently on top of the cake. Dust cocoa powder over the stencil to form the cat silhouette. Carefully lift the stencil to reveal the design.
- Finishing Touches: Use the remaining black whipped cream to pipe a border around the base of the cake or to add any additional decorations as desired.
Extra Tips:
For best results, make sure that your cake is completely cool before applying the frosting to prevent it from melting. If you don’t have a cat silhouette stencil, you can easily make one by printing a silhouette design on paper and cutting it out.
For an extra touch of Halloween flair, consider adding edible glitter or small candy decorations around the silhouette. This cake can also be made a day in advance; simply store it in the refrigerator and bring it to room temperature before serving.
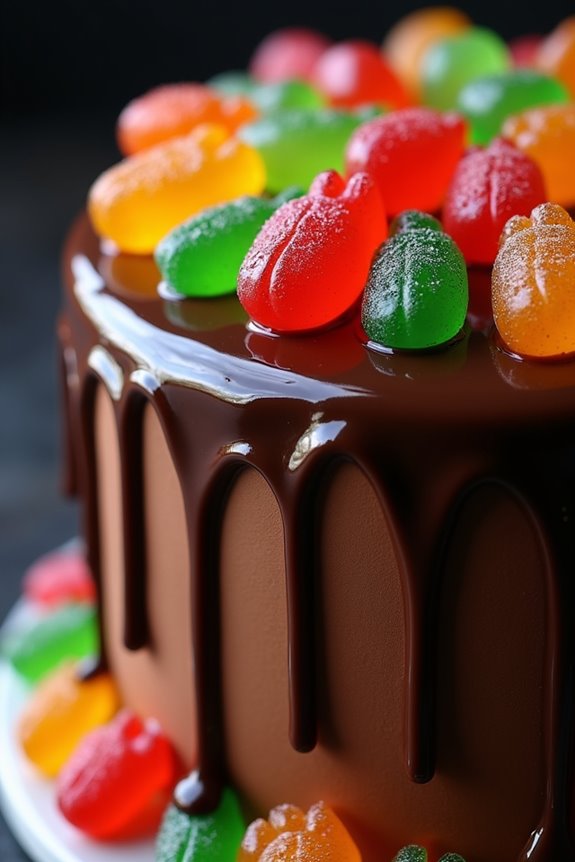
Poison Apple Cake
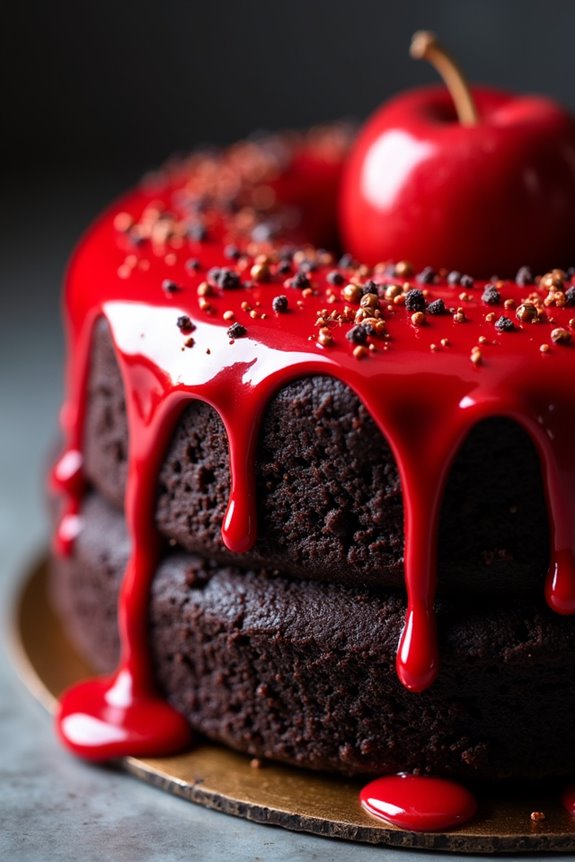
The Poison Apple Cake is a tantalizing dessert perfect for Halloween festivities. This enchanting cake is inspired by the classic fairy tale apple—a symbol of forbidden temptation. With its rich chocolate cake base, vibrant red apple glaze, and a touch of sinister charm, the Poison Apple Cake is sure to captivate both the eyes and taste buds of your guests.
Perfectly themed for the spookiest night of the year, this cake not only looks the part but also delivers a decadent flavor that will leave everyone enchanted.
Crafted to serve 4-6 people, this cake combines layers of moist chocolate cake with a luscious apple-flavored glaze that mirrors the look of a shiny, poisonous apple. The deep red glaze, achieved through a combination of apple-flavored syrup and red food coloring, contrasts beautifully with the dark chocolate.
The result is a visually striking dessert that embodies the essence of Halloween magic. Whether you’re hosting a Halloween party or simply want to surprise your family with a themed dessert, this Poison Apple Cake is the perfect choice.
Ingredients:
- 1 1/2 cups all-purpose flour
- 1 cup granulated sugar
- 1/2 cup unsweetened cocoa powder
- 1 teaspoon baking powder
- 1/2 teaspoon baking soda
- 1/2 teaspoon salt
- 2 large eggs
- 1/2 cup buttermilk
- 1/2 cup vegetable oil
- 1 teaspoon vanilla extract
- 1/2 cup boiling water
- 1/2 cup apple-flavored syrup
- Red food coloring
- 1 tablespoon cornstarch
- 1/4 cup water
- Edible glitter or sprinkles (optional for decoration)
Cooking Instructions:
- Prepare the Cake Batter: Preheat your oven to 350°F (175°C) and grease a 9-inch round cake pan. In a large mixing bowl, sift together the flour, sugar, cocoa powder, baking powder, baking soda, and salt.
- In a separate bowl, whisk together the eggs, buttermilk, vegetable oil, and vanilla extract until well combined.
- Combine Wet and Dry Ingredients: Gradually add the wet ingredients to the dry ingredients, mixing until just combined. Pour in the boiling water and stir until the batter is smooth and well blended. The batter will be thin, but this is normal.
- Bake the Cake: Pour the cake batter into the prepared cake pan. Bake in the preheated oven for 30-35 minutes, or until a toothpick inserted into the center comes out clean. Allow the cake to cool in the pan for 10 minutes, then transfer to a wire rack to cool completely.
- Make the Apple Glaze: In a small saucepan, combine the apple-flavored syrup and a few drops of red food coloring. In a separate bowl, mix the cornstarch with 1/4 cup water to create a slurry.
- Add the slurry to the saucepan and cook over medium heat, stirring constantly, until the mixture thickens and becomes glossy. Remove from heat and let it cool slightly.
- Assemble the Cake: Once the cake is cooled, pour the apple glaze over the top, allowing it to drip down the sides for a dramatic effect. Use a spatula to spread the glaze if necessary for even coverage.
- If desired, sprinkle with edible glitter or sprinkles for added sparkle.
Extra Tips:
To enhance the apple flavor, consider adding a teaspoon of apple extract to the cake batter. When making the glaze, adjust the amount of red food coloring to achieve the desired shade, but be cautious not to use too much as it can alter the taste.
If the glaze becomes too thick while cooling, gently reheat it on the stove, adding a little water to reach the desired consistency. For a more whimsical presentation, serve the cake with apple slices or candied apple decorations to enhance the theme.
Skeleton Bones Cake
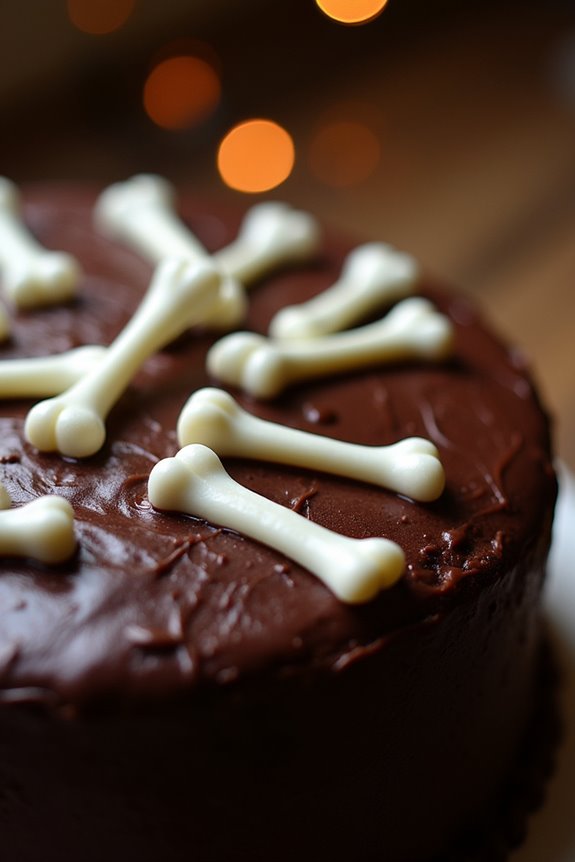
The Skeleton Bones Cake is a spooky and delightful treat perfect for any Halloween gathering. This cake combines rich, decadent chocolate with a playful and eerie design that mimics the skeletal remains of a long-lost creature. The cake itself is moist and chocolatey, while the frosting and decorations add an extra layer of fun and creativity.
Whether you’re hosting a Halloween party or just want to surprise your family with a ghoulish dessert, this cake is sure to be a hit.
Creating a Skeleton Bones Cake involves baking a classic chocolate cake, then decorating it with white chocolate or fondant to resemble bones. The cake can be as simple or elaborate as you like, depending on your artistic skills and creativity. The key is to have fun with the design and let your imagination run wild.
Here’s how you can make this creepy confection for 4-6 people.
Ingredients:
- 1 cup all-purpose flour
- 1 cup granulated sugar
- 1/3 cup unsweetened cocoa powder
- 1 teaspoon baking powder
- 1/2 teaspoon baking soda
- 1/4 teaspoon salt
- 1/2 cup buttermilk
- 1/4 cup vegetable oil
- 1 large egg
- 1 teaspoon vanilla extract
- 1/2 cup boiling water
- 1 cup white chocolate chips or fondant for bones
- Black food coloring gel (optional)
Instructions:
- Prepare the Cake Batter: Preheat your oven to 350°F (175°C). Grease and flour an 8-inch round cake pan. In a large bowl, whisk together the flour, sugar, cocoa powder, baking powder, baking soda, and salt. In another bowl, combine the buttermilk, vegetable oil, egg, and vanilla extract. Gradually add the wet ingredients to the dry ingredients and mix until well combined. Carefully stir in the boiling water until the batter is smooth.
- Bake the Cake: Pour the batter into the prepared cake pan and bake for 25-30 minutes, or until a toothpick inserted into the center comes out clean. Once baked, let the cake cool in the pan for 10 minutes, then transfer it to a wire rack to cool completely.
- Create the Bones: While the cake is cooling, melt the white chocolate chips in a microwave-safe bowl in 30-second intervals, stirring in between, until smooth. Alternatively, roll out the fondant to about 1/4 inch thickness. Use a bone-shaped cookie cutter or a knife to cut out bone shapes from the fondant, or pipe bones using the melted white chocolate onto a piece of parchment paper. Allow them to set.
- Assemble the Cake: If desired, tint some of the white chocolate or fondant with black food coloring to add shadows or details to the bones. Once the cake has cooled, place it on a serving platter. Arrange the bones on top of the cake in a skeleton pattern or scatter them randomly for a spooky effect.
- Serve and Enjoy: Slice the cake and serve to your guests, making sure to point out the creative skeleton design. Enjoy the moist chocolate cake with the sweet crunch of white chocolate bones.
Extra Tips: For a more dramatic effect, consider dying the cake batter with black food coloring to create a darker, more mysterious look. If you’re using fondant for the bones, you can also use edible markers to add details like cracks or shading.
If you’re short on time, you can use a store-bought chocolate cake mix as a base and focus your efforts on the decoration. Remember, the goal is to have fun and embrace the Halloween spirit!