

When planning a Halloween bash, finger foods are essential for keeping the energy high and the theme intact. I always aim for treats that are both delicious and visually enchanting. Picture Monster Eye Deviled Eggs staring up at you or Mummy Jalapeño Poppers that seem to be wrapped in a cryptic embrace. These are just the start of a spooky culinary journey that’ll thrill your guests and ignite their imaginations. Eager to discover more?
Monster Eye Deviled Eggs
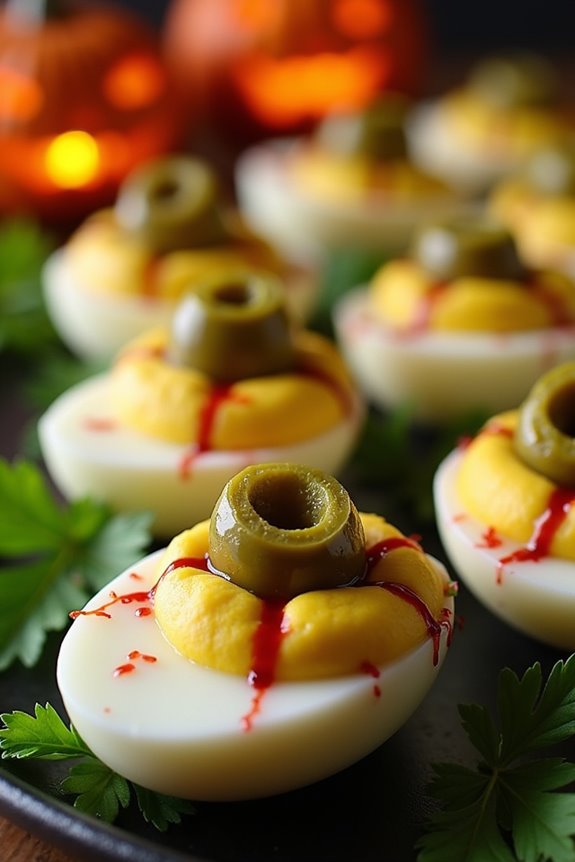
Monster Eye Deviled Eggs are a spooky and delicious addition to any Halloween party. These eerie appetizers aren’t only visually engaging but also packed with flavor. The deviled eggs are given a monstrous twist with the addition of edible “eyeballs,” making them the perfect finger food to delight and entertain your guests.
Whether you’re hosting a haunted house or a casual get-together, these deviled eggs will surely be a hit.
The creamy yolk filling of these deviled eggs is seasoned with classic ingredients like mayonnaise and mustard, while the addition of a few unique touches gives them an extra kick. To create the monstrous appearance, sliced olives serve as the pupils, and a touch of red food coloring mimics bloodshot eyes.
These Monster Eye Deviled Eggs are easy to prepare, allowing you to spend more time enjoying the festivities with your guests.
Ingredients (Serves 4-6):
- 6 large eggs
- 3 tablespoons mayonnaise
- 1 teaspoon Dijon mustard
- 1/4 teaspoon salt
- 1/8 teaspoon black pepper
- 1/4 teaspoon smoked paprika
- 12 small pimento-stuffed green olives
- Red food coloring
- Fresh parsley leaves (for garnish)
Instructions:
- Boil the Eggs: Place the eggs in a medium saucepan and cover them with cold water. Bring the water to a boil over medium-high heat. Once boiling, reduce the heat to low and let the eggs simmer for 10 minutes.
- Cool and Peel the Eggs: After boiling, immediately transfer the eggs to a bowl of ice water. Let them cool for about 5 minutes. Carefully peel the eggs under running water to help remove the shells easily.
- Prepare the Filling: Slice each egg in half lengthwise and carefully remove the yolks, placing them in a separate bowl. Mash the yolks with a fork until smooth. Add mayonnaise, Dijon mustard, salt, black pepper, and smoked paprika to the yolks and mix until well combined.
- Assemble the Eyes: Spoon or pipe the yolk mixture back into the egg whites, filling the cavities evenly. Slice the olives in half horizontally, and place one half onto the yolk mixture of each egg, with the pimento facing up to resemble an iris and pupil.
- Add the Bloodshot Effect: Using a toothpick, apply a small amount of red food coloring to the yolk mixture around the olives, creating lines that resemble bloodshot eyes.
- Garnish and Serve: Arrange the Monster Eye Deviled Eggs on a platter. Garnish with fresh parsley leaves for a touch of color and serve immediately or refrigerate until ready to serve.
Extra Tips:
When making Monster Eye Deviled Eggs, verify the eggs are cooked just right to avoid overcooked yolks, which can turn greenish.
For the smoothest filling, use a piping bag or a plastic bag with the tip cut off to fill the egg whites. If you’re short on time, prepare the eggs a day in advance and assemble them just before the party.
Finally, be creative with the garnishes—you can use different types of olives or even small pieces of roasted red pepper for variety.
Mummy Jalapeño Poppers

Mummy Jalapeño Poppers are a spooky and delicious addition to any Halloween party spread. These creepy little appetizers are as fun to make as they’re to eat, offering a delightful combination of spicy, creamy, and crispy textures. Wrapped in strips of crescent dough to resemble mummies, these jalapeño poppers are filled with a creamy cheese mixture that balances the heat of the peppers. Perfect for serving a crowd, they’re guaranteed to be a hit with both kids and adults.
These poppers not only look the part for a Halloween celebration but also deliver on taste. The richness of the cream cheese pairs excellently with the sharpness of cheddar and the zing of the jalapeños, while the crescent dough provides a satisfying crunch. Whether you’re hosting a Halloween bash or just looking for a festive appetizer to enjoy with friends and family, these Mummy Jalapeño Poppers are a must-try.
Ingredients (Serving Size: 4-6 people):
- 12 fresh jalapeño peppers
- 8 oz cream cheese, softened
- 1 cup shredded cheddar cheese
- 1/2 teaspoon garlic powder
- 1/2 teaspoon onion powder
- 1/4 teaspoon salt
- 1 can (8 oz) refrigerated crescent roll dough
- 1 egg, beaten
- Candy eyeballs or sliced black olives for decoration
Cooking Instructions:
- Preheat the Oven: Start by preheating your oven to 400°F (200°C) to make sure it’s hot enough to bake the poppers evenly.
- Prepare the Jalapeños: Wearing gloves, slice the jalapeños in half lengthwise and carefully remove the seeds and membranes using a small spoon. This helps to reduce the heat of the peppers while maintaining their shape.
- Make the Filling: In a medium-sized bowl, mix the softened cream cheese, shredded cheddar cheese, garlic powder, onion powder, and salt until well combined.
- Fill the Jalapeños: Spoon the cheese mixture into each jalapeño half, filling them generously. Be sure to smooth the top for even wrapping with the dough.
- Wrap with Dough: Open the can of crescent roll dough and unroll it onto a floured surface. Cut the dough into thin strips (about 1/4 inch wide). Wrap each filled jalapeño half with the dough strips, leaving small gaps to give a mummy effect.
- Add the Eyes: Place two candy eyeballs or small pieces of black olives near the top of each wrapped jalapeño to create the eyes.
- Brush with Egg Wash: Place the wrapped jalapeños on a baking sheet lined with parchment paper. Brush each with the beaten egg to give them a golden finish when baked.
- Bake: Transfer the baking sheet to the preheated oven and bake for 15-20 minutes, or until the dough is golden brown and crispy.
- Cool and Serve: Allow the poppers to cool slightly before serving so the cheese filling isn’t too hot. Enjoy these mummified treats warm!
Extra Tips:
When preparing the jalapeños, wearing gloves is essential to avoid transferring any irritation-causing oils to your skin or eyes. If you prefer a milder flavor, you can blanch the jalapeño halves in boiling water for a minute before filling them.
Be creative with the mummy wrapping—it’s okay if they don’t look perfect, as it’s all part of the Halloween fun. Additionally, if you can’t find candy eyeballs, small pieces of black olives make a great alternative. Enjoy your spooky culinary creation!
Witch’s Fingers Breadsticks

Witch’s Fingers Breadsticks are a spooky addition to any Halloween party, designed to look eerily like a witch’s bony fingers. These breadsticks aren’t only creepy but also delicious, providing a savory treat that pairs well with a variety of dips. The breadsticks are crafted with a simple dough that’s shaped and decorated to resemble fingers, complete with almond “fingernails” for an added realistic touch. Perfect for both adults and kids, these breadsticks are sure to be a hit at your next Halloween gathering.
Making Witch’s Fingers Breadsticks is an enjoyable culinary activity that can involve the whole family. The process begins with preparing the dough, which is then shaped into long, thin sticks to mimic fingers. The addition of slivered almonds adds a realistic nail effect, while a touch of paprika or food coloring gel can give the “fingers” a more ghoulish appearance.
Whether you’re hosting a large Halloween bash or a small get-together, these breadsticks are a fantastic way to add some frightful flair to your finger food spread.
Ingredients (serving size: 4-6 people)
- 2 cups all-purpose flour
- 1 packet (2 1/4 tsp) active dry yeast
- 1 teaspoon sugar
- 3/4 cup warm water (about 110°F)
- 1 tablespoon olive oil
- 1 teaspoon salt
- 20-24 whole blanched almonds
- 1 egg (beaten, for egg wash)
- Paprika or red food coloring gel (optional)
Instructions
- Prepare the Dough: In a large mixing bowl, combine the warm water, sugar, and yeast. Let the mixture sit for about 5-10 minutes until it becomes frothy, indicating that the yeast is activated.
- Mix the Ingredients: Add the flour, olive oil, and salt to the yeast mixture. Stir until the dough begins to come together. Transfer the dough to a lightly floured surface and knead for about 5-7 minutes until it becomes smooth and elastic.
- Let the Dough Rise: Place the dough in a lightly oiled bowl, cover it with a damp cloth, and let it rise in a warm area for about 1 hour or until it doubles in size.
- Shape the Fingers: Preheat your oven to 375°F (190°C). Punch down the risen dough and divide it into 20-24 equal pieces. Roll each piece into a thin stick about 4-5 inches long to resemble a finger.
- Add the Nails: Press a whole almond into the tip of each breadstick to serve as the “fingernail”. Use a knife to make small, shallow cuts along the breadstick to mimic knuckle lines.
- Apply the Egg Wash: Place the breadsticks on a baking sheet lined with parchment paper. Brush each breadstick with the beaten egg to give them a golden finish once baked.
- Add Optional Effects: If desired, sprinkle a little paprika or use a brush to apply streaks of red food coloring gel for a bloodied effect.
- Bake: Bake the breadsticks in the preheated oven for about 15-20 minutes or until they’re golden brown and firm to the touch.
Extra Tips
To guarantee the Witch’s Fingers have a crisp exterior, make sure the dough sticks are thin enough before baking. The almonds should be pressed firmly so they stay in place during baking, but be cautious not to tear the dough.
For a more intense flavor, consider adding garlic powder or Italian herbs to the dough. These breadsticks can be served warm or at room temperature and pair well with marinara or cheese dip for added flavor. Store any leftovers in an airtight container to keep them fresh.
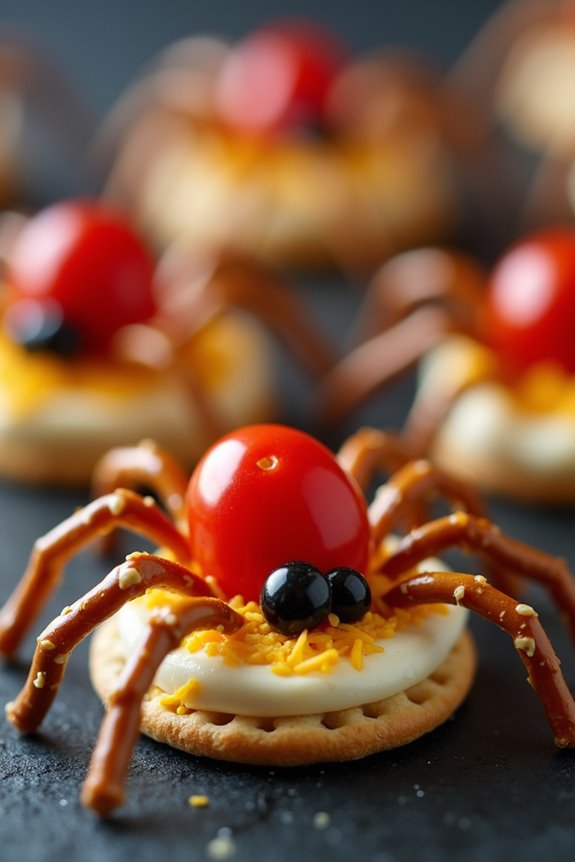
Creepy Cheese Spiders
Seeking to add a touch of creepy-crawly fun to your Halloween party snacks? Search no further than these delicious and spooky Creepy Cheese Spiders. They aren’t only a visual treat but also a delightful savory bite that will have your guests both thrilled and satisfied.
These cheesy critters are easy to assemble and can be prepared ahead of time, giving you more time to enjoy the festivities. Creepy Cheese Spiders are a fantastic choice for a Halloween party because they incorporate simple ingredients that are transformed into a spooky display.
The combination of cheese, crackers, and a few crafty additions make these spiders both tasty and eye-catching. They’re perfect for a serving size of 4-6 people, guaranteeing that everyone at your gathering will have the chance to enjoy these eerie treats.
Ingredients for Creepy Cheese Spiders (serving size: 4-6 people):
- 12 round crackers (such as Ritz)
- 1 cup of cream cheese
- 1/2 cup of shredded cheddar cheese
- 24 pretzel sticks
- 24 black olive slices
- 12 small cherry tomatoes
- 24 candy eyes (available in baking supply stores)
Cooking Instructions:
- Prepare the Cheese Mixture: In a bowl, combine the cream cheese and shredded cheddar cheese. Mix well until fully blended. This cheesy spread will serve as the body of your spiders.
- Assemble the Spider Bodies: Take one round cracker and spread a generous amount of the cheese mixture on top. Place another cracker on top to create a sandwich-like structure. Repeat this process until all crackers are paired.
- Create Spider Legs: Break the pretzel sticks in half. Insert four pretzel halves into each side of the cheese-filled cracker sandwich to form the spider’s legs. Confirm they’re evenly distributed.
- Add the Spider Eyes: Place two black olive slices on the top of each cracker sandwich to serve as the base for the eyes. Then, use a small dab of the cheese mixture to stick candy eyes onto the olives.
- Finish with a Head: Cut each cherry tomato in half, and place one half at the front of each spider to represent its head.
- Chill Before Serving: Place all the assembled Creepy Cheese Spiders on a tray and refrigerate for at least 30 minutes before serving. This allows the cheese to firm up, holding everything together better.
Extra Tips:
For an extra touch of realism, you can use a toothpick to create small indentations on the cheese to mimic a spider’s texture.
If you prefer a different flavor profile, you can substitute the cream cheese with a flavored cream cheese spread or even a spicy cheese blend for an added kick.
Make sure to handle the candy eyes gently, as they can be delicate. With these tips, your Creepy Cheese Spiders will be both a visual and culinary hit at your Halloween gathering!
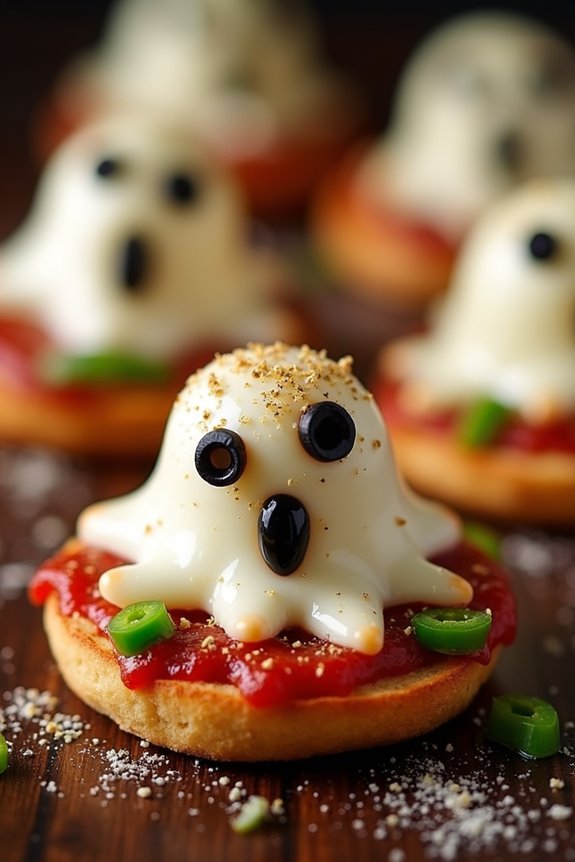
Ghostly Mini Pizzas
Add a spooky touch to your Halloween party with Ghostly Mini Pizzas. These fun and delicious appetizers are perfect for both kids and adults, offering a creative way to enjoy the classic flavors of pizza with a haunting twist.
Easy to prepare and a hit at any party, these mini pizzas come to life with ghost-shaped mozzarella cheese that melts into a spooky specter right on top of each bite-sized pizza. Whether you’re hosting a Halloween feast or simply want to add some frightful fun to your snack table, these mini pizzas are certain to delight.
Ghostly Mini Pizzas aren’t only appealing visually, but they also offer the perfect balance of flavors with a crispy crust, savory tomato sauce, and creamy melted cheese. The ghost shapes add an element of surprise and fun, making them an interactive and engaging treat for party-goers of all ages.
Prepare them ahead of time or bake them fresh during the party to fill your home with the irresistible aroma of fresh pizza. Here’s how you can create these eerie yet delicious treats for 4-6 people.
Ingredients:
- 6 English muffins, split in half
- 1 cup pizza sauce
- 12 slices of mozzarella cheese
- 1/4 cup black olives, sliced
- 1/4 cup green bell pepper, diced
- 1/4 cup pepperoni slices
- 1 tablespoon olive oil
- 1 teaspoon dried oregano
- 1 teaspoon garlic powder
Cooking Instructions:
- Preheat the Oven: Begin by preheating your oven to 375°F (190°C). This guarantees that the mini pizzas will cook evenly and develop a nice crisp.
- Prepare the English Muffins: Arrange the split English muffins on a baking sheet. Brush each half lightly with olive oil to help them toast up nicely in the oven.
- Spread the Sauce: Spoon about 1 tablespoon of pizza sauce onto each muffin half. Use the back of the spoon to spread the sauce evenly to the edges.
- Cut Ghost Shapes: Use a ghost-shaped cookie cutter to cut each slice of mozzarella cheese into a ghost shape. Place one ghost-shaped cheese slice on each muffin half.
- Add Toppings: Decorate your ghostly pizzas with black olive slices for eyes, and use small pieces of green bell pepper or pepperoni for additional facial features or spooky adornments.
- Season and Bake: Sprinkle a pinch of dried oregano and garlic powder over each mini pizza. Place the baking sheet in the preheated oven and bake for 10-12 minutes, or until the cheese is melted and bubbly and the edges of the muffins are golden brown.
- Serve: Remove the mini pizzas from the oven and let them cool slightly. Serve warm and enjoy your spooky creations!
Extra Tips:
For an extra crispy crust, you can lightly toast the English muffins in the oven for about 3 minutes before adding the toppings.
If you can’t find a ghost-shaped cookie cutter, don’t worry! You can use a knife to cut the cheese into ghost shapes by hand.
Feel free to get creative with toppings and adapt the recipe to include your favorite pizza ingredients. Keeping an eye on the baking time is important, as the cheese melts quickly and can brown faster than expected, so adjust accordingly based on your oven’s performance.
Bloody Mary Skewers

Bloody Mary Skewers are the perfect spooky treat for a Halloween party. These skewers capture the essence of a classic Bloody Mary cocktail, but in a fun, finger-food form. The combination of savory, spicy, and tangy flavors makes them a crowd-pleaser, while the presentation can be easily enhanced with some Halloween-themed decorations.
This recipe is simple to assemble and can be prepared ahead of time, allowing you to spend more time enjoying the party with your guests. Each skewer is like a miniature salad on a stick, packed with vibrant vegetables and a punch of flavor from the spices and dressing. The skewers can be tailored to your guests’ preferences, allowing for a variety of ingredients to be used.
This recipe serves 4-6 people, making it an ideal choice for small gatherings or as part of a larger spread of Halloween treats.
Ingredients for 4-6 People:
- 1 pound cherry tomatoes
- 1 cucumber, sliced into thick rounds
- 8 ounces mozzarella balls
- 12 green olives, pitted
- 12 black olives, pitted
- 1 tablespoon Worcestershire sauce
- 1 tablespoon hot sauce (such as Tabasco)
- 1 teaspoon celery salt
- Freshly ground black pepper
- 12 wooden skewers
- Fresh basil leaves for garnish
Cooking Instructions:
- Prepare the Ingredients: Begin by washing the cherry tomatoes and cucumber thoroughly. Slice the cucumber into thick rounds and set aside. Drain the mozzarella balls and olives, and pat them dry with a paper towel to remove any excess moisture.
- Season the Ingredients: In a small bowl, mix together the Worcestershire sauce, hot sauce, celery salt, and a few grinds of black pepper. Toss the cherry tomatoes and mozzarella balls in this mixture until they’re evenly coated with the spices.
- Assemble the Skewers: Take a wooden skewer and begin threading the ingredients. Start with a cherry tomato, followed by a mozzarella ball, a slice of cucumber, a green olive, and a black olive. Repeat the sequence until the skewer is filled, leaving some space at the top for easy handling. Continue this process with the remaining skewers.
- Garnish and Serve: Once all the skewers are assembled, garnish them with fresh basil leaves for a burst of color and flavor. Arrange the skewers on a platter for serving, and refrigerate until ready to serve to keep them fresh.
Extra Tips:
For an extra touch of Halloween spirit, consider using Halloween-themed skewers or adding small edible decorations, like fake spider rings or ghostly cutouts, to the platter.
If you’re hosting a larger party, you can easily double the recipe. Additionally, feel free to customize the skewers by adding other ingredients such as pickles, pepperoncini, or even a slice of cooked bacon for added flavor. Remember to adjust the seasoning to your taste, especially the hot sauce, if you prefer a milder or spicier kick.
Spooky Stuffed Peppers

This dish combines vibrant bell peppers filled with a hearty mixture of ground meat, rice, and vegetables, all seasoned to perfection. The peppers are then topped with cheese that melts and drips to create a spooky effect, making them both a feast for the eyes and the taste buds.
Whether you’re hosting a Halloween party or just want to get into the festive spirit, these Spooky Stuffed Peppers are a must-try. Here’s how to make them for a serving size of 4-6 people.
Ingredients:
- 6 medium-sized bell peppers (orange, red, or yellow for a festive look)
- 1 pound ground beef or turkey
- 1 cup cooked rice
- 1 medium onion, chopped
- 2 cloves garlic, minced
- 1 can (14.5 oz) diced tomatoes, drained
- 1 tablespoon tomato paste
- 1 teaspoon Italian seasoning
- Salt and pepper to taste
- 1 cup shredded mozzarella cheese
- Olive oil for cooking
Cooking Instructions:
- Prepare the Peppers: Preheat your oven to 375°F (190°C). Cut the tops off the bell peppers and remove the seeds and membranes. Use a small, sharp knife to carefully carve jack-o’-lantern faces into one side of each pepper. Set aside.
- Cook the Filling: In a large skillet over medium heat, add a drizzle of olive oil. Add the chopped onion and minced garlic, sauté until the onions are translucent. Add the ground beef (or turkey) and cook until browned, breaking it apart with a spatula. Drain any excess fat.
- Combine Ingredients: Stir in the cooked rice, diced tomatoes, tomato paste, Italian seasoning, salt, and pepper. Mix well and let it simmer for about 5 minutes, allowing the flavors to meld together.
- Stuff the Peppers: Fill each carved pepper with the meat and rice mixture. Press the filling down gently with a spoon to guarantee they’re well-packed. Place the peppers upright in a baking dish.
- Bake the Peppers: Cover the baking dish with aluminum foil and bake in the preheated oven for 25 minutes. Remove the foil, sprinkle the shredded mozzarella cheese on top of each pepper, and return to the oven.
- Finish Baking: Bake for an additional 10-15 minutes, or until the cheese is melted and bubbly, and the peppers are tender. If you want an extra spooky look, let the cheese bubble and drip slightly over the pepper faces.
- Serve: Remove from the oven and let cool slightly before serving. Enjoy your spooky creation!
Extra Tips:
For a vegetarian version, replace the ground meat with a plant-based alternative or increase the amount of rice and add beans or mushrooms for additional texture and flavor.
You can also mix different types of cheese or add some hot sauce to the filling for a spicy kick. If you prefer softer peppers, blanch them in boiling water for a few minutes before stuffing.
To make them even more fun, let your guests carve their own pepper faces before baking!
Bat Wing Chicken Drumettes

Bat Wing Chicken Drumettes are a spooky and delicious finger food perfect for any Halloween party. These drumettes are marinated in a dark, flavorful sauce that gives them a sinister appearance, reminiscent of bat wings. The combination of soy sauce, honey, and spices creates a savory and slightly sweet glaze that’s certain to be a hit with your guests. Serve them with a side of eerie dipping sauce to complete the Halloween theme.
Not only are these Bat Wing Chicken Drumettes visually striking, but they’re also incredibly tasty and easy to make. The key to achieving the perfect texture and flavor is allowing the chicken to marinate for a few hours or overnight. This gives the flavors time to meld and guarantees the drumettes are juicy and flavorful. Whether you’re hosting a large gathering or an intimate get-together, these drumettes will be a crowd-pleaser.
Ingredients (Serving Size: 4-6 people):
- 2 pounds chicken drumettes
- 1/2 cup soy sauce
- 1/4 cup honey
- 2 tablespoons olive oil
- 2 tablespoons balsamic vinegar
- 1 tablespoon Worcestershire sauce
- 2 teaspoons smoked paprika
- 1 teaspoon garlic powder
- 1 teaspoon onion powder
- 1/2 teaspoon black pepper
- Green onions or chives for garnish (optional)
Cooking Instructions:
- Prepare the Marinade: In a large mixing bowl, combine the soy sauce, honey, olive oil, balsamic vinegar, Worcestershire sauce, smoked paprika, garlic powder, onion powder, and black pepper. Whisk the ingredients together until well-blended.
- Marinate the Chicken: Add the chicken drumettes to the bowl, making sure they’re well-coated in the marinade. Cover the bowl with plastic wrap or transfer the drumettes and marinade to a large resealable plastic bag. Refrigerate for at least 2 hours, or overnight for best results.
- Preheat the Oven: Preheat your oven to 400°F (200°C). Line a baking sheet with aluminum foil or parchment paper for easy cleanup, and place a wire rack on top.
- Bake the Drumettes: Arrange the marinated drumettes on the wire rack, ensuring they’re evenly spaced and not touching. Reserve the remaining marinade. Bake in the preheated oven for 25-30 minutes, turning once halfway through, until the drumettes are cooked through and the skin is crispy.
- Reduce the Marinade: While the drumettes are baking, pour the reserved marinade into a small saucepan and bring it to a boil over medium heat. Reduce the heat to low and let it simmer for about 5 minutes until it thickens slightly.
- Glaze the Drumettes: Once the drumettes are done baking, remove them from the oven and brush them with the reduced marinade to add an extra layer of flavor and shine.
- Serve and Garnish: Transfer the glazed drumettes to a serving platter and garnish with chopped green onions or chives, if desired. Serve immediately for the best taste and texture.
Extra Tips:
For an extra spooky presentation, consider serving the Bat Wing Chicken Drumettes on a dark-colored platter. You can also add some Halloween-themed decorations around the platter to enhance the festive atmosphere.
If you prefer a spicier kick, add a pinch of cayenne pepper to the marinade. Remember, the longer you marinate the drumettes, the more flavorful they’ll become, so plan ahead for the best result. Enjoy your hauntingly delicious creation!
Pumpkin Patch Brownie Bites

Pumpkin Patch Brownie Bites are a delightful and festive treat perfect for Halloween parties. These bite-sized desserts combine the rich, fudgy goodness of brownies with the adorable presentation of a miniature pumpkin patch. Each brownie bite is topped with a charming pumpkin candy, making them not only delicious but also visually appealing. They’re bound to be a hit with both children and adults alike, adding a touch of whimsy to your Halloween spread.
The preparation of Pumpkin Patch Brownie Bites is simple and requires minimal ingredients. The base is a classic brownie recipe, baked to perfection and cut into small, manageable pieces. The top is decorated with fun and colorful pumpkin-shaped candies, which can be found at most grocery stores during the Halloween season. These little bites of joy are perfect for serving at parties, as they’re easy to handle and eat without the need for utensils.
Ingredients (Serving Size: 4-6 people):
- 1 box brownie mix (for a 9×9 inch pan)
- 2 large eggs
- 1/2 cup vegetable oil
- 1/4 cup water
- 1 cup chocolate chips
- 24 pumpkin-shaped candies
- 1/4 cup green icing (optional for decorating)
- Cooking spray or parchment paper
Cooking Instructions:
- Preheat the Oven: Start by preheating your oven to 350°F (175°C). This guarantees that your brownies will bake evenly.
- Prepare the Brownie Batter: In a large mixing bowl, combine the brownie mix, eggs, vegetable oil, and water. Stir until the mixture is smooth and no lumps remain. Fold in the chocolate chips to add extra richness to the brownies.
- Bake the Brownies: Lightly grease a 9×9 inch baking pan with cooking spray or line it with parchment paper. Pour the brownie batter into the prepared pan and spread it evenly. Bake in the preheated oven for 20-25 minutes, or until a toothpick inserted into the center comes out with a few moist crumbs.
- Cool and Cut: Once baked, remove the brownies from the oven and allow them to cool completely in the pan. Once cool, carefully lift the brownies out of the pan using the parchment paper and cut them into small, bite-sized squares.
- Decorate the Bites: Place a pumpkin-shaped candy on top of each brownie bite, pressing gently to adhere. If desired, use green icing to pipe small “vines” or “leaves” around the candy to enhance the pumpkin patch appearance.
- Serve: Arrange the Pumpkin Patch Brownie Bites on a serving platter. They’re ready to be enjoyed by your guests!
Extra Tips:
For an even more festive touch, consider using different colored icing to create a variety of vine designs on the brownies. If you prefer homemade brownies, you can substitute the box mix with your favorite brownie recipe. Just make sure you adjust the baking time if necessary.
Additionally, if you want to prepare these treats in advance, store them in an airtight container at room temperature for up to two days, guaranteeing they remain fresh and delicious for your Halloween festivities.
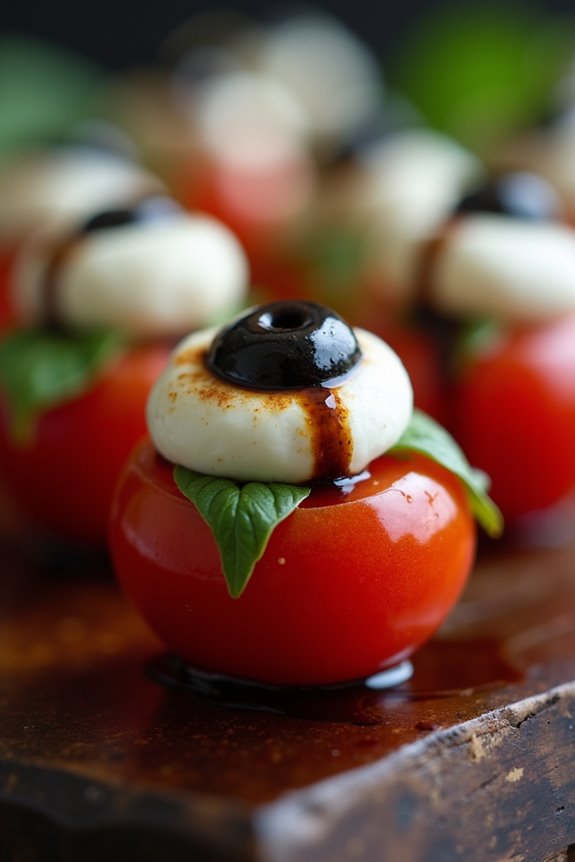
Eyeball Caprese Bites
Preparing for a spook-tacular Halloween party? Add a touch of creepiness with Eyeball Caprese Bites! This eerily delightful appetizer not only brings a festive flair to your table but also delivers a burst of flavor in every bite.
These bites are a clever twist on the classic Caprese salad, transforming the traditional ingredients into a ghoulish treat that will both terrify and tantalize your guests. Each bite-sized morsel resembles a bloodshot eyeball, making it a perfect addition to your Halloween finger food spread.
Eyeball Caprese Bites are incredibly easy to assemble, requiring minimal cooking and maximum creativity. The combination of juicy cherry tomatoes, creamy mozzarella balls, and fresh basil leaves guarantees that these appetizers are as delicious as they’re visually appealing.
To create the eyeball effect, a slice of black olive is placed atop the mozzarella, while a drizzle of balsamic glaze adds a touch of elegance. Serve these on a platter, and watch them disappear as your guests marvel at your culinary creativity.
Ingredients for 4-6 people:
- 12 cherry tomatoes
- 12 mini mozzarella balls
- 12 fresh basil leaves
- 6 black olives, pitted and sliced
- Balsamic glaze
- Salt and pepper to taste
- Toothpicks
Cooking Instructions:
- Prepare the Ingredients: Begin by washing the cherry tomatoes and basil leaves under cold running water. Pat them dry with a paper towel. Slice each black olive into thin rings, which will serve as the ‘pupils’ for the eyeballs.
- Assemble the Eyeballs: Take a cherry tomato and slice a small section off the top to create a flat surface. Place a mini mozzarella ball on this flat surface, securing it with a toothpick that goes through the tomato and mozzarella ball. Repeat this for all 12 portions.
- Add the Pupil: Place a sliced black olive ring on top of each mozzarella ball, pressing down gently so it adheres to the cheese. This creates the pupil of the eyeball.
- Add the Basil: Slide a fresh basil leaf onto each toothpick, positioning it underneath the tomato to resemble a green iris.
- Finish with Glaze: Drizzle a small amount of balsamic glaze over each assembled eyeball for added flavor and a spooky, bloodshot appearance. Season with salt and pepper to taste.
- Serve: Arrange the Eyeball Caprese Bites on a serving platter. They’re ready to be served immediately or can be stored in the refrigerator until your guests arrive.
Extra Tips:
To enhance the spooky appearance of your Eyeball Caprese Bites, consider using heirloom cherry tomatoes which come in various colors and patterns, adding even more character to each eyeball.
Make sure the mozzarella balls are well-drained to prevent any water from diluting the flavors. If you want more variation, you can use pesto instead of basil leaves for a different taste profile.
These bites are best served fresh, but if you need to prepare them in advance, assemble them up to a few hours before serving and keep them refrigerated until your guests arrive.
Graveyard Taco Cups

Graveyard Taco Cups are the perfect spooky treat to serve at your Halloween party. These delectable taco cups combine the classic flavors of tacos with a fun and eerie presentation that will delight both kids and adults. The dish features layers of seasoned beef, cheese, and various toppings, all nestled in crispy tortilla cups that resemble mini graveyards.
Add some creative decorations like tombstone-shaped tortilla chips or guacamole ghosts, and you’ve got a frightfully delicious appetizer that’s sure to be a hit.
Not only are Graveyard Taco Cups delicious, but they’re also incredibly easy to make. With just a few simple ingredients and minimal prep time, you can whip up this festive finger food in no time. The individual servings make it easy for guests to grab and enjoy while mingling at your Halloween party.
Plus, this recipe can be easily customized to suit different tastes and dietary preferences, making it a versatile addition to your party menu.
Ingredients (for 4-6 servings):
- 12 small flour tortillas
- 1 pound ground beef
- 1 packet taco seasoning
- 1 cup shredded cheddar cheese
- 1 cup shredded lettuce
- 1/2 cup sour cream
- 1/2 cup salsa
- 1/4 cup sliced black olives
- 1/4 cup chopped tomatoes
- Optional: guacamole, tortilla chips
Cooking Instructions:
1. Prepare the tortilla cups:
Preheat your oven to 375°F (190°C). Lightly grease a muffin tin. Cut each flour tortilla into quarters and gently press them into the muffin tin to form cup shapes. Bake for 8-10 minutes or until the edges are golden and crispy. Remove from oven and set aside.
2. Cook the beef:
In a large skillet over medium heat, cook the ground beef until it’s browned and fully cooked. Drain any excess fat. Add the taco seasoning according to the packet instructions, usually requiring a bit of water. Stir well and cook for another 5 minutes until the flavors are well combined.
3. Assemble the taco cups:
Fill each tortilla cup with a spoonful of the seasoned beef. Top with shredded cheddar cheese, shredded lettuce, and a dollop of sour cream. Add a spoonful of salsa, then garnish with sliced black olives and chopped tomatoes.
4. Decorate for Halloween:
For a spooky touch, use tortilla chips to create tombstone shapes and place them in each cup. Add small dollops of guacamole to resemble ghosts, if desired.
Extra Tips:
For a vegetarian option, substitute the ground beef with a plant-based protein or cooked black beans. Consider offering a variety of toppings like diced avocado, chopped green onions, or jalapeños for guests to customize their taco cups.
Preparing the tortilla cups ahead of time and reheating them just before serving can save time on the day of your party, ensuring you have more time to enjoy the festivities.