

Are you ready to take your Halloween festivities to the next level with some spook-tacular finger foods? Picture your guests’ delight as they encounter treats like Spooky Spider Deviled Eggs or Monster Mouth Apple Slices. These 13 Halloween finger food ideas are sure to enchant your gathering and leave everyone talking. Get ready to sprinkle a little magic into your kitchen this season. Let’s explore some bewitching recipes that will make your celebration unforgettable!
Spooky Spider Deviled Eggs

Get ready to add a touch of creepy-crawly fun to your Halloween party with Spooky Spider Deviled Eggs. This delightfully eerie appetizer combines the classic flavor of deviled eggs with a playful twist, making it a perfect finger food for your holiday gathering. The creamy filling is rich and tangy, while the spider decorations add a whimsical flair that’s sure to impress both young and old alike.
Not only are these deviled eggs simple to make, but they also add an element of creativity to your Halloween spread. The secret to creating these spooky little critters is in the decoration. Sliced black olives are transformed into little spiders, perched atop each deviled egg half. The contrasting colors of the eggs and olives make for a visually striking presentation. Serve them on a dark platter for an added haunted effect.
Whether you’re hosting a Halloween party or just making a festive treat for your family, these Spooky Spider Deviled Eggs are sure to be a hit.
Ingredients (Serves 4-6):
- 6 large eggs
- ¼ cup mayonnaise
- 1 teaspoon Dijon mustard
- 1 teaspoon white vinegar
- Salt and pepper to taste
- Paprika for garnish
- 12 whole black olives
Cooking Instructions:
- Boil the Eggs: Place the eggs in a saucepan and cover them with cold water. Bring the water to a boil over medium-high heat. Once boiling, remove from heat and cover the saucepan. Let the eggs stand in the hot water for about 10-12 minutes.
- Cool and Peel: After the eggs have cooked, drain the hot water and transfer them to a bowl of ice water to cool for at least 5 minutes. Once cooled, gently peel the shells off the eggs.
- Prepare the Filling: Slice each egg in half lengthwise and carefully remove the yolks. Place the yolks in a mixing bowl and mash them with a fork. Add mayonnaise, Dijon mustard, vinegar, salt, and pepper to the yolks and mix until smooth and creamy.
- Fill the Egg Whites: Spoon or pipe the yolk mixture back into the hollowed egg white halves. Mound the filling slightly over the egg white surface for a more attractive presentation.
- Create the Spider Decorations: Cut the whole black olives in half. Use one half for the spider body, and slice the other half into thin strips to create the legs. Arrange one olive half on top of each filled egg as the spider’s body, then place the olive strips around it to resemble legs.
- Garnish and Serve: Lightly sprinkle paprika over the eggs for a touch of color and added flavor. Arrange the completed Spooky Spider Deviled Eggs on a serving platter and enjoy!
Extra Tips:
For a more dramatic effect, consider using smoked paprika instead of regular paprika for a burst of smoky flavor. If you want to enhance the Halloween theme, serve the deviled eggs on a black or dark-colored platter to make the spiders stand out even more.
Additionally, you can prepare the eggs and filling a day in advance, storing them separately in the refrigerator, and assemble right before serving to save time on the day of your event.
Creepy Crawly Cheese Ball
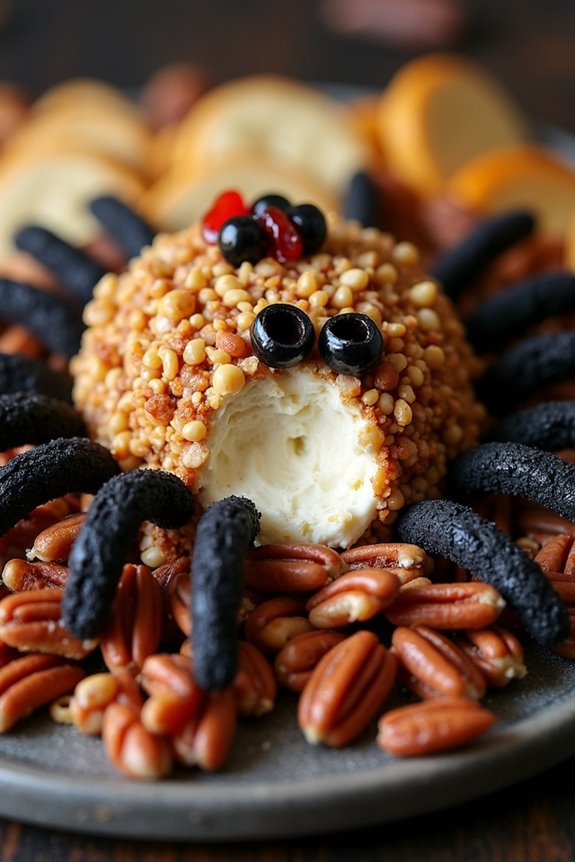
Are you ready to spook your guests with a deliciously eerie treat this Halloween? The Creepy Crawly Cheese Ball isn’t just a feast for the eyes but also a delightful snack to tickle the taste buds. Perfect for any Halloween party, this cheese ball is shaped like a giant tarantula, complete with olive legs and a crunchy, nutty exterior.
It’s a fun and easy way to add a touch of spookiness to your appetizer spread, and it’s certain to be a crowd-pleaser for both kids and adults alike. Serving size is designed for 4-6 people, making it an ideal centerpiece for a small gathering. The combination of creamy cheese, savory spices, and crunchy nuts makes this an irresistible snack.
Your guests will love breaking off a spider leg and scooping up the delicious cheese ball. It’s a simple recipe that requires minimal preparation yet offers maximum impact, perfect for those looking to impress without spending hours in the kitchen.
Ingredients:
- 2 cups sharp cheddar cheese, shredded
- 8 oz cream cheese, softened
- 1/2 cup sour cream
- 1 tablespoon Worcestershire sauce
- 1 teaspoon garlic powder
- 1 teaspoon onion powder
- 1/2 teaspoon smoked paprika
- Salt and pepper to taste
- 1 cup crushed pecans or walnuts
- Black olives, halved or sliced (for spider legs)
- Pretzel sticks (for additional legs or decoration)
Instructions:
- Mix the Base: In a large mixing bowl, combine the shredded cheddar cheese, softened cream cheese, and sour cream. Use a hand mixer or a sturdy spatula to blend until the mixture is smooth and creamy.
- Add Flavor: Stir in the Worcestershire sauce, garlic powder, onion powder, smoked paprika, salt, and pepper. Mix thoroughly to guarantee all flavors are evenly distributed throughout the cheese mixture.
- Shape the Cheese Ball: Once the mixture is well combined, form it into a large ball using your hands. You can use plastic wrap to help shape it more easily and avoid sticking.
- Add Texture: Spread the crushed pecans or walnuts on a flat surface or baking sheet. Roll the cheese ball in the nuts until it’s fully coated, pressing gently to confirm the nuts adhere to the surface.
- Create the Creepy Crawler: Place the nut-coated cheese ball on a serving platter. Use the black olive halves or slices to form spider legs around the cheese ball. Insert pretzel sticks into the cheese ball to create additional legs or decorative elements if desired.
- Chill: Refrigerate the assembled cheese ball for at least one hour before serving. This allows the flavors to meld together and the ball to firm up slightly.
Extra Tips:
For an extra spooky effect, you can use red bell pepper or pimento pieces to create eyes for your spider cheese ball. If you prefer a sweeter note, consider adding dried cranberries or chopped dried apricots to the cheese mixture.
When rolling the ball in nuts, confirm the surface is completely covered for the best texture and appearance. If you’re short on time, you can prepare the cheese ball a day in advance and store it in the fridge until ready to serve. Make sure to bring it to room temperature for about 15 minutes before serving for easier spreading.
Witch’s Broomstick Pretzels

Witch’s Broomstick Pretzels are a fun and festive finger food perfect for your Halloween gathering. These whimsical snacks not only add a spooky charm to your party spread, but they’re also easy to make and deliciously satisfying. The combination of salty pretzels and the creamy richness of cheese makes them a hit among both kids and adults.
With a few simple ingredients, you can create these delightful treats that resemble the classic witch’s broomstick, adding a bit of magic to your festivities.
These broomsticks are made by combining pretzel sticks with cheese, a pairing that isn’t only visually appealing but also packs a punch in flavor. The broom bristles are crafted from cheese sticks, which are effortlessly attached to the pretzel sticks, forming the broomstick handle. This simple yet effective snack is sure to impress your guests, making it a fantastic addition to your Halloween-themed menu.
Ingredients (Serves 4-6):
- 12 pretzel sticks
- 6 cheese sticks (mozzarella or string cheese)
- 12 fresh chives (optional)
Instructions:
- Prepare the Cheese Sticks: Begin by unwrapping the cheese sticks and cutting each one in half to create shorter pieces. These will serve as the broom bristles.
- Shape the Broom Bristles: Take each half of the cheese sticks and gently pull apart the strands at one end to create a fringed effect, resembling broom bristles. Be careful not to split the entire cheese stick.
- Attach the Pretzel Handles: Insert one end of the pretzel stick into the unfringed end of each cheese stick. Push firmly but gently to secure it without breaking the cheese.
- Add Chive Ties (Optional): For an extra touch, you can tie a chive around the top of the cheese stick where it meets the pretzel, to create the appearance of a tied broom. Simply wrap the chive and tuck in the ends to secure it.
- Serve: Arrange the Witch’s Broomstick Pretzels on a serving platter and present them to your guests as a charming Halloween treat.
Extra Tips: When crafting your Witch’s Broomstick Pretzels, make certain that the cheese is at room temperature; this makes it easier to pull apart into strands without breaking.
You can prepare these broomsticks a few hours ahead of time and refrigerate them until ready to serve. If you choose to add the chive ties, make sure they’re fresh to maintain their vibrant color and pliability.
These broomsticks can be paired with a dip of your choice, such as marinara or ranch, to enhance their flavor.
Ghostly Guacamole Dip

This Halloween, bring a spooktacular dish to your festive gathering with our Ghostly Guacamole Dip. This ghoulishly green dip isn’t only frightfully fun but also deliciously invigorating, combining the creamy texture of ripe avocados with a zesty lime punch. Perfect for a Halloween party, this dip is sure to be a hit with both kids and adults alike.
The added touch of ghost-shaped tortilla chips makes it a creatively eerie appetizer that will have your guests enthusiastically dipping in for more.
Creating this dip is as simple as it’s fun. The key to capturing the perfect ghostly essence isn’t just in the taste but also in the presentation. With a serving size designed for 4-6 people, this dish can easily be doubled or tripled for larger parties. Serve it up with ghost-shaped tortilla chips to add a playful Halloween twist.
Whether you’re hosting a haunted house gathering or just enjoying a spooky night in, this Ghostly Guacamole Dip is the perfect addition to your Halloween finger food lineup.
Ingredients (serving size: 4-6 people):
- 3 ripe avocados
- 1 lime, juiced
- 1 teaspoon salt
- 1/2 cup diced onion
- 2-3 tablespoons chopped fresh cilantro
- 2 Roma tomatoes, diced
- 1 teaspoon minced garlic
- 1 pinch ground cayenne pepper (optional)
- Ghost-shaped tortilla chips (store-bought or homemade)
Cooking Instructions:
- Prepare the Avocados: Begin by cutting the avocados in half and removing the pits. Scoop out the flesh into a large mixing bowl. Mash the avocado with a fork or a potato masher until it reaches your desired level of smoothness.
- Add Lime and Salt: Squeeze the juice of one lime into the mashed avocados. Add the salt and mix well. The lime juice won’t only add flavor but also help to keep the avocados from browning.
- Incorporate Other Ingredients: Add the diced onion, chopped cilantro, diced tomatoes, and minced garlic to the avocado mixture. Stir everything together until well combined.
- Season with Cayenne Pepper: If you prefer a bit of heat, add a pinch of cayenne pepper to the mixture. Be sure to mix thoroughly to confirm the spice is evenly distributed.
- Chill the Dip: Cover the bowl with plastic wrap and refrigerate for at least 30 minutes to allow the flavors to meld together. This step enhances the taste and gives the dip an invigorating coolness.
- Serve with Ghost Chips: Just before serving, give the guacamole a quick stir and spoon it into a serving dish. Arrange ghost-shaped tortilla chips around the dip for a festive presentation.
Extra Tips: For an added Halloween touch, you can make your own ghost-shaped tortilla chips using flour tortillas and a ghost-shaped cookie cutter. Simply cut out the shapes, brush them lightly with olive oil, sprinkle with a bit of salt, and bake them at 350°F (175°C) for about 8-10 minutes or until golden and crispy.
Additionally, to prevent browning, press a piece of plastic wrap directly onto the surface of the guacamole before chilling. This simple step will keep your Ghostly Guacamole Dip fresh and vibrant, ready to impress your guests with its tasty and spooky charm.
Mummy Wrapped Sausages
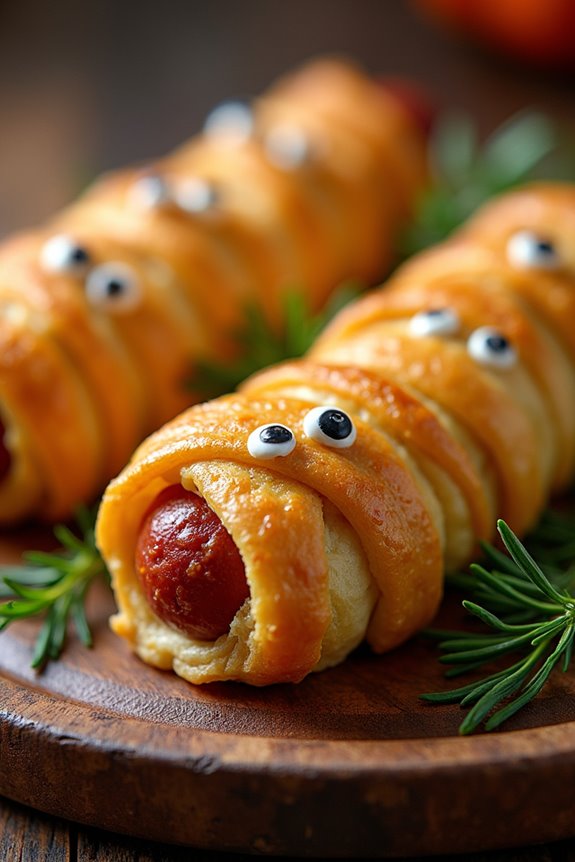
Mummy Wrapped Sausages are a fun and spooky finger food idea perfect for your Halloween celebrations. These adorable and delicious snacks resemble little mummies, making them a hit with both kids and adults alike. The combination of savory sausages wrapped in golden, flaky dough makes for a satisfying treat that’s both easy to make and delightful to eat.
Whether you’re hosting a Halloween party or simply looking to add a festive touch to your dinner table, Mummy Wrapped Sausages are certain to impress your guests.
These Mummy Wrapped Sausages are incredibly simple to prepare, requiring just a handful of ingredients. The sausages are wrapped in strips of dough, creating the mummy effect, and then baked to perfection. You can use either cocktail sausages or regular-sized ones, depending on your preference.
The best part is that these can be prepared in advance and served warm or at room temperature, making them a convenient option for entertaining. With just a little creativity, you can even add details like edible eyes to complete the mummy look.
Ingredients for 4-6 servings:
- 12 cocktail sausages or 6 regular-sized sausages
- 1 sheet of puff pastry or crescent dough
- Mustard or ketchup (for eyes)
- Cooking spray or parchment paper
Cooking Instructions:
- Preheat the Oven: Begin by preheating your oven to 375°F (190°C). This guarantees your oven is ready for baking once the sausages are prepared.
- Prepare the Dough: If you’re using puff pastry, roll out the dough on a lightly floured surface into a thin layer. Cut the dough into thin strips, about 1/4-inch wide. If using crescent dough, unroll and separate along perforations, then cut each triangle into thin strips.
- Wrap the Sausages: Take each sausage and wrap the dough strips around it, leaving small gaps to give the appearance of mummy bandages. Leave a small space unwrapped at one end for the face. Continue this process until all sausages are wrapped.
- Prepare for Baking: Line a baking sheet with parchment paper or lightly coat it with cooking spray. Place the wrapped sausages on the sheet, ensuring they’re spaced out evenly.
- Bake the Mummies: Place the baking sheet in the preheated oven and bake for 12-15 minutes or until the dough is golden brown and crisp.
- Add the Eyes: Once baked, remove the sausages from the oven and let them cool slightly. Using a small amount of mustard or ketchup, dot on eyes on the exposed sausage end to complete the mummy look.
- Serve: Arrange the Mummy Wrapped Sausages on a platter and serve them with your choice of dipping sauces, such as mustard or ketchup.
Extra Tips: For a more festive appearance, consider using edible candy eyes for the mummies instead of mustard or ketchup. If you prefer a spicier flavor, choose spicy sausages or add a dash of hot sauce before wrapping them in dough.
You can also experiment with flavored doughs, such as garlic or herb-infused, to add extra taste. Make sure to keep an eye on the baking time, as ovens may vary, and you want to make sure the dough is baked to a perfect golden brown without overcooking the sausages.
Bloody Eyeball Caprese Bites
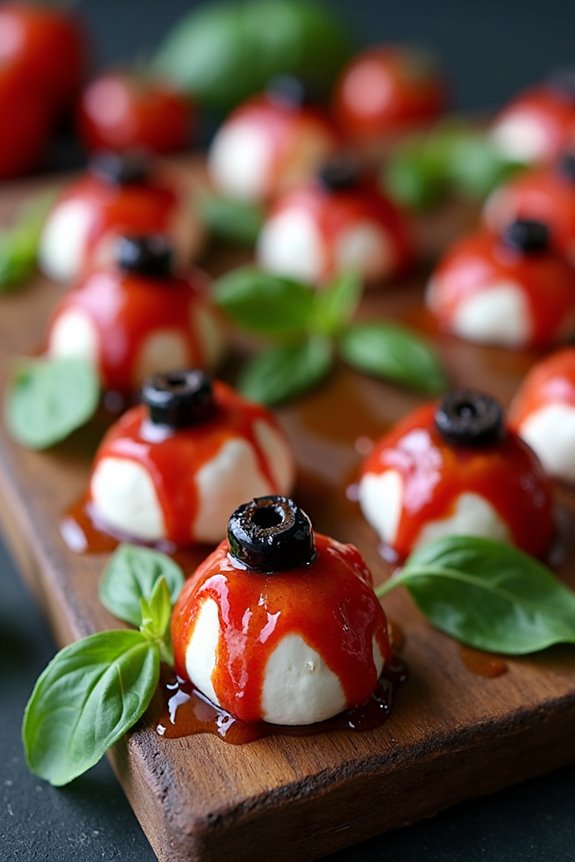
Bloody Eyeball Caprese Bites are a spine-chilling twist on the classic Italian Caprese salad, perfect for your next Halloween gathering. These creepy yet delicious bites are sure to be a hit with both kids and adults, as they not only look eerily realistic but also offer a delightful blend of fresh flavors. The combination of creamy mozzarella, ripe tomatoes, and fresh basil topped with a drizzle of balsamic reduction creates a tasty treat that’s easy to prepare and even easier to devour.
To create the “bloody eyeball” effect, you’ll use black olives to mimic pupils and a bit of red food coloring to give the mozzarella a gory look. These bites can be prepared ahead of time, allowing you to enjoy your Halloween festivities without spending too much time in the kitchen. Serve them on a platter with a spooky backdrop to enhance the Halloween theme and watch your guests’ reactions as they bite into these terrifyingly tasty treats.
Ingredients (serving size: 4-6 people):
- 12 cherry tomatoes
- 12 fresh mozzarella balls (bocconcini)
- 12 fresh basil leaves
- 6 black olives
- 2 tablespoons balsamic reduction
- 1 tablespoon olive oil
- Red food coloring
- Salt and pepper to taste
- 12 toothpicks
Cooking Instructions:
- Prepare the Ingredients: Rinse the cherry tomatoes and basil leaves under cold water and pat them dry with a paper towel. Slice the black olives in half lengthwise and set aside.
- Assemble the Eyeballs: Take each mozzarella ball and use a small, sharp knife to cut a shallow slit on top, enough to fit half of a black olive. Press the olive half into the slit to create the pupil, ensuring it’s secure.
- Add the Blood Effect: Use a toothpick to dab small amounts of red food coloring onto the mozzarella balls, creating veiny streaks radiating from the “pupil” to mimic bloodshot eyes.
- Construct the Bites: On each toothpick, layer in this order: one cherry tomato, one basil leaf, and one mozzarella ball with the olive and food coloring facing upwards. Repeat this process until all ingredients are used.
- Drizzle with Dressing: Arrange the completed eyeball bites on a serving platter. Drizzle a mixture of olive oil and balsamic reduction over the top, and season with salt and pepper to taste.
- Chill Before Serving: Place the platter in the fridge for about 20 minutes before serving to allow the flavors to meld together.
Extra Tips: For a more intense flavor, marinate the mozzarella balls in olive oil, salt, and pepper for an hour before assembling. If you can’t find bocconcini, you can use mozzarella pearls or cut larger mozzarella balls into smaller pieces.
To make the balsamic reduction at home, simply simmer balsamic vinegar in a saucepan until it reduces by half and thickens. Adjust the amount of red food coloring to achieve the desired level of bloodiness, and remember, a little goes a long way!
Monster Mouth Apple Slices
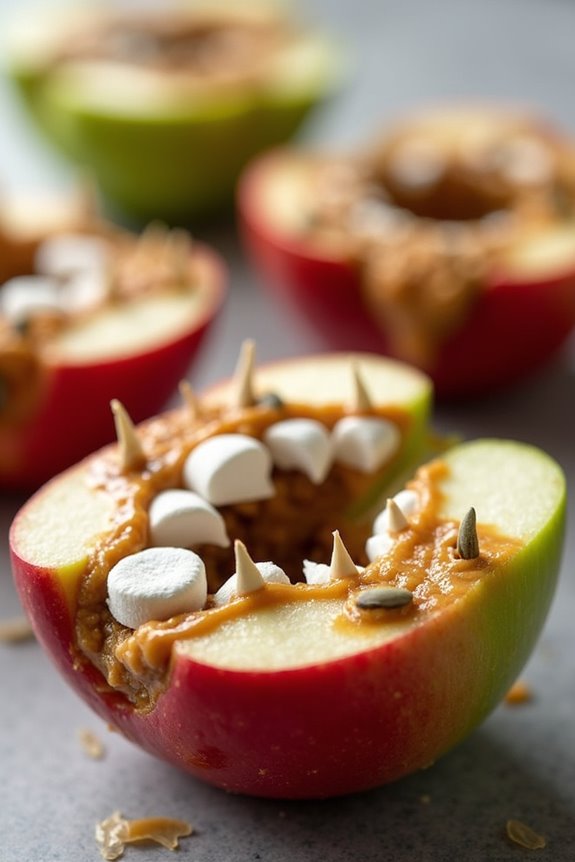
Creating Monster Mouth Apple Slices isn’t only easy but also allows for creativity and personal touches. Whether you’re hosting a Halloween party or simply looking to surprise your family with a themed snack, these apple slices are an excellent choice. Not only will they satisfy your sweet tooth, but they also provide a nutritious option amidst the candy-filled holiday. This recipe will yield a serving size fit for 4 to 6 people, perfect for small gatherings or a family treat.
Ingredients:
- 4 medium-sized apples (Granny Smith or Red Delicious recommended)
- 1/2 cup creamy peanut butter
- 1/2 cup mini marshmallows
- 1/4 cup slivered almonds or sunflower seeds
- 1 tablespoon lemon juice (optional, to prevent browning)
Instructions:
- Prepare the Apples: Wash the apples thoroughly under running water. Using a sharp knife, cut each apple into quarters and remove the core. Then, slice each quarter into two or three wedges, depending on the size of the apple. For best results, aim for each slice to be about 1/2 inch thick.
- Prevent Browning: If desired, brush each apple slice lightly with lemon juice. This optional step helps to keep the apples from browning too quickly, which can occur when exposed to air.
- Assemble the Monster Mouths: Spread a generous layer of peanut butter on one side of each apple slice. The peanut butter will act as the “glue” to hold the marshmallows and almonds or seeds in place.
- Create the Teeth and Fangs: Place mini marshmallows along the edge of the peanut butter-covered side of the apple slice to form the “teeth.” For added spookiness, insert slivered almonds or sunflower seeds between some of the marshmallows to create “fangs.”
- Serve and Enjoy: Arrange the Monster Mouth Apple Slices on a serving platter. Serve immediately, or if you need to store them for a short period, place them in the refrigerator to keep them fresh.
Extra Tips:
To make these Monster Mouth Apple Slices more allergy-friendly, consider using sunflower seed butter or almond butter instead of peanut butter. If you want to add more variety, you can use different-colored apples to create a more colorful display.
Always verify that the apple slices are cut evenly to keep the “mouth” structure stable. Finally, for a sweeter version, consider drizzling a bit of honey over the top before serving.
Vampire Bat Wing Chips
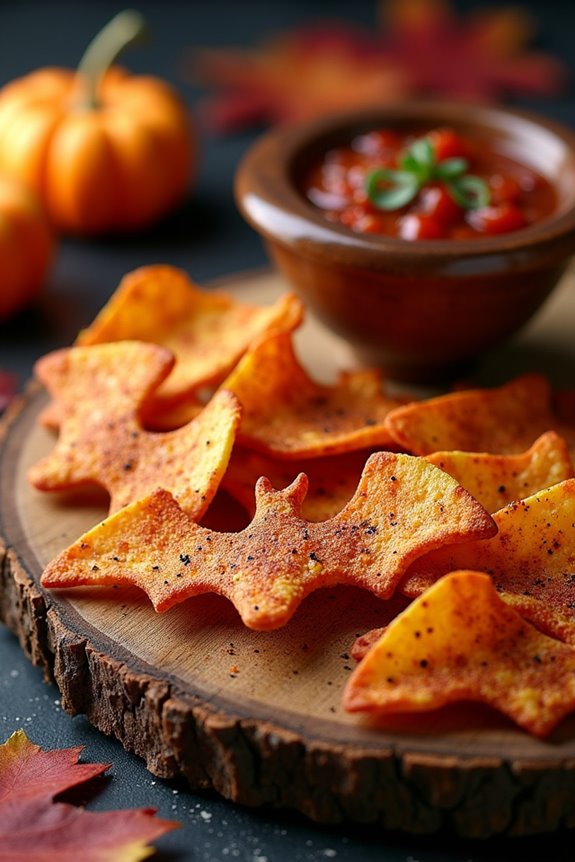
Halloween is the perfect time to get creative in the kitchen with spooky-themed snacks that both delight and frighten your guests. Vampire Bat Wing Chips are a fun and eerie twist on traditional tortilla chips, making them an ideal addition to any Halloween party spread. These chips are shaped like bat wings and seasoned with a mix of spices to give them a dark, savory flavor that will have your guests coming back for more. Serve them with a side of blood-red salsa or a creamy dip to complete the chilling presentation.
The beauty of Vampire Bat Wing Chips lies in their simplicity and ability to be prepared ahead of time, allowing you to focus on other party preparations. Using store-bought flour tortillas as a base, you can easily transform these into crispy bat wings with the help of a bat-shaped cookie cutter. A coating of olive oil and a mixture of spices adds the perfect touch of flavor, while baking guarantees they remain light and crispy. This recipe yields enough chips to serve 4-6 people, making it perfect for small gatherings or as part of a larger buffet.
Ingredients (Serves 4-6 people):
- 10 large flour tortillas
- 1/4 cup olive oil
- 1 teaspoon smoked paprika
- 1 teaspoon garlic powder
- 1 teaspoon onion powder
- 1/2 teaspoon ground cumin
- 1/2 teaspoon salt
- 1/2 teaspoon black pepper
Instructions:
- Preheat Oven: Preheat your oven to 350°F (175°C) to confirm it’s ready for baking the chips.
- Prepare Tortillas: Using a bat-shaped cookie cutter, cut out bat shapes from the flour tortillas. You should be able to get multiple bats from each tortilla depending on the size of your cutter.
- Mix Seasoning: In a small bowl, combine the smoked paprika, garlic powder, onion powder, ground cumin, salt, and black pepper. Mix well to create a uniform spice blend.
- Coat Tortillas: Lay the tortilla bats on a large baking sheet in a single layer. Brush each piece lightly with olive oil on both sides.
- Season the Chips: Sprinkle the spice mixture evenly over the oiled tortilla bats. Flip them over and sprinkle the other side as well to confirm full coverage.
- Bake: Place the baking sheet in the preheated oven. Bake for about 10-12 minutes or until the chips are golden brown and crispy. Keep an eye on them to prevent burning.
- Cool: Remove from the oven and let the chips cool on the baking sheet for 5 minutes before transferring them to a serving platter.
Extra Tips: For an extra touch of realism, you can use blue corn tortillas for a darker appearance that more closely resembles bat wings. If you’re short on time, you can also use pre-cut tortilla chips and season them using the same spice blend before baking. To enhance the flavor, consider serving these chips with a spicy salsa or a guacamole dip, providing a fun and tasty contrast to the crispy bat wings.
Severed Finger Cheese Sticks
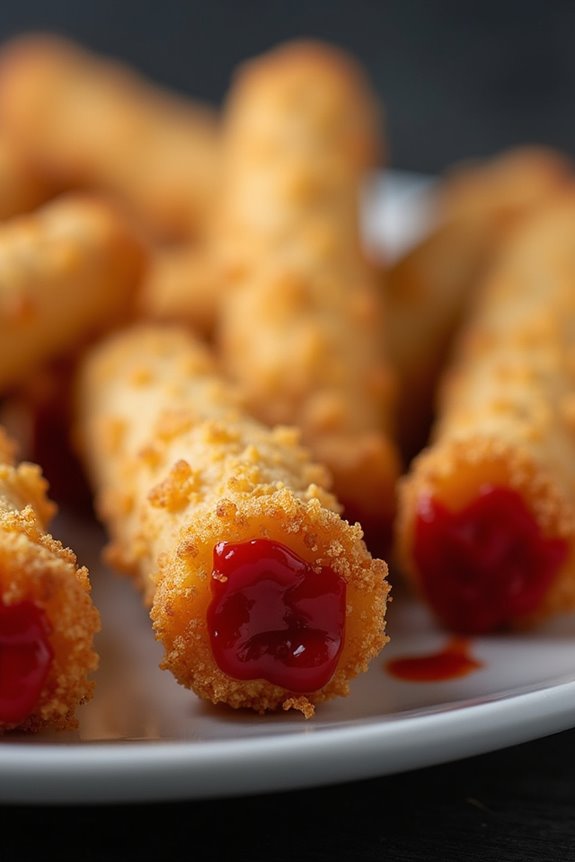
Severed Finger Cheese Sticks are the perfect spooky snack to add a touch of frightful fun to your Halloween party. These gory-looking yet delicious appetizers are made from mozzarella sticks cleverly decorated to resemble severed fingers. They’re easy to prepare, making them an ideal choice for those looking to impress their guests with minimal effort while adding a creepy vibe to the table.
Whether you’re hosting a large get-together or a small family gathering, these cheese sticks are sure to be a hit among both kids and adults alike.
The secret to these Severed Finger Cheese Sticks lies in the detailed decoration that mimics the look of realistic fingers. By using simple ingredients like almonds and ketchup, you can create the illusion of fingernails and bloody stumps, while the mozzarella sticks provide a cheesy delight wrapped in a crunchy crust.
The following recipe will guide you in preparing this dish for 4-6 people, guaranteeing everyone has a spine-chilling snack to enjoy at your Halloween celebration.
Ingredients for Severed Finger Cheese Sticks (Serving size: 4-6 people):
- 12 mozzarella sticks
- 12 whole blanched almonds
- 1 cup all-purpose flour
- 2 large eggs
- 1 cup breadcrumbs
- 1 teaspoon garlic powder
- 1 teaspoon paprika
- Salt and pepper to taste
- Red food coloring or ketchup
- Vegetable oil for frying
Cooking Instructions:
- Prepare the Breading Station: Set up three shallow bowls. In the first bowl, place the flour. In the second bowl, beat the eggs. In the third bowl, combine the breadcrumbs, garlic powder, paprika, salt, and pepper.
- Coat the Mozzarella Sticks: Roll each mozzarella stick first in the flour, then dip it into the beaten eggs, and finally coat it thoroughly with the breadcrumb mixture. Confirm they’re fully covered for a nice, crispy texture.
- Freeze the Coated Sticks: Place the breaded mozzarella sticks on a baking sheet lined with parchment paper and freeze them for about 30 minutes. This helps the breading adhere better during frying.
- Decorate the Fingernails: While the sticks are freezing, take the blanched almonds and use a small amount of red food coloring or ketchup to color one side of the almond. This will be the “bloody nail” for each finger.
- Attach the Fingernails: Once the mozzarella sticks are out of the freezer, press a colored almond onto the end of each stick to resemble a fingernail. Make sure it sticks firmly.
- Fry the Cheese Sticks: Heat vegetable oil in a deep pan over medium-high heat. Once the oil is hot, carefully fry the mozzarella sticks in batches until golden brown and crispy, about 2-3 minutes. Drain them on paper towels to remove excess oil.
- Add the Final Touch: For the severed look, add a small amount of ketchup to the opposite end of the almond to resemble a bloody stump.
Extra Tips:
To enhance the realism of your Severed Finger Cheese Sticks, consider using a toothpick or a knife to create knuckle lines on the sticks before frying. Additionally, confirm that the mozzarella sticks are thoroughly frozen before frying to prevent the cheese from leaking out.
If you’re short on time, use store-bought string cheese sticks as an alternative to mozzarella sticks for a quicker prep. Remember to serve these finger foods while warm for the best gooey cheese experience.
Pumpkin Patch Hummus Cups
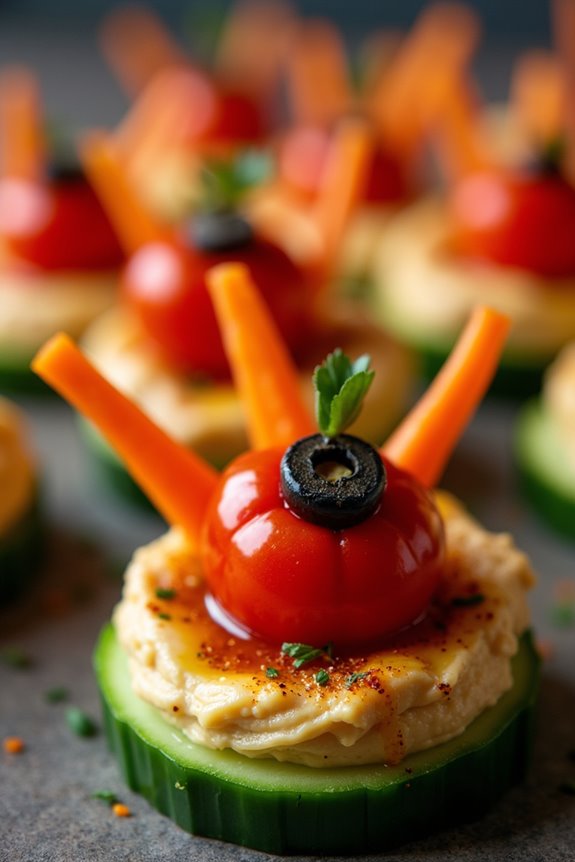
Whether you’re hosting a spooky Halloween party or simply looking for a creative appetizer, Pumpkin Patch Hummus Cups offer a delicious and festive option. These delightful treats combine the creamy, savory flavor of hummus with the fun and whimsy of a pumpkin patch theme. Served in small, individual cups, they’re perfect for mingling guests and are sure to be a hit at your Halloween gathering.
These hummus cups aren’t only fun but also healthy, as they’re packed with protein-rich chickpeas and vibrant vegetables. The playful presentation mimics a mini pumpkin patch, complete with edible “pumpkins” and “vines”. This makes them an ideal choice for both adults and children alike, and the recipe can be easily doubled or tripled to accommodate larger crowds.
Let’s immerse ourselves in creating these charming Pumpkin Patch Hummus Cups for 4-6 people.
Ingredients:
- 2 cups of plain hummus
- 1/2 cup of roasted red peppers, diced
- 1/4 cup of fresh parsley, chopped
- 1/4 cup of black olives, sliced
- 1 medium cucumber, sliced into rounds
- 1 carrot, peeled and cut into thin sticks
- 1/2 cup of cherry tomatoes
- 1/4 teaspoon paprika
- 1/4 teaspoon ground cumin
- 1 tablespoon olive oil
- 6 small plastic or glass cups
Instructions:
- Prepare the Hummus Base: In a medium-sized bowl, mix the plain hummus with paprika and ground cumin. Stir well to combine the spices evenly throughout the hummus. This will add a subtle warmth and depth of flavor.
- Assemble the Cups: Divide the spiced hummus evenly among the 6 small cups, filling each one about halfway. Smooth the top with the back of a spoon to create an even surface.
- Decorate the Pumpkin Patch: For each cup, place a few diced roasted red peppers on top of the hummus for color. Add a couple of black olive slices and sprinkle some chopped parsley to mimic the look of a pumpkin patch.
- Add the Pumpkins and Vines: Insert a few cucumber rounds and carrot sticks upright into the hummus to represent pumpkin vines and stalks. Place cherry tomatoes on top of the cucumber rounds to serve as mini pumpkins.
- Finish with a Drizzle: Lightly drizzle olive oil over the top of each hummus cup for added richness and sheen. This will also help all the toppings stick together.
Extra Tips:
When preparing Pumpkin Patch Hummus Cups, feel free to get creative with the decorations. You can carve little faces into the cherry tomatoes with a small knife to further enhance the Halloween theme.
Additionally, if you wish to make this dish ahead of time, prepare the hummus cups up to the decorating stage and store them in the refrigerator. Just be sure to add the vegetables and olive oil drizzle right before serving to keep everything fresh and crisp.
Zombie Brain Jello Shots
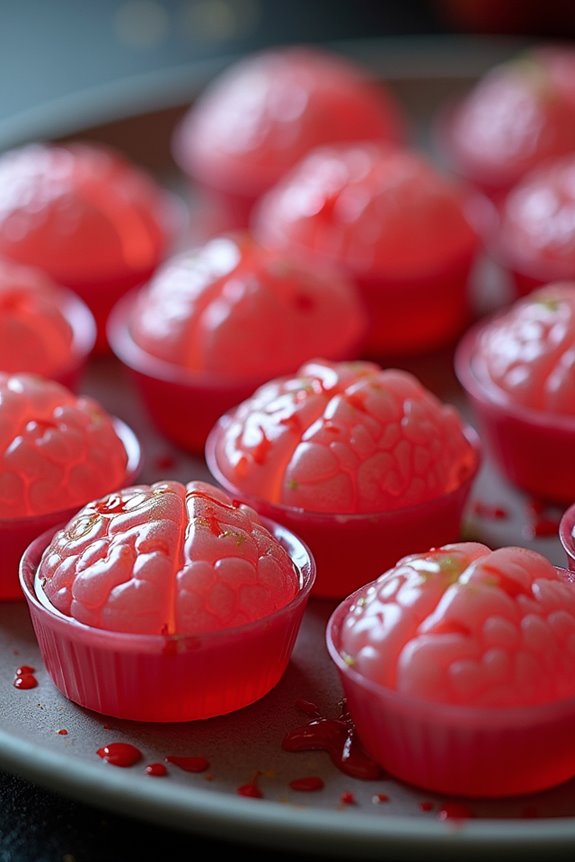
Zombie Brain Jello Shots are a frightfully fun addition to any Halloween party, guaranteed to spook and delight your guests. These gory-looking treats are a clever twist on traditional jello shots, designed to resemble a zombie’s brain. The combination of gelatin, fruit juice, and alcohol creates a wobbly, deliciously creepy treat that captures the essence of Halloween in each bite.
Whether you’re hosting a haunted house gathering or a spooky cocktail party, these jello shots will be a hit with both ghouls and goblins alike.
The beauty of Zombie Brain Jello Shots lies not only in their gruesome appearance but also in their versatility. You can customize the flavors and colors to suit your party theme, making them as eerie or as vibrant as you like. The key is to use brain-shaped molds, available at most kitchen or party supply stores, to achieve the perfect eerie effect.
With some simple preparation, these jello shots are easy to make and serve, allowing you to focus on other elements of your Halloween festivities.
Ingredients for 4-6 servings:
- 1 package (3 oz) flavored gelatin (preferably lime or green apple for a ghoulish green color)
- 1 cup boiling water
- 1/2 cup vodka (chilled)
- 1/2 cup cold water
- 1/4 cup sweetened condensed milk
- Red food coloring or gel
- Brain-shaped silicone molds
Cooking Instructions:
- Prepare the Gelatin: Begin by dissolving the flavored gelatin in 1 cup of boiling water. Stir well until the gelatin is completely dissolved, making certain there are no granules left.
- Mix the Liquids: Once the gelatin is dissolved, add 1/2 cup of chilled vodka and 1/2 cup of cold water to the mixture. Stir until everything is well combined.
- Add the Sweetened Condensed Milk: To give the jello shots a creamy, brain-like appearance, stir in 1/4 cup of sweetened condensed milk. Mix thoroughly until the liquid is uniform in color and texture.
- Color the Mixture: Add a few drops of red food coloring or gel to the mixture to give it a bloody, brain-like appearance. Stir well, and adjust the color to your liking, aiming for a creepy pinkish hue.
- Fill the Molds: Carefully pour the gelatin mixture into brain-shaped silicone molds. Fill each mold to the top and make sure the mixture is evenly distributed.
- Chill the Jello Shots: Place the filled molds in the refrigerator and allow them to chill for at least 2-4 hours, or until the jello is firm and set.
- Unmold and Serve: Once the jello shots are fully set, gently remove them from the molds. Arrange them on a serving platter and serve immediately for the best effect.
Extra Tips:
To enhance the gory appearance, you can drizzle a small amount of red food coloring or raspberry syrup over the jello shots just before serving. This adds an extra touch of bloodiness to the presentation.
Additionally, if you prefer a non-alcoholic version, simply replace the vodka with an equal amount of cold water or fruit juice. Remember to keep the jello shots refrigerated until serving to maintain their shape and texture. Enjoy these spooky treats responsibly!
Graveyard Dirt Cups
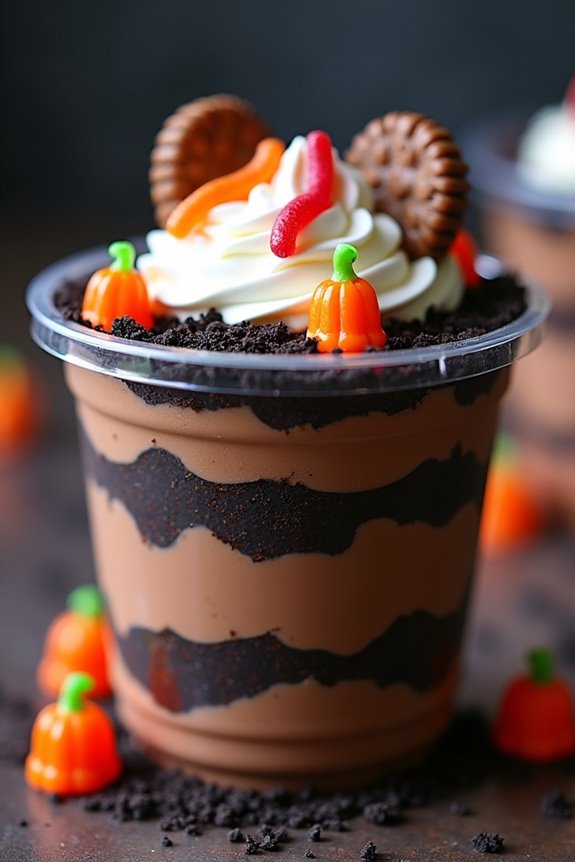
Graveyard Dirt Cups are a spooktacular treat perfect for Halloween parties, combining creamy layers of chocolate pudding and crushed cookies to resemble a hauntingly delicious graveyard. These whimsical desserts aren’t only fun to make but also entertaining to serve, especially with children.
Each cup is creatively adorned with candy decorations to mimic eerie gravesites, making them an exciting addition to your Halloween finger food spread.
The beauty of Graveyard Dirt Cups lies in their simplicity and customization. They can be assembled quickly with store-bought ingredients, allowing you more time to focus on creating the perfect Halloween ambiance.
Whether you’re hosting a party for little ghouls and goblins or planning a spooky soirée for adults, these dirt cups are sure to be a hit. Best of all, they can be prepared in advance, providing you with a stress-free way to deliver a chillingly delightful dessert.
Ingredients for 4-6 servings:
- 2 cups milk
- 1 package (3.9 oz) instant chocolate pudding mix
- 15 chocolate sandwich cookies
- 1 cup whipped topping
- 6 gummy worms
- 6 Halloween-themed candy decorations (e.g., candy pumpkins, tombstone-shaped cookies)
- Clear plastic cups
Instructions:
- Prepare the Pudding: In a large mixing bowl, whisk together the milk and instant chocolate pudding mix until well combined. Allow the mixture to set for about 5 minutes until it thickens.
- Crush the Cookies: Place the chocolate sandwich cookies in a sealed plastic bag. Using a rolling pin or a heavy object, crush the cookies into fine crumbs. These crumbs will mimic the “dirt” for your graveyard cups.
- Layer the Dirt Cups: Start by adding a generous spoonful of crushed cookies to the bottom of each clear plastic cup. Follow with a layer of chocolate pudding, then add another layer of cookie crumbs. Repeat the layers until the cups are nearly full, ending with a layer of cookie crumbs on top.
- Add Toppings: Top each cup with a dollop of whipped topping. Stick a few gummy worms into each cup so they look like they’re “crawling” out of the dirt. Add your Halloween-themed candy decorations to create a graveyard scene on top of each cup.
- Chill: Place the finished dirt cups in the refrigerator for at least 30 minutes to allow the flavors to meld and the pudding to firm up.
Extra Tips:
For an added touch of spookiness, use edible markers to write spooky messages or names on the tombstone-shaped cookies.
You can also mix in a few drops of green food coloring into the whipped topping to give it a ghoulish hue. If you’re preparing these cups for a party, consider assembling them in advance and keeping them chilled until serving time.
This way, you can focus on enjoying the festivities without worrying about last-minute preparations.
Skeleton Bone Breadsticks

Skeleton Bone Breadsticks are a spooky and delicious addition to your Halloween finger food spread. These cleverly shaped breadsticks mimic the eerie look of skeletal bones, making them a fun yet creepy snack for your Halloween party. Not only are they visually appealing, but they’re also incredibly tasty, with a crispy exterior and a soft, chewy interior.
Perfect for serving 4-6 people, these breadsticks are made using simple ingredients and can easily be prepared in your kitchen. They pair wonderfully with a variety of dips, such as marinara sauce or garlic butter, enhancing their flavor and making them a crowd favorite. Whether you’re hosting a Halloween gathering or just want to surprise your family with a festive treat, these Skeleton Bone Breadsticks are sure to be a hit.
Ingredients:
- 1 packet active dry yeast (2 1/4 teaspoons)
- 1 cup warm water (about 110°F)
- 2 tablespoons sugar
- 3 cups all-purpose flour
- 1 teaspoon salt
- 3 tablespoons olive oil
- 1 egg
- Coarse sea salt, for sprinkling
- 1 tablespoon sesame seeds (optional)
- Marinara sauce or garlic butter, for serving
Instructions:
- Prepare the Dough: In a large mixing bowl, dissolve the sugar in warm water. Sprinkle the yeast over the top and let it sit for about 5 minutes until it becomes frothy.
- Mix Ingredients: Add the flour, salt, and olive oil to the yeast mixture. Stir until the dough comes together, then knead it on a floured surface for about 5-7 minutes until smooth and elastic.
- First Rise: Transfer the dough to a lightly oiled bowl, cover it with a damp cloth, and let it rise in a warm place for about 1 hour, or until it has doubled in size.
- Shape the Dough: Punch down the dough and divide it into 12 equal pieces. Roll each piece into a long rope, about 6-8 inches long. Form each rope into a bone shape by tying a loose knot at each end and stretching the middle slightly.
- Second Rise: Place the shaped dough on a parchment-lined baking sheet, cover it with a cloth, and let it rise for another 20 minutes.
- Preheat Oven: Preheat your oven to 375°F (190°C).
- Prepare for Baking: Beat the egg and brush it over the top of each breadstick. Sprinkle with coarse sea salt and sesame seeds if desired.
- Bake: Place the baking sheet in the preheated oven and bake for 15-20 minutes, or until the breadsticks are golden brown and cooked through.
- Serve: Remove from the oven and let cool slightly on a wire rack. Serve warm with marinara sauce or garlic butter on the side for dipping.
Extra Tips:
For extra flavor, consider adding garlic powder or Italian seasoning to the dough before kneading. If you want to make ahead, you can prepare the dough a day in advance and let it rise in the refrigerator overnight. Just make sure to bring it to room temperature before shaping.
To keep the breadsticks warm for serving, you can wrap them in aluminum foil and place them in a low oven until ready to serve. These breadsticks freeze well and can be reheated in the oven for a quick snack later.