

Hey there, lovely readers. Are you ready to make this year’s Halloween potluck at work absolutely spook-tacular? I’ve got some enchanting treats that’ll have your colleagues raving. Think Witch’s Brew Punch bubbling away, Creepy Crawly Deviled Eggs, and Mummy Jalapeño Poppers. Let’s brew up some more magical recipes together!
Witch’s Brew Punch
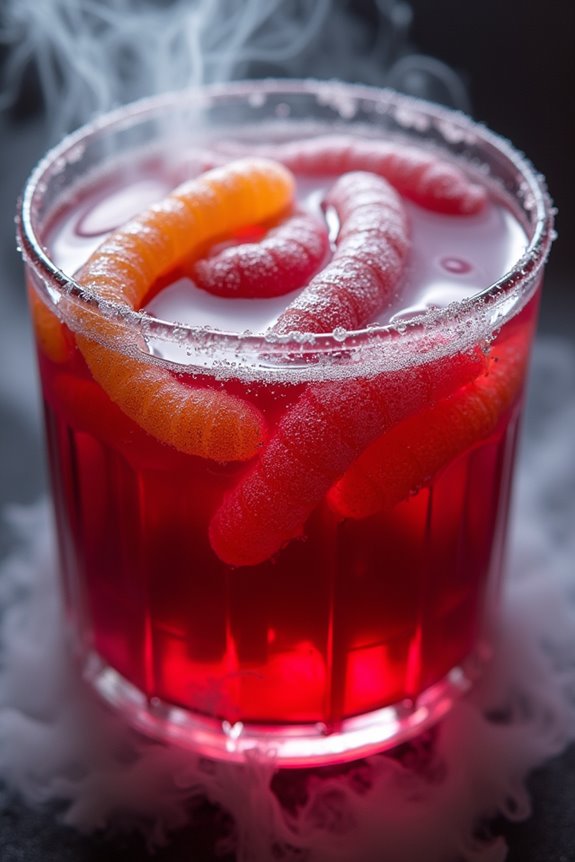
Celebrate Halloween at your workplace with a bewitching treat that’s sure to be a hit at your potluck—Witch’s Brew Punch. This spooky concoction is both fun and delicious, perfect for bringing a little magic to your office gathering. With its vibrant color and bubbling presentation, Witch’s Brew Punch will captivate your coworkers and add a festive flair to your Halloween celebration.
Witch’s Brew Punch isn’t only visually appealing but also delightfully invigorating. The combination of fruity flavors and a fizzy twist creates a drink that’s both tantalizing and easy to make. This recipe is designed to serve 4-6 people, making it an ideal choice for an office potluck. Serve it in a cauldron-like punch bowl with a ladle, and watch as your coworkers are enchanted by its charm and flavor.
Ingredients (Serves 4-6 people):
- 2 cups grape juice
- 1 cup cranberry juice
- 1 cup pineapple juice
- 2 cups ginger ale
- 1 cup lemon-lime soda
- 1 cup club soda
- 1/4 cup fresh lime juice
- 1/2 cup orange juice
- 1/4 cup grenadine syrup
- Ice cubes
- Optional garnish: gummy worms or plastic spiders
Instructions:
- Prepare the Base: In a large punch bowl, combine the grape juice, cranberry juice, and pineapple juice. Stir well to confirm the juices are thoroughly mixed.
- Add the Fizz: Pour in the ginger ale, lemon-lime soda, and club soda. Stir gently to combine, being careful not to lose too much of the carbonation.
- Incorporate Citrus: Add the fresh lime juice and orange juice to the punch. Stir to blend the citrus flavors into the mixture.
- Create the Color: Slowly add the grenadine syrup to the punch. Stir gently to distribute the syrup evenly, creating a rich, deep color reminiscent of a witch’s brew.
- Chill and Garnish: Add a generous amount of ice cubes to keep the punch chilled. For a spooky touch, garnish with gummy worms or plastic spiders, letting them float on the surface.
- Serve: Ladle the punch into cups or glasses, ensuring each serving has a piece of the fun garnish for added Halloween flair.
Extra Tips:
When preparing Witch’s Brew Punch, consider using a clear glass punch bowl to showcase its vibrant color and fun garnishes.
For an even spookier effect, you can place a small amount of dry ice in a separate, secure container within the punch bowl to create a foggy, bubbling cauldron effect.
If opting for dry ice, make sure it isn’t directly in contact with the punch itself to confirm safety. Additionally, adjust the sweetness to your liking by varying the amount of grenadine syrup or adding a splash more of soda.
Creepy Crawly Deviled Eggs
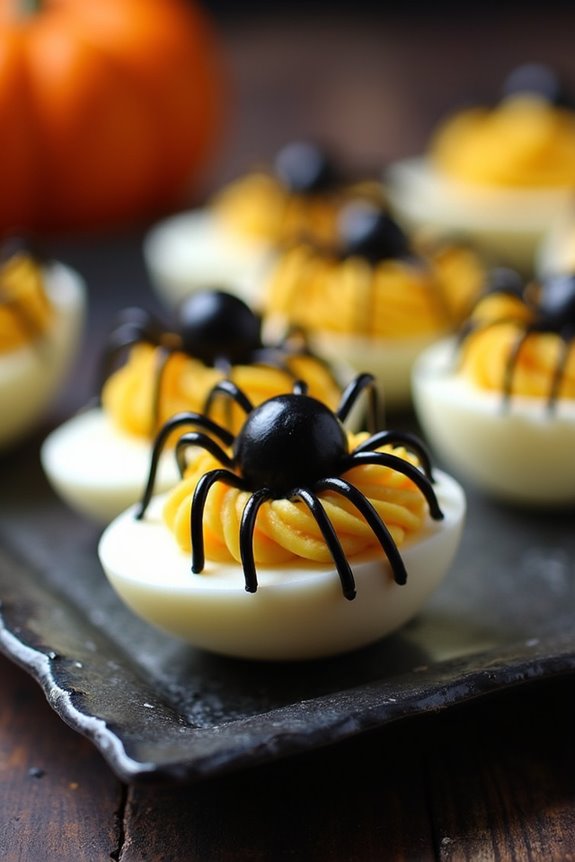
If you’re looking to add a spine-chilling dish to your Halloween potluck, these Creepy Crawly Deviled Eggs are the perfect choice. Not only do they taste delicious, but their spooky appearance will surely grab the attention of your co-workers. The classic deviled egg filling is given a sinister twist with the addition of olive spiders, making them both fun and festive.
Whether you’re a Halloween enthusiast or just love a good themed dish, these deviled eggs will make a great addition to your office potluck spread. The key to making these deviled eggs truly creepy lies in the decoration. By using black olives to create tiny spiders on top of each egg half, you transform a simple appetizer into something special.
The eggs are easy to make ahead of time, allowing you to focus on other aspects of your Halloween festivities. The combination of creamy egg yolk filling and the briny taste of olives creates a flavorful bite that will satisfy both the taste buds and the imagination.
Ingredients (Serves 4-6 people):
- 6 large eggs
- 1/4 cup mayonnaise
- 1 teaspoon Dijon mustard
- 1 teaspoon white vinegar
- Salt and pepper to taste
- 12 black olives
Cooking Instructions:
- Boil the Eggs: Place the eggs in a medium-sized saucepan and cover them with cold water. Bring the water to a boil over medium-high heat. Once boiling, remove the saucepan from the heat, cover, and let the eggs sit for 10-12 minutes.
- Cool and Peel: Drain the hot water and transfer the eggs to a bowl of ice water to cool for about 5 minutes. Once cooled, gently tap each egg on a hard surface and peel off the shells.
- Prepare the Filling: Slice the peeled eggs in half lengthwise. Carefully remove the yolks and place them in a small mixing bowl. Arrange the egg whites on a serving platter.
- Mix the Filling: Mash the yolks with a fork until they reach a crumbly consistency. Add mayonnaise, Dijon mustard, and white vinegar to the bowl, and mix until smooth. Season with salt and pepper to taste.
- Fill the Egg Whites: Spoon the yolk mixture into a piping bag or a resealable plastic bag with a corner snipped off. Pipe the filling into the hollow of each egg white half.
- Create the Olive Spiders: Slice the olives in half. Use one half for the spider’s body and slice the other half into thin strips to form the legs. Place an olive half on top of each filled egg to form the spider’s body, and arrange the strips around it to complete the spider shape.
Extra Tips:
For the best results, make sure your eggs are at room temperature before boiling, as this helps in even cooking. If you don’t have a piping bag, a spoon can be used to fill the eggs, though it may not be as precise.
You can also add a touch of paprika or a dash of hot sauce to the yolk mixture for extra flavor. Finally, prepare the eggs a few hours in advance and store them in the refrigerator; this will give the flavors time to meld together while keeping them fresh for your potluck.
Mummy Jalapeño Poppers
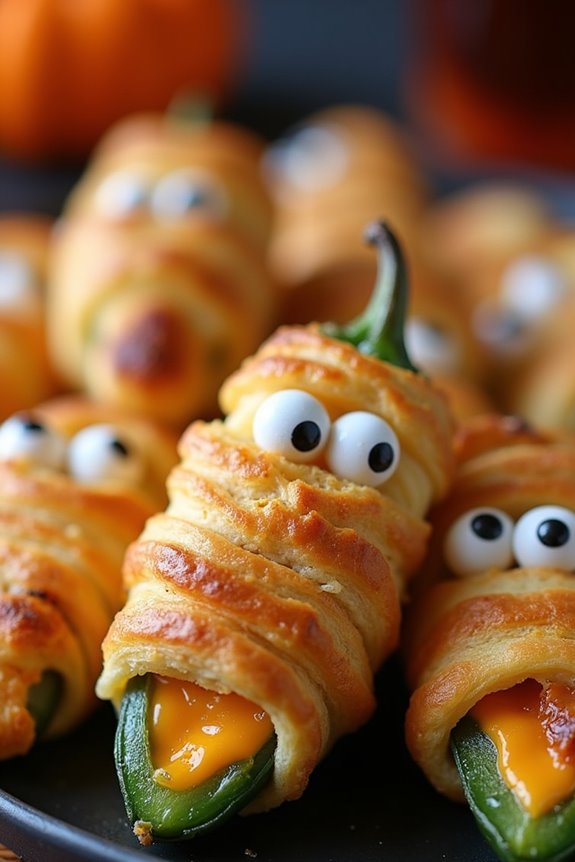
Mummy Jalapeño Poppers are a spooky and scrumptious treat perfect for a Halloween potluck at work. These deliciously creepy appetizers bring a festive twist to classic jalapeño poppers by wrapping them in strips of crescent roll dough to resemble mummies. The combination of spicy jalapeños, creamy cheese filling, and buttery crescent roll dough makes these poppers an irresistible snack that will be a hit at any Halloween gathering.
These Mummy Jalapeño Poppers aren’t only fun to eat but also simple to make. They can be prepared in advance and baked just before serving, making them a convenient choice for busy hosts or those bringing a dish to share at a work event. With just a few basic ingredients and a little creativity, you can whip up these playful poppers that are sure to impress your colleagues and add a touch of Halloween spirit to your potluck spread.
Ingredients for 4-6 servings:
- 12 large jalapeño peppers
- 8 oz cream cheese, softened
- 1 cup shredded cheddar cheese
- 1 tsp garlic powder
- 1 tsp onion powder
- 1/2 tsp salt
- 1/4 tsp ground black pepper
- 1 can (8 oz) crescent roll dough
- 24 candy eyeballs
Cooking Instructions:
- Prepare the Jalapeños: Preheat your oven to 375°F (190°C). Slice the jalapeños in half lengthwise and remove the seeds and membranes to minimize the heat. Set them aside for filling.
- Make the Cheese Mixture: In a medium-sized bowl, mix together the softened cream cheese, shredded cheddar cheese, garlic powder, onion powder, salt, and black pepper until well combined.
- Fill the Jalapeños: Using a spoon or a piping bag, fill each jalapeño half with the cheese mixture, ensuring they’re generously filled but not overflowing.
- Wrap the Mummies: Open the can of crescent roll dough and divide it into rectangles by pressing together the perforations. Cut each rectangle into thin strips, approximately 1/4-inch wide. Carefully wrap each filled jalapeño half with 2-3 strips of dough, leaving a small gap for the eyes.
- Add the Eyes: Place the wrapped jalapeños on a baking sheet lined with parchment paper. Gently press two candy eyeballs onto each jalapeño, securing them in the gap between the dough strips.
- Bake the Poppers: Bake in the preheated oven for 20-25 minutes, or until the dough is golden brown and the cheese is bubbly. Remove from the oven and allow them to cool slightly before serving.
Extra Tips:
When preparing Mummy Jalapeño Poppers, wearing gloves is recommended while handling jalapeños to avoid irritation from the seeds and oils.
If you prefer milder poppers, consider using mini sweet peppers instead of jalapeños. For added flavor, you can sprinkle a little bacon bits into the cheese mixture before filling the peppers.
These poppers can also be prepped ahead of time and refrigerated until ready to bake, making them convenient for preparing in advance.
Ghostly Pizza Bagels
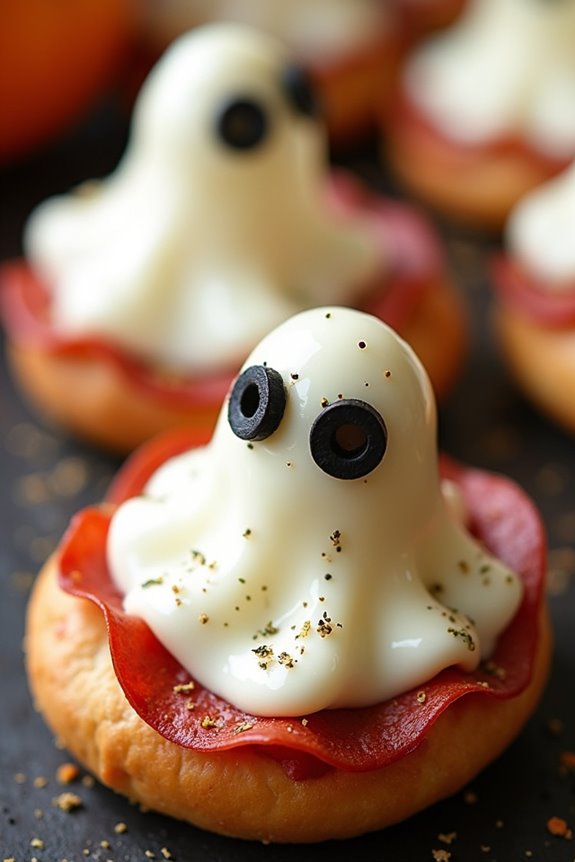
Ghostly Pizza Bagels are a fun and spooky snack perfect for a Halloween potluck at work. These mini pizzas bring a festive flair to any gathering with their ghostly appearance and crowd-pleasing taste. Not only are they easy to make, but they also provide a delightful twist on classic pizza that colleagues will love. The combination of chewy bagels, tangy pizza sauce, and gooey cheese creates a delicious treat that’s both satisfying and visually appealing.
These Ghostly Pizza Bagels can be customized with your favorite toppings, making them versatile for all taste preferences. The ghost shapes are made using slices of mozzarella cheese, giving each bagel a hauntingly fun look. This recipe serves 4-6 people, making it perfect for a small office gathering or as part of a larger spread. Whether you’re a fan of traditional pepperoni or prefer veggie options, these pizza bagels are sure to be a hit.
Ingredients:
- 6 mini bagels, sliced in half
- 1 cup pizza sauce
- 12 slices of mozzarella cheese
- 24 slices of pepperoni (optional)
- 1/2 cup sliced black olives (optional)
- 1 tablespoon olive oil
- Italian seasoning or dried oregano (optional)
Cooking Instructions:
- Preheat the Oven: Preheat your oven to 375°F (190°C) to guarantee it’s hot enough for baking the bagels evenly.
- Prepare the Bagels: Place the sliced mini bagels on a baking sheet, cut side up. Lightly brush each half with olive oil to help them crisp up while baking.
- Add Sauce: Spread a generous tablespoon of pizza sauce over each bagel half, making sure the surface is evenly covered.
- Create Ghosts: Cut the mozzarella slices into ghost shapes using a small knife or cookie cutter. Place one ghost-shaped mozzarella slice onto each bagel half.
- Add Toppings: If desired, add pepperoni slices and black olives to the bagels. Position the olives as eyes on the ghostly cheese for a more festive look.
- Season the Bagels: Sprinkle a little Italian seasoning or dried oregano over the top for added flavor.
- Bake: Place the baking sheet in the preheated oven and bake for 10-12 minutes, or until the cheese is melted and bubbly, and the bagels are golden brown.
- Serve: Remove from the oven and let cool slightly before serving. Arrange the Ghostly Pizza Bagels on a platter for a spooky presentation.
Extra Tips:
For best results, use fresh bagels to guarantee they become perfectly crisp and not soggy. When cutting the cheese slices into ghost shapes, use a paring knife for more precise edges.
If you’re short on time, consider using pre-sliced mozzarella cheese and simply cut them into ghost shapes as desired. Feel free to get creative with the toppings; you can add green peppers, mushrooms, or even pineapple for a sweet twist.
These pizza bagels are best enjoyed warm, so consider reheating them slightly before serving if made in advance.
Spooky Spider Dip
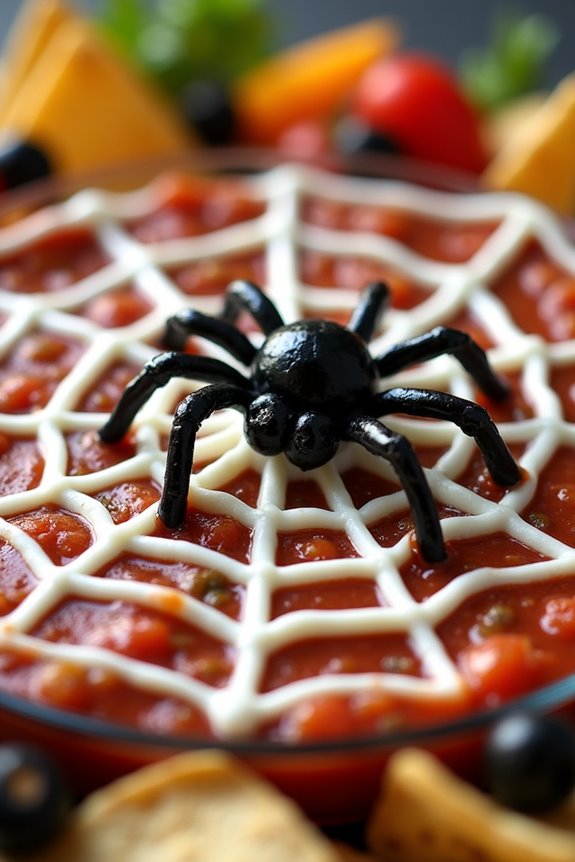
The centerpiece of this dish is the spider web design, achieved with sour cream piped over a layer of salsa-topped cream cheese. The “spiders” are created using black olives, adding a realistic touch to this ghoulishly good snack.
Not only is it visually appealing, but it’s also incredibly easy to prepare, making it an ideal addition to any Halloween gathering. Pair it with tortilla chips or assorted veggies for a deliciously eerie appetizer that will have everyone asking for the recipe.
Ingredients (Serves 4-6 people):
- 8 oz cream cheese, softened
- 1 cup salsa
- 1/2 cup sour cream
- 1/4 cup sliced black olives
- Tortilla chips or assorted veggies for dipping
Cooking Instructions:
- Prepare the Cream Cheese Base: In a medium-sized bowl, soften the cream cheese by leaving it at room temperature for about 15 minutes. Once softened, spread the cream cheese evenly over the bottom of a shallow serving dish or pie plate using a spatula.
- Add the Salsa Layer: Pour the salsa over the cream cheese layer, spreading it evenly to cover the entire surface. The salsa will add a burst of flavor and a splash of color to the dish.
- Create the Spider Web: Transfer the sour cream into a small resealable plastic bag. Cut a tiny corner off the bag to create a makeshift piping bag. Pipe concentric circles of sour cream over the salsa, starting from the center and working your way outwards.
- Design the Web: Using a toothpick or the tip of a knife, drag lines from the center of the circles outwards to create the spider web design. Wipe the toothpick clean between each drag to maintain clean lines.
- Add the Spiders: Slice a few black olives in half to create the spider bodies. Use smaller strips of the olives to make the legs, arranging them around the olive half to complete the spider look.
- Serve: Once the design is complete, refrigerate the dip for at least 30 minutes to allow the flavors to meld. Serve chilled with tortilla chips or assorted veggies.
Extra Tips:
To guarantee your Spooky Spider Dip is a hit at the potluck, consider using a combination of mild and spicy salsas to cater to different taste preferences.
You can also add a layer of shredded lettuce or grated cheese between the cream cheese and salsa for additional flavor and texture.
If you’re making this dish ahead of time, assemble it up to the sour cream piping stage, then complete the web design just before serving to keep the design fresh and crisp.
Finally, encourage creativity by letting guests add their own spider designs using extra olives!
Pumpkin Patch Brownies
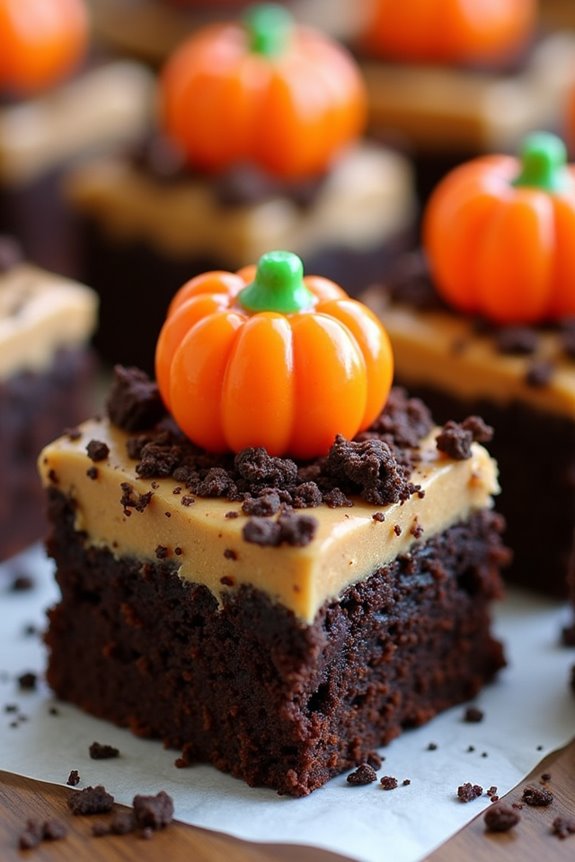
Are you aiming to add a touch of Halloween magic to your office potluck? Search no more than these delightful Pumpkin Patch Brownies. These rich, fudgy brownies are topped with a layer of creamy pumpkin frosting and decorated to resemble a mini pumpkin patch.
They’re not only delicious but also visually stunning, making them the perfect centerpiece for your Halloween celebration at work. With their blend of chocolate and pumpkin flavors, these brownies are sure to be a hit among your colleagues.
This recipe yields enough for 4-6 people, making it perfect for sharing at your workplace gathering. The base is a classic chocolate brownie, accented with a hint of cinnamon to enhance the seasonal theme. The frosting is a smooth pumpkin-flavored topping that brings out the essence of autumn in every bite.
Whether you’re a baking novice or a seasoned pro, these Pumpkin Patch Brownies are easy to make and require minimal ingredients.
Ingredients (Serves 4-6):
- 1/2 cup unsalted butter
- 1 cup granulated sugar
- 2 large eggs
- 1 teaspoon vanilla extract
- 1/3 cup unsweetened cocoa powder
- 1/2 cup all-purpose flour
- 1/4 teaspoon salt
- 1/4 teaspoon ground cinnamon
- 1/4 teaspoon baking powder
For the pumpkin frosting:
- 1/2 cup canned pumpkin puree
- 1/2 cup cream cheese, softened
- 1/4 cup powdered sugar
- 1/2 teaspoon ground cinnamon
- 1/4 teaspoon nutmeg
For decoration:
- 1/4 cup crushed chocolate sandwich cookies
- Candy pumpkins or candy corn
Cooking Instructions:
- Preheat Oven and Prepare Pan: Preheat your oven to 350°F (175°C). Line an 8×8-inch baking pan with parchment paper, leaving some overhang for easy removal.
- Make Brownie Batter: In a medium saucepan, melt the butter over low heat. Remove from heat and stir in sugar, eggs, and vanilla extract until smooth. Sift in cocoa powder, flour, salt, cinnamon, and baking powder. Mix until well combined.
- Bake Brownies: Pour the brownie batter into the prepared baking pan and spread it evenly. Bake in the preheated oven for 20-25 minutes, or until a toothpick inserted into the center comes out with a few moist crumbs. Allow to cool completely in the pan on a wire rack.
- Prepare Pumpkin Frosting: In a medium bowl, beat together the pumpkin puree, softened cream cheese, powdered sugar, cinnamon, and nutmeg until smooth and creamy.
- Assemble and Decorate: Once the brownies are cooled, spread the pumpkin frosting evenly over the top. Sprinkle crushed chocolate sandwich cookies over the frosting to mimic soil. Place candy pumpkins or candy corn strategically to create a pumpkin patch effect.
- Chill and Serve: Refrigerate the assembled brownies for at least 30 minutes to set the frosting. Once set, lift the brownies from the pan using the parchment paper overhang, cut into squares, and serve.
Extra Tips:
For the best results, make sure your cream cheese is fully softened before mixing with the pumpkin puree to avoid lumps in the frosting. If you prefer a more intense pumpkin flavor, you can add a touch more cinnamon or a pinch of ginger to the frosting.
These brownies can be made a day in advance and stored in the refrigerator, which allows the flavors to meld beautifully. Finally, feel free to get creative with the decorations – adding green icing for vines or using edible glitter can enhance the festive appeal of your Pumpkin Patch Brownies!
Monster Meatballs
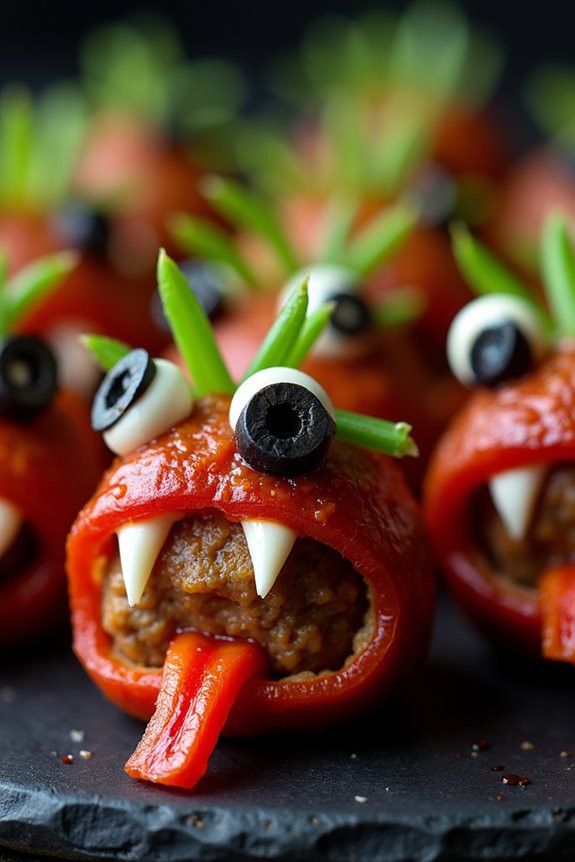
Monster Meatballs are a spooktacular addition to any Halloween potluck at work, offering a deliciously ghoulish twist on a classic favorite. These savory meatballs aren’t only flavorful but are also creatively presented to capture the Halloween spirit. Perfect for serving a crowd, Monster Meatballs will surely be the highlight of the party table, enticing both the young and the young at heart.
The combination of ground meat, spices, and fun decorations transforms ordinary meatballs into a monstrously delightful dish. This recipe for Monster Meatballs is designed to serve 4-6 people, making it ideal for a small to medium-sized gathering. The meatballs are seasoned with herbs and spices, baked to perfection, and then decorated to resemble cute and creepy monsters.
Whether you’re looking to impress your coworkers with your culinary creativity or simply want to enjoy a hearty, festive dish, these meatballs are sure to be a hit. Let’s plunge into the ingredients and steps needed to bring these creatures to life.
Ingredients:
- 1 pound ground beef
- 1/2 cup breadcrumbs
- 1/4 cup grated Parmesan cheese
- 1 large egg
- 2 cloves garlic, minced
- 1 teaspoon Italian seasoning
- Salt and pepper to taste
- 1/4 cup ketchup
- 1/4 cup barbecue sauce
- Black olives (sliced for eyes)
- Mozzarella cheese sticks (cut into small pieces for teeth)
- Red bell pepper (cut into strips for tongues)
- Green onions (cut for hair)
Cooking Instructions:
- Preheat the Oven: Preheat your oven to 375°F (190°C). This will guarantee that the meatballs cook evenly and develop a nice crust.
- Mix Ingredients: In a large mixing bowl, combine the ground beef, breadcrumbs, Parmesan cheese, egg, minced garlic, Italian seasoning, salt, and pepper. Use your hands to mix the ingredients thoroughly until everything is well combined. This mixture forms the base of your meatballs, ensuring they’re flavorful and hold together well.
- Shape the Meatballs: Form the mixture into 1.5-inch meatballs using your hands. Place them on a baking sheet lined with parchment paper, ensuring they’re evenly spaced to allow for even cooking.
- Bake the Meatballs: Place the baking sheet in the preheated oven and bake the meatballs for 20-25 minutes, or until they’re browned and cooked through. You can check for doneness by cutting into one meatball to ensure it’s no longer pink inside.
- Prepare the Sauce: While the meatballs are baking, mix the ketchup and barbecue sauce in a small bowl. This mixture will serve as a flavorful glaze for the meatballs.
- Glaze the Meatballs: Once the meatballs are cooked, remove them from the oven and brush the tops with the ketchup and barbecue sauce mixture. This will add a sweet and tangy layer of flavor.
- Decorate: Let the meatballs cool slightly, then let your creativity shine. Use slices of black olives for eyes, mozzarella cheese pieces for teeth, red bell pepper strips for tongues, and green onions for hair. Arrange these elements on the meatballs to create monster faces.
- Serve: Arrange the Monster Meatballs on a platter and serve them warm. Enjoy the combination of flavors and the fun presentation!
Extra Tips:
When making Monster Meatballs, feel free to experiment with the decorations. You can use different vegetables or cheeses to create unique monster faces.
If you’re transporting these to a potluck, assemble the decorations at the venue to keep them fresh and intact. Additionally, consider offering a side of marinara sauce for dipping to add another layer of flavor. The key is to have fun with the presentation while guaranteeing the meatballs remain delicious and visually appealing.
Graveyard Taco Dip

Graveyard Taco Dip is the perfect spooky addition to your Halloween potluck at work. This layered dip combines all the flavors you love in a taco with a ghoulish twist, featuring a decorative top layer that resembles a graveyard. Delicious and festive, it’s sure to be a hit among your colleagues, offering both a visual treat and a savory delight. The dish is designed to serve 4-6 people, making it a great choice for sharing with a small group.
This taco dip isn’t only visually striking but also easy to make, with layers of refried beans, seasoned sour cream, guacamole, and cheese. The top is adorned with tortilla chips shaped like tombstones and other ghoulish decorations to enhance the Halloween theme. Graveyard Taco Dip is a crowd-pleaser with its rich combination of textures and flavors, providing a perfect balance of creamy, tangy, and spicy elements.
Ingredients (Serves 4-6):
- 1 can (16 oz) refried beans
- 1 packet taco seasoning
- 1 cup sour cream
- 1 cup guacamole
- 1 cup shredded cheddar cheese
- 1 cup diced tomatoes
- 1/2 cup sliced black olives
- 1/4 cup chopped green onions
- Tortilla chips (tombstone-shaped or regular)
- 2 tablespoons chopped cilantro (optional for garnish)
Cooking Instructions:
- Prepare the Sour Cream Mixture: In a small bowl, mix the sour cream with half of the taco seasoning packet until well combined. Set aside.
- Layer the Refried Beans: Spread the refried beans evenly across the bottom of a shallow serving dish or a 9×9 inch square dish. This layer will act as the base of your dip.
- Add the Sour Cream: Gently spread the sour cream mixture over the refried beans, ensuring an even layer.
- Layer the Guacamole: Carefully spread the guacamole on top of the sour cream layer. Be gentle to avoid mixing the layers.
- Sprinkle the Cheese: Evenly distribute the shredded cheddar cheese over the guacamole for a rich and cheesy layer.
- Add Toppings: Scatter the diced tomatoes, black olives, and green onions over the cheese layer. These toppings will add color and extra flavor to your dip.
- Create the Graveyard Scene: Insert tortilla chips upright into the dip to resemble tombstones. If possible, use a food-safe marker to write spooky names or designs on the chips for added effect.
- Garnish: Optionally, sprinkle chopped cilantro over the top of the dip for a fresh and vibrant garnish.
Extra Tips:
When making Graveyard Taco Dip, feel free to customize the toppings based on your preferences or dietary restrictions. You can add jalapeños for extra heat or substitute Greek yogurt for sour cream to lighten the dish.
For a more festive appearance, consider using Halloween-themed cookie cutters to shape your tortilla chips into various spooky designs. Additionally, assembling the dip just before serving will keep the layers fresh and the chips crispy.
Remember to have extra tortilla chips on hand for dipping, as they’ll likely disappear quickly in this deliciously eerie dish.
Vampire Veggie Platter
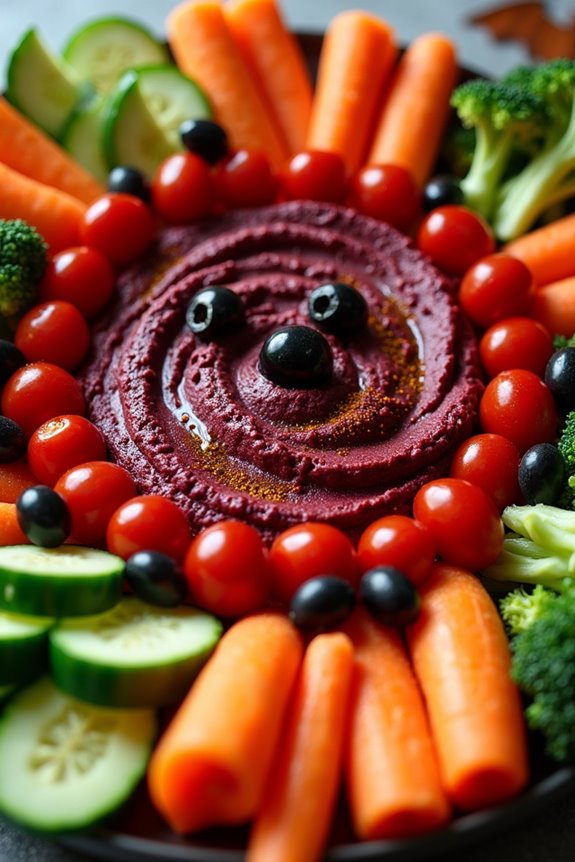
Halloween is the perfect time to get creative with your culinary presentations, and a Vampire Veggie Platter offers a fun and healthy way to celebrate at work. This veggie platter combines a variety of fresh vegetables arranged into a spooky yet inviting display, perfect for a Halloween potluck. The colorful array of veggies isn’t only visually appealing but also provides a nutritious option among the sweet treats usually present during the festivities.
The key to a successful Vampire Veggie Platter is in the arrangement and choice of vegetables. By using a mix of red, green, and dark-hued vegetables, you can create a palette reminiscent of a vampire’s dark and mysterious allure. Served with a blood-red dip, such as a beet hummus or a spicy sriracha yogurt dip, this platter will surely catch the eyes of your coworkers and provide a revitalizing break from sugary snacks.
Ingredients (Serves 4-6):
- 1 cup cherry tomatoes
- 1 red bell pepper, sliced
- 1 cucumber, sliced
- 1 cup broccoli florets
- 1/2 cup black olives
- 1/2 cup baby carrots
- 1 cup beet hummus (or dip of choice)
- 1 small round loaf of pumpernickel bread (optional, for decoration)
Instructions:
- Prepare the Vegetables: Rinse all the vegetables thoroughly under cold running water. Pat them dry with a clean kitchen towel or paper towels to guarantee they’re free of excess moisture.
- Slice and Arrange: Slice the red bell pepper into thin strips, cut the cucumber into round slices, and separate the broccoli into bite-sized florets. Arrange the vegetables on a large serving platter to form a circular pattern, alternating colors to create a visually appealing contrast.
- Create the Vampire Effect: Position the cherry tomatoes and black olives at the center of the platter to represent vampire “eyes.” You can slice one or two cherry tomatoes in half to create a “pupil” effect with the olives.
- Add the Dip: Place the beet hummus or your choice of dip in a small bowl at the center of the platter. You can garnish the dip with a drizzle of olive oil or a sprinkle of paprika for an added touch of color.
- Decorate with Bread (Optional): If using the pumpernickel bread, cut it into small, bat-shaped pieces using a cookie cutter, and place them around the edges of the platter for a thematic decoration.
- Serve: Place the platter on the table with small serving tongs or cocktail picks for easy grabbing. The dip can be served with additional small bowls for each guest.
Extra Tips: When selecting vegetables, choose those that are fresh and firm for the best presentation and taste. You can also add other vegetables like radishes or red cabbage for additional color and texture.
If you want to make the platter even more thematic, consider using Halloween-themed cookie cutters to shape some of the vegetables. Keep the platter refrigerated until serving to maintain freshness, and if possible, prepare it on the day of the event to guarantee the vegetables remain crisp.
Haunted Cheese Board
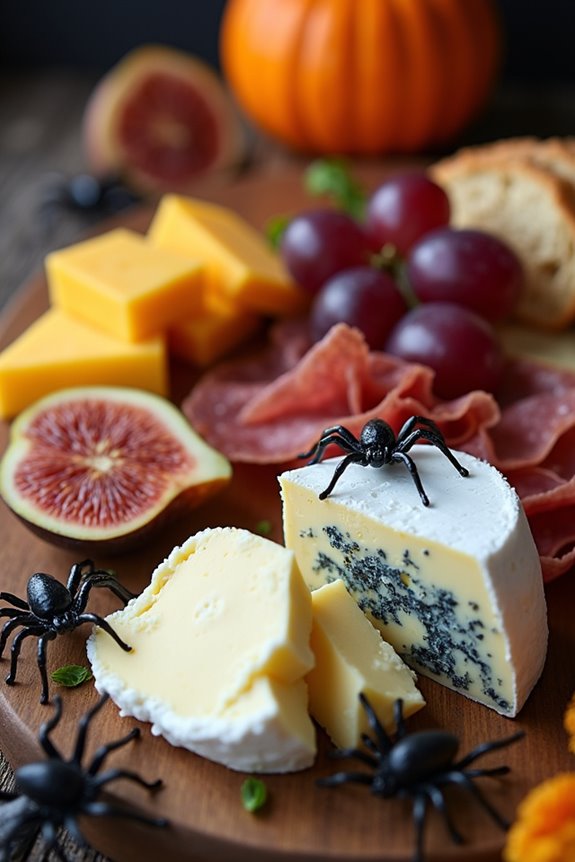
A cheese board is a classic choice for any gathering, but if you’re looking to add a spooky twist for your Halloween potluck at work, a Haunted Cheese Board is the perfect option. This themed cheese board combines a selection of cheeses, meats, and seasonal fruits with some eerie elements to create a visually striking and delicious spread. Not only will it be a treat for the taste buds, but it will also serve as a delightful centerpiece for your Halloween celebration.
To craft this delightfully creepy cheese board, select a variety of cheeses that offer different tastes and textures, such as creamy brie, sharp cheddar, and tangy blue cheese. Complement these with a selection of cured meats, crackers, and fresh fruits like grapes and figs. Add a dash of Halloween flair with decorative items such as plastic spiders, cobwebs, and small pumpkins. Your colleagues will be impressed by both the creativity and the flavors of this hauntingly good dish.
Ingredients for 4-6 people:
- 200g brie cheese
- 200g sharp cheddar cheese
- 200g blue cheese
- 150g salami slices
- 150g prosciutto slices
- 1 small bunch of grapes
- 4 figs, quartered
- 1 baguette, sliced
- 100g assorted crackers
- 1 small pumpkin or gourd (for decoration)
- 2-3 plastic spiders (for decoration)
- A small handful of edible flowers or herbs (optional)
- A drizzle of honey (optional)
Instructions:
- Select Your Board: Choose a large wooden board or platter as the base for your cheese board. Verify it’s clean and dry before arranging the ingredients.
- Arrange the Cheeses: Place the brie, cheddar, and blue cheese on different sections of the board. Cut the cheddar into cubes or slices to make it easier for guests to serve themselves.
- Add the Meats: Roll the salami and prosciutto into small rosettes or fold them neatly, then arrange them around the cheeses. This creates a nice contrast in texture and makes the board visually appealing.
- Incorporate Fruits: Arrange the grapes and quartered figs around the cheese and meats. The grapes can be left in small bunches, while the figs add a pop of color and sweetness.
- Include Bread and Crackers: Place the sliced baguette and assorted crackers on the board, making sure they’re accessible from all sides.
- Decorate: Add the small pumpkin or gourd in a corner of the board and scatter a few plastic spiders around the cheeses for a spooky touch. If using, sprinkle some edible flowers or herbs for added color and freshness.
- Finishing Touches: Optionally, drizzle honey over the blue cheese or provide a small dish of honey on the side for dipping.
Extra Tips:
When assembling your Haunted Cheese Board, consider the balance of flavors and textures. Confirm that there’s a good mix of soft and hard cheeses, as well as sweet and savory elements.
If you want to make the board more festive, consider incorporating additional Halloween-themed decorations like black olives shaped as eyes or slices of kiwi arranged like monster faces. Remember, the goal is to create a board that’s as much a feast for the eyes as it’s for the palate, so have fun with the presentation!
Zombie Finger Cookies
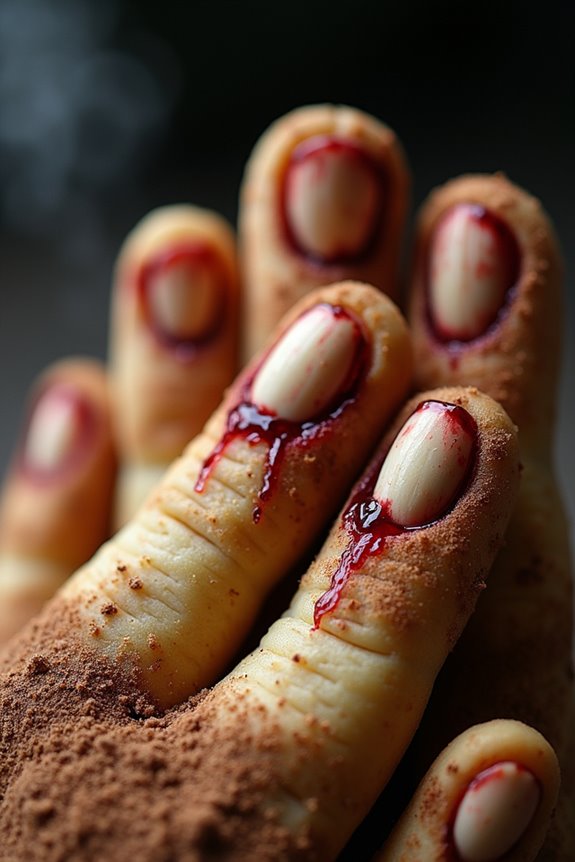
When planning a Halloween potluck at work, it’s always fun to bring a dish that embraces the spooky spirit of the holiday. Zombie Finger Cookies are the perfect eerie treat to surprise and delight your colleagues. These creepy cookies not only look the part but also taste delicious with a buttery, almond-infused flavor. Perfect for a serving size of 4-6 people, these cookies are sure to be a hit at the office with their realistic finger-like appearance.
Zombie Finger Cookies are easy to prepare and require just a few simple ingredients. The dough is shaped into finger-like forms and adorned with almond nails and knuckle lines to give them a ghoulishly realistic look. These cookies are a fun and creative way to celebrate Halloween, and they pair well with other spooky treats you might find at a Halloween potluck. So, gather your ingredients and get ready to bake a batch of these terrifyingly tasty treats.
Ingredients (serving size: 4-6 people):
- 1 cup unsalted butter, softened
- 1 cup powdered sugar
- 1 large egg
- 1 teaspoon vanilla extract
- 1 teaspoon almond extract
- 2 3/4 cups all-purpose flour
- 1 teaspoon baking powder
- 1 teaspoon salt
- Whole blanched almonds (about 20-24)
- Red food coloring gel
- 1 tablespoon cocoa powder (optional, for dusting)
Cooking Instructions:
- Preheat the Oven: Begin by preheating your oven to 325°F (165°C). This will guarantee the cookies bake evenly.
- Prepare the Dough: In a large mixing bowl, cream together the softened butter and powdered sugar until light and fluffy. Add in the egg, vanilla extract, and almond extract, mixing well until fully incorporated.
- Mix Dry Ingredients: In a separate bowl, whisk together the all-purpose flour, baking powder, and salt. Gradually add the dry ingredients to the wet mixture, stirring until a soft dough forms.
- Shape the Fingers: Take small portions of the dough (about a tablespoon each) and roll them into finger-like shapes. Use your fingers to create knuckles by pinching the dough slightly in two places. Use a knife to lightly score lines onto the knuckles for added realism.
- Add the Almond Nails: Press a whole blanched almond into one end of each cookie to form a fingernail. Make sure it’s securely attached.
- Bake the Cookies: Place the shaped cookies on a baking sheet lined with parchment paper. Bake in the preheated oven for 20-25 minutes or until the cookies are lightly golden.
- Decorate the Fingers: After baking, allow the cookies to cool slightly. Use a small brush or a toothpick to apply red food coloring gel around the almond nails to mimic blood. Optionally, dust with cocoa powder for a more aged, dirty appearance.
Extra Tips:
For added spookiness, you can mix a tiny amount of cocoa powder into some of the dough before shaping to give the fingers a varied tone. If you find the dough too sticky while shaping, refrigerate it for about 20 minutes to make it easier to handle.
When pressing the almonds into the dough, do so gently to avoid cracking the dough. Finally, these cookies can be made a day ahead and stored in an airtight container to maintain freshness for the potluck.
Eyeball Pasta Salad
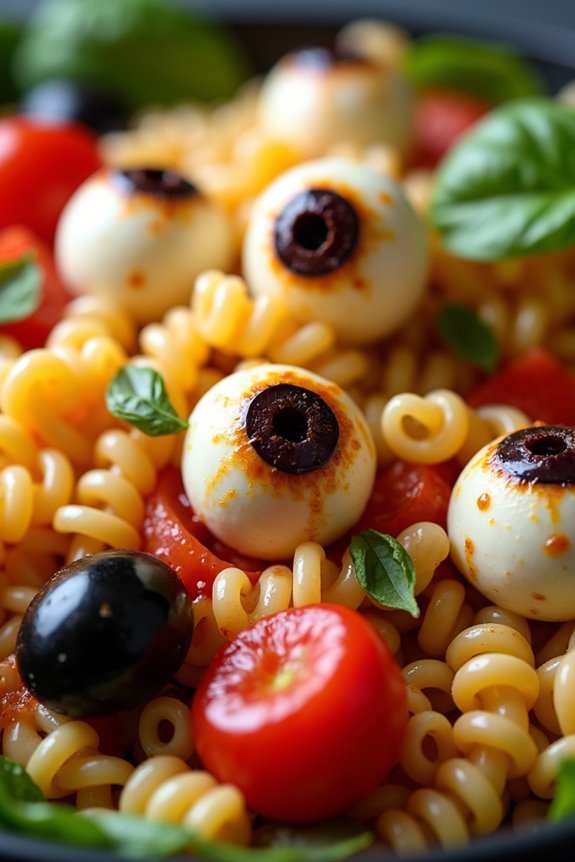
Eyeball Pasta Salad is a spooky and delicious dish perfect for a Halloween potluck at work. This creative recipe combines traditional pasta salad elements with a fun and eerie twist. The dish isn’t only tasty but also visually entertaining, making it a hit at any Halloween gathering.
The pasta salad is decorated with mozzarella balls, olives, and cherry tomatoes to resemble creepy eyeballs, which adds a festive touch to your Halloween spread. This dish is perfect for a serving size of 4-6 people, offering enough for everyone to enjoy.
The pasta salad is easy to prepare and can be made ahead of time, allowing you to focus on other party preparations. The combination of pasta, fresh vegetables, and a tangy Italian dressing makes it both invigorating and satisfying. Whether you’re a fan of Halloween or just looking for a unique way to celebrate the season, Eyeball Pasta Salad is sure to be a crowd-pleaser.
Ingredients for 4-6 servings:
- 12 oz rotini pasta
- 1 cup cherry tomatoes
- 1 cup mozzarella balls (bocconcini)
- 1/2 cup black olives
- 1/2 cup green olives
- 1/2 cup red bell pepper, diced
- 1/2 cup yellow bell pepper, diced
- 1/4 cup red onion, finely chopped
- 1/2 cup Italian dressing
- Salt and pepper to taste
- Fresh basil leaves for garnish
Cooking Instructions:
- Cook the Pasta: Start by boiling a large pot of salted water. Add the rotini pasta and cook according to the package instructions until al dente. Once cooked, drain the pasta and rinse it under cold water to cool it down. This will stop the cooking process and help maintain the pasta’s texture.
- Prepare the Eyeballs: Slice the mozzarella balls in half. Then, slice the black olives and green olives into thin rings. Place one olive ring on each half of the mozzarella balls to create the “eyeballs.” For added effect, you can place a small piece of red bell pepper in the center of the olive ring to mimic the pupil.
- Chop the Vegetables: Dice the red bell pepper and yellow bell pepper into small, bite-sized pieces. Finely chop the red onion. Halve the cherry tomatoes. These will add color and flavor to your pasta salad.
- Combine Ingredients: In a large mixing bowl, combine the cooled pasta, diced bell peppers, chopped red onion, and halved cherry tomatoes. Add the mozzarella “eyeballs” into the mix, being gentle to keep their shape intact.
- Dress the Salad: Pour the Italian dressing over the pasta and vegetables. Toss everything together until the salad is well coated with the dressing. Season with salt and pepper to taste.
- Chill and Serve: Cover the pasta salad and refrigerate it for at least 30 minutes to allow the flavors to meld. Before serving, garnish with fresh basil leaves for an aromatic touch.
Extra Tips:
For the best flavor, prepare the salad a few hours in advance to let the ingredients marinate in the dressing. If you prefer a creamier texture, consider adding a dollop of mayonnaise or a sprinkle of grated Parmesan cheese.
To add an extra spooky effect, use food coloring to dye the mozzarella balls or pasta in shades like green or purple. Remember to keep the salad chilled if you’re serving it at an outdoor event to guarantee it stays fresh.
Black Cat Cupcakes
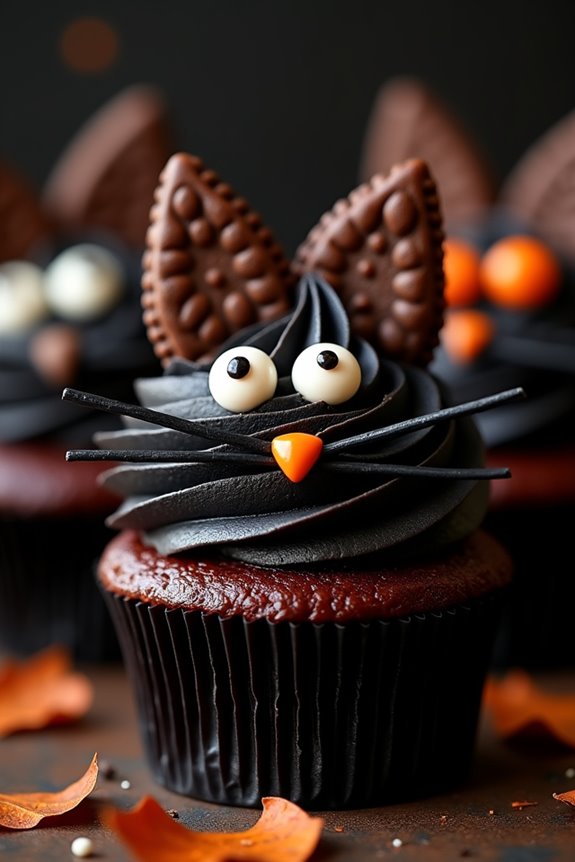
Halloween is the perfect time to indulge in some spooky treats, and what better way to celebrate than with Black Cat Cupcakes? These delightful confections aren’t only delicious but also fun to make, guaranteeing your Halloween potluck at work is a hit.
These cupcakes feature a rich chocolate flavor, topped with creamy frosting and decorated to resemble adorable black cats. They’re sure to add a playful and festive touch to your gathering.
Crafting these cupcakes is a creative endeavor that invites you to embrace your inner artist. The process involves baking moist chocolate cupcakes, preparing a smooth frosting, and then using clever decorations to bring the black cat design to life.
With just a few simple ingredients and a little bit of creativity, you can whip up a batch of these charming cupcakes that will impress your colleagues and add a touch of whimsy to your Halloween spread.
Ingredients (Serving Size: 4-6 people):
- 1 cup all-purpose flour
- 1 cup granulated sugar
- 1/3 cup unsweetened cocoa powder
- 1 teaspoon baking powder
- 1/2 teaspoon baking soda
- 1/4 teaspoon salt
- 1/2 cup milk
- 1/4 cup vegetable oil
- 1 egg
- 1 teaspoon vanilla extract
- 1/2 cup hot water
- 1 cup butter, softened (for frosting)
- 3 cups powdered sugar (for frosting)
- 1/3 cup unsweetened cocoa powder (for frosting)
- 1/4 cup milk (for frosting)
- 1 teaspoon vanilla extract (for frosting)
- Black food coloring
- Chocolate sandwich cookies
- Candy eyes
- Black licorice strings
Cooking Instructions:
1. Preheat the Oven: Begin by preheating your oven to 350°F (175°C). Line a 12-cup muffin tin with cupcake liners to guarantee easy removal later.
2. Mix Dry Ingredients: In a large mixing bowl, combine the flour, sugar, cocoa powder, baking powder, baking soda, and salt. Stir until all ingredients are well distributed.
3. Combine Wet Ingredients: In a separate bowl, whisk together the milk, vegetable oil, egg, and vanilla extract. Pour the wet ingredients into the dry ingredients and mix until just combined. Be careful not to overmix.
4. Add Hot Water: Gradually add the hot water to the batter, mixing slowly until the batter becomes smooth and slightly thin.
5. Fill Cupcake Liners: Pour the batter into the prepared cupcake liners, filling each about two-thirds full, to allow space for the cupcakes to rise.
6. Bake Cupcakes: Place the muffin tin in the preheated oven and bake for 18-20 minutes or until a toothpick inserted into the center of a cupcake comes out clean. Let the cupcakes cool completely on a wire rack.
7. Prepare Frosting: In a large bowl, beat the softened butter until creamy. Gradually add the powdered sugar and cocoa powder, alternating with the milk, beating until smooth.
Add vanilla extract and a few drops of black food coloring, mixing until the desired color is achieved.
8. Decorate Cupcakes: Once the cupcakes are completely cool, spread or pipe the black frosting on top of each. Break chocolate sandwich cookies in half to create ears, and place them on top of the frosted cupcakes.
Use candy eyes for eyes and cut black licorice strings to create whiskers.
Extra Tips:
When decorating your Black Cat Cupcakes, consider using a piping bag with a star tip for a more professional frosting look.
To make the ears stand out, try using double-stuffed cookies for a thicker appearance. If black licorice strings prove difficult to find, you can substitute with thinly sliced fruit leather or use edible marker pens to draw whiskers directly onto the frosting.
These little touches will elevate your cupcakes and make them the talk of the potluck. Enjoy your delicious and spooky creations!