

When Halloween morning rolls around, there’s nothing quite like turning breakfast into a spooktacular celebration for the little ones. Picture ghostly pancakes with chocolate chip eyes or a plate of creepy crawly toast that brings smiles and giggles. From monster smoothie bowls to haunted hash browns, these playful creations promise a fun and festive start to the day. Are you ready to make breakfast a thrilling feast? Let’s get creative in the kitchen!
Ghostly Pancakes
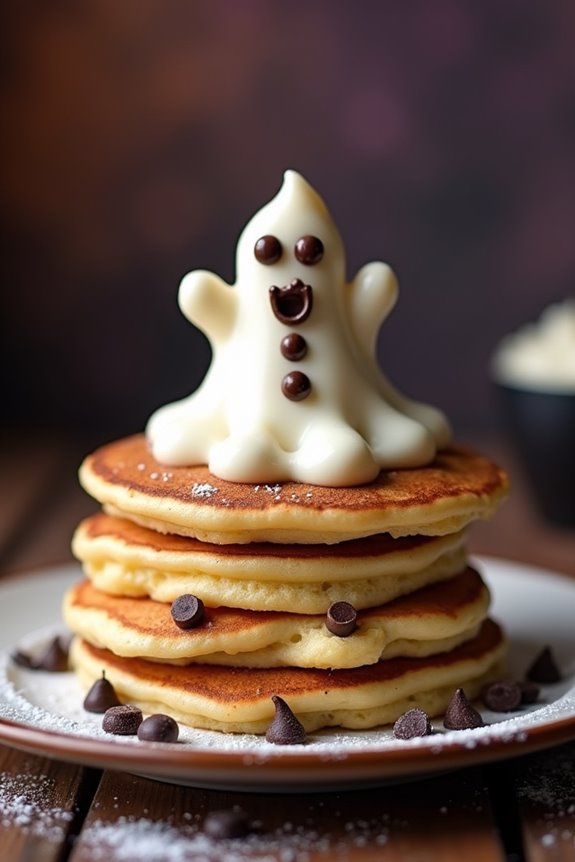
Start your Halloween morning with a spooktacular breakfast that will delight kids and adults alike: Ghostly Pancakes. These fluffy and light pancakes are transformed into hauntingly cute ghost shapes, complete with eerie faces made from chocolate chips. Not only are they a feast for the eyes, but they also offer a delicious start to a day of Halloween festivities.
Perfect for a family breakfast or a Halloween-themed brunch, these pancakes are bound to become a seasonal favorite. Making Ghostly Pancakes is a fun and interactive activity that can involve the entire family. The recipe is simple and can be easily modified to suit different tastes or dietary needs.
Kids will love helping to create the ghost shapes and decorating them with chocolate chips. This recipe serves 4-6 people, making it ideal for a family meal or a small gathering of friends. So, grab your skillet and let’s whip up some ghostly delights!
Ingredients:
- 2 cups all-purpose flour
- 2 tablespoons sugar
- 2 teaspoons baking powder
- 1/2 teaspoon baking soda
- 1/2 teaspoon salt
- 2 cups buttermilk
- 2 large eggs
- 1/4 cup unsalted butter, melted
- 1 teaspoon vanilla extract
- Cooking spray or additional butter for the pan
- Chocolate chips for decorating
Instructions:
- Mix Dry Ingredients: In a large mixing bowl, combine the flour, sugar, baking powder, baking soda, and salt. Stir the ingredients together until they’re well mixed.
- Prepare Wet Ingredients: In another bowl, whisk together the buttermilk, eggs, melted butter, and vanilla extract until fully combined.
- Combine Mixtures: Pour the wet ingredients into the dry ingredients. Stir gently with a spatula or wooden spoon until just combined. It’s okay if the batter is a little lumpy; overmixing can result in tough pancakes.
- Heat the Skillet: Place a non-stick skillet or griddle over medium heat. Lightly coat the surface with cooking spray or a small amount of butter.
- Form Ghost Shapes: Using a ladle, pour the pancake batter onto the skillet to create ghost shapes. Start with a round base and then drag out a tail to mimic a ghost. For smaller ghosts, use a spoon to shape.
- Decorate with Chocolate Chips: As the pancakes cook on one side, place chocolate chips onto the uncooked surface to form eyes and a spooky mouth. Press them lightly so they adhere once flipped.
- Cook Until Bubbly: Wait for bubbles to form on the top of the pancakes and the edges to look set, about 2-3 minutes.
- Flip and Finish Cooking: Carefully flip the pancakes with a spatula and cook for an additional 1-2 minutes, until the other side is golden brown.
- Serve Warm: Remove the pancakes from the skillet and keep them warm until ready to serve. Repeat the process for the remaining batter.
Extra Tips:
To guarantee your Ghostly Pancakes come out perfectly shaped, consider using a squeeze bottle to pour the batter into ghost forms. This technique gives you more control over the shapes.
If you’re looking to add a bit of color, consider using food coloring in the batter to create different ghostly hues. For a healthier version, you can substitute whole wheat flour for all-purpose flour, or use a non-dairy milk alternative.
Serve these pancakes with maple syrup, fresh fruit, or a sprinkle of powdered sugar to complete your spooky breakfast table.
Spooky Spiderweb Waffles
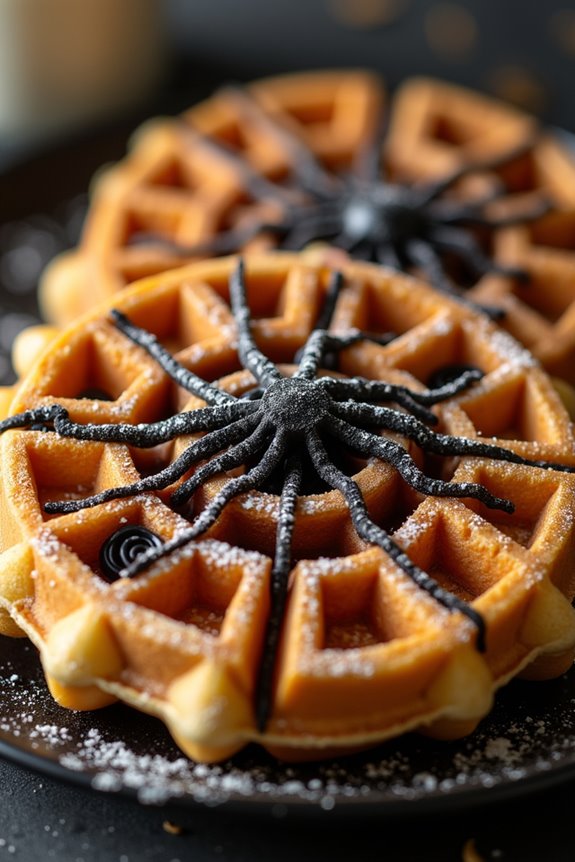
Creating these spiderweb waffles is a simple process that can easily be done with a standard waffle maker and a little creativity. The key to achieving the spiderweb pattern is in the batter distribution technique, which we’ll guide you through step by step.
Whether you’re hosting a Halloween breakfast party or just want to surprise your kids with a themed breakfast, these waffles are sure to be a hit!
Ingredients (Serving Size: 4-6 people)
- 2 cups all-purpose flour
- 2 tablespoons granulated sugar
- 1 tablespoon baking powder
- 1/2 teaspoon salt
- 2 large eggs
- 1 3/4 cups milk
- 1/2 cup unsalted butter, melted
- 1 teaspoon vanilla extract
- Black food coloring or gel
- Cooking spray or additional melted butter (for greasing the waffle maker)
Cooking Instructions
- Prepare the Waffle Batter: In a large mixing bowl, whisk together the all-purpose flour, granulated sugar, baking powder, and salt. In a separate bowl, beat the eggs and then mix in the milk, melted butter, and vanilla extract until well combined.
- Combine Wet and Dry Ingredients: Pour the wet ingredients into the dry ingredients and stir until just combined. Be careful not to overmix, as this can lead to dense waffles.
- Add Food Coloring: Divide the batter into two separate bowls. Add a few drops of black food coloring or gel to one of the bowls and mix until the desired color is achieved. This will be used for the spiderweb pattern.
- Preheat and Grease the Waffle Maker: Preheat your waffle maker according to the manufacturer’s instructions. Lightly grease it with cooking spray or a small amount of melted butter to prevent sticking.
- Create the Spiderweb Pattern: Pour a small amount of the plain batter into the center of the waffle maker. Then, using a piping bag or a squeeze bottle, drizzle the black batter in a circular pattern starting from the center, working outwards to create a spiderweb design.
- Cook the Waffles: Close the waffle maker and cook according to its instructions, usually for about 3-5 minutes, until the waffles are golden brown and cooked through.
- Serve and Enjoy: Carefully remove the waffles from the maker and serve immediately with your choice of toppings. Suggest spooky decorations like candy spiders or a dusting of powdered sugar for an extra Halloween touch.
Extra Tips
For best results, make certain your waffle maker is thoroughly preheated before adding the batter, as this will help achieve a crispy texture on the outside while keeping the inside fluffy.
If you’re using food coloring, start with a small amount and gradually add more until you reach the desired intensity; too much can alter the taste of the waffles.
For an even more festive presentation, consider serving these waffles alongside Halloween-themed drinks or snacks for a complete spooky breakfast experience.
Monster Smoothie Bowls
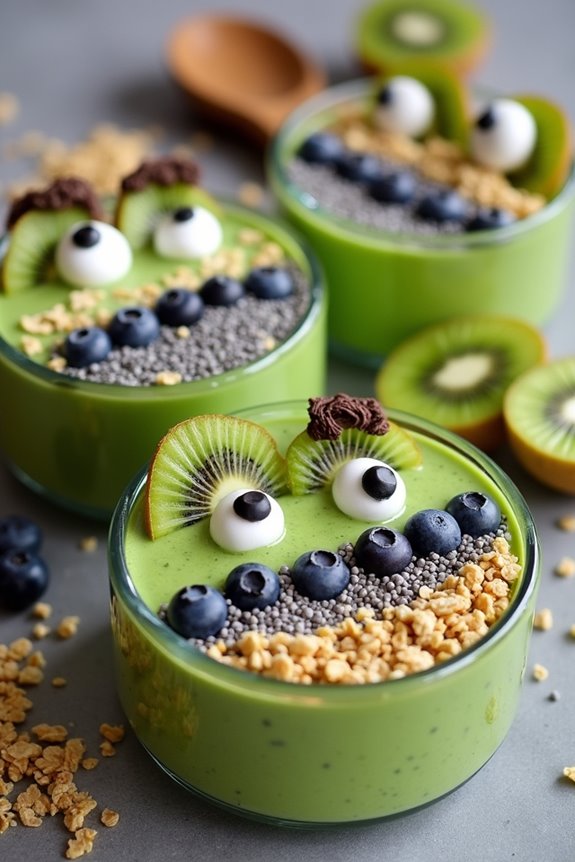
Transform your Halloween morning into a spook-tacular event with these delicious and fun Monster Smoothie Bowls. Designed to delight children and adults alike, these bowls are both nutritious and visually appealing. Packed with fruits and vegetables, they provide a healthy start to the day while keeping in line with the festive theme of Halloween.
With a little creativity, you can turn an ordinary breakfast into a monstrous creation that will fuel your little monsters through a day of trick-or-treating. The vibrant colors and fun toppings of the Monster Smoothie Bowls make them a hit at any Halloween breakfast table.
The base of the smoothie is crafted with a blend of colorful fruits and spinach, giving it a ghoulishly green hue. Toppings such as kiwi, blueberries, chia seeds, and chocolate chips are used to create monster faces. This dish is as much about having fun while assembling it as it’s about enjoying the taste. Kids will love the chance to personalize their own monster with spooky features.
Ingredients (serving size: 4-6 people):
- 2 cups spinach leaves
- 2 ripe bananas
- 2 cups frozen mango chunks
- 2 cups frozen pineapple chunks
- 2 cups almond milk (or any milk of choice)
- 1/4 cup honey (optional, for sweetness)
- 1 teaspoon vanilla extract
- 1 kiwi, sliced
- 1/2 cup blueberries
- 1/4 cup mini chocolate chips
- 1/4 cup chia seeds
- 1/2 cup granola
Cooking Instructions:
- Prepare the Smoothie Base: Begin by adding the spinach leaves, bananas, frozen mango chunks, frozen pineapple chunks, almond milk, honey, and vanilla extract into a high-speed blender. Blend until smooth and the mixture achieves a bright green color. Adjust the consistency by adding more milk if necessary.
- Pour and Smooth: Divide the smoothie base evenly into 4-6 bowls, using a spoon to smooth out the top for a flat surface ready for decorating.
- Create Monster Faces: Let the creativity flow by using kiwi slices for eyes, blueberries for pupils, and mini chocolate chips for details like eyebrows or freckles. Chia seeds can be used to add texture to the face or as hair, while granola can form a mouth or other features.
- Layer with Additional Toppings: Once the monster faces are completed, sprinkle additional blueberries, chia seeds, or granola around the edges for extra texture and flavor.
Extra Tips:
To keep the smoothie bowls cold and invigorating, chill your bowls in the freezer for about 10 minutes before assembling. This will also help the smoothie maintain its firm texture while decorating.
Encourage kids to get involved by letting them design their own monster faces; this not only makes breakfast fun but also encourages them to eat their creations. If you want to switch up the base color, try adding different fruits like berries for a purple hue or peaches for an orange glow. Enjoy your monstrous breakfast!
Creepy Crawly Toast
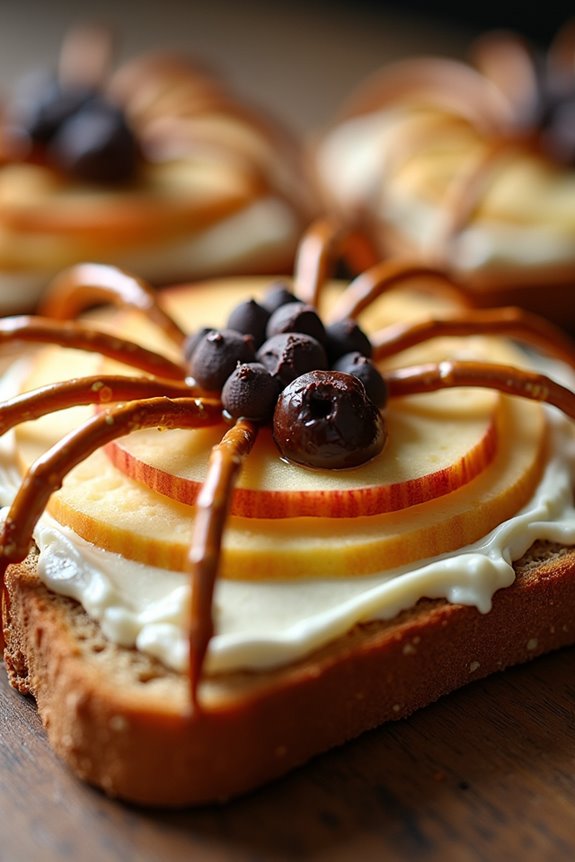
Give your kids a delightfully spooky start to their Halloween morning with Creepy Crawly Toast. This fun and easy-to-make breakfast combines the deliciousness of toast with the eerie charm of creepy crawlies, sure to excite the kids and get them in the Halloween spirit. Perfect for a family breakfast or a Halloween party, this breakfast idea isn’t only visually appealing but also nutritious and tasty.
The concept of Creepy Crawly Toast is to create spider and bug designs using various toppings on slices of toast. Using ingredients like cream cheese, fruits, and chocolate, you can craft little edible creatures that will have your children squealing with delight. Whether you’re creating spiders with pretzel legs and chocolate chip eyes or bugs with raisin spots, this breakfast is all about creativity and fun. Here’s how to make Creepy Crawly Toast for 4-6 people.
Ingredients:
- 6 slices of whole grain bread
- 1 cup cream cheese
- 12 pretzel sticks
- 24 chocolate chips
- 18 raisins
- 1 apple, thinly sliced
- 1 banana, thinly sliced
- 2 tablespoons honey (optional)
Cooking Instructions:
- Toast the Bread: Begin by toasting the whole grain bread slices until they’re golden brown and crispy. This will serve as the base for your creepy crawly designs.
- Spread the Cream Cheese: Once the bread is toasted, spread a generous layer of cream cheese on each slice. This will act as the adhesive for your edible decorations.
- Create Spider Legs: For each slice of toast, break pretzel sticks in half and place them on the cream cheese to form spider legs – three on each side of the toast.
- Add Spider Bodies and Eyes: Place two chocolate chips on each toast slice to form the spider’s eyes. Use a slice of banana or an apple piece as the spider’s body, placing it in the middle of the pretzel legs.
- Make Bugs with Raisins: For variety, add raisins to the toast to create bugs. Arrange them in a line or cluster, using thin apple slices as wings or body segments.
- Finish with Details: Drizzle a little honey over the top for added sweetness, if desired, and to give a sticky, glossy finish to your creepy creatures.
Extra Tips:
When making Creepy Crawly Toast, feel free to let your imagination run wild. You can substitute the cream cheese with nut butter or yogurt for a different flavor profile.
Encourage your kids to get involved in the creation process, allowing them to place pretzels, chocolate chips, and fruits as they desire. This makes the breakfast not only creative but also a fun family activity.
Keep in mind that the key to this dish is its visual appeal, so ascertain that the ‘creepy crawlies’ are distinct and easily recognizable. Enjoy creating and eating your spooky breakfast!
Witch’s Brew Oatmeal
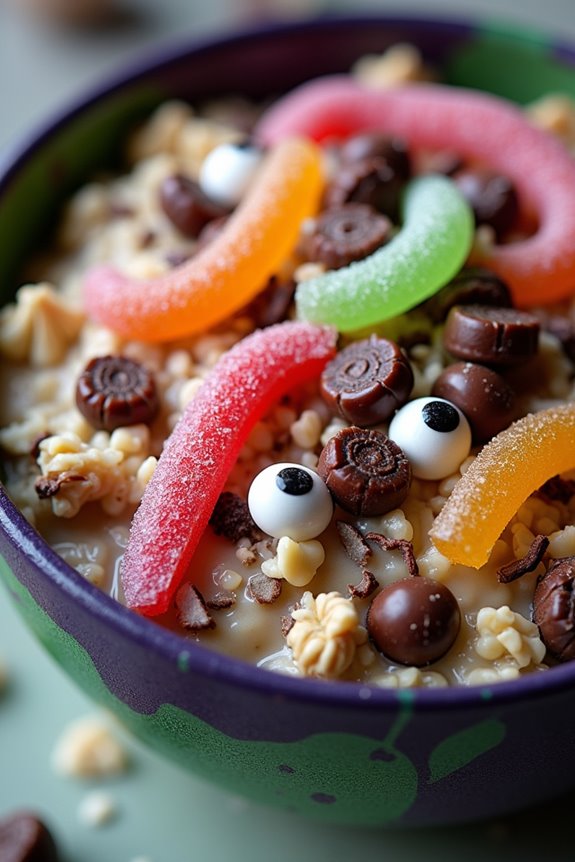
Transform your everyday breakfast into a spooky delight with Witch’s Brew Oatmeal, a fun and nutritious way to start Halloween morning. This bewitching breakfast combines hearty oats with a swirl of spooky, vibrant colors, and is topped with a variety of ghoulish garnishes that kids will love.
With a cauldron bubbling over with flavor, this oatmeal not only nourishes but also adds an element of magic to your morning routine. Perfect for a family of 4-6, Witch’s Brew Oatmeal is designed to be a feast for both the eyes and the taste buds. It’s an ideal way to sneak in some healthy ingredients while letting the little ones enjoy a bit of Halloween fun.
Get ready to stir up some enchantment in the kitchen with this easy-to-follow recipe that brings the spirit of Halloween to the breakfast table.
Ingredients (Serves 4-6):
- 3 cups rolled oats
- 6 cups water or milk
- 1/4 teaspoon salt
- 1/2 cup canned pumpkin puree
- 2 tablespoons honey or maple syrup
- 1 teaspoon vanilla extract
- 1/2 teaspoon ground cinnamon
- 1/4 teaspoon ground nutmeg
- Green and purple food coloring
- 1/4 cup raisins
- 1/4 cup chopped nuts (optional)
- 1/4 cup chocolate chips
- 1/4 cup shredded coconut
- 1/4 cup gummy worms
- 1/4 cup candy eyeballs
Cooking Instructions:
- Prepare the Oats: In a large pot, combine the rolled oats, water or milk, and salt. Bring the mixture to a boil over medium-high heat, then reduce the heat to low and let it simmer. Stir occasionally until the oats are cooked and creamy, about 10-15 minutes.
- Mix in the Pumpkin and Spices: Once the oats are cooked, stir in the pumpkin puree, honey or maple syrup, vanilla extract, cinnamon, and nutmeg. Mix well to make certain the flavors are evenly distributed.
- Divide and Color: Split the oatmeal into three separate bowls. Add a few drops of green food coloring to one bowl and purple food coloring to the second bowl. Leave the third portion its natural color. Stir each bowl until the color is evenly mixed and vibrant.
- Create the Brew: In serving bowls, layer the different colored oatmeals to create a marbled effect that mimics a bubbling witch’s brew.
- Add Toppings: Sprinkle the top of each bowl with raisins, chopped nuts, chocolate chips, and shredded coconut. For a spooky touch, add gummy worms and candy eyeballs as desired.
Extra Tips:
For the best results, use natural food colorings if you’re concerned about artificial dyes, especially for younger children. If you prefer a creamier texture, substituting half of the water with milk or a non-dairy alternative can enhance the oatmeal’s richness.
Feel free to adjust the sweetness to taste, keeping in mind that the toppings also add to the overall flavor. For a nut-free version, simply omit the nuts or substitute with seeds. Finally, involving your kids in the swirling and topping process can make breakfast preparation an exciting part of the Halloween festivities.
Jack-O’-Lantern Fruit Cups
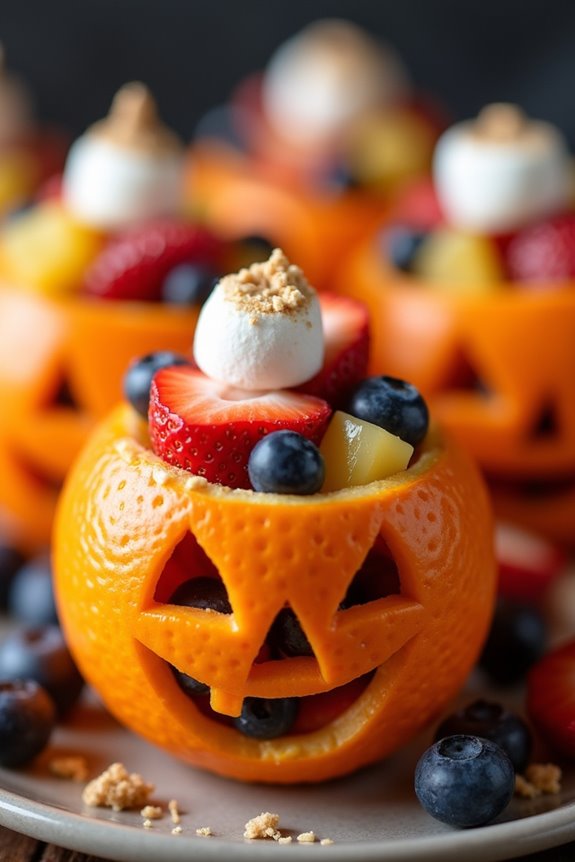
Celebrate Halloween morning with these delightful Jack-O’-Lantern Fruit Cups, a healthy and fun breakfast idea that kids will love. These fruit cups are designed to look like little jack-o’-lanterns, adding a touch of festive flair to your breakfast table. They’re not only visually appealing but also packed with vitamins and nutrients, making them a great way to start the day.
Made with fresh oranges and a colorful assortment of fruits, these fruit cups are simple to prepare and perfect for involving the kids in the kitchen. The tangy sweetness of the oranges complements the juicy medley inside, while the creative jack-o’-lantern faces make breakfast feel like a treat.
These fruit cups are suitable for a serving size of 4-6 people, making them ideal for a family breakfast or a small Halloween gathering.
Ingredients for Jack-O’-Lantern Fruit Cups (Serves 4-6):
- 6 large navel oranges
- 1 cup of strawberries, hulled and sliced
- 1 cup of blueberries
- 1 cup of seedless grapes, halved
- 1 cup of diced pineapple
- Optional: 1/2 cup of mini marshmallows or yogurt-covered raisins
Cooking Instructions:
- Prepare the Oranges: Begin by slicing the top off each orange, about 1/4 from the top, to create a lid. Carefully scoop out the inside of the oranges using a spoon, being cautious not to pierce the skin. Set the orange flesh aside in a bowl for later use.
- Create Jack-O’-Lantern Faces: Using a small paring knife, carve jack-o’-lantern faces into the side of each hollowed-out orange. Make sure the cuts are clean and distinct, creating eyes, noses, and mouths to resemble traditional jack-o’-lanterns.
- Prepare the Fruit Filling: In a large mixing bowl, combine the strawberries, blueberries, grapes, pineapple, and any reserved orange segments. Mix gently to evenly distribute the fruits.
- Assemble the Fruit Cups: Fill each carved orange with the fruit mixture, mounding slightly on top. If using, sprinkle a few mini marshmallows or yogurt-covered raisins on top for added fun and sweetness.
- Add the Lids: Place the orange tops back on each fruit cup, slightly askew to reveal the colorful fruit inside and complete the jack-o’-lantern look. Serve immediately or refrigerate until ready to serve.
Extra Tips:
For an extra twist, consider adding a drizzle of honey or a sprinkle of cinnamon to the fruit mixture for added flavor. If you’re short on time, you can prepare the fruit filling in advance and store it in the refrigerator until you’re ready to assemble the fruit cups.
Additionally, encourage the kids to help with the carving and assembling process, making it a fun family activity that doubles as a lesson in healthy eating.
Mummy Sausages

Halloween is the perfect time to get creative with food and what better way to start the day than with a spooky breakfast? Mummy Sausages are a fun and delicious treat that will delight kids and set the tone for a festive day. These sausages are wrapped in crescent dough to resemble mummies, making them both tasty and visually appealing. They’re simple to make and can be a great activity for kids to get involved with in the kitchen.
Mummy Sausages aren’t just about the looks; they’re also packed with flavor. The combination of juicy sausages and buttery crescent rolls creates a savory breakfast that’s hard to resist. This dish is perfect for a Halloween breakfast or brunch, and can even be served as a quick snack or appetizer during a Halloween party. With just a few ingredients and minimal prep time, you’ll have a crowd-pleasing dish that will make your Halloween morning extra special.
Ingredients for 4-6 servings:
- 12 breakfast sausages
- 1 can of crescent roll dough
- 1 egg, beaten
- Mustard or ketchup for eyes
Cooking Instructions:
- Preheat the Oven: Start by preheating your oven to 375°F (190°C). This guarantees that the oven is hot enough to bake the crescent dough to a golden brown.
- Prepare the Dough: Open the can of crescent roll dough and unroll it on a clean surface. Separate the dough into triangular pieces, then use a pizza cutter or knife to cut each triangle into thin strips about 1/4 inch wide.
- Wrap the Sausages: Take a sausage and wrap it with the dough strips, leaving a small gap near the top to create a face for the mummy. Wrap the strips haphazardly to mimic the look of mummy bandages. Repeat this process for each sausage.
- Arrange on a Baking Sheet: Place the wrapped sausages on a baking sheet lined with parchment paper. Make sure to space them evenly to allow for proper baking.
- Egg Wash: Brush each wrapped sausage with the beaten egg. This will give your mummies a nice golden color once baked.
- Bake: Place the baking sheet in the preheated oven and bake for about 15 minutes, or until the dough is golden brown and the sausages are cooked through.
- Decorate the Mummies: Once baked, remove from the oven and let them cool slightly. Use a toothpick to dot mustard or ketchup onto the exposed sausage face to create eyes for the mummy.
Extra Tips:
For an extra spooky touch, consider using food coloring to dye the dough green or purple before wrapping the sausages. If you’re looking for a healthier version, opt for turkey sausages or veggie sausages as an alternative.
You can also add some shredded cheese inside the wrap for an extra cheesy surprise. These Mummy Sausages can be prepared a day in advance and stored in the fridge, then popped in the oven the morning of your Halloween breakfast.
Encourage kids to help with the wrapping and decorating process for a fun family activity.
Batty Breakfast Sandwiches
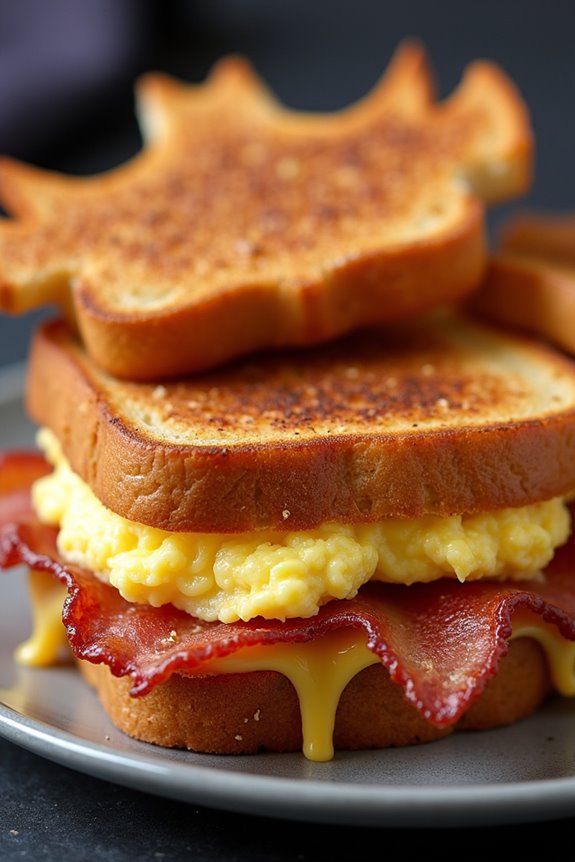
Start your Halloween morning off with a spooky twist by preparing Batty Breakfast Sandwiches! These fun and easy-to-make sandwiches are perfect for getting your kids into the Halloween spirit right from breakfast. Shaped like bats, these sandwiches aren’t only delightful to look at but also packed with flavors that will satisfy even the pickiest of eaters.
Using simple ingredients, this recipe allows you to whip up a delicious and creative breakfast that can be enjoyed by the whole family.
These Batty Breakfast Sandwiches are made with crispy bacon, creamy scrambled eggs, and melted cheese, all sandwiched between toasted bread cut into playful bat shapes. The sandwiches are a hit with kids and can be easily customized with your favorite fillings or cheese. Serve them with a side of fresh fruit or a glass of orange juice for a complete morning meal that will kick off the Halloween festivities with a bang!
Ingredients for 4-6 Servings:
- 12 slices of whole wheat bread
- 6 large eggs
- 6 slices of bacon
- 6 slices of cheddar cheese
- 2 tablespoons of milk
- 1 tablespoon of butter
- Salt and pepper to taste
- Ketchup or mustard for decorating (optional)
Cooking Instructions:
- Cook the Bacon: In a large skillet over medium heat, cook the bacon slices until crispy. Once done, remove them from the skillet and place them on a paper towel-lined plate to drain excess oil.
- Prepare the Eggs: In a bowl, whisk together the eggs, milk, salt, and pepper until well combined. Melt the butter in a non-stick skillet over medium heat. Pour in the egg mixture and gently scramble until the eggs are fully cooked but still creamy. Remove from heat and set aside.
- Toast the Bread: Using a bat-shaped cookie cutter, cut out bat shapes from each slice of bread. Toast the bat-shaped bread slices in a toaster or on a skillet until golden brown.
- Assemble the Sandwiches: Place a slice of cheese on half of the toasted bat-shaped bread slices. Spoon a portion of scrambled eggs over the cheese, followed by a slice of bacon. Top with another slice of bat-shaped toast to complete the sandwich.
- Decorate (Optional): Use ketchup or mustard to draw eyes and a mouth on the bat-shaped sandwiches for a fun touch.
- Serve: Serve the Batty Breakfast Sandwiches warm with a side of fresh fruit or your choice of beverage.
Extra Tips:
When making Batty Breakfast Sandwiches, you can prepare the bacon and scramble the eggs a day in advance to save time in the morning.
If you don’t have a bat-shaped cookie cutter, you can use a knife to carefully cut out the shapes. Feel free to experiment with different fillings such as sliced avocado or sautéed mushrooms for added variety.
Adjust the seasoning to suit your family’s taste preferences, and have fun with the decorating step to engage the kids in the kitchen!
Skeleton Yogurt Parfaits
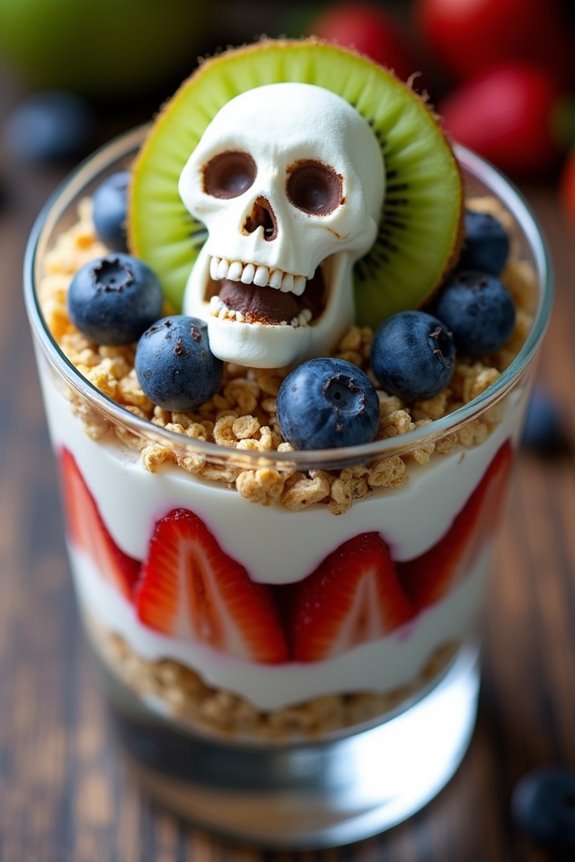
Skeleton Yogurt Parfaits are the perfect spooky yet nutritious breakfast treat for kids during Halloween. This fun and creative dish combines the smooth texture of yogurt with the natural sweetness of fruits, creating a layered effect that resembles a skeleton.
The parfaits aren’t only visually appealing but also packed with calcium, vitamins, and antioxidants, making them a healthy start to a day filled with trick-or-treating and Halloween festivities.
Ideal for kids’ breakfast parties or a special Halloween morning meal, these parfaits can be assembled quickly and easily. The ingredients are simple and customizable, allowing you to adapt the flavors and decorations to suit your child’s preferences.
With a few basic ingredients and some imagination, you can create a breakfast that will delight and excite your little ones.
Ingredients for 4-6 servings:
- 4 cups vanilla yogurt
- 1 cup granola
- 1 cup blueberries
- 1 cup strawberries, sliced
- 1 cup kiwi, sliced
- 1/2 cup mini marshmallows
- 1/4 cup chocolate chips
- 6 clear cups or jars
Instructions:
- Prepare the Fruit: Wash and slice the strawberries and kiwis. Rinse the blueberries and set all the fruits aside to dry.
- Layer the Yogurt: Spoon approximately 1/4 cup of vanilla yogurt into the bottom of each clear cup or jar. This forms the base layer of your parfait.
- Add the First Fruit Layer: Evenly distribute a layer of blueberries over the yogurt in each cup. This creates the first “bone” of your skeleton.
- Add Granola: Sprinkle a layer of granola over the blueberries. This adds a nice crunch and mimics the texture of skeleton bones.
- Continue Layering: Add another 1/4 cup of yogurt over the granola layer. Follow this with a layer of sliced strawberries, then another layer of granola.
- Final Yogurt Layer: Add a final layer of yogurt on top of the strawberries and granola.
- Decorate the Top: Arrange slices of kiwi on the top yogurt layer to form the skeleton’s head. Use mini marshmallows for eyes and chocolate chips for pupils to complete the skeleton face.
- Serve: Serve immediately for the freshest taste, or refrigerate until ready to serve.
Extra Tips:
For an extra touch of Halloween fun, consider adding some edible googly eyes or use black licorice pieces to form a mouth or nose on your skeleton faces.
If your kids have specific fruit preferences, feel free to substitute with other fruits like raspberries or banana slices.
To create more defined layers, gently tap the cups on a countertop after each layer to settle the ingredients.
If preparing in advance, keep the granola separate until just before serving to maintain its crunch.
Haunted Hash Browns
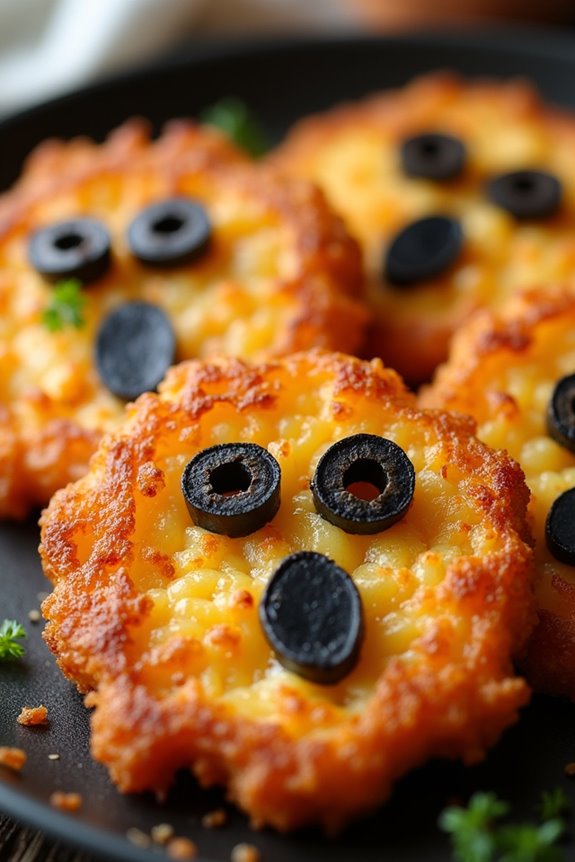
Transform your everyday breakfast into a spooky delight with this Haunted Hash Browns recipe, perfect for adding a touch of Halloween magic to your morning. These crispy, golden-brown treats are shaped into fun ghostly figures, making them an exciting addition to your Halloween breakfast menu.
Whether you’re hosting a festive brunch or simply want to surprise the little ones, these hash browns are sure to be a hit. The recipe is designed for a serving size of 4-6 people, making it great for small gatherings or family meals. The combination of potatoes, onions, and simple spices guarantees a deliciously savory experience.
With minimal ingredients and easy-to-follow steps, you can whip up these spirited hash browns in no time, leaving you free to enjoy the festivities.
Ingredients for Haunted Hash Browns (Serves 4-6):
- 4 large russet potatoes
- 1 medium onion
- 2 tablespoons all-purpose flour
- 1 large egg
- 1 teaspoon garlic powder
- 1 teaspoon onion powder
- Salt and pepper to taste
- 4 tablespoons vegetable oil (for frying)
- Black olives (for decoration)
Cooking Instructions:
- Prepare the Potatoes and Onion: Peel the russet potatoes and grate them using a box grater. Place the grated potatoes in a bowl of cold water to help remove excess starch. Meanwhile, finely chop the onion.
- Drain and Dry the Potatoes: Drain the grated potatoes thoroughly by placing them in a clean kitchen towel and squeezing out as much moisture as possible. This step is essential for achieving crispiness.
- Mix Ingredients: In a large mixing bowl, combine the grated potatoes, chopped onion, flour, egg, garlic powder, onion powder, salt, and pepper. Mix until all ingredients are well incorporated.
- Shape the Hash Browns: Using your hands, form the mixture into ghost shapes or any spooky shapes you desire. Make sure the shapes aren’t too thick to guarantee even cooking.
- Heat the Oil: In a large skillet, heat the vegetable oil over medium-high heat. Confirm the oil is hot enough by dropping a small piece of potato into the pan; it should sizzle immediately.
- Cook the Hash Browns: Carefully place the shaped hash browns into the hot oil. Cook for about 3-4 minutes on each side or until they’re golden brown and crispy.
- Decorate: Once cooked, remove the hash browns from the skillet and place them on a paper towel-lined plate to drain excess oil. Use black olives to create ghostly faces, placing slices for eyes and mouths.
Extra Tips:
For an extra touch of Halloween flair, consider serving the Haunted Hash Browns with a side of ketchup or your favorite dipping sauce, which can double as “bloody” accompaniment.
If you’re short on time, you can prepare the potato mixture a day in advance and store it in the refrigerator until you’re ready to cook. Just remember to shape them fresh before frying to maintain their spooky form.
Finally, confirm the oil is at the right temperature to prevent the hash browns from becoming soggy. Enjoy your spooky breakfast!
Pumpkin Spice Muffins With a Twist
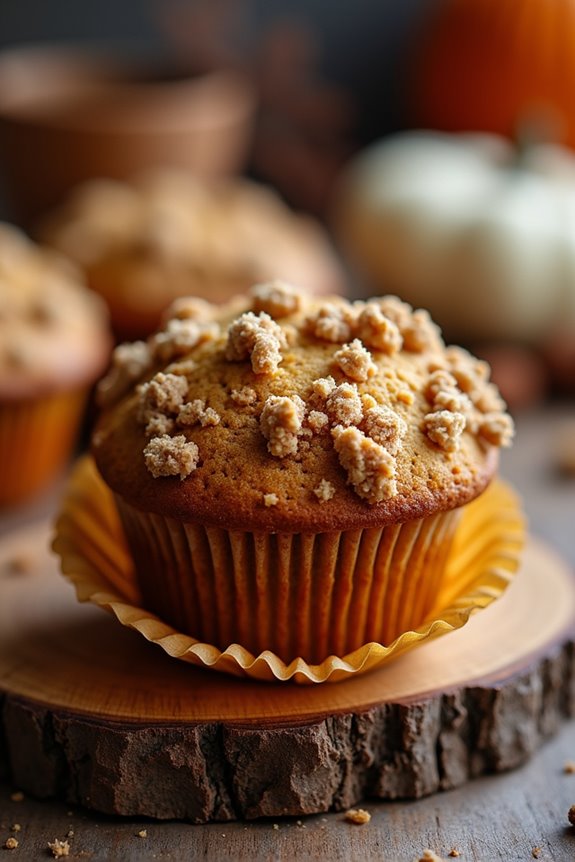
Halloween is the perfect time to enjoy the flavors of fall, and what better way to start the day than with Pumpkin Spice Muffins With a Twist? These muffins aren’t your ordinary pumpkin spice treat; they incorporate delightful surprises like cream cheese filling and a crunchy streusel topping that will make any Halloween breakfast special.
The combination of warm spices, creamy filling, and a sweet, crumbly topping is sure to enchant both kids and adults alike. These muffins aren’t only delicious but also fun to make, making them a great activity to do with the kids. Involving them in the kitchen can add to the Halloween excitement, and they’ll love helping to scoop batter and sprinkle the streusel.
Plus, the aroma of pumpkin spice wafting through your home is sure to create a cozy, festive atmosphere. Let’s explore the ingredients and steps to create these scrumptious muffins, perfectly sized for a gathering of 4-6 people.
Ingredients (Serves 4-6):
- 1 ¾ cups all-purpose flour
- 1 cup canned pumpkin puree
- 1 cup granulated sugar
- ½ cup vegetable oil
- 2 large eggs
- 1 teaspoon baking soda
- ½ teaspoon baking powder
- ½ teaspoon salt
- 1 teaspoon ground cinnamon
- ½ teaspoon ground nutmeg
- ¼ teaspoon ground cloves
- 1 teaspoon vanilla extract
Cream Cheese Filling:
- 4 oz cream cheese, softened
- ¼ cup powdered sugar
- ½ teaspoon vanilla extract
Streusel Topping:
- ½ cup all-purpose flour
- ½ cup brown sugar
- ¼ cup cold unsalted butter, cubed
- 1 teaspoon ground cinnamon
Instructions:
- Preheat and Prepare: Preheat your oven to 350°F (175°C). Line a muffin tin with paper liners or lightly grease with cooking spray.
- Mix Dry Ingredients: In a medium bowl, whisk together the flour, baking soda, baking powder, salt, cinnamon, nutmeg, and cloves. Set aside.
- Blend Wet Ingredients: In a large bowl, mix the pumpkin puree, sugar, oil, eggs, and vanilla extract until well combined.
- Combine Mixtures: Gradually add the dry ingredients to the wet ingredients, stirring until just combined. Be careful not to overmix to guarantee fluffy muffins.
- Prepare Cream Cheese Filling: In a small bowl, blend the softened cream cheese, powdered sugar, and vanilla extract until smooth.
- Make Streusel Topping: In another bowl, combine flour, brown sugar, and cinnamon. Add the cold butter cubes and use a pastry cutter or your fingers to mix until the mixture resembles coarse crumbs.
- Assemble Muffins: Fill each muffin cup halfway with the pumpkin batter. Add a teaspoon of cream cheese filling to the center of each, then cover with more pumpkin batter until each cup is about ¾ full. Sprinkle the streusel topping generously over each muffin.
- Bake: Place the muffins in the preheated oven and bake for 18-22 minutes, or until a toothpick inserted into the muffin (away from the cream cheese center) comes out clean. Allow them to cool in the pan for a few minutes before transferring to a wire rack to cool completely.
Extra Tips: For an additional Halloween flair, consider adding orange or black food coloring to the cream cheese filling for a spooky twist. You can also use decorative Halloween-themed muffin liners to enhance the festive presentation.
If you want to make the muffins ahead of time, they can be stored in an airtight container at room temperature for up to 3 days or frozen for up to a month. Just reheat them in the oven for a few minutes before serving to bring back their fresh-baked warmth.
Vampire Blood Smoothies
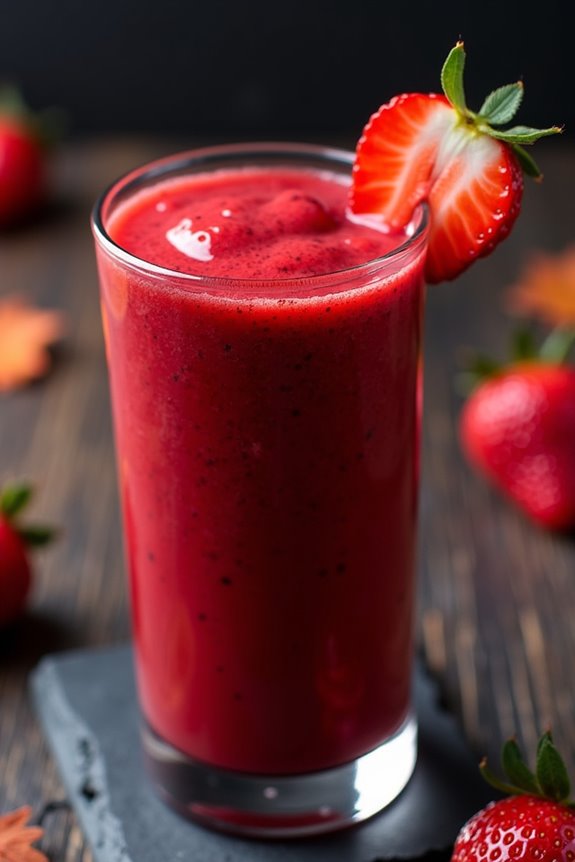
Start your Halloween morning with a spooky and nutritious treat that’s both fun and delicious—Vampire Blood Smoothies! This vibrant red smoothie isn’t only visually striking but also packed with vitamins and minerals. Perfect for kids, this smoothie combines the natural sweetness of fruits with a hint of tang, making it an irresistible breakfast option. It’s an excellent way to sneak in some healthy ingredients while keeping the Halloween spirit alive.
The Vampire Blood Smoothie is a breeze to whip up and will definitely add a dash of eeriness to your breakfast table. With its blood-red color, thanks to the rich hue of beets and strawberries, this smoothie is sure to delight and surprise young ones. Serve it in clear glasses for the full effect, and watch as your kids slurp down this ghoulishly good drink with glee.
Ingredients for 4-6 servings:
- 2 cups fresh strawberries, hulled
- 1 medium beet, cooked and peeled
- 1 cup plain Greek yogurt
- 1 cup unsweetened almond milk (or any milk of choice)
- 2 tablespoons honey or maple syrup
- 1 teaspoon vanilla extract
- 1 banana, peeled
- Ice cubes (optional, for thickness)
Cooking Instructions:
- Prepare the Beet: If not already cooked, wash the beet thoroughly and remove the skin. Cut it into small cubes to make blending easier. You can boil or steam the beet until tender, which usually takes about 20-30 minutes.
- Blend the Ingredients: In a blender, combine the strawberries, cooked beet cubes, Greek yogurt, almond milk, honey, vanilla extract, and banana. If you like a thicker smoothie, add a handful of ice cubes.
- Blend Until Smooth: Secure the lid on the blender and blend on high speed until the mixture is smooth and creamy. This should take about 1-2 minutes, depending on your blender’s power.
- Taste and Adjust: Once blended, taste the smoothie. If you prefer it sweeter, add more honey or maple syrup to taste and blend again briefly.
- Serve Immediately: Pour the smoothie into clear glasses to showcase the vivid red color. For an extra spooky touch, you can garnish with gummy vampire teeth or a strawberry slice on the rim.
Extra Tips:
To make this smoothie even more fun for kids, consider adding edible decorations like candy eyes or using themed straws for serving.
If you want to prepare the beets in advance, they can be cooked and stored in the refrigerator for up to three days, making the assembly of the smoothie even quicker.
For a dairy-free version, substitute the Greek yogurt with a non-dairy alternative like coconut or almond yogurt. Enjoy this eerie and delicious treat as a great way to kick off your Halloween festivities!
Eyeball Bagels

These Eyeball Bagels can be customized with your children’s favorite toppings, allowing for creativity and personalization. You can use different spreads, fruits, and vegetables to create the perfect eerie look. With a serving size enough for 4-6 people, this dish is ideal for a family breakfast or a small Halloween gathering with friends.
So, gather your ingredients and start assembling these deliciously spooky bagels for a morning filled with fun and fright.
Ingredients for 4-6 servings:
- 4-6 plain bagels
- 8 ounces cream cheese
- 1/2 cup sliced black olives
- 1/2 cup cherry tomatoes, sliced
- 1/4 cup thinly sliced cucumbers
- 1/4 cup thinly sliced red bell peppers
- Food coloring (optional, for added effect)
Instructions:
- Prepare the Bagels: Begin by slicing the bagels in half and toasting them lightly if desired. Toasting gives the bagels a slight crispness, enhancing the texture when combined with the creamy toppings.
- Spread the Cream Cheese: Evenly spread a generous layer of cream cheese on each bagel half. The cream cheese acts as the base and resembles the whites of an eyeball, providing a perfect canvas for your spooky creations.
- Add Food Coloring (Optional): If you want to add a bit more creepiness, mix a few drops of food coloring into the cream cheese to give it a ghostly tint. Use colors like green or purple for a more eerie effect.
- Create the Iris and Pupil: Place a slice of cucumber or red bell pepper in the center of the cream cheese to serve as the iris of the eyeball. For the pupil, add a sliced black olive on top of the cucumber or bell pepper slice.
- Add Bloodshot Effect: Use the cherry tomato slices to create veins radiating from the “iris,” giving the bagels a bloodshot look. Arrange the slices around the perimeter of the bagel to complete the eerie eyeball appearance.
- Serve and Enjoy: Once all the bagels are decorated, arrange them on a serving platter and watch as your kids delight in these creepy yet tasty treats.
Extra Tips:
For a more nutritious touch, consider using whole-grain bagels and low-fat cream cheese. You can also experiment with different toppings to suit dietary preferences or restrictions, such as using dairy-free cream cheese or gluten-free bagels.
Encourage your kids to get involved in decorating their bagels, as this can be a fun and engaging way to spend time together on Halloween morning.