

When it comes to Halloween, there’s a special kind of magic in creating spooky pizza creations that kids will absolutely adore. Picture Monster Face Pizzas with playful toppings or Mummy Wrapped Pizzas that seem to come straight from a haunted kitchen. These delightful ideas are perfect for transforming a simple meal into a festive feast. Are you ready to turn your kitchen into a Halloween wonderland? Let’s dive into some fun and frightfully delicious pizza ideas!
Monster Face Pizzas
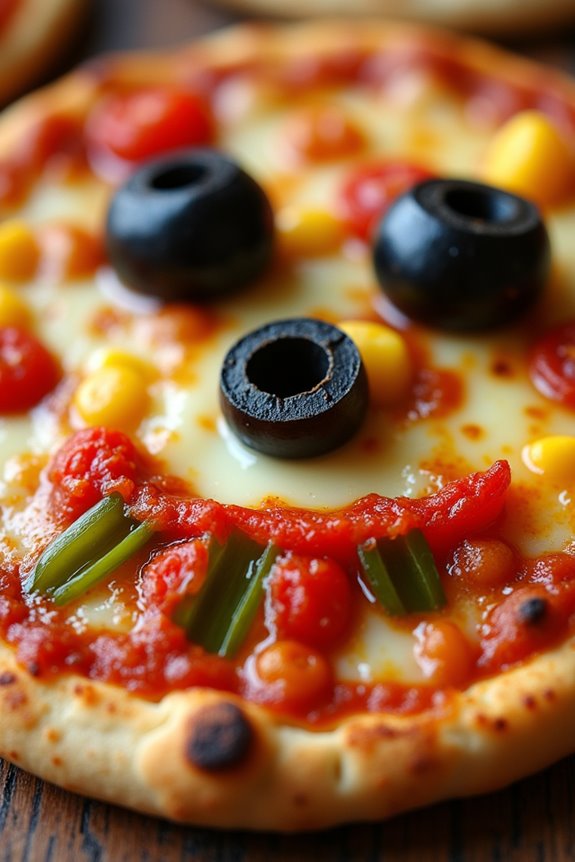
Halloween is the perfect time to let creativity run wild in the kitchen, and Monster Face Pizzas offer a fun, engaging activity for kids to enjoy. These pizzas aren’t only spooky and silly but also delicious, making them an ideal choice for a festive meal or a Halloween party. By using an assortment of colorful toppings, children can create their own unique monster faces, sparking their imaginations and motivating them to try new ingredients.
For this recipe, you’ll be making mini pizzas that each child can personalize. This interactive cooking experience allows young chefs to explore different flavors and textures while crafting their monstrous masterpieces. Plus, it’s a great way to introduce children to the basics of cooking in a fun and stress-free environment. As an added bonus, you can prepare these Monster Face Pizzas ahead of time, making them an easy and entertaining addition to your Halloween celebrations.
Ingredients (Serving Size: 4-6 people):
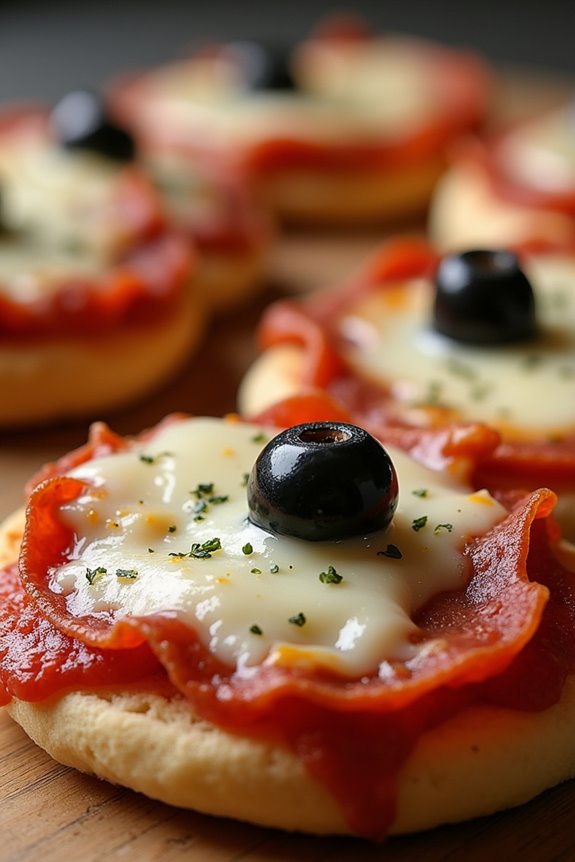
- 6 mini pizza bases or English muffins, halved
- 1 cup of pizza sauce
- 2 cups shredded mozzarella cheese
- 1/2 cup sliced black olives
- 1/2 cup sliced green bell peppers
- 1/2 cup sliced red bell peppers
- 1/4 cup pepperoni slices
- 1/4 cup sliced mushrooms
- 1/4 cup cherry tomatoes, halved
- 1/4 cup sweetcorn
- 1/4 cup pineapple chunks (optional)
Cooking Instructions:
- Preheat and Prepare: Preheat your oven to 375°F (190°C). Lay out the mini pizza bases or English muffin halves on a large baking sheet, making sure they’ve enough space between them for even cooking.
- Spread the Sauce: Using a spoon, spread about 1-2 tablespoons of pizza sauce over each pizza base. Be sure to cover the surface evenly, leaving a small border around the edge for the crust.
- Add the Cheese: Sprinkle a generous amount of shredded mozzarella cheese on top of the sauce, covering it completely. The cheese will act as the “canvas” for your monster faces, so make sure to create an even layer.
- Create Monster Faces: Here’s where the fun begins! Use the assortment of toppings to create silly, spooky monster faces on each pizza. For example, use olive slices for eyes, bell pepper strips for mouths, and cherry tomatoes for noses. Let your creativity flow!
- Bake the Pizzas: Once all the monster faces are complete, place the baking sheet in the preheated oven. Bake for about 10-12 minutes, or until the cheese is melted and bubbly, and the edges of the crust are golden brown.
- Serve and Enjoy: Remove the pizzas from the oven and let them cool slightly before serving. These Monster Face Pizzas are best enjoyed warm and are sure to delight kids and adults alike.
Extra Tips:
Feel free to experiment with different toppings to cater to various taste preferences and dietary needs. If you have picky eaters, consider setting up a toppings bar where kids can choose their own ingredients. This not only adds to the fun but also encourages them to try new foods.
If you’re short on time, you can use pre-made pizza dough, and for a healthier option, whole wheat English muffins work well too. Finally, remember that the more outrageous and colorful the monster faces, the more fun the pizzas will be!
Mummy Wrapped Pizzas
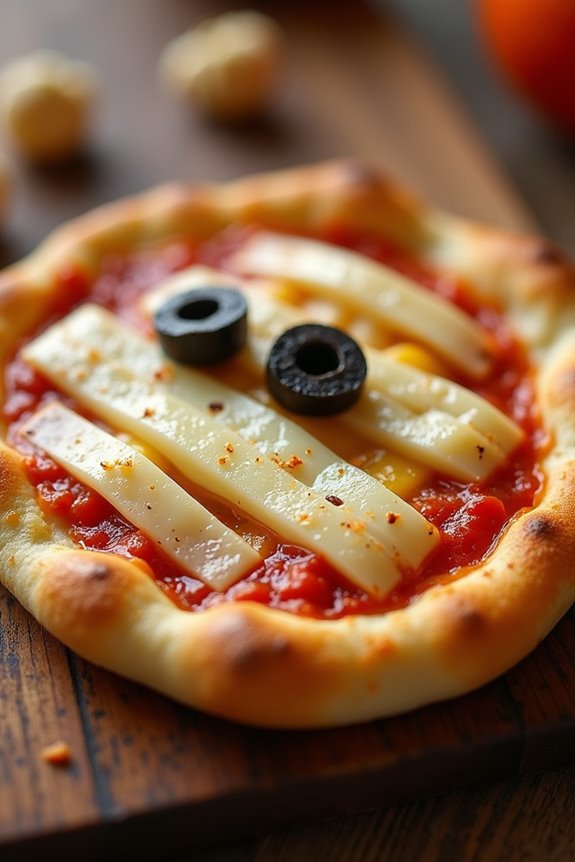
Halloween is the perfect time to get creative in the kitchen, and what better way to delight the little ones than with Mummy Wrapped Pizzas? These spooky treats aren’t only fun to make but also delicious to eat. Perfect for a Halloween party or a themed dinner, these pizzas are wrapped in strips of gooey cheese to resemble a mummy, with olive slices for the eyes. They’re easy to prepare and are sure to be a hit with kids and adults alike.
Mummy Wrapped Pizzas are made using simple ingredients that you probably already have in your kitchen. The base is made from store-bought pizza dough or you can make your own if you prefer. Each mini pizza is topped with a savory tomato sauce, your choice of toppings, and wrapped with cheese strips to give it that iconic mummy look. This recipe yields enough to serve 4-6 people, making it a perfect appetizer or snack for small gatherings.
Ingredients for 4-6 servings:
- 1 pound pizza dough
- 1 cup pizza sauce
- 1 ½ cups shredded mozzarella cheese
- 12 slices of mozzarella cheese
- 24 black olive slices
- Toppings of your choice (pepperoni, sausage, veggies, etc.)
- 1 tablespoon olive oil
- 1 teaspoon Italian seasoning
Cooking Instructions:
- Prepare the Dough: Preheat your oven to 425°F (220°C). Roll out the pizza dough on a lightly floured surface to about ¼ inch thickness. Cut the dough into small oval shapes, about 5-6 inches long, to form the base for each mummy pizza.
- Add Sauce and Toppings: Place the ovals on a lightly greased baking sheet. Spread a tablespoon of pizza sauce over each dough oval. Add your desired toppings, like pepperoni, sausage, or veggies, ensuring not to overload so the cheese strips can still be wrapped.
- Create the Mummy Look: Cut the mozzarella slices into thin strips. Arrange the cheese strips across each pizza oval in a crisscross pattern to mimic mummy bandages, leaving a small gap at the top for the eyes.
- Make the Eyes: Place two black olive slices on each pizza in the gap left at the top to create the eyes. This adds a fun and spooky touch to your mummy pizzas.
- Bake: Brush the edges of the dough with olive oil and sprinkle a little Italian seasoning on top. Bake in the preheated oven for 12-15 minutes, or until the cheese is melted and bubbly and the crust is golden brown.
- Serve: Remove from the oven and let them cool slightly before serving. Your kids and guests will love the look and taste of these creative Mummy Wrapped Pizzas.
Extra Tips:
For the best results, make sure your dough is at room temperature before rolling it out, as this makes it easier to shape. If you want to make the pizzas even more festive, consider using colored olives or peppers for the eyes.
Additionally, if you’re in a pinch for time, you can use pre-made mini pizza crusts instead of rolling out your dough. Finally, have fun with the toppings and let the kids help in arranging the cheese strips and olives to personalize their mummy creations!
Spider Web Pizzas
Halloween is a time for spooky treats and ghoulish delights, and what better way to celebrate than with a fun and delicious Spider Web Pizza? This creative twist on a classic favorite is perfect for kids and adults alike, combining the cheesy goodness of pizza with a playful design that’s sure to be a hit at any Halloween party.
These mini pizzas aren’t only easy to make but also provide a delightful activity for the whole family, allowing kids to get involved in creating their own edible spider webs.
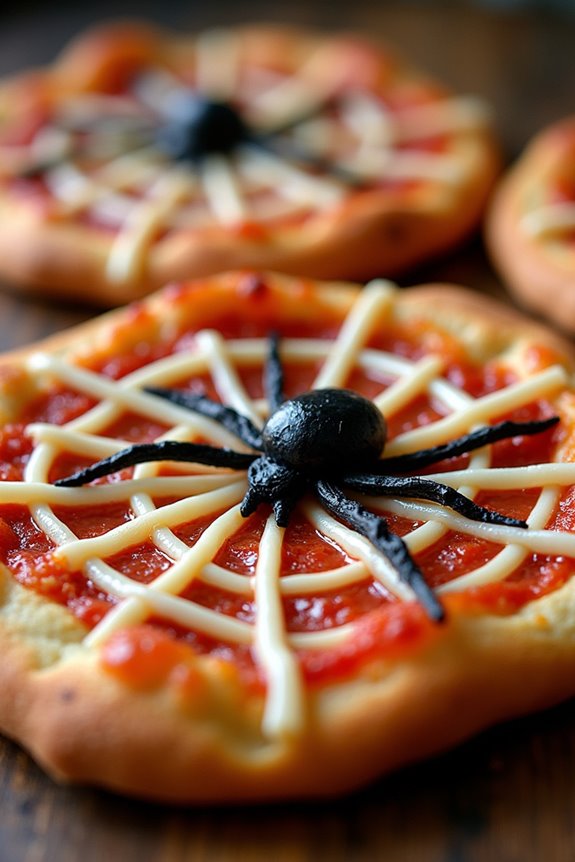
Spider Web Pizzas are made by using string cheese to create a web-like pattern over marinara sauce, giving the appearance of a spooky spider web. Topped with creepy-crawly olive spiders, these pizzas are both visually appealing and tantalizing to the taste buds. Ideal for a serving size of 4-6 people, this recipe will guarantee everyone gets their fill of Halloween fun and flavor.
Ingredients:
- 6 mini pizza crusts or English muffins
- 1 cup marinara sauce
- 8 string cheese sticks
- 1 cup sliced black olives
- 1 cup shredded mozzarella cheese
- Olive oil for brushing
Cooking Instructions:
- Prepare the Crusts: Preheat your oven to 375°F (190°C). Arrange the mini pizza crusts or halved English muffins on a baking sheet. Lightly brush each with olive oil to prevent them from drying out during baking.
- Spread the Sauce: Evenly spread a generous spoonful of marinara sauce over each crust, ensuring the entire surface is covered. This forms the base layer for your spider web design.
- Create the Spider Webs: Peel the string cheese sticks into thin strips. Arrange the strips over the sauce on each pizza to form a spider web pattern. Start from the center and work your way outwards in a radial pattern, then connect the lines with shorter strips to complete the web design.
- Add the Spiders: To make the olive spiders, cut some black olives in half to create the body and slice others into strips for the legs. Place a half olive in the center of each pizza for the spider’s body, and arrange the sliced olive pieces around it for legs.
- Add Additional Cheese: Sprinkle a small amount of shredded mozzarella cheese over the pizza to add extra cheesiness without obscuring the web design.
- Bake the Pizzas: Place the prepared pizzas in the preheated oven and bake for about 10-12 minutes, or until the cheese is melted and the crust is golden brown.
- Serve and Enjoy: Remove the pizzas from the oven and let them cool slightly before serving. Enjoy your spooky Spider Web Pizzas as a fun Halloween treat!
Extra Tips:
For an added touch of Halloween fun, consider using food coloring to tint the cheese a ghostly white or a ghoulish green. You can also experiment with different toppings to create other Halloween-themed designs, such as using bell pepper slices for pumpkin faces.
Encourage your kids to get creative with their spider web patterns and toppings—it’s a great way to let them express their Halloween spirit in a tasty and edible form!
Pumpkin Patch Pizzas

Pumpkin Patch Pizzas are a delightful and creative twist on traditional pizzas, perfect for getting into the Halloween spirit with your kids. These fun and festive pizzas resemble a pumpkin patch, offering a visually appealing and tasty treat that children will love. The concept is simple: use basic pizza ingredients and a bit of creativity to transform them into mini pumpkin patches complete with cute little pumpkins and vines. The recipe is designed to be easy enough for kids to help with, making it a fun family activity that gets everyone into the kitchen.
The recipe is designed to serve 4-6 people, making it perfect for a small Halloween gathering or a family dinner. You’ll need some basic pizza-making ingredients like dough, sauce, and cheese, along with a few extras to create the pumpkin patch effect. With these ingredients, you can create adorable pumpkin patches on your pizzas that are as delicious as they’re fun to look at. Whether you’re hosting a Halloween party or just want to make a spooky-themed meal for your family, Pumpkin Patch Pizzas are sure to be a hit.
Ingredients (Serves 4-6):
- 1 lb pizza dough (store-bought or homemade)
- 1 cup pizza sauce
- 2 cups shredded mozzarella cheese
- 1/2 cup grated Parmesan cheese
- 1/2 cup sliced black olives
- 1/2 cup mini pepperoni slices
- 1/4 cup chopped fresh basil
- 1 small green bell pepper, sliced into thin strips
- 1 small orange bell pepper, sliced into rounds
- Olive oil for brushing
- Cornmeal for dusting
Cooking Instructions:
- Preheat the Oven: Start by preheating your oven to 475°F (245°C). If you have a pizza stone, place it in the oven as it heats.
- Prepare the Dough: On a lightly floured surface, divide the pizza dough into 4-6 equal portions. Roll each portion into a round, approximately 6-8 inches in diameter. Transfer the rounds onto a baking sheet dusted with cornmeal to prevent sticking.
- Assemble the Pizzas: Spread a thin layer of pizza sauce over each dough round, leaving a small border around the edges. Sprinkle mozzarella and Parmesan cheese evenly over the sauce.
- Create the Pumpkin Patches: Arrange the orange bell pepper rounds on the pizzas to resemble pumpkins. Use the mini pepperoni slices as additional pumpkins or to add texture. Place black olive slices to create eyes and mouths on some of the pumpkin shapes for added character.
- Add the Vines: Use the green bell pepper strips and fresh basil to create vines and leaves around the pumpkins. This will add a touch of realism to your pumpkin patches.
- Bake: Brush the edges of the dough with a bit of olive oil to encourage browning. Place the pizzas in the oven (or on the pizza stone) and bake for about 10-12 minutes, or until the crust is golden and the cheese is bubbling.
- Serve: Remove the pizzas from the oven and let them cool slightly before serving. Cut into slices and enjoy your Halloween-themed feast!
Extra Tips:
For an even more engaging experience, involve your kids in the decoration process. Let them arrange the pepperoni and olives to make funny or spooky faces on the bell pepper pumpkins.
If you prefer a healthier option, consider using whole wheat pizza dough or adding more vegetables like mushrooms or spinach to the toppings. Remember, the key to perfecting these pizzas is to have fun with the design and enjoy the process of bringing a pumpkin patch to life on your plate.
Ghostly Cheese Pizzas
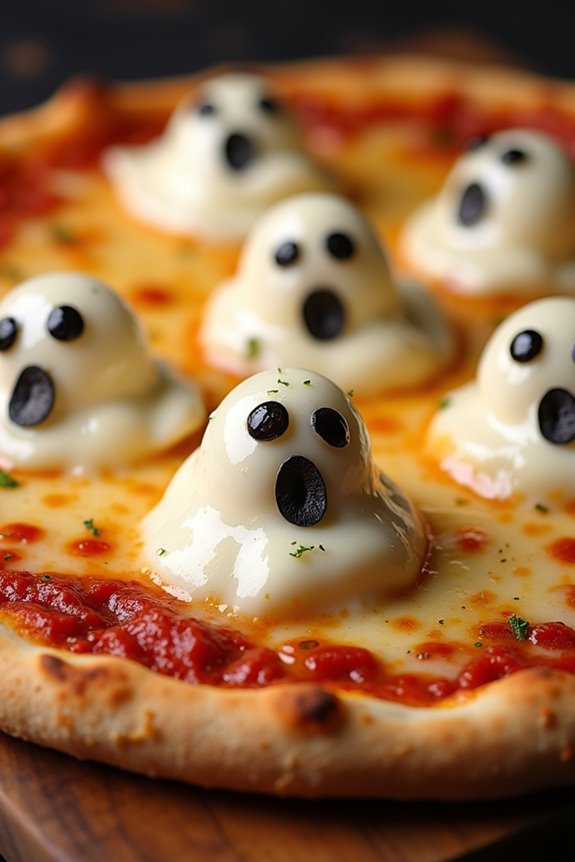
Transform your ordinary pizza night into a spooky Halloween feast with these delightful Ghostly Cheese Pizzas. Perfectly crafted to captivate the imaginations and taste buds of kids, these pizzas combine the classic flavors of cheese and tomato sauce with a playful twist. The ghostly shapes and fun decorations will make this dish the highlight of your Halloween celebration.
Whether you’re hosting a party or simply looking for a creative dinner idea, these pizzas are bound to be a hit. This recipe is designed to be simple and fun, making it an ideal cooking activity to involve the kids. Not only will they enjoy eating the ghoulish creations, but they’ll also love helping out in the kitchen.
Using either store-bought or homemade pizza dough, you can whip up these spooky treats in no time. With gooey mozzarella ghosts and a sprinkle of creativity, your family will be in for a delicious and frightfully fun meal.
Ingredients for Ghostly Cheese Pizzas (Serves 4-6):
- 2 pre-made pizza doughs (or homemade)
- 1 cup pizza sauce
- 3 cups shredded mozzarella cheese
- 12 slices of mozzarella cheese (cut into ghost shapes)
- 1/4 cup black olives (sliced)
- 1/4 cup mini pepperoni slices
- 2 tablespoons olive oil
- 1 teaspoon dried oregano
- 1 teaspoon garlic powder
- Salt and pepper to taste
Cooking Instructions:
- Preheat the Oven: Begin by preheating your oven to 450°F (232°C). This guarantees that the pizzas cook evenly and the crust becomes nice and crispy.
- Prepare the Dough: Roll out the pizza dough on a floured surface until it’s about 1/4 inch thick. Transfer the rolled dough onto a baking sheet or pizza stone, and brush lightly with olive oil.
- Add the Sauce: Spread a generous amount of pizza sauce evenly over each pizza base, leaving a small border around the edges for the crust.
- Sprinkle Cheese: Sprinkle the shredded mozzarella cheese over the sauce, covering the entire pizza. This will act as the base layer for your ghostly creations.
- Create Ghosts: Cut out ghost shapes from the slices of mozzarella cheese using a ghost-shaped cookie cutter. Place these cheese ghosts randomly on top of the shredded cheese.
- Olive and Pepperoni Features: Use sliced black olives for the eyes and mini pepperoni slices for the mouths of the cheese ghosts. Get creative with the placement to give each ghost a unique expression.
- Season and Bake: Sprinkle the pizzas with dried oregano, garlic powder, salt, and pepper. Bake in the preheated oven for about 12-15 minutes, or until the cheese is melted and bubbly, and the crust is golden brown.
- Serve and Enjoy: Once baked, remove the pizzas from the oven and let them cool slightly before slicing. Serve these delightfully spooky pizzas warm and enjoy the Halloween fun!
Extra Tips:
For an added Halloween touch, consider using colored dough or food coloring to tint the mozzarella cheese for your ghost shapes. You can also involve kids in shaping the ghosts and adding facial features, making it a fun family activity.
If you prefer a healthier option, try using whole wheat pizza dough or a cauliflower crust. Don’t forget to have fun with it – after all, Halloween is all about creativity and a little bit of spookiness!
Eyeball Pizzas
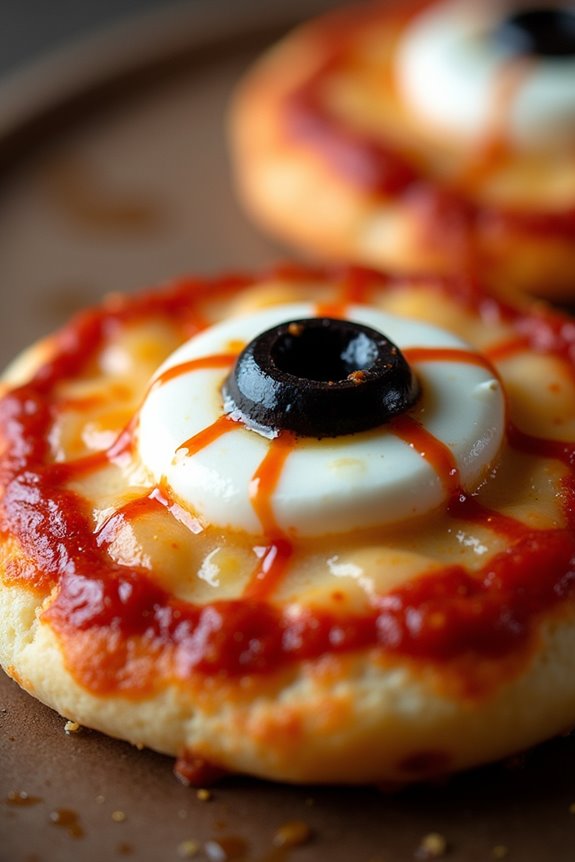
Halloween is the perfect time to get creative in the kitchen, especially when it comes to making fun and spooky treats for kids. Eyeball Pizzas are a delightful and eerie dish that both children and adults can enjoy. These mini pizzas aren’t only delicious but also serve as a great activity to get little hands involved in the kitchen.
With a few simple ingredients and a bit of imagination, you can create a platter of creepy eyeballs that are bound to be a hit at any Halloween gathering. Eyeball Pizzas are easy to prepare and can be customized according to your taste preferences. The base is a mini pizza, which can be made using store-bought dough, English muffins, or even pita bread.
Each pizza is topped with your choice of sauce and cheese, and for the spooky touch, you’ll add slices of mozzarella cheese and olives to create the appearance of bloodshot eyes. This recipe yields 4-6 servings, making it perfect for a small party or a family Halloween dinner.
Ingredients for 4-6 servings:
- 6 English muffins or mini pizza bases
- 1 cup pizza sauce
- 2 cups shredded mozzarella cheese
- 6 slices mozzarella cheese (cut into circles)
- 12 black olives (pitted and sliced)
- Red food coloring or ketchup (optional)
Cooking Instructions:
- Preheat the Oven: Preheat your oven to 375°F (190°C) to guarantee it’s hot and ready for baking the pizzas.
- Prepare the Bases: If using English muffins, split them in half to create 12 mini pizza bases. If using mini pizza bases, lay them out on a baking sheet.
- Add the Sauce: Spread about 1-2 tablespoons of pizza sauce onto each pizza base, leaving a small border around the edges.
- Add Shredded Cheese: Sprinkle a generous amount of shredded mozzarella cheese over the sauce on each pizza base.
- Create the Eyeballs: Place one mozzarella cheese circle in the center of each pizza. This will act as the white of the eyeball.
- Add the Pupils: Place a slice of black olive on top of each mozzarella circle to create the pupil of the eyeball.
- Add Bloodshot Effect: For a more gory look, use a toothpick to apply thin lines of red food coloring or a small amount of ketchup around the mozzarella circle to mimic bloodshot eyes.
- Bake: Place the pizzas in the preheated oven and bake for 10-12 minutes, or until the cheese is melted and bubbly and the edges are golden brown.
- Serve: Remove from the oven and let them cool slightly before serving to confirm they’re safe for little mouths.
Extra Tips:
For an added touch of flavor, consider adding some herbs like oregano or basil to the pizza sauce. If you have picky eaters, you can also offer a variety of toppings such as pepperoni or diced bell peppers to accompany the creepy eyeball theme.
Remember to monitor the baking closely, as cooking times may vary depending on the thickness of your pizza bases. Finally, if you’re using food coloring, make sure to use a clean toothpick for each pizza to avoid cross-contamination.
Bat Wing Pizzas
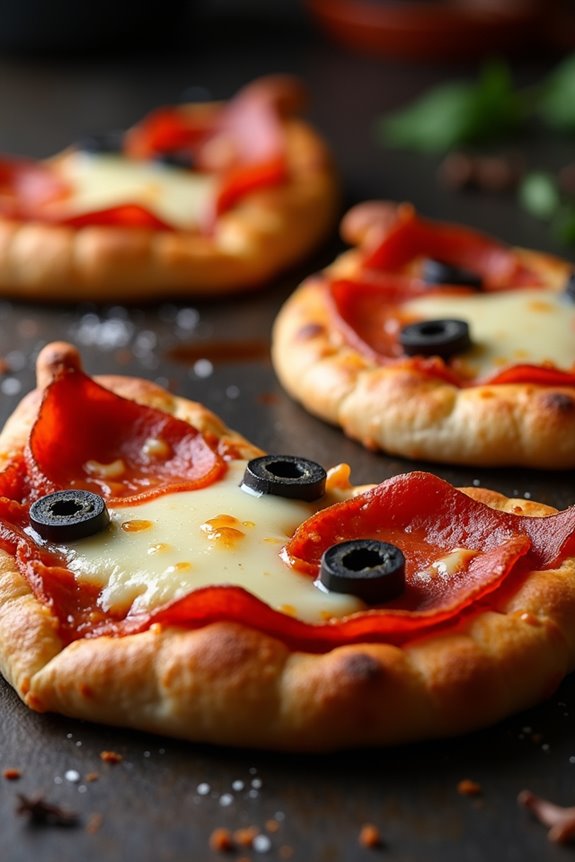
Bat Wing Pizzas are a fun and spooky treat that will surely be a hit at your Halloween gathering. These creative pizzas are designed to look like bat wings, making them perfect for kids who love a little thrill with their meal. The combination of gooey cheese, tangy tomato sauce, and crispy pepperoni creates a deliciously satisfying snack that’s as fun to make as it’s to eat.
Whether you’re hosting a Halloween party or just looking for a festive dinner idea, these Bat Wing Pizzas are an excellent choice. To create the bat-wing effect, the dough is cut into bat shapes before being topped with all the classic pizza fixings. This simple yet effective technique transforms an ordinary pizza into a themed masterpiece.
Kids will enjoy helping with the cutting and topping, making this a great family activity. With a few basic ingredients and some creativity, you can whip up these pizzas in no time, providing a delightful Halloween experience for everyone involved.
Ingredients (Serves 4-6):
- 1 pound pizza dough
- 1 cup pizza sauce
- 2 cups shredded mozzarella cheese
- 1/2 cup sliced black olives
- 1/2 cup mini pepperoni slices
- Olive oil for brushing
- 1 teaspoon dried oregano
- Flour for dusting
Cooking Instructions:
- Preheat the Oven: Begin by preheating your oven to 450°F (230°C). This guarantees your pizzas cook evenly and achieve a crispy crust.
- Prepare the Dough: On a lightly floured surface, roll out the pizza dough to about 1/4-inch thickness. Use a bat-shaped cookie cutter or a knife to cut out bat shapes. You should be able to get about 8-10 bat shapes depending on the size of your cutter.
- Arrange on Baking Sheet: Place the bat-shaped dough pieces on a baking sheet lined with parchment paper. Lightly brush the tops with olive oil to help achieve a golden color when baked.
- Add Sauce and Cheese: Spread a tablespoon of pizza sauce over each bat shape, leaving a small border around the edges. Sprinkle about 2 tablespoons of mozzarella cheese on top of the sauce.
- Decorate: Arrange the mini pepperoni slices and black olives on the cheese to create a spooky bat wing pattern. You can get creative with the placement to mimic the texture of wings.
- Season: Sprinkle a pinch of dried oregano over each pizza for added flavor.
- Bake: Place in the preheated oven and bake for 10-12 minutes, or until the cheese is melted and bubbly, and the edges of the dough are golden brown.
- Serve: Remove from the oven and allow to cool slightly before serving. These Bat Wing Pizzas are best enjoyed warm.
Extra Tips:
For a more personalized touch, let the kids add their favorite toppings in addition to the pepperoni and olives. Consider using whole wheat dough for a healthier option.
If you don’t have a bat-shaped cutter, you can freehand the bat wing shapes with a knife. Just be sure to flour your work surface and rolling pin to avoid sticking. When cutting the dough, try to make the most of your dough by arranging the cuts close together to minimize waste.
Enjoy this festive dish while watching a Halloween movie or as part of a themed dinner party!
Witch’s Hat Pizzas
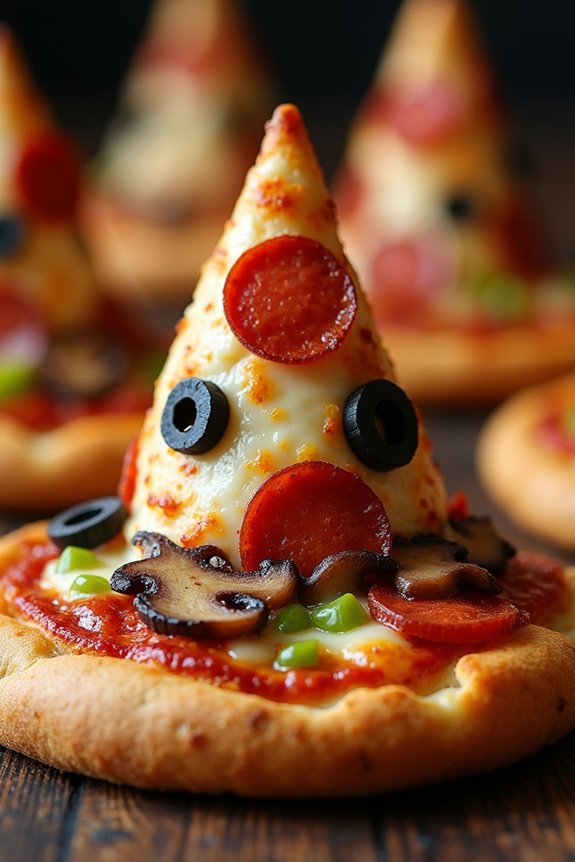
Witch’s Hat Pizzas are a fun and spooky treat perfect for a Halloween celebration with kids. These delightful pizzas are designed to resemble a witch’s hat, making them an exciting culinary project for little hands. Not only are they visually appealing, but they’re also delicious, combining classic pizza flavors with a creative twist.
This recipe is perfect for a Halloween party or a cozy night at home with the family, as it allows children to participate in the preparation, adding their personal touch to each witch’s hat.
The preparation of Witch’s Hat Pizzas involves using simple ingredients that are easily accessible and loved by kids. The base of the pizza is shaped into a classic witch’s hat, using dough that’s easy to handle and molds seamlessly into the desired shape.
The topping choices can be customized to suit individual preferences, making sure that every little witch and wizard at the table finds something they enjoy. Follow this recipe to create a serving size for 4-6 people, making sure that everyone gets their fill of this mystical meal.
Ingredients for Witch’s Hat Pizzas (4-6 servings):
- 1 pound pizza dough
- 1 cup pizza sauce
- 2 cups shredded mozzarella cheese
- 12 slices pepperoni
- 1/2 cup black olives, sliced
- 1/2 cup green bell pepper, diced
- 1/2 cup mushrooms, sliced
- 2 tablespoons olive oil
- 1 teaspoon dried oregano
- 1 teaspoon garlic powder
- Flour for dusting
Cooking Instructions:
- Preheat the Oven: Set your oven to 425°F (220°C) and allow it to preheat while you prepare the pizzas. This guarantees that the pizzas cook evenly and achieve a crispy crust.
- Prepare the Dough: Lightly flour a clean work surface and roll out the pizza dough into a large rectangle. Use a sharp knife or pizza cutter to carve out 4-6 triangular shapes, resembling witch hats. Save any excess dough for making additional hats or other creative shapes.
- Shape the Hats: Transfer the triangular dough pieces to a baking sheet lined with parchment paper. Pinch the top of each triangle to create a pointed tip, and slightly curve the base to give the hat a whimsical look.
- Add the Sauce and Cheese: Spread a thin layer of pizza sauce over each dough triangle, leaving a small border around the edges. Sprinkle mozzarella cheese generously over the sauce.
- Decorate with Toppings: Arrange pepperoni slices, black olives, green bell pepper, and mushrooms on each pizza, creating fun patterns or faces. Be creative with placements to enhance the witch hat appearance.
- Season and Bake: Drizzle olive oil over the pizzas and sprinkle with dried oregano and garlic powder for added flavor. Bake in the preheated oven for 12-15 minutes, or until the crust is golden brown and the cheese is bubbly.
- Serve and Enjoy: Once baked, remove the Witch’s Hat Pizzas from the oven and let them cool slightly before serving. This allows the cheese to set and makes them easier to handle.
Extra Tips:
For extra fun, allow kids to personalize their Witch’s Hat Pizzas by adding their favorite toppings or creating silly faces with the ingredients.
Consider using cookie cutters to shape the dough into other spooky Halloween-themed designs like ghosts or pumpkins. If you want a healthier alternative, try using whole wheat pizza dough or adding more vegetables.
Remember to supervise kids during the shaping and decorating process to promote safety, especially when using sharp utensils.
Skeleton Bone Pizzas

Skeleton Bone Pizzas are a spooky and delicious addition to any Halloween celebration, especially for kids who love themed treats. These pizzas are both fun to make and delightful to eat, guaranteeing that your little ones will be excited to help in the kitchen and even more thrilled to devour their creations.
The playful presentation of these pizzas, shaped like skeleton bones, adds an extra layer of Halloween spirit while still satisfying everyone’s craving for a slice of cheesy goodness. Perfect for a group of 4-6 people, this recipe transforms simple pizza dough and toppings into a bone-chilling treat that’s bound to be a hit at any Halloween gathering.
The process involves shaping the dough into bone-like structures, topping them with sauce, mozzarella cheese, and your choice of spooky toppings. Whether served as a main dish or a festive snack, Skeleton Bone Pizzas will bring smiles and perhaps a few playful scares to your Halloween festivities.
Ingredients:
- 2 packages of refrigerated pizza dough
- 1 cup pizza sauce
- 2 cups shredded mozzarella cheese
- 12 slices of pepperoni (optional)
- 1/2 cup black olives, sliced
- 1/2 cup green bell pepper, diced
- Olive oil for brushing
- 1 teaspoon garlic powder
- 1 teaspoon Italian seasoning
- Flour for dusting
Cooking Instructions:
- Preheat and Prepare: Preheat your oven to 425°F (220°C). Lightly grease two large baking sheets or line them with parchment paper. Dust your work surface with a little flour to prevent sticking.
- Shape the Dough: Unroll the pizza dough onto the floured surface. Use a sharp knife or pizza cutter to cut each dough roll into 6 equal strips. Gently shape each strip into a bone shape by pinching and stretching the ends to resemble the rounded ends of bones. Place the shaped dough onto the prepared baking sheets.
- Brush with Olive Oil: Lightly brush each bone-shaped dough piece with olive oil to help them brown nicely while baking. Sprinkle with garlic powder and Italian seasoning for added flavor.
- Add Sauce and Cheese: Spread a thin layer of pizza sauce over each bone, leaving a little border around the edges. Sprinkle evenly with mozzarella cheese.
- Decorate with Toppings: Use the pepperoni slices, black olives, and green bell peppers to create spooky faces or patterns on each bone pizza. Kids will have fun getting creative with their designs.
- Bake the Pizzas: Place the baking sheets in the oven and bake for 10-12 minutes, or until the cheese is melted and bubbly, and the dough is golden brown.
- Cool and Serve: Allow the pizzas to cool for a few minutes before serving. This will guarantee the cheese sets slightly and makes them easier to handle.
Extra Tips:
For an even spookier presentation, use cookie cutters to shape the pepperoni and bell peppers into fun Halloween-themed shapes like bats or pumpkins. You can also experiment with different toppings to cater to your kids’ preferences, such as using mushrooms or pineapple to create unique designs.
If you’re making these pizzas with younger children, consider pre-shaping the dough and letting them focus on decorating, which is often the most enjoyable part for them. Remember to supervise children closely when using the oven and handling sharp tools.
Frankenstein’s Monster Pizzas
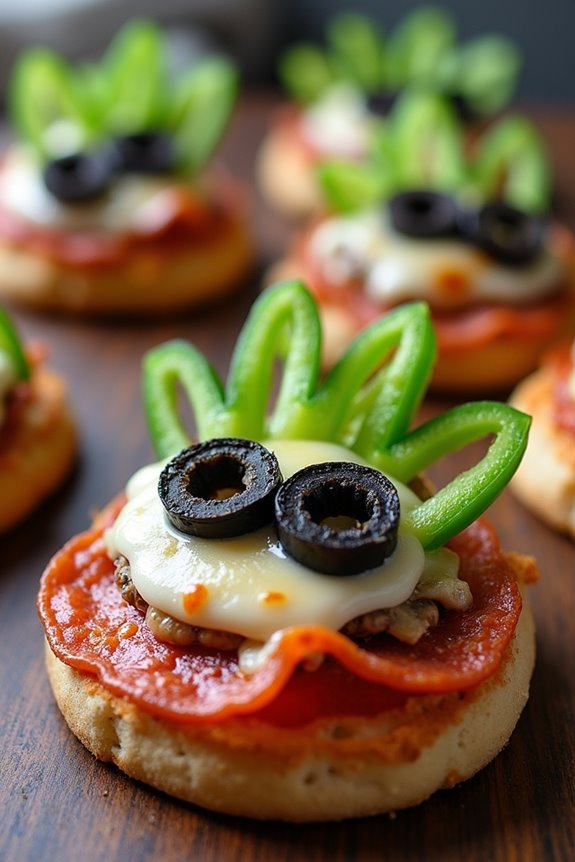
Frankenstein’s Monster Pizzas are a fun and spooky way to get kids excited about Halloween while also enjoying a delicious meal. These mini pizzas are designed to look like the iconic monster, complete with green skin, dark hair, and a variety of toppings that can be customized according to your child’s preferences.
They’re perfect for a Halloween party or a themed family dinner, offering a creative twist on a classic favorite. The best part about Frankenstein’s Monster Pizzas is that they’re simple to make and can involve the whole family in the preparation process.
Kids will love assembling the pizzas and adding their own personal touches to each monster creation. The recipe uses basic ingredients that are easy to find and allows for creativity in both design and flavor. With this recipe, you can serve a group of 4-6 people, guaranteeing there are enough monstrous delights for everyone at the table.
Ingredients (serving size: 4-6 people):
- 6 English muffins, halved
- 1 cup pizza sauce
- 2 cups shredded mozzarella cheese
- 1 cup green bell peppers, sliced into strips
- 12 black olives, halved
- 1/2 cup sliced mushrooms
- 1/2 cup sliced pepperoni
- 1/4 cup sliced black olives
- 12 pepperoncini rings
- 1/4 cup pesto sauce (optional for green monster effect)
Cooking Instructions:
1. Preheat the Oven: Begin by preheating your oven to 375°F (190°C). This will guarantee the pizzas cook evenly and the cheese melts perfectly.
2. Prepare the English Muffins: Place the halved English muffins on a baking sheet, cut side up. This will serve as the base for your monster pizzas.
3. Apply the Sauce: Spread a generous spoonful of pizza sauce over each muffin half. For a green monster effect, you can also spread a thin layer of pesto sauce over the pizza sauce.
4. Add the Cheese: Sprinkle a layer of shredded mozzarella cheese over the sauce. This will act as the monster’s skin, so guarantee even coverage.
5. Create the Monster’s Face: Use the green bell peppers to make the monster’s hair by placing strips at the top of each muffin.
Add sliced black olives for eyes, using pepperoncini rings to add a spooky touch around them. Place mushroom slices for ears and arrange pepperoni slices for the mouth. Feel free to get creative with the toppings to design different facial expressions.
6. Bake the Pizzas: Place the baking sheet in the preheated oven and bake for 10-12 minutes, or until the cheese is melted and bubbly.
7. Serve: Once baked, allow the pizzas to cool slightly before serving them to the enthusiastic little monsters at your table.
Extra Tips:
For an even spookier effect, try using food coloring to tint the cheese green before sprinkling it onto the pizzas. You can also set up a toppings station and let each child customize their own Frankenstein monster, making it a more interactive and fun experience.
If you’re short on time, pre-baked pizza bases can be used as an alternative to English muffins. Remember to supervise young children when handling the oven and any sharp utensils during preparation.
Vampire Fang Pizzas
Halloween is a time for spooky fun and creative treats, and what better way to celebrate than with some themed pizza? Vampire Fang Pizzas are a delightful twist on the traditional pizza, perfect for kids who are looking for a bit of Halloween excitement in their meals.
These pizzas use simple ingredients and a dash of creativity to transform ordinary pizza into a fang-tastic feast that kids and adults alike will enjoy. This recipe is designed to serve 4-6 people and is an engaging activity that children can help with, making it a fun family cooking experience.
With just a few ingredients and some imaginative assembly, you can create a visually striking and delicious dish that’s bound to be a hit at any Halloween gathering. These pizzas won’t only satisfy your cravings but also add a playful touch to your Halloween menu.
Ingredients (serves 4-6):
- 6 English muffins, split in half
- 1 cup pizza sauce
- 2 cups shredded mozzarella cheese
- 24 slices of pepperoni
- 12 black olives, sliced
- 12 whole almonds, blanched
- 1 tablespoon olive oil
- 1 teaspoon dried oregano
Cooking Instructions:
- Preheat the Oven: Begin by preheating your oven to 375°F (190°C). This guarantees that the pizzas will cook evenly and achieve a deliciously crispy finish.
- Prepare the Muffins: Arrange the English muffin halves on a baking sheet lined with parchment paper. Brush each muffin with a light coating of olive oil to give them a slight golden crust once baked.
- Add the Sauce: Spread a generous tablespoon of pizza sauce on each muffin half, ensuring even coverage to the edges. This will be the base for your vampire fangs.
- Layer the Cheese: Sprinkle a layer of shredded mozzarella cheese over the sauce, creating a bed of cheese to hold the toppings. Use about 2 tablespoons per muffin half.
- Create the Vampire Fangs: Place two slices of pepperoni on each muffin half as the ‘gums’ of the vampire fangs. Position an almond at the pointed end of each pepperoni slice to resemble fangs.
- Add the Eyes: Position two slices of black olive above the pepperoni to serve as the vampire’s eyes. The dark color and round shape add a spooky touch.
- Season and Bake: Sprinkle a pinch of oregano over each pizza for additional flavor. Bake in the preheated oven for 10-12 minutes, or until the cheese is melted and bubbly, and the muffins are golden brown.
- Cool and Serve: Allow the pizzas to cool slightly before serving. This will make them easier to handle and guarantee the toppings stay in place.
Extra Tips:
For an extra boost of flavor, you can add a pinch of garlic powder or Italian seasoning to the olive oil before brushing it onto the muffins.
If your kids aren’t fans of olives, you can substitute them with small slices of red or green bell pepper for the eyes. Additionally, these pizzas can be made gluten-free by using gluten-free English muffins.
Encourage kids to get involved in the assembly process; they’ll love creating their own vampire faces and might even come up with creative variations!