

As Halloween creeps closer, my excitement for festive baking fun grows.
The kitchen becomes a playground for creativity, filled with the sweet aroma of treats in the making.
Little hands eagerly craft Spooky Spider Cupcakes and Frankenstein Rice Krispie Treats from simple ingredients.
It’s more than just baking—it’s about the laughter, the mess, and the cherished memories we create.
Ready for some ghoulishly delightful baking ideas that the kids will adore?
Spooky Spider Cupcakes
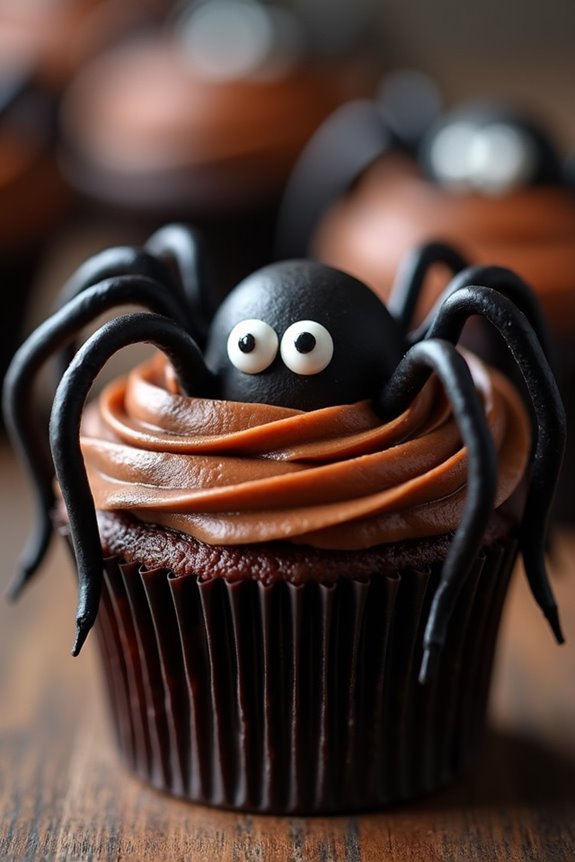
Halloween is the perfect time to get creative in the kitchen, and what better way to delight and spook your little ones than with some Spooky Spider Cupcakes? These creepy-crawly treats aren’t only delicious but also a fun activity for kids to participate in. Perfect for a Halloween party or a festive treat at home, these cupcakes are sure to bring smiles and maybe a few playful shrieks.
With a rich chocolate base and a decorative spider theme, these cupcakes combine taste and creativity. The recipe is simple enough for kids to help with and can be completed in under an hour. The chocolate cupcakes are topped with a layer of chocolate frosting, and the spider decorations are made using licorice and candy eyes. Kids will love creating their own edible spiders while practicing their decorating skills.
Whether you’re a seasoned baker or a beginner, these Spooky Spider Cupcakes are a great way to enjoy Halloween in the kitchen.
Ingredients (for 4-6 people):
- 1 cup all-purpose flour
- 1/2 cup unsweetened cocoa powder
- 1 teaspoon baking powder
- 1/2 teaspoon baking soda
- 1/4 teaspoon salt
- 1/2 cup unsalted butter, softened
- 1 cup granulated sugar
- 2 large eggs
- 1 teaspoon vanilla extract
- 1/2 cup buttermilk
- 1 cup chocolate frosting
- Black licorice strings
- Candy eyes
Instructions:
- Preheat and Prepare: Preheat your oven to 350°F (175°C). Line a muffin tin with cupcake liners to prepare for baking.
- Mix Dry Ingredients: In a medium bowl, whisk together the flour, cocoa powder, baking powder, baking soda, and salt. Set aside.
- Cream Butter and Sugar: In a large bowl, beat the softened butter and granulated sugar together until light and fluffy. This should take about 2-3 minutes using an electric mixer.
- Add Eggs and Vanilla: Beat in the eggs, one at a time, ensuring each is fully incorporated before adding the next. Mix in the vanilla extract.
- Combine with Buttermilk: Gradually add the dry ingredients to the butter mixture, alternating with the buttermilk. Mix until just combined, being careful not to overmix.
- Fill and Bake: Divide the batter evenly among the prepared cupcake liners, filling each about two-thirds full. Bake in the preheated oven for 18-20 minutes, or until a toothpick inserted into the center comes out clean.
- Cool and Frost: Allow the cupcakes to cool in the pan for 5 minutes before transferring to a wire rack to cool completely. Once cooled, spread chocolate frosting over each cupcake.
- Decorate: Cut the black licorice strings into small pieces to create spider legs. Place four pieces on each side of the cupcake to form eight legs. Add two candy eyes on top of the frosting to complete the spider look.
Extra Tips:
When making Spooky Spider Cupcakes, be sure to let the cupcakes cool completely before frosting to prevent the frosting from melting. If you’re working with younger children, pre-cut the licorice strings to avoid any sharp scissors or knives in the kitchen.
For a fun twist, use different colored frosting or candy eyes to make a variety of spider designs. These cupcakes are best enjoyed fresh but can be stored in an airtight container for up to three days. Enjoy your Halloween baking adventure!
Ghostly Meringue Pops

Ghostly Meringue Pops are the perfect spooky treat to bake with kids this Halloween. These delightful little pops are made from light and airy meringue, shaped into ghostly figures and decorated with chocolate faces. They aren’t only fun to make but also a deliciously sweet addition to any Halloween party.
Kids will love getting creative with the designs, and the process of making meringue is a great hands-on activity that introduces them to the basics of baking.
These pops aren’t only visually enchanting but also easy to prepare, requiring just a few simple ingredients. With a crisp exterior and a slightly chewy center, meringue pops melt in your mouth, leaving a sweet and satisfying taste. You can customize them with different flavors or colors if desired, although the classic white ghost look is always a hit.
Whether you’re hosting a party or just looking for a fun kitchen project, Ghostly Meringue Pops are sure to bring smiles and a little bit of Halloween magic to your day.
Ingredients (Serving Size: 4-6 people):
- 4 large egg whites
- 1 cup granulated sugar
- 1/2 teaspoon cream of tartar
- 1 teaspoon vanilla extract
- A pinch of salt
- 1/2 cup mini chocolate chips or melted chocolate (for decoration)
- Lollipop sticks
Cooking Instructions:
- Preheat the Oven: Start by preheating your oven to 200°F (95°C). Line two baking sheets with parchment paper. This low temperature is vital to dry the meringues rather than bake them.
- Prepare the Meringue Mixture: In a clean, grease-free bowl, beat the egg whites with a pinch of salt until they form soft peaks. Gradually add the sugar, one tablespoon at a time, while continuing to beat. Add the cream of tartar and vanilla extract once the mixture has thickened. Continue beating until stiff, glossy peaks form.
- Pipe the Ghost Shapes: Transfer the meringue mixture to a piping bag fitted with a large round tip. Pipe ghost shapes onto the prepared baking sheets. They should be about 3-4 inches tall. Insert a lollipop stick into the base of each ghost, making sure it’s secure.
- Bake the Meringues: Place the baking sheets in the oven and bake for 1.5 to 2 hours, or until the meringues are dry to the touch and easily lift off the parchment paper. Turn off the oven and let the meringues cool in the oven with the door slightly ajar for another hour to confirm they’re completely dry.
- Decorate: Once the meringues are cooled, use mini chocolate chips or melted chocolate to create ghost faces. If using melted chocolate, pipe small dots and lines for eyes and mouths.
Extra Tips: When making meringue, make sure all your equipment is completely clean and dry; any grease or moisture can prevent the egg whites from whipping correctly. It’s also essential to add sugar gradually to help stabilize the meringue.
If you’re using melted chocolate for the faces, a toothpick can be a handy tool for precise application. Remember to store your Ghostly Meringue Pops in an airtight container to maintain their crispness. They can last for up to a week if kept dry.
Frankenstein Rice Krispie Treats
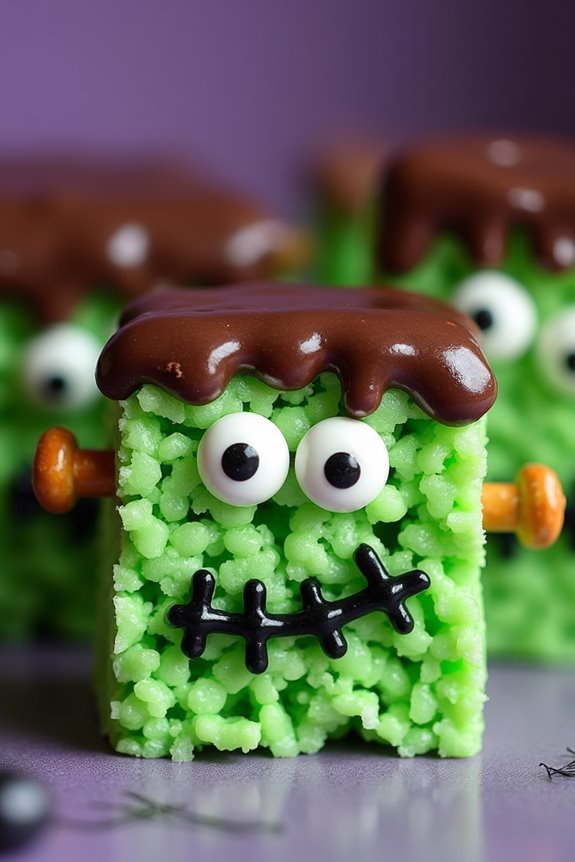
Frankenstein Rice Krispie Treats are a delightful and spooky addition to any Halloween celebration, guaranteed to be a hit with kids and adults alike. These treats combine the classic, gooey goodness of Rice Krispie squares with a fun, monstrous twist that’s easy and enjoyable to make. With vibrant green coloring and comical candy facial features, these treats capture the essence of the beloved Frankenstein monster in a sweet, edible form.
Perfect for a serving size of 4-6 people, this recipe is simple enough for kids to help out, making it a fantastic activity for the whole family. Whether you’re preparing for a Halloween party or just looking for a festive snack, these Frankenstein Rice Krispie Treats are sure to bring some spooky fun to your kitchen. Gather your ingredients and get ready to create these monstrously delicious treats!
Ingredients:
- 3 tablespoons unsalted butter
- 6 cups mini marshmallows
- Green food coloring
- 6 cups Rice Krispies cereal
- 1 cup melted chocolate (for decoration)
- 12 candy eyeballs
- 6 pretzel sticks, broken in half
- Black decorating gel
Instructions:
- Melt the Butter and Marshmallows: In a large saucepan over medium heat, melt the butter. Once melted, add the mini marshmallows, stirring continuously until they’re completely melted and smooth. Remove from heat.
- Add Food Coloring: Stir in a few drops of green food coloring into the melted marshmallow mixture until you achieve the desired shade of “Frankenstein green.”
- Mix with Cereal: Add the Rice Krispies cereal to the marshmallow mixture, stirring well until the cereal is evenly coated.
- Shape the Treats: Grease a 9×13 inch pan lightly with cooking spray and press the mixture into the pan evenly using a spatula or wax paper. Allow to cool for about 15-20 minutes.
- Cut and Decorate: Once set, cut the Rice Krispie mixture into rectangles (approximately 3×2 inches each). Dip the top of each rectangle into melted chocolate to create Frankenstein’s hair. Attach two candy eyeballs to each treat using a small dab of melted chocolate or decorating gel. Use the black decorating gel to add a mouth and stitches. Insert half of a pretzel stick into each side of the treat to create Frankenstein’s neck bolts.
- Set: Allow the decorated treats to set for about 10 minutes before serving, ensuring the chocolate and decorations are firm.
Extra Tips: When melting the marshmallows, make sure to keep the heat on medium to avoid scorching. If the mixture begins to harden while shaping, you can reheat it slightly or keep your hands damp to prevent sticking.
Also, be creative with your Frankenstein faces; kids enjoy adding their own artistic flair, so allow them to experiment with different expressions and decorations. Enjoy your monstrously delicious Rice Krispie treats!
Witch Hat Cookies
Halloween is the perfect time for creative and spooky treats, and what better way to celebrate than with Witch Hat Cookies? These delightful and whimsical cookies aren’t only fun to make but also delicious to eat. With their pointy hats and chocolatey goodness, they’re sure to be a hit at any Halloween party or gathering.
Plus, making these cookies is a fantastic activity to enjoy with kids, allowing them to get hands-on with the decorating process and let their imaginations run wild.
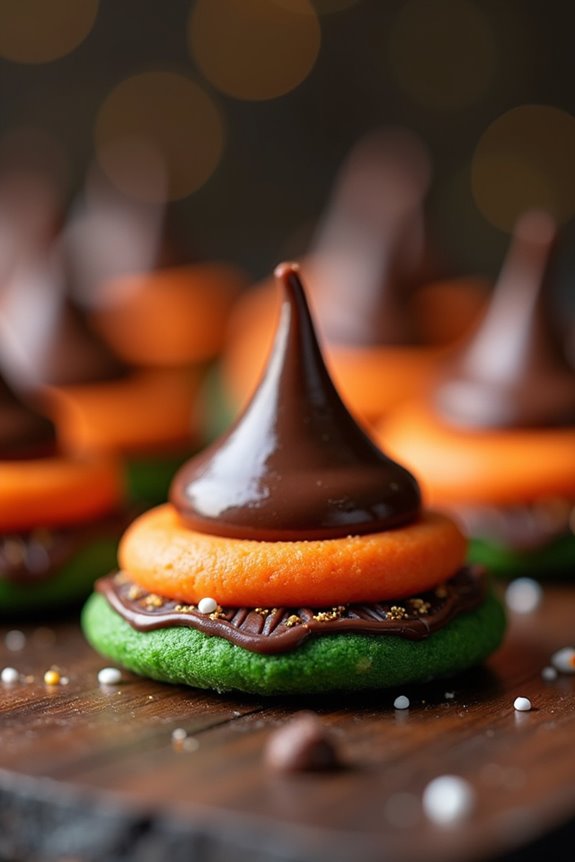
These Witch Hat Cookies are made with simple ingredients that you probably already have at home, making them an easy and cost-effective option for a festive treat. The combination of chocolate cookies, chocolate kisses, and colorful icing will make these cookies the star of your Halloween dessert table.
Whether you’re baking them for a party, sharing them with friends, or simply enjoying them at home with your family, these cookies are bound to bring a touch of magic to your Halloween celebrations.
Ingredients for 4-6 servings:
- 1 package of chocolate wafer cookies
- 1 bag of chocolate kisses
- 1 tube of orange decorating icing
- 1 tube of green decorating icing
- 1 tablespoon of melted chocolate or chocolate frosting
- Sprinkles (optional)
Cooking Instructions:
- Prepare the Ingredients: Start by gathering all your ingredients and preheating your oven to 350°F (175°C), if you plan to bake the cookies instead of using pre-made ones.
- Melt Chocolate: Melt a tablespoon of chocolate or heat up the chocolate frosting until it becomes spreadable. This will act as the glue to attach the chocolate kisses to the cookies.
- Assemble the Witch Hats: Take a chocolate wafer cookie and place it flat side up on your work surface. Dab a small amount of melted chocolate or chocolate frosting in the center of the cookie.
- Attach the Chocolate Kisses: Quickly press a chocolate kiss onto the melted chocolate or frosting on the cookie. Hold it in place for a few seconds to guarantee it sticks firmly.
- Decorate the Hat: Use the orange and green decorating icing to draw a band around the base of the chocolate kiss, where it meets the cookie. You can also add a small bow or other embellishments to make it more festive.
- Add Sprinkles: If desired, sprinkle a few festive sprinkles onto the icing while it’s still wet to add some extra color and fun to the cookies.
- Let Set: Allow the cookies to set for about 30 minutes to confirm the chocolate and icing harden properly before serving.
Extra Tips:
For a more intense chocolate flavor, consider using dark chocolate wafers and kisses. If you don’t have a tube of decorating icing, you can make your own by mixing powdered sugar with a few drops of food coloring and a little water until you reach the desired consistency.
These cookies can also be customized with different colored icings or by adding edible glitter for an extra magical touch. Remember, the goal is to have fun, so let the kids experiment with different designs and decorations!
Monster Eyeball Cake Pops
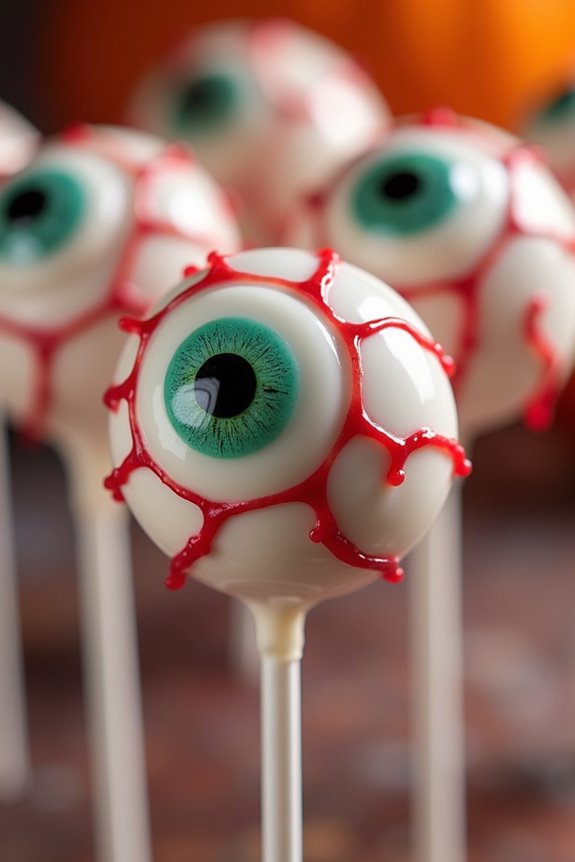
Monster Eyeball Cake Pops are a fun and spooky treat that kids will love making and eating this Halloween. These cake pops are designed to look like creepy eyeballs, complete with colorful icing and candy decorations. They’re perfect for a Halloween party or a special treat leading up to October 31st. Not only are they visually exciting, but they also offer a delicious bite-sized dessert that combines moist cake with a sweet candy coating.
Making Monster Eyeball Cake Pops is a great way to get creative in the kitchen with your kids. This recipe is designed to serve 4-6 people, making it an ideal project for a family activity or a small group of friends. Easy to prepare and assemble, these cake pops provide a hands-on experience where kids can let their imaginations run wild decorating their creepy creations. Let’s explore the spooky fun of making these delightful eyeballs on a stick.
Ingredients:
- 1 box of cake mix (any flavor of your choice)
- Ingredients required for cake mix (usually eggs, oil, and water)
- 1 cup of vanilla frosting
- 1 package of white candy melts
- 1 package of black candy melts or mini chocolate chips
- Food coloring (red, green, or purple)
- Lollipop sticks
- Candy eyeballs or round candies
- Red gel icing
Instructions:
- Bake the Cake: Prepare the cake mix according to the package instructions. Once baked, let the cake cool completely. This step is essential as warm cake can cause your pops to fall apart during the forming process.
- Crumble the Cake: In a large bowl, crumble the cooled cake using your hands until it resembles fine crumbs. Verify there are no large pieces of cake remaining.
- Mix with Frosting: Add the vanilla frosting to the crumbled cake gradually, mixing until the mixture holds together and is moist enough to form into balls, but not too sticky.
- Form the Cake Balls: Roll small amounts of the cake mixture into balls about the size of a golf ball. Place the balls on a baking sheet lined with parchment paper.
- Chill the Cake Balls: Refrigerate the cake balls for about 1-2 hours or until they’re firm.
- Melt the Candy Coating: Melt the white candy melts according to the package directions. If desired, add a few drops of food coloring to achieve your desired eyeball color.
- Insert Sticks: Dip the tip of each lollipop stick into the melted candy, then insert it into a cake ball. This helps the stick adhere to the cake pop.
- Coat the Cake Pops: Dip each cake pop into the melted candy melts, gently tapping off any excess. Allow the coating to set slightly.
- Decorate the Eyeballs: While the coating is still slightly soft, press a candy eyeball or a round candy into the center of each pop. Use black candy melts or mini chocolate chips to add pupils if necessary. Draw red gel icing “veins” starting from the candy eye outward to enhance the monster look.
- Set the Cake Pops: Insert the completed cake pops into a styrofoam block or a cake pop stand to set completely.
Extra Tips:
For best results, verify the cake balls are thoroughly chilled before dipping to prevent them from falling off the sticks. If the candy coating becomes too thick during the dipping process, stir in a tiny amount of vegetable shortening to thin it out.
Encourage creativity by experimenting with different candy decorations and food coloring to create a variety of monster eyeballs. Store any leftovers in an airtight container in the refrigerator to maintain freshness.
Pumpkin Patch Brownies
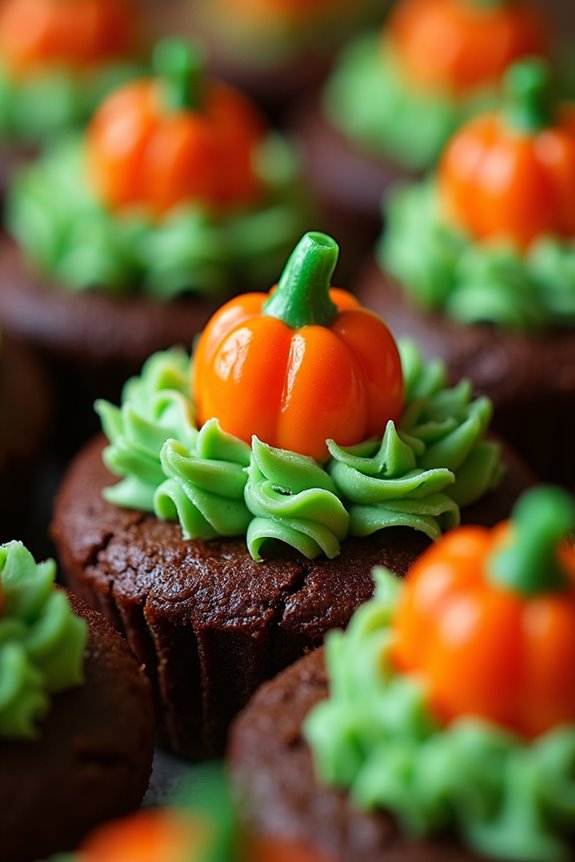
Halloween is the perfect time to get creative in the kitchen, and what better way to celebrate than with some festive baking? Enter Pumpkin Patch Brownies – a delightful treat that combines the rich, fudgy goodness of brownies with the playful, autumnal theme of a pumpkin patch.
These brownies aren’t only delicious but also a fun project for kids, allowing them to decorate their own little edible pumpkin patches. Whether you’re hosting a Halloween party or simply want to enjoy a cozy family baking day, these brownies are a definite hit.
The base of this treat is a classic brownie recipe, giving you a dense and chocolaty foundation. The fun comes in with the decorations – using green frosting to create a “grass” effect and candy pumpkins to populate your edible patch. This recipe serves 4-6 people, making it perfect for a small gathering or a family dessert night.
With just a few ingredients and some imagination, you can transform a simple brownie into a Halloween masterpiece.
Ingredients:
- 1 cup (2 sticks) unsalted butter
- 2 cups granulated sugar
- 1 cup unsweetened cocoa powder
- 4 large eggs
- 1 teaspoon vanilla extract
- 1 cup all-purpose flour
- 1/2 teaspoon baking powder
- 1/2 teaspoon salt
- 1 cup chocolate chips
- Green frosting (store-bought or homemade)
- Candy pumpkins (such as mellowcreme pumpkins)
Instructions:
- Preheat the Oven: Start by preheating your oven to 350°F (175°C). Grease a 9×13 inch baking pan with butter or cooking spray to make certain the brownies don’t stick.
- Melt the Butter: In a medium saucepan over low heat, melt the butter. Once melted, remove from heat and add the sugar and cocoa powder, stirring until smooth.
- Mix Wet Ingredients: Add the eggs one at a time to the butter mixture, beating well after each addition. Stir in the vanilla extract.
- Combine Dry Ingredients: In a separate bowl, whisk together the flour, baking powder, and salt. Gradually add this dry mixture to the wet ingredients, stirring until just combined.
- Add Chocolate Chips: Fold in the chocolate chips to the batter, ensuring they’re evenly distributed.
- Bake the Brownies: Pour the brownie batter into the prepared baking pan, spreading it evenly. Bake in the preheated oven for 25-30 minutes, or until a toothpick inserted in the center comes out mostly clean (a few moist crumbs are okay).
- Cool and Decorate: Allow the brownies to cool completely in the pan. Once cooled, use green frosting to pipe “grass” on the surface of the brownies. Place candy pumpkins on top to create a pumpkin patch effect.
Extra Tips:
For an extra touch of creativity, consider adding edible eyes to the candy pumpkins to make them look like adorable Halloween characters.
If you’re making your own green frosting, a few drops of green food coloring mixed into vanilla frosting will do the trick. Be sure to let the brownies cool completely before decorating to prevent the frosting from melting.
For a fun variation, you can also add a layer of crushed Oreo cookies to resemble “dirt” beneath the pumpkin patch. Enjoy your delightful Pumpkin Patch Brownies with a glass of milk or a warm cup of apple cider for the full autumn experience!
Bat-Shaped Sugar Cookies
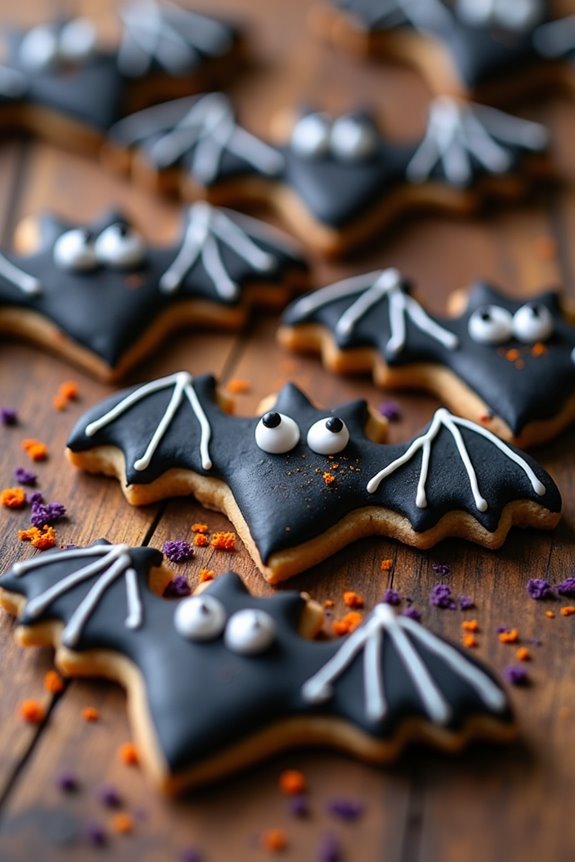
Halloween is a time for fun, creativity, and of course, delicious treats. One delightful way to celebrate the spooky season with your kids is by baking Bat-Shaped Sugar Cookies.
These cookies aren’t only easy to make, but they’re also a fantastic way to engage children in the kitchen. The simple sugar cookie base is perfect for cutting into bat shapes, and decorating them can be a fun activity that allows kids to express their creativity.
Whether you’re hosting a Halloween party or just looking for a festive baking project, these Bat-Shaped Sugar Cookies are sure to be a hit. The recipe is straightforward, requiring basic ingredients that you likely already have in your pantry.
Plus, the cookies can be decorated in various ways, offering endless possibilities for spooky designs. With this recipe, you can enjoy a fun bonding experience with your kids and create a memorable Halloween treat.
Ingredients (serving size: 4-6 people):
- 2 3/4 cups all-purpose flour
- 1 teaspoon baking soda
- 1/2 teaspoon baking powder
- 1 cup unsalted butter, softened
- 1 1/2 cups granulated sugar
- 1 egg
- 1 teaspoon vanilla extract
- Black food coloring
- Bat-shaped cookie cutter
- Icing and sprinkles for decoration (optional)
Instructions:
1. Preheat the Oven: Start by preheating your oven to 375°F (190°C). This guarantees that it’s at the right temperature when your cookies are ready to bake.
2. Prepare the Dough: In a medium bowl, mix together the flour, baking soda, and baking powder. In a larger bowl, cream the softened butter and sugar together until the mixture is smooth.
Beat in the egg and vanilla extract. Gradually blend in the dry ingredients until fully combined.
3. Color the Dough: Add a few drops of black food coloring to the dough and mix until you achieve the desired shade of black. You can adjust the amount of food coloring to make the cookies as dark as you want.
4. Roll Out the Dough: On a lightly floured surface, Roll Out the Dough to about 1/4 inch thickness. This thickness guarantees that the cookies will bake evenly and hold their shape.
5. Cut the Cookies: Use a bat-shaped cookie cutter to cut out the cookies from the rolled dough. Place the cookies on an ungreased baking sheet, leaving space between each one.
6. Bake the Cookies: Bake in the preheated oven for 8 to 10 minutes or until the edges are lightly golden. Be careful not to overbake, as the cookies can easily turn hard.
7. Cool and Decorate: Once baked, allow the cookies to cool on the baking sheet for a few minutes before transferring them to a wire rack to cool completely.
Once cool, you can decorate them with icing, sprinkles, or any other decorations your kids might enjoy.
Extra Tips:
For best results, make sure the butter is at room temperature before starting, as this will help it cream smoothly with the sugar.
If you’d like to prepare in advance, the dough can be made a day ahead and stored in the refrigerator. Just let it sit at room temperature for a bit before rolling it out if it’s too firm.
Encourage your kids to get creative with their decorations; they can use colored icing to draw faces or add sprinkles for a bit of sparkle.
Finally, store any leftover cookies in an airtight container to keep them fresh. Enjoy your spooky baking adventure!
Haunted House Gingerbread
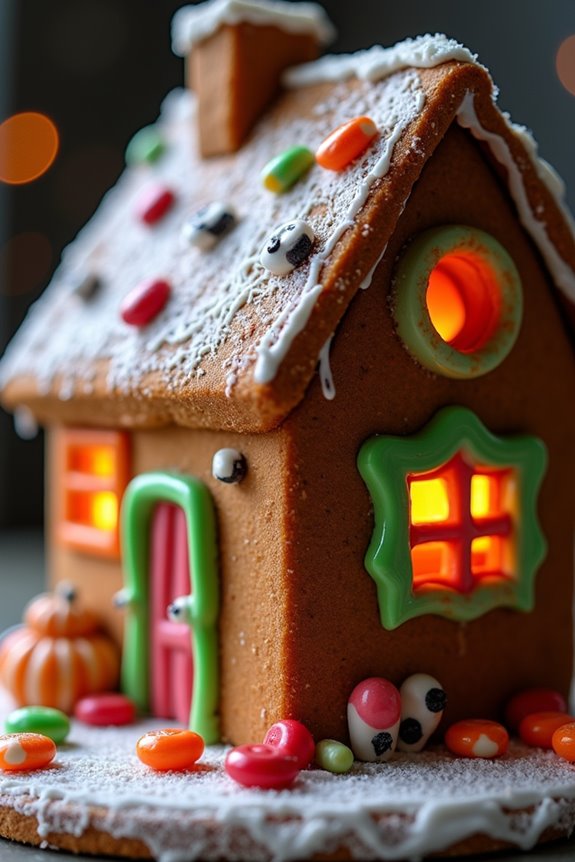
Haunted House Gingerbread is the perfect Halloween baking project to engage kids and bring out their creativity. Crafting a spooky gingerbread house isn’t only fun, but it also serves as a centerpiece for your Halloween festivities. This activity is a fantastic way for kids to explore their artistic side while enjoying the delicious combination of gingerbread and sweet decorations.
With a few simple ingredients and some imagination, you can create a haunted house that’s as tasty as it’s eerie. Building a Haunted House Gingerbread requires a bit of planning and patience, but the end result is worth the effort. The process involves baking gingerbread pieces that will form the structure of the house, then assembling and decorating it with a variety of colorful candies and icing.
This recipe caters to 4-6 people, making it ideal for a small group of children or a family activity. Gather your little bakers and get ready for a spooky, sweet adventure.
Ingredients:
- 3 cups all-purpose flour
- 1 tablespoon ground ginger
- 1 tablespoon ground cinnamon
- 1/2 teaspoon ground cloves
- 1/2 teaspoon baking soda
- 1/2 teaspoon salt
- 3/4 cup unsalted butter, softened
- 3/4 cup packed brown sugar
- 1 large egg
- 1/2 cup molasses
- 1 teaspoon vanilla extract
- Assorted candies for decoration (gumdrops, licorice, candy corn, etc.)
- Royal icing (for assembly and decoration)
Instructions:
- Prepare the Dough: In a large bowl, whisk together the flour, ginger, cinnamon, cloves, baking soda, and salt. In a separate bowl, beat the softened butter and brown sugar until light and fluffy. Add the egg, molasses, and vanilla extract, mixing until well combined. Gradually add the dry ingredients to the wet mixture, stirring until a dough forms.
- Chill the Dough: Divide the dough into two portions, flatten each into a disk, wrap in plastic wrap, and refrigerate for at least 2 hours. This will make it easier to roll out and cut into shapes.
- Preheat and Roll Out: Preheat your oven to 350°F (175°C). Remove the dough from the fridge, and on a floured surface, roll it out to about 1/4 inch thickness. Use a knife or gingerbread house template to cut out the pieces for your haunted house (walls, roof, door, etc.).
- Bake the Gingerbread: Place the cut-out pieces on a baking sheet lined with parchment paper. Bake for 10-12 minutes or until the edges start to brown. Let them cool completely on a wire rack.
- Assemble the House: Prepare the royal icing according to package instructions or a simple recipe. Use the icing as glue to assemble the house pieces. Start by attaching the walls and letting them dry before adding the roof. Hold each piece in place for a few minutes until the icing sets.
- Decorate: Once the house is assembled and stable, let the kids decorate using the remaining royal icing and assorted candies. They can create spooky windows, a candy door, and even add ghosts and goblins to their haunted house.
Extra Tips: When building your Haunted House Gingerbread, make sure that the gingerbread pieces are completely cool before starting the assembly. Warm pieces can soften the icing and cause the structure to collapse.
It’s also helpful to have extra icing on hand for any repairs or additional decorations. Encourage the kids to plan their designs before sticking the candies on, which will help them create a more cohesive and spooky look. Finally, be patient and let each step dry thoroughly to avoid any mishaps with your haunted house masterpiece.
Mummy Hot Dog Bites
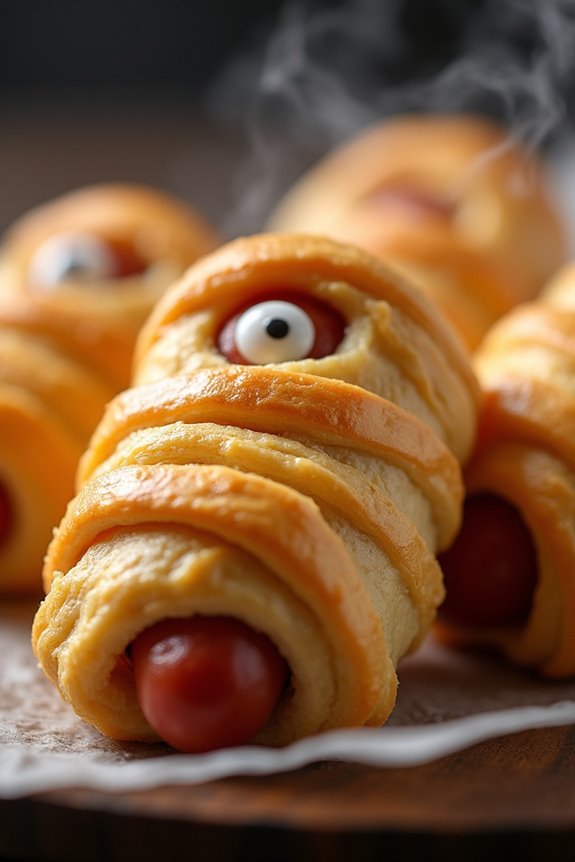
Mummy Hot Dog Bites are a fun and spooky treat perfect for kids to enjoy during Halloween festivities. These adorable snacks are easy to make and require minimal ingredients, making them an excellent option for a quick and festive addition to any Halloween gathering.
By wrapping hot dogs in strips of crescent dough and adding small eyes, you can create a delicious and playful dish that’s certain to delight children and adults alike.
These Mummy Hot Dog Bites are perfect for serving a group of 4-6 people, making them ideal for small gatherings or family dinners. The combination of flaky crescent dough and savory hot dogs is irresistible, and the mummy design is sure to bring smiles to everyone’s faces.
This recipe is straightforward enough for kids to get involved in the kitchen, allowing them to have fun while learning basic cooking skills.
Ingredients (for 4-6 people):
- 8 hot dogs
- 1 can of refrigerated crescent roll dough
- 16 small edible eyes (or use mustard/ketchup for eyes)
- Mustard or ketchup for dipping (optional)
Cooking Instructions:
- Preheat the Oven: Start by preheating your oven to 375°F (190°C). This guarantees that it reaches the right temperature while you prepare the mummy hot dogs.
- Prepare the Dough: Unroll the crescent roll dough on a clean surface. If needed, press the perforations to seal them and create a smooth sheet of dough.
- Cut the Dough: Using a pizza cutter or a sharp knife, slice the dough into thin strips approximately 1/4 inch wide. These strips will be used to wrap around the hot dogs to create the mummy effect.
- Wrap the Hot Dogs: Take one hot dog and begin wrapping it with the dough strips, leaving a little space for the mummy’s face. Wrap each hot dog with 2-3 strips, slightly overlapping them to mimic mummy bandages.
- Add the Eyes: Place two small edible eyes on the uncovered section of each hot dog. If you don’t have edible eyes, you can use dots of mustard or ketchup to create eyes after baking.
- Bake the Mummies: Arrange the wrapped hot dogs on a baking sheet lined with parchment paper, ensuring they’re spaced apart. Bake in the preheated oven for 12-15 minutes, or until the dough is golden brown and cooked through.
- Serve: Remove from the oven and allow them to cool for a few minutes before serving. Serve with mustard or ketchup for dipping if desired.
Extra Tips:
When using crescent dough, make sure to keep it cold before wrapping the hot dogs, as it’s easier to handle. If the dough gets too warm, it can become sticky and difficult to work with.
For an extra cheesy twist, add a small strip of cheese under the dough before wrapping the hot dogs. Be creative with the mummy faces by experimenting with different edible decorations like olives or small pieces of vegetables for the eyes.
Creepy Finger Breadsticks

Creepy Finger Breadsticks are a fun and spooky treat that will be a hit at your Halloween party. These breadsticks are shaped to look like gnarled witch fingers, complete with almond slice fingernails and a hint of green food coloring for an extra eerie touch. Kids will love helping to shape the dough and get creative with their “finger” designs.
Not only are they visually striking, but they’re also deliciously buttery and perfect for dipping into a warm marinara sauce or cheesy dip. This recipe is simple enough for kids to assist with, making it an excellent Halloween cooking activity. With just a few basic ingredients, you can transform ordinary breadstick dough into a creepy centerpiece for your Halloween spread.
Whether served as a savory snack or a party appetizer, these Creepy Finger Breadsticks will add a delightful fright to your festive holiday table.
Ingredients (serving size: 4-6 people):
- 1 package of refrigerated breadstick dough
- 1/4 cup melted butter
- 1 teaspoon garlic powder
- 1/4 teaspoon green food coloring
- 24 sliced almonds
- Salt, to taste
- Marinara sauce or cheese dip (optional, for serving)
Instructions:
- Preheat the Oven: Start by preheating your oven to 375°F (190°C), the temperature required for baking the breadsticks to a golden brown perfection.
- Prepare the Baking Sheet: Line a baking sheet with parchment paper or a silicone baking mat to prevent the breadsticks from sticking and guarantee even baking.
- Color the Butter: In a small bowl, combine the melted butter with garlic powder and green food coloring. Stir until the color is evenly distributed. This will give your breadsticks an eerie green hue.
- Shape the Breadsticks: Unroll the breadstick dough and separate it into individual strips. Roll each strip slightly between your hands to elongate them, then shape them to resemble fingers by pinching them to form knuckles and tapering one end to a point.
- Decorate the Fingers: Brush each shaped breadstick with the green-tinted melted butter. Press a sliced almond onto the pointed end of each breadstick to create a fingernail. Make small indentations with a knife to form knuckle lines.
- Bake: Place the decorated breadsticks on the prepared baking sheet, leaving space between each one. Bake in the preheated oven for 10-12 minutes or until they’re golden brown.
- Season and Serve: Once baked, remove the breadsticks from the oven and sprinkle them lightly with salt. Serve warm with marinara sauce or cheese dip on the side for dipping.
Extra Tips: To guarantee your Creepy Finger Breadsticks turn out perfect every time, make sure to use refrigerated dough that’s cold, as it will be easier to shape.
You can adjust the green food coloring to achieve your desired shade of green, but be cautious not to over-color as it can affect the flavor. If you want to make the fingers look extra gnarly, use a small knife to make additional shallow cuts or creases along the dough before baking.
Ultimately, if you’re preparing these in advance, reheat them in the oven for a few minutes before serving to retain their crispness.
Vampire Bite Red Velvet Cupcakes
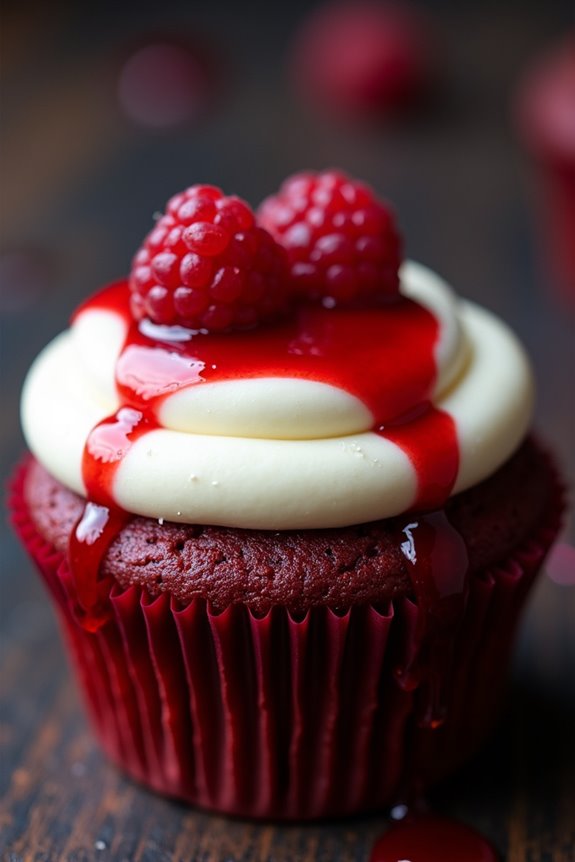
Halloween is the perfect time to get creative in the kitchen, especially with your little ones. One spooky treat that’s sure to be a hit with kids and adults alike are Vampire Bite Red Velvet Cupcakes. These delicious cupcakes not only taste great but also have a fun, eerie design that’s perfect for Halloween parties. The rich, velvety texture of the red velvet coupled with a surprise “bloody” filling and scary vampire bite marks will definitely make these a Halloween favorite.
To make these cupcakes, you’ll start with a classic red velvet cupcake base, which is known for its soft and moist texture, along with a hint of cocoa flavor. The vibrant red color is enhanced with a little food coloring, making it the perfect canvas for a Halloween-themed design. Once baked, the cupcakes are filled with a sweet raspberry jam “blood” and topped with a smooth cream cheese frosting. To complete the look, make small puncture marks on top with a toothpick or skewer and add a bit of raspberry jam to mimic vampire bites.
Ingredients (for 4-6 servings):
- For the Cupcakes:
- 1 1/4 cups all-purpose flour
- 1 cup granulated sugar
- 1 tablespoon unsweetened cocoa powder
- 1/2 teaspoon baking soda
- 1/2 teaspoon salt
- 1/2 cup buttermilk
- 1/2 cup vegetable oil
- 1 large egg
- 1 tablespoon red food coloring
- 1 teaspoon vanilla extract
- 1/2 teaspoon white vinegar
- For the Filling:
- 1/4 cup raspberry jam
- For the Cream Cheese Frosting:
- 1/2 cup unsalted butter, softened
- 8 oz cream cheese, softened
- 2 cups powdered sugar
- 1 teaspoon vanilla extract
Instructions:
- Preheat the Oven: Preheat your oven to 350°F (175°C). Line a cupcake pan with paper liners.
- Prepare the Dry Ingredients: In a large bowl, sift together the flour, sugar, cocoa powder, baking soda, and salt. Set aside.
- Mix the Wet Ingredients: In another bowl, whisk together the buttermilk, oil, egg, food coloring, vanilla extract, and vinegar until well combined.
- Combine the Ingredients: Gradually add the wet ingredients to the dry ingredients, mixing until just combined. Be careful not to overmix to guarantee a soft texture.
- Fill the Cupcake Liners: Divide the batter evenly among the cupcake liners, filling each about two-thirds full.
- Bake the Cupcakes: Bake in the preheated oven for 18-20 minutes or until a toothpick inserted into the center comes out clean. Allow to cool completely on a wire rack.
- Prepare the Frosting: While the cupcakes are cooling, beat the butter and cream cheese together in a medium bowl until smooth. Gradually add the powdered sugar and vanilla extract, beating until light and fluffy.
- Fill the Cupcakes: Once the cupcakes are cool, use a small knife to cut a small hole in the center of each cupcake. Fill the holes with a small spoonful of raspberry jam.
- Frost the Cupcakes: Pipe or spread the cream cheese frosting over each cupcake.
- Create Vampire Bites: Use a toothpick or skewer to make two small holes on the top of the frosting to resemble vampire bites. Drizzle a small amount of raspberry jam from the holes to mimic blood.
Extra Tips:
For an even spookier effect, consider adding a drop of red food coloring to the raspberry jam to make it more vibrant. If you don’t have buttermilk on hand, you can make a substitute by adding 1/2 tablespoon of lemon juice or vinegar to 1/2 cup of milk and letting it sit for a few minutes.
Additionally, verify the cream cheese and butter are at room temperature before making the frosting to achieve a smooth consistency. These extra steps will help you create the perfect Vampire Bite Red Velvet Cupcakes that are both delicious and visually striking for your Halloween festivities.