

Halloween is just around the corner, and I’ve stumbled upon 11 magical sugar cookie recipes that are just begging for your creative flair. From spooky ghosts to playful black cats, each cookie serves as a blank canvas ready for your artistic touch. Transform simple dough into grinning jack-o’-lanterns or eerie eyeballs. The possibilities are endless, and the results are not only delicious but also a feast for the eyes. Ready to explore these enchanting treats?
Spooky Ghost Cookies
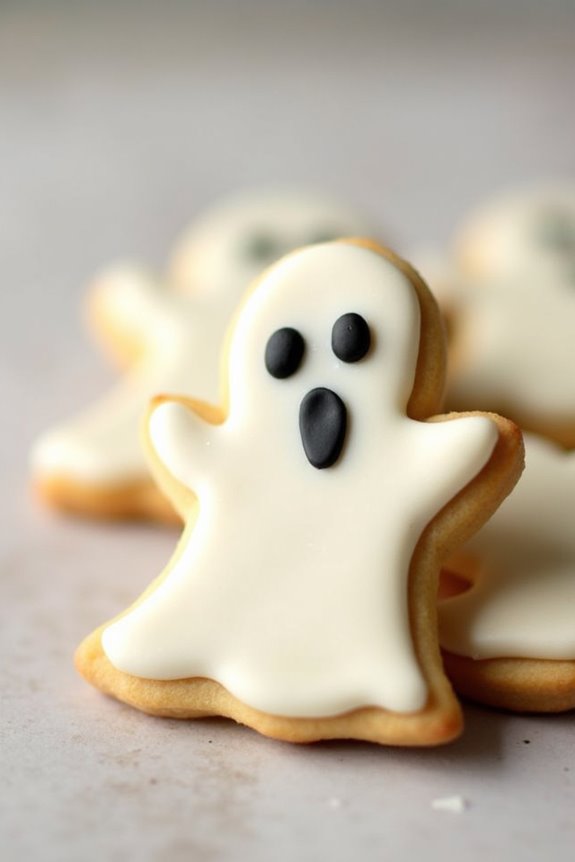
Spooky Ghost Cookies are the perfect Halloween treat to delight both kids and adults alike. These charming cookies aren’t only fun to make but also a fantastic way to get into the Halloween spirit. With their cute ghostly shapes and sweet sugary taste, they make an excellent addition to any Halloween party or festive gathering.
Whether you’re a seasoned baker or a novice, these cookies are simple to prepare and certain to impress your guests with their adorable appearance and delicious flavor.
To start, you’ll be making a classic sugar cookie dough that will serve as the base for our Spooky Ghost Cookies. This versatile dough is easy to work with and holds its shape well when baked, which is essential for maintaining the ghostly look. Once baked, you can use royal icing to decorate the cookies and add the final touches, like spooky eyes and mouths, to bring your ghost creations to life.
With a little creativity, you can customize each ghost to have its own unique personality, making the baking process even more enjoyable.
Ingredients (serving size: 4-6 people):
- 2 ¾ cups all-purpose flour
- 1 teaspoon baking powder
- ½ teaspoon salt
- 1 cup unsalted butter, softened
- 1 ½ cups granulated sugar
- 1 large egg
- 1 teaspoon vanilla extract
- ½ teaspoon almond extract
- Royal icing (for decorating)
- Black food coloring (for decorating)
Cooking Instructions:
- Prepare the Dough: In a medium bowl, whisk together the flour, baking powder, and salt. In a large bowl, beat the softened butter and sugar together using an electric mixer until light and fluffy. Add the egg, vanilla extract, and almond extract, and continue to beat until well combined.
- Combine Ingredients: Gradually add the dry ingredients to the wet ingredients, mixing on low speed until a soft dough forms. Divide the dough into two portions, flatten each into a disk, wrap in plastic wrap, and refrigerate for at least 1 hour.
- Preheat and Roll Out: Preheat your oven to 350°F (175°C). Remove one dough disk from the refrigerator. On a lightly floured surface, roll out the dough to about ¼ inch thickness.
- Cut Out Shapes: Use a ghost-shaped cookie cutter to cut out the cookies. Place the cookies on a baking sheet lined with parchment paper, leaving a bit of space between each cookie.
- Bake the Cookies: Bake in the preheated oven for 8-10 minutes, or until the edges are just starting to turn golden. Allow the cookies to cool on the baking sheet for a few minutes before transferring them to a wire rack to cool completely.
- Decorate the Cookies: Prepare the royal icing according to the package instructions. Divide the icing into two portions; leave one portion white and color the other with black food coloring. Using a piping bag, outline and fill in the ghost shapes with white icing. Use the black icing to create eyes and mouths.
Extra Tips:
For best results, make sure that your butter is softened to room temperature before starting the recipe, as it will cream more effectively with the sugar.
If you don’t have a ghost-shaped cookie cutter, you can use a knife to carefully cut out ghost shapes freehand. When rolling out the dough, try to work quickly to prevent it from becoming too warm and sticky.
If the dough becomes difficult to work with, return it to the refrigerator to firm up. Finally, let the decorated cookies dry completely before stacking or storing them to prevent the icing from smudging. Enjoy your spooky creations!
Grinning Jack-O’-Lanterns
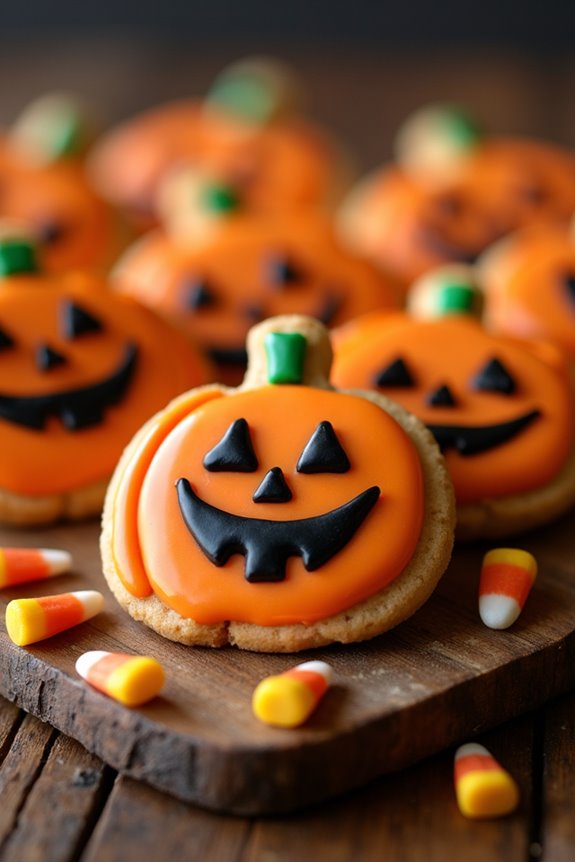
Celebrate Halloween with these delightful Grinning Jack-O’-Lantern sugar cookies. These cookies aren’t only fun to make but also delicious to eat, with a buttery, sweet flavor that everyone will love. Perfect for parties or simply enjoying with family, these cookies capture the spirit of Halloween with their playful and spooky designs.
The process is simple enough for bakers of all levels, and decorating them can be a delightful activity for both kids and adults. This recipe yields enough cookies to serve 4-6 people, depending on the size of your cookies and the appetites of your guests. The dough can be prepared in advance, allowing you to spend more time creatively decorating your Jack-O’-Lantern faces. With the right ingredients and a bit of imagination, you can create a batch of cookies that are as charming to look at as they’re tasty.
Ingredients (Serves 4-6)
- 2 ¾ cups all-purpose flour
- 1 teaspoon baking soda
- ½ teaspoon baking powder
- 1 cup unsalted butter, softened
- 1 ½ cups white sugar
- 1 egg
- 1 teaspoon vanilla extract
- ½ teaspoon almond extract
- Orange food coloring
- Black food coloring or icing gel
- Royal icing or store-bought icing
- Candy corn or other small candies for decoration (optional)
Cooking Instructions
- Prepare the Dough: In a medium-sized bowl, combine the flour, baking soda, and baking powder. Set this aside. In a large bowl, cream together the softened butter and sugar until smooth. Beat in the egg, vanilla extract, and almond extract until well combined.
- Color the Dough: Gradually blend the dry ingredients into the wet mixture. Once the dough forms, add orange food coloring to achieve the desired pumpkin color. Mix until the color is evenly distributed.
- Chill the Dough: Wrap the dough in plastic wrap and chill in the refrigerator for at least 1 hour. This will make it easier to roll out and cut.
- Preheat and Prepare: Preheat your oven to 375°F (190°C). Line baking sheets with parchment paper.
- Roll and Cut: On a floured surface, roll out the dough to about ¼-inch thick. Use a pumpkin-shaped cookie cutter to cut out the cookies. Place them on the prepared baking sheets, spacing them about 1 inch apart.
- Bake the Cookies: Bake in the preheated oven for 8 to 10 minutes, or until the edges are lightly golden. Cool on the baking sheets for a few minutes before transferring to wire racks to cool completely.
- Decorate the Cookies: Once the cookies are cool, use black food coloring or icing gel to draw Jack-O’-Lantern faces on each cookie. If using royal icing, you can pipe the black details for more precision. Add candy corn or other decorations as desired.
Extra Tips
For best results, make sure your butter is at room temperature before creaming with sugar to achieve a smooth consistency. If you want your cookies to have a uniform thickness, consider using rolling pin guides or dowels.
When decorating, allow plenty of time for the icing to set before stacking the cookies. If you’re planning to store them, place wax paper between layers to prevent sticking. Enjoy your festive Grinning Jack-O’-Lantern cookies with a glass of milk or a mug of warm cider for a delightful Halloween treat.
Witch’s Hat Treats
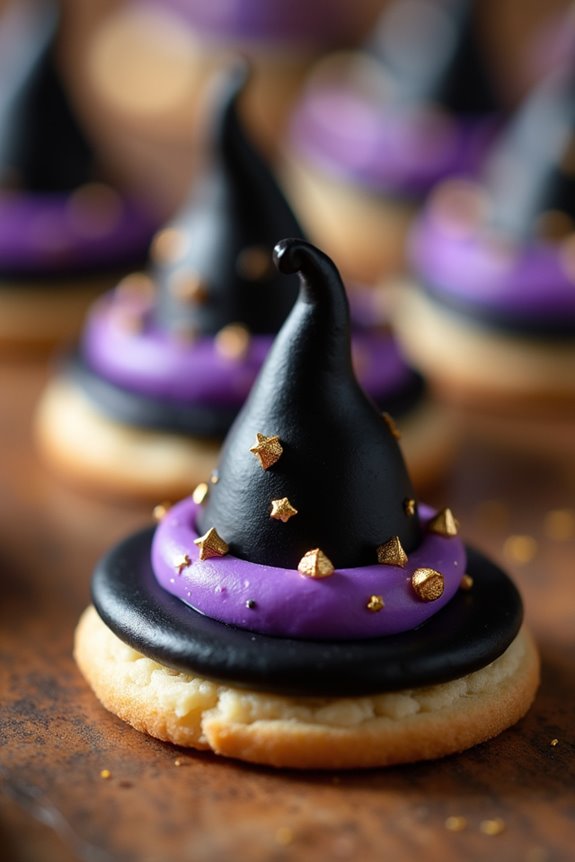
Halloween Sugar Cookies – Witch’s Hat Treats are a delightful and festive addition to any Halloween celebration. These cookies aren’t only fun to make but also serve as a creative treat that can be enjoyed by both kids and adults alike. With a whimsical witch’s hat design, these sugar cookies are sure to be a hit at any spooky gathering.
The base of this recipe is a classic sugar cookie, which is known for its sweet, buttery flavor and tender, crumbly texture. Once baked, the cookies are decorated with a simple icing and adorned with edible decorations to mimic the look of a witch’s hat. This recipe yields enough cookies to serve 4-6 people, making it perfect for small parties or family gatherings.
Ingredients (serving size: 4-6 people):
- 2 1/2 cups all-purpose flour
- 1 teaspoon baking powder
- 1/2 teaspoon salt
- 1 cup unsalted butter, softened
- 1 cup granulated sugar
- 1 large egg
- 1 teaspoon vanilla extract
- Black food coloring
- Purple food coloring
- 1 1/2 cups powdered sugar
- 2-3 tablespoons milk
- Edible gold stars or sprinkles
Cooking Instructions:
- Preheat the Oven: Begin by preheating your oven to 350°F (175°C). Line two baking sheets with parchment paper and set aside.
- Prepare the Cookie Dough: In a medium-sized bowl, whisk together the flour, baking powder, and salt. In a separate large bowl, cream together the softened butter and granulated sugar using an electric mixer until light and fluffy. Beat in the egg and vanilla extract until well combined.
- Combine Ingredients: Gradually add the dry ingredients to the wet mixture, mixing on low speed until the dough comes together. Divide the dough into two portions. Add a few drops of black food coloring to one portion and a few drops of purple food coloring to the other, kneading each until the colors are evenly distributed.
- Shape the Cookies: Roll out each portion of dough on a lightly floured surface to about 1/4-inch thickness. Use a witch’s hat cookie cutter to cut out shapes, placing them about 1 inch apart on the prepared baking sheets.
- Bake the Cookies: Bake in preheated oven for 10-12 minutes, or until the edges are just beginning to turn golden. Remove from oven and allow to cool on the baking sheets for 5 minutes before transferring to wire racks to cool completely.
- Prepare the Icing: In a small bowl, mix together the powdered sugar and milk until smooth and spreadable. If the icing is too thick, add more milk a teaspoon at a time. Divide the icing into two bowls, tint one with black food coloring and the other with purple.
- Decorate the Cookies: Once the cookies are completely cool, spread black icing over the hat portion and purple icing over the band. Decorate with edible gold stars or sprinkles while the icing is still wet.
- Let Set: Allow the decorated cookies to set at room temperature until the icing has hardened, approximately 1-2 hours, before serving.
Extra Tips: To guarantee your Witch’s Hat Treats have a vibrant color, use gel food coloring as it provides a more intense hue without altering the consistency of the dough or icing.
If you’re short on time, you can prepare the cookie dough a day in advance and store it in the refrigerator, wrapped tightly in plastic wrap. Just be sure to allow it to warm slightly at room temperature before rolling it out.
Additionally, for a personal touch, consider adding different colored bands to your witch hats, or use royal icing for more intricate designs.
Creepy Crawly Spider Cookies
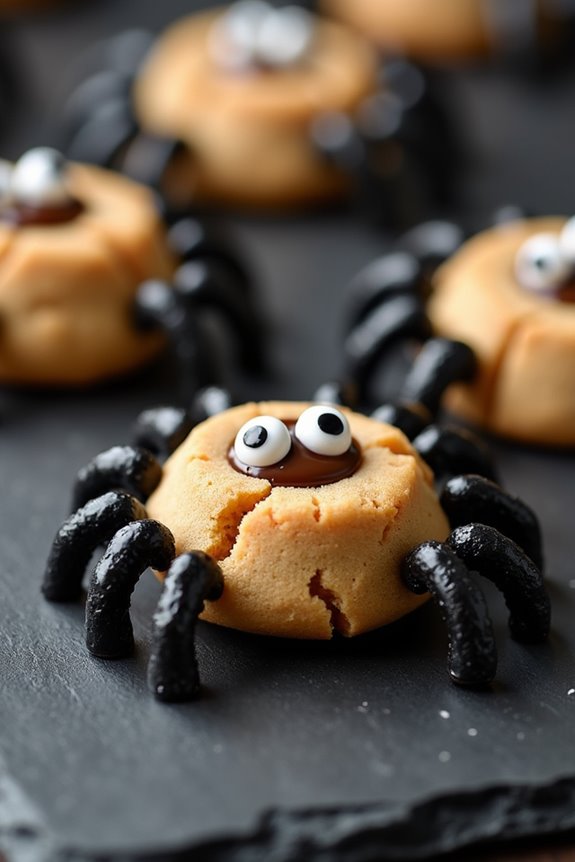
Creepy Crawly Spider Cookies are the perfect spooky treat to add a little frightful fun to your Halloween celebrations. These delicious sugar cookies are decorated to resemble creepy spiders, adding a touch of ghoulish charm to your dessert table. With a buttery, crisp texture and a sweet, spooky design, these cookies are sure to delight both kids and adults alike.
Whether you’re hosting a Halloween party or just looking to enjoy a festive baking session, these cookies are a must-try. The process is as enjoyable as the final result, allowing you to release your creativity as you shape and decorate each cookie. By following this recipe, you’ll create a batch of Creepy Crawly Spider Cookies that serve approximately 4-6 people.
The ingredients list is simple and straightforward, guaranteeing that bakers of all skill levels can achieve delicious and visually stunning results. Get into the spirit of Halloween with these fun and tasty treats!
Ingredients (serving size: 4-6 people):
- 2 ¾ cups all-purpose flour
- 1 teaspoon baking powder
- ½ teaspoon salt
- 1 cup unsalted butter, softened
- 1 ½ cups granulated sugar
- 1 large egg
- 2 teaspoons vanilla extract
- 24 miniature peanut butter cups
- 48 candy eyes
- ½ cup chocolate chips, melted
- Black decorating gel
Instructions:
- Preheat the Oven: Start by preheating your oven to 350°F (175°C). Line two baking sheets with parchment paper to prevent the cookies from sticking.
- Mix Dry Ingredients: In a medium bowl, whisk together the flour, baking powder, and salt. This guarantees that the baking powder and salt are evenly distributed throughout the flour.
- Cream Butter and Sugar: In a large mixing bowl, beat the softened butter and granulated sugar together until light and fluffy, about 2-3 minutes. This will create a smooth and creamy base for the cookies.
- Add Egg and Vanilla: Beat in the egg and vanilla extract until well-incorporated. This adds flavor and helps bind the dough together.
- Combine Dry and Wet Ingredients: Gradually add the dry ingredients to the wet mixture, mixing until just combined. Be careful not to over-mix, as this can result in tough cookies.
- Shape and Bake Cookies: Scoop tablespoon-sized amounts of dough and roll them into balls. Place them on the prepared baking sheets about 2 inches apart. Flatten each ball slightly before baking for 10-12 minutes, or until the edges are lightly golden.
- Add Spider Bodies: Immediately after removing the cookies from the oven, gently press a miniature peanut butter cup onto the center of each cookie to form the spider’s body. Allow the cookies to cool completely on a wire rack.
- Decorate Spiders: Use melted chocolate to attach candy eyes to each peanut butter cup. Draw spider legs radiating out from the body using black decorating gel. Let the cookies sit until the chocolate and gel have set.
Extra Tips:
For the best results, make sure your butter is softened to room temperature before starting the recipe. This allows for the best creaming with the sugar, leading to a better texture in the finished cookie.
If you’re not a fan of peanut butter cups, substitute them with chocolate truffles or any small round candy of your choice. Finally, store these Creepy Crawly Spider Cookies in an airtight container to keep them fresh and crisp for up to a week. Enjoy your spooky baking adventure!
Bewitching Black Cat Designs
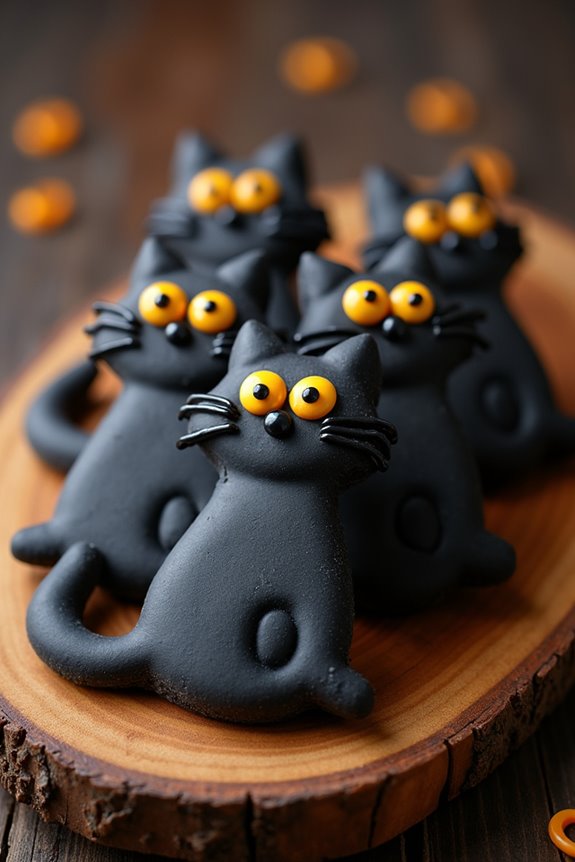
Halloween is the perfect time to let your creativity run wild in the kitchen, and what better way to celebrate than with some Bewitching Black Cat Sugar Cookies? These cookies aren’t only deliciously sweet and buttery but also make for an impressive centerpiece at any Halloween gathering.
With their striking black color and cute cat design, they’re sure to be a hit with both kids and adults alike. The dough is easy to work with, making it a fun activity for the whole family to get involved in.
Creating these enchanting cookies involves a simple sugar cookie recipe paired with black food coloring for that hauntingly perfect shade. After baking, you can let your imagination soar as you decorate the cookies to resemble charming black cats, complete with eyes, whiskers, and tails.
Whether you’re hosting a spooky party or just want to surprise your loved ones with a festive treat, these Bewitching Black Cat Sugar Cookies will add a touch of magic to your Halloween celebrations.
Ingredients (Serves 4-6 people):
- 2 ¾ cups all-purpose flour
- 1 teaspoon baking soda
- ½ teaspoon baking powder
- 1 cup unsalted butter, softened
- 1 ½ cups white sugar
- 1 egg
- 1 teaspoon vanilla extract
- Black gel food coloring
- Royal icing (for decorating)
- Edible candy eyes (optional)
- Black decorating gel or icing (for details)
Cooking Instructions:
- Prepare the Cookie Dough: In a medium bowl, whisk together the flour, baking soda, and baking powder. In a large bowl, cream the softened butter and sugar together until light and fluffy. Beat in the egg and vanilla extract until well combined.
- Color the Dough: Gradually add the dry ingredients to the wet ingredients, mixing until just combined. Add black gel food coloring to the dough, kneading until you achieve the desired shade of black. Wrap the dough in plastic wrap and refrigerate for at least 1 hour.
- Preheat and Prepare: Preheat the oven to 350°F (175°C). Line baking sheets with parchment paper.
- Roll and Cut: Roll out the chilled dough on a lightly floured surface to about ¼ inch thickness. Use a cat-shaped cookie cutter to cut out the cookies, and place them on the prepared baking sheets.
- Bake the Cookies: Bake in the preheated oven for 8-10 minutes, or until the edges are set but not browned. Allow the cookies to cool on the baking sheets for 5 minutes before transferring them to a wire rack to cool completely.
- Decorate: Once the cookies are completely cool, use royal icing to add eyes and additional features such as whiskers and tails. Attach edible candy eyes with a dab of icing and use black decorating gel for finer details.
Extra Tips: For a more intense black color, you might need to use a significant amount of gel food coloring, as opposed to liquid food coloring, which could alter the dough’s consistency.
If the dough becomes too sticky while adding the color, consider chilling it briefly before rolling it out. Additionally, to guarantee even baking, make sure the cookies are of uniform thickness, and keep an eye on them as they bake to avoid any browning, which can affect the color.
Remember that decorating can be customized; feel free to add your own spooky twists to these versatile cookies!
Ghoulish Skull Delights
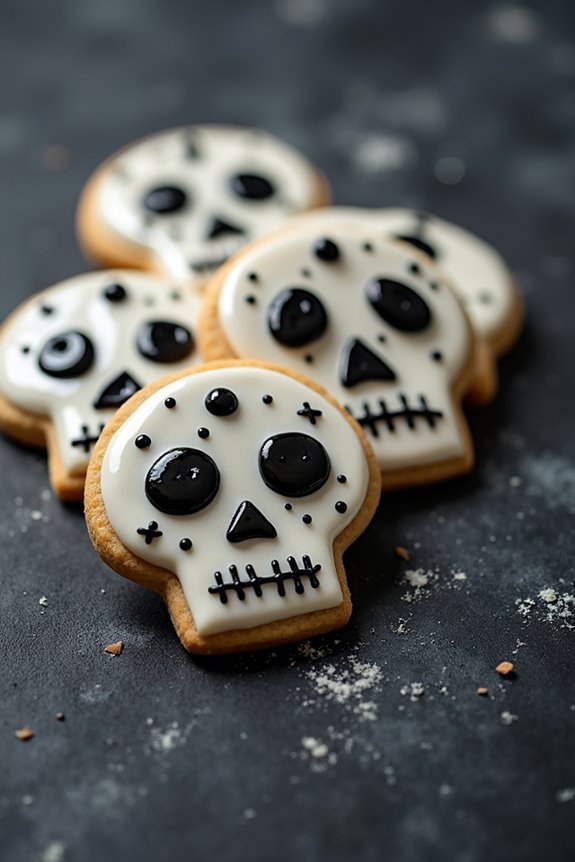
Halloween is the perfect time to get creative in the kitchen, and what better way to celebrate than with some spooky, fun, and delicious cookies? Ghoulish Skull Delights aren’t only visually engaging but also delightfully sweet. These sugar cookies are shaped like skulls and decorated with eerie details that will impress both kids and adults at any Halloween gathering.
The combination of buttery, soft cookies and vibrant icing makes these treats a must-have for your Halloween festivities. Creating Ghoulish Skull Delights is a fun activity that can be enjoyed by the whole family. This recipe is designed to serve 4-6 people, making it perfect for small parties or family get-togethers.
Whether you’re looking to entertain or simply want to indulge in a festive treat, these cookies are sure to add a touch of macabre magic to your Halloween. With simple ingredients and easy-to-follow steps, you’ll have a batch of deliciously creepy cookies in no time.
Ingredients (Serves 4-6):
- 2 3/4 cups all-purpose flour
- 1 teaspoon baking powder
- 1/2 teaspoon salt
- 1 cup unsalted butter, softened
- 1 1/2 cups granulated sugar
- 1 egg
- 1 teaspoon vanilla extract
- 1/2 teaspoon almond extract
- Black and white royal icing
- Edible decorative markers or food coloring pens
Instructions:
- Prepare the Dry Ingredients: In a medium bowl, whisk together the flour, baking powder, and salt. Set aside to incorporate later into the dough.
- Mix the Wet Ingredients: In a large mixing bowl, cream the softened butter and sugar together until the mixture is light and fluffy. This should take about 3-4 minutes using an electric mixer on medium speed. Add the egg, vanilla extract, and almond extract, and beat until well combined.
- Combine and Chill the Dough: Gradually add the dry ingredients to the wet mixture, mixing slowly until a dough forms. Once the dough is well combined, divide it into two equal portions and wrap each in plastic wrap. Chill the dough in the refrigerator for at least 1 hour, or until firm enough to roll out.
- Preheat and Prepare: Preheat your oven to 350°F (175°C). Line two baking sheets with parchment paper or silicone baking mats.
- Shape the Cookies: On a lightly floured surface, roll out the chilled dough to about 1/4 inch thick. Use a skull-shaped cookie cutter to cut out the cookies, placing them about 1 inch apart on the prepared baking sheets.
- Bake the Cookies: Bake the cookies in the preheated oven for 8-10 minutes, or until the edges are lightly golden. Be careful not to overbake; the cookies should remain soft. Allow cookies to cool on the baking sheet for 5 minutes before transferring them to a wire rack to cool completely.
- Decorate the Skulls: Once the cookies are completely cool, use the black and white royal icing to decorate them. You can create skull features such as eyes, nose hollows, and teeth using the icing. For added detail, use edible decorative markers or food coloring pens to draw intricate designs or add color.
Extra Tips:
For the best results, make sure your butter is softened to room temperature before you begin mixing. This guarantees a smooth and creamy dough.
When rolling out the dough, keep it evenly thick to guarantee uniform baking. If you don’t have a skull-shaped cookie cutter, you can hand-cut the shapes with a knife or use another spooky cutter.
To make the royal icing, you can use powdered sugar mixed with a small amount of water or purchase pre-made icing. Allow the icing to dry completely before handling the cookies to avoid smudging your designs.
Enjoy these ghoulish treats with a glass of milk or a warm cup of cider for a perfect Halloween delight!
Haunted House Creations
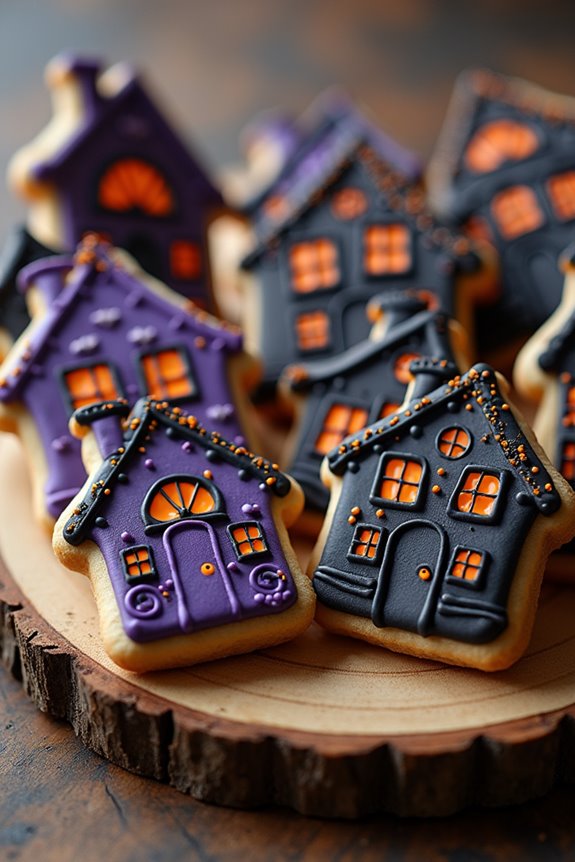
As the eerie ambiance of Halloween approaches, it’s the perfect time to indulge in baking some spooky yet delightful Halloween Sugar Cookies. The Haunted House Creations aren’t just ordinary cookies; they’re a canvas for your imagination to run wild. These sweet treats are crafted to resemble haunted houses, complete with spooky details and eerie colors, making them a fun and festive addition to any Halloween celebration.
Whether you’re hosting a Halloween party or simply enjoying a cozy night in, these cookies will surely cast a spell on your taste buds and add a touch of enchantment to your festivities.
Creating these Haunted House Creations involves a wonderful blend of creativity and culinary skills. The sugar cookie base provides a deliciously crisp and buttery foundation, perfect for decorating with icing and embellishments. With this recipe, you’ll be able to make a batch that serves 4 to 6 people, allowing everyone to partake in the hauntingly delightful experience.
Gather your ingredients, prepare your workspace, and let the magic of Halloween inspire your cookie creations.
Ingredients (Serves 4-6):
- 2 3/4 cups all-purpose flour
- 1 teaspoon baking soda
- 1/2 teaspoon baking powder
- 1 cup unsalted butter, softened
- 1 1/2 cups granulated sugar
- 1 egg
- 1 teaspoon vanilla extract
- 1/2 teaspoon almond extract
- Assorted food coloring (black, orange, purple, etc.)
- Royal icing mix or ingredients for homemade royal icing
- Assorted Halloween-themed sprinkles and edible decorations
Instructions:
- Preheat and Prepare: Preheat your oven to 350°F (175°C). Line your baking sheets with parchment paper to prevent the cookies from sticking.
- Mix Dry Ingredients: In a medium bowl, whisk together the all-purpose flour, baking soda, and baking powder. This guarantees that the baking agents are evenly distributed throughout the flour.
- Cream Butter and Sugar: In a large bowl, cream together the softened butter and granulated sugar using an electric mixer on medium speed until the mixture is light and fluffy, about 2-3 minutes.
- Add Egg and Extracts: Beat in the egg, vanilla extract, and almond extract until well combined, guaranteeing a smooth and homogeneous mixture.
- Combine Wet and Dry Ingredients: Gradually add the dry ingredients to the wet mixture, mixing on low speed until just combined. Don’t overmix to avoid tough cookies.
- Divide and Color Dough: Divide the dough into separate bowls. Add different food colorings to each portion, kneading gently to incorporate the colors evenly.
- Roll and Cut Dough: Roll out your colored dough on a floured surface to about 1/4 inch thickness. Use haunted house-shaped cookie cutters to cut out shapes and place them on the prepared baking sheets.
- Bake the Cookies: Bake in the preheated oven for 8-10 minutes, or until the edges are lightly golden. Allow the cookies to cool on the baking sheets for a few minutes before transferring them to wire racks to cool completely.
- Decorate: Prepare your royal icing according to package instructions or your preferred recipe. Use the icing to decorate the cookies, creating haunted house designs with windows, doors, and spooky details. Add sprinkles and edible decorations for extra flair.
Extra Tips:
To guarantee your Halloween Sugar Cookies hold their shape during baking, it’s helpful to chill the cut-out dough for about 10 minutes before placing them in the oven. This prevents the cookies from spreading too much.
Additionally, when decorating, have fun experimenting with different piping tips and colors to bring your haunted house designs to life. Consider using edible markers for finer details, and remember that creativity is key in making each cookie unique and beautifully eerie.
Mummy-Fied Cookies
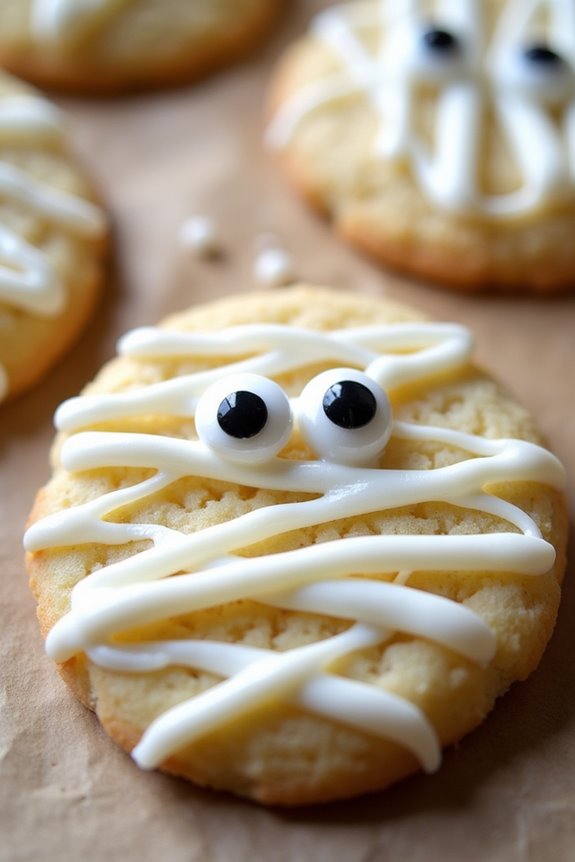
Halloween is the perfect time to get creative in the kitchen, and what better way to celebrate than with some spooky-themed treats? Mummy-Fied Cookies are a fun and festive twist on the classic sugar cookie, perfect for parties or simply enjoying with family.
These cookies aren’t only delicious but also serve as a fantastic activity to get everyone in the Halloween spirit. With their playful design and sweet taste, they’re sure to be a hit with kids and adults alike.
Creating these Mummy-Fied Cookies involves a simple sugar cookie recipe that forms the base, which you can then decorate to resemble little mummies. The process is straightforward and allows for plenty of customization, making it a great opportunity to let your creativity shine.
Whether you’re an experienced baker or a beginner, this recipe is easy to follow and promises delightful results. This recipe will make enough cookies to serve 4-6 people.
Ingredients:
- 1 cup unsalted butter, softened
- 1 cup granulated sugar
- 1 large egg
- 1 teaspoon vanilla extract
- 2 ½ cups all-purpose flour
- 1 teaspoon baking powder
- ¼ teaspoon salt
- White fondant or white chocolate melts
- Edible googly eyes
Cooking Instructions:
- Prepare the Dough: In a large mixing bowl, cream together the softened butter and granulated sugar until light and fluffy. Add the egg and vanilla extract, and beat until well combined.
- Mix Dry Ingredients: In a separate bowl, whisk together the all-purpose flour, baking powder, and salt. Gradually add the dry ingredients to the wet ingredients, mixing until a dough forms.
- Chill the Dough: Divide the dough into two equal portions, wrap each in plastic wrap, and refrigerate for at least 1 hour. This will make it easier to roll out and cut into shapes.
- Preheat and Prepare: Preheat your oven to 350°F (175°C). Line a baking sheet with parchment paper.
- Roll and Cut: On a lightly floured surface, roll out one portion of dough to about ¼ inch thick. Use a round or coffin-shaped cookie cutter to cut out your cookies and place them on the prepared baking sheet.
- Bake the Cookies: Bake the cookies in the preheated oven for 8-10 minutes, or until the edges are lightly golden. Allow them to cool completely on a wire rack.
- Decorate the Mummies: If using white fondant, roll it out and cut into thin strips to create bandages. If using white chocolate melts, melt them according to package instructions and drizzle over the cookies to create a bandage effect. Place the edible googly eyes on each cookie while the fondant or chocolate is still soft.
- Set and Serve: Let the fondant or chocolate set completely before serving. Enjoy your spooky, sweet treats!
Extra Tips:
For a more authentic mummy look, alternate the directions of the bandages to create a layered effect. If you prefer a softer cookie, make sure not to overbake them; they should just be starting to turn golden at the edges when you take them out of the oven.
You can also use different flavored extracts, like almond or pumpkin spice, to give your cookies a unique twist. Finally, have fun with the decorations, and feel free to get creative with different colors or styles of googly eyes to give each mummy its own personality.
Franken-Cookies
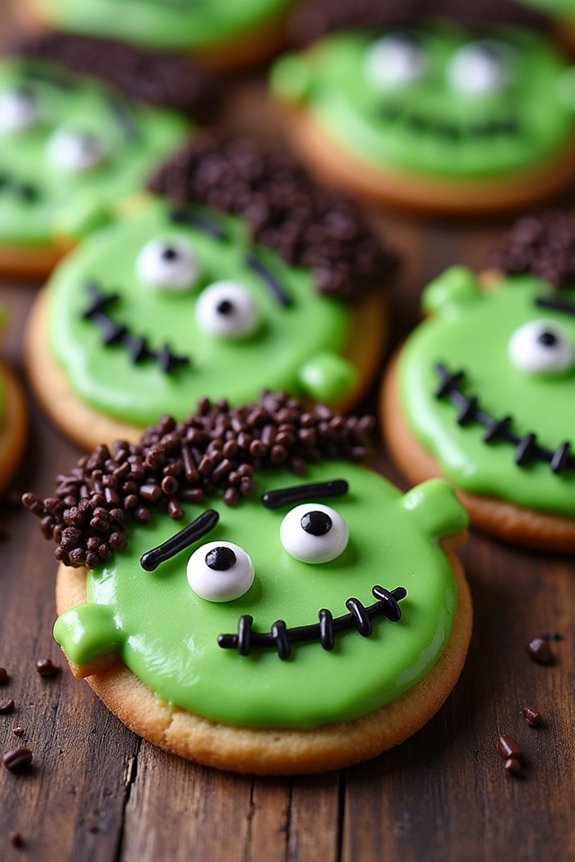
Halloween is the perfect time to get creative in the kitchen, and there’s no better way to embrace the spooky spirit than by baking some Franken-Cookies. These delightful sugar cookies aren’t only delicious but also a fun and festive way to celebrate the season. Designed to look like everyone’s favorite monster, Frankenstein, these cookies are sure to be a hit at any Halloween party or gathering.
Made with a classic sugar cookie base, they’re decorated with vibrant green icing, chocolate sprinkles for hair, and candy eyes to bring the monster to life. Creating Franken-Cookies is an enjoyable activity for both kids and adults, making it an ideal family project.
The process involves baking the cookies to a perfect golden brown and then adorning them with a variety of colorful toppings to mimic Frankenstein’s iconic features. Whether you’re a seasoned baker or a novice in the kitchen, this recipe is straightforward and provides a fantastic opportunity to release your creativity.
So, gather your ingredients and get ready to bake a batch of these monstrously delicious Halloween sugar cookies.
Ingredients (for 4-6 people):
- 2 3/4 cups all-purpose flour
- 1 teaspoon baking soda
- 1/2 teaspoon baking powder
- 1 cup unsalted butter, softened
- 1 1/2 cups granulated sugar
- 1 egg
- 1 teaspoon vanilla extract
- Green food coloring
- Chocolate sprinkles
- Candy eyes
- Black decorating gel
Cooking Instructions:
- Preheat the Oven: Begin by preheating your oven to 350°F (175°C) to make sure it’s ready for baking once your cookie dough is prepared.
- Mix Dry Ingredients: In a medium-sized bowl, whisk together the flour, baking soda, and baking powder until well combined. Set this mixture aside.
- Cream Butter and Sugar: In a large mixing bowl, cream together the softened butter and granulated sugar until the mixture is light and fluffy. This should take about 3 to 5 minutes.
- Add Egg and Vanilla: Beat in the egg and vanilla extract until fully incorporated. This step adds richness and flavor to your cookie dough.
- Combine Dry and Wet Ingredients: Gradually add the dry ingredients to the wet ingredients, mixing until just combined. Be careful not to overmix, as this can result in tough cookies.
- Color the Dough: Add a few drops of green food coloring to the dough. Mix until the dough is uniformly colored to your desired shade of green.
- Shape the Cookies: Scoop tablespoons of dough and roll them into balls. Flatten each ball slightly to form a thick disc and place them on a baking sheet lined with parchment paper, leaving space between each cookie.
- Bake the Cookies: Bake in the preheated oven for 8-10 minutes, or until the edges are lightly golden. Remove from the oven and let them cool on the baking sheet for a few minutes before transferring them to a wire rack to cool completely.
- Decorate the Cookies: Once the cookies are cooled, use black decorating gel to draw a mouth and stitches. Place candy eyes on each cookie and use chocolate sprinkles to create Frankenstein’s hair on the top edge of the cookies.
Extra Tips:
When working with food coloring, start with a few drops and gradually add more until you achieve your desired color, as it’s easier to add more than to remove excess.
If you don’t have candy eyes, you can use small, round candies or white chocolate chips with a dot of black gel for the pupils. For a more pronounced Frankenstein look, use a small offset spatula or the back of a spoon to smooth the icing and make sure the chocolate sprinkles adhere well.
Store any leftover cookies in an airtight container to maintain their freshness. Enjoy your creepy creation!
Eerie Eyeball Sweets
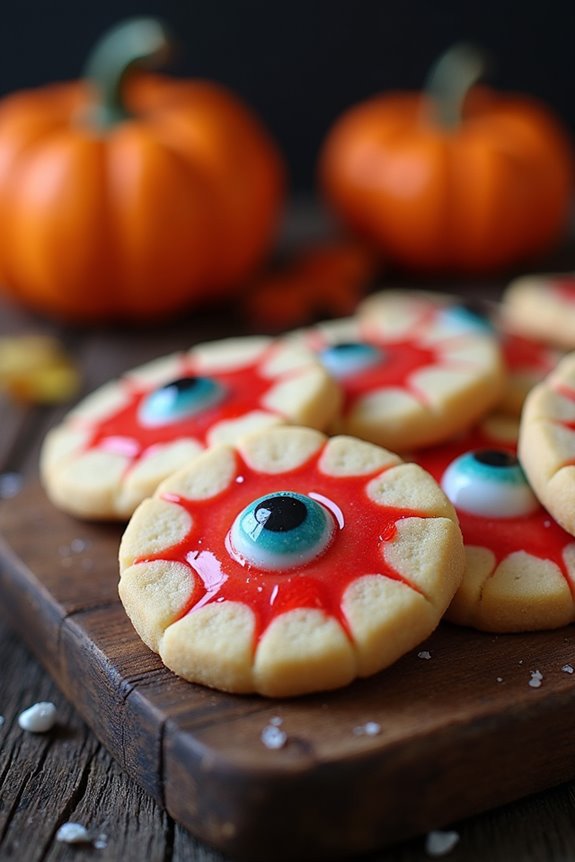
Get ready to spook your guests with these delightfully creepy Eerie Eyeball Sweets. Perfect for Halloween gatherings, these sugar cookies not only taste delicious but also add a fun, eerie twist to your dessert table. The soft, buttery cookies are topped with a creepy eyeball design that’s sure to catch everyone’s attention.
Whether you’re hosting a party or just looking for a fun Halloween baking activity, these cookies will both delight and frighten your family and friends.
These Eerie Eyeball Sweets are incredibly easy to make, even if you’re not a professional baker. Using basic ingredients, you can whip up a batch of these spooky treats in no time. The cookies are rolled in sugar before baking to give them a nice crunch, while the eerie eyeball design is created using colored icing and candy decorations.
This recipe yields enough cookies to serve 4-6 people, making it perfect for a small gathering or family treat.
Ingredients (Serves 4-6):
- 2 1/2 cups all-purpose flour
- 1 teaspoon baking powder
- 1/2 teaspoon salt
- 1 cup unsalted butter, softened
- 1 cup granulated sugar
- 1 large egg
- 1 teaspoon vanilla extract
- 1/2 teaspoon almond extract (optional)
- Assorted food coloring (red, green, blue)
- Candy eyeballs or round candies for decoration
- Red gel icing for bloodshot effect
- Additional granulated sugar for rolling
Instructions:
- Preheat and Prepare: Preheat your oven to 350°F (175°C) and line two baking sheets with parchment paper to prevent the cookies from sticking.
- Mix Dry Ingredients: In a medium bowl, whisk together the all-purpose flour, baking powder, and salt. Set aside.
- Cream Butter and Sugar: In a large bowl, using an electric mixer, cream the softened butter and granulated sugar together until light and fluffy. This should take about 3-4 minutes.
- Add Wet Ingredients: Beat in the egg, vanilla extract, and almond extract (if using) until well combined.
- Combine: Gradually add the dry ingredients to the wet ingredients, mixing on low speed until just combined. The dough should be soft but not sticky.
- Shape the Cookies: Scoop tablespoons of dough and roll them into balls. Roll each ball in additional granulated sugar to coat.
- Create Eyeball Design: Flatten each ball slightly and place a candy eyeball or round candy in the center. Use the red gel icing to draw bloodshot lines radiating from the candy.
- Bake: Place the cookies on the prepared baking sheets about 2 inches apart. Bake for 10-12 minutes or until the edges are lightly golden. Remove from the oven and let cool on the baking sheets for 5 minutes before transferring to a wire rack to cool completely.
Extra Tips:
For a more dramatic effect, you can use different colored candies for the iris of the eyeball and even use a toothpick to drag some of the gel icing to create a more realistic bloodshot effect.
If you don’t have candy eyeballs, you can use a small round candy like M&Ms or Skittles as a substitute. Make sure to keep an eye on the cookies while they bake to avoid overcooking, as they should remain soft and chewy with a slight crunch on the outside.
Enjoy your frightfully fun baking experience!
Batty Bat Cookies

Batty Bat Cookies are a fun and festive treat perfect for Halloween celebrations. These spooky sugar cookies are shaped like bats and can be decorated to your heart’s content. Whether you’re hosting a Halloween party or simply making a fun snack for your family, Batty Bat Cookies are sure to be a hit. With a buttery, sweet flavor and a hint of vanilla, these cookies are as delicious as they’re visually appealing.
The key to these cookies is a simple yet tasty sugar cookie dough that can be easily rolled and cut into bat shapes before baking. The secret to making perfect Batty Bat Cookies lies in the dough consistency and the creative decorating that follows. Once baked, these cookies provide a blank canvas for you to release your artistic flair. You can use royal icing, chocolate, or colored candy melts to add features such as eyes, wings, and other batty attributes.
Not only are these cookies a delightful treat to eat, but they also make a great activity for kids and adults alike, allowing everyone to get involved in the Halloween spirit. Below is the recipe for making a batch of Batty Bat Cookies that serves 4-6 people.
Ingredients:
- 2 3/4 cups all-purpose flour
- 1 teaspoon baking powder
- 1/2 teaspoon salt
- 1 cup unsalted butter, softened
- 1 1/2 cups granulated sugar
- 1 large egg
- 1 teaspoon vanilla extract
- Black food coloring
- Royal icing or melted chocolate for decorating
Instructions:
- Preheat the Oven: Begin by preheating your oven to 350°F (175°C) and line two baking sheets with parchment paper to prevent the cookies from sticking.
- Mix Dry Ingredients: In a medium bowl, whisk together the flour, baking powder, and salt. This will guarantee that your dry ingredients are evenly distributed throughout the dough.
- Cream the Butter and Sugar: In a large bowl, use an electric mixer to beat the softened butter and granulated sugar together until the mixture is light and fluffy. This should take about 2-3 minutes.
- Add Egg and Vanilla: Beat in the egg and vanilla extract until fully incorporated. The mixture should be smooth and creamy.
- Combine Wet and Dry Ingredients: Gradually add the dry ingredients to the wet mixture, mixing on low speed until the dough begins to form. Don’t overmix; the dough should be soft and pliable.
- Color the Dough: Add black food coloring to the dough until the desired shade is achieved. Knead the dough lightly to distribute the color evenly.
- Roll and Cut Dough: On a floured surface, roll out the dough to about 1/4 inch thickness. Use a bat-shaped cookie cutter to cut out the cookies and place them on the prepared baking sheets, leaving a little space between each cookie.
- Bake the Cookies: Place the baking sheets in the oven and bake for 8-10 minutes, or until the edges are lightly golden. Remove from the oven and allow the cookies to cool on the baking sheet for 5 minutes before transferring them to a wire rack.
- Decorate: Once completely cooled, decorate the cookies with royal icing or melted chocolate to add bat features. Allow the decorations to set before serving or storing.
Extra Tips:
When making Batty Bat Cookies, confirm that your butter is completely softened for easier mixing. If the dough becomes too soft while rolling and cutting, refrigerate it for 10-15 minutes to make it easier to handle.
For a more intense black color, use gel food coloring as it provides a richer shade with less liquid, preventing the dough from becoming too sticky. If you’re involving kids in the decorating process, consider using a variety of edible decorations like candy eyes or sprinkles to make the activity even more enjoyable.