

As the holiday season approaches, my mind fills with the comforting scent of peanut butter treats baking in the oven. Picture a tray of warm Peanut Butter Blossoms topped with chocolate kisses. Whimsical Peanut Butter Reindeer Cookies with pretzel antlers are always a hit. And let’s not forget the creamy Peanut Butter Fudge that simply melts in your mouth. These mouthwatering delights are perfect for sharing joy and sweetness around the holiday table.
Peanut Butter Blossoms
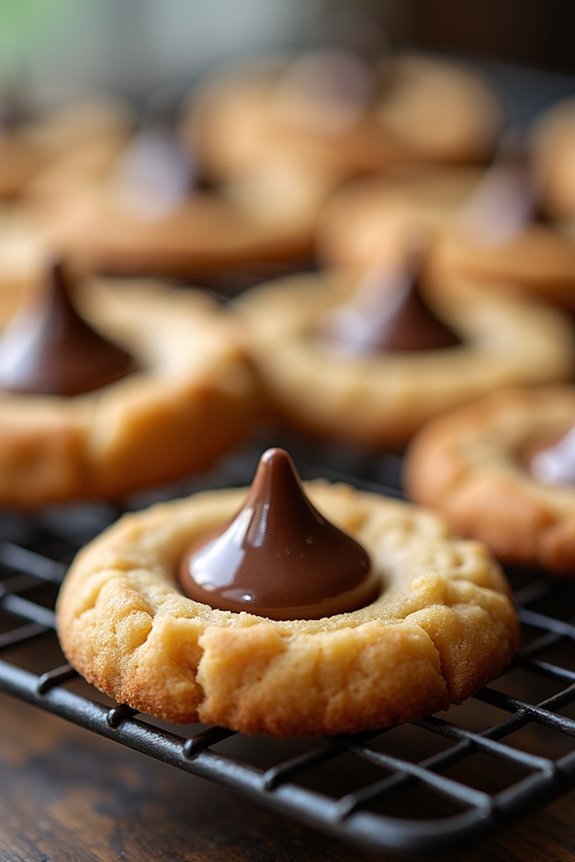
Peanut Butter Blossoms are a classic holiday treat that combine the irresistible flavors of peanut butter and chocolate, making them a staple on any Christmas cookie platter. These delightful cookies are soft, chewy, and topped with a luscious chocolate kiss, offering a perfect balance of sweet and nutty.
Whether you’re baking these cookies for a festive get-together or as a special treat for family and friends, they’re sure to bring joy and nostalgia to your holiday celebrations. Perfect for serving a small crowd, this recipe yields approximately 24 cookies, making it ideal for a serving size of 4-6 people.
The dough is easy to prepare, and the cookies bake quickly, making them a convenient option for busy holiday schedules. Gather your ingredients and follow the steps below to create these delicious Peanut Butter Blossoms that will surely be a hit at your next holiday gathering.
Ingredients:
- 1/2 cup unsalted butter, softened
- 1/2 cup creamy peanut butter
- 1/2 cup granulated sugar
- 1/2 cup packed light brown sugar
- 1 large egg
- 1 teaspoon vanilla extract
- 1 1/2 cups all-purpose flour
- 1 teaspoon baking soda
- 1/4 teaspoon salt
- Additional granulated sugar for rolling
- 24 milk chocolate kisses, unwrapped
Instructions:
- Preheat the Oven: Begin by preheating your oven to 375°F (190°C). Line two baking sheets with parchment paper or silicone baking mats to prevent sticking.
- Cream the Butter and Sugars: In a large mixing bowl, combine the softened butter, peanut butter, granulated sugar, and brown sugar. Beat with an electric mixer on medium speed until the mixture is light and fluffy, about 2-3 minutes.
- Add Wet Ingredients: Add the egg and vanilla extract to the creamed mixture. Beat until well combined and smooth.
- Combine Dry Ingredients: In a separate bowl, whisk together the flour, baking soda, and salt. Gradually add the dry ingredients to the wet mixture, mixing on low speed until just combined. Be careful not to overmix.
- Form Dough Balls: Scoop out tablespoon-sized amounts of dough and roll them into balls. Roll each ball in granulated sugar to coat.
- Bake the Cookies: Place the sugar-coated dough balls onto the prepared baking sheets, spacing them about 2 inches apart. Bake in the preheated oven for 8-10 minutes, or until the edges are lightly golden and the tops are set.
- Add Chocolate Kisses: Immediately after removing the cookies from the oven, gently press a chocolate kiss into the center of each cookie. The cookies will crack slightly around the edges, which is normal.
- Cool the Cookies: Allow the cookies to cool on the baking sheets for 5 minutes before transferring them to a wire rack to cool completely.
Extra Tips:
To guarantee your Peanut Butter Blossoms turn out perfectly every time, make sure your butter is softened to room temperature before you start, as it will cream more effectively with the sugars.
When forming the dough balls, try to make them uniform in size for even baking. If you prefer a stronger peanut butter flavor, you can use chunky peanut butter instead of creamy.
Finally, for a fun twist, try using different flavored chocolate kisses, like dark chocolate or mint, to give your cookies a unique taste that your guests will love.
Chocolate Peanut Butter Fudge
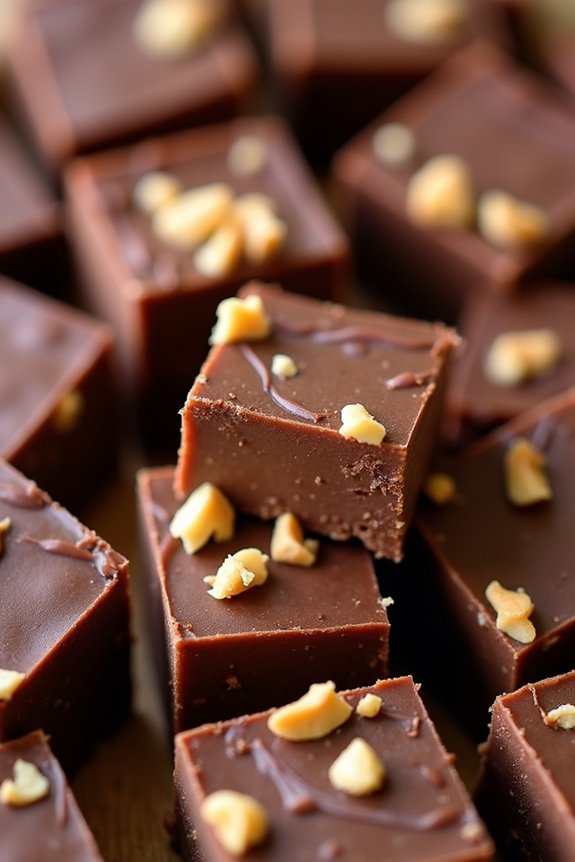
This fudge isn’t only simple to make but also a wonderful homemade gift idea. With just a few ingredients and minimal cooking time, you’ll have a batch of delectable fudge ready to share.
Whether you’re a seasoned baker or a novice in the kitchen, this recipe is straightforward enough for anyone to follow. The end result is a rich, flavorful treat that’s perfect for satisfying any sweet tooth.
Ingredients (serves 4-6 people):
- 1 cup semi-sweet chocolate chips
- 1 cup creamy peanut butter
- 1 can (14 ounces) sweetened condensed milk
- 1 teaspoon vanilla extract
- 1/4 teaspoon salt
- Optional: Chopped nuts or mini marshmallows for topping
Cooking Instructions:
- Prepare Your Pan: Line an 8×8-inch baking dish with parchment paper, leaving some overhang on the sides for easy removal later. Lightly grease the paper with cooking spray or butter.
- Melt the Ingredients: In a medium saucepan over low heat, combine the semi-sweet chocolate chips, creamy peanut butter, and sweetened condensed milk. Stir continuously until the mixture is completely melted and smooth. This should take about 5-7 minutes.
- Add Vanilla and Salt: Once the mixture is smooth, remove the saucepan from heat and stir in the vanilla extract and salt. Mix until fully incorporated.
- Pour and Smooth: Pour the fudge mixture into the prepared baking dish. Use a spatula to spread it evenly across the dish. If you’re adding toppings like chopped nuts or mini marshmallows, sprinkle them over the top and gently press them into the fudge.
- Chill and Set: Place the baking dish in the refrigerator and allow the fudge to chill for at least 2 hours, or until it’s firm and set.
- Cut and Serve: Once the fudge is set, lift it from the pan using the parchment paper overhang. Place it on a cutting board and cut into small squares. Serve immediately or store in an airtight container in the refrigerator for up to a week.
Extra Tips: For the best texture, confirm that you melt the chocolate and peanut butter mixture over low heat to prevent scorching.
If you prefer a sweeter fudge, you can use milk chocolate chips instead of semi-sweet. Additionally, you can experiment with different toppings like sea salt flakes, crushed pretzels, or dried fruit to give your fudge a unique twist.
Peanut Butter Reindeer Cookies
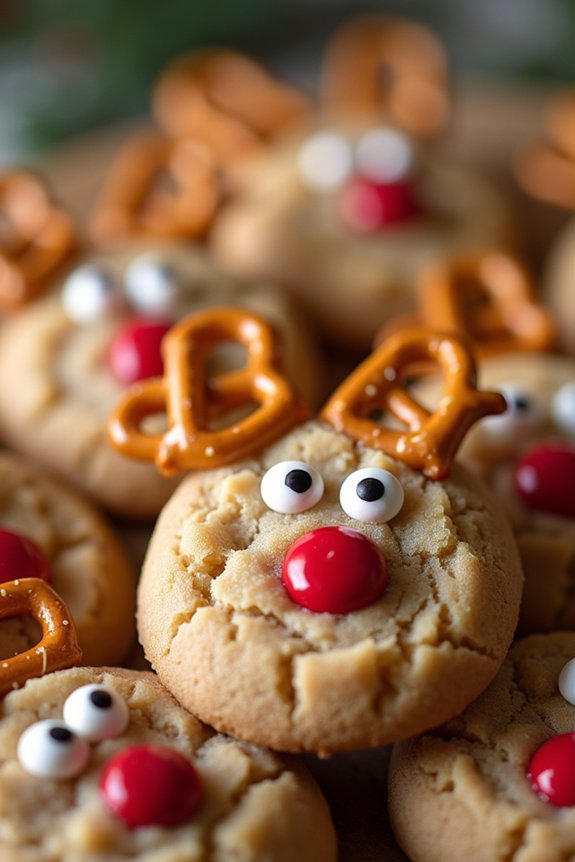
Peanut Butter Reindeer Cookies are a delightful holiday treat that combines the rich, nutty flavor of peanut butter with a festive and playful design. These cookies are perfect for getting into the Christmas spirit and are sure to bring smiles to the faces of both children and adults alike.
The combination of a soft, chewy cookie with the whimsical decoration of reindeer faces makes this recipe a fun and interactive baking experience for the whole family. Not only are these cookies delicious, but they also make for a beautiful addition to any holiday cookie platter.
The reindeer faces are created using simple decorations like pretzels for antlers, chocolate chips for eyes, and a red candy for the nose, giving each cookie a charming, personalized touch. This recipe yields about 24 cookies, making it ideal for serving 4-6 people or for sharing with guests at a holiday gathering.
Ingredients:
- 1 cup creamy peanut butter
- 1/2 cup unsalted butter, softened
- 1/2 cup granulated sugar
- 1/2 cup brown sugar, packed
- 1 large egg
- 1 teaspoon vanilla extract
- 1 and 1/4 cups all-purpose flour
- 1/2 teaspoon baking powder
- 1/2 teaspoon baking soda
- 1/4 teaspoon salt
- Mini pretzels
- Chocolate chips
- Red candy-coated chocolates (such as M&Ms)
Instructions:
- Preheat and Prepare: Preheat your oven to 350°F (175°C). Line two baking sheets with parchment paper or silicone baking mats to prevent the cookies from sticking.
- Mix Wet Ingredients: In a large mixing bowl, cream together the peanut butter, softened butter, granulated sugar, and brown sugar until the mixture is light and fluffy. This should take about 2-3 minutes using an electric mixer.
- Add Egg and Vanilla: Beat in the egg and vanilla extract to the creamed mixture until well combined.
- Combine Dry Ingredients: In a separate bowl, whisk together the flour, baking powder, baking soda, and salt. Gradually add this dry mixture to the wet ingredients, mixing until a soft dough forms.
- Shape the Cookies: Using a tablespoon, scoop and roll the dough into 1-inch balls. Place them onto the prepared baking sheets, leaving about 2 inches of space between each ball.
- Flatten and Decorate: Gently press each dough ball with a fork to create a crisscross pattern. Immediately press two mini pretzels at the top of each cookie to resemble antlers, two chocolate chips for the eyes, and a red candy in the center for the nose.
- Bake: Place the cookies in the preheated oven and bake for 8-10 minutes or until the edges are lightly golden. Don’t overbake, as the cookies will continue to firm up as they cool.
- Cool: Allow the cookies to cool on the baking sheet for about 5 minutes before transferring them to a wire rack to cool completely.
Extra Tips:
When making Peanut Butter Reindeer Cookies, verify that the butter is at room temperature before mixing to achieve the perfect creamy texture. If the dough seems too sticky after mixing, refrigerate it for about 15 minutes to make it easier to handle.
Additionally, you can personalize your reindeer cookies by experimenting with different candy colors for the nose or using various types of chocolate for the eyes. Enjoy the process and have fun decorating these charming holiday cookies!
Peanut Butter Snowballs
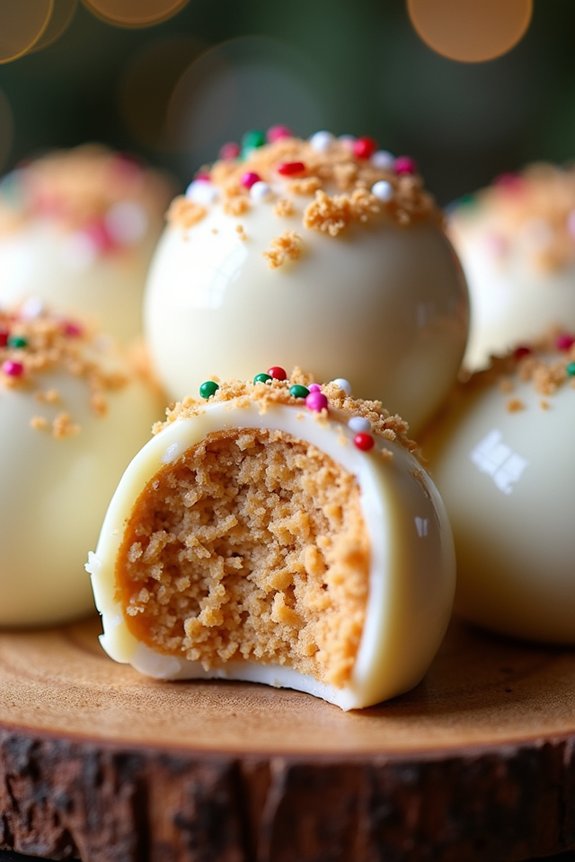
Peanut Butter Snowballs are a delightful holiday treat perfect for the Christmas season. These bite-sized confections combine the rich, creamy taste of peanut butter with a sweet, crunchy coating, making them a favorite amongst both kids and adults.
Whether you’re hosting a festive gathering or preparing gifts for friends and family, Peanut Butter Snowballs are bound to impress with their irresistible flavor and charming presentation.
Crafting these delicious treats is both simple and fun, requiring only a handful of ingredients and minimal preparation time. The result is a batch of scrumptious, no-bake goodies that look like little snowballs, adding a festive touch to your holiday dessert table.
With this recipe, you’ll be able to create a serving size of 4-6 people, perfect for sharing the joy of the season with loved ones.
Ingredients (Serving Size: 4-6 People):
- 1 cup creamy peanut butter
- 1/2 cup unsalted butter, softened
- 1 teaspoon vanilla extract
- 2 cups powdered sugar
- 2 cups white chocolate chips
- 1 tablespoon coconut oil
- 1/2 cup finely crushed graham crackers
- Assorted sprinkles (optional)
Cooking Instructions:
- Prepare the Mixture: In a large mixing bowl, combine the creamy peanut butter, softened unsalted butter, and vanilla extract. Mix well until smooth and creamy.
- Add Sugar: Gradually add the powdered sugar to the peanut butter mixture, stirring continuously until the mixture is thick and well combined. The mixture should be firm enough to hold its shape but still pliable.
- Shape the Snowballs: Using a small cookie scoop or your hands, form the mixture into small balls, approximately 1 inch in diameter. Place the balls on a baking sheet lined with parchment paper.
- Chill the Balls: Transfer the baking sheet to the refrigerator and chill the peanut butter balls for about 20-30 minutes, or until they’re firm to the touch.
- Melt the Chocolate: In a microwave-safe bowl, combine the white chocolate chips and coconut oil. Microwave in 30-second intervals, stirring in between, until the chocolate is completely melted and smooth.
- Coat the Snowballs: Using a fork or toothpick, dip each chilled peanut butter ball into the melted white chocolate, making sure it’s fully coated. Let any excess chocolate drip off before placing the coated ball back onto the parchment paper.
- Decorate: If desired, quickly sprinkle the coated snowballs with crushed graham crackers or assorted sprinkles before the chocolate sets.
- Set the Coating: Allow the chocolate coating to set completely by placing the snowballs back in the refrigerator for another 20-30 minutes.
Extra Tips:
For a smoother coating, verify both the peanut butter balls and melted chocolate are at the right temperatures; the balls should be cool and firm, while the chocolate should be warm but not hot.
If you find the chocolate too thick for coating, you can add a bit more coconut oil to thin it out. Feel free to get creative with the decorations by using different sprinkles or even drizzling some dark chocolate over the top for a contrasting effect.
Enjoy these delightful treats with a glass of milk or a cup of hot cocoa for the ultimate holiday indulgence!
Peanut Butter Cup Christmas Trees
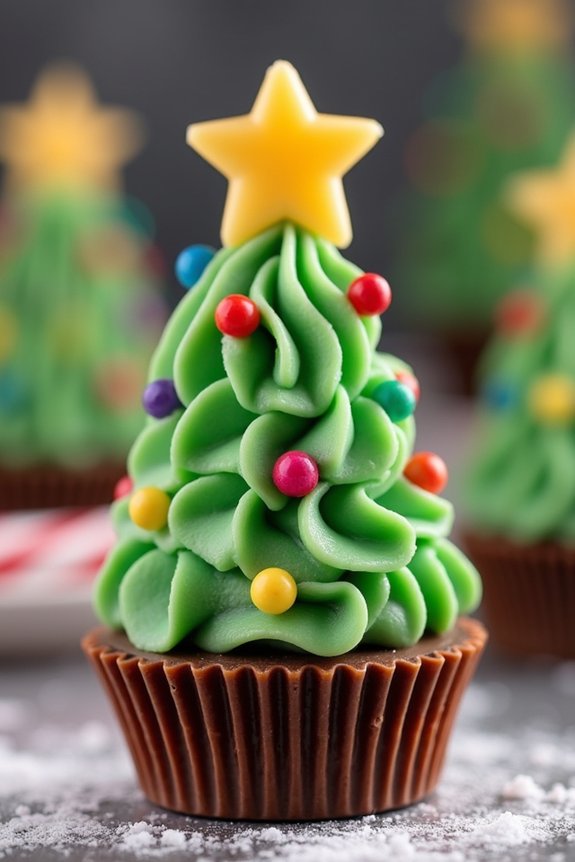
Peanut Butter Cup Christmas Trees are a delightful and festive treat perfect for the holiday season. These charming little trees aren’t only delicious but also fun to make, making them a great activity for kids and adults alike.
Combining the rich, creamy taste of peanut butter cups with the festive flair of Christmas trees, these treats are bound to be a hit at any holiday gathering. With their eye-catching appearance and delicious flavor, they make for a perfect addition to your Christmas dessert table.
Creating Peanut Butter Cup Christmas Trees is a straightforward process that requires minimal ingredients and time, yet yields impressive results. This recipe is designed to serve 4-6 people, making it ideal for small gatherings or family treats.
By stacking various sizes of peanut butter cups and decorating them with green frosting and colorful candies, you can easily create a batch of these adorable Christmas trees. Whether you’re a seasoned baker or a beginner, this recipe promises fun and scrumptious results for all.
Ingredients (Serves 4-6):
- 12 miniature peanut butter cups
- 6 standard-sized peanut butter cups
- 6 large peanut butter cups
- 1 cup green frosting
- Assorted mini candy decorations (like M&Ms or sprinkles)
- 6 small pretzel sticks
- 6 star-shaped candies
Instructions:
- Prepare the Peanut Butter Cups: Start by unwrapping all the peanut butter cups. Confirm that they’re at room temperature to prevent cracking when assembling.
- Make the Frosting Glue: Place the green frosting into a piping bag or a small zip-top bag with the corner cut off. This will be used as the “glue” to hold the peanut butter cups together.
- Assemble the Tree Base: Take one large peanut butter cup and place it upside down on a flat surface to form the base of the tree. Pipe a small amount of frosting in the center of the peanut butter cup.
- Build the Tree Layers: Place a standard-sized peanut butter cup on top of the frosting, also upside down. Press gently to adhere. Pipe another small amount of frosting on top of the standard-sized peanut butter cup.
- Complete the Tree: Finish by placing a miniature peanut butter cup, right side up, on top of the frosting. This will create the cone shape of the Christmas tree.
- Decorate the Tree: Use the green frosting to pipe small “branches” around the peanut butter cups. Stick assorted mini candies onto the frosting to resemble ornaments.
- Add the Finishing Touches: Insert a small pretzel stick into the top of the tree for the trunk. Place a star-shaped candy at the top of the tree to complete the look.
Extra Tips:
To make your Peanut Butter Cup Christmas Trees even more festive, consider using a variety of candy colors to add more visual appeal. You can also experiment with different types of frosting, such as vanilla or chocolate, to suit your taste preferences.
Confirm the frosting is thick enough to hold the candies but not too thick to squeeze out easily. If you’re making these with kids, let them have fun with the decorations, adding their own creative touch to each tree.
Store any leftover trees in an airtight container to keep them fresh for several days.
Peanut Butter Pretzel Bark
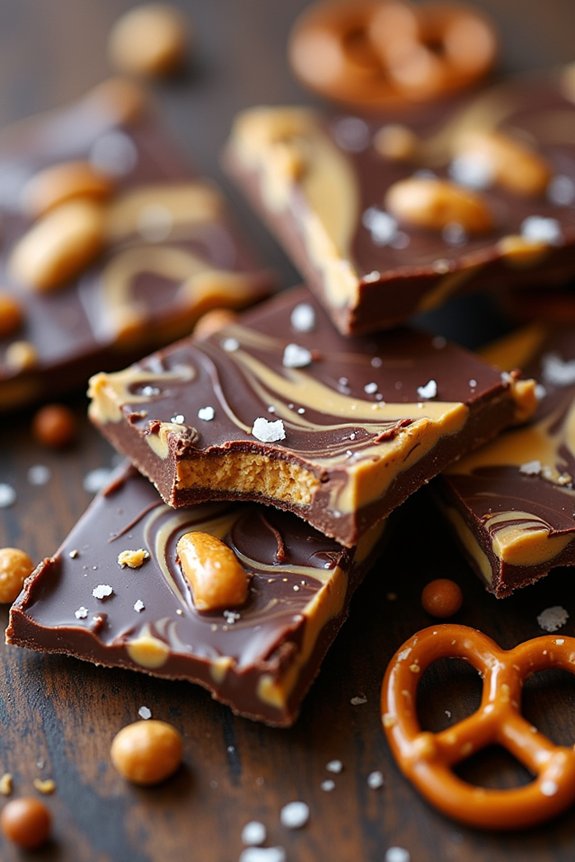
Peanut Butter Pretzel Bark is the perfect combination of sweet, salty, and crunchy, making it an irresistible treat for your holiday festivities. This delightful bark pairs the creamy richness of peanut butter with the light, airy snap of pretzels, all enveloped in a smooth chocolate coating. Not only is it a crowd-pleaser, but it’s also remarkably simple to make, requiring minimal ingredients and time.
Ideal for serving at holiday parties or as a homemade gift, Peanut Butter Pretzel Bark is both convenient and delicious. This recipe yields enough for 4-6 people, guaranteeing everyone gets a taste of this delectable treat. Whether you’re a seasoned baker or a novice in the kitchen, this recipe is straightforward and fun to create, offering a delightful blend of textures and flavors.
Ingredients for 4-6 servings:
- 12 ounces semisweet chocolate chips
- 1 cup creamy peanut butter
- 2 cups pretzel sticks, broken into pieces
- 1/4 cup powdered sugar
- 1 tablespoon unsalted butter
- 1 teaspoon vanilla extract
- Sea salt (optional, for sprinkling)
Instructions:
- Prepare the Baking Sheet: Line a large baking sheet with parchment paper, guaranteeing it covers the entire surface. This will prevent the bark from sticking and make it easier to remove once set.
- Melt the Chocolate: In a microwave-safe bowl, melt the semisweet chocolate chips in 30-second increments, stirring in between, until smooth. Alternatively, use a double boiler method to melt the chocolate on the stove.
- Spread the Chocolate: Pour the melted chocolate onto the prepared baking sheet. Use a spatula to spread it evenly into a thin layer, approximately 1/4 inch thick.
- Prepare the Peanut Butter Mixture: In a separate bowl, combine the peanut butter, powdered sugar, unsalted butter, and vanilla extract. Heat the mixture in the microwave for about 20-30 seconds until smooth and slightly runny.
- Add the Peanut Butter Mixture: Drizzle the peanut butter mixture over the layer of chocolate. Use a knife or a skewer to gently swirl the peanut butter into the chocolate, creating a marbled effect.
- Add the Pretzels: Evenly sprinkle the broken pretzel pieces over the top of the chocolate and peanut butter mixture. Gently press them into the surface to guarantee they stick.
- Optional Salt Sprinkle: If desired, lightly sprinkle sea salt over the top for an extra touch of flavor.
- Chill the Bark: Place the baking sheet in the refrigerator for at least 1 hour, or until the bark is fully set and firm.
- Break into Pieces: Once the bark is set, remove it from the refrigerator. Use your hands to break it into smaller, irregular pieces for serving.
Extra Tips:
For the best results, make sure that the chocolate layer isn’t too thick, as this can make the bark difficult to break into pieces. You can customize the bark by adding other toppings such as crushed nuts or dried fruits for extra flavor and texture.
If you prefer a sweeter bark, consider using milk chocolate instead of semisweet. Store any leftovers in an airtight container at room temperature for up to a week to maintain freshness.
Peanut Butter and Jelly Thumbprints
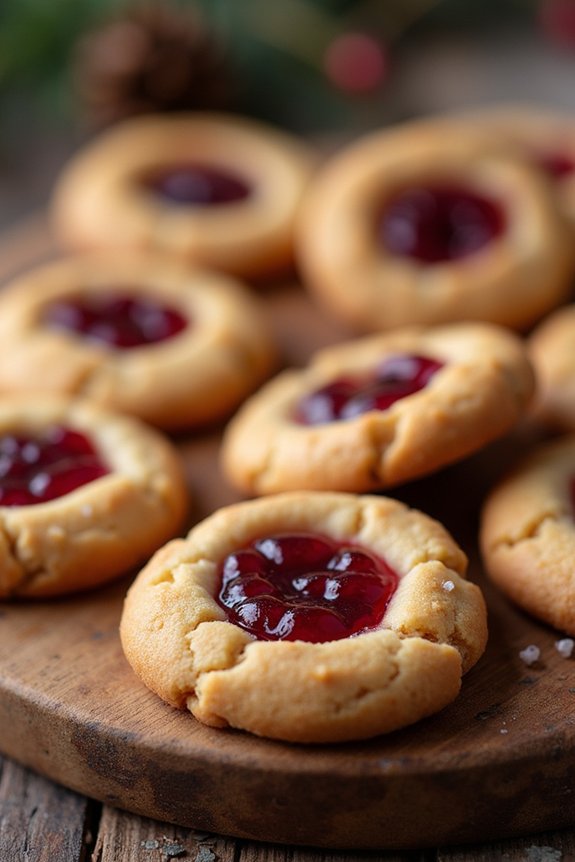
Peanut Butter and Jelly Thumbprints are a delightful holiday treat that combines the classic flavors of peanut butter and jelly into a festive cookie perfect for Christmas gatherings.
These cookies aren’t only visually appealing with their little jelly-filled centers but also offer a nostalgic taste reminiscent of childhood PB&J sandwiches. The soft and slightly chewy texture of the peanut butter cookie paired with the sweet and slightly tart jelly makes for an irresistible combination that’s certain to be a hit at any holiday event.
This recipe is perfect for serving 4-6 people, making it an ideal choice for small family gatherings or as a special treat for your closest friends. The preparation is simple and straightforward, allowing even novice bakers to create these delicious thumbprints with ease.
Whether you’re looking to add a homemade touch to your Christmas cookie platter or want a new go-to recipe for peanut butter lovers, these Peanut Butter and Jelly Thumbprints are certain to become a holiday staple.
Ingredients:
- 1 cup creamy peanut butter
- 1/2 cup unsalted butter, softened
- 1/2 cup granulated sugar
- 1/2 cup packed light brown sugar
- 1 large egg
- 1 teaspoon vanilla extract
- 1 1/4 cups all-purpose flour
- 1/2 teaspoon baking powder
- 1/4 teaspoon baking soda
- 1/4 teaspoon salt
- 1/3 cup of your favorite jelly or jam
Cooking Instructions:
- Preheat the oven: Begin by preheating your oven to 350°F (175°C). Line two baking sheets with parchment paper or silicone baking mats and set aside.
- Cream the butters and sugars: In a large mixing bowl, beat together the creamy peanut butter, softened butter, granulated sugar, and light brown sugar until the mixture is smooth and creamy, about 2-3 minutes.
- Add wet ingredients: Mix in the egg and vanilla extract until fully incorporated.
- Combine dry ingredients: In a separate bowl, whisk together the all-purpose flour, baking powder, baking soda, and salt.
- Mix dry and wet ingredients: Gradually add the dry ingredients into the peanut butter mixture, stirring until just combined and a dough forms.
- Shape the cookies: Roll the dough into 1-inch balls and place them on the prepared baking sheets, leaving about 2 inches of space between each ball.
- Create thumbprints: Use your thumb or the back of a teaspoon to gently press an indentation into the center of each dough ball.
- Fill with jelly: Carefully spoon about 1/2 teaspoon of your chosen jelly or jam into each indentation.
- Bake the cookies: Place the baking sheets in the oven and bake for 10-12 minutes, or until the edges of the cookies are lightly golden. The centers will still be soft.
- Cool the cookies: Remove the cookies from the oven and allow them to cool on the baking sheets for about 5 minutes before transferring them to a wire rack to cool completely.
Extra Tips:
For a more festive look, consider using a variety of different jellies or jams to add a splash of color to your cookie platter. Ascertain that the butter is softened before mixing to achieve a smooth and creamy dough.
If the dough feels too sticky to handle, refrigerate it for about 30 minutes before rolling into balls. Additionally, the cookies can be stored in an airtight container at room temperature for up to a week, making them a convenient make-ahead treat for the busy holiday season.
Peanut Butter Chocolate Chip Cookies
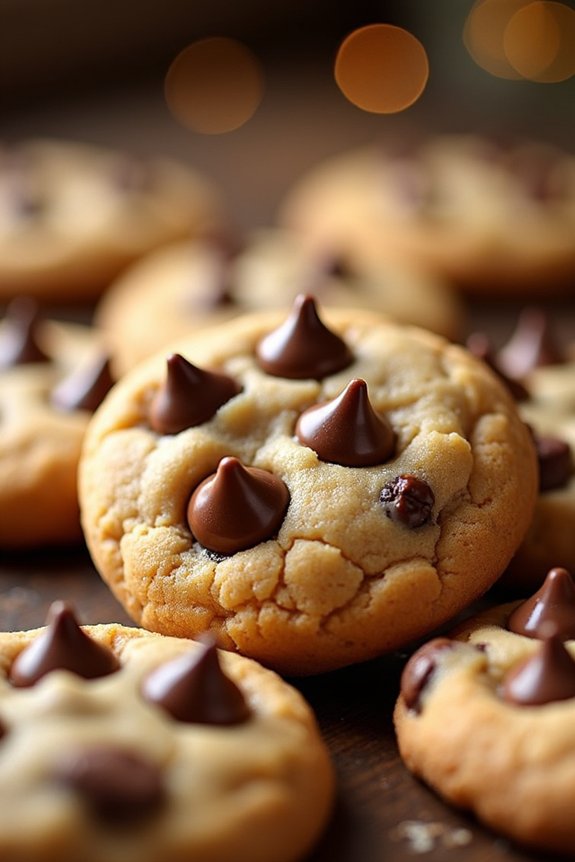
Peanut butter chocolate chip cookies are the perfect treat for the holiday season, combining the creamy richness of peanut butter with the sweet delight of chocolate chips. These cookies are a delightful blend of textures and flavors that will surely bring a smile to anyone’s face.
Ideal for a Christmas gathering or a cozy night in by the fireplace, these cookies are easy to make and even easier to enjoy. Imagine biting into a warm, chewy cookie with the nutty aroma of peanut butter and the melty goodness of chocolate – it’s a taste sensation that captures the essence of festive cheer.
This recipe is designed to serve 4-6 people, making it a great option for a small gathering or family treat. The preparation is straightforward, requiring only a few steps to create a batch of cookies that will quickly become a holiday favorite.
Whether you’re an experienced baker or a newcomer to the kitchen, these peanut butter chocolate chip cookies are sure to be a hit. Let’s plunge into the ingredients and the method to create these irresistible treats.
Ingredients (for 4-6 servings):
- 1 cup creamy peanut butter
- 1 cup granulated sugar
- 1 large egg
- 1 teaspoon vanilla extract
- 1/2 teaspoon baking soda
- 1/4 teaspoon salt
- 1 cup semi-sweet chocolate chips
Cooking Instructions:
- Preheat the Oven: Preheat your oven to 350°F (175°C). This guarantees it’s ready by the time your cookie dough is prepared and ready to bake.
- Mix Peanut Butter and Sugar: In a large mixing bowl, combine the peanut butter and sugar. Use a hand mixer on medium speed to blend until the mixture is smooth and creamy.
- Add Wet Ingredients: Crack in the egg and add the vanilla extract to the peanut butter mixture. Continue mixing until everything is well combined and the dough has a homogenous texture.
- Incorporate Dry Ingredients: Sprinkle in the baking soda and salt, mixing them into the dough until just combined. This helps the cookies rise slightly and adds a subtle hint of flavor.
- Fold in Chocolate Chips: Gently fold in the chocolate chips using a spatula or wooden spoon, ensuring the chips are evenly distributed throughout the dough.
- Shape the Cookies: Line a baking sheet with parchment paper. Use a tablespoon to scoop dough balls, approximately 1 inch in diameter, onto the prepared baking sheet. Space them about 2 inches apart to allow for spreading.
- Bake the Cookies: Place the baking sheet in the preheated oven and bake for about 10-12 minutes, or until the cookies are lightly golden around the edges but still soft in the center.
- Cool and Set: Remove the cookies from the oven and let them cool on the baking sheet for 5 minutes before transferring them to a wire rack to cool completely.
Extra Tips:
For best results, confirm that the peanut butter you use is at room temperature, as this will make it easier to mix and result in a smoother dough.
If you’re using natural peanut butter, make sure it’s well-stirred to avoid any oil separation. If you prefer a chunkier texture, you can opt for crunchy peanut butter or add chopped peanuts to the dough.
To keep the cookies fresh, store them in an airtight container at room temperature for up to a week. For an extra festive touch, consider drizzling some melted chocolate over the cooled cookies or adding a sprinkle of sea salt for a gourmet finish.
Peanut Butter Rice Krispie Treats
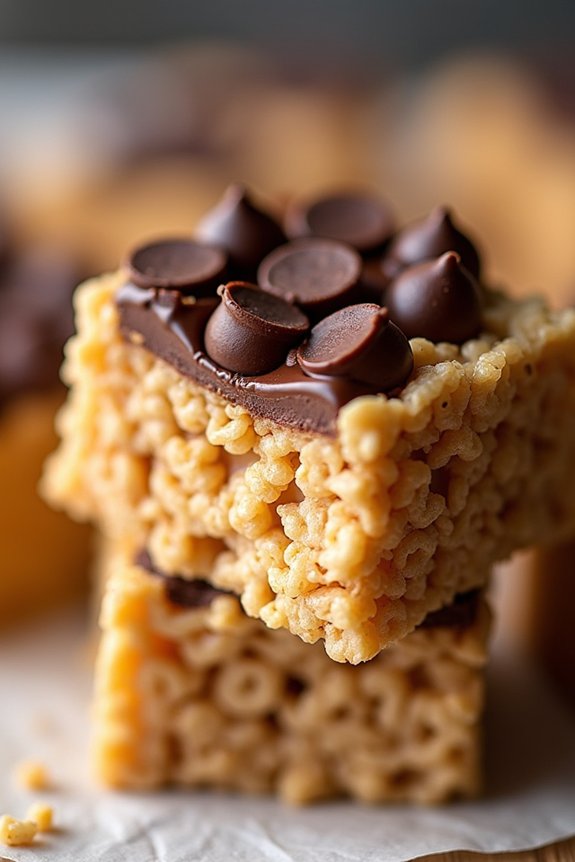
Peanut Butter Rice Krispie Treats are a delightful twist on the classic crispy treat that combines the rich, nutty flavor of peanut butter with the crunchy, airy texture of Rice Krispies cereal. Perfect for the holiday season, these treats make for a quick and easy addition to your Christmas dessert table.
Whether you’re a fan of peanut butter or simply looking for a new way to enjoy Rice Krispie treats, this recipe is sure to be a hit with friends and family.
These treats aren’t only delicious but also incredibly simple to prepare, requiring just a few basic ingredients and minimal cooking time. With a balance of sweet and savory flavors, Peanut Butter Rice Krispie Treats are perfect for those who love a little something different in their holiday treats.
Plus, they can be made ahead of time, making them a convenient option for busy holiday schedules.
Ingredients for Peanut Butter Rice Krispie Treats (Serves 4-6):
- 1 cup smooth peanut butter
- 1 cup light corn syrup
- 1 cup granulated sugar
- 6 cups Rice Krispies cereal
- 1 teaspoon vanilla extract
- Optional: 1 cup chocolate chips for topping
Instructions:
- Prepare the Pan: Begin by lightly greasing a 9×13-inch baking dish with non-stick cooking spray or line it with parchment paper. This will prevent the treats from sticking and make them easier to remove once set.
- Heat the Mixture: In a large saucepan over medium heat, combine the peanut butter, light corn syrup, and granulated sugar. Stir continuously until the mixture is smooth and just begins to boil. Be careful not to overcook, as this can make the treats hard.
- Add Vanilla Extract: Once the mixture is smooth and heated through, remove it from the heat and stir in the vanilla extract. This will add a lovely aroma and enhance the overall flavor of the treats.
- Mix with Rice Krispies: In a large mixing bowl, pour the heated peanut butter mixture over the Rice Krispies cereal. Use a spatula to gently fold the cereal into the mixture until all the cereal is evenly coated.
- Press into the Pan: Transfer the mixture into the prepared baking dish. Use a spatula or your hands (lightly greased) to press the mixture evenly into the pan, ensuring it’s compact and level.
- Optional Chocolate Topping: If desired, sprinkle chocolate chips evenly over the top of the pressed mixture. Allow them to melt slightly before spreading them evenly over the top with a spatula for a chocolatey finish.
- Let Set: Allow the Peanut Butter Rice Krispie Treats to cool and set at room temperature for about 30 minutes. For quicker setting, you can place the pan in the refrigerator for 15 minutes.
- Cut and Serve: Once set, use a sharp knife to cut the treats into squares or rectangles. Serve immediately or store in an airtight container for up to a week.
Extra Tips:
When making Peanut Butter Rice Krispie Treats, it’s important not to overheat the peanut butter mixture to avoid making the treats too hard. If you prefer a softer texture, consider reducing the cooking time slightly.
Additionally, you can customize these treats by adding mix-ins such as chopped nuts or dried fruits for extra flavor and texture. For a festive touch, consider using colored sprinkles or drizzling white chocolate over the top.
Enjoy these treats as part of your holiday celebrations or anytime you crave a delicious, peanut buttery snack!
No-Bake Peanut Butter Bars
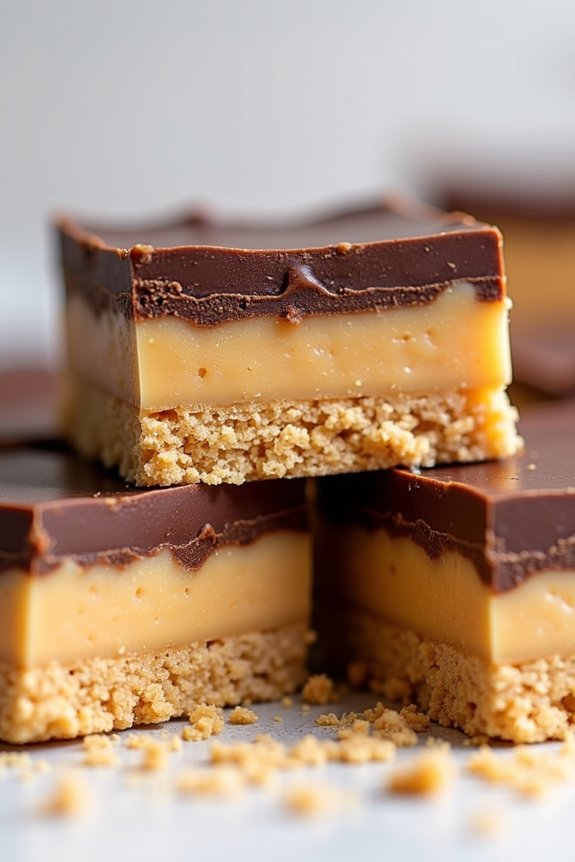
No-Bake Peanut Butter Bars are a delightful treat that perfectly combines the rich, creamy texture of peanut butter with the sweetness of chocolate. These bars are a fantastic option for those who want an easy, quick dessert without the fuss of baking. Great for holiday gatherings or just an indulgent snack, these bars are sure to be a hit with both kids and adults alike.
Plus, because they’re no-bake, they make for a convenient recipe to whip up when your oven is occupied with other holiday goodies.
The simplicity of the ingredients and the ease of preparation make these No-Bake Peanut Butter Bars a must-have for your Christmas treat lineup. The base of the bar is a mixture of peanut butter, butter, and graham cracker crumbs, which create a soft yet firm texture. Topped with a layer of melted chocolate, these bars offer the perfect balance of flavors.
With just a few ingredients and minimal prep time, you can create a mouthwatering treat that will leave everyone asking for the recipe.
Ingredients (for 4-6 servings):
- 1 cup unsalted butter, melted
- 2 cups graham cracker crumbs
- 2 cups confectioners’ sugar
- 1 cup creamy peanut butter
- 1 ½ cups semi-sweet chocolate chips
- 4 tablespoons creamy peanut butter
Cooking Instructions:
- Prepare the Base Layer: In a large mixing bowl, combine the melted butter, graham cracker crumbs, confectioners’ sugar, and 1 cup of creamy peanut butter. Stir the mixture until it’s well-blended and smooth.
- Press the Mixture: Transfer the mixture into a 9×13 inch baking dish lined with parchment paper. Use a spatula or the back of a spoon to press the mixture evenly and firmly into the dish, forming the base layer of your bars.
- Melt the Chocolate: In a microwave-safe bowl, combine the semi-sweet chocolate chips and the remaining 4 tablespoons of creamy peanut butter. Microwave the mixture in 30-second intervals, stirring between each interval, until the chocolate is fully melted and smooth.
- Spread the Chocolate Layer: Pour and spread the melted chocolate mixture over the peanut butter base layer in the baking dish, using a spatula to guarantee an even layer.
- Chill the Bars: Place the baking dish in the refrigerator for at least 1 hour, or until the bars are fully set and firm. This will make them easier to cut and serve.
- Cut and Serve: Once set, remove the bars from the refrigerator. Lift the parchment paper out of the dish and place it on a cutting board. Use a sharp knife to cut the bars into squares or rectangles before serving.
Extra Tips:
For an extra layer of flavor, consider adding a pinch of salt to the peanut butter mixture to enhance the sweetness of the bars. You can also experiment with different types of chocolate, such as dark or milk chocolate, depending on your preference.
If you’re feeling adventurous, add a layer of chopped nuts or crushed pretzels on top of the chocolate before chilling for added texture and flavor. Remember to store any leftover bars in an airtight container in the refrigerator to keep them fresh and delicious.
Peanut Butter Truffles
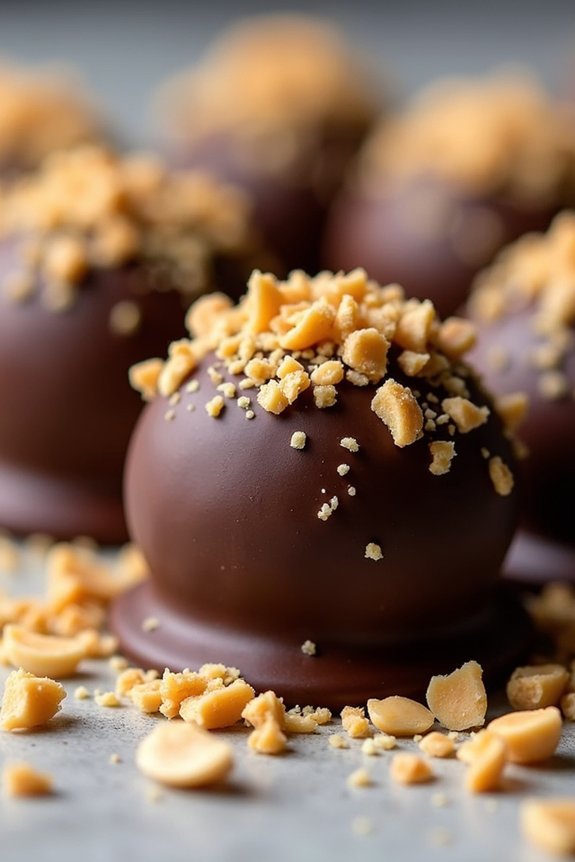
Peanut Butter Truffles are a delightful holiday treat, perfect for adding a dash of sweetness to your Christmas festivities. These bite-sized confections combine the rich, creamy taste of peanut butter with a luscious chocolate coating, creating an indulgent treat that’s hard to resist.
Their simplicity makes them an ideal recipe for both novice and seasoned cooks, while their decadent flavor guarantees they’ll be a hit at any holiday gathering.
Preparing these truffles is a fun and rewarding activity that can be enjoyed alone or with family and friends. The recipe requires minimal ingredients and equipment, yet yields impressive results that are sure to impress.
Whether you’re giving them as gifts or serving them at your holiday party, Peanut Butter Truffles are a versatile and delicious addition to your Christmas treat repertoire.
Ingredients for 4-6 People:
- 1 cup creamy peanut butter
- 1/4 cup unsalted butter, softened
- 2 cups powdered sugar
- 1 teaspoon vanilla extract
- 1 1/2 cups semi-sweet chocolate chips
- 2 tablespoons coconut oil
- 1/4 cup crushed peanuts (optional, for garnish)
Cooking Instructions:
- Prepare the Peanut Butter Mixture: In a large mixing bowl, combine the creamy peanut butter and softened unsalted butter. Stir until well blended and smooth.
- Add Sugar and Vanilla: Gradually add the powdered sugar and vanilla extract to the mixture. Mix until the sugar is fully incorporated and the mixture is firm enough to hold its shape.
- Shape the Truffles: Using your hands, roll the mixture into small balls, about 1 inch in diameter. Place the balls on a baking sheet lined with parchment paper.
- Chill the Truffles: Refrigerate the peanut butter balls for about 30 minutes. This will help them firm up and make them easier to dip in chocolate.
- Melt the Chocolate: In a microwave-safe bowl, combine the semi-sweet chocolate chips and coconut oil. Microwave in 30-second intervals, stirring in between, until completely melted and smooth.
- Coat the Truffles: Using a fork or toothpick, dip each peanut butter ball into the melted chocolate, making sure it’s fully coated. Allow any excess chocolate to drip off before placing it back on the parchment-lined baking sheet.
- Garnish and Set: If desired, sprinkle crushed peanuts over the chocolate-coated truffles for extra texture and flavor. Allow the chocolate to set completely at room temperature or in the refrigerator.
Extra Tips:
When making Peanut Butter Truffles, it’s important to verify the peanut butter and butter are at room temperature for easy mixing.
If the mixture is too sticky, you can add a bit more powdered sugar to adjust the consistency. For a smoother chocolate coating, make sure the chocolate is fully melted and stir it frequently to prevent burning.
If you prefer a different flavor, try experimenting with different types of chocolate or adding a pinch of salt to the peanut butter mixture for a sweet and salty twist.
Store the truffles in an airtight container in the refrigerator to keep them fresh for up to a week.
Peanut Butter Hot Chocolate
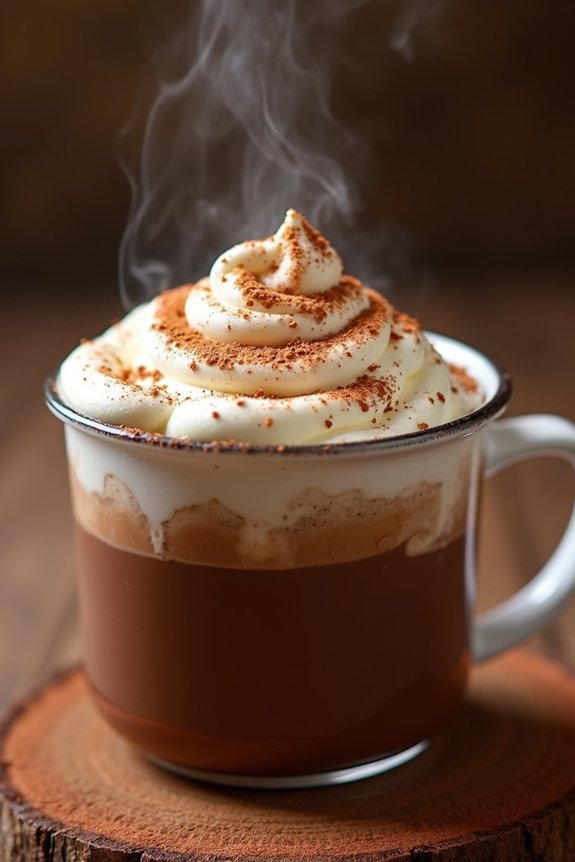
Nothing says cozy holiday season like a warm cup of Peanut Butter Hot Chocolate. This delightful twist on the classic hot chocolate combines the rich, velvety smoothness of chocolate with the creamy, nutty flavor of peanut butter, creating a comforting beverage that’s perfect for sipping by the fire.
Whether you’re hosting a Christmas gathering or just looking for a festive treat to enjoy with your family, Peanut Butter Hot Chocolate is sure to be a hit.
Imagine the aroma of melted chocolate blending with peanut butter wafting through your kitchen, inviting everyone to gather around for a cup of this indulgent drink. Not only is it delicious, but it’s also incredibly easy to prepare, requiring only a few simple ingredients.
Serve it topped with whipped cream and a sprinkle of cocoa powder or crushed peanuts for an extra special touch. Here’s how to make Peanut Butter Hot Chocolate for 4-6 people.
Ingredients for 4-6 servings:
- 4 cups of milk (whole or your preferred type)
- 1 cup of heavy cream
- 1 cup of semi-sweet chocolate chips
- 1/2 cup of creamy peanut butter
- 1/4 cup of sugar
- 1 teaspoon of vanilla extract
- A pinch of salt
- Whipped cream (optional, for topping)
- Crushed peanuts or cocoa powder (optional, for garnish)
Cooking Instructions:
- Heat the Milk and Cream: In a medium saucepan, combine the milk and heavy cream. Place the saucepan over medium heat and warm the mixture, stirring occasionally, until it’s hot but not boiling. This should take about 5-7 minutes.
- Melt the Chocolate and Peanut Butter: Add the semi-sweet chocolate chips and creamy peanut butter to the hot milk mixture. Stir continuously until the chocolate and peanut butter are completely melted and the mixture is smooth. This should take another 5 minutes.
- Sweeten and Flavor: Stir in the sugar, vanilla extract, and a pinch of salt. Continue to stir until the sugar is fully dissolved and the mixture is well combined. Taste the hot chocolate and adjust the sweetness to your liking, adding more sugar if necessary.
- Serve: Once everything is well combined and heated through, remove the saucepan from the heat. Carefully pour the hot chocolate into mugs. If desired, top each mug with a dollop of whipped cream and a sprinkle of crushed peanuts or cocoa powder for an extra festive touch.
Extra Tips:
For a richer flavor, consider using dark chocolate chips instead of semi-sweet ones. If you prefer a thicker consistency, you can add a tablespoon of cornstarch to the milk and cream mixture before heating.
Be sure to stir constantly to avoid any lumps. To make this recipe dairy-free, substitute the milk and cream with almond milk or coconut milk, and use dairy-free chocolate chips. Enjoy your Peanut Butter Hot Chocolate immediately for the best taste and texture.
Peanut Butter Cheesecake Bites

Peanut Butter Cheesecake Bites are a delightful and indulgent treat perfect for the holiday season. These bite-sized morsels combine the creamy richness of cheesecake with the nutty flavor of peanut butter, all enveloped in a smooth chocolate coating.
Whether you’re hosting a festive gathering or simply enjoying a cozy evening at home, these treats are certain to impress your family and friends. The balance of flavors and textures makes them irresistible, offering a satisfying crunch followed by a melt-in-your-mouth experience.
The beauty of Peanut Butter Cheesecake Bites lies in their simplicity and versatility. They can be made ahead of time, allowing you to focus on other holiday preparations. Plus, they require no baking, making them a convenient option for busy schedules.
With just a few ingredients and minimal effort, you can create a dessert that looks and tastes like it took hours to prepare. The combination of creamy, nutty, and sweet elements will make these bites a favorite on your holiday dessert table.
Ingredients (Serves 4-6):
- 1 cup cream cheese, softened
- 1 cup peanut butter
- 1 cup powdered sugar
- 1 teaspoon vanilla extract
- 1 cup graham cracker crumbs
- 1 cup semi-sweet chocolate chips
- 1 tablespoon coconut oil
- 1/4 cup crushed peanuts (optional, for garnish)
Instructions:
- Prepare the Cream Cheese Mixture: In a large mixing bowl, combine the softened cream cheese and peanut butter. Use an electric mixer to blend them until smooth and creamy.
- Add Sweetness and Flavor: Gradually add the powdered sugar and vanilla extract to the cream cheese mixture. Continue mixing until the ingredients are fully incorporated and the mixture is smooth.
- Form the Base: Stir in the graham cracker crumbs until they’re evenly distributed throughout the mixture. The crumbs will add a pleasant texture to the bites.
- Shape the Bites: Using your hands or a small cookie scoop, form the mixture into 1-inch balls. Place them on a baking sheet lined with parchment paper.
- Chill the Bites: Transfer the baking sheet to the refrigerator and allow the bites to chill for at least 1 hour. This will help them firm up and hold their shape for dipping.
- Melt the Chocolate: In a microwave-safe bowl, combine the chocolate chips and coconut oil. Microwave in 30-second intervals, stirring in between, until the chocolate is completely melted and smooth.
- Dip the Bites: Using a fork or a toothpick, dip each chilled cheesecake bite into the melted chocolate, making sure it’s fully coated. Allow any excess chocolate to drip off before placing it back on the parchment paper.
- Add Garnish: While the chocolate is still wet, sprinkle crushed peanuts on top of each bite for added texture and flavor.
- Set the Chocolate: Place the coated bites back in the refrigerator for about 30 minutes, or until the chocolate has hardened.
Extra Tips:
For best results, verify that the cream cheese is fully softened before mixing, as this will help achieve a smooth consistency. If you don’t have coconut oil, you can substitute it with butter or vegetable oil to help the chocolate melt smoothly.
Feel free to experiment with different toppings, such as crushed pretzels or sprinkles, to suit your taste preferences. These bites can be stored in an airtight container in the refrigerator for up to a week, making them a convenient make-ahead option for holiday parties.