

When planning your holiday menu, there’s nothing quite like desserts that both dazzle the eyes and delight the taste buds. Think of shimmering sugar cookie snowflakes or a festive red velvet cake roll that takes center stage on your Christmas table. These sweets are about more than just satisfying a craving; they’re about creating lasting holiday magic. Ready to bring that Pinterest-perfect charm to your celebrations?
Shimmering Sugar Cookie Snowflakes

Shimmering Sugar Cookie Snowflakes are the perfect festive treat to add a touch of magic to your holiday celebrations. These delicate and beautifully designed cookies not only taste delightful but also serve as a stunning visual element on your dessert table. With their delicate crunch and sweet, buttery flavor, these cookies are sure to be a hit with both children and adults alike.
The shimmering effect is achieved by using edible glitter or sanding sugar, mimicking the sparkle of freshly fallen snow, making them almost too pretty to eat.
Baking these cookies is a fun activity for the whole family, allowing you to bond while releasing your creativity with various snowflake designs. The recipe is straightforward, but the results are truly impressive, making them a great option for holiday parties, gift-giving, or simply enjoying with a cup of hot cocoa by the fire.
With a serving size of 4-6 people, you’ll have just the right amount to enjoy and share.
Ingredients (Serving Size: 4-6 people):
- 2 3/4 cups all-purpose flour
- 1 teaspoon baking powder
- 1/2 teaspoon salt
- 1 cup unsalted butter, softened
- 1 1/2 cups granulated sugar
- 1 large egg
- 1 teaspoon vanilla extract
- 1/2 teaspoon almond extract (optional)
- Edible glitter or sanding sugar for decoration
Cooking Instructions:
- Prepare the Dry Ingredients: In a medium bowl, whisk together the flour, baking powder, and salt. This will guarantee that the dry ingredients are evenly distributed throughout the dough.
- Cream the Butter and Sugar: In a large mixing bowl, beat the softened butter and granulated sugar together on medium speed until light and fluffy, about 3-4 minutes. This process incorporates air into the mixture, which is vital for the texture of the cookies.
- Add Wet Ingredients: Add the egg, vanilla extract, and almond extract (if using) to the butter mixture. Beat until well combined, making sure to scrape down the sides of the bowl as needed.
- Combine Dry and Wet Ingredients: Gradually add the dry ingredients to the wet mixture, mixing on low speed until just combined. Be careful not to overmix, as this can toughen the cookies.
- Chill the Dough: Divide the dough into two portions, flatten each into a disk, wrap in plastic wrap, and refrigerate for at least 1 hour. Chilling the dough is essential for maintaining the shape of the cookies while baking.
- Preheat the Oven: Preheat your oven to 350°F (175°C). Line two baking sheets with parchment paper.
- Roll and Cut the Dough: On a lightly floured surface, roll out one disk of dough to about 1/4 inch thickness. Use snowflake-shaped cookie cutters to cut out the cookies and place them on the prepared baking sheets.
- Decorate and Bake: Sprinkle edible glitter or sanding sugar over the cookies for a shimmering effect. Bake in the preheated oven for 8-10 minutes, or until the edges are lightly golden. Let them cool on the baking sheet for 5 minutes before transferring to a wire rack to cool completely.
Extra Tips:
For an easier rollout, consider rolling the dough between two sheets of parchment paper to prevent sticking. If the dough becomes too soft and difficult to work with, simply return it to the refrigerator for a brief chill.
When decorating, you can also use royal icing to create intricate snowflake patterns before adding the edible glitter for an even more festive look. These cookies can be stored in an airtight container at room temperature for up to a week, making them a great make-ahead option during the busy holiday season.
Sparkling Cranberry Cheesecake Bars
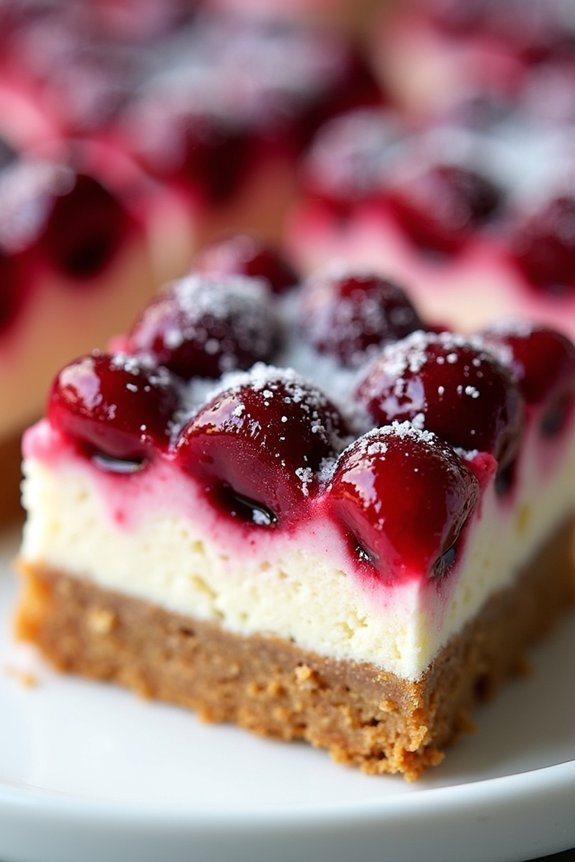
Sparkling Cranberry Cheesecake Bars are a delightful dessert perfect for the holiday season. These bars combine the creamy richness of cheesecake with the tartness of cranberries, topped with a sparkling sugar coating that makes them as beautiful as they’re delicious.
Whether you’re hosting a festive gathering or simply indulging in a sweet treat, these cheesecake bars promise to impress with their combination of flavors and textures. Not only do they look stunning on a dessert table, but they also offer a revitalizing contrast to traditional holiday desserts.
The creamy cheesecake layer is perfectly balanced by a buttery graham cracker crust and a vibrant cranberry topping. The cranberries are cooked down into a sweet-tart sauce, creating a striking red layer that’s both flavorful and festive.
Sparkling sugar sprinkled on top adds a touch of elegance, making these bars a standout addition to any Christmas celebration. Follow the recipe below to create a batch of these decadent bars for 4-6 people.
Ingredients:
- 1 1/2 cups graham cracker crumbs
- 1/4 cup unsalted butter, melted
- 1/4 cup granulated sugar
- 16 oz cream cheese, softened
- 1/2 cup granulated sugar
- 2 large eggs
- 1 tsp vanilla extract
- 1 cup fresh cranberries
- 1/4 cup water
- 1/4 cup granulated sugar (for cranberry sauce)
- 1 tbsp cornstarch
- 2 tbsp water (to mix with cornstarch)
- 1/4 cup sparkling sugar
Instructions:
- Prepare the Crust: Preheat your oven to 350°F (175°C). In a medium mixing bowl, combine the graham cracker crumbs, melted butter, and 1/4 cup sugar. Mix until the crumbs are evenly moistened. Press the mixture firmly into the bottom of an 8×8 inch baking dish to form an even layer. Bake for 10 minutes, then set aside to cool slightly.
- Make the Cheesecake Layer: In a large bowl, beat the softened cream cheese and 1/2 cup sugar until smooth and creamy. Add the eggs, one at a time, mixing well after each addition. Stir in the vanilla extract. Pour the cheesecake mixture over the slightly cooled crust, spreading it evenly.
- Prepare the Cranberry Sauce: In a small saucepan, combine the fresh cranberries, 1/4 cup water, and 1/4 cup sugar. Cook over medium heat, stirring occasionally, until the cranberries begin to pop and break down. In a small bowl, mix the cornstarch and 2 tablespoons of water until smooth. Add this to the cranberry sauce, stirring continuously until the sauce thickens. Remove from heat and let it cool slightly.
- Assemble and Bake: Spoon the cranberry sauce over the cheesecake layer, spreading it gently to cover the surface. Bake in the preheated oven for 25-30 minutes, or until the cheesecake is set and the edges are lightly golden. Remove from oven and allow to cool completely at room temperature.
- Chill and Serve: Once the bars are cooled, refrigerate them for at least 2 hours or until fully chilled. Before serving, sprinkle the sparkling sugar evenly over the top of the cranberry layer to give it a festive sparkle. Cut into bars and serve chilled.
Extra Tips:
For best results, verify that the cream cheese is at room temperature before mixing to achieve a smooth cheesecake layer.
When preparing the cranberry sauce, taste it and adjust the sugar if needed based on your preference for tartness. The bars can be made a day in advance and stored in the refrigerator; this allows the flavors to meld beautifully.
To make cutting easier, use a sharp knife dipped in hot water and wiped dry for each slice. Enjoy these festive treats with a warm beverage for the ultimate holiday experience!
Chocolate Peppermint Bark
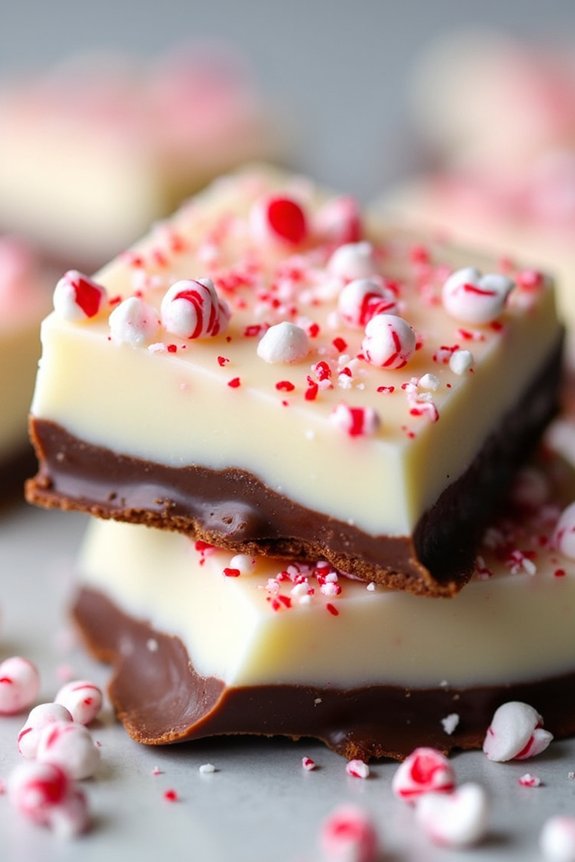
Chocolate Peppermint Bark is a festive and delightful treat that perfectly captures the essence of the holiday season. This simple yet indulgent dessert combines rich chocolate with the invigorating zing of peppermint, creating a harmonious blend of flavors that will leave you craving more.
Not only is it a joy to eat, but it’s also an ideal gift to share with friends and family during Christmas gatherings or as a sweet addition to your holiday dessert spread.
With its elegant appearance and irresistible taste, Chocolate Peppermint Bark is surprisingly easy to make, requiring just a few ingredients and minimal effort. Whether you’re a seasoned baker or a novice in the kitchen, this recipe is sure to become a holiday favorite.
Follow these steps to create a batch of delicious Chocolate Peppermint Bark that serves 4-6 people.
Ingredients:
- 12 ounces of semi-sweet chocolate chips
- 12 ounces of white chocolate chips
- 1 teaspoon of peppermint extract
- 1/2 cup of crushed candy canes
Cooking Instructions:
- Prepare the Baking Sheet: Line a baking sheet with parchment paper, guaranteeing it covers the entire surface. This will prevent the chocolate from sticking and make it easier to remove once it has set.
- Melt the Semi-Sweet Chocolate: In a microwave-safe bowl, melt the semi-sweet chocolate chips in 30-second intervals, stirring between each interval until the chocolate is smooth and fully melted. Be careful not to overheat the chocolate as it can seize.
- Spread the First Layer: Pour the melted semi-sweet chocolate onto the prepared baking sheet. Use a spatula to spread it evenly into a thin layer, approximately 1/4-inch thick. Place the baking sheet in the refrigerator for about 15 minutes to allow the chocolate to set slightly.
- Melt the White Chocolate: While the first layer is setting, melt the white chocolate chips in a similar manner as the semi-sweet chocolate. Once melted, stir in the peppermint extract until well combined.
- Add the Peppermint Layer: Remove the baking sheet from the refrigerator and pour the white chocolate mixture over the semi-sweet chocolate layer. Spread it evenly, guaranteeing it covers the entire surface.
- Sprinkle the Candy Canes: Immediately sprinkle the crushed candy canes over the white chocolate layer while it’s still soft. Press gently to guarantee they adhere to the chocolate.
- Final Set: Return the baking sheet to the refrigerator for about 30 minutes or until the chocolate is fully set and firm.
- Break into Pieces: Once the bark is set, remove it from the refrigerator and break it into uneven pieces with your hands or a knife. The irregular shapes add to the charm of the bark.
Extra Tips:
To achieve a glossy finish on your chocolate, consider tempering the chocolate before spreading it on the baking sheet. This process stabilizes the chocolate, preventing a dull finish and ensuring a nice snap when broken.
Additionally, when crushing the candy canes, place them in a sealed plastic bag and use a rolling pin to crush them to your desired size. This helps avoid a mess and keeps the pieces relatively uniform.
Store your Chocolate Peppermint Bark in an airtight container to maintain its freshness and keep it crisp. Enjoy this delightful treat throughout the holiday season!
Festive Red Velvet Cake Roll
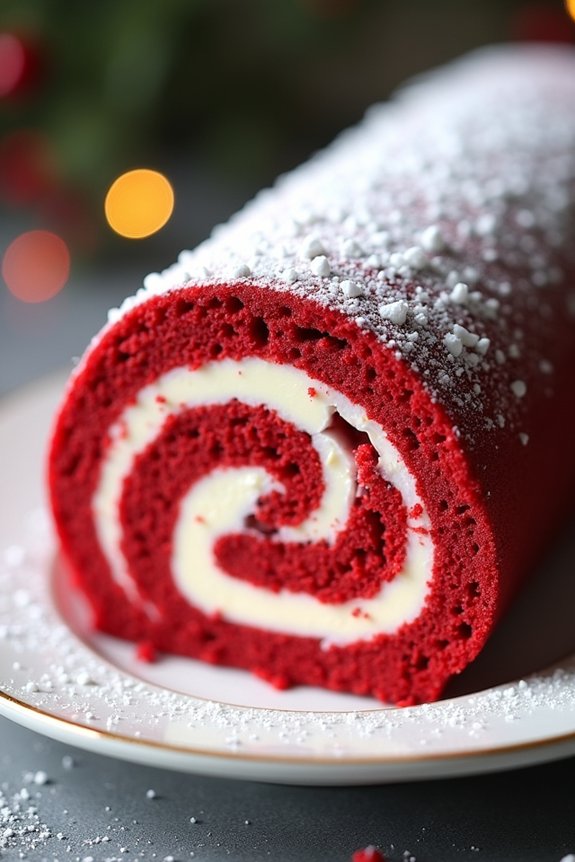
Celebrate the season with a delectable Festive Red Velvet Cake Roll that’s as delightful to look at as it’s to eat. This elegant dessert features a soft, velvety red sponge cake rolled around a luscious cream cheese filling, creating a beautiful swirl with every slice. Perfect for holiday gatherings, this cake roll is sure to impress your guests with its rich flavor and stunning presentation.
Whether you’re hosting a large party or a small family dinner, this festive treat will add a touch of elegance to your holiday table.
The preparation involves creating a classic red velvet sponge, which is light, fluffy, and vibrantly colored, thanks to a hint of cocoa and a splash of red food coloring. This is then paired with a smooth and creamy filling made from cream cheese, butter, and vanilla, bringing together the ideal balance of sweetness and tang.
Once assembled, the cake roll can be dusted with powdered sugar or decorated with additional festive toppings to make it truly special. Let’s explore the ingredients and steps to create this delightful dessert.
Ingredients for 4-6 servings:
- 3/4 cup all-purpose flour
- 1/4 cup unsweetened cocoa powder
- 1 teaspoon baking powder
- 1/4 teaspoon salt
- 4 large eggs
- 3/4 cup granulated sugar
- 1 teaspoon vanilla extract
- 2 tablespoons red food coloring
- 1 tablespoon milk
- 1/2 cup powdered sugar (for dusting)
- 8 ounces cream cheese, softened
- 4 tablespoons unsalted butter, softened
- 1 cup powdered sugar
- 1 teaspoon vanilla extract
Cooking Instructions:
- Preheat and Prepare: Preheat your oven to 350°F (175°C). Line a 10×15 inch jelly roll pan with parchment paper, and lightly grease it to prevent sticking.
- Mix Dry Ingredients: In a medium bowl, sift together the flour, cocoa powder, baking powder, and salt. This guarantees an even distribution of ingredients and a lighter cake texture.
- Beat Eggs and Sugar: In a large mixing bowl, beat the eggs with an electric mixer on high speed until thick and pale. Gradually add the granulated sugar, beating continuously, until the mixture is light and fluffy.
- Add Vanilla and Food Coloring: Stir in the vanilla extract and red food coloring, mixing until the color is evenly distributed. Add the milk to thin the batter slightly.
- Combine Wet and Dry Mixes: Gently fold the dry ingredients into the wet mixture, being careful not to deflate the batter. Mix until just combined.
- Bake the Cake: Pour the batter into the prepared pan, smoothing the top with a spatula. Bake for 12-15 minutes, or until the cake springs back when touched lightly.
- Roll the Cake: Immediately after removing from the oven, turn the cake onto a clean kitchen towel dusted with powdered sugar. Carefully peel off the parchment paper, and while the cake is still warm, roll it up with the towel inside. Allow it to cool completely in this rolled shape.
- Prepare the Filling: In a mixing bowl, beat the softened cream cheese and butter until smooth. Gradually add the powdered sugar and vanilla extract, beating until the filling is creamy and well-blended.
- Assemble the Cake Roll: Once the cake has cooled, unroll it gently, spread the cream cheese filling evenly over the surface, and roll it back up without the towel.
- Chill and Serve: Wrap the cake roll in plastic wrap and refrigerate for at least an hour before serving. Dust with additional powdered sugar before slicing.
Extra Tips:
When rolling the cake, make sure it’s warm to avoid cracking, as the flexibility decreases as it cools. If the cake does crack, don’t worry too much—any imperfections can be hidden with a generous dusting of powdered sugar or a drizzle of chocolate.
For an extra festive touch, consider adding crushed peppermint candies or holiday sprinkles on top. Always use high-quality food coloring to achieve the best and most vibrant red hue. Enjoy your beautiful and delicious Festive Red Velvet Cake Roll!
Gingerbread Layer Cake With Cream Cheese Frosting
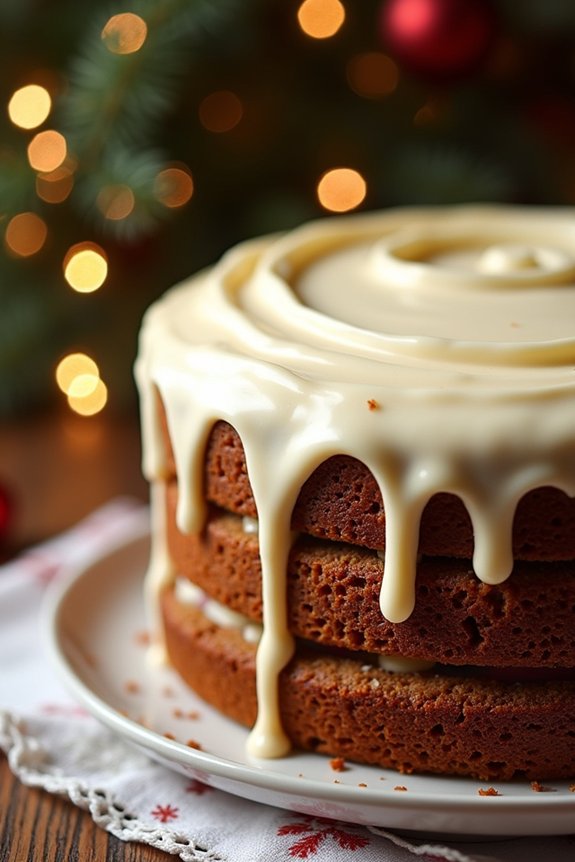
Gingerbread Layer Cake with Cream Cheese Frosting is the perfect festive dessert to impress your holiday guests. This delightful cake combines the warmth of classic gingerbread spices with the richness of silky cream cheese frosting. It’s aromatic, moist, and layered to perfection, making each bite a celebration of flavor and texture. Ideal for both intimate family gatherings and larger holiday parties, this cake promises to be the star of your dessert table.
Crafting this cake involves preparing a deeply flavorful gingerbread batter, baking it into layers, and then slathering each layer with a creamy and tangy frosting. The combination of spices such as cinnamon, ginger, and cloves gives the cake its signature holiday flavor, while the cream cheese frosting adds a delightful tang that balances the sweetness.
To serve 4-6 people, you’ll find the ingredients list and step-by-step instructions below to guide you in creating this seasonal treat.
Ingredients for 4-6 servings:
- 2 ½ cups all-purpose flour
- 1 teaspoon baking soda
- 1 teaspoon ground cinnamon
- 1 teaspoon ground ginger
- ½ teaspoon ground cloves
- ½ teaspoon salt
- 1 cup unsalted butter, softened
- 1 cup dark brown sugar
- 1 cup molasses
- 2 large eggs
- 1 cup buttermilk
- 1 teaspoon vanilla extract
For the Cream Cheese Frosting:
- 8 ounces cream cheese, softened
- ½ cup unsalted butter, softened
- 3 ½ cups powdered sugar
- 1 teaspoon vanilla extract
Instructions:
- Preheat and Prepare Pans: Preheat your oven to 350°F (175°C). Grease and flour two 9-inch round cake pans, and set them aside.
- Mix Dry Ingredients: In a medium bowl, whisk together the flour, baking soda, cinnamon, ginger, cloves, and salt. Set the mixture aside.
- Cream Butter and Sugar: In a large mixing bowl, cream the softened butter and dark brown sugar together using an electric mixer until light and fluffy, about 3 minutes.
- Add Wet Ingredients: Beat in the molasses until fully incorporated, then add the eggs one at a time, mixing well after each addition. Stir in the vanilla extract.
- Combine Mixtures: Gradually add the dry ingredients to the wet mixture, alternating with the buttermilk, beginning and ending with the dry ingredients. Mix until just combined.
- Bake the Cake: Divide the batter evenly between the prepared cake pans. Smooth the tops with a spatula and bake for 30-35 minutes, or until a toothpick inserted into the center comes out clean. Allow the cakes to cool in the pans for 10 minutes before transferring them to a wire rack to cool completely.
- Prepare Frosting: In a large bowl, beat the softened cream cheese and butter together until smooth and creamy. Gradually add the powdered sugar, beating until well combined. Stir in the vanilla extract.
- Assemble the Cake: Once the cake layers are completely cool, place one layer on a serving plate. Spread a generous amount of cream cheese frosting on top. Place the second layer on top and frost the top and sides of the cake with the remaining frosting.
Extra Tips:
For the best results, make sure that all your ingredients, especially the butter and cream cheese, are at room temperature before beginning the recipe. This will guarantee a smooth batter and frosting.
Additionally, when slicing the cake layers, use a serrated knife to get clean, even cuts. If you want to add an extra touch of holiday flair, consider garnishing the cake with candied ginger, a sprinkle of ground cinnamon, or some festive holiday decorations.
Enjoy your Gingerbread Layer Cake with Cream Cheese Frosting as a delightful end to your holiday meal!
Holiday Macarons With Festive Fillings
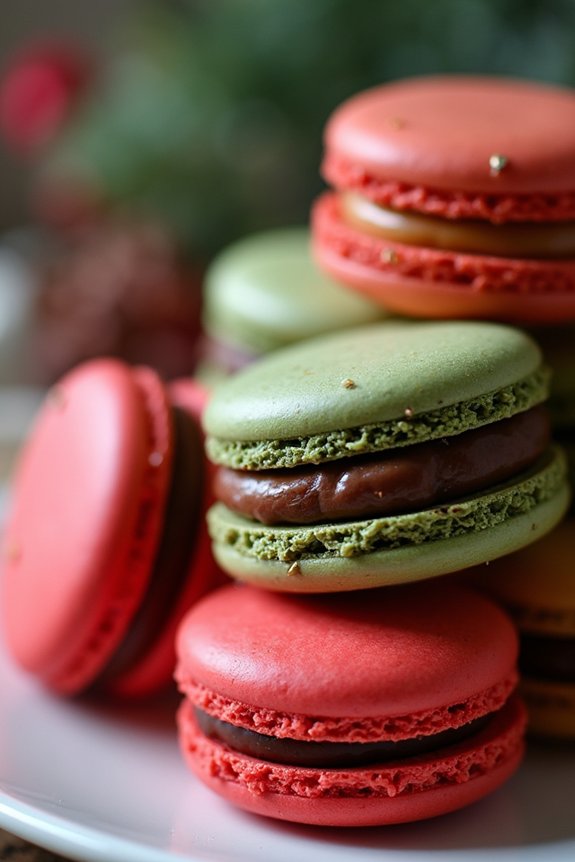
Indulge in the delightful world of French patisserie this holiday season with these exquisite Holiday Macarons with Festive Fillings. These delicate sandwich cookies aren’t only a treat for the taste buds but also add a pop of festive color to any Christmas dessert table.
With their crisp outer shell, soft chewy center, and a variety of flavor-packed fillings, they’re sure to be a hit among family and friends. Perfect for gifting or serving at your holiday gatherings, these macarons can be customized in color and flavor to match any festive theme.
Creating macarons requires precision and patience, but the results are well worth the effort. This recipe yields 24-30 macarons, perfect for sharing with a group of 4-6 people. The macarons are filled with an assortment of festive fillings, including peppermint chocolate ganache, cranberry buttercream, and spiced gingerbread cream, offering a variety of flavors that capture the essence of the holiday season.
Follow these instructions closely for perfect macarons that will impress and delight.
Ingredients:
*Macaron Shells:*
- 200g powdered sugar
- 100g almond flour
- 110g egg whites (aged overnight)
- 50g granulated sugar
- Gel food coloring (red and green)
Peppermint Chocolate Ganache:
- 100g dark chocolate, chopped
- 100ml heavy cream
- 1 tsp peppermint extract
Cranberry Buttercream:
- 100g unsalted butter, softened
- 200g powdered sugar
- 2 tbsp cranberry sauce
Gingerbread Cream:
- 100g cream cheese, softened
- 50g unsalted butter, softened
- 100g powdered sugar
- 1 tsp gingerbread spice
Cooking Instructions:
- Prepare the Macaron Shells:
- Preheat your oven to 150°C (300°F). Line two baking sheets with parchment paper.
- Sift the powdered sugar and almond flour together into a bowl. Set aside.
- In a separate bowl, beat the egg whites with an electric mixer on medium speed until foamy. Gradually add the granulated sugar and continue to beat until stiff peaks form.
- Gently fold the dry ingredients into the meringue in batches, being careful not to overmix. The batter should flow like lava.
- Divide the batter into two portions. Add red food coloring to one portion and green to the other, folding gently until evenly colored.
- Transfer the batter to piping bags fitted with a round tip. Pipe small rounds onto the prepared baking sheets, leaving space between each.
- Let the piped macarons sit at room temperature for about 30-45 minutes, until a skin forms on the surface.
- Bake the Macaron Shells:
- Bake in the preheated oven for 12-15 minutes. The macarons are done when they’ve risen and have developed feet.
- Remove from the oven and let cool completely on the baking sheets.
- Prepare the Fillings:
*Peppermint Chocolate Ganache:*
– Heat the heavy cream until just simmering. Pour over the chopped dark chocolate and let sit for 2 minutes. Stir until smooth, then add peppermint extract. Allow to cool until thickened.
Cranberry Buttercream:
– Beat the butter until creamy. Gradually add the powdered sugar and cranberry sauce, beating until smooth and fluffy.
Gingerbread Cream:
– Beat the cream cheese and butter together until smooth. Add the powdered sugar and gingerbread spice, mixing until well combined.
4. Assemble the Macarons:
– Pair the macaron shells by size. Pipe a small amount of filling onto one shell and top with another shell to create a sandwich. Repeat with remaining shells and fillings.
5. Chill and Serve:
– Place the assembled macarons in an airtight container and refrigerate for at least 24 hours to allow the flavors to meld. Bring to room temperature before serving.
Extra Tips:
When making macarons, it’s important to use aged egg whites as they stabilize the meringue better. Confirm all your equipment is completely clean and dry before starting, as any oil or moisture can affect the batter.
If you find that your macarons aren’t developing feet, check your oven temperature — it might be too low or too high. Finally, be patient when letting the macarons sit before baking; this step is essential for creating the signature macaron texture.
Enjoy the process, and don’t be discouraged by a few imperfections!
Mini Christmas Tree Cupcakes
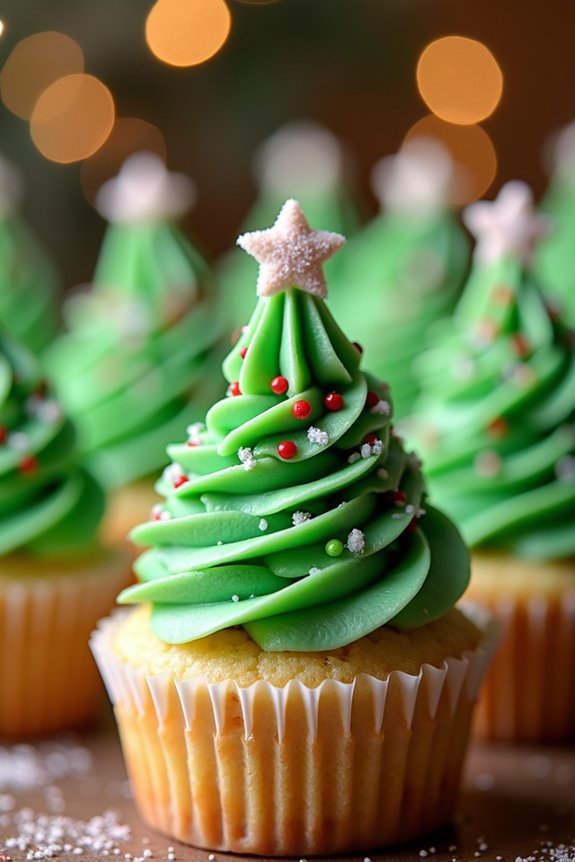
Mini Christmas Tree Cupcakes are the perfect festive treat to add a whimsical touch to your holiday celebrations. These delightful cupcakes not only look adorable, but they also pack a delicious punch of flavor that will leave your guests wanting more. With a moist cupcake base and a creamy frosting topped with a charming mini Christmas tree, these cupcakes are sure to impress both kids and adults alike.
Whether you’re hosting a holiday party or simply want to enjoy a sweet treat with your family, these cupcakes are easy to make and can be decorated to reflect your own creative flair.
The secret to these cupcakes lies in their perfect balance of flavors and textures. The cupcakes themselves are tender and fluffy, with a hint of vanilla or chocolate, depending on your preference. The frosting is rich and creamy, providing the ideal canvas for your edible Christmas tree decorations.
To create the tree, you’ll use ice cream cones as the base, which are then coated with green frosting and adorned with colorful sprinkles or edible stars. These charming confections are a fun and festive way to bring holiday cheer to your dessert table.
Ingredients (serving size: 4-6 people):
- 1 ½ cups all-purpose flour
- 1 cup granulated sugar
- 1 ½ teaspoons baking powder
- ½ teaspoon salt
- ½ cup unsalted butter, softened
- 2 large eggs
- 1 teaspoon vanilla extract
- ½ cup whole milk
- Green food coloring
- 6 small sugar cones
- 2 cups powdered sugar
- 1 cup unsalted butter, softened (for frosting)
- 2 tablespoons heavy cream
- Assorted sprinkles or edible stars for decoration
Instructions:
- Preheat the Oven: Preheat your oven to 350°F (175°C) and line a muffin tin with cupcake liners.
- Prepare the Cupcake Batter: In a large mixing bowl, combine the all-purpose flour, granulated sugar, baking powder, and salt. Add the softened butter, eggs, vanilla extract, and milk. Mix until just combined and smooth.
- Divide and Color the Batter: Divide the batter evenly into the lined muffin tin, filling each cup about two-thirds full.
- Bake the Cupcakes: Place the muffin tin in the preheated oven and bake for 18-20 minutes, or until a toothpick inserted into the center of a cupcake comes out clean. Once baked, remove from the oven and let cool completely on a wire rack.
- Prepare the Frosting: While the cupcakes are cooling, prepare the frosting by beating the softened butter in a large bowl until creamy. Gradually add the powdered sugar and heavy cream, mixing until smooth. Add a few drops of green food coloring and mix until the desired shade of green is achieved.
- Decorate the Christmas Trees: Once the cupcakes are completely cooled, take a small sugar cone and cover it with the prepared green frosting. Use a piping bag fitted with a star tip to pipe frosting onto the cone, mimicking tree branches.
- Assemble the Cupcakes: Place the decorated cones on top of each cupcake, pressing down gently so they adhere. Add sprinkles or edible stars to the frosting tree for decoration.
- Final Touches: Allow the cupcakes to set for a few minutes so the frosting can stabilize before serving.
Extra Tips:
When frosting the cones, it’s helpful to use a turntable or lazy Susan to easily reach all sides. If you want to add a bit more flavor to the frosting, consider incorporating a drop of peppermint or almond extract.
Additionally, for a more colorful display, you can use different shades of green for the frosting or incorporate colored sugar sprinkles. If you’re making these cupcakes ahead of time, store them in an airtight container to keep them fresh until ready to serve.
Raspberry and White Chocolate Mousse Parfaits
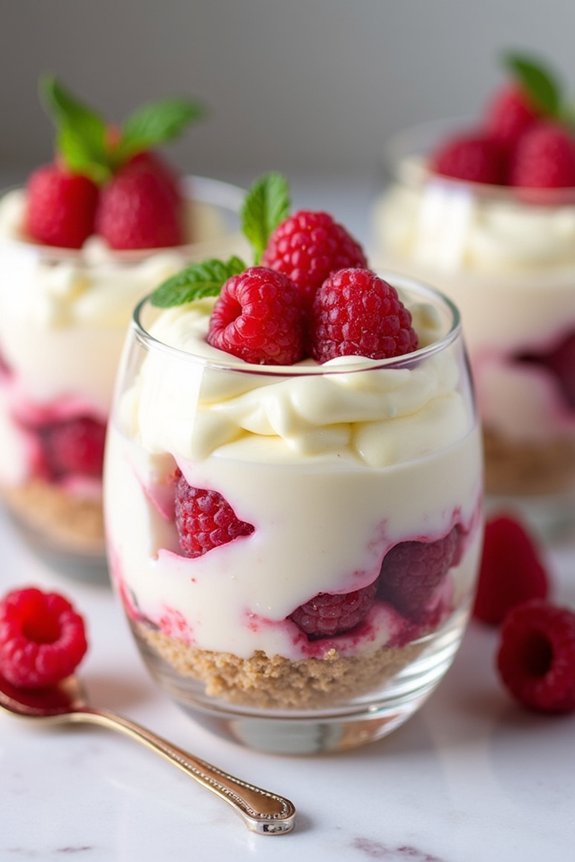
Raspberry and White Chocolate Mousse Parfaits are a delightful way to end a festive meal, combining the tartness of fresh raspberries with the creamy sweetness of white chocolate.
These parfaits aren’t only visually appealing, with their layered colors and textures, but they also offer a luxurious taste that will impress your guests. Perfect for the holiday season, they deliver a sense of indulgence while being light enough to enjoy after a big Christmas dinner.
The combination of white chocolate mousse with raspberry sauce is a classic pairing that balances sweetness and acidity beautifully. The whipped cream adds an airy texture, while the crispy cookie crumble at the bottom adds a satisfying crunch.
Whether you’re hosting a large gathering or a small family dinner, these parfaits make for an elegant dessert that can be prepared ahead of time, allowing you to relax and enjoy the festivities.
Ingredients (Serves 4-6):
- 1 cup fresh raspberries (plus extra for garnish)
- 2 tablespoons sugar
- 1 tablespoon lemon juice
- 8 ounces white chocolate, chopped
- 1 1/2 cups heavy cream, divided
- 1 teaspoon vanilla extract
- 6-8 shortbread cookies, crushed
- Mint leaves for garnish (optional)
Cooking Instructions:
- Prepare the Raspberry Sauce: In a small saucepan, combine 1 cup of fresh raspberries, 2 tablespoons of sugar, and 1 tablespoon of lemon juice. Cook over medium heat, stirring occasionally, until the raspberries break down and the mixture thickens, about 5-7 minutes. Strain the sauce through a fine-mesh sieve to remove seeds and set aside to cool.
- Melt the White Chocolate: Place the chopped white chocolate in a heatproof bowl. In another small saucepan, bring 1/2 cup of heavy cream to just a simmer over medium heat. Pour the hot cream over the white chocolate and let it sit for a minute, then stir until smooth. Allow the mixture to cool slightly.
- Make the White Chocolate Mousse: In a large mixing bowl, whip the remaining 1 cup of heavy cream with a hand mixer or stand mixer until soft peaks form. Gently fold in the vanilla extract and the cooled white chocolate mixture until fully incorporated, being careful not to deflate the cream.
- Assemble the Parfaits: Begin by adding a layer of crushed shortbread cookies at the bottom of each serving glass. Next, add a layer of white chocolate mousse, followed by a layer of raspberry sauce. Repeat the layers until the glasses are full, ending with a layer of mousse.
- Chill and Serve: Refrigerate the parfaits for at least 2 hours to allow the mousse to set. When ready to serve, garnish with fresh raspberries and mint leaves if desired.
Extra Tips: To guarantee the best results, make sure the white chocolate is completely melted and smooth before folding it into the whipped cream. This will help maintain the mousse’s airy texture.
You can prepare the raspberry sauce and crushed cookies a day ahead to save time on the day of serving. Additionally, if you prefer a sweeter mousse, you can add a tablespoon of powdered sugar to the whipped cream before folding in the chocolate. Enjoy these parfaits chilled for the best flavor and texture.
Eggnog Panna Cotta With Spiced Cranberry Sauce

Eggnog Panna Cotta with Spiced Cranberry Sauce is a delightful and festive dessert that combines the creamy texture of panna cotta with the warm, aromatic flavors of eggnog, complemented by a vibrant spiced cranberry sauce. This dish is perfect for a holiday gathering, offering a sophisticated yet approachable end to any Christmas meal.
The panna cotta itself is infused with classic eggnog ingredients like nutmeg, cinnamon, and vanilla, creating a rich and velvety base. The spiced cranberry sauce adds a tart yet sweet contrast, making each spoonful a harmonious blend of holiday flavors.
To make Eggnog Panna Cotta with Spiced Cranberry Sauce for 4-6 people, you’ll need to allow a few hours for the panna cotta to set, so it’s best to start this recipe a day ahead or early in the day you plan to serve it. The preparation is straightforward, but a little patience is required to guarantee the panna cotta achieves the perfect creamy consistency.
The spiced cranberry sauce can be made in advance as well, allowing the flavors to meld together beautifully. Here is the list of ingredients and step-by-step instructions to create this stunning holiday dessert.
Ingredients:
*For the Eggnog Panna Cotta*
- 2 cups heavy cream
- 1 cup eggnog
- 1/2 cup granulated sugar
- 1 teaspoon vanilla extract
- 1/2 teaspoon ground nutmeg
- 1/2 teaspoon ground cinnamon
- 2 1/4 teaspoons (about 1 envelope) unflavored gelatin
- 3 tablespoons cold water
For the Spiced Cranberry Sauce
- 2 cups fresh or frozen cranberries
- 1/2 cup granulated sugar
- 1/2 cup water
- 1 cinnamon stick
- 1/4 teaspoon ground allspice
- 1/4 teaspoon ground cloves
- 1 teaspoon orange zest
- 1 tablespoon orange juice
Instructions:
- Prepare the Gelatin: In a small bowl, sprinkle the gelatin over 3 tablespoons of cold water. Allow it to sit for about 5 minutes to bloom. This step is vital for the gelatin to dissolve properly and guarantee a smooth panna cotta texture.
- Heat the Cream and Eggnog: In a medium saucepan, combine the heavy cream, eggnog, and granulated sugar. Place over medium heat and stir gently until the sugar is fully dissolved. Be careful not to let the mixture boil.
- Incorporate the Gelatin: Once the cream mixture is hot but not boiling, remove it from the heat. Add the bloomed gelatin and stir until completely dissolved. Then, stir in the vanilla extract, ground nutmeg, and ground cinnamon.
- Set the Panna Cotta: Pour the mixture into individual serving molds or ramekins. Allow them to cool slightly before covering with plastic wrap. Refrigerate for at least 4 hours, or until set.
- Make the Spiced Cranberry Sauce: In a medium saucepan, combine the cranberries, sugar, water, cinnamon stick, allspice, cloves, orange zest, and orange juice. Cook over medium heat, stirring occasionally until the cranberries burst and the sauce thickens, about 10-15 minutes. Remove the cinnamon stick and let the sauce cool completely.
- Serve: To serve, run a sharp knife around the edge of each panna cotta and invert onto a serving plate. Top with a generous spoonful of spiced cranberry sauce and garnish with additional orange zest if desired.
Extra Tips: When making panna cotta, guarantee that the gelatin is fully dissolved in the hot cream mixture; any undissolved bits can affect the texture. If you’re concerned about lumps, you can strain the mixture before pouring it into molds.
The spiced cranberry sauce can be made a few days in advance and stored in the refrigerator. This allows the spices to infuse more deeply, enhancing the flavor. Finally, for a smooth release from the molds, dip the bottom of each mold briefly in warm water and gently shake to loosen the panna cotta before inverting onto a plate.
Candy Cane Chocolate Truffles
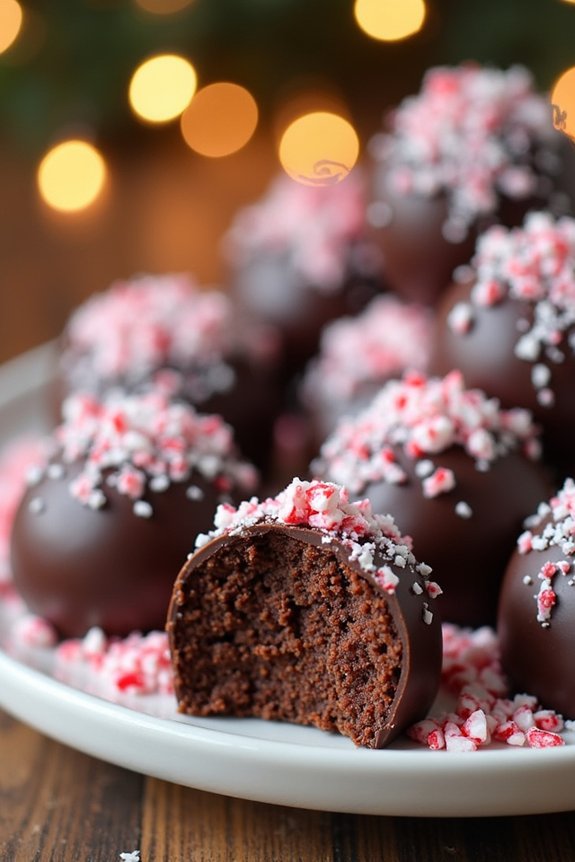
Candy Cane Chocolate Truffles are the perfect festive treat to share with friends and family during the holiday season. With their rich, creamy chocolate center and a revitalizing minty coating, these truffles offer a delightful contrast of flavors and textures. The addition of crushed candy canes not only adds a pop of color but also provides a satisfying crunch, making these truffles a hit at any holiday gathering.
They’re easy to make, require no baking, and can be prepared in advance, allowing you to focus on other holiday preparations. These truffles are a wonderful homemade gift option, beautifully packaged in a decorative box. Whether you enjoy them as an indulgent dessert after Christmas dinner or as a sweet treat to accompany a cup of hot cocoa, Candy Cane Chocolate Truffles are sure to become a holiday favorite.
This recipe will yield approximately 24-30 truffles, making it suitable for serving 4-6 people as a dessert or for gifting.
Ingredients:
- 1 cup heavy cream
- 8 ounces semisweet chocolate, chopped
- 1 teaspoon vanilla extract
- 1/2 teaspoon peppermint extract
- 1/4 cup unsweetened cocoa powder
- 1/2 cup crushed candy canes
Cooking Instructions:
- Preparation of Chocolate Mixture:
- In a small saucepan, heat the heavy cream over medium heat until it just starts to simmer. Don’t let it come to a boil.
- Remove the saucepan from the heat and add the chopped semisweet chocolate. Let it sit for a minute to allow the chocolate to soften.
- Stir the mixture gently until the chocolate is completely melted and smooth.
- Add the vanilla extract and peppermint extract, stirring well to combine.
- Chill the Mixture:
- Transfer the chocolate mixture to a shallow dish or bowl.
- Cover with plastic wrap and refrigerate for about 2 hours, or until the mixture is firm enough to scoop.
- Form the Truffles:
- Once the chocolate mixture is firm, use a small cookie scoop or a teaspoon to scoop out portions of the mixture.
- Roll each portion into a ball between your palms to form smooth truffles.
- Coat the Truffles:
- Place the unsweetened cocoa powder in a shallow dish and the crushed candy canes in another.
- Roll half of the truffles in the cocoa powder and the remaining half in the crushed candy canes, making sure each truffle is evenly coated.
- Serving and Storage:
- Arrange the truffles on a serving platter and serve immediately, or store them in an airtight container in the refrigerator for up to a week.
Extra Tips:
For best results, confirm that the chocolate used is of high quality, as this will greatly impact the taste and texture of your truffles.
When melting the chocolate with the cream, be patient and stir gently to avoid incorporating air bubbles, which can affect the smoothness of the truffles. If you prefer a stronger mint flavor, you can adjust the amount of peppermint extract to your liking.
Additionally, when crushing the candy canes, aim for a mix of smaller pieces and larger shards to give your truffles a more interesting texture.
Snow-Dusted Lemon Tarts
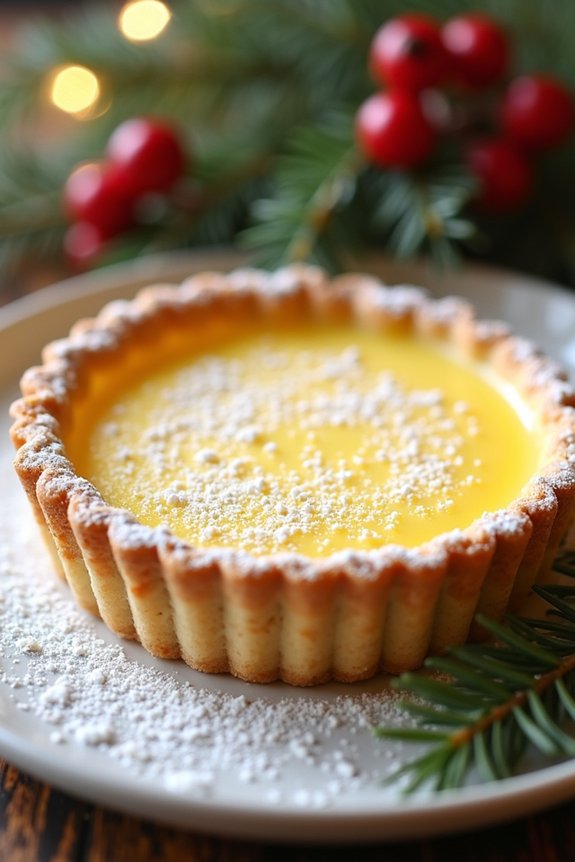
Snow-Dusted Lemon Tarts are a delightful festive dessert that brings a fresh twist to holiday treats. These tarts are perfect for adding a touch of elegance to your Christmas spread, with their tangy lemon filling and a delicate dusting of powdered sugar that resembles freshly fallen snow. The buttery, crumbly tart shell pairs beautifully with the zesty lemon curd, creating a balance of flavors that will leave your guests craving more.
Whether you’re hosting a large gathering or an intimate dinner, these tarts are sure to impress with their stunning presentation and irresistible taste.
The preparation of Snow-Dusted Lemon Tarts isn’t only rewarding but also an enjoyable experience. The recipe involves making a simple tart dough from scratch, which, when baked, provides a perfect base for the luscious lemon filling. The lemon curd is made with fresh lemon juice and zest, giving it a vibrant and revitalizing flavor.
Once the tarts are filled and chilled, they’re dusted with powdered sugar just before serving, adding a festive touch to the presentation. With a serving size perfect for 4-6 people, these tarts are an ideal choice for your holiday dessert table.
Ingredients (Serves 4-6):
- 1 1/2 cups all-purpose flour
- 1/2 cup unsalted butter, chilled and cubed
- 1/4 cup granulated sugar
- 1/4 teaspoon salt
- 3 tablespoons ice water
- 3/4 cup granulated sugar
- 2/3 cup fresh lemon juice (about 4 lemons)
- 1 tablespoon lemon zest
- 3 large eggs
- 1/2 cup unsalted butter, melted
- Powdered sugar for dusting
Instructions:
- Prepare the Tart Shell: In a large mixing bowl, combine the flour, 1/4 cup granulated sugar, and salt. Add the chilled, cubed butter and use a pastry cutter or your fingers to mix until the mixture resembles coarse crumbs. Gradually add the ice water, one tablespoon at a time, mixing just until the dough comes together.
- Chill the Dough: Form the dough into a disk, wrap it in plastic wrap, and refrigerate for at least 30 minutes. This helps the gluten relax and makes the dough easier to roll out.
- Preheat the Oven: Preheat your oven to 375°F (190°C).
- Roll Out and Bake the Tart Shells: On a lightly floured surface, roll out the chilled dough to about 1/8-inch thickness. Cut out circles to fit your tart pans (about 4 inches in diameter). Press the dough into the pans and trim any excess. Prick the bases with a fork, line with parchment paper, and fill with pie weights or dried beans. Bake for 10-12 minutes, then remove the weights and parchment. Continue baking for another 5-7 minutes until lightly golden. Let them cool completely.
- Make the Lemon Curd: In a medium saucepan, whisk together 3/4 cup granulated sugar, lemon juice, and lemon zest over medium heat. Add the eggs and continue whisking until the mixture thickens, about 5-7 minutes. Remove from heat and stir in the melted butter until smooth.
- Fill the Tart Shells: Pour the lemon curd into the cooled tart shells. Smooth the tops with a spatula and refrigerate for at least 1 hour to set.
- Dust with Powdered Sugar: Just before serving, dust the tops of the tarts with powdered sugar using a fine-mesh sieve to create a snow-dusted effect.
Extra Tips:
For the best results, use fresh lemons for both the juice and zest to verify a bright and tangy flavor in the lemon curd. The dough can be made a day in advance and kept chilled until ready to use.
When rolling out the dough, work quickly to prevent the butter from melting. If you don’t have individual tart pans, you can use a muffin tin as an alternative. Finally, dust the tarts with powdered sugar just before serving to maintain the snow-dusted appearance, as it can dissolve if left too long.
Almond and Dark Chocolate Biscotti
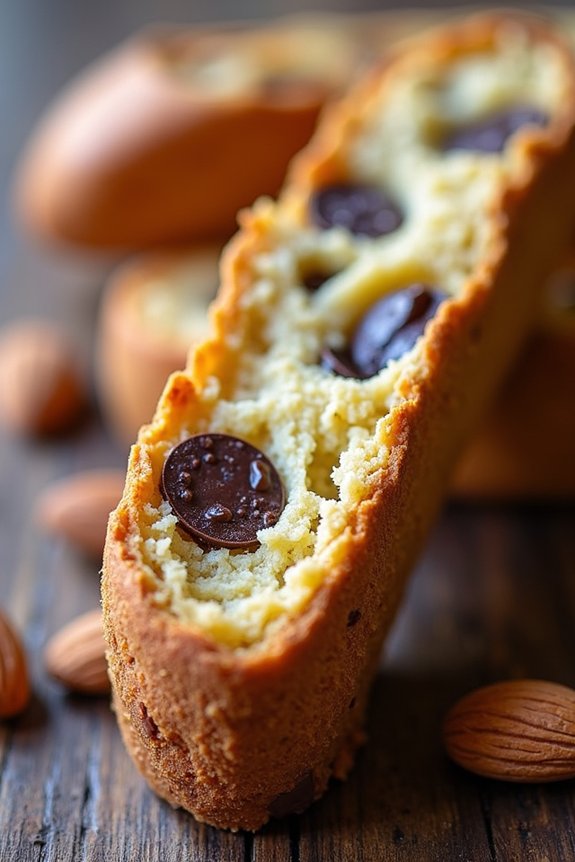
Almond and Dark Chocolate Biscotti are a delightful addition to any holiday dessert spread. These twice-baked Italian cookies are known for their crunchy texture and perfect pairing with coffee or hot cocoa. The combination of nutty almonds and rich dark chocolate creates a wonderfully balanced treat that brings a touch of elegance to your Christmas festivities.
Whether you’re hosting a festive gathering or simply enjoying a quiet evening by the fire, these biscotti are sure to impress and satisfy.
Making Almond and Dark Chocolate Biscotti is a rewarding endeavor that requires basic baking skills and a bit of patience while waiting for the cookies to bake and cool. This recipe yields 24 biscotti, perfect for serving 4-6 people or for sharing as thoughtful homemade gifts.
As you initiate this baking journey, you’ll appreciate the delightful aroma filling your kitchen and the joy of presenting beautifully crafted cookies to your loved ones. Let’s plunge into the ingredients and steps needed to create this holiday treat.
Ingredients (for 4-6 servings):
- 2 cups all-purpose flour
- 1 cup granulated sugar
- 1 teaspoon baking powder
- 1/4 teaspoon salt
- 3 large eggs
- 1 teaspoon vanilla extract
- 1 teaspoon almond extract
- 1 cup whole almonds, toasted and coarsely chopped
- 1 cup dark chocolate chunks or chips
- Egg wash (1 egg beaten with 1 tablespoon of water)
Instructions:
- Preheat the Oven: Start by preheating your oven to 350°F (175°C). Line a baking sheet with parchment paper for easy cleanup.
- Mix Dry Ingredients: In a large bowl, whisk together the flour, sugar, baking powder, and salt until well combined. This guarantees that the baking powder is evenly distributed, which is vital for even rising.
- Prepare Wet Ingredients: In a separate bowl, beat the eggs, vanilla extract, and almond extract together until smooth. This mixture will provide the liquid base for your biscotti dough.
- Combine Ingredients: Gradually add the wet mixture to the dry ingredients, stirring until a dough begins to form. Add in the chopped almonds and dark chocolate chunks, and mix until they’re evenly distributed throughout the dough.
- Shape the Dough: Divide the dough in half and shape each portion into a log, approximately 10 inches long and 3 inches wide. Place the logs on the prepared baking sheet, leaving space between them as they’ll spread slightly during baking.
- First Bake: Brush the logs with the egg wash, which will give them a beautiful golden color. Bake in the preheated oven for 25-30 minutes, or until the logs are firm to the touch and lightly browned.
- Cool and Slice: Remove the logs from the oven and allow them to cool for about 10 minutes. This step is important as it prevents the biscotti from crumbling when you slice them. Once slightly cooled, use a serrated knife to cut the logs into 1/2-inch thick slices.
- Second Bake: Arrange the slices cut side down on the baking sheet. Return them to the oven and bake for an additional 10-15 minutes until they’re crisp and golden brown. Flip the biscotti halfway through the baking time for even crispness.
- Cool Completely: Transfer the biscotti to a wire rack to cool completely. As they cool, they’ll become even more crunchy, achieving the perfect biscotti texture.
Extra Tips:
When making Almond and Dark Chocolate Biscotti, it’s essential to toast the almonds beforehand to enhance their flavor and add an extra layer of crunch to the cookies.
Be mindful not to overbake the biscotti during the second bake; they should be crisp but not hard enough to break a tooth! If you prefer a softer biscotti, reduce the second baking time slightly.
Spiced Orange and Almond Yule Log
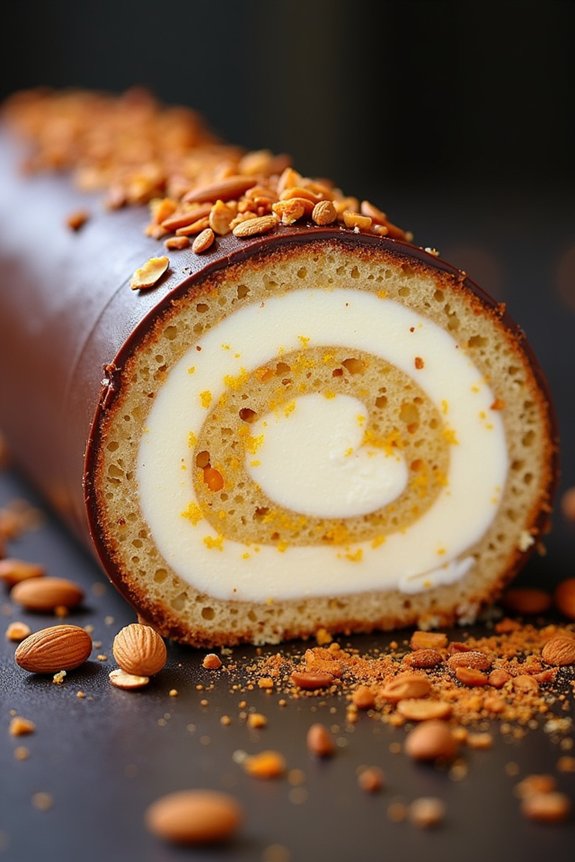
The Spiced Orange and Almond Yule Log is a delightful twist on the traditional Yule Log, offering a festive blend of citrus and nutty flavors perfect for your holiday dessert table.
This elegant dessert combines the warm, spicy notes of cinnamon and nutmeg with the bright zestiness of orange, all nestled within a light almond sponge cake. The luscious cream filling and smooth chocolate ganache coating elevate this Yule Log to an indulgent treat that your family and guests will love.
This recipe serves 4-6 people and is an ideal centerpiece for any Christmas celebration. Whether you’re looking to impress your guests or simply want to indulge in a special holiday treat, this Spiced Orange and Almond Yule Log is sure to be a hit. The combination of flavors and textures creates a harmonious balance that’s both satisfying and invigorating.
Ingredients for Spiced Orange and Almond Yule Log:
- 4 large eggs
- 100g caster sugar
- 1 tsp vanilla extract
- Zest of 1 large orange
- 100g ground almonds
- 50g plain flour
- 1 tsp baking powder
- 1/2 tsp ground cinnamon
- 1/4 tsp ground nutmeg
- A pinch of salt
- 200ml double cream
- 2 tbsp icing sugar
- 1 tbsp orange juice
- 150g dark chocolate, chopped
- 100ml double cream (for ganache)
- 1 tbsp flaked almonds, toasted (for garnish)
Instructions:
- Prepare the sponge cake: Preheat your oven to 180°C (350°F) and line a 23x33cm (9×13 inch) jelly roll pan with baking paper. In a large mixing bowl, whisk together the eggs and caster sugar until thick and pale. Add the vanilla extract and orange zest, mixing well.
- Combine dry ingredients: In a separate bowl, sift together the ground almonds, plain flour, baking powder, cinnamon, nutmeg, and salt. Gently fold the dry ingredients into the egg mixture, being careful not to deflate the batter.
- Bake the sponge: Pour the batter into the prepared pan, spreading it evenly. Bake in the preheated oven for 10-12 minutes or until the cake springs back when gently pressed. Remove from the oven and allow to cool for a few minutes.
- Roll the sponge: While the cake is still warm, turn it out onto a clean tea towel sprinkled with icing sugar. Peel off the baking paper and gently roll the cake up from the short end using the towel. Let it cool completely, rolled up.
- Make the cream filling: In a medium bowl, whip the double cream with icing sugar and orange juice until soft peaks form. Carefully unroll the cooled cake and spread the cream filling evenly over the surface. Re-roll the cake without the towel, leaving it seam side down.
- Prepare the ganache: Place the chopped dark chocolate in a heatproof bowl. Heat the 100ml of double cream until just boiling, then pour it over the chocolate. Let it sit for a few minutes, then stir until smooth and glossy.
- Coat the Yule Log: Pour the ganache over the rolled cake, spreading it with a spatula to cover evenly. Allow the ganache to set slightly before garnishing with toasted flaked almonds.
Extra Tips:
To guarantee your sponge cake is light and airy, make sure to whisk the eggs and sugar until they’re very pale and thick. This will help incorporate air and give the cake its structure.
When rolling the cake, it’s important to do this while it’s still warm to prevent cracking. If you find the sponge is cracking, don’t worry too much, as the ganache and cream will help conceal any imperfections.
Finally, for added citrus flavor, consider adding a bit of orange zest to the ganache or garnish with candied orange peel for an added festive touch.