

As a lover of all things Christmas and a passion for creating festive treats, I’m excited to share 15 vegan dessert recipes that will wow your family and friends, no matter their dietary preferences. Think rich chocolate yule log and vibrant cranberry almond tart, perfect for your holiday table. Each recipe is designed to be simple yet impressive, adding an extra touch of cheer to your celebrations. Can’t wait for you to try these delicious ideas!
Decadent Vegan Chocolate Yule Log
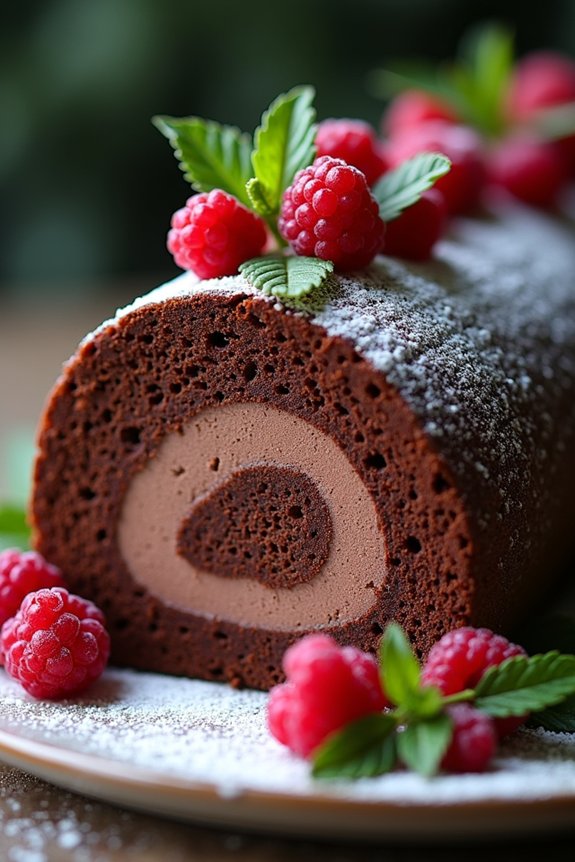
Indulge in the festive spirit with this Decadent Vegan Chocolate Yule Log, a show-stopping dessert that will impress both vegans and non-vegans alike. This plant-based version of the classic holiday treat is rich, creamy, and full of chocolatey goodness, making it the perfect sweet ending to your Christmas dinner.
The combination of a soft, moist chocolate sponge rolled with a luscious vegan chocolate cream filling is sure to delight your taste buds and bring a touch of elegance to your holiday table.
Creating a vegan Yule log may seem intimidating, but with the right ingredients and a little patience, you can whip up this delightful dessert in no time. The key is to use high-quality cocoa powder and vegan butter to achieve that rich chocolate flavor, while aquafaba (chickpea brine) acts as a fantastic egg replacement to guarantee the sponge stays light and fluffy.
Gather your family and friends around, and enjoy the festive season with this indulgent and cruelty-free treat.
Ingredients for 4-6 servings:
- 1 cup all-purpose flour
- 1/3 cup cocoa powder
- 1/2 teaspoon baking powder
- 1/2 teaspoon baking soda
- 1/4 teaspoon salt
- 3/4 cup sugar
- 1/3 cup vegetable oil
- 1/2 cup almond milk
- 1 teaspoon vanilla extract
- 1/4 cup aquafaba (liquid from canned chickpeas)
- 1 cup vegan dark chocolate chips
- 1/2 cup vegan butter
- 1 1/2 cups powdered sugar
- 1 teaspoon instant coffee granules (optional)
- Powdered sugar for dusting
- Fresh berries or mint leaves for decoration (optional)
Cooking Instructions:
- Preheat and Prepare the Baking Sheet: Preheat your oven to 350°F (175°C). Line a 10×15-inch jelly roll pan with parchment paper, making sure to leave some overhang on the sides for easy removal.
- Mix the Dry Ingredients: In a large mixing bowl, sift together the flour, cocoa powder, baking powder, baking soda, and salt. Whisk until well combined.
- Combine Wet Ingredients: In another bowl, whisk together the sugar, vegetable oil, almond milk, and vanilla extract until smooth. Add the aquafaba and whisk until frothy.
- Create the Batter: Gradually add the dry ingredients to the wet mixture, stirring gently until just combined. Be careful not to overmix to keep the batter light.
- Bake the Sponge: Pour the batter into the prepared pan and spread evenly. Bake in the preheated oven for 12-15 minutes, or until a toothpick inserted into the center comes out clean. Let it cool slightly.
- Prepare the Chocolate Filling: In a heatproof bowl, melt the vegan dark chocolate chips and vegan butter over a pot of simmering water, stirring until smooth. Remove from heat and let cool for a few minutes. Stir in the powdered sugar and instant coffee granules (if using) until well combined.
- Roll the Cake: While the sponge is still slightly warm, carefully invert it onto another piece of parchment paper dusted with powdered sugar. Peel off the top parchment and, starting from a short edge, gently roll the sponge into a log shape with the parchment inside. Let it cool completely.
- Assemble the Yule Log: Unroll the cooled sponge and spread the chocolate filling evenly over the surface, leaving a small border around the edges. Re-roll the sponge without the parchment, and place seam-side down on a serving platter.
- Decorate: Dust the Yule log with powdered sugar and decorate with fresh berries or mint leaves if desired. Slice and serve.
Extra Tips:
When making the chocolate filling, make sure the melted chocolate mixture is cooled slightly before adding the powdered sugar to prevent it from melting further.
If the sponge cracks slightly when rolling, don’t worry, as the cracks can be disguised with decorations and dusting of powdered sugar. For a firmer filling, refrigerate the Yule log for an hour before serving. Enjoy this delightful vegan dessert with a warm cup of coffee or hot cocoa for the ultimate holiday experience.
Festive Cranberry Almond Tart
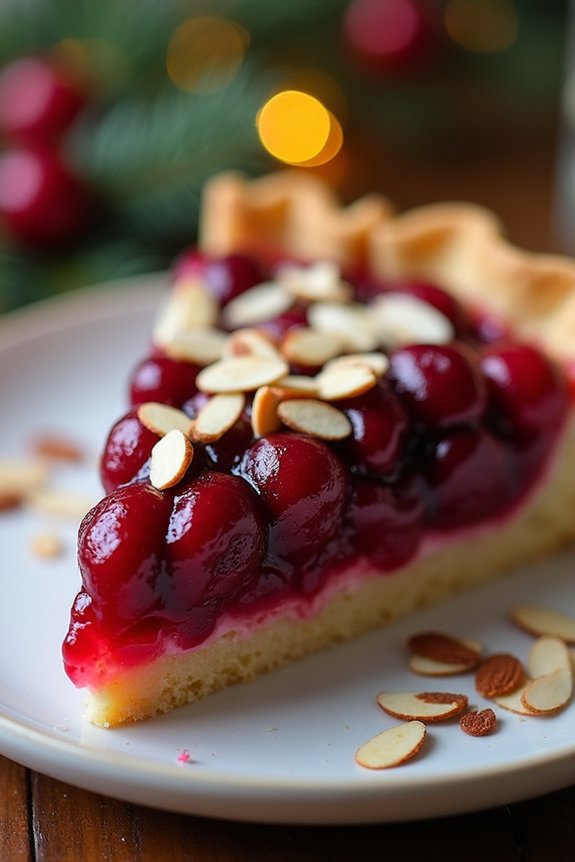
Indulge in the perfect holiday treat with this Festive Cranberry Almond Tart, a delightful vegan dessert that will add a touch of elegance to your Christmas table. With its vibrant colors and rich flavors, this tart combines the tartness of fresh cranberries with the sweet, nutty taste of almonds, all encased in a crisp, buttery crust.
It’s a show-stopping dessert that will impress your guests, and it’s entirely plant-based, guaranteeing everyone can enjoy a slice of festive cheer.
This tart features a simple almond crust that’s both tender and flaky, filled with a luscious cranberry almond filling. The combination of fresh cranberries, almond flour, and a hint of orange zest creates a harmonious blend of flavors that’s both warming and invigorating.
Perfect for a serving size of 4-6 people, this dessert isn’t only delicious but also easy to make, guaranteeing you have more time to spend with your loved ones during the holiday season.
Ingredients:
- 1 1/2 cups almond flour
- 1/2 cup all-purpose flour
- 1/4 cup coconut oil, melted
- 1/4 cup maple syrup
- 1/2 teaspoon salt
- 2 cups fresh cranberries
- 1/2 cup granulated sugar
- 1/4 cup orange juice
- 1 tablespoon orange zest
- 1/4 cup almond milk
- 1 teaspoon vanilla extract
- 1 tablespoon cornstarch
Instructions:
- Prepare the Crust:
- Preheat your oven to 350°F (175°C). In a medium mixing bowl, combine the almond flour, all-purpose flour, melted coconut oil, maple syrup, and salt. Mix until the dough holds together when pressed.
- Form the Crust:
- Press the dough evenly into the bottom and up the sides of a 9-inch tart pan with a removable bottom. Prick the bottom with a fork to prevent bubbling. Place the tart pan on a baking sheet and bake for 10-12 minutes, or until lightly golden. Remove from the oven and let it cool.
- Make the Filling:
- In a medium saucepan over medium heat, combine the cranberries, granulated sugar, orange juice, and orange zest. Cook, stirring occasionally, until the cranberries start to pop and the mixture thickens, about 8-10 minutes.
- Thicken the Filling:
- In a small bowl, whisk together the almond milk, vanilla extract, and cornstarch until smooth. Add this mixture to the saucepan and cook, stirring constantly, until the filling thickens further and becomes glossy, about 2-3 minutes.
- Assemble the Tart:
- Pour the cranberry mixture into the prepared crust, spreading it evenly. Return the tart to the oven and bake for an additional 15 minutes, or until the filling is set.
- Cool and Serve:
- Allow the tart to cool completely on a wire rack before removing it from the pan. Serve at room temperature or chilled, garnished with a sprinkle of sliced almonds if desired.
Extra Tips:
When preparing the crust, guarantee that all ingredients are well combined to prevent it from crumbling. If the dough feels too dry, add a little more coconut oil or maple syrup to help it bind.
For an extra festive touch, consider decorating the top of the tart with sugared cranberries or a dusting of powdered sugar before serving. This tart can be made a day in advance and stored in the refrigerator, making it a convenient option for busy holiday schedules.
Spiced Gingerbread Cupcakes
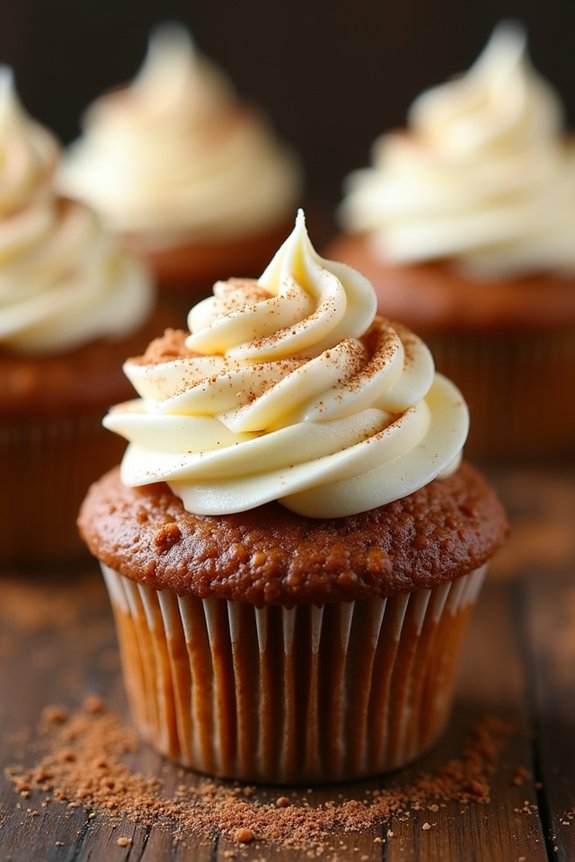
Spiced Gingerbread Cupcakes are a delightful addition to any vegan Christmas dessert menu. These festive cupcakes incorporate the warm and inviting flavors of ginger, cinnamon, and nutmeg to create a comforting treat that’s perfect for the holiday season. The moist and fluffy texture of these cupcakes is achieved without the use of any animal products, making them suitable for those following a vegan lifestyle. Topped with a creamy vegan frosting, these cupcakes are sure to be a hit at your holiday gathering.
Not only are these Spiced Gingerbread Cupcakes delicious, but they’re also relatively easy to make. Using simple ingredients, you can whip up a batch of these flavorful treats in no time. Whether you’re serving them at a holiday party or enjoying them with a cup of tea by the fireplace, these cupcakes will fill your home with the wonderful aroma of spices and holiday cheer. The following recipe serves 4-6 people, guaranteeing there’s enough to share with friends and family.
Ingredients:
- 1 1/2 cups all-purpose flour
- 1 teaspoon baking soda
- 1/2 teaspoon baking powder
- 1 teaspoon ground ginger
- 1 teaspoon ground cinnamon
- 1/2 teaspoon ground nutmeg
- 1/4 teaspoon ground cloves
- 1/4 teaspoon salt
- 1/2 cup brown sugar
- 1/2 cup unsweetened applesauce
- 1/4 cup molasses
- 1/3 cup vegetable oil
- 1/2 cup almond milk
- 1 teaspoon vanilla extract
Cooking Instructions:
- Preheat the Oven: Begin by preheating your oven to 350°F (175°C) and line a cupcake tray with paper liners. This guarantees that your cupcakes bake evenly and come out easily after baking.
- Mix Dry Ingredients: In a large mixing bowl, sift together the all-purpose flour, baking soda, baking powder, ground ginger, cinnamon, nutmeg, cloves, and salt. Mixing the dry ingredients first guarantees that the spices are evenly distributed throughout the batter.
- Combine Wet Ingredients: In a separate bowl, whisk together the brown sugar, applesauce, molasses, vegetable oil, almond milk, and vanilla extract until well combined. This mixture will add moisture and sweetness to your cupcakes.
- Combine Mixtures: Gradually add the wet ingredients to the dry ingredients, stirring gently until just combined. Be careful not to overmix, as this can result in dense cupcakes.
- Fill Cupcake Liners: Carefully spoon the batter into the prepared cupcake liners, filling each one about 2/3 full. This allows room for the cupcakes to rise without overflowing.
- Bake: Place the tray in the preheated oven and bake for 18-20 minutes, or until a toothpick inserted into the center of a cupcake comes out clean. This indicates that your cupcakes are fully baked.
- Cool: Allow the cupcakes to cool in the tray for a few minutes before transferring them to a wire rack to cool completely. This prevents the bottoms from becoming soggy.
- Frost: Once cooled, frost the cupcakes with your favorite vegan frosting. You can use store-bought frosting or make your own by whipping together vegan butter, powdered sugar, and a splash of almond milk.
Extra Tips:
When preparing Spiced Gingerbread Cupcakes, confirm that all ingredients are at room temperature before mixing. This allows them to combine more effectively, resulting in a smoother batter.
If you prefer a stronger spice flavor, you can adjust the quantity of ginger or cinnamon to suit your taste. Additionally, for a decorative touch, consider sprinkling the frosted cupcakes with a bit of cinnamon or nutmeg.
Finally, these cupcakes can be stored in an airtight container for up to three days, making them a convenient make-ahead option for busy holiday schedules.
Vegan Eggnog Cheesecake Bars
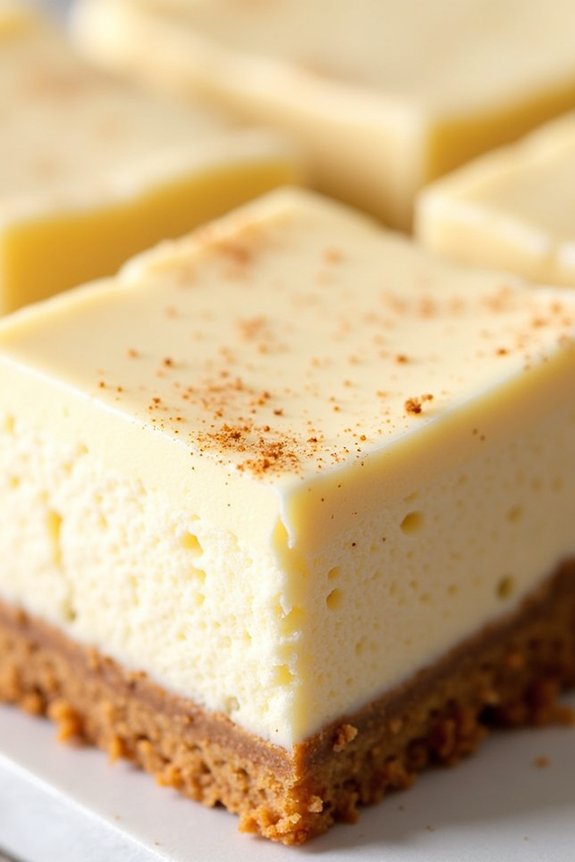
Indulge in the festive spirit with these delectable Vegan Eggnog Cheesecake Bars, a perfect dessert to elevate your holiday celebrations. These bars combine the classic flavors of eggnog and creamy cheesecake, all without any animal products, making them a delightful treat for everyone at your table.
The smooth filling, spiced with nutmeg and cinnamon, sits on a crunchy graham cracker crust, offering a satisfying blend of textures and flavors. Whether you’re hosting a gathering or simply want to enjoy a sweet treat, these bars are bound to be a hit.
Creating these Vegan Eggnog Cheesecake Bars is a relatively simple process that doesn’t require any fancy equipment. You’ll need a few key ingredients to achieve that authentic eggnog taste and a creamy consistency.
These bars are great for serving to a small group of 4-6 people, guaranteeing that everyone gets a generous portion. With a little patience and some time in the fridge to set, you’ll have a dessert that looks as impressive as it tastes.
Ingredients (Serves 4-6):
- 1 1/2 cups vegan graham cracker crumbs
- 1/4 cup coconut oil, melted
- 16 oz vegan cream cheese, softened
- 1 cup canned coconut milk
- 1/2 cup maple syrup
- 1/4 cup cornstarch
- 1 tsp vanilla extract
- 1/2 tsp ground nutmeg
- 1/2 tsp ground cinnamon
- Pinch of sea salt
Instructions:
- Prepare the Crust: Preheat your oven to 350°F (175°C). In a medium-sized bowl, combine the vegan graham cracker crumbs and melted coconut oil. Mix until the crumbs are evenly coated and the mixture resembles wet sand.
- Form the Crust: Press the crumb mixture firmly into the bottom of an 8×8-inch baking dish lined with parchment paper. Use the back of a spoon to smooth it out into an even layer. Bake in the preheated oven for 8-10 minutes, or until slightly golden. Remove from the oven and let it cool slightly.
- Make the Filling: In a large mixing bowl, beat the vegan cream cheese with an electric mixer until smooth. Add the coconut milk, maple syrup, cornstarch, vanilla extract, ground nutmeg, ground cinnamon, and a pinch of sea salt. Mix until well combined and creamy.
- Assemble the Bars: Pour the cheesecake filling over the cooled crust in the baking dish. Spread it out evenly using a spatula to cover the crust completely.
- Bake the Cheesecake: Place the baking dish back into the oven and bake for 30-35 minutes, or until the edges are set and the center is slightly jiggly. Remove from the oven and let it cool to room temperature.
- Chill the Cheesecake: Once cooled, cover the dish with plastic wrap and refrigerate for at least 4 hours, or overnight, to allow the cheesecake to set properly.
- Serve and Enjoy: Once set, slice the cheesecake into bars and serve chilled. Optionally, sprinkle with additional nutmeg or cinnamon before serving for extra flavor.
Extra Tips: To achieve the creamiest filling, make sure your vegan cream cheese is at room temperature before mixing. This will help prevent lumps and provide a smooth consistency.
If you find that the edges of your cheesecake are browning too quickly during baking, you can cover the dish with aluminum foil halfway through the baking time. Additionally, allowing the cheesecake to chill overnight will yield the best results, as this gives the flavors time to meld and the texture to firm up perfectly.
Chocolate-Dipped Peppermint Cookies

The Vegan Chocolate-Dipped Peppermint Cookies are a delightful and festive treat perfect for the holiday season. These cookies combine the invigorating taste of peppermint with the rich, decadent flavor of chocolate, making them an irresistible addition to your Christmas dessert table. Not only are they delicious, but they’re also free from animal products, making them suitable for vegans and those with dairy or egg allergies.
Crafted with a simple vegan cookie base, these cookies are infused with peppermint extract for a holiday twist. Once baked to perfection, they’re dipped in a luscious vegan chocolate coating and sprinkled with crushed peppermint candies for a beautiful and crunchy finish. Enjoy these cookies with a warm cup of cocoa, and share them with loved ones to spread holiday cheer.
Ingredients for 4-6 servings:
- 1 cup all-purpose flour
- 1/3 cup maple syrup
- 1/2 cup vegan butter, softened
- 1 teaspoon vanilla extract
- 1 teaspoon peppermint extract
- 1/4 teaspoon salt
- 1/2 cup vegan chocolate chips
- 1 tablespoon coconut oil
- 1/4 cup crushed peppermint candies
Instructions:
- Prepare the Cookie Dough: In a large mixing bowl, combine the softened vegan butter, maple syrup, vanilla extract, and peppermint extract. Mix until well incorporated and creamy in texture.
- Add Dry Ingredients: Gradually add the all-purpose flour and salt to the wet mixture. Stir until a soft dough forms. You may need to use your hands to confirm all ingredients are fully combined.
- Chill the Dough: Wrap the dough in plastic wrap and refrigerate for at least 30 minutes. This will make it easier to handle and help the cookies keep their shape.
- Preheat the Oven: Preheat your oven to 350°F (175°C) and line a baking sheet with parchment paper.
- Shape the Cookies: Once the dough is chilled, roll it out on a lightly floured surface to about 1/4-inch thickness. Use a cookie cutter to cut out shapes, and place them on the prepared baking sheet.
- Bake the Cookies: Bake in the preheated oven for 10-12 minutes, or until the edges are lightly golden. Remove from the oven and let them cool completely on a wire rack.
- Melt the Chocolate: In a microwave-safe bowl, combine the vegan chocolate chips and coconut oil. Microwave in 30-second intervals, stirring in between, until the chocolate is fully melted and smooth.
- Dip and Decorate: Dip each cooled cookie halfway into the melted chocolate, allowing any excess to drip off. Place them back on the parchment-lined baking sheet and sprinkle with crushed peppermint candies immediately.
- Set the Cookies: Allow the chocolate to set completely at room temperature or place the cookies in the refrigerator for faster setting.
Extra Tips:
When making these cookies, confirm your vegan butter is softened, not melted, to achieve the best texture for the dough. Chilling the dough is essential, as it prevents the cookies from spreading too much during baking.
If you prefer a stronger peppermint flavor, you can increase the peppermint extract slightly, but be cautious as it can quickly become overpowering. For a gluten-free version, substitute the all-purpose flour with a gluten-free flour blend, adjusting the consistency of the dough if necessary.
Enjoy these festive cookies with friends and family for a truly merry vegan Christmas!
Vegan Sticky Toffee Pudding

Vegan Sticky Toffee Pudding is a delightful dessert that brings a plant-based twist to a classic British treat. This rich, moist pudding is infused with the warm flavors of dates and covered in a luscious toffee sauce, making it an irresistible addition to any festive feast. Perfect for serving as a centerpiece dessert during the holiday season, this vegan version guarantees that everyone at the table can indulge in a sweet, comforting treat without compromising on dietary choices.
The pudding itself is made using wholesome ingredients like dates, almond milk, and whole wheat flour, which come together to create a soft and dense cake-like texture. The toffee sauce, made from coconut cream and brown sugar, adds a beautiful caramel finish that perfectly complements the flavors of the pudding. Whether you’re hosting a Christmas party or having a cozy family dinner, this Vegan Sticky Toffee Pudding is sure to impress your guests with its decadent taste and elegant presentation.
Ingredients for 4-6 Servings:
- 1 cup pitted dates, chopped
- 1 cup almond milk
- 1 teaspoon vanilla extract
- 1 teaspoon baking soda
- 1 cup whole wheat flour
- 1 teaspoon baking powder
- 1/4 teaspoon salt
- 1/2 cup coconut sugar
- 1/4 cup vegan butter, melted
- 1/4 cup unsweetened applesauce
For the Toffee Sauce:
- 1 cup coconut cream
- 1/2 cup brown sugar
- 1/4 cup vegan butter
- 1 teaspoon vanilla extract
- Pinch of salt
Cooking Instructions:
- Preheat the Oven: Begin by preheating your oven to 350°F (175°C). Grease a baking dish or a 9-inch round cake pan with vegan butter or line it with parchment paper for easy removal.
- Prepare the Dates: In a small saucepan, combine the chopped dates and almond milk. Heat the mixture over medium heat until it starts to simmer. Remove from heat and stir in the vanilla extract and baking soda. Let it sit for about 10 minutes, allowing the dates to soften and the mixture to cool.
- Mix Dry Ingredients: In a large mixing bowl, whisk together the whole wheat flour, baking powder, salt, and coconut sugar until well combined.
- Combine Wet and Dry Ingredients: Add the melted vegan butter and applesauce to the softened date mixture. Stir to combine, then pour this wet mixture into the bowl with the dry ingredients. Gently fold the ingredients together until just combined, being careful not to overmix.
- Bake the Pudding: Pour the batter into the prepared baking dish, smoothing the top with a spatula. Bake in the preheated oven for 25-30 minutes, or until a toothpick inserted into the center comes out clean.
- Make the Toffee Sauce: While the pudding is baking, prepare the toffee sauce. In a small saucepan, combine the coconut cream, brown sugar, vegan butter, and a pinch of salt. Cook over medium heat, stirring frequently, until the mixture comes to a boil. Reduce the heat and let it simmer for 5 minutes, or until slightly thickened. Stir in the vanilla extract and remove from heat.
- Serve: Once the pudding is done, let it cool for a few minutes before slicing. Serve warm, drizzled generously with the toffee sauce. For an extra indulgent touch, pair it with a scoop of vegan vanilla ice cream.
Extra Tips:
For the best results, use fresh, soft dates such as Medjool, as they provide the ideal texture and sweetness for the pudding. If your dates are a bit dry, consider soaking them in hot water for a few minutes before using.
Additionally, to guarantee your toffee sauce has a smooth texture, make sure the coconut cream is well-mixed, with no solidified parts before heating. Finally, if you prefer a nutty flavor, try adding a handful of chopped walnuts or pecans to the batter before baking. Enjoy your delicious vegan sticky toffee pudding!
Cranberry Orange Bundt Cake
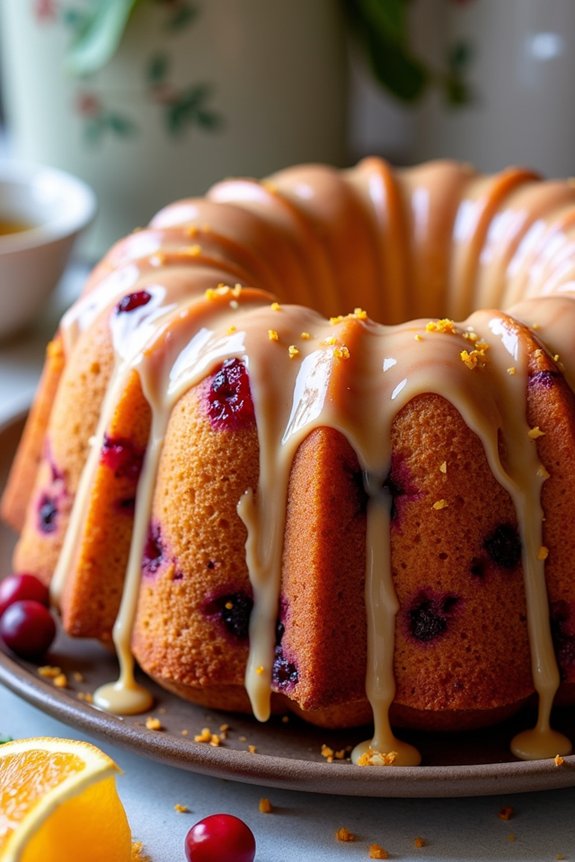
Indulge in the festive spirit with a delightful Vegan Cranberry Orange Bundt Cake, a perfect centerpiece for your holiday dessert table. This cake boasts a moist and tender crumb, infused with the tangy zest of fresh oranges and the vibrant tartness of cranberries. The luscious glaze drizzled on top adds just the right amount of sweetness to balance the flavors, making it a treat everyone can enjoy, regardless of dietary preferences.
Whether you’re hosting a Christmas gathering or simply want to enjoy a slice of holiday joy, this vegan bundt cake is sure to impress.
The Vegan Cranberry Orange Bundt Cake isn’t only a feast for the taste buds but also a beautiful visual delight. The bundt shape provides an elegant presentation, while the contrasting colors of the cranberries and orange zest create a festive look.
With simple ingredients and easy-to-follow steps, this recipe guarantees that even novice bakers can achieve a stunning result. So gather your ingredients and get ready to bake a cake that’s as lovely as it’s delicious.
Ingredients (Serves 4-6):
- 2 cups all-purpose flour
- 1 cup granulated sugar
- 1 teaspoon baking soda
- 1/2 teaspoon baking powder
- 1/2 teaspoon salt
- 1/2 cup unsweetened applesauce
- 1/2 cup almond milk (or any plant-based milk)
- 1/3 cup vegetable oil
- 1 tablespoon apple cider vinegar
- 1 tablespoon vanilla extract
- Zest of 1 large orange
- 1 cup fresh or frozen cranberries
For the Glaze:
- 1 cup powdered sugar
- 2 tablespoons orange juice
- Zest of 1/2 orange
Instructions:
- Preheat and Prepare the Pan: Preheat your oven to 350°F (175°C). Grease a bundt pan thoroughly with vegetable oil or a non-stick spray to guarantee the cake releases easily after baking.
- Mix Dry Ingredients: In a large mixing bowl, whisk together the all-purpose flour, granulated sugar, baking soda, baking powder, and salt until well combined.
- Combine Wet Ingredients: In a separate bowl, mix the applesauce, almond milk, vegetable oil, apple cider vinegar, vanilla extract, and orange zest. Stir until everything is well incorporated.
- Create the Batter: Gradually add the wet ingredients to the dry ingredients, stirring gently with a spatula or wooden spoon until just combined. Be careful not to overmix, as this could make the cake dense.
- Fold in the Cranberries: Gently fold in the cranberries, ensuring they’re evenly distributed throughout the batter.
- Transfer and Bake: Pour the batter into the prepared bundt pan, smoothing the top with a spatula. Bake in the preheated oven for 40-45 minutes, or until a toothpick inserted into the center comes out clean.
- Cool the Cake: Allow the cake to cool in the pan for about 15 minutes. Then, carefully invert it onto a wire rack to cool completely.
- Prepare the Glaze: In a small bowl, whisk together the powdered sugar, orange juice, and orange zest until smooth and pourable.
- Glaze the Cake: Once the cake is completely cooled, drizzle the glaze over the top, allowing it to cascade down the sides for a beautiful finish.
Extra Tips:
To guarantee your Vegan Cranberry Orange Bundt Cake is a success, make sure the cranberries are well-dusted with flour before folding them into the batter; this helps prevent them from sinking to the bottom during baking.
If using frozen cranberries, don’t thaw them before adding to the batter to avoid bleeding into the cake. For an extra burst of flavor, consider adding a teaspoon of ground cinnamon or nutmeg to the batter.
Finally, let the cake cool completely before glazing to avoid a runny glaze and ensure it adheres properly. Enjoy this holiday delight with your loved ones!
No-Bake Chocolate Hazelnut Tart
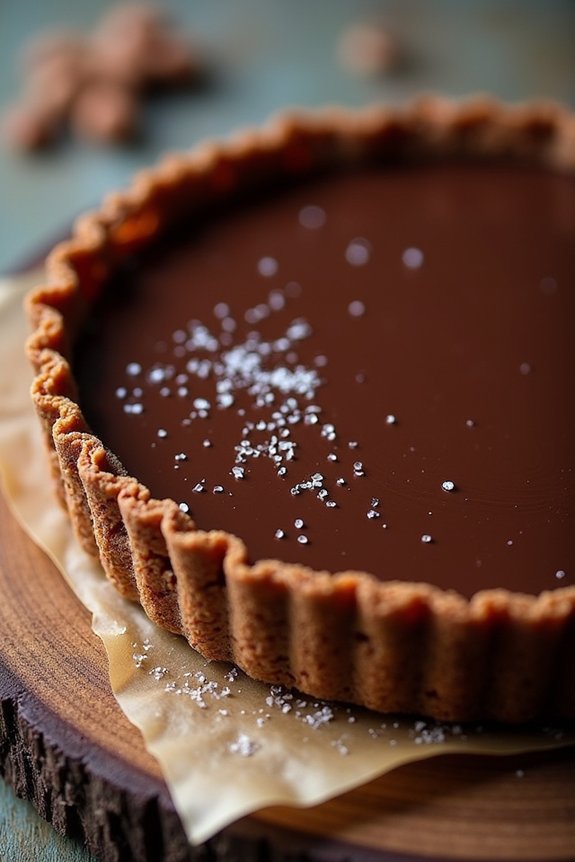
Indulge in a delectable and festive No-Bake Chocolate Hazelnut Tart this Christmas season. This vegan dessert isn’t only delicious but also remarkably simple to prepare, making it a perfect choice for a stress-free holiday treat.
With a rich, creamy chocolate filling and a crunchy hazelnut base, this tart is sure to impress your family and friends, even those who aren’t following a vegan diet. The best part? You won’t need to turn on your oven, leaving you with more time to enjoy the holiday festivities.
The No-Bake Chocolate Hazelnut Tart combines the luxurious flavors of chocolate and hazelnuts, creating a perfect harmony of taste and texture. The crust, made from crushed hazelnuts and dates, is naturally sweet and nutty, providing the perfect contrast to the smooth, decadent chocolate filling.
Garnished with a sprinkle of sea salt or a dusting of cocoa powder, this tart isn’t only a feast for the taste buds but also a visual delight. Whether you’re hosting a holiday gathering or simply want to treat yourself, this tart is a delightful and easy addition to your Christmas dessert lineup.
Servings: 4-6
Ingredients:
- 1 cup hazelnuts, roasted
- 1 cup pitted Medjool dates
- 2 tablespoons cocoa powder
- 1 tablespoon coconut oil, melted
- 1/4 teaspoon salt
- 1 cup full-fat coconut milk
- 200 grams dark chocolate, chopped
- 1/4 cup maple syrup
- 1 teaspoon vanilla extract
- Sea salt or cocoa powder for garnish
Instructions:
1. Prepare the Crust:
Begin by placing the roasted hazelnuts in a food processor. Pulse until finely ground, then add the pitted dates, cocoa powder, melted coconut oil, and salt. Blend until the mixture is sticky and holds together when pressed.
2. Form the Base:
Press the crust mixture evenly into the bottom and up the sides of a 9-inch tart pan with a removable bottom. Confirm the base is compact and evenly distributed. Place the tart pan in the refrigerator while you prepare the filling.
3. Make the Chocolate Filling:
In a small saucepan, heat the coconut milk over medium heat until it just begins to simmer. Remove from heat and add the chopped dark chocolate, stirring until completely melted and smooth. Add the maple syrup and vanilla extract, mixing until well combined.
4. Assemble the Tart:
Pour the chocolate filling over the prepared crust, spreading it evenly with a spatula. Tap the tart gently on the counter to remove any air bubbles and confirm a smooth surface.
5. Chill the Tart:
Refrigerate the tart for at least 4 hours, or until the filling is set and firm to the touch.
6. Garnish and Serve:
Before serving, garnish the tart with a light sprinkle of sea salt or a dusting of cocoa powder for a festive touch. Slice and serve chilled.
Extra Tips:
For an even more pronounced hazelnut flavor, consider toasting the hazelnuts before using them in the crust. Simply spread them on a baking sheet and toast in an oven at 350°F (175°C) for about 10 minutes, or until fragrant. Allow them to cool before processing.
Additionally, confirm your dates are fresh and moist for easy blending. If they seem dry, soak them in warm water for a few minutes before use and then drain thoroughly.
Finally, when choosing dark chocolate, opt for one with at least 70% cocoa content for a rich, intense flavor that complements the sweetness of the dates and maple syrup.
Vegan Snowball Cookies
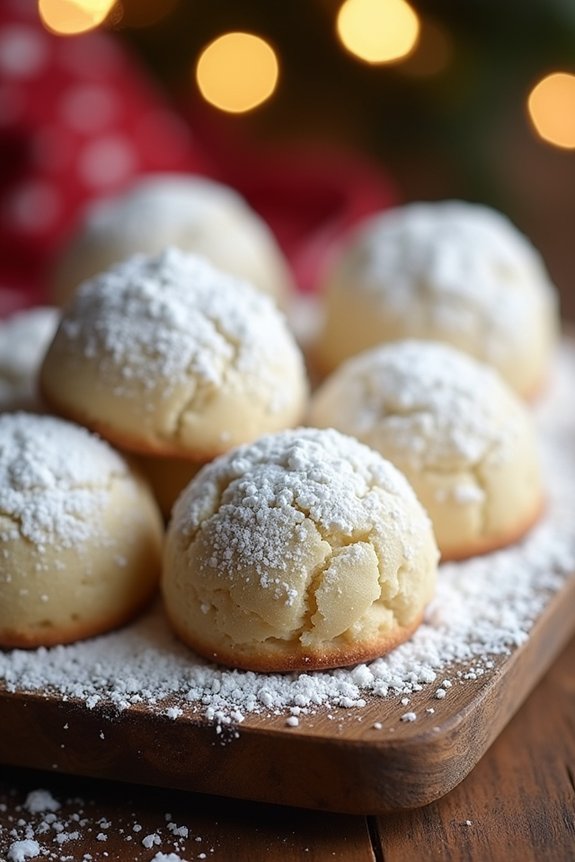
Vegan Snowball Cookies are the perfect festive treat to add to your holiday dessert spread. These delightful little cookies are known for their melt-in-your-mouth texture and their snowy powdered sugar coating, reminiscent of freshly fallen snow.
They’re not only vegan-friendly but also incredibly easy to make, making them a great option for both experienced bakers and those who are new to the kitchen. Whether you’re serving them at a holiday gathering or gifting them in a festive tin, these cookies are sure to be a hit with everyone who tries them.
These cookies, sometimes referred to as Russian tea cakes or Mexican wedding cookies, are traditionally made with butter and nuts. However, this vegan version swaps out the butter for a plant-based alternative and uses simple ingredients that you might already have in your pantry.
The result is a nutty, sweet, and tender cookie that captures the essence of the original while aligning with a plant-based lifestyle. Serve these cookies alongside a warm cup of tea or coffee for a cozy holiday treat.
Ingredients (serving size: 4-6 people):
- 1 cup vegan butter, softened
- 1/2 cup powdered sugar, plus extra for coating
- 2 teaspoons vanilla extract
- 2 cups all-purpose flour
- 1 cup finely chopped nuts (such as pecans or walnuts)
- 1/4 teaspoon salt
Cooking Instructions:
- Preheat and Prepare: Preheat your oven to 350°F (175°C) and line a baking sheet with parchment paper to prevent sticking.
- Cream the Butter and Sugar: In a large mixing bowl, cream together the softened vegan butter and 1/2 cup of powdered sugar until the mixture is light and fluffy. This typically takes about 2-3 minutes with an electric mixer.
- Add Vanilla: Mix in the vanilla extract until fully incorporated. This will add a lovely aromatic flavor to your cookies.
- Combine Dry Ingredients: In a separate bowl, combine the flour, chopped nuts, and salt. Stir to make certain the nuts are evenly distributed throughout the flour.
- Mix Dry and Wet Ingredients: Gradually add the dry ingredients to the butter mixture, mixing until a dough forms. The dough should be firm enough to hold its shape but soft enough to handle.
- Shape and Bake: Roll the dough into 1-inch balls and place them on the prepared baking sheet about 1 inch apart. Bake in the preheated oven for 12-15 minutes, or until the cookies are lightly golden on the bottom.
- Cool and Coat: Allow the cookies to cool on the baking sheet for about 5 minutes. While still warm, roll each cookie in the extra powdered sugar to give them their signature “snowball” appearance. For an extra snowy effect, you can roll them a second time once they’re completely cool.
Extra Tips:
For the best results, make sure your vegan butter is softened to room temperature before you begin mixing. This will help achieve the perfect creamy consistency when combined with the powdered sugar.
When choosing nuts, pecans and walnuts both work well, but feel free to experiment with your favorite nuts or a combination for a unique flavor. If you’re storing the cookies, place them in an airtight container to keep them fresh and dust with additional powdered sugar just before serving if needed.
Enjoy these Vegan Snowball Cookies as a delightful addition to your holiday festivities!
Spiced Apple Crumble Pie

Spiced Apple Crumble Pie is a delightful vegan treat that combines the comforting flavors of apples and spices with a crumbly, buttery topping. Perfect for the holiday season, this pie is sure to impress both vegans and non-vegans alike.
The tender apple filling is seasoned with warming spices and topped with a crunchy, golden crumble, making it a perfect indulgence for a festive gathering or a cozy night in. This recipe serves 4-6 people and is designed to satisfy your sweet tooth while remaining entirely plant-based.
Whether you’re serving it with vegan ice cream or a dollop of dairy-free whipped cream, this Spiced Apple Crumble Pie is a versatile dessert that’s sure to become a holiday favorite. Gather your ingredients and get ready to bake a pie that’s both simple to prepare and delightfully satisfying.
Ingredients:
For the Apple Filling:
- 6 medium-sized apples (Granny Smith or Honeycrisp recommended), peeled, cored, and sliced
- 1/4 cup coconut sugar
- 1 tablespoon lemon juice
- 1 teaspoon ground cinnamon
- 1/4 teaspoon ground nutmeg
- 1/4 teaspoon ground ginger
- 1 tablespoon cornstarch
For the Crumble Topping:
- 1 cup rolled oats
- 1/2 cup almond flour
- 1/3 cup coconut sugar
- 1/2 cup cold vegan butter, cubed
- 1 teaspoon ground cinnamon
- A pinch of salt
For the Pie Crust:
- 1 1/4 cups all-purpose flour
- 1/4 teaspoon salt
- 1/3 cup cold vegan butter, cubed
- 3-4 tablespoons ice water
Instructions:
- Prepare the Pie Crust:
- In a large bowl, combine the flour and salt. Add in the cold vegan butter cubes.
- Using a pastry cutter or your fingers, cut the butter into the flour until the mixture resembles coarse crumbs.
- Gradually add in ice water, one tablespoon at a time, until the dough comes together into a ball. Avoid over-mixing.
- Wrap the dough in plastic wrap and refrigerate for at least 30 minutes.
- Preheat the Oven:
- Preheat your oven to 375°F (190°C).
- Prepare the Apple Filling:
- In a large mixing bowl, toss the sliced apples with coconut sugar, lemon juice, cinnamon, nutmeg, ginger, and cornstarch. Confirm the apples are evenly coated with the spices and cornstarch. Set aside.
- Roll Out the Pie Crust:
- On a lightly floured surface, roll out the chilled dough to fit a 9-inch pie dish. Transfer the rolled-out dough into the pie dish, trimming any excess edges.
- Assemble the Pie:
- Pour the prepared apple filling into the pie crust, spreading it evenly.
- Prepare the Crumble Topping:
- In a separate bowl, mix together the oats, almond flour, coconut sugar, cinnamon, and salt. Add the cold vegan butter cubes.
- Use your fingers to combine until small clumps form. Evenly sprinkle the crumble topping over the apple filling.
- Bake the Pie:
- Place the pie on a baking sheet and bake for 45-50 minutes, or until the topping is golden brown and the apples are tender when pierced with a fork.
- If the crumble starts to brown too quickly, cover the pie lightly with aluminum foil.
- Cool and Serve:
- Allow the pie to cool at room temperature for at least 15 minutes before serving. This will help the filling set.
Extra Tips:
For the best results, choose apples that are firm and slightly tart, such as Granny Smith or Honeycrisp, as they hold up well during baking.
Confirming your vegan butter is cold is vital for both the crust and the crumble topping, as this will create a flaky texture. If you find your pie crust edges browning too quickly, use a pie shield or carefully crimp foil around the edges.
Serve your Spiced Apple Crumble Pie with a scoop of vegan vanilla ice cream or a drizzle of caramel sauce for an extra decadent treat.
Rich Chocolate Avocado Mousse
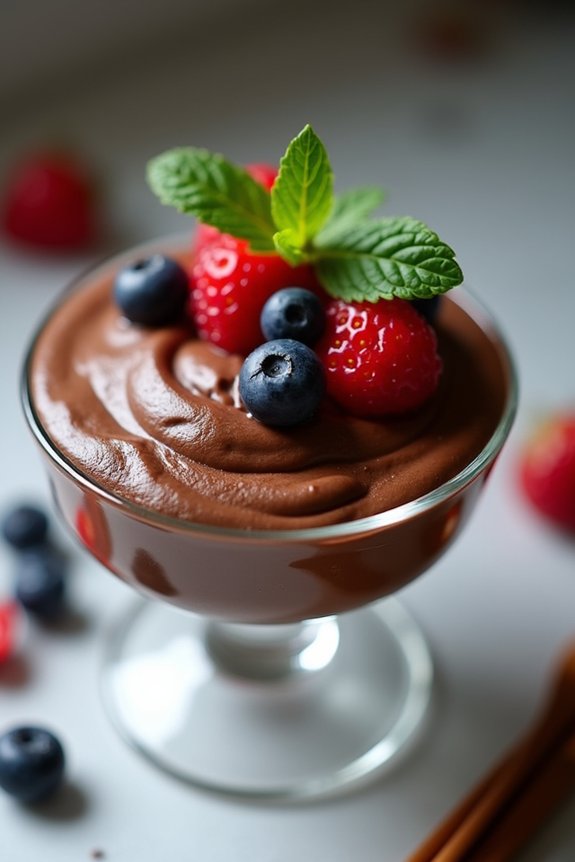
Indulge in a decadent and creamy dessert that will surprise even the most discerning palates with its rich flavor and smooth texture: Rich Chocolate Avocado Mousse. This vegan delight isn’t only a treat for your taste buds but also a healthier alternative to traditional chocolate mousse. By using ripe avocados as the main ingredient, you create a luscious base that pairs beautifully with dark chocolate, resulting in a dessert that’s both satisfying and nourishing.
Perfect for the holiday season, this mousse will add a touch of elegance to your Christmas dessert table while catering to plant-based diets.
The beauty of this recipe lies in its simplicity and the ability to create a luxurious dessert with minimal ingredients. The avocados provide the creamy texture, while pure maple syrup adds a natural sweetness, and a hint of vanilla extract enhances the chocolate flavor. Cocoa powder and melted dark chocolate come together to give the mousse its rich and intense chocolate profile.
With just a few steps, you can whip up a delightful dessert that will impress your family and friends, making it an ideal choice for your vegan Christmas celebrations.
Ingredients for 4-6 servings:
- 4 ripe avocados, peeled and pitted
- 1/2 cup unsweetened cocoa powder
- 1/2 cup pure maple syrup
- 2 teaspoons vanilla extract
- 1/2 cup melted dark chocolate (vegan)
- A pinch of sea salt
- Fresh berries or mint leaves for garnish (optional)
Cooking Instructions:
- Prepare the Avocados: Begin by scooping the flesh of the ripe avocados into a food processor or blender. Confirm there are no brown spots, as they can affect the taste and texture of the mousse.
- Blend the Base: Add the unsweetened cocoa powder, pure maple syrup, vanilla extract, and a pinch of sea salt to the avocados in the processor. Blend until the mixture is smooth and creamy, scraping down the sides if necessary.
- Incorporate the Chocolate: Melt the dark chocolate in a microwave-safe bowl or over a double boiler until smooth. Allow it to cool slightly before adding it to the avocado mixture. Blend again until the chocolate is fully incorporated, and the mousse is silky.
- Chill the Mousse: Spoon the mousse into individual serving dishes or glasses. Cover them with plastic wrap and refrigerate for at least 30 minutes to 1 hour, allowing the flavors to meld and the mousse to set.
- Serve and Garnish: Before serving, garnish the mousse with fresh berries or mint leaves for an added touch of color and freshness. Serve chilled and enjoy the rich, chocolatey goodness.
Extra Tips:
For an even smoother texture, confirm your avocados are perfectly ripe and free from any blemishes. If you prefer a sweeter mousse, you can adjust the amount of maple syrup to taste.
Remember to let the melted chocolate cool slightly before adding it to the avocado mixture to prevent the mousse from becoming too runny. This dessert is best enjoyed fresh but can be stored in the refrigerator for up to two days.
Feel free to get creative with the garnishes – a sprinkle of cocoa nibs or chopped nuts can also add a delightful crunch.
Vegan Raspberry Linzer Cookies

Vegan Raspberry Linzer Cookies are a delightful holiday treat that combine the classic flavors of buttery cookies with sweet raspberry preserves. These cookies aren’t only vegan but are also made with wholesome ingredients, making them a healthier option for your Christmas dessert table.
The classic Linzer cookie is traditionally made with almonds and filled with raspberry jam, and this vegan version stays true to those flavors while using plant-based ingredients. Perfect for sharing with family and friends, these cookies are sure to impress with their beautiful appearance and delicious taste.
The dough is made with a blend of almond flour and all-purpose flour, providing a slightly nutty flavor and a tender crumb. Coconut oil is used instead of butter, which adds a subtle richness without overpowering the other flavors. The raspberry preserves add a pop of color and a burst of fruity flavor that perfectly complements the cookie.
These Vegan Raspberry Linzer Cookies aren’t only festive and pretty but are also straightforward to make. They’re perfect for a cozy holiday gathering or as a sweet gift for loved ones.
Ingredients (serves 4-6 people):
- 1 cup almond flour
- 1 cup all-purpose flour
- 1/2 cup coconut oil, solid
- 1/2 cup powdered sugar
- 1 teaspoon vanilla extract
- 1/4 teaspoon salt
- 1/2 cup raspberry preserves
- Powdered sugar for dusting
Instructions:
- Prepare the Dough: In a large mixing bowl, combine the almond flour, all-purpose flour, powdered sugar, and salt. Mix well to guarantee all dry ingredients are evenly distributed. Add the solid coconut oil and vanilla extract to the dry mixture. Use a pastry cutter or your fingers to blend the coconut oil into the flour until the mixture resembles coarse crumbs.
- Form the Dough: Gather the dough into a ball and then flatten it into a disc. Wrap the disc in plastic wrap and refrigerate for at least 30 minutes. This will help the dough firm up, making it easier to roll out later.
- Roll and Cut the Dough: Preheat your oven to 350°F (175°C). Line a baking sheet with parchment paper. Unwrap the chilled dough and place it between two sheets of parchment paper. Roll out the dough to about 1/8 inch thickness. Use a round cookie cutter to cut out the base cookies, and then use a smaller cutter to cut out the centers of half of the cookies to create the top layer.
- Bake the Cookies: Place the cookies on the prepared baking sheet, leaving about an inch of space between them. Bake in the preheated oven for 10-12 minutes, or until the edges are lightly golden. Remove from the oven and let them cool completely on a wire rack.
- Assemble the Cookies: Once the cookies are cooled, spread about a teaspoon of raspberry preserves on each whole cookie. Place the cookies with the cut-out center on top to form a sandwich. Gently press down to guarantee the preserves spread to the edges.
- Decorate: Dust the assembled cookies with powdered sugar for a festive finish.
Extra Tips:
When rolling out the dough, make sure to work quickly to prevent it from becoming too soft. If the dough becomes difficult to handle, simply return it to the refrigerator for a few minutes to firm up.
Additionally, feel free to experiment with different fruit preserves if raspberry isn’t your preference. Apricot or strawberry preserves make excellent alternatives and can add a nice variety to your cookie platter.
Finally, confirm your coconut oil is solid before working with it, as liquid oil can alter the texture of the dough.
Coconut Cream Panna Cotta
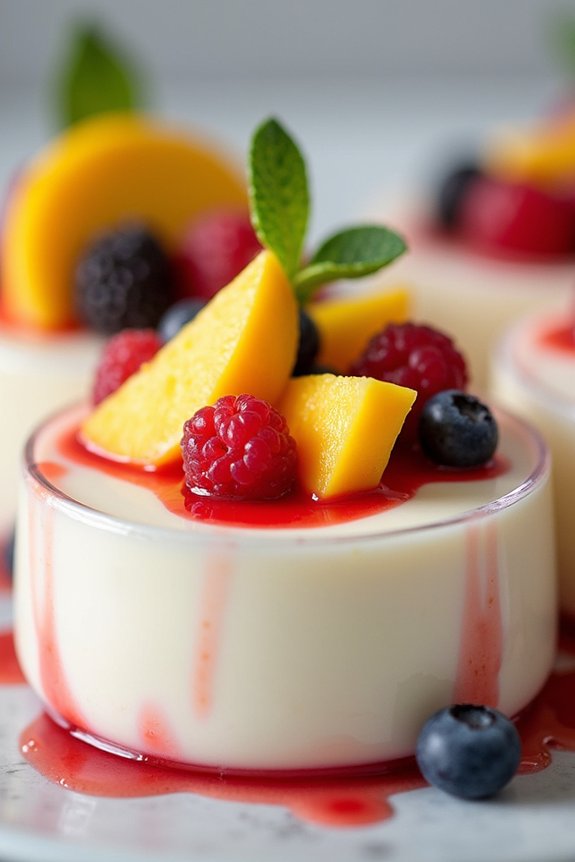
Coconut Cream Panna Cotta is a delightful vegan dessert that offers a creamy and luscious treat perfect for your holiday table. This recipe uses coconut milk as a base, creating a rich and silky texture that pairs beautifully with the subtle sweetness of vanilla.
It’s a simple yet elegant dessert that can be prepared in advance, allowing you to focus on other holiday preparations. Whether you’re serving it at a festive gathering or enjoying a quiet evening in, this Coconut Cream Panna Cotta is sure to impress your guests.
To accentuate the tropical flavors, you can top it with fresh fruits, like mango or berries, or a drizzle of fruit coulis. The panna cotta is set using agar-agar, a plant-based gelatin alternative, making it suitable for a vegan diet. This dessert not only caters to those with dietary restrictions but also appeals to anyone who appreciates a light and invigorating end to a meal.
Follow this recipe to create a Coconut Cream Panna Cotta that serves 4-6 people, perfect for sharing with family and friends.
Ingredients:
- 2 cups full-fat coconut milk
- 1/3 cup granulated sugar
- 1 teaspoon vanilla extract
- 1 teaspoon agar-agar powder
- A pinch of salt
- Fresh fruit or fruit coulis for topping (optional)
Cooking Instructions:
- Prepare the Ingredients: Start by gathering all ingredients, confirming that the agar-agar powder is ready to use. This will help the cooking process go smoothly.
- Combine Coconut Milk and Sugar: In a medium saucepan, pour the coconut milk and add the granulated sugar. Stir the mixture over medium heat until the sugar has completely dissolved. This should take about 3-4 minutes.
- Add Agar-Agar: Sprinkle the agar-agar powder into the coconut milk mixture while stirring constantly. Continue to heat the mixture and bring it to a gentle boil. Let it simmer for about 2 minutes to activate the agar-agar, confirming it’s fully dissolved.
- Incorporate Vanilla and Salt: Remove the saucepan from heat and stir in the vanilla extract and a pinch of salt. Mix well to confirm an even distribution of flavors.
- Set the Panna Cotta: Pour the mixture into individual serving glasses or ramekins. Allow it to cool at room temperature for 10-15 minutes before transferring to the refrigerator.
- Chill Until Set: Refrigerate the panna cotta for at least 4 hours, or until fully set. The texture should be firm yet slightly wobbly when done.
- Serve and Enjoy: Once set, serve the panna cotta chilled. Top with fresh fruit or a drizzle of fruit coulis if desired for added flavor and presentation.
Extra Tips:
To achieve the perfect texture, make sure the agar-agar is completely dissolved and properly activated by simmering the mixture. If you prefer a sweeter dessert, you can adjust the sugar to taste.
For an extra touch, consider infusing the coconut milk with a dash of lime zest or a few crushed cardamom pods during cooking for additional depth of flavor. Remember, this dessert can be prepared a day in advance, making it an ideal choice for stress-free holiday entertaining.
Vegan Black Forest Trifle
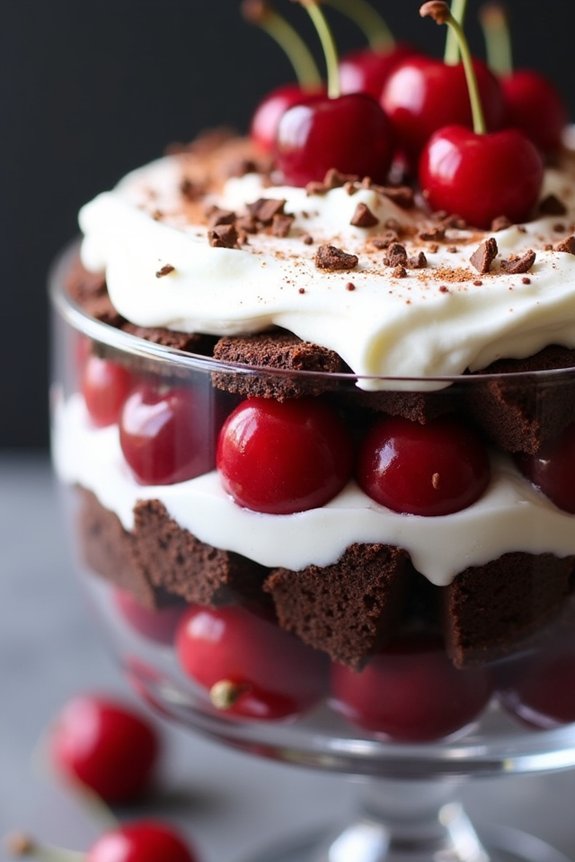
Vegan Black Forest Trifle is a delightful combination of rich chocolate cake, sweet cherries, and dairy-free whipped cream that will add a festive flair to your holiday dessert spread. This dessert isn’t only delicious but also a feast for the eyes, with its layers of deep, dark chocolate, vibrant red cherries, and fluffy white cream.
The trifle is a perfect way to end a holiday meal, offering a blend of textures and flavors that will satisfy any sweet tooth. This vegan version of the classic Black Forest dessert is made with plant-based ingredients, guaranteeing that everyone at the table can enjoy it, regardless of dietary preferences.
The cake is soft and moist, the cherries are juicy and sweet, and the coconut whipped cream adds a light, airy finish. The trifle is assembled in a large glass bowl, allowing the layers to be visible, making it a stunning centerpiece as well as a delicious treat. Prepare this trifle for your Christmas celebration, and watch as your guests plunge in for a second helping.
Ingredients (Serves 4-6):
- 1 cup all-purpose flour
- 1/3 cup unsweetened cocoa powder
- 1 teaspoon baking soda
- 1/2 teaspoon salt
- 1 cup almond milk
- 1 tablespoon apple cider vinegar
- 1/2 cup granulated sugar
- 1/4 cup vegetable oil
- 1 teaspoon vanilla extract
- 1 can (21 oz) cherry pie filling
- 1 cup coconut cream (chilled)
- 2 tablespoons powdered sugar
- 1 teaspoon vanilla extract (for the whipped cream)
- Dairy-free chocolate shavings for garnish (optional)
Instructions:
- Prepare the Vegan Chocolate Cake:
- Preheat your oven to 350°F (175°C). Grease and line an 8-inch round cake pan with parchment paper.
- In a large mixing bowl, sift together the flour, cocoa powder, baking soda, and salt. Set aside.
- In a separate bowl, mix the almond milk and apple cider vinegar and let it sit for about 5 minutes to curdle.
- Add the sugar, vegetable oil, and vanilla extract to the almond milk mixture and whisk until well combined.
- Gradually add the wet ingredients to the dry ingredients, stirring gently until the batter is smooth.
- Pour the batter into the prepared cake pan and bake for 25-30 minutes, or until a toothpick inserted into the center comes out clean.
- Allow the cake to cool completely before cutting it into small cubes.
- Prepare the Coconut Whipped Cream:
- Open the chilled can of coconut cream, and scoop out the solidified cream into a mixing bowl, leaving the liquid behind.
- Add the powdered sugar and vanilla extract to the bowl, and beat with an electric mixer on high speed until soft peaks form. Set aside.
- Assemble the Trifle:
- Begin by placing a layer of chocolate cake cubes at the bottom of a large glass trifle bowl.
- Spoon a layer of cherry pie filling over the cake cubes, guaranteeing an even distribution.
- Spread a layer of coconut whipped cream over the cherries.
- Repeat the layering process until all ingredients are used, finishing with a layer of whipped cream on top.
- Garnish with dairy-free chocolate shavings if desired.
- Chill and Serve:
- Refrigerate the trifle for at least 2 hours before serving, allowing the flavors to meld together.
Extra Tips:
When making Vegan Black Forest Trifle, verify that the coconut cream is well chilled before whipping, as this will help it achieve the desired texture.
If you prefer a homemade cherry compote instead of canned pie filling, simply cook pitted cherries with a bit of sugar and cornstarch until they thicken. For added flair, you can layer in some crushed vegan chocolate biscuits for extra crunch.
Finally, prepare the trifle a day in advance to enhance the flavors even more, making it an easy and stress-free dessert option for your holiday celebration.
Festive Spiced Pumpkin Roll
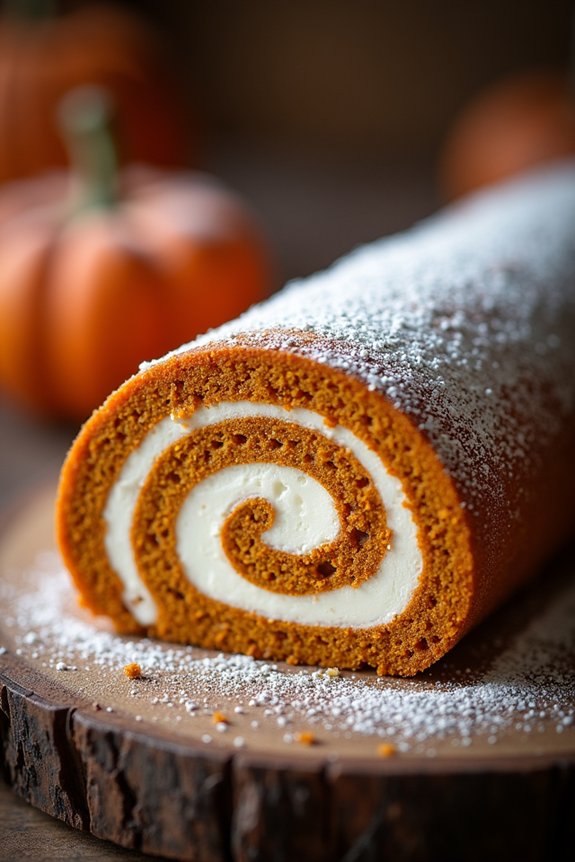
The holiday season is a time of warmth, joy, and indulging in delicious treats, and what better way to celebrate than with a Festive Spiced Pumpkin Roll? This vegan dessert is perfect for Christmas, combining the rich, earthy flavors of pumpkin with a medley of spices that evoke the essence of the holiday season.
The pumpkin roll is a delightful blend of a moist, spiced pumpkin cake and a creamy, sweet filling, rolled to perfection. It’s an impressive dessert that will wow your guests and cater to those following a plant-based lifestyle.
Perfect for serving 4-6 people, this Festive Spiced Pumpkin Roll isn’t only scrumptious but also visually stunning, making it an excellent centerpiece for your dessert table. The roll is made with wholesome plant-based ingredients that guarantee everyone can enjoy a slice.
The creamy filling, made with vegan cream cheese, adds a delightful contrast to the spiced cake, while the rolling process creates an elegant swirl that’s both beautiful and delicious.
Ingredients:
- 1 cup all-purpose flour
- 1 teaspoon baking powder
- 1/2 teaspoon baking soda
- 1/2 teaspoon salt
- 1 teaspoon ground cinnamon
- 1/2 teaspoon ground ginger
- 1/4 teaspoon ground nutmeg
- 1/4 teaspoon ground cloves
- 3/4 cup granulated sugar
- 1 cup pumpkin puree
- 1 tablespoon ground flaxseed + 3 tablespoons water (flax egg)
- 1 teaspoon vanilla extract
- 1 cup vegan cream cheese, softened
- 1 cup powdered sugar
- 1 teaspoon vanilla extract (for filling)
- Powdered sugar (for dusting)
Instructions:
- Preheat and Prepare: Preheat your oven to 375°F (190°C). Line a 10×15 inch jelly roll pan with parchment paper, guaranteeing it covers the entire surface. This will prevent the cake from sticking and make rolling easier.
- Make Flax Egg: In a small bowl, combine 1 tablespoon of ground flaxseed with 3 tablespoons of water. Stir and let it sit for about 5 minutes until it thickens. This mixture acts as a vegan egg substitute.
- Mix Dry Ingredients: In a medium-sized bowl, whisk together the flour, baking powder, baking soda, salt, cinnamon, ginger, nutmeg, and cloves. Set aside.
- Combine Wet Ingredients: In a large mixing bowl, beat together the granulated sugar, pumpkin puree, prepared flax egg, and vanilla extract until smooth and creamy.
- Create Batter: Gradually add the dry ingredients to the wet ingredients, stirring until just combined. Be careful not to overmix as this can result in a dense cake.
- Bake the Cake: Pour the batter into the prepared jelly roll pan, spreading it evenly. Bake for about 13-15 minutes, or until the cake springs back when lightly touched.
- Roll the Cake: While the cake is baking, lay a clean kitchen towel on a flat surface and dust it generously with powdered sugar. Once the cake is done, immediately turn it out onto the sugared towel. Carefully peel off the parchment paper.
- Shape the Roll: Starting at the short end, roll the cake up with the towel. Let it cool completely in this rolled shape — this helps set the roll form and prevents cracking later.
- Prepare the Filling: In a medium bowl, beat together the softened vegan cream cheese, powdered sugar, and 1 teaspoon of vanilla extract until smooth and creamy.
- Assemble the Roll: Once the cake is completely cool, gently unroll it. Spread the cream cheese filling evenly over the entire surface, then carefully roll the cake back up without the towel.
- Chill and Serve: Wrap the pumpkin roll in plastic wrap and refrigerate for at least 1 hour before serving. This helps firm up the filling and enhances the flavors. Dust with additional powdered sugar before slicing and serving.
Extra Tips:
To make sure your Festive Spiced Pumpkin Roll turns out perfectly, confirm your cake is fully cooled before spreading the filling to prevent it from melting.
If you find the cake is cracking slightly when rolling, don’t worry too much; powdered sugar can help cover minor imperfections. Also, make sure your vegan cream cheese is softened before mixing it into the filling for a smoother texture.
Finally, this dessert can be made a day in advance, allowing the flavors to meld beautifully and making your holiday preparations more manageable.