

The holiday season is the perfect time to indulge in sweet marshmallow desserts that bring joy to our gatherings. Picture yourself surrounded by loved ones, with the delightful scents of chocolate and peppermint filling the air. From charming Marshmallow Reindeer Cupcakes to the timeless Marshmallow Peppermint Bark, these recipes are sure to make your celebrations extra special. Each treat is crafted to add a sprinkle of magic to your festive moments. Ready to explore these joyful creations?
Marshmallow Peppermint Bark
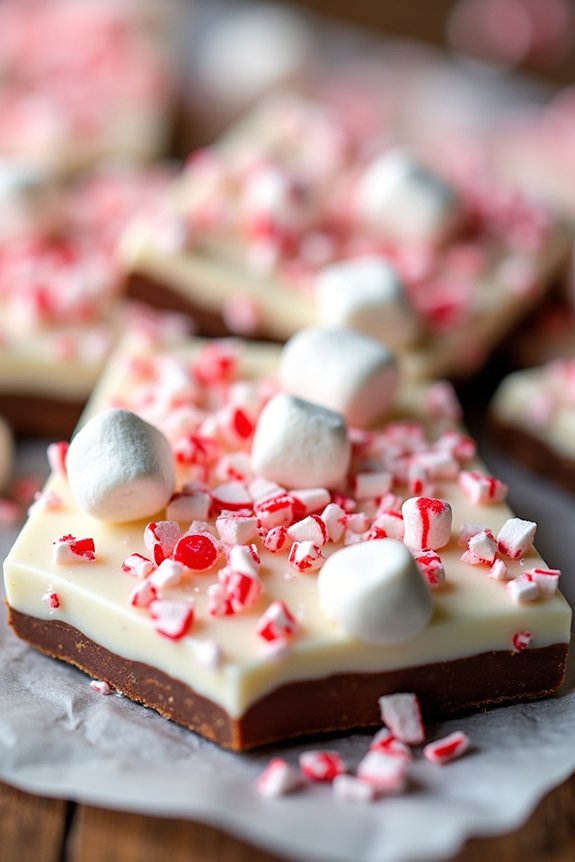
Marshmallow Peppermint Bark is a delightful holiday treat that combines the rich flavors of chocolate with the invigorating taste of peppermint, all topped off with the soft, gooey texture of marshmallows. This festive dessert is perfect for the Christmas season, capturing the spirit of the holidays in each bite.
Not only does it look impressive with its layered design and sprinkled candy canes, but it also offers a perfect balance of flavors that will leave your taste buds dancing. This dessert is incredibly easy to prepare and makes for an excellent addition to any holiday gathering.
Its simplicity means you can whip it up in no time, while still impressing your family and friends with a homemade treat. Whether you’re serving it as a sweet ending to your Christmas dinner or wrapping it up as a thoughtful gift, Marshmallow Peppermint Bark is sure to be a hit. Prepare this delicious dessert for 4-6 people and spread the holiday cheer one piece at a time.
Ingredients:
- 1 cup semi-sweet chocolate chips
- 1 cup white chocolate chips
- 1 teaspoon peppermint extract
- 1 cup mini marshmallows
- 1/2 cup crushed candy canes
- 1 tablespoon vegetable oil
Instructions:
- Prepare the Baking Sheet: Line a baking sheet with parchment paper or a silicone baking mat. This will prevent the bark from sticking and make it easier to remove once it’s set.
- Melt the Semi-Sweet Chocolate: In a microwave-safe bowl, combine the semi-sweet chocolate chips with 1/2 tablespoon of vegetable oil. Microwave in 30-second intervals, stirring between each, until the chocolate is completely melted and smooth.
- Spread the Chocolate Base: Pour the melted semi-sweet chocolate onto the prepared baking sheet. Use a spatula to spread it into an even layer, about 1/4 inch thick. Place the baking sheet in the refrigerator to set while you prepare the next layer.
- Melt the White Chocolate: In another microwave-safe bowl, combine the white chocolate chips with the remaining 1/2 tablespoon of vegetable oil. Again, microwave in 30-second intervals, stirring between each, until smooth and fully melted.
- Add Peppermint Flavor: Stir the peppermint extract into the melted white chocolate until well combined.
- Layer the White Chocolate: Once the semi-sweet chocolate layer has set, remove it from the refrigerator. Carefully pour the white chocolate over the top, spreading it evenly with a spatula.
- Top with Marshmallows and Candy Canes: Immediately sprinkle the mini marshmallows and crushed candy canes over the white chocolate layer. Gently press them into the chocolate to guarantee they stick.
- Set the Bark: Place the baking sheet back in the refrigerator for 1-2 hours, or until the chocolate is fully set and firm.
- Break into Pieces: Once set, remove the bark from the refrigerator. Use your hands to break it into irregular pieces for serving.
Extra Tips:
When making Marshmallow Peppermint Bark, make certain that each chocolate layer is fully set before adding the next to prevent them from mixing together.
If you prefer a less sweet version, consider using dark chocolate in place of semi-sweet chocolate. Additionally, feel free to experiment with different toppings, such as nuts or other types of crushed candies, to make the dessert your own.
Store any leftovers in an airtight container at room temperature or in the refrigerator, where they’ll keep well for up to two weeks.
Chocolate Marshmallow Snowballs
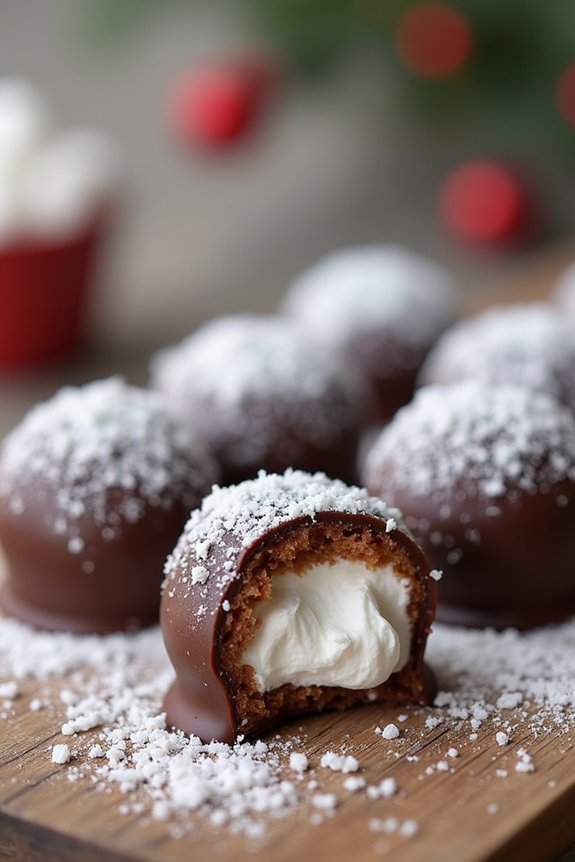
Chocolate Marshmallow Snowballs are a delightful treat that merges the gooey goodness of marshmallows with the rich, indulgent taste of chocolate. Perfect for holiday gatherings or just a cozy winter evening, these snowballs aren’t only delicious but also visually appealing.
They resemble little snow-covered balls, hence the name, and are an instant hit with both kids and adults. This dessert is relatively easy to make and doesn’t require any baking, making it an excellent choice for a quick festive treat.
The combination of chocolate, coconut, and marshmallows creates a medley of textures and flavors that’s simply irresistible. As you bite into the snowball, the outer layer of chocolate crumbles to reveal a soft, marshmallowy center. The shredded coconut adds a subtle crunch and a hint of tropical flavor, balancing the sweetness of the chocolate and marshmallows.
These Chocolate Marshmallow Snowballs are sure to become a favorite holiday tradition in your home.
Ingredients (Serves 4-6):
- 2 cups semi-sweet chocolate chips
- 1 tablespoon unsalted butter
- 1 cup mini marshmallows
- 1 teaspoon vanilla extract
- 2 cups sweetened shredded coconut
- 2 tablespoons powdered sugar for dusting
Instructions:
- Prepare the Chocolate Mixture: In a medium microwave-safe bowl, combine the semi-sweet chocolate chips and unsalted butter. Microwave in 30-second intervals, stirring after each, until the mixture is smooth and fully melted. This should take about 1-2 minutes. Stir in the vanilla extract.
- Mix in the Marshmallows: Allow the melted chocolate mixture to cool slightly, then gently fold in the mini marshmallows until they’re fully coated with chocolate. Be gentle to maintain the marshmallows’ shape.
- Shape the Snowballs: Fill a shallow dish with the sweetened shredded coconut. Using a spoon, scoop a small portion of the chocolate-marshmallow mixture and roll it into a ball with your hands. Roll each ball in the coconut until fully coated. Repeat the process until all the mixture is used.
- Chill the Snowballs: Arrange the snowballs on a baking sheet lined with parchment paper. Place them in the refrigerator for about 1 hour, or until the chocolate has set and the snowballs are firm to the touch.
- Finish with Powdered Sugar: Once the snowballs are set, lightly dust them with powdered sugar to give them a frosted, snowy appearance.
Extra Tips:
- If you prefer a more intense coconut flavor, try toasting the shredded coconut before coating the snowballs. Simply spread the coconut on a baking sheet and bake at 350°F (175°C) for 5-8 minutes, stirring occasionally, until golden brown.
- You can customize the filling by adding chopped nuts or dried fruits for extra texture and flavor.
- To ascertain the chocolate mixture remains smooth, avoid getting any water in it as moisture can cause the chocolate to seize.
- These snowballs can be made ahead of time and stored in an airtight container in the refrigerator for up to a week, making them a convenient make-ahead dessert option.
Holiday Marshmallow Fudge
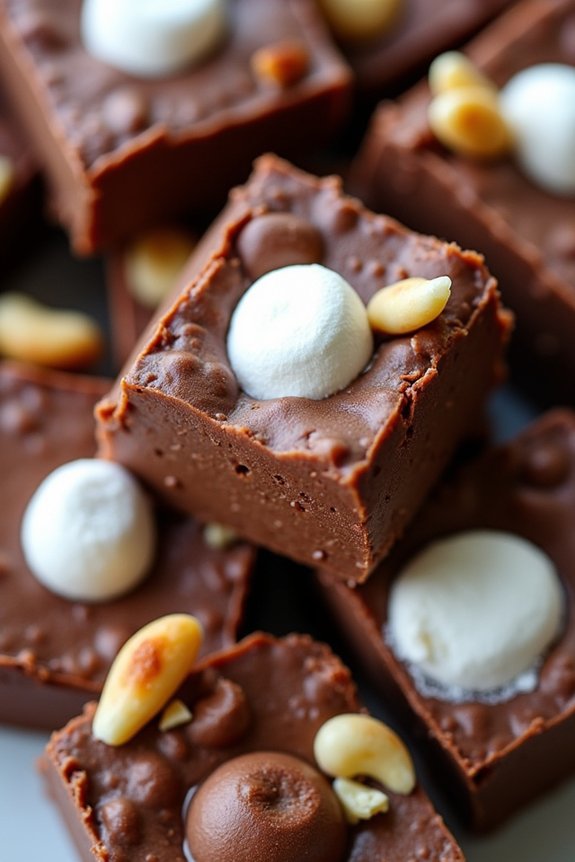
The Holiday Marshmallow Fudge is a delightful treat that combines the rich, creamy texture of traditional fudge with the light, airy sweetness of marshmallows. Perfect for the festive season, this dessert captures the essence of Christmas with its decadent flavors and simple preparation.
The combination of chocolate and marshmallows creates a mouthwatering experience that’s both comforting and indulgent, making it the ideal treat to share with family and friends during holiday gatherings.
This fudge recipe is designed to serve 4-6 people, making it a great choice for a small holiday party or family dinner. The process of creating this fudge is straightforward, requiring only a few key ingredients and minimal cooking skills.
Once prepared, the fudge can be stored and enjoyed over several days, allowing you to savor its deliciousness throughout the holiday season.
Ingredients:
- 2 cups semisweet chocolate chips
- 1 can (14 ounces) sweetened condensed milk
- 1 teaspoon vanilla extract
- 2 cups mini marshmallows
- 1/2 cup chopped nuts (optional)
- 1 tablespoon unsalted butter
Cooking Instructions:
- Prepare the Pan: Line an 8-inch square baking pan with aluminum foil, leaving an overhang on the sides. This will help you lift the fudge out of the pan once it has set.
- Melt the Chocolate: In a medium saucepan, combine the semisweet chocolate chips and sweetened condensed milk. Cook over low heat, stirring constantly with a heat-resistant spatula, until the chocolate is completely melted and the mixture is smooth.
- Add Vanilla: Remove the saucepan from heat and stir in the vanilla extract. Mix well to verify the vanilla is fully incorporated into the chocolate mixture.
- Fold in Marshmallows and Nuts: Gently fold in the mini marshmallows and chopped nuts, if using, until they’re evenly distributed throughout the chocolate mixture.
- Transfer to Pan: Pour the fudge mixture into the prepared baking pan, using the spatula to spread it evenly into the corners. Press down gently to verify the marshmallows are submerged in the fudge.
- Chill the Fudge: Refrigerate the fudge for at least 2 hours, or until it’s firm enough to cut. For best results, allow it to chill overnight.
- Cut and Serve: Once set, use the foil overhang to lift the fudge out of the pan. Cut the fudge into small squares, about 1 inch each, and serve.
Extra Tips:
For a festive touch, consider sprinkling some crushed peppermint candies or colored sprinkles on top of the fudge before refrigerating. This will add a holiday flair and a hint of crunch to each bite.
If you prefer a smoother texture, you can omit the nuts or substitute them with dried fruits like cranberries or cherries.
When cutting the fudge, use a sharp knife dipped in hot water for cleaner, smoother cuts. Store any leftovers in an airtight container in the refrigerator to maintain freshness. Enjoy this indulgent treat with a hot cup of cocoa for the ultimate holiday experience!
Marshmallow Christmas Tree Brownies
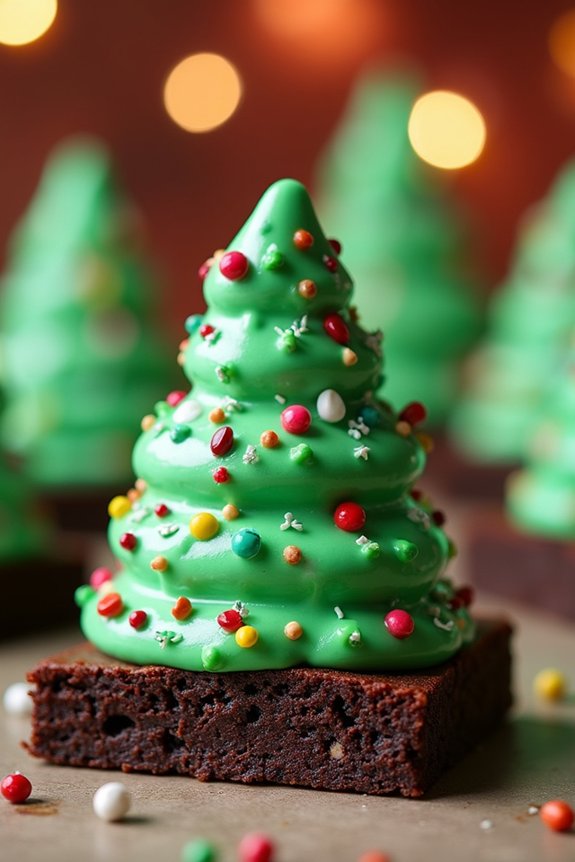
Marshmallow Christmas Tree Brownies are a delightful holiday treat that combines the rich, fudgy goodness of brownies with the whimsical charm of marshmallow trees. Perfect for festive gatherings or as a fun family activity, these brownies bring together the classic flavors of chocolate and marshmallows in a creative and eye-catching presentation.
Whether you’re an experienced baker or just looking for a simple yet impressive dessert to share, these brownies are sure to be a hit with both children and adults alike.
This recipe for Marshmallow Christmas Tree Brownies is designed to serve 4-6 people, making it ideal for small holiday parties or family dinners. The brownies form the base of the dessert, while marshmallows are transformed into tree shapes and decorated with colorful icing and sprinkles to mimic ornaments and lights.
The combination of textures and flavors makes this dessert not only delicious but also a fun project to get everyone into the holiday spirit.
Ingredients:
- 1 box of brownie mix (for a 9×13 inch pan)
- 1/2 cup vegetable oil
- 2 large eggs
- 1/4 cup water
- 12 large marshmallows
- Green icing (store-bought or homemade)
- Assorted sprinkles and small candies (for decoration)
- Mini pretzel sticks (for tree trunks)
Instructions:
- Prepare the Brownie Mix: Preheat your oven to 350°F (175°C). In a large mixing bowl, combine the brownie mix, vegetable oil, eggs, and water. Stir until the mixture is smooth and well combined. Pour the batter into a greased 9×13 inch baking pan.
- Bake the Brownies: Place the pan in the preheated oven and bake for 20-25 minutes, or until a toothpick inserted into the center comes out mostly clean. Allow the brownies to cool completely in the pan before cutting.
- Cut the Brownies: Once cooled, cut the brownies into triangular shapes to resemble Christmas trees. You should aim for about 12 triangles.
- Prepare Marshmallow Trees: Skewer a large marshmallow onto a mini pretzel stick, ensuring the pretzel doesn’t poke through the top. Use green icing to cover the marshmallow, creating the appearance of a tree.
- Decorate the Trees: Add assorted sprinkles and small candies to the marshmallow trees while the icing is still wet. This will help the decorations stick to the icing.
- Assemble the Dessert: Place each marshmallow tree on top of a brownie triangle, pressing gently to secure it in place. The pretzel stick should act as a trunk, anchoring the tree to the brownie.
Extra Tips:
For an added touch of flavor, consider mixing in a handful of chocolate chips or nuts into the brownie batter before baking.
If you prefer homemade icing, simply blend powdered sugar with a bit of milk and green food coloring until you reach the desired consistency.
When cutting the brownies into triangles, use a warm knife to achieve clean edges, and if any of the marshmallows become too sticky to handle, lightly dust your fingertips with powdered sugar to prevent sticking.
Enjoy creating and indulging in these festive treats!
Gingerbread Marshmallow Pops

Indulge in the festive spirit with these delightful Gingerbread Marshmallow Pops that are perfect for a cozy Christmas gathering. These sweet treats blend the classic holiday flavors of gingerbread with the soft, fluffy texture of marshmallows, making them an irresistible addition to your dessert table.
With just a few ingredients and easy-to-follow steps, you can whip up a batch of these pops in no time, making them an excellent option for last-minute holiday gatherings or as a fun activity with the kids.
The Gingerbread Marshmallow Pops aren’t only delicious but also visually appealing. Coated in a gingerbread-flavored chocolate shell and decorated with sprinkles or crushed candy canes, they make for a festive dessert that will impress your guests.
These pops can be served as a standalone treat or as part of a larger dessert spread, adding a whimsical touch to your Christmas celebrations. With a serving size of 4-6 people, this recipe guarantees everyone gets to enjoy this delightful holiday treat.
Ingredients (serving size: 4-6 people):
- 12 large marshmallows
- 1 cup of white chocolate chips
- 1 teaspoon of ground ginger
- 1 teaspoon of ground cinnamon
- 1/2 teaspoon of ground nutmeg
- 1/4 teaspoon of ground cloves
- 12 lollipop sticks
- 1/4 cup of sprinkles or crushed candy canes
Cooking Instructions:
- Prepare the Marshmallows: Insert a lollipop stick into each marshmallow, making sure it goes about halfway through. This will provide a sturdy base for dipping and decoration.
- Melt the Chocolate: In a microwave-safe bowl, combine the white chocolate chips and microwave on medium power in 30-second intervals. Stir between intervals until the chocolate is completely melted and smooth.
- Add the Spices: Once the chocolate is melted, stir in the ground ginger, cinnamon, nutmeg, and cloves until the spices are thoroughly incorporated, creating a gingerbread-flavored chocolate coating.
- Dip the Marshmallows: Dip each marshmallow into the spiced chocolate mixture, making sure it’s completely covered. Use a spoon to help coat the marshmallow evenly if necessary.
- Decorate the Pops: Immediately after dipping, sprinkle the marshmallow pops with your choice of sprinkles or crushed candy canes. Place the pops on a sheet of parchment paper to set.
- Set the Pops: Allow the chocolate coating to harden at room temperature, or place the pops in the refrigerator for quicker setting. Once the chocolate has set, the pops are ready to serve.
Extra Tips:
To make the dipping process smoother, verify that the white chocolate isn’t too thick. If needed, add a small amount of vegetable oil or coconut oil to thin the chocolate for easier coating.
Be creative with your decorations; you can use different colored sprinkles or even edible glitter to add more festive flair. For an extra gingerbread kick, consider adding a pinch of ground ginger to the marshmallows before dipping them in chocolate.
These pops can be made a day in advance, making them a convenient option for stress-free holiday preparations.
Cranberry Marshmallow Cheesecake
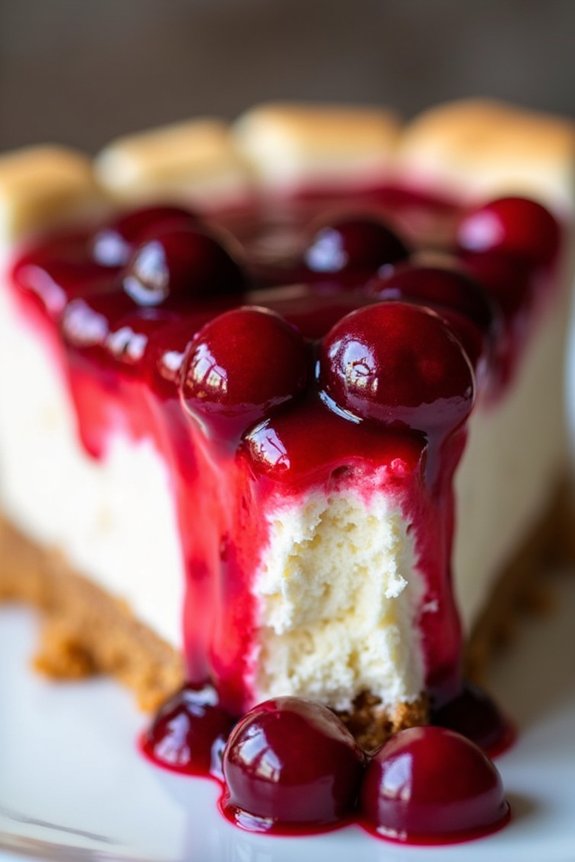
Celebrate the holiday season with a delightful Cranberry Marshmallow Cheesecake, a perfect blend of tart cranberries and sweet marshmallows in a creamy cheesecake base. This festive dessert combines the smooth texture of cheesecake with the chewy goodness of marshmallows, all topped with a vibrant cranberry sauce that adds an extra layer of flavor.
It’s an ideal treat to impress your family and friends during holiday gatherings, and its beautiful presentation will surely be a conversation starter at any Christmas feast.
This cheesecake isn’t only delicious but also surprisingly easy to prepare. The key to success lies in balancing the sweetness of the marshmallows with the tartness of the cranberries, resulting in a harmonious blend that will please any palate.
With a buttery graham cracker crust, a creamy marshmallow-infused filling, and a homemade cranberry topping, this dessert offers a festive twist on the classic cheesecake. Let’s plunge into the recipe and bring this delightful dessert to life.
Ingredients for 4-6 servings:
- 1 1/2 cups graham cracker crumbs
- 1/2 cup unsalted butter, melted
- 3 (8 oz) packages cream cheese, softened
- 1 cup granulated sugar
- 1 teaspoon vanilla extract
- 3 large eggs
- 1 1/2 cups mini marshmallows
- 1 cup fresh or frozen cranberries
- 1/3 cup water
- 1/3 cup granulated sugar (for cranberry sauce)
- 1 tablespoon cornstarch
- 1 tablespoon water (for cornstarch mixture)
Cooking Instructions:
- Prepare the Crust:
- Preheat your oven to 325°F (165°C). In a medium-sized bowl, mix the graham cracker crumbs with melted butter until well combined.
- Press the mixture firmly into the bottom of a 9-inch springform pan to form an even crust. Bake for 10 minutes, then remove from the oven and let it cool.
- Make the Cheesecake Filling:
- In a large mixing bowl, combine the softened cream cheese, 1 cup of granulated sugar, and vanilla extract. Beat with an electric mixer on medium speed until smooth and creamy.
- Add the eggs one at a time, beating well after each addition. Gently fold in the mini marshmallows until evenly distributed in the mixture.
- Assemble and Bake:
- Pour the cheesecake filling over the cooled crust, spreading it evenly. Bake in the preheated oven for 55-60 minutes, or until the center is set and the top is lightly golden.
- Turn off the oven and let the cheesecake cool in the oven with the door slightly ajar for about an hour. This helps prevent cracking.
- Prepare the Cranberry Sauce:
- In a small saucepan, combine the cranberries, 1/3 cup of water, and 1/3 cup of sugar. Cook over medium heat until the cranberries burst and the mixture thickens, about 10 minutes.
- Mix 1 tablespoon of cornstarch with 1 tablespoon of water to create a slurry. Stir this into the cranberry mixture and cook for another 2 minutes until thickened. Allow to cool completely.
- Assemble the Dessert:
- Once the cheesecake has cooled, remove it from the springform pan and transfer it to a serving platter. Spoon the cooled cranberry sauce over the top of the cheesecake, spreading it evenly.
- Chill and Serve:
- Refrigerate the cheesecake for at least 4 hours, or overnight, to allow the flavors to meld and the cheesecake to firm up. Serve chilled.
Extra Tips:
When preparing the cheesecake, verify all ingredients are at room temperature for the best texture and to avoid lumps in the filling. If you prefer a smoother cranberry sauce, you can blend it after cooking and before adding the cornstarch slurry.
For added festive flair, consider garnishing the cheesecake with a handful of fresh cranberries or a dusting of powdered sugar before serving. Enjoy this delightful dessert as the perfect end to your holiday meal!
Marshmallow Reindeer Cupcakes

Marshmallow Reindeer Cupcakes are an adorable and festive treat perfect for the holiday season. These fun cupcakes combine the rich flavors of chocolate with the playful texture of marshmallows, bringing joy to both children and adults alike. The whimsical design of reindeer faces on each cupcake not only makes them a delightful centerpiece for any Christmas dessert table but also adds a personal touch to your holiday baking.
Whether you’re hosting a Christmas party or simply looking for a fun cooking project to do with kids, these Marshmallow Reindeer Cupcakes are certain to impress.
Creating these cupcakes involves a few simple steps, from baking the cupcakes to decorating them with marshmallow antlers and candy eyes. The process is straightforward, making it an ideal recipe for beginner bakers or those short on time.
The key to these cupcakes is in the creative decoration, which transforms ordinary chocolate cupcakes into charming reindeer with a bit of frosting, pretzels, and candy embellishments. With just a little effort, you can bring a touch of magic to your holiday gatherings.
Ingredients for 4-6 servings:
- 1 cup all-purpose flour
- 1/2 cup unsweetened cocoa powder
- 1 cup granulated sugar
- 1 teaspoon baking soda
- 1/2 teaspoon baking powder
- 1/4 teaspoon salt
- 1/2 cup buttermilk
- 1/4 cup vegetable oil
- 1 large egg
- 1 teaspoon vanilla extract
- 1/2 cup boiling water
- 12 large marshmallows
- 24 mini pretzels
- 24 candy eyes
- 12 red candy-coated chocolates (for noses)
- Chocolate frosting (store-bought or homemade)
Cooking Instructions:
- Preheat and Prepare: Preheat your oven to 350°F (175°C). Line a muffin pan with cupcake liners to guarantee easy removal after baking.
- Mix Dry Ingredients: In a large bowl, sift together the flour, cocoa powder, sugar, baking soda, baking powder, and salt. This guarantees even distribution and helps prevent lumps.
- Combine Wet Ingredients: In a separate bowl, whisk together the buttermilk, vegetable oil, egg, and vanilla extract until well combined and smooth.
- Create Batter: Gradually add the wet ingredients to the dry ingredients, stirring gently. Once combined, slowly mix in the boiling water. The batter will be thin, but this is normal.
- Bake Cupcakes: Pour the batter into the prepared muffin pan, filling each liner about two-thirds full. Bake for 18–20 minutes or until a toothpick inserted into the center of a cupcake comes out clean. Allow them to cool completely on a wire rack.
- Prepare Decorations: While the cupcakes cool, prepare the marshmallow antlers by cutting each large marshmallow in half diagonally to create two pieces. Insert a mini pretzel into each marshmallow half to form antlers.
- Decorate: Once the cupcakes are cool, spread a generous amount of chocolate frosting on each one. Place a set of marshmallow antlers on top, add two candy eyes, and finish with a red candy-coated chocolate to create the reindeer’s nose.
Extra Tips:
When decorating the cupcakes, make sure the frosting is thick enough to hold the marshmallow antlers and other decorations securely in place. If you’re working with kids, have all the decorations prepped and set out in advance to streamline the process.
For an extra festive touch, consider using different colored candy-coated chocolates for the noses or experimenting with various candy eyes to give each reindeer its unique personality. Remember, the key is to have fun and let your creativity shine!
Snowman Marshmallow Pops
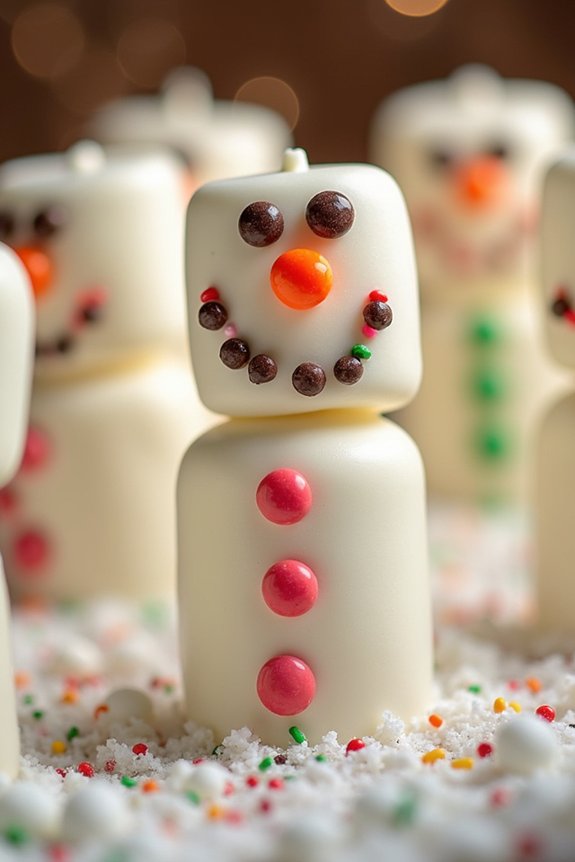
Snowman Marshmallow Pops are an adorable and festive treat perfect for the holiday season. These cute little pops aren’t only delightful to look at but also scrumptious to eat, making them a great activity for both kids and adults. With just a few ingredients, you can create these fun, wintry characters that will be the highlight of your Christmas dessert table.
They’re a wonderful combination of marshmallows, chocolate, and candies, bringing together a variety of textures and flavors in every bite.
These Snowman Marshmallow Pops are easy to make and require no baking, making them a convenient option for busy holiday schedules. Assembling these pops is an engaging and creative project that can be enjoyed by the whole family. Whether you’re making them as a treat for a holiday party or just as a fun family activity, these pops are sure to bring a smile to everyone’s face.
They also make charming homemade gifts, wrapped individually in cellophane bags and tied with a festive ribbon.
Ingredients for Snowman Marshmallow Pops (Serves 4-6):
- 12 large marshmallows
- 12 candy sticks or lollipop sticks
- 1 cup white chocolate chips
- 1/4 cup mini chocolate chips
- 12 orange candy-coated chocolates (for noses)
- 1/4 cup assorted colored candy sprinkles
- 1/4 cup shredded coconut (optional, for snow effect)
- 1 tablespoon vegetable oil
Instructions:
- Prepare the Marshmallows: Take two marshmallows and gently push them onto a candy stick, one on top of the other, to form the snowman’s body and head. Repeat this process to create a total of six snowmen.
- Melt the Chocolate: In a microwave-safe bowl, combine the white chocolate chips and vegetable oil, then microwave in 30-second intervals, stirring in between, until smooth and melted.
- Coat the Snowmen: Dip each marshmallow snowman into the melted white chocolate, making certain they’re completely covered. Allow any excess chocolate to drip off before placing them on a sheet of parchment paper.
- Decorate the Faces: While the chocolate is still soft, attach mini chocolate chips to create eyes and an orange candy-coated chocolate for the nose on the top marshmallow of each snowman.
- Add Buttons and Accessories: Use mini chocolate chips or colorful candy sprinkles to make buttons on the lower marshmallow. You can also sprinkle shredded coconut over the pops for a snowy effect.
- Let Them Set: Allow the snowman pops to set at room temperature or place them in the refrigerator for quicker setting until the chocolate has hardened completely.
Extra Tips:
When creating the Snowman Marshmallow Pops, make sure the white chocolate is melted smoothly to guarantee even coating on the marshmallows. If the chocolate begins to harden while decorating, you can reheat it for a few seconds.
For added stability, let the marshmallow pops rest on a wire rack after coating. If you’d like to personalize your snowmen further, use different colors of candy sprinkles to add scarves or hats.
These pops are best enjoyed fresh, but they can be stored in an airtight container for a couple of days if needed.
Eggnog Marshmallow Mousse
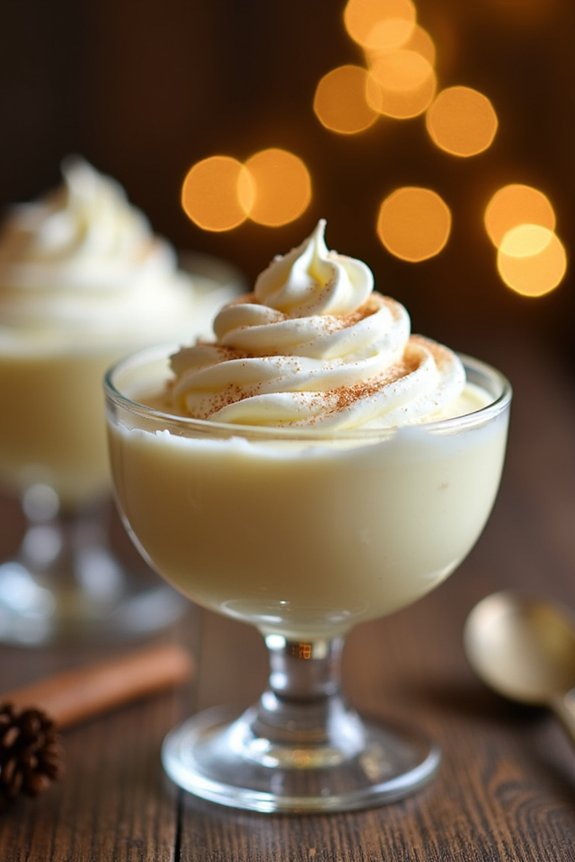
Eggnog Marshmallow Mousse is a delightful and festive dessert that combines the creamy richness of classic eggnog with the fluffy, light texture of marshmallows. Perfect for a Christmas gathering or cozy winter night, this mousse brings the best of both worlds together into a decadent and airy treat. The subtle spices of nutmeg and cinnamon enhance the eggnog flavor, creating a deliciously comforting experience.
This dish is easy to prepare and will surely impress your family and friends with its unique twist on traditional holiday flavors. Designed to serve 4-6 people, the Eggnog Marshmallow Mousse is both elegant and simple to make. You’ll need to set aside some time for chilling, but the actual preparation is quick and straightforward. Whether you’re a seasoned chef or a beginner in the kitchen, this recipe will guide you through the process of crafting a dessert that’s sure to become a holiday favorite.
Ingredients:
- 1 cup of eggnog
- 1/2 cup of heavy cream
- 2 tablespoons of sugar
- 1 teaspoon of vanilla extract
- 1/2 teaspoon of ground nutmeg
- 1/4 teaspoon of ground cinnamon
- 1 1/2 cups of mini marshmallows
- 1 packet of unflavored gelatin
- 2 tablespoons of cold water
- Whipped cream and additional nutmeg for garnish (optional)
Cooking Instructions:
- Prepare the Gelatin: In a small bowl, sprinkle the gelatin over the cold water and let it sit for about 5 minutes to soften. This step is vital for achieving the right mousse consistency.
- Heat the Eggnog Mixture: In a medium saucepan, combine the eggnog, sugar, vanilla extract, nutmeg, and cinnamon. Heat over medium heat, stirring occasionally, until the mixture is warm but not boiling.
- Melt the Marshmallows: Stir in the mini marshmallows into the warm eggnog mixture. Continue to stir until the marshmallows have completely melted and the mixture is smooth.
- Incorporate the Gelatin: Remove the saucepan from the heat and stir in the softened gelatin. Mix thoroughly until the gelatin is completely dissolved.
- Cool the Mixture: Transfer the eggnog mixture to a large bowl and let it cool to room temperature, stirring occasionally to prevent a skin from forming.
- Whip the Cream: In a separate bowl, whip the heavy cream until soft peaks form. This will add volume and lightness to the mousse.
- Combine and Chill: Gently fold the whipped cream into the cooled eggnog mixture until fully combined. Spoon the mousse into individual dessert glasses or bowls and refrigerate for at least 2 hours, or until set.
- Serve: Once set, serve the mousse chilled, garnished with a dollop of whipped cream and a sprinkle of nutmeg, if desired.
Extra Tips:
Make sure the eggnog mixture has cooled considerably before folding in the whipped cream, as mixing it in while too warm can cause the mousse to lose its airy texture.
If you prefer a stronger spice flavor, adjust the nutmeg and cinnamon to taste. For an extra festive touch, consider garnishing with a cinnamon stick or a dusting of cocoa powder.
Finally, allow enough time for the mousse to chill properly, as this will guarantee the best texture and flavor.
Marshmallow Candy Cane Cookies

Marshmallow Candy Cane Cookies are a festive treat that combines the delightful flavors of marshmallows and peppermint to create a holiday dessert that both kids and adults will love.
These cookies are perfect for sharing at holiday gatherings or giving as gifts during the Christmas season. With their chewy texture, sweet marshmallow chunks, and a hint of peppermint from the candy canes, these cookies are bound to become a new holiday favorite.
These cookies aren’t only easy to make but also a joy to decorate. The combination of marshmallows and crushed candy canes creates a delightful contrast in texture, while the festive colors add a cheerful touch to any dessert table.
The recipe is designed to serve 4-6 people, ideal for small gatherings or family treats. Follow the steps below to create these delicious Marshmallow Candy Cane Cookies and bring the joy of the holiday season to your kitchen.
Ingredients:
- 1 cup unsalted butter, softened
- 1 cup granulated sugar
- 1/2 cup brown sugar, packed
- 2 large eggs
- 1 teaspoon vanilla extract
- 2 3/4 cups all-purpose flour
- 1 teaspoon baking soda
- 1/2 teaspoon salt
- 1 cup mini marshmallows
- 1 cup crushed candy canes
- 1/2 cup white chocolate chips (optional)
Instructions:
- Preheat and Prepare: Preheat your oven to 350°F (175°C). Line two baking sheets with parchment paper or silicone baking mats to prevent sticking.
- Cream the Butter and Sugars: In a large mixing bowl, cream together the softened butter, granulated sugar, and brown sugar until light and fluffy. This should take about 3-4 minutes using an electric mixer on medium speed.
- Add Wet Ingredients: Add the eggs one at a time, beating well after each addition. Mix in the vanilla extract until fully incorporated.
- Mix Dry Ingredients Separately: In another bowl, whisk together the all-purpose flour, baking soda, and salt.
- Combine Wet and Dry Ingredients: Gradually add the dry ingredients to the wet mixture, mixing on low speed until just combined. Be careful not to overmix.
- Fold in Mix-ins: Using a spatula, gently fold in the mini marshmallows, crushed candy canes, and white chocolate chips, if using.
- Shape the Cookies: Using a cookie scoop or tablespoon, drop heaping spoonfuls of dough onto the prepared baking sheets, spacing them about 2 inches apart to allow for spreading.
- Bake the Cookies: Bake in the preheated oven for 10-12 minutes, or until the edges are lightly golden. Be careful not to overbake, as the marshmallows can melt and spread.
- Cool and Serve: Allow the cookies to cool on the baking sheets for 5 minutes before transferring them to a wire rack to cool completely. Enjoy your Marshmallow Candy Cane Cookies with a glass of milk or a cup of hot cocoa.
Extra Tips: For best results, make certain the butter is at room temperature before you start mixing. This helps achieve a smooth and creamy texture in the dough.
When crushing the candy canes, consider using a food processor or placing them in a zip-top bag and gently crushing with a rolling pin. This guarantees you get a mix of fine and coarse pieces, which adds a delightful crunch to the cookies.
If you’re preparing the dough in advance, it can be refrigerated for up to 24 hours. Just be sure to let it come to room temperature before baking. Enjoy the festive spirit these cookies bring to your holiday season!
Hot Chocolate Marshmallow Cake

Indulge in the ultimate festive treat with our Hot Chocolate Marshmallow Cake, a decadent dessert that combines the comforting flavors of hot chocolate with the gooey delight of marshmallows. This cake is perfect for the holiday season, bringing warmth and sweetness to your Christmas celebrations.
The rich, moist chocolate cake is infused with a hint of cocoa and topped with a luscious marshmallow frosting that melts in your mouth, making it an irresistible centerpiece for any holiday gathering.
Perfect for serving 4-6 people, this cake is ideal for small family gatherings or intimate holiday parties. The combination of deep chocolate notes and the fluffy marshmallow topping creates a nostalgic feeling reminiscent of sipping hot cocoa by the fire.
Whether you’re a seasoned baker or a beginner, this recipe is straightforward and rewarding, resulting in a show-stopping dessert that will have everyone reaching for seconds.
Ingredients:
- 1 cup all-purpose flour
- 1 cup granulated sugar
- 1/2 cup unsweetened cocoa powder
- 1 teaspoon baking powder
- 1/2 teaspoon baking soda
- 1/4 teaspoon salt
- 1/2 cup unsalted butter, melted
- 2 large eggs
- 1 teaspoon vanilla extract
- 1/2 cup whole milk
- 1/2 cup hot water
- 1 cup mini marshmallows
- 1/2 cup heavy cream
- 1/2 cup marshmallow fluff
- 1/4 cup powdered sugar
Cooking Instructions:
- Preheat and Prepare: Preheat your oven to 350°F (175°C). Grease and flour an 8-inch round cake pan to prevent sticking.
- Mix Dry Ingredients: In a large bowl, whisk together the flour, sugar, cocoa powder, baking powder, baking soda, and salt until well combined.
- Combine Wet Ingredients: In a separate bowl, beat the melted butter, eggs, and vanilla extract until smooth. Gradually add the milk, mixing until fully incorporated.
- Combine Wet and Dry Mixtures: Slowly add the wet ingredients to the dry ingredients, mixing until just combined. Carefully stir in the hot water until the batter is smooth and well-blended.
- Bake the Cake: Pour the cake batter into the prepared pan and bake for 30-35 minutes, or until a toothpick inserted into the center comes out clean. Allow the cake to cool in the pan for 10 minutes before transferring to a wire rack to cool completely.
- Prepare Marshmallow Topping: In a small saucepan over low heat, melt the mini marshmallows with the heavy cream, stirring constantly until smooth. Remove from heat and let cool slightly.
- Frost the Cake: In a medium bowl, combine the cooled marshmallow mixture with the marshmallow fluff and powdered sugar. Beat until light and fluffy. Spread the marshmallow frosting evenly over the cooled cake.
- Serve and Enjoy: Cut the cake into slices and serve immediately for best results. Enjoy the gooey, chocolatey goodness with a side of hot cocoa for an extra festive treat.
Extra Tips:
For an added touch of holiday magic, consider sprinkling crushed peppermint candies or chocolate shavings on top of the marshmallow frosting before serving.
If you prefer a more pronounced cocoa flavor, you can substitute the hot water with freshly brewed coffee. This cake is best enjoyed fresh, but if you have leftovers, store them in an airtight container at room temperature for up to two days.
Reheat slices in the microwave for a few seconds to restore the gooey texture of the marshmallow topping.
Marshmallow Filled Gingerbread Men
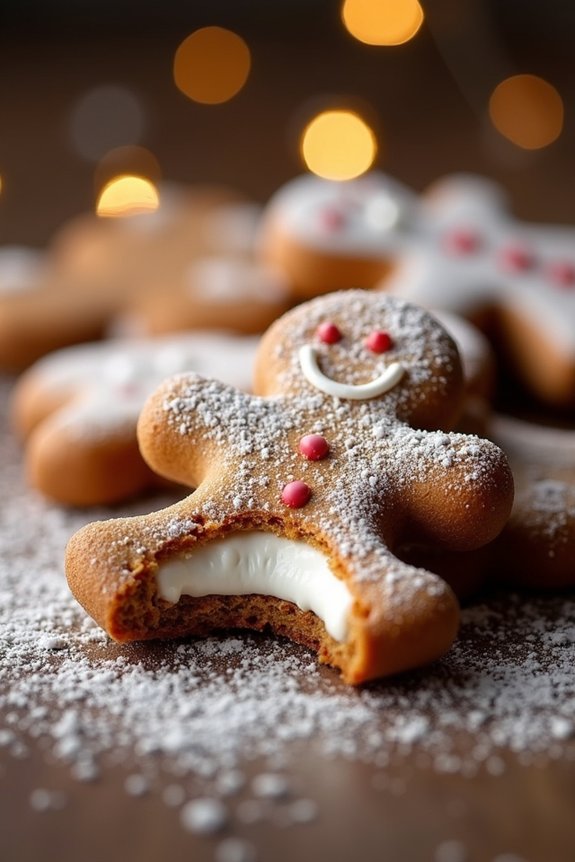
There’s something magical about the combination of spicy gingerbread and sweet marshmallow that makes the holiday season feel even more festive. Marshmallow Filled Gingerbread Men are a delightful twist on the classic gingerbread cookie, with a surprise gooey center that will surely bring smiles to anyone who takes a bite.
Perfect for holiday gatherings, these cookies aren’t only delicious but also fun to make and decorate. Creating these treats involves crafting gingerbread dough with warming spices and then filling them with a marshmallow surprise before baking. The result is a batch of cookies that are crispy on the outside and soft and melty on the inside.
This recipe serves 4-6 people, guaranteeing there’s enough to share with family and friends during your Christmas celebrations.
Ingredients:
- 3 cups all-purpose flour
- 1 teaspoon baking soda
- 1/4 teaspoon salt
- 1 tablespoon ground ginger
- 1 tablespoon ground cinnamon
- 1/2 teaspoon ground cloves
- 1/4 teaspoon ground nutmeg
- 1/2 cup unsalted butter, softened
- 1/2 cup packed dark brown sugar
- 1 large egg
- 1/2 cup unsulfured molasses
- 1 teaspoon vanilla extract
- 1 pack (10 oz) mini marshmallows
- 1/4 cup powdered sugar (for dusting)
Cooking Instructions:
- Prepare the Dough: In a large bowl, whisk together the flour, baking soda, salt, ginger, cinnamon, cloves, and nutmeg. In a separate bowl, beat the butter and brown sugar until light and fluffy.
- Add the egg, molasses, and vanilla extract, and mix until well combined.
- Combine Ingredients: Gradually add the dry ingredients to the wet ingredients, mixing on low speed until the dough forms. Once combined, shape the dough into a disk, wrap it in plastic wrap, and refrigerate it for at least 2 hours or until firm.
- Preheat and Roll: Preheat your oven to 350°F (175°C). On a lightly floured surface, roll out the dough to about 1/4-inch thickness. Use a gingerbread man cookie cutter to cut out shapes and carefully place them on a parchment-lined baking sheet.
- Add Marshmallow Filling: Place a few mini marshmallows in the center of half of the gingerbread shapes. Cover with another gingerbread man cutout and gently press the edges to seal.
- Bake the Cookies: Bake the cookies in the preheated oven for 10-12 minutes, or until the edges are golden brown. Allow them to cool on the baking sheet for a few minutes before transferring them to a wire rack to cool completely.
- Decorate and Serve: Once cooled, dust the cookies with powdered sugar for a festive touch. Serve them as a delightful treat for your holiday gathering.
Extra Tips:
To make certain your Marshmallow Filled Gingerbread Men have the perfect texture, it’s important to measure your flour correctly. Too much flour can make the cookies tough and crumbly, so use a spoon to fluff the flour before spooning it into your measuring cup and leveling it off with a knife.
Additionally, verify your butter is softened to the right consistency to blend smoothly with the sugar, resulting in a tender cookie. If you prefer a more marshmallowy center, experiment with larger marshmallows or marshmallow fluff for a different texture and flavor.
White Chocolate Marshmallow Bark
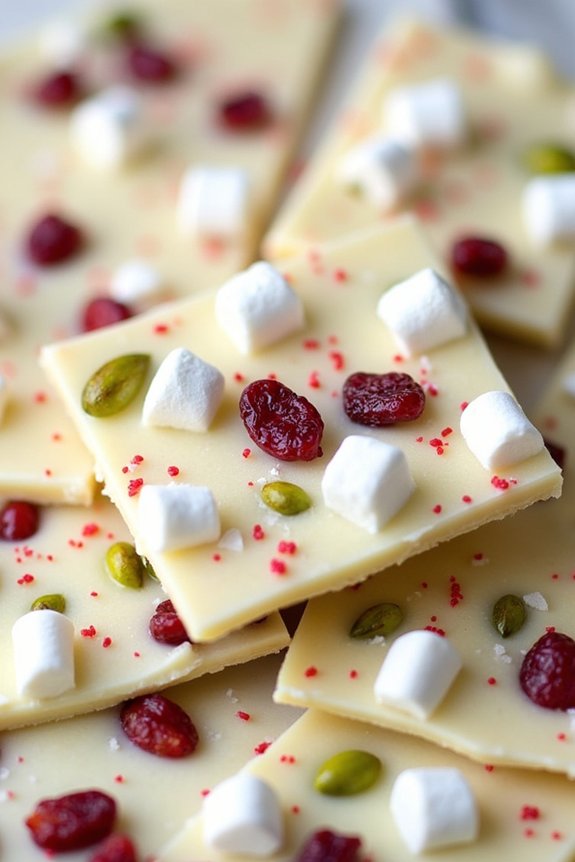
White Chocolate Marshmallow Bark is a delightful treat that pairs the creamy sweetness of white chocolate with the soft, fluffy texture of marshmallows. This festive dessert is perfect for the holiday season, offering a balance of rich flavors and eye-catching visuals.
It’s quick to make, which makes it an ideal choice for those looking to create a homemade gift or a show-stopping centerpiece for their Christmas dessert table.
The beauty of White Chocolate Marshmallow Bark lies in its simplicity and versatility. You can easily customize it with your favorite add-ins like nuts, dried fruits, or even a sprinkle of sea salt for a gourmet touch.
Plus, it’s a no-bake recipe, meaning it’s both convenient and fun to prepare, making it a perfect kitchen activity for families with children. The following recipe serves 4-6 people, guaranteeing that everyone gets to enjoy a piece of this festive delight.
Ingredients:
- 2 cups white chocolate chips
- 1 cup mini marshmallows
- 1/2 cup dried cranberries
- 1/2 cup chopped pistachios
- 1 teaspoon vanilla extract
- 1/4 teaspoon sea salt
- 1 tablespoon sprinkles (optional)
Instructions:
- Prepare Your Baking Sheet: Line a baking sheet with parchment paper. This will prevent the bark from sticking and make it easier to remove once set.
- Melt the White Chocolate: In a microwave-safe bowl, melt the white chocolate chips in 30-second intervals, stirring in between until smooth. Alternatively, you can melt the chocolate using a double boiler on the stove.
- Add Flavorings: Once the chocolate is melted, stir in the vanilla extract and sea salt. This will enhance the flavor of the chocolate.
- Mix in the Add-ins: Gently fold in the mini marshmallows, dried cranberries, and chopped pistachios into the melted chocolate, guaranteeing that they’re evenly distributed.
- Spread the Mixture: Pour the chocolate mixture onto the prepared baking sheet, spreading it evenly to a thickness of about 1/4 inch.
- Add Sprinkles (Optional): If using, sprinkle the colored sprinkles on top of the bark for a festive touch.
- Set the Bark: Place the baking sheet in the refrigerator and allow the chocolate to set for about 1-2 hours, or until firm.
- Break into Pieces: Once set, remove the bark from the refrigerator and break it into pieces of your desired size.
Extra Tips:
When making White Chocolate Marshmallow Bark, confirm that the chocolate isn’t overheated as this can cause it to seize and become grainy.
If you don’t have a microwave, a double boiler is a great option for melting chocolate evenly. For a more colorful appearance, consider using a mix of white and colored mini marshmallows.
Additionally, storing the bark in an airtight container will keep it fresh and maintain its texture for up to a week.
Marshmallow Christmas Wreaths
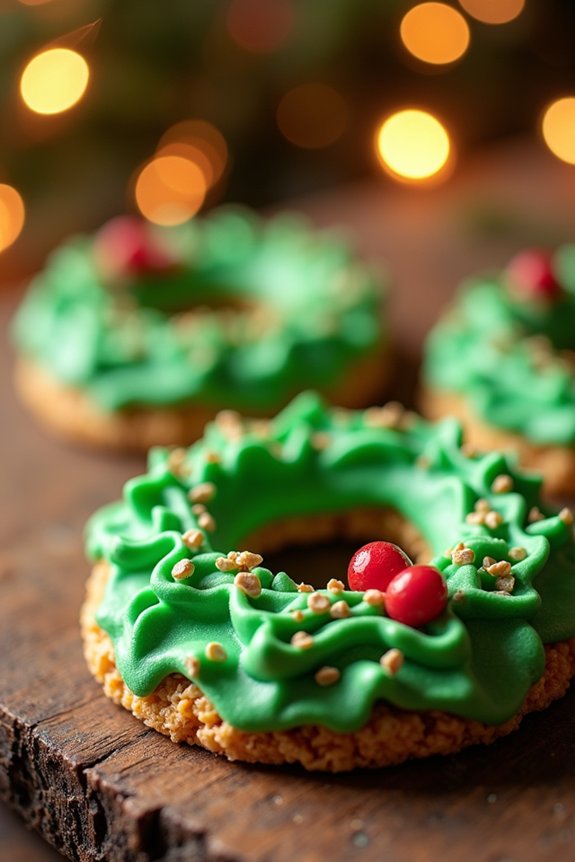
The vibrant green color of the marshmallow mixture, adorned with red candy “berries,” makes these wreaths a visually appealing treat that embodies the spirit of Christmas. Not only are they cute and colorful, but they also offer a delicious blend of sweet and crunchy flavors that will have everyone reaching for more.
With a simple list of ingredients and easy-to-follow instructions, you can whip up a batch of these adorable Marshmallow Christmas Wreaths in no time.
Ingredients (Serves 4-6):
- 1/2 cup unsalted butter
- 1 package (10 oz) mini marshmallows
- 1 teaspoon green food coloring
- 1 teaspoon vanilla extract
- 6 cups cornflakes cereal
- Red cinnamon candies (for decoration)
- Cooking spray or additional butter (for greasing)
Cooking Instructions:
- Prepare the Base: In a large saucepan, melt the unsalted butter over low heat. Once fully melted, add the mini marshmallows and stir continuously until they’re completely melted and the mixture is smooth.
- Add Color and Flavor: Remove the saucepan from heat. Stir in the green food coloring and vanilla extract until the marshmallow mixture is evenly colored and fully incorporated.
- Mix with Cereal: Gently fold in the cornflakes cereal, ensuring that all the cereal is well-coated with the marshmallow mixture. Be careful not to crush the cornflakes as you mix.
- Shape the Wreaths: Using a spoon, drop spoonfuls of the cereal mixture onto a parchment-lined baking sheet. Grease your fingers with cooking spray or butter and shape each spoonful into a wreath form, creating a small hole in the center and forming a circular shape.
- Decorate: While the wreaths are still warm, press a few red cinnamon candies onto each one to resemble holly berries. Allow the wreaths to cool completely at room temperature, letting them set.
- Serve: Once set, carefully lift the wreaths off the parchment paper and arrange them on a serving plate. Enjoy your festive Marshmallow Christmas Wreaths!
Extra Tips:
For best results, work quickly once the cereal is mixed in, as the marshmallow mixture can begin to set as it cools.
If you find the mixture sticking to your hands while shaping the wreaths, keep a small bowl of water nearby to lightly dampen your fingers, which will prevent sticking.
To make the wreaths even more festive, consider adding a sprinkle of edible glitter or using different colored candies for decoration.
Store the wreaths in an airtight container to keep them fresh and chewy for several days.