

When the holiday season rolls around, there’s nothing quite like a dessert that’s both cute and mouthwatering. I’ve rounded up 10 mini Christmas dessert recipes that are bound to bring a festive touch to your gatherings. Think peppermint chocolate tarts and tiny gingerbread trifles, perfect for sharing and simple to make. Ready to see how these little treats can brighten up your holiday table? Let’s check them out together!
Mini Peppermint Chocolate Tarts
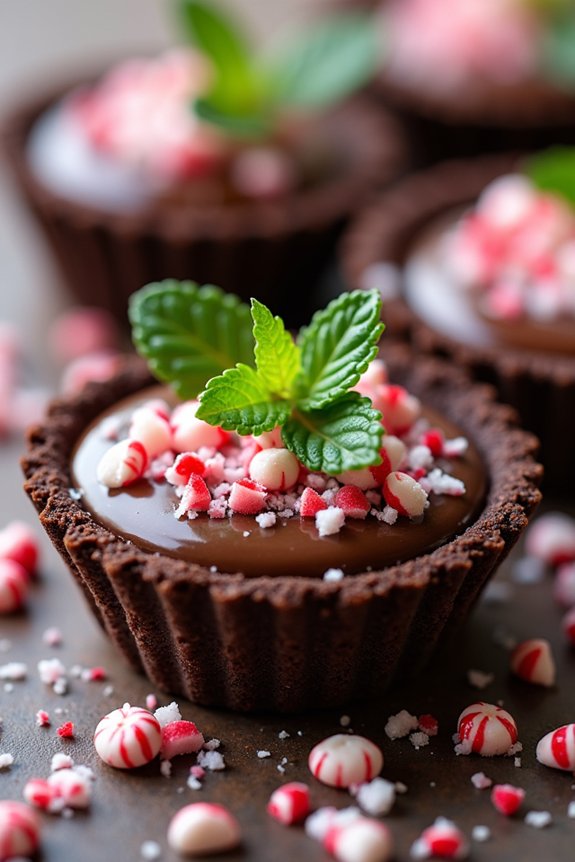
Mini Peppermint Chocolate Tarts are a delightful and festive treat perfect for any holiday celebration. These bite-sized desserts combine the rich flavors of chocolate with the invigorating taste of peppermint, making them a seasonal favorite. Their petite size makes them ideal for serving at parties, allowing guests to indulge without overindulging. The combination of a crisp chocolate crust and a smooth, creamy peppermint-infused filling creates a perfect balance of textures and flavors.
Creating these Mini Peppermint Chocolate Tarts at home is easier than you might think, and they’re sure to impress your family and friends. This recipe yields 4-6 servings, making it suitable for small gatherings or as part of a larger dessert buffet. By following this simple recipe, you can create a stunning dessert that looks as good as it tastes. Gather your ingredients and get ready to enjoy the delightful combination of chocolate and peppermint.
Ingredients (Serves 4-6):
- 1 cup chocolate wafer cookies, crushed
- 4 tablespoons unsalted butter, melted
- 1 cup heavy cream
- 8 ounces semi-sweet chocolate, chopped
- 1 teaspoon peppermint extract
- 1/4 cup powdered sugar
- Crushed peppermint candies, for garnish
- Fresh mint leaves, for garnish (optional)
Instructions:
- Prepare the Crust: Begin by preheating your oven to 350°F (175°C). In a medium-sized bowl, combine the crushed chocolate wafer cookies with the melted butter. Mix until the crumbs are evenly coated and resemble wet sand.
- Form the Tart Shells: Divide the cookie mixture evenly among mini tart pans or a muffin tin lined with paper liners. Press the mixture firmly into the bottom and up the sides to form a compact crust. Bake in the preheated oven for 8-10 minutes, or until the crust is set. Remove from the oven and let cool completely.
- Make the Chocolate Filling: In a small saucepan, heat the heavy cream over medium heat until it just begins to simmer. Remove from heat and add the chopped semi-sweet chocolate. Let sit for 2 minutes, then stir until smooth and fully combined. Stir in the peppermint extract.
- Fill the Tart Shells: Pour the chocolate mixture into the cooled tart shells, filling each one to the brim. Smooth the tops with a spoon or spatula if necessary. Refrigerate the tarts for at least 2 hours, or until the filling is set.
- Garnish and Serve: Before serving, sprinkle the tops of the tarts with crushed peppermint candies. If desired, add a fresh mint leaf for an extra festive touch. Serve chilled and enjoy the invigorating combination of flavors.
Extra Tips: When crushing the chocolate wafer cookies, you can use a food processor for a finer texture, which will help the crust hold together better. If you don’t have mini tart pans, a muffin tin works perfectly; just be sure to use liners for easy removal.
For a more intense peppermint flavor, you can adjust the amount of peppermint extract to taste, but be careful not to overpower the chocolate. These tarts can be made a day in advance and stored in the refrigerator, making them a convenient option for holiday entertaining.
Bite-Sized Eggnog Cheesecakes
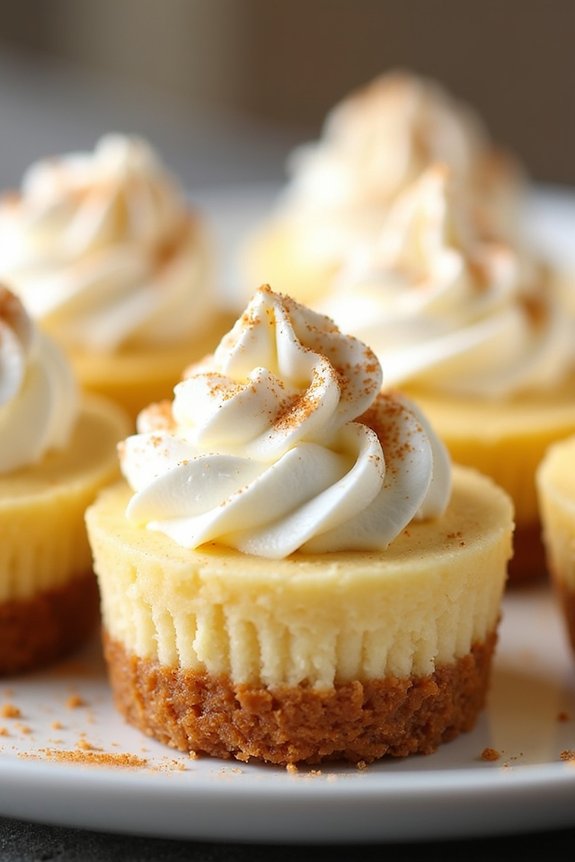
Bring the festive spirit to your dessert table with these delightful Bite-Sized Eggnog Cheesecakes. Perfect for a holiday gathering or a cozy night in, these mini cheesecakes combine the rich, creamy flavor of eggnog with the classic taste of cheesecake, all in a bite-sized form that’s both convenient and indulgent.
With a buttery graham cracker crust and a smooth, spiced eggnog filling, these treats are sure to be a hit with friends and family. The beauty of these mini cheesecakes lies not just in their taste, but also in their simplicity. They’re easy to prepare, making them an ideal choice for those bustling holiday days when you’re juggling numerous tasks.
Plus, their small size means they’re perfectly portioned for a dessert buffet or a sweet treat after dinner. This recipe yields enough to serve 4-6 people, guaranteeing everyone gets their fair share of holiday cheer.
Ingredients (serving size: 4-6 people):
- 1 cup graham cracker crumbs
- 2 tablespoons granulated sugar
- 1/4 cup unsalted butter, melted
- 8 ounces cream cheese, softened
- 1/4 cup granulated sugar
- 1 large egg
- 1/4 cup eggnog
- 1/2 teaspoon vanilla extract
- 1/4 teaspoon ground nutmeg
- Whipped cream, for topping (optional)
- Additional ground nutmeg, for garnish (optional)
Cooking Instructions:
- Prepare the Crust: Preheat your oven to 325°F (163°C). In a medium bowl, mix together the graham cracker crumbs, 2 tablespoons of granulated sugar, and melted butter until well combined. The mixture should resemble wet sand.
- Form the Crusts: Line a mini muffin tin with paper liners. Spoon about a tablespoon of the crumb mixture into each liner. Use the back of a spoon or your fingertips to press the crumbs firmly into the bottom to form a crust.
- Make the Filling: In a large bowl, beat the softened cream cheese and 1/4 cup of granulated sugar together with an electric mixer until smooth and creamy. Add the egg and continue to beat until fully incorporated.
- Add Eggnog and Flavorings: Pour in the eggnog, vanilla extract, and ground nutmeg, and mix on low speed until the filling is smooth and well combined.
- Fill the Muffin Tin: Carefully spoon the cream cheese mixture on top of the prepared crusts in the muffin tin, filling each cup almost to the top.
- Bake the Cheesecakes: Place the muffin tin in the preheated oven and bake for about 18-20 minutes, or until the filling is set and slightly puffed. The centers should still have a slight jiggle when shaken.
- Cool and Chill: Remove the tin from the oven and allow the cheesecakes to cool in the tin for about 10 minutes. Transfer them to a wire rack to cool completely, then refrigerate for at least 2 hours or until thoroughly chilled.
- Serve and Garnish: Before serving, top each mini cheesecake with a dollop of whipped cream and a sprinkle of ground nutmeg, if desired.
Extra Tips:
When preparing the crust, ascertain that the graham cracker mixture is packed tightly into the liners to prevent crumbling when removed.
Softening the cream cheese before mixing will result in a smoother filling, so take it out of the refrigerator ahead of time. For an extra burst of flavor, consider adding a pinch of cinnamon to the filling.
If you don’t have mini muffin tins, standard muffin tins can be used; just adjust the baking time accordingly.
Tiny Gingerbread Trifles
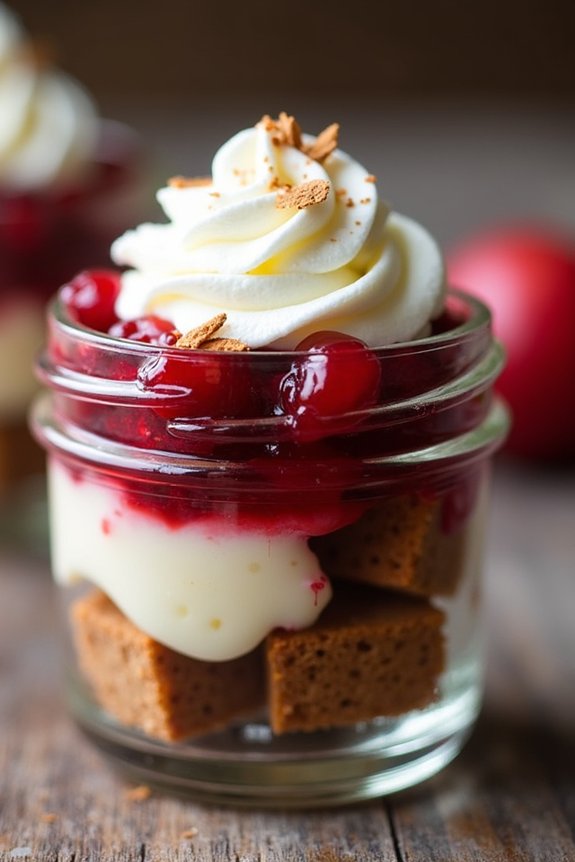
Indulge in the festive spirit with Tiny Gingerbread Trifles, a delightful mini dessert perfect for holiday gatherings. These trifles combine layers of spiced gingerbread cake, creamy vanilla pudding, and a zesty cranberry compote, creating a symphony of flavors in each bite. Their petite size makes them a charming addition to your Christmas dessert table, offering a taste of tradition in a modern, elegant presentation.
Creating these trifles is a straightforward process that will leave you with a deliciously impressive dessert. The gingerbread cake is rich with warming spices like cinnamon and ginger, contrasting beautifully with the smoothness of the pudding and the tartness of the cranberry compote. Assemble them in small glasses or jars for individual servings that are as pleasing to the eye as they’re to the palate.
Ingredients (Serves 4-6):
- 1 cup all-purpose flour
- 1/2 cup molasses
- 1/2 cup brown sugar
- 1/2 cup unsalted butter, melted
- 1/4 cup milk
- 1 large egg
- 1 teaspoon baking soda
- 1 teaspoon ground ginger
- 1 teaspoon ground cinnamon
- 1/4 teaspoon ground cloves
- 1/4 teaspoon salt
- 2 cups vanilla pudding
- 1 cup cranberries, fresh or frozen
- 1/2 cup orange juice
- 1/2 cup granulated sugar
- Whipped cream for topping (optional)
Cooking Instructions:
- Preheat and Prepare: Preheat your oven to 350°F (175°C). Grease and flour an 8-inch square baking pan for the gingerbread cake.
- Mix Gingerbread Batter: In a large bowl, whisk together the flour, baking soda, ginger, cinnamon, cloves, and salt. In another bowl, combine the molasses, brown sugar, melted butter, milk, and egg. Gradually add the wet ingredients to the dry ingredients, stirring until just combined.
- Bake the Cake: Pour the batter into the prepared baking pan. Bake for 25-30 minutes, or until a toothpick inserted into the center comes out clean. Allow the cake to cool completely before cutting into small cubes.
- Prepare Cranberry Compote: In a saucepan over medium heat, combine the cranberries, orange juice, and granulated sugar. Cook until the cranberries burst and the mixture thickens, about 10 minutes. Let it cool to room temperature.
- Assemble the Trifles: In each serving glass or jar, layer gingerbread cubes, a spoonful of vanilla pudding, and a dollop of cranberry compote. Repeat the layers until the glass is nearly full, ending with a layer of pudding or compote.
- Chill and Serve: Refrigerate the trifles for at least 1 hour to allow the flavors to meld together. Just before serving, top with a swirl of whipped cream if desired.
Extra Tips: When assembling the trifles, verify each layer is distinct for an appealing visual contrast. For added texture, consider adding a sprinkle of crushed ginger cookies between the layers.
The trifles can be made a day in advance and stored in the refrigerator, making them a convenient option for holiday entertaining. Adjust the sweetness of the cranberry compote to your liking by adding more or less sugar as needed. Enjoy these Tiny Gingerbread Trifles as a sweet ending to your festive feast!
Petite Cranberry Orange Scones
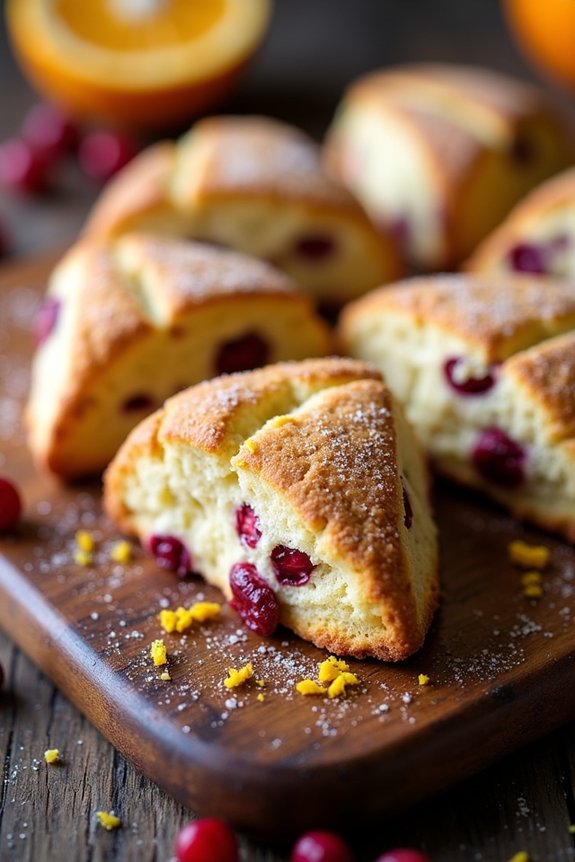
Petite Cranberry Orange Scones are a delightful addition to any holiday dessert table. These mini scones are a perfect blend of tangy cranberries and zesty orange, offering a burst of flavor in every bite. Their petite size makes them ideal for sharing, and they pair wonderfully with a warm cup of tea or coffee.
Whether you’re hosting a festive gathering or simply enjoying a quiet holiday afternoon, these scones are sure to bring a touch of cheer to your celebrations. The combination of fresh cranberries and orange zest gives these scones a vibrant taste that’s both invigorating and comforting.
The scones are light and tender, with a slightly crisp exterior, making them a perfect treat for those who prefer a less sweet dessert. Serve them warm with a pat of butter or a dollop of clotted cream, and watch them disappear in no time.
These Petite Cranberry Orange Scones are easy to make and even easier to enjoy, making them a must-have for your holiday baking list.
Ingredients (Serves 4-6):
- 2 cups all-purpose flour
- 1/4 cup granulated sugar
- 1 tablespoon baking powder
- 1/2 teaspoon salt
- 1/2 cup unsalted butter, cold and cubed
- 1/2 cup fresh cranberries, roughly chopped
- 1 tablespoon orange zest
- 1/2 cup heavy cream
- 1 large egg
- 1 teaspoon vanilla extract
- 1 tablespoon milk (for brushing)
- 1 tablespoon coarse sugar (for sprinkling)
Cooking Instructions:
- Preheat the Oven: Preheat your oven to 400°F (200°C) and line a baking sheet with parchment paper.
- Mix Dry Ingredients: In a large mixing bowl, whisk together the flour, granulated sugar, baking powder, and salt until well combined.
- Cut in Butter: Add the cold, cubed butter to the dry ingredients. Using a pastry blender or your fingers, work the butter into the flour mixture until it resembles coarse crumbs.
- Add Cranberries and Orange Zest: Stir in the chopped cranberries and orange zest, making certain they’re evenly distributed throughout the mixture.
- Combine Wet Ingredients: In a small bowl, whisk together the heavy cream, egg, and vanilla extract. Pour this mixture into the dry ingredients, and gently fold until just combined. The dough should be slightly sticky.
- Shape the Dough: Turn the dough out onto a lightly floured surface. Gently pat it into a circle about 1-inch thick. Use a knife or a dough cutter to divide the circle into 8 small wedges.
- Prepare for Baking: Place the scone wedges onto the prepared baking sheet. Brush the tops with milk and sprinkle with coarse sugar for a delightful crunch.
- Bake the Scones: Bake in the preheated oven for 15-18 minutes, or until the scones are golden brown and a toothpick inserted into the center comes out clean.
- Cool and Serve: Allow the scones to cool on a wire rack for a few minutes before serving. Enjoy them warm or at room temperature.
Extra Tips:
When making these scones, make sure the butter is as cold as possible, as this helps create a flaky texture. If you don’t have fresh cranberries, dried cranberries can be used, but consider soaking them in orange juice beforehand to plump them up and add extra flavor.
To prevent overworking the dough, mix until just combined to avoid tough scones. Finally, if you want a more pronounced orange flavor, add a little orange juice to the wet ingredients.
Miniature Yule Log Cakes
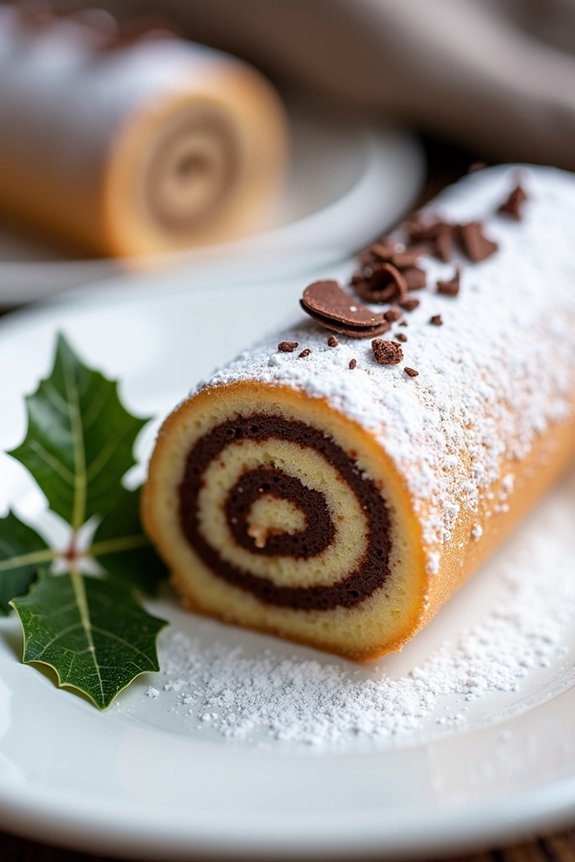
Delight your family and friends this holiday season with Miniature Yule Log Cakes, a charming and festive dessert that brings the spirit of Christmas to your table. These adorable mini cakes are a delightful twist on the traditional yule log, featuring a light and fluffy sponge cake rolled with a luscious chocolate filling. Perfect for individual servings, these miniature treats aren’t only visually appealing but also packed with rich flavors that embody the warmth and joy of the season.
Whether you’re hosting a holiday party or simply enjoying a cozy evening at home, these Miniature Yule Log Cakes are bound to impress and satisfy any sweet tooth.
Creating these mini yule logs is a fun and rewarding process that combines classic baking techniques with creative decoration. The sponge cake base is delicately rolled with a creamy chocolate frosting, then adorned with festive decorations such as powdered sugar, chocolate shavings, or miniature holly leaves. The result is a stunning presentation that captures the essence of a winter wonderland.
With the following recipe, you can easily prepare these delightful desserts for a serving size of 4-6 people, making them an ideal addition to your holiday dessert spread.
Ingredients (Serves 4-6):
- 4 large eggs
- 1/2 cup granulated sugar
- 1 teaspoon vanilla extract
- 1/2 cup all-purpose flour
- 1/4 cup unsweetened cocoa powder
- 1 teaspoon baking powder
- 1/4 teaspoon salt
- 1/4 cup confectioners’ sugar (for dusting)
- 1 cup heavy cream
- 1/2 cup semi-sweet chocolate chips
- 2 tablespoons unsalted butter
- 1 teaspoon instant coffee granules
- Festive decorations (e.g., powdered sugar, chocolate shavings, holly leaves)
Instructions:
- Preheat and Prepare: Preheat your oven to 350°F (175°C). Line a 10×15-inch jelly roll pan with parchment paper, leaving some overhang on the sides for easy removal later.
- Make the Sponge Cake: In a large mixing bowl, beat the eggs, granulated sugar, and vanilla extract until thick and pale, about 5 minutes. In a separate bowl, sift together flour, cocoa powder, baking powder, and salt. Gently fold the dry ingredients into the egg mixture until just combined.
- Bake the Cake: Pour the batter into the prepared pan and spread evenly. Bake for 10-12 minutes, or until the cake springs back when lightly touched. Don’t overbake.
- Roll the Cake: Immediately after removing the cake from the oven, dust the top with confectioners’ sugar. Place a clean kitchen towel over the cake, and carefully flip it onto a flat surface. Gently peel off the parchment paper. Starting from a short edge, roll the cake with the towel inside and let it cool completely.
- Prepare the Filling: In a small saucepan, heat the heavy cream over medium heat until it begins to simmer. Remove from heat and add the chocolate chips, butter, and instant coffee granules. Stir until smooth and let cool to room temperature.
- Assemble the Logs: Unroll the cooled cake and spread the chocolate filling evenly over the surface. Roll the cake back up (without the towel), and cut into 4-6 equal pieces.
- Decorate: Place the mini yule logs on a serving platter. Dust with additional confectioners’ sugar, add chocolate shavings, and decorate with holly leaves or other festive garnishes of your choice.
Extra Tips:
To guarantee your Miniature Yule Log Cakes have the perfect texture, be gentle when folding the dry ingredients into the egg mixture to maintain the airiness of the batter. If the cake cracks slightly during rolling, don’t worry; the filling can help hold it together.
For a more intense chocolate flavor, consider using dark chocolate chips for the filling. Finally, for a professional finish, use a serrated knife to carefully slice the roll into smaller logs, and chill them briefly before serving to help them hold their shape. Enjoy your holiday baking!
Little Candy Cane Meringues
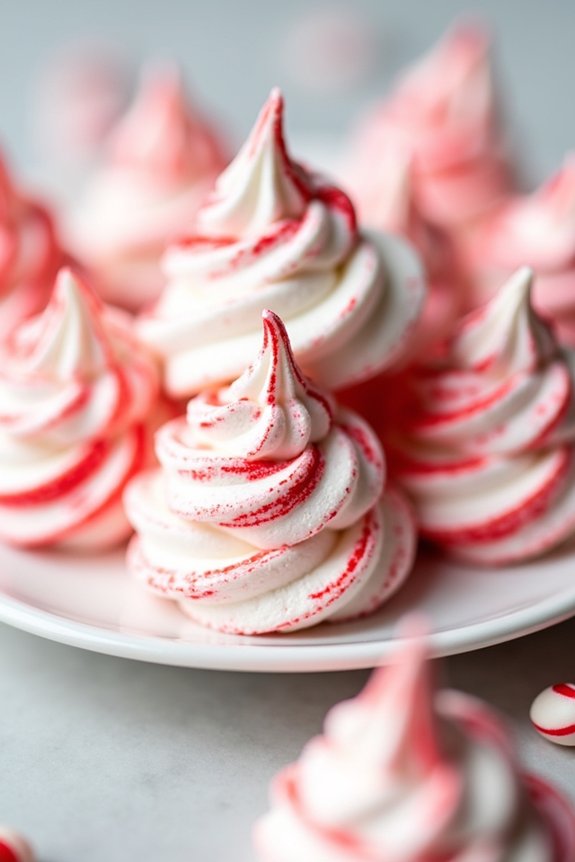
These Little Candy Cane Meringues are a delightful addition to any Christmas dessert spread. With their light and airy texture and a hint of peppermint, they perfectly capture the festive spirit. The beautiful red and white swirls resemble candy canes, making them not only delicious but also visually stunning. Perfect for serving at holiday gatherings or as a sweet gift, these meringues are sure to impress your guests with both their flavor and presentation.
Creating these charming treats involves whipping up a simple meringue mixture, infusing it with peppermint, and piping it into beautiful swirl shapes. This recipe yields enough meringues to serve 4-6 people, guaranteeing everyone at the table gets to enjoy these sweet bites. The process is straightforward, but be sure to follow each step carefully to achieve the perfect texture and appearance.
Ingredients (Serving size: 4-6 people):
- 4 large egg whites
- 1 cup granulated sugar
- 1/4 teaspoon cream of tartar
- 1/4 teaspoon peppermint extract
- Red gel food coloring
Instructions:
- Preparation: Preheat your oven to 225°F (110°C) and line two baking sheets with parchment paper. Confirm the egg whites are at room temperature for maximum volume.
- Whip the Egg Whites: In a clean, dry mixing bowl, add the egg whites. Use an electric mixer to beat them on medium speed until they become frothy. Add the cream of tartar and continue beating until soft peaks form.
- Add Sugar Gradually: Increase the mixer speed to high and start adding the granulated sugar, one tablespoon at a time. Allow the sugar to dissolve completely before adding more. Continue this process until the meringue reaches stiff, glossy peaks.
- Incorporate Peppermint: Gently fold in the peppermint extract with a spatula, ensuring it’s evenly distributed throughout the meringue.
- Prepare the Piping Bag: Fit a piping bag with a large star tip. Using a small brush or a toothpick, add streaks of red gel food coloring along the inside of the bag. This will create the candy cane effect when the meringue is piped.
- Pipe the Meringues: Carefully fill the prepared piping bag with the meringue mixture. Pipe small swirls onto the lined baking sheets, spacing them about an inch apart.
- Bake the Meringues: Place the baking sheets in the preheated oven and bake for 1.5 to 2 hours. The meringues should be dry to the touch and easily lift off the parchment paper. Turn off the oven and let the meringues cool completely inside to prevent cracking.
Extra Tips: Confirm that your mixing bowl and beaters are thoroughly clean and free of any grease, as this can prevent the egg whites from whipping properly. If you’re short on time, you can use store-bought meringue powder as a substitute for egg whites. For a more intense peppermint flavor, you can adjust the extract quantity to taste. Remember to store your meringues in an airtight container to keep them crisp and fresh.
Small Fruitcake Cookies
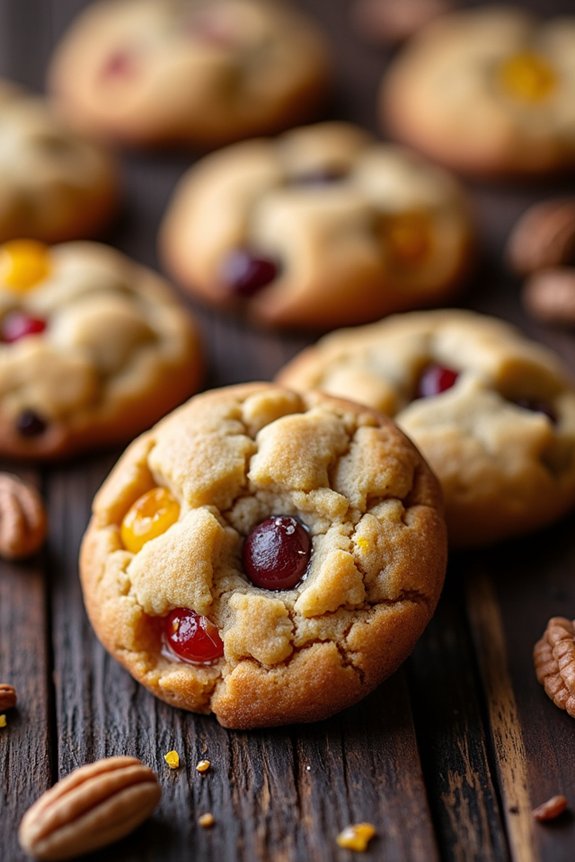
These Small Fruitcake Cookies are a delightful twist on the traditional fruitcake, perfect for those who crave the festive flavors of the holiday season in a smaller, more manageable form. Packed with candied fruits, nuts, and a hint of warm spices, these cookies are an excellent addition to your Christmas dessert table.
Their bite-sized form makes them easy to serve at gatherings, and they’re sure to be a hit with both adults and children alike. Whether you’re looking to add variety to your holiday dessert offerings or want a quick and easy recipe to share with friends and family, these Small Fruitcake Cookies are a wonderful choice.
Ideal for serving 4-6 people, this recipe will yield a batch of cookies that are brimming with holiday cheer and robust flavors that echo the essence of Christmas.
Ingredients:
- 1 cup of all-purpose flour
- 1/2 teaspoon of baking powder
- 1/4 teaspoon of salt
- 1/2 teaspoon of ground cinnamon
- 1/4 teaspoon of ground nutmeg
- 1/4 teaspoon of ground cloves
- 1/2 cup of unsalted butter, softened
- 1/2 cup of brown sugar
- 1 large egg
- 1 teaspoon of vanilla extract
- 1 cup of mixed candied fruits, chopped
- 1/2 cup of chopped nuts (walnuts or pecans recommended)
Cooking Instructions:
1. Prepare the Dry Ingredients:
In a medium-sized bowl, whisk together the all-purpose flour, baking powder, salt, ground cinnamon, ground nutmeg, and ground cloves. This mixture will guarantee that the spices are evenly distributed throughout the cookie dough.
2. Cream the Butter and Sugar:
In a large mixing bowl, beat the softened butter and brown sugar together using an electric mixer on medium speed until the mixture is light and fluffy, about 3-4 minutes. This creaming process incorporates air, which will help give the cookies their soft texture.
3. Incorporate the Egg and Vanilla:
Add the egg and vanilla extract to the butter and sugar mixture. Beat until fully combined, making sure that the egg is well incorporated to provide moisture and richness to the dough.
4. Combine Wet and Dry Ingredients:
Gradually add the dry ingredients to the wet mixture, mixing on low speed until just combined. Be careful not to overmix, as this can result in tough cookies.
5. Fold in Fruits and Nuts:
Using a spatula or wooden spoon, gently fold in the chopped candied fruits and nuts until they’re distributed evenly throughout the dough. This will guarantee that each cookie is packed with flavor and texture.
6. Chill the Dough:
Cover the dough with plastic wrap and refrigerate for at least 1 hour. Chilling helps to firm the dough, making it easier to handle and shape.
7. Preheat and Prepare:
Preheat your oven to 350°F (175°C). Line a baking sheet with parchment paper to prevent sticking.
8. Shape and Bake:
Once the dough is chilled, scoop tablespoon-sized portions onto the prepared baking sheet, spacing them about 2 inches apart. Bake in the preheated oven for 12-15 minutes, or until the edges are golden brown. Allow the cookies to cool on the baking sheet for a few minutes before transferring them to a wire rack to cool completely.
Extra Tips:
For the best results, make sure that your butter is well softened before creaming it with the sugar, as this will yield a smoother dough.
Feel free to experiment with different types of nuts or add a splash of your favorite liqueur for an adult version of these cookies.
Store the baked cookies in an airtight container at room temperature for up to a week, or freeze them for longer storage. These cookies also make great festive gifts, so consider packaging them in decorative tins for a thoughtful homemade present.
Mini Apple Cinnamon Galettes
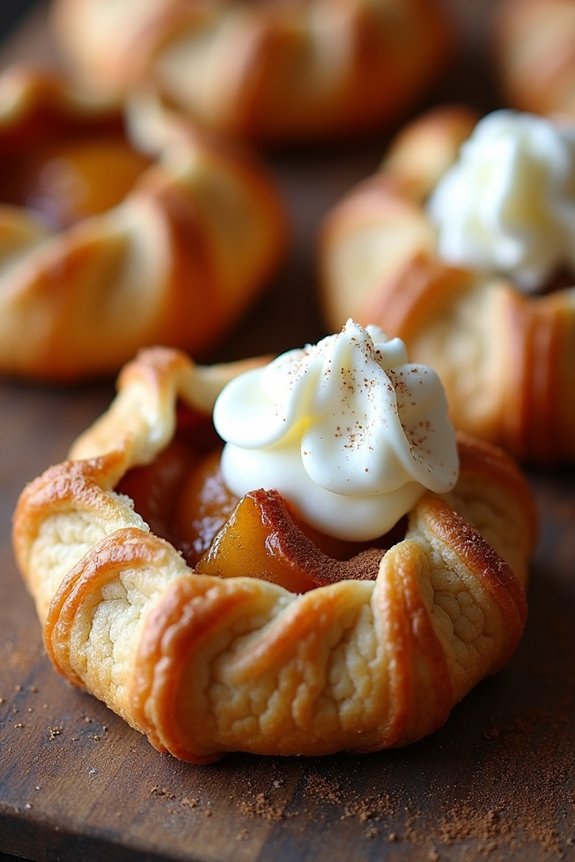
Mini Apple Cinnamon Galettes are a delightful treat that brings the comforting flavors of apple pie into a petite, individual serving. Perfect for holiday gatherings, these mini galettes are easy to make and allow everyone to enjoy their own personal dessert.
With a flaky crust enveloping a spiced apple filling, they offer the perfect balance of sweetness and spice, ideal for those who crave a taste of the season without the commitment of a full-sized pie.
These galettes are perfect for serving at Christmas gatherings or any festive occasion. The recipe is designed to serve 4-6 people, providing enough for everyone to have a taste of this delightful dessert. The combination of warm apples, cinnamon, and a buttery crust makes these galettes a crowd-pleaser, and they can be served with a dollop of whipped cream or a scoop of vanilla ice cream for an extra indulgent touch.
Ingredients for 4-6 Servings:
- 2 medium apples, peeled, cored, and thinly sliced
- 1 tablespoon lemon juice
- 1/4 cup granulated sugar
- 1 teaspoon ground cinnamon
- 1/4 teaspoon ground nutmeg
- 1 tablespoon all-purpose flour
- 1 package (14 oz) refrigerated pie crusts (2 crusts)
- 1 egg, beaten
- 1 tablespoon coarse sugar (optional)
- Vanilla ice cream or whipped cream, for serving (optional)
Instructions:
- Prepare the Apples: In a medium bowl, combine the thinly sliced apples with lemon juice, ensuring all slices are coated to prevent browning. Add granulated sugar, ground cinnamon, ground nutmeg, and flour. Mix well until the apples are evenly coated with the sugar and spices. Let the mixture sit for about 10 minutes to allow the flavors to meld and the apples to release some juice.
- Preheat the Oven: Preheat your oven to 400°F (200°C). Line a baking sheet with parchment paper to prevent sticking and ease cleanup.
- Roll Out the Dough: Unroll the refrigerated pie crusts onto a lightly floured surface. Use a rolling pin to gently flatten each crust, maintaining a circular shape. Cut each crust into smaller circles, about 5-6 inches in diameter, using a bowl or a pastry cutter.
- Assemble the Galettes: Place the dough circles onto the prepared baking sheet. Spoon a small amount of the apple mixture onto the center of each circle, leaving a 1-inch border around the edges. Fold the edges of the dough up over the apples, pleating as necessary to create a rustic edge. Brush the edges of the dough with the beaten egg to help achieve a golden brown color. Sprinkle coarse sugar over the top of the galettes for added sweetness and crunch.
- Bake the Galettes: Place the baking sheet in the preheated oven and bake for 20-25 minutes, or until the crust is golden brown and the apples are tender. Remove the galettes from the oven and let them cool slightly on the baking sheet.
- Serve: Serve the mini apple cinnamon galettes warm, topped with a scoop of vanilla ice cream or a dollop of whipped cream if desired. Enjoy the warm, comforting flavors of this mini dessert.
Extra Tips: For best results, choose firm apples like Granny Smith or Honeycrisp, as they hold their shape well during baking. If you prefer a sweeter filling, you can adjust the sugar to taste.
When folding the dough over the filling, don’t worry about making it perfect; the rustic look adds to the charm of these galettes. If you have any leftover filling, it can be stored in the refrigerator and used in other desserts or as a topping for oatmeal or pancakes.
Tiny Chocolate Hazelnut Pots De Crème
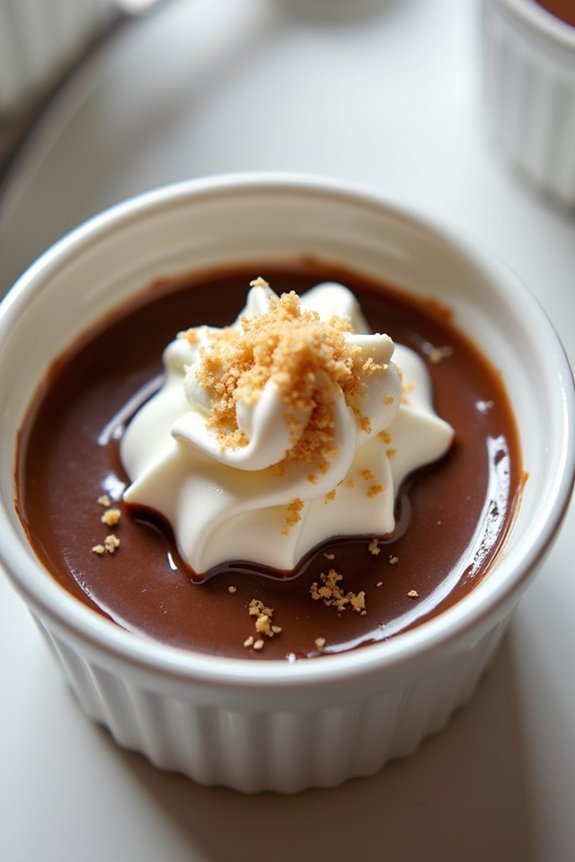
Tiny Chocolate Hazelnut Pots De Crème are a delightful way to add a touch of indulgence to your holiday celebrations without overwhelming your guests. These miniature desserts pack a punch with their rich chocolatey flavor, mellowed by the sweet, nutty essence of hazelnuts. Perfectly suited for intimate gatherings, these pots de crème provide a luxurious finish to any festive meal. With their smooth, creamy texture and deep flavor profile, they’re sure to become a favorite at your Christmas table.
Creating these Tiny Chocolate Hazelnut Pots De Crème is surprisingly simple and requires only a handful of ingredients. The key to achieving the perfect texture lies in gently cooking the custard base and guaranteeing it sets to silky perfection. Served in small ramekins or espresso cups, these desserts are ideal for a serving size of 4-6 people, making them a perfect fit for small holiday gatherings or as an elegant addition to a dessert buffet.
Ingredients for 4-6 Servings:
- 1 cup heavy cream
- 1/2 cup whole milk
- 4 ounces bittersweet chocolate, finely chopped
- 1/4 cup hazelnut spread
- 3 large egg yolks
- 1/4 cup granulated sugar
- 1/2 teaspoon vanilla extract
- Pinch of salt
- Whipped cream, for serving (optional)
- Crushed toasted hazelnuts, for garnish (optional)
Cooking Instructions:
- Preheat the Oven: Begin by preheating your oven to 325°F (160°C). This guarantees it will be ready to gently cook the pots de crème.
- Prepare the Custard Base: In a medium saucepan over medium heat, combine the heavy cream and whole milk. Bring the mixture to a gentle simmer, then remove from heat. Add the chopped chocolate and hazelnut spread, stirring until completely melted and smooth.
- Whisk the Eggs: In a separate bowl, whisk together the egg yolks and granulated sugar until the mixture is pale and slightly thickened. This helps to create a smooth, creamy custard.
- Combine and Temper: Gradually whisk the warm chocolate mixture into the egg yolks, a little at a time, to temper the eggs and prevent them from curdling. Add the vanilla extract and a pinch of salt, stirring until fully combined.
- Strain the Mixture: Pour the custard through a fine-mesh sieve into a clean bowl to remove any lumps. This step guarantees a silky-smooth texture.
- Fill the Ramekins: Divide the custard evenly among 4-6 small ramekins or espresso cups. Place them in a deep baking dish or roasting pan.
- Create a Water Bath: Carefully pour hot water into the baking dish, making sure it reaches halfway up the sides of the ramekins. This gentle cooking method helps the custard set without cracking.
- Bake: Cover the baking dish loosely with aluminum foil and bake in the preheated oven for 30-35 minutes, or until the edges are set but the centers still jiggle slightly when shaken.
- Chill: Remove the ramekins from the water bath and let them cool to room temperature. Then refrigerate for at least 2 hours, or until thoroughly chilled.
- Serve: Before serving, top each pot de crème with a dollop of whipped cream and a sprinkle of crushed toasted hazelnuts, if desired.
Extra Tips:
When making Tiny Chocolate Hazelnut Pots De Crème, it’s important to use high-quality chocolate and hazelnut spread for the best flavor.
Be mindful of the baking time, as overbaking can lead to a grainy texture. The water bath is essential for even cooking, so confirm the water remains at the correct level throughout the baking process.
Finally, these desserts can be made a day in advance and kept refrigerated, freeing up time during your holiday festivities.
Individual Pecan Pie Bites
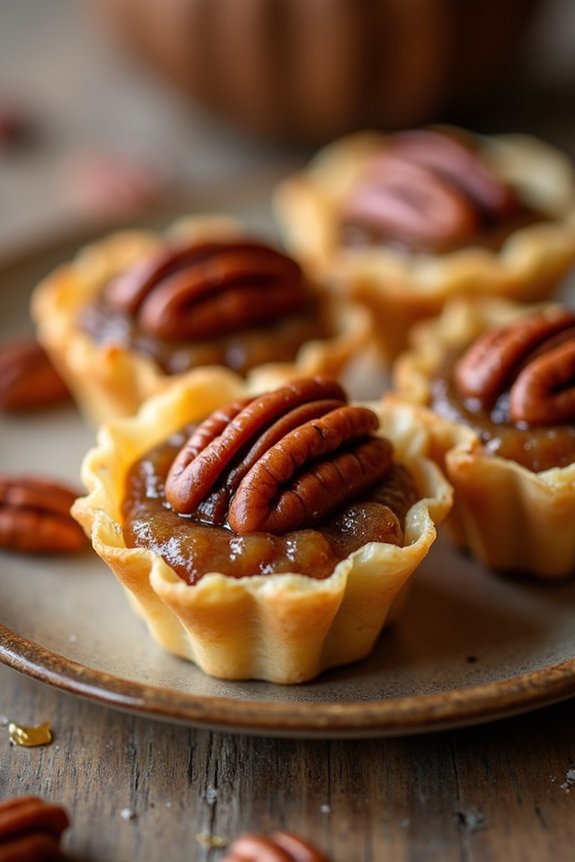
Indulge in the rich and buttery flavor of pecan pie with these delightful Individual Pecan Pie Bites. Perfect for holiday gatherings, these mini desserts capture the essence of a classic pecan pie in a bite-sized form.
With a crisp crust and a gooey, nutty filling, each bite offers a taste of comfort and festivity. They’re easy to make, can be prepared ahead of time, and are guaranteed to impress your family and guests.
These Individual Pecan Pie Bites are a great addition to any dessert table, offering a sweet treat that’s both satisfying and manageable. Made with simple ingredients and baked to perfection, they complement any Christmas meal beautifully.
Serve them warm with a scoop of vanilla ice cream or enjoy them on their own as a quick and tasty treat. Perfect for a serving size of 4-6 people, this recipe is sure to become a holiday favorite.
Ingredients (Serves 4-6 people):
- 1 cup pecan halves
- 1/2 cup light corn syrup
- 1/2 cup packed brown sugar
- 2 tablespoons unsalted butter, melted
- 1 teaspoon vanilla extract
- 1/4 teaspoon salt
- 2 large eggs
- 1 package (14 oz) mini phyllo pastry shells
Cooking Instructions:
- Preheat the Oven: Begin by preheating your oven to 350°F (175°C). This will make certain the oven is ready for the pecan bites, allowing them to cook evenly and thoroughly.
- Prepare the Filling: In a medium bowl, combine the light corn syrup, brown sugar, melted butter, vanilla extract, and salt. Mix well until all the ingredients are thoroughly blended.
- Add the Eggs: Crack the eggs into a separate bowl and lightly beat them. Gradually incorporate the beaten eggs into the sugar mixture, stirring constantly until the mixture is smooth and fully combined.
- Fill the Pastry Shells: Arrange the mini phyllo pastry shells on a baking sheet. Spoon the pecan filling mixture into each shell, filling them about 3/4 full. Be careful not to overfill, as the filling will expand slightly when baking.
- Top with Pecans: Place one or two pecan halves on top of each filled pastry shell. This not only adds texture but also gives a visually appealing finish to your bites.
- Bake: Place the baking sheet in the preheated oven and bake for 15-20 minutes, or until the filling is set and the pastry shells are golden brown. Keep an eye on them to avoid over-baking.
- Cool and Serve: Once baked, remove the pecan bites from the oven and allow them to cool slightly on a wire rack. Serve warm for the best flavor, or refrigerate and serve chilled.
Extra Tips:
For best results, use fresh pecans to make certain a crisp and flavorful nutty taste. If you prefer a more caramelized flavor, you can substitute dark corn syrup for the light corn syrup.
Be sure to monitor the phyllo shells closely as they bake, as they can quickly go from golden to overdone. These pecan pie bites can be made a day in advance and stored in an airtight container, making them a convenient option for holiday prep.
Enjoy them as they are, or pair them with a dollop of whipped cream or a scoop of vanilla ice cream for an extra indulgent treat.