

The holiday season is here, and it’s time to embrace the joy of Christmas baking. I’ve gathered a list of the most charming recipes that will surely be the highlight of your festivities. From reinvented sugar cookies to a stunning chocolate yule log, these treats are perfect for making memories. Get ready for your holiday spread to be a conversation starter. There’s so much to explore and enjoy!
Classic Sugar Cookies With a Modern Twist

Baking holiday sugar cookies is a beloved tradition, and this recipe gives the classic treat a contemporary spin. These cookies maintain their buttery, melt-in-your-mouth texture, but are elevated with a hint of citrus zest and a touch of almond extract. The addition of these flavors brings a revitalizing twist, making the cookies not only a treat for the taste buds but also a feast for the senses.
These sugar cookies are perfect for decorating with royal icing or enjoying as they are, straight out of the oven. Whether you’re baking for a Christmas party or a cozy family gathering, these cookies are sure to be a hit. They’re simple to prepare, making them an excellent choice for bakers of all skill levels.
Plus, the joy of cutting out different shapes and decorating them with your favorite colors and sprinkles adds an element of fun to the baking process. This recipe yields about 24 cookies, making it ideal for serving 4-6 people, guaranteeing everyone gets to enjoy a sweet festive treat.
Ingredients:
- 2 ¾ cups all-purpose flour
- 1 teaspoon baking powder
- ½ teaspoon baking soda
- ½ teaspoon salt
- 1 cup unsalted butter, softened
- 1 ½ cups granulated sugar
- 1 large egg
- 1 teaspoon vanilla extract
- ½ teaspoon almond extract
- Zest of 1 lemon
- Zest of 1 orange
- 3 tablespoons milk
- Royal icing and sprinkles for decoration (optional)
Instructions:
- Preheat and Prep: Preheat your oven to 350°F (175°C). Line two baking sheets with parchment paper to prevent the cookies from sticking and guarantee even baking.
- Mix Dry Ingredients: In a medium bowl, whisk together the flour, baking powder, baking soda, and salt. This helps to evenly distribute the leavening agents in the dough.
- Cream Butter and Sugar: In a large mixing bowl, using an electric mixer, beat the softened butter and sugar together on medium speed until light and fluffy, about 2-3 minutes. This step is essential for incorporating air into the dough, which helps the cookies rise.
- Add Wet Ingredients: Beat in the egg, vanilla extract, almond extract, lemon zest, and orange zest until well combined. These ingredients infuse the dough with flavor, giving the cookies their unique twist.
- Combine and Chill: Gradually add the dry ingredients to the wet mixture, alternating with the milk, beginning and ending with the dry ingredients. Mix until just combined. Wrap the dough in plastic wrap and refrigerate for at least 1 hour. Chilling the dough is vital as it makes it easier to roll out and cut into shapes.
- Roll and Cut: On a lightly floured surface, roll out the chilled dough to about ¼ inch thickness. Use your favorite cookie cutters to cut out shapes and place them on the prepared baking sheets about 1 inch apart.
- Bake: Bake the cookies in the preheated oven for 8-10 minutes, or until the edges just begin to turn golden brown. Remove from the oven and let them cool on the baking sheets for 5 minutes before transferring to a wire rack to cool completely.
- Decorate: Once cooled, decorate the cookies with royal icing and sprinkles if desired. Allow the icing to set before serving or storing the cookies.
Extra Tips:
- For the best flavor, use high-quality vanilla and almond extracts. They make a noticeable difference in the taste of the cookies.
- The dough can be made a day in advance and stored in the refrigerator, which can help enhance the flavors.
- If the dough becomes too soft while rolling, return it to the fridge for a few minutes to firm up.
- Be careful not to overbake the cookies; they should be set but still soft, as they’ll firm up as they cool.
- Store the cookies in an airtight container to keep them fresh, and layer parchment paper between them to protect any decorations.
Decadent Chocolate Yule Log

A Chocolate Yule Log, or Bûche de Noël, is a festive and delicious dessert that’s a centerpiece of many holiday tables. This delightful confection is made with a light and airy sponge cake, generously filled with a creamy chocolate filling, and then rolled up to resemble a log.
It’s traditionally decorated with ganache or buttercream to mimic bark, and can be adorned with meringue mushrooms, powdered sugar snow, or holly leaves for an extra festive touch. Perfect for serving at Christmas gatherings, this dessert combines rich chocolate flavors with a delicate texture, making it a favorite among chocolate lovers.
Creating a Decadent Chocolate Yule Log is a rewarding culinary adventure that involves several steps, each contributing to the final elegant presentation. This recipe yields a serving size suitable for 4-6 people, ensuring everyone gets to enjoy a slice of this holiday classic.
The key to success lies in preparing the sponge cake with care, ensuring it remains pliable enough to roll without cracking, and creating a luxurious chocolate filling that complements the cake beautifully. Follow this recipe to impress your guests with a stunning and scrumptious Yule Log.
Ingredients (Serves 4-6)
- 6 large eggs, separated
- 3/4 cup granulated sugar
- 1/3 cup unsweetened cocoa powder
- 1 teaspoon vanilla extract
- 1/4 teaspoon salt
- 1/2 teaspoon cream of tartar
- 1 cup heavy cream
- 1 cup semi-sweet chocolate chips
- 2 tablespoons unsalted butter
- Powdered sugar, for dusting
Instructions
1. Preheat and Prepare: Preheat your oven to 350°F (175°C). Line a 10×15 inch jelly roll pan with parchment paper, ensuring it extends over the edges for easy removal. Lightly grease the paper.
2. Make the Sponge Cake Batter: In a large bowl, beat the egg yolks and 1/2 cup of the sugar until thick and pale. Mix in the vanilla extract and sift in the cocoa powder, stirring until smooth.
In a separate bowl, beat the egg whites with cream of tartar until soft peaks form. Gradually add the remaining 1/4 cup of sugar and continue beating until stiff peaks form. Gently fold the egg whites into the chocolate mixture in thirds, being careful not to deflate the batter.
3. Bake the Sponge Cake: Spread the batter evenly into the prepared pan. Bake in the preheated oven for 12-15 minutes, or until the cake springs back when lightly touched.
After baking, immediately loosen the edges and invert the cake onto a clean kitchen towel dusted with powdered sugar. Carefully peel away the parchment paper.
4. Roll the Cake: Starting at the short end, roll the warm cake and towel together into a log. Allow it to cool completely while rolled to set its shape.
5. Prepare the Chocolate Filling: In a small saucepan, heat the heavy cream over medium heat until it just begins to simmer. Remove from heat and add the chocolate chips and butter, stirring until smooth and fully melted. Allow it to cool to a spreadable consistency.
6. Unroll and Fill the Cake: Once the cake is cool, gently unroll it and spread the chocolate filling evenly over the surface, leaving a small border around the edges.
Re-roll the cake (without the towel) and place seam-side down on a serving platter.
7. Decorate the Yule Log: Dust the top with powdered sugar, or cover with additional chocolate ganache or buttercream if desired. Add any festive decorations like meringue mushrooms or holly leaves.
Extra Tips
When preparing the sponge cake, make sure all your ingredients are at room temperature, as this will help in achieving the perfect texture.
Be gentle while folding the egg whites into the chocolate mixture to maintain the airiness of the batter. If you notice any cracks while rolling, they can be hidden with decorations or extra frosting.
For a more stable roll, refrigerate the cake after spreading the filling for about 10 minutes before the final roll. Enjoy your Decadent Chocolate Yule Log with a cup of hot cocoa or coffee for an extra-special holiday treat.
Gingerbread Men With a Spicy Kick

Gingerbread Men With a Spicy Kick are a festive treat that combines traditional holiday flavors with an unexpected twist. Perfect for those who love a bit of heat, these cookies aren’t only delicious but also fun to make and decorate. The blend of warm spices like cinnamon, nutmeg, and cloves, combined with a touch of cayenne pepper, gives these gingerbread men a unique flavor profile that will surprise and delight your taste buds.
Whether you’re making them for a party, as a gift, or just to enjoy at home, these cookies are sure to be a hit. This recipe is designed to yield about 24 cookies, perfect for serving 4-6 people. The dough is easy to work with, and the end result is a batch of sturdy yet tender cookies that hold their shape beautifully.
Don’t forget to have fun decorating them with icing, candies, or any of your favorite toppings to give each gingerbread man a personality of its own. Let’s get started on making these delightful spicy treats!
Ingredients:
- 3 1/4 cups all-purpose flour
- 3/4 teaspoon baking soda
- 1 tablespoon ground ginger
- 1 tablespoon ground cinnamon
- 1/2 teaspoon ground cloves
- 1/2 teaspoon ground nutmeg
- 1/4 teaspoon cayenne pepper
- 1/4 teaspoon salt
- 3/4 cup (1 1/2 sticks) unsalted butter, softened
- 1/2 cup packed dark-brown sugar
- 1 large egg
- 1/2 cup unsulfured molasses
- 2 teaspoons pure vanilla extract
Cooking Instructions:
- Prepare the Dry Ingredients: In a medium bowl, whisk together the flour, baking soda, ginger, cinnamon, cloves, nutmeg, cayenne pepper, and salt. This guarantees that the spices are evenly distributed throughout the flour.
- Cream the Butter and Sugar: In a large bowl, using an electric mixer on medium speed, cream the softened butter and dark-brown sugar until the mixture is light and fluffy. This should take about 2-3 minutes.
- Add Wet Ingredients: Beat in the egg, molasses, and vanilla extract to the butter-sugar mixture. Mix until well combined. The mixture should be smooth and creamy.
- Combine Dry and Wet Ingredients: Gradually add the flour mixture to the wet ingredients, mixing on low speed until just combined. Be careful not to overmix, as this can make the cookies tough.
- Chill the Dough: Divide the dough in half, wrap each half in plastic wrap, and refrigerate until firm, about 1 hour. Chilling the dough makes it easier to roll out and cut.
- Preheat and Prepare: Preheat your oven to 350°F (175°C). Line two baking sheets with parchment paper.
- Roll and Cut the Dough: On a lightly floured surface, roll out one portion of dough to about 1/4-inch thickness. Use a gingerbread man cookie cutter to cut out shapes, and transfer them to the prepared baking sheets.
- Bake the Cookies: Bake the cookies in the preheated oven for 8-10 minutes, or until the edges are set and just beginning to brown. Allow them to cool on the baking sheets for 5 minutes before transferring them to a wire rack to cool completely.
- Decorate: Once completely cooled, decorate your gingerbread men with icing and any other decorations you prefer.
Extra Tips: To guarantee your gingerbread men have a consistent texture, always use room temperature butter for creaming. The dough can be made ahead of time and stored in the refrigerator for up to two days or frozen for up to a month.
If you prefer a milder spice level, reduce the cayenne pepper to 1/8 teaspoon. For a crispier cookie, roll the dough slightly thinner and adjust the baking time as needed. Enjoy customizing your gingerbread men with different icing colors and patterns for a personalized touch.
Festive Peppermint Bark
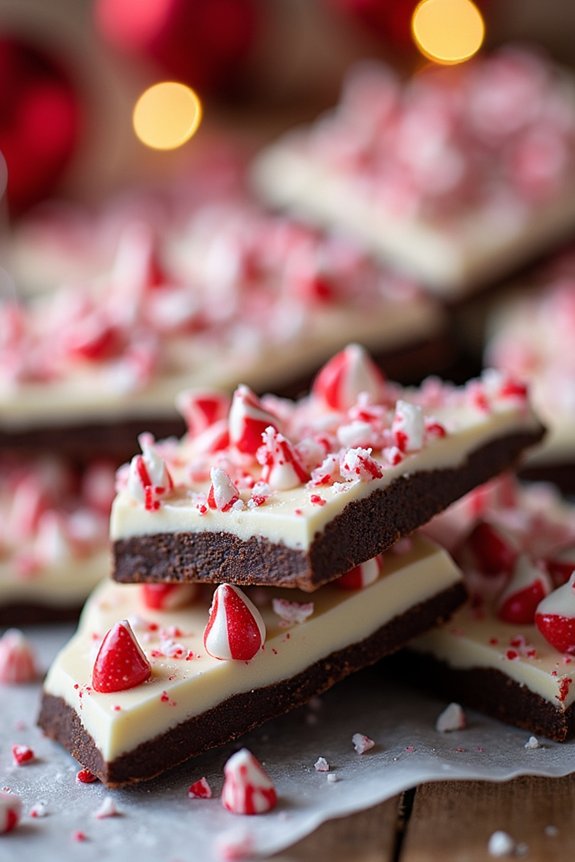
Peppermint Bark is a classic festive treat that combines the rich, creamy textures of chocolate with the invigorating zing of peppermint. This delightful dessert isn’t only a feast for the taste buds but also a visual treat, with its contrasting layers of dark, milk, and white chocolate adorned with crushed peppermint candy.
Perfect for holiday gatherings or as a homemade gift, peppermint bark is a simple yet elegant addition to your Christmas baking repertoire.
Making Festive Peppermint Bark at home is surprisingly easy and requires minimal ingredients. It’s a versatile recipe that can be adapted to suit your taste preferences, whether you prefer a hint of mint or a more robust peppermint flavor.
The key to achieving the perfect bark lies in selecting high-quality chocolate and allowing each layer to set properly, guaranteeing a satisfying snap with each bite. Here’s how to make a serving size for 4-6 people.
Ingredients:
- 12 ounces dark chocolate, chopped
- 12 ounces white chocolate, chopped
- 1 teaspoon peppermint extract
- 1/2 cup crushed peppermint candies or candy canes
- 1 tablespoon coconut oil or vegetable shortening (optional)
Instructions:
1. Prepare the Baking Sheet:
Line a baking sheet with parchment paper or a silicone baking mat to prevent the chocolate from sticking.
2. Melt the Dark Chocolate:
In a microwave-safe bowl, melt the dark chocolate in 30-second intervals, stirring after each until smooth. If using, add half of the coconut oil to help the chocolate melt smoothly.
3. Spread the Dark Chocolate:
Pour the melted dark chocolate onto the prepared baking sheet and spread it into an even layer, about 1/4 inch thick. Place the sheet in the refrigerator for about 10-15 minutes to set.
4. Melt the White Chocolate:
While the dark chocolate is setting, melt the white chocolate using the same method. Once melted, stir in the peppermint extract and the remaining coconut oil, if using.
5. Spread the White Chocolate:
Once the dark chocolate layer is firm, pour the white chocolate over it and spread evenly. Work quickly to guarantee the layers adhere well.
6. Add Peppermint Topping:
Immediately sprinkle the crushed peppermint candies over the white chocolate layer, pressing gently to adhere.
7. Set the Bark:
Allow the peppermint bark to set at room temperature for a few hours or in the refrigerator for about 30 minutes until fully hardened.
8. Break into Pieces:
Once the bark is set, remove it from the baking sheet and break it into irregular pieces.
Extra Tips:
To guarantee the best texture, avoid overheating the chocolate, which can cause it to seize or bloom. If you find it difficult to break the bark into pieces, use a sharp knife to score lines before breaking.
For additional flavor, consider adding a sprinkle of sea salt on top of the white chocolate layer before it sets. Store the peppermint bark in an airtight container in a cool place to maintain its crunch and freshness.
Traditional Stollen With a Nutty Surprise

Traditional Stollen With a Nutty Surprise is a delightful Christmas treat that combines the rich flavors of dried fruits, spices, and the unexpected crunch of nuts. This German-inspired bread is a festive favorite, perfect for sharing with family and friends during the holiday season. With its moist, buttery texture and a sweet almond filling, this stollen is certain to become a cherished tradition in your home.
The origins of stollen date back to the 15th century, where it was initially made as a simple bread for fasting during Advent. Over time, it has evolved into a more decadent delight, often filled with marzipan and a variety of spices and nuts. This version of Traditional Stollen With a Nutty Surprise features a homemade almond paste filling, along with a generous scattering of toasted nuts that add a satisfying crunch to each bite.
Ingredients (Serves 4-6):
- 4 cups all-purpose flour
- 1/2 cup granulated sugar
- 1 packet (2 1/4 tsp) active dry yeast
- 1 cup warm milk (about 110°F)
- 1/2 cup unsalted butter, softened
- 1 large egg
- 1 teaspoon vanilla extract
- 1/2 teaspoon salt
- 1 teaspoon ground cinnamon
- 1/2 teaspoon ground nutmeg
- 1/4 teaspoon ground cardamom
- 1 cup mixed dried fruits (raisins, currants, chopped apricots)
- 1/2 cup chopped nuts (almonds, walnuts, or hazelnuts)
- 1/2 cup powdered sugar for dusting
For the Almond Filling:
- 1 cup ground almonds
- 1/2 cup powdered sugar
- 1 large egg white
- 1 teaspoon almond extract
Cooking Instructions:
- Prepare the Dough: In a large mixing bowl, combine the warm milk and yeast. Let it sit for about 5 minutes until it becomes frothy. Add the softened butter, sugar, egg, vanilla extract, salt, cinnamon, nutmeg, and cardamom. Mix well until combined.
- Knead the Dough: Gradually add the flour to the wet ingredients, mixing until a dough forms. Knead the dough on a floured surface for about 8-10 minutes until it’s smooth and elastic. Transfer the dough to a lightly oiled bowl, cover it with a clean cloth, and let it rise in a warm place for about 1-2 hours or until doubled in size.
- Prepare Almond Filling: While the dough is rising, prepare the almond filling by combining ground almonds, powdered sugar, egg white, and almond extract in a bowl. Mix until it forms a smooth paste. Set aside.
- Incorporate Fruits and Nuts: Once the dough has risen, gently deflate it and knead in the mixed dried fruits and chopped nuts until well distributed throughout the dough.
- Shape the Stollen: Roll the dough into a rectangle approximately 10×14 inches. Spread the almond filling down the center of the rectangle. Fold the dough over the filling from both sides, slightly overlapping in the middle. Pinch the seams to seal.
- Second Rise: Place the shaped stollen on a parchment-lined baking sheet. Cover it with a cloth and let it rise for another 30-45 minutes.
- Bake: Preheat the oven to 350°F (175°C). Bake the stollen for 35-40 minutes or until golden brown and sounds hollow when tapped.
- Finish and Serve: Allow the stollen to cool on a wire rack. Once cooled, dust generously with powdered sugar before slicing and serving.
Extra Tips:
For a stollen with the perfect texture, verify that all ingredients are at room temperature before starting. If you don’t have ground almonds for the filling, you can substitute with almond meal or finely chopped whole almonds.
Be sure to roll the dough tightly around the filling to prevent any gaps. Finally, it’s important to store the stollen in an airtight container to maintain its moisture. Enjoy this festive bread with a hot cup of tea or coffee for a perfect holiday treat.
Luxurious Eggnog Cheesecake
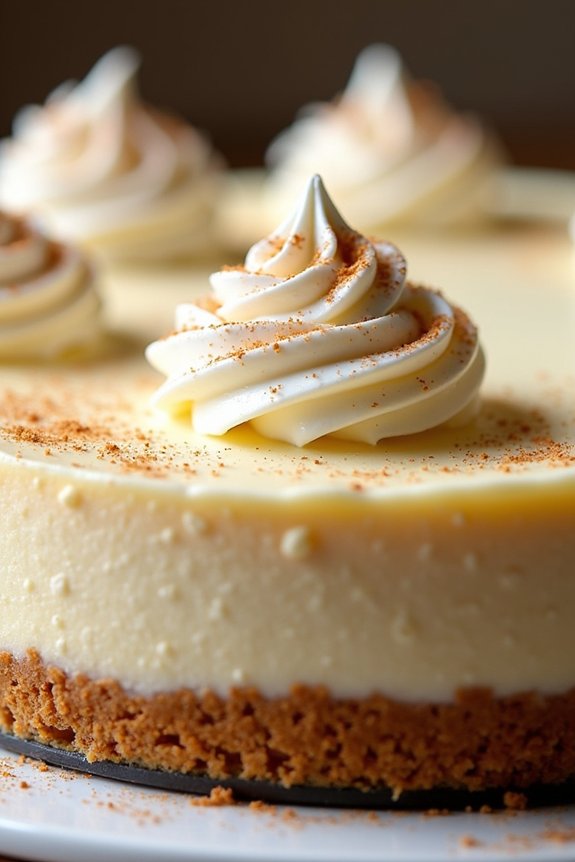
Luxurious Eggnog Cheesecake is a festive and decadent dessert that combines the creamy richness of cheesecake with the spicy, warming flavors of traditional eggnog. This delightful dessert is perfect for holiday gatherings and will surely impress your guests with its smooth texture, vibrant flavor, and stunning presentation.
The cheesecake features a buttery graham cracker crust, a rich eggnog-flavored filling with hints of nutmeg and cinnamon, and is topped with a dollop of whipped cream or a sprinkle of freshly ground nutmeg for an added festive touch.
Creating this Luxurious Eggnog Cheesecake is a rewarding process that involves careful preparation and attention to detail. It requires a bit of time, as the cheesecake needs to chill thoroughly after baking to develop its full flavor and texture. However, the end result is well worth the effort.
This recipe serves 4-6 people, making it ideal for an intimate holiday dinner or a cozy family gathering. Let’s explore the ingredients and steps needed to make this delectable treat.
Ingredients:
- 1 cup graham cracker crumbs
- 1/4 cup butter, melted
- 16 oz cream cheese, softened
- 3/4 cup granulated sugar
- 2 tablespoons all-purpose flour
- 1/2 cup eggnog
- 2 large eggs
- 1/2 teaspoon vanilla extract
- 1/4 teaspoon ground nutmeg
- 1/4 teaspoon ground cinnamon
- Whipped cream, for serving (optional)
- Freshly ground nutmeg, for garnish (optional)
Cooking Instructions:
- Prepare the Crust: Preheat your oven to 325°F (160°C). In a medium bowl, combine graham cracker crumbs and melted butter. Mix until the crumbs are well-coated. Press the mixture firmly into the bottom of a 9-inch springform pan to form an even layer. Bake for 10 minutes, then remove from the oven and let cool.
- Prepare the Filling: In a large mixing bowl, beat the cream cheese until smooth and creamy. Gradually add the granulated sugar and flour, and continue to beat until well combined. Slowly mix in the eggnog, followed by the eggs, one at a time. Add vanilla extract, ground nutmeg, and ground cinnamon, and mix until all ingredients are fully incorporated.
- Assemble the Cheesecake: Pour the eggnog cheesecake filling over the prepared crust in the springform pan. Smooth the top with a spatula to guarantee even baking.
- Bake the Cheesecake: Place the springform pan on a baking sheet to catch any drips and bake in the preheated oven for 45-50 minutes, or until the center is set but still slightly jiggly. Turn off the oven, crack the door open, and let the cheesecake cool gradually inside the oven for about 1 hour. This helps prevent cracking.
- Chill the Cheesecake: Remove the cheesecake from the oven and let it cool to room temperature. Once cooled, cover with plastic wrap and refrigerate for at least 4 hours, or overnight, to allow the flavors to meld and the texture to firm up.
- Serve and Garnish: Before serving, run a knife around the edge of the pan to loosen the cheesecake, then carefully remove the sides of the springform pan. Serve slices with a dollop of whipped cream and a sprinkle of freshly ground nutmeg, if desired.
Extra Tips:
For best results, make sure that all your ingredients are at room temperature before starting, as this helps them to blend together more smoothly.
If your cheesecake develops any cracks, don’t worry—these can easily be covered with whipped cream or another topping of your choice.
To make slicing easier, use a sharp knife dipped in hot water and wiped clean between cuts. Remember, patience is key when making cheesecake; allow ample chilling time for the best texture and flavor.
Cranberry Orange Bread With Zesty Glaze
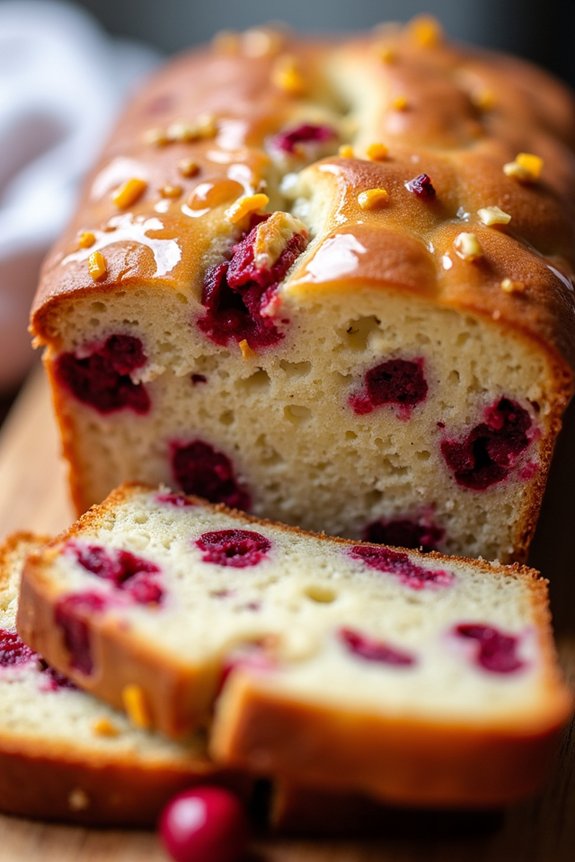
Cranberry Orange Bread With Zesty Glaze is the perfect festive treat for the holiday season. This delicious bread combines the tartness of fresh cranberries with the sweet and citrusy flavor of orange, resulting in a delightful balance that’s certain to impress your family and friends. The addition of a zesty glaze enhances the flavor profile, providing a sweet and tangy finishing touch that complements the bread beautifully.
This recipe is perfect for breakfast, brunch, or even as a dessert option during your holiday gatherings. The vibrant colors of the cranberries and orange zest make this bread not only tasty but also visually appealing. It’s a versatile dish that can be enjoyed warm or at room temperature, making it an ideal choice for any occasion. Here’s how to make Cranberry Orange Bread With Zesty Glaze for a serving size of 4-6 people.
Ingredients:
- 1 1/2 cups all-purpose flour
- 1 teaspoon baking powder
- 1/2 teaspoon baking soda
- 1/2 teaspoon salt
- 1 cup granulated sugar
- 1/4 cup unsalted butter, softened
- 2 large eggs
- 1 tablespoon orange zest
- 1/4 cup freshly squeezed orange juice
- 1/2 cup buttermilk
- 1 cup fresh cranberries, roughly chopped
- 1/2 cup chopped walnuts (optional)
For the Zesty Glaze:
- 1 cup powdered sugar
- 2 tablespoons freshly squeezed orange juice
- 1 teaspoon orange zest
Instructions:
- Preheat and Prepare the Pan: Preheat your oven to 350°F (175°C). Grease and flour a 9×5 inch loaf pan to guarantee the bread doesn’t stick while baking.
- Mix Dry Ingredients: In a medium-sized bowl, whisk together the all-purpose flour, baking powder, baking soda, and salt until well combined.
- Cream Butter and Sugar: In a large mixing bowl, cream together the softened butter and granulated sugar until the mixture is light and fluffy. This should take about 2-3 minutes using an electric mixer.
- Add Eggs and Orange Flavor: Beat in the eggs one at a time, making sure each egg is fully incorporated before adding the next. Add the orange zest and orange juice, mixing until well combined.
- Combine Wet and Dry Ingredients: Gradually add the dry ingredients to the wet ingredients, alternating with the buttermilk. Begin and end with the dry ingredients, mixing just until combined.
- Fold in Cranberries and Walnuts: Gently fold in the chopped cranberries and walnuts (if using) with a spatula, being careful not to overmix.
- Bake the Bread: Pour the batter into the prepared loaf pan and smooth the top with a spatula. Bake in the preheated oven for 50-60 minutes or until a toothpick inserted in the center comes out clean.
- Prepare the Glaze: While the bread is baking, prepare the glaze by whisking together the powdered sugar, orange juice, and orange zest in a small bowl until smooth.
- Cool and Glaze: Once the bread is done, remove it from the oven and let it cool in the pan for about 10 minutes. Transfer to a wire rack and let it cool completely before drizzling the zesty glaze over the top.
Extra Tips:
For best results, use fresh cranberries as they provide the best flavor and texture. If fresh cranberries aren’t available, frozen cranberries can be used; just make sure to thaw and drain them before adding to the batter.
Be sure not to overmix the batter once you add the cranberries and walnuts, as this can result in a denser bread. Finally, for a more pronounced orange flavor, consider adding a few drops of orange extract to the glaze.
Enjoy your homemade Cranberry Orange Bread With Zesty Glaze as a wonderful addition to your holiday table!
Rich and Buttery Pecan Snowballs
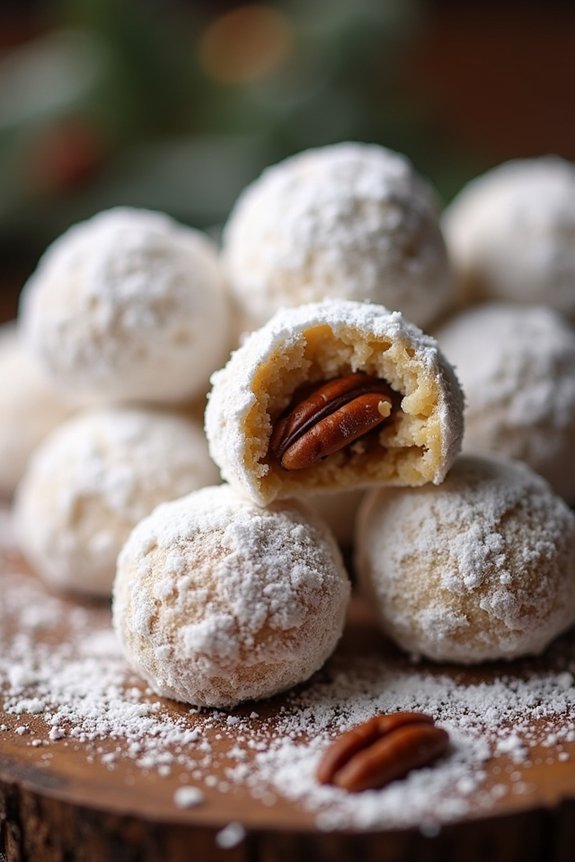
Rich and Buttery Pecan Snowballs are a festive treat that’s perfect for the holiday season. These delightful cookies, also known as Mexican wedding cookies or Russian tea cakes, are known for their melt-in-your-mouth texture and the rich, buttery flavor that’s perfectly complemented by the nutty pecans. Rolled in powdered sugar, these cookies resemble little snowballs, making them an ideal addition to your Christmas cookie tray.
Whether you’re making them for a holiday gathering or to enjoy with a cup of tea by the fire, these pecan snowballs are sure to be a hit. The recipe comes together quickly, making it a great choice for both novice and experienced bakers. With a few simple ingredients that you probably already have in your pantry, you’ll have a batch of these delightful cookies ready to share in no time.
The key to a perfect pecan snowball is using high-quality butter and fresh pecans, which enhance the flavor and texture of the cookies. So gather your ingredients and get ready to bake a classic holiday favorite that will surely bring joy to your family and friends.
Ingredients for 4-6 servings:
- 1 cup (2 sticks) unsalted butter, softened
- 1/2 cup powdered sugar, plus additional for coating
- 1 teaspoon vanilla extract
- 2 1/4 cups all-purpose flour
- 1/4 teaspoon salt
- 1 cup finely chopped pecans
Instructions:
- Preheat the Oven: Preheat your oven to 350°F (175°C). Line two baking sheets with parchment paper or silicone baking mats to prevent sticking.
- Cream the Butter and Sugar: In a large mixing bowl, use an electric mixer to cream together the softened butter and 1/2 cup of powdered sugar until the mixture is light and fluffy. This usually takes about 2-3 minutes. Add the vanilla extract and mix until combined.
- Combine Dry Ingredients: In a separate bowl, whisk together the all-purpose flour and salt. Gradually add the dry ingredients to the creamed butter mixture, mixing on low speed until just combined. Be careful not to overmix, as this can make the cookies tough.
- Add Pecans: Gently fold in the finely chopped pecans until they’re evenly distributed throughout the dough.
- Shape the Dough: Using a small cookie scoop or your hands, shape the dough into 1-inch balls and place them on the prepared baking sheets, spacing them about 1 inch apart.
- Bake: Bake the cookies in the preheated oven for 15-18 minutes, or until the bottoms are lightly golden. The tops of the cookies should remain pale.
- Cool and Coat: Allow the cookies to cool on the baking sheets for about 5 minutes, then transfer them to a wire rack to cool completely. Once cooled, roll the cookies generously in powdered sugar until fully coated.
- Store: Store the cookies in an airtight container at room temperature for up to a week. For longer storage, you can freeze them in a zip-top bag for up to 3 months.
Extra Tips:
For an extra burst of flavor, try toasting the pecans before chopping them. Simply spread the pecans on a baking sheet and toast in a 350°F (175°C) oven for 5-7 minutes, stirring once, until they’re fragrant. Let them cool before chopping and adding to the dough.
Additionally, if you prefer a stronger vanilla flavor, you can add an extra half teaspoon of vanilla extract to the dough. Finally, if you find your dough is too crumbly to hold together, add a teaspoon of milk at a time until it reaches the desired consistency. Enjoy your homemade Rich and Buttery Pecan Snowballs!
Almond Biscotti Dipped in Chocolate
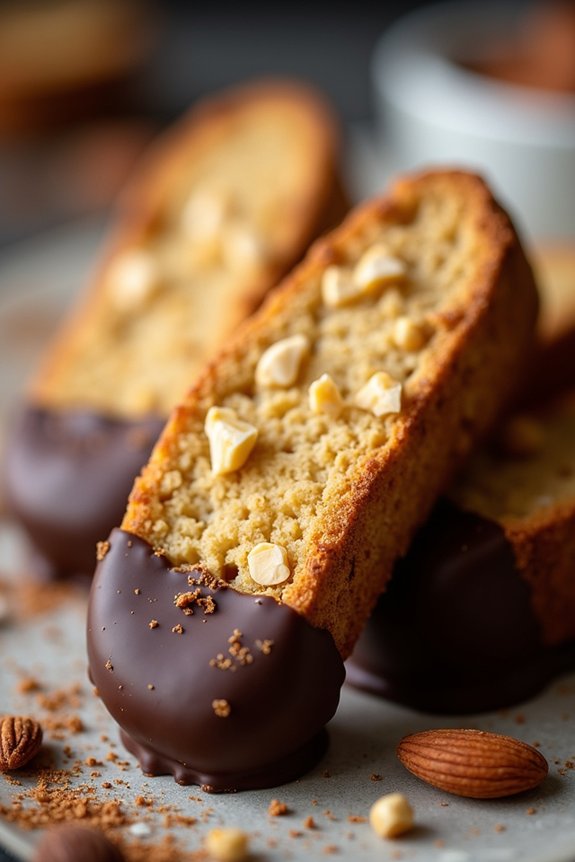
Almond Biscotti Dipped in Chocolate is a delightful treat perfect for the holiday season. These crunchy, twice-baked Italian cookies are infused with the rich flavor of toasted almonds and are beautifully complemented by a coating of silky, melted chocolate. Their texture and taste make them an excellent accompaniment to coffee or tea, transforming any ordinary moment into a festive occasion.
Whether you’re hosting a holiday gathering or simply enjoying a quiet moment at home, these biscotti will add a touch of elegance and indulgence to your Christmas festivities. Biscotti are known for their long shelf life, making them ideal for gift-giving during the holidays. This recipe yields a serving size of 4-6 people, making it perfect for small gatherings or as a thoughtful homemade gift for friends and family.
The combination of almond and chocolate not only tastes divine but also embodies the warmth and richness associated with Christmas. Follow these simple steps to create your own batch of Almond Biscotti Dipped in Chocolate, and spread the joy and flavors of the holiday season.
Ingredients (Serves 4-6):
- 1 3/4 cups all-purpose flour
- 1/2 teaspoon baking powder
- 1/4 teaspoon salt
- 1/2 cup granulated sugar
- 1/4 cup unsalted butter, softened
- 2 large eggs
- 1 teaspoon vanilla extract
- 1 teaspoon almond extract
- 1 cup whole almonds, toasted and coarsely chopped
- 1 cup semisweet chocolate chips
Cooking Instructions:
- Preheat the Oven: Begin by preheating your oven to 350°F (175°C). Line a baking sheet with parchment paper to prevent the biscotti from sticking.
- Mix Dry Ingredients: In a medium bowl, whisk together the flour, baking powder, and salt. Set aside.
- Cream Butter and Sugar: In a large mixing bowl, beat the softened butter and sugar with an electric mixer on medium speed until the mixture is light and fluffy, about 2-3 minutes.
- Add Eggs and Extracts: Add the eggs, one at a time, beating well after each addition. Mix in the vanilla and almond extracts until fully incorporated.
- Combine Wet and Dry Ingredients: Gradually add the dry ingredient mixture to the wet ingredients, mixing on low speed until just combined. Stir in the toasted almonds using a spatula or wooden spoon.
- Shape the Biscotti Dough: On a lightly floured surface, divide the dough in half. Shape each portion into a log approximately 10 inches long and 2 inches wide. Place the logs on the prepared baking sheet, leaving some space between them.
- First Bake: Bake in the preheated oven for 25-30 minutes, or until the logs are firm to the touch and lightly golden. Remove from the oven and let them cool on the baking sheet for about 10 minutes.
- Slice and Second Bake: Using a serrated knife, cut the logs diagonally into 3/4-inch thick slices. Arrange the slices cut-side down on the baking sheet. Return to the oven and bake for an additional 10-12 minutes, flipping them halfway through, until they’re golden brown and crisp.
- Melt Chocolate: While the biscotti cool, melt the chocolate chips in a microwave-safe bowl or a double boiler until smooth and shiny.
- Dip and Cool: Dip one end of each biscotti into the melted chocolate, allowing any excess to drip off. Place the dipped biscotti on a wire rack or parchment paper to set.
Extra Tips:
Toasting the almonds before adding them to the dough enhances their flavor, giving your biscotti a deeper, nuttier taste. Make sure to use a serrated knife for slicing the biscotti, as this will help maintain their shape and prevent crumbling.
If you prefer a different nut, feel free to substitute the almonds with hazelnuts or pistachios for a unique twist. Additionally, you can sprinkle the dipped chocolate with crushed nuts or festive sprinkles before it sets for added texture and holiday flair.
Store the biscotti in an airtight container to keep them fresh for up to two weeks.
Cinnamon Star Cookies
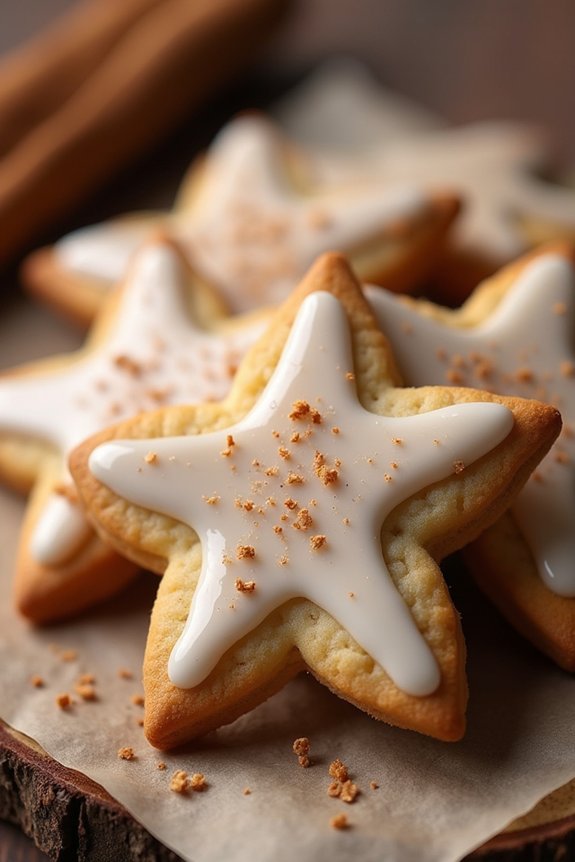
Cinnamon Star Cookies, also known as Zimtsterne, are a classic Christmas treat originating from Germany. These delightful cookies are known for their aromatic blend of cinnamon and almonds, topped with a sweet, crisp royal icing. Their star shape isn’t only festive but also symbolic of the holiday season. Perfect for sharing with family and friends, Cinnamon Star Cookies add a touch of warmth and tradition to any holiday gathering.
These cookies are naturally gluten-free as they’re made without flour, using ground almonds as the main ingredient. This makes them a great option for those with gluten sensitivities. The combination of cinnamon and almonds creates a rich, nutty flavor that’s beautifully complemented by the delicate sweetness of the icing. They’re slightly chewy on the inside with a crisp outer layer, making them an irresistible addition to any Christmas cookie platter.
Ingredients for 4-6 servings:
- 3 egg whites
- 250g powdered sugar
- 300g ground almonds
- 2 teaspoons ground cinnamon
- 1 teaspoon lemon juice
- 1 tablespoon almond extract
- A pinch of salt
Instructions:
- Prepare the Egg Whites: Begin by separating the egg whites from the yolks. Place the egg whites in a clean, dry bowl and beat them with a pinch of salt until soft peaks form. This will add volume and lightness to your cookie dough.
- Add Sugar and Flavorings: Gradually add the powdered sugar to the egg whites, continuing to beat until you achieve a stiff, glossy meringue. Reserve about 3 tablespoons of this mixture for icing the cookies later. Add the lemon juice and almond extract to the remaining meringue and mix until well combined.
- Combine with Dry Ingredients: Gently fold in the ground almonds and cinnamon into the meringue mixture. Stir until a dough forms, ensuring all ingredients are evenly incorporated. The dough may be slightly sticky but should hold together well.
- Roll and Cut the Dough: Dust your work surface with powdered sugar to prevent sticking, and roll out the dough to about 1/2 inch thickness. Using a star-shaped cookie cutter, cut out the cookies and place them on a baking sheet lined with parchment paper.
- Apply the Icing: Use the reserved meringue to carefully brush a thin layer over the top of each cookie. This will create a beautiful, glossy finish once baked.
- Bake the Cookies: Preheat your oven to 150°C (300°F) and bake the cookies for 15-20 minutes. They should remain pale in color and just start to firm up. Avoid overbaking to maintain their chewy texture.
- Cool and Serve: Allow the cookies to cool on the baking sheet for a few minutes before transferring them to a wire rack to cool completely. Serve them as a delightful treat for holiday guests or store them in an airtight container to enjoy later.
Extra Tips:
For the best results, use fresh, high-quality almonds and make sure they’re finely ground to achieve a smooth dough. If the dough feels too sticky, you can chill it in the refrigerator for about 30 minutes to make it easier to handle.
Additionally, when cutting out the cookies, dip the cutter in powdered sugar to prevent sticking. Remember, these cookies are meant to be soft and chewy, so be careful not to overbake them. Enjoy your Cinnamon Star Cookies with a cup of hot cocoa or mulled wine for the perfect holiday treat!
Red Velvet Christmas Cupcakes

There’s something truly magical about the holiday season, and what better way to celebrate than with a batch of delightful Red Velvet Christmas Cupcakes? These cupcakes are a perfect blend of rich cocoa flavor, a hint of vanilla, and the festive charm of red velvet, all topped with a luscious cream cheese frosting. Ideal for serving at holiday gatherings or gifting to loved ones, these cupcakes are as beautiful as they’re delicious.
With their vibrant red color and smooth, tangy frosting, they capture the essence of Christmas cheer in every bite. Whether you’re an experienced baker or trying your hand at holiday baking for the first time, this recipe is straightforward and incredibly rewarding. The moist, tender crumb of the cupcakes pairs perfectly with the creamy frosting, creating a dessert that’s sure to impress.
This recipe is designed to serve 4-6 people, making it perfect for intimate gatherings or as part of a larger dessert spread. So, gather your ingredients, preheat your oven, and let’s get started on creating these festive treats that are bound to become a holiday favorite.
Ingredients for Red Velvet Christmas Cupcakes (Serves 4-6):
- 1 cup all-purpose flour
- 1 tablespoon unsweetened cocoa powder
- 1/2 teaspoon baking soda
- 1/4 teaspoon salt
- 1/2 cup sugar
- 1/2 cup buttermilk
- 1/3 cup vegetable oil
- 1 large egg
- 1 tablespoon red food coloring
- 1/2 teaspoon vanilla extract
- 1/2 teaspoon distilled white vinegar
- 4 ounces cream cheese, softened
- 1/4 cup unsalted butter, softened
- 1 cup powdered sugar
- 1/2 teaspoon vanilla extract
Cooking Instructions:
- Preheat and Prep: Begin by preheating your oven to 350°F (175°C). Line a muffin tin with 6 cupcake liners to prepare for baking.
- Mix Dry Ingredients: In a medium-sized bowl, sift together the all-purpose flour, cocoa powder, baking soda, and salt. This guarantees that all dry ingredients are well combined and clump-free.
- Combine Wet Ingredients: In a separate large bowl, whisk together the sugar, buttermilk, vegetable oil, egg, red food coloring, vanilla extract, and vinegar. Mix until smooth and fully combined.
- Combine Wet and Dry Mixtures: Gradually add the dry ingredients to the wet mixture, stirring gently until just combined. Be careful not to overmix to maintain a light texture.
- Fill Cupcake Liners: Divide the batter evenly among the prepared cupcake liners, filling each about two-thirds full to allow room for rising.
- Bake: Place the muffin tin in the preheated oven and bake for 18-20 minutes. To check for doneness, insert a toothpick into the center of a cupcake; it should come out clean.
- Cool: Allow the cupcakes to cool in the tin for about 5 minutes, then transfer them to a wire rack to cool completely before frosting.
- Prepare Frosting: In a medium bowl, beat the softened cream cheese and unsalted butter together until smooth and creamy. Gradually add the powdered sugar and vanilla extract, beating until the frosting is light and fluffy.
- Frost Cupcakes: Once the cupcakes are completely cool, use a spatula or piping bag to frost each cupcake generously with the cream cheese frosting.
Extra Tips:
For an extra festive touch, consider decorating your Red Velvet Christmas Cupcakes with holiday-themed sprinkles, edible glitter, or a dusting of cocoa powder. If you want to make your cupcakes even more eye-catching, try using green-colored sprinkles or sugar decorations to contrast with the rich red cake.
Additionally, make sure all your ingredients, especially the cream cheese and butter, are at room temperature before mixing to promote a smooth and creamy texture. These cupcakes can be stored in an airtight container in the refrigerator for up to three days, but they’re best enjoyed fresh.
Spiced Apple Cider Donuts
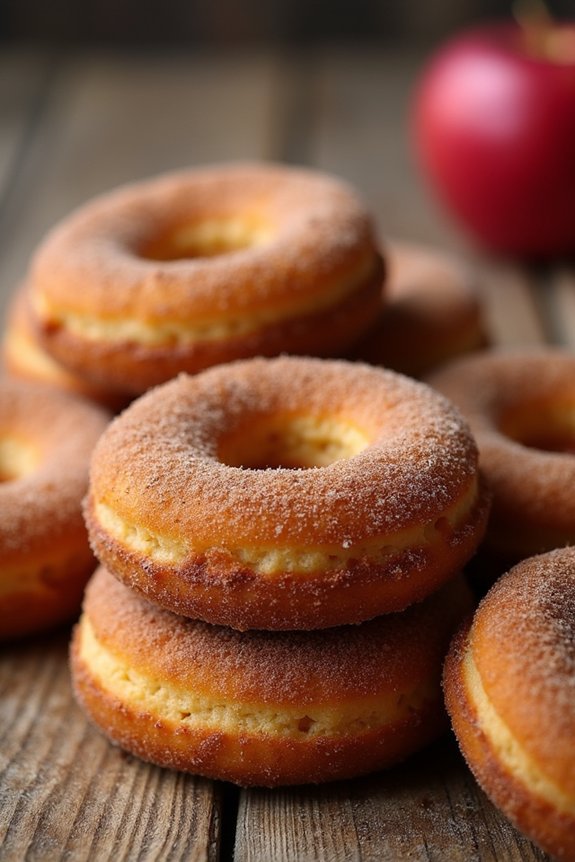
Spiced Apple Cider Donuts are the perfect treat to warm up your winter mornings or to share with family and friends during the holiday season. These donuts capture the essence of Christmas with their spicy, sweet aroma that fills the kitchen as they bake. Made with apple cider, a blend of warm spices, and coated in cinnamon sugar, these donuts are both flavorful and festive, making them an irresistible addition to your holiday baking repertoire.
The key to making these donuts truly special is the apple cider reduction, which intensifies the apple flavor and provides a moist texture. Once you bite into the soft, cake-like donut, you’re met with a burst of warm spices that complement the sweet apple flavor. This recipe is designed to yield 12-15 donuts, perfect for serving 4-6 people. Gather your ingredients and get ready to fill your home with the comforting smells and tastes of Christmas.
Ingredients:
- 1 1/2 cups apple cider
- 2 cups all-purpose flour
- 1 teaspoon baking powder
- 1/2 teaspoon baking soda
- 1 teaspoon ground cinnamon
- 1/2 teaspoon ground nutmeg
- 1/4 teaspoon ground cloves
- 1/4 teaspoon salt
- 2 tablespoons unsalted butter, melted
- 1/2 cup granulated sugar
- 1/3 cup brown sugar
- 1 large egg
- 1/2 cup buttermilk
- 1 teaspoon vanilla extract
For the Cinnamon Sugar Coating:
- 1/2 cup granulated sugar
- 1 tablespoon ground cinnamon
Instructions:
- Reduce the Apple Cider: Pour the apple cider into a small saucepan. Bring it to a boil over medium-high heat, then reduce the heat to medium-low and simmer until it’s reduced to about 1/2 cup, approximately 15-20 minutes. Allow it to cool slightly.
- Prepare the Dry Ingredients: In a medium bowl, whisk together the flour, baking powder, baking soda, cinnamon, nutmeg, cloves, and salt until well combined. Set aside.
- Mix the Wet Ingredients: In a large bowl, whisk together the melted butter, granulated sugar, and brown sugar until smooth. Add the egg, buttermilk, vanilla extract, and cooled apple cider reduction, mixing until fully combined.
- Combine Wet and Dry Ingredients: Gradually add the dry ingredients to the wet ingredients, stirring gently with a spatula until just combined. Be careful not to overmix, as this can result in dense donuts.
- Prepare the Donut Pan: Lightly grease a donut pan with nonstick spray. Spoon the batter into a piping bag or use a spoon to fill each cavity about 3/4 full.
- Bake the Donuts: Preheat your oven to 350°F (175°C). Bake the donuts for 10-12 minutes, or until a toothpick inserted into the center comes out clean. Allow the donuts to cool in the pan for 5 minutes before transferring them to a wire rack.
- Coat with Cinnamon Sugar: While the donuts are still warm, mix together the cinnamon and granulated sugar for the coating. Dip each donut into the mixture, coating evenly on all sides.
Extra Tips:
For the best texture, make sure not to overfill the donut cavities, as this can cause the donuts to lose their shape. If you don’t have a donut pan, you can use a muffin tin and simply mold the batter into donut shapes by hand.
Additionally, you can prepare the apple cider reduction a day in advance to save time during the baking process. Enjoy these donuts fresh for the best flavor and texture, but they can be stored in an airtight container for up to two days.