

When the holiday season rolls around, there’s one flavor I absolutely can’t resist—peppermint. Its cool, minty freshness perfectly complements rich chocolate or buttery treats. Picture the delightful swirl of peppermint in a sugar cookie or the layers of a peppermint icebox cake. These baking recipes are not just about satisfying a sweet tooth; they bring a festive warmth to my kitchen. Ready to explore these winter treats?
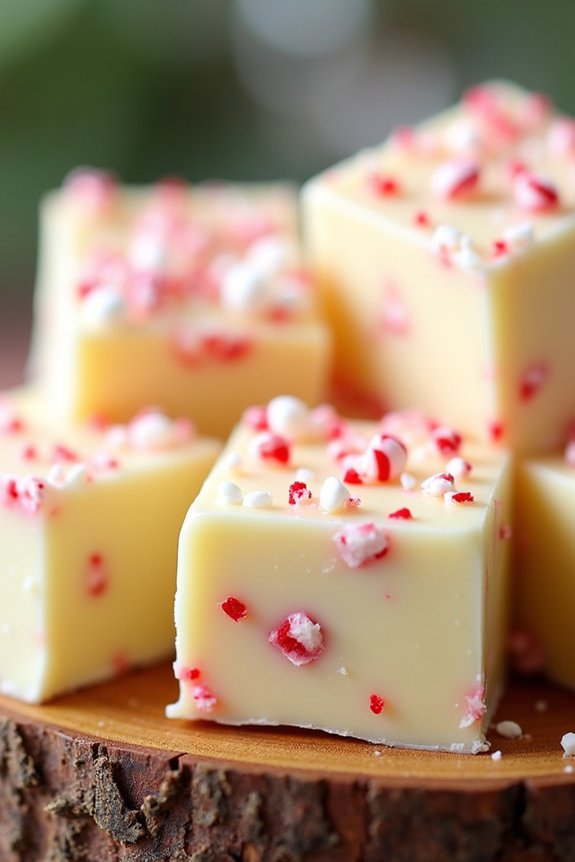
Peppermint Bark
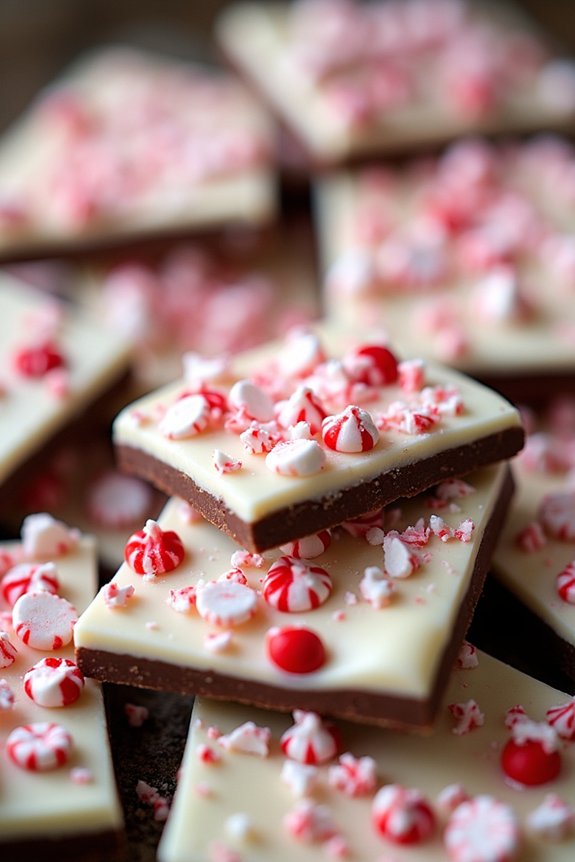
Peppermint Bark is a delightful holiday treat that combines the rich, creamy texture of chocolate with the invigorating taste of peppermint. This simple yet festive dessert is perfect for Christmas gatherings or as a homemade gift for friends and family. The contrasting layers of dark and white chocolate, sprinkled with crushed peppermint candies, create a visually appealing and deliciously addictive treat.
This recipe for Peppermint Bark serves 4-6 people and is incredibly easy to make, requiring minimal ingredients and effort. The key to a perfect Peppermint Bark is using high-quality chocolate and verifying the layers are properly set before adding the next. Follow these instructions for a beautifully layered peppermint bark that will be a hit at any holiday event.
Ingredients:
- 8 ounces of semisweet or dark chocolate
- 8 ounces of white chocolate
- 1 teaspoon of peppermint extract
- 1/2 cup of crushed peppermint candies (or candy canes)
- 1 tablespoon of vegetable oil (optional)
Cooking Instructions:
- Prepare the Baking Sheet: Line a baking sheet with parchment paper, making sure it covers the entire surface to prevent the chocolate from sticking.
- Melt the Dark Chocolate: Place the semisweet or dark chocolate in a microwave-safe bowl. Microwave in 30-second intervals, stirring in between, until the chocolate is fully melted and smooth. If desired, stir in the vegetable oil for a smoother consistency.
- Add Peppermint Extract: Once the dark chocolate is melted, stir in 1/2 teaspoon of peppermint extract until thoroughly combined.
- Spread the Dark Chocolate: Pour the melted dark chocolate onto the prepared baking sheet, spreading it evenly with a spatula to about 1/4 inch thick. Place the baking sheet in the refrigerator to set for about 15-20 minutes.
- Melt the White Chocolate: While the dark chocolate is setting, melt the white chocolate using the same method. Stir in the remaining 1/2 teaspoon of peppermint extract once melted.
- Layer the White Chocolate: Remove the baking sheet with the set dark chocolate from the refrigerator. Carefully pour the melted white chocolate over the dark chocolate layer, spreading it evenly.
- Add Crushed Peppermint Candies: Immediately sprinkle the crushed peppermint candies over the white chocolate while it’s still wet. Press them gently to make sure they stick.
- Set the Bark: Return the baking sheet to the refrigerator and allow the peppermint bark to set completely, about 45 minutes to 1 hour.
- Break into Pieces: Once the bark is fully set, remove it from the refrigerator. Carefully lift the bark from the parchment paper and break it into irregular pieces.
Extra Tips:
For best results, verify each chocolate layer is completely set before adding the next to prevent mixing. If you prefer a smoother texture, consider using candy melts instead of chocolate, as they’re specifically designed for confections.
Store the peppermint bark in an airtight container at room temperature for up to a week, or in the refrigerator for longer freshness.
Peppermint Chocolate Crinkle Cookies
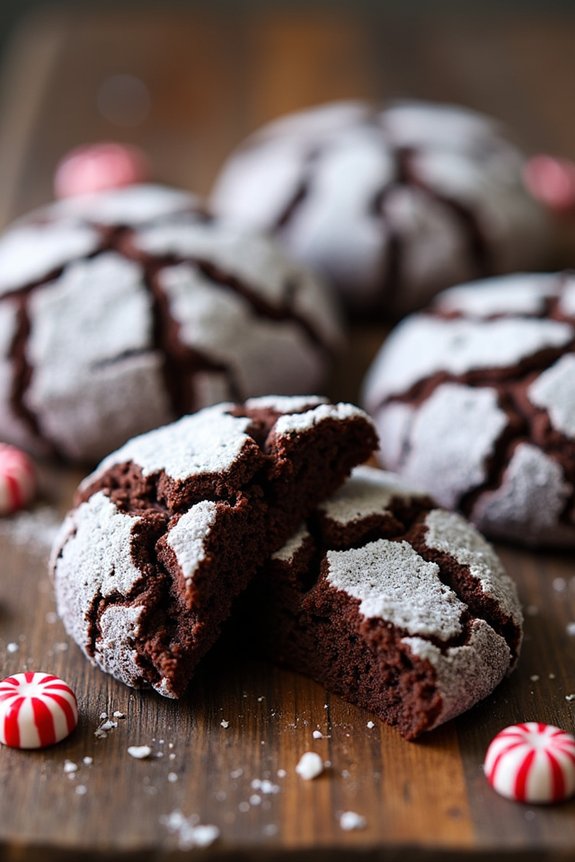
Making these cookies is a fun and rewarding process that brings the spirit of Christmas into your kitchen. Whether you’re an experienced baker or a beginner, this recipe is simple to follow and yields mouthwatering results. Serve these cookies at your holiday gatherings, or package them as thoughtful homemade gifts.
Let’s plunge into the recipe for a serving size of 4-6 people.
Ingredients:
- 1 cup all-purpose flour
- 1/2 cup unsweetened cocoa powder
- 1 teaspoon baking powder
- 1/2 teaspoon salt
- 1/2 cup unsalted butter, softened
- 3/4 cup granulated sugar
- 2 large eggs
- 1 teaspoon vanilla extract
- 1 teaspoon peppermint extract
- 1/2 cup powdered sugar
Instructions:
- Prepare the Dry Ingredients: In a medium bowl, whisk together the flour, cocoa powder, baking powder, and salt. Set the mixture aside for later.
- Cream the Butter and Sugar: In a large mixing bowl, use an electric mixer to beat the softened butter and granulated sugar until the mixture is light and fluffy. This should take about 3-4 minutes.
- Add Eggs and Extracts: Beat in the eggs, one at a time, making sure each is fully incorporated before adding the next. Then, mix in the vanilla and peppermint extracts.
- Combine Wet and Dry Ingredients: Gradually add the dry ingredient mixture to the wet ingredients, mixing until just combined. Be careful not to overmix.
- Chill the Dough: Cover the dough with plastic wrap and refrigerate for at least 2 hours, or until firm. This step is essential for achieving the crinkle effect.
- Preheat and Prepare: Preheat your oven to 350°F (175°C). Line two baking sheets with parchment paper.
- Form the Cookies: Roll the chilled dough into 1-inch balls. Roll each ball in powdered sugar until thoroughly coated, and place them on the prepared baking sheets, leaving about 2 inches of space between each cookie.
- Bake: Bake in the preheated oven for 10-12 minutes, or until the cookies have spread and cracked. They should be set around the edges but still soft in the center.
- Cool: Allow the cookies to cool on the baking sheets for 5 minutes before transferring them to a wire rack to cool completely.
Extra Tips: For best results, make certain your butter is softened to room temperature, as this helps in creating a smooth and fluffy batter.
Be patient with the chilling process, as it ensures the cookies don’t spread too much during baking and helps achieve the desired crinkle effect. If you prefer a stronger peppermint flavor, you can adjust the amount of peppermint extract to taste.
Enjoy your homemade holiday cookies with a glass of milk or a cup of hot cocoa for a perfect treat.
Candy Cane Brownies
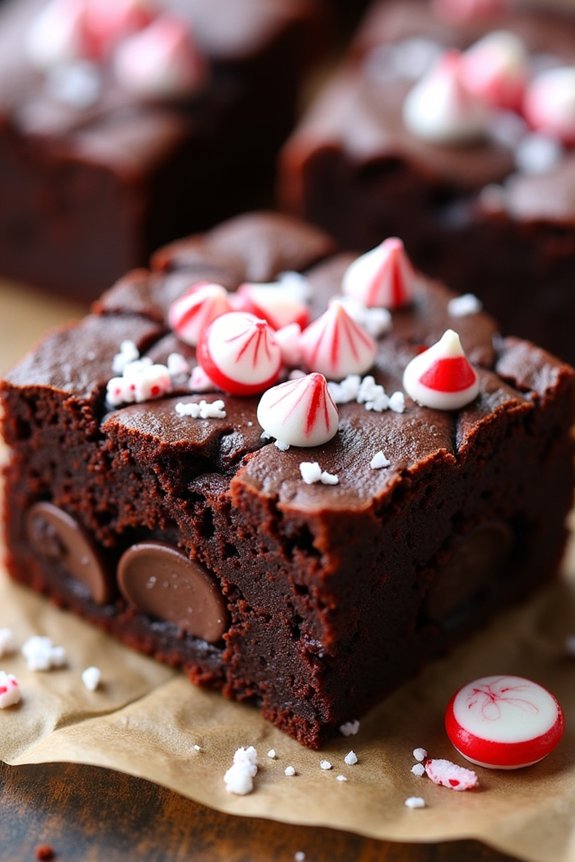
Candy Cane Brownies are a delightful treat that combines the rich, fudgy goodness of classic brownies with the invigorating, festive flavor of peppermint. Perfect for the holiday season, these brownies are enhanced by the addition of crushed candy canes, which provide a satisfying crunch and a burst of minty sweetness in every bite.
Whether you’re hosting a holiday gathering or simply enjoying a cozy night in by the fire, Candy Cane Brownies are sure to be a crowd-pleaser.
These brownies aren’t only delicious but also incredibly easy to make, requiring only a handful of ingredients that are likely already in your pantry. The key to achieving the perfect balance of flavors lies in using high-quality cocoa powder and fresh candy canes.
In just a few simple steps, you’ll have a batch of festive brownies that are ready to be devoured by friends and family. This recipe makes enough to serve 4-6 people, ensuring everyone gets a generous piece.
Ingredients:
- 1/2 cup unsalted butter
- 1 cup granulated sugar
- 2 large eggs
- 1 teaspoon vanilla extract
- 1/3 cup unsweetened cocoa powder
- 1/2 cup all-purpose flour
- 1/4 teaspoon salt
- 1/4 teaspoon baking powder
- 1/2 cup crushed candy canes
- 1/2 cup chocolate chips (optional)
Instructions:
- Preheat the Oven: Begin by preheating your oven to 350°F (175°C). Grease an 8×8-inch baking pan or line it with parchment paper for easy removal.
- Melt the Butter: In a medium saucepan over low heat, melt the butter. Once melted, remove the saucepan from the heat and stir in the sugar, mixing until well combined.
- Add Wet Ingredients: Allow the mixture to cool slightly, then add the eggs one at a time, beating well after each addition. Stir in the vanilla extract until the mixture is smooth and glossy.
- Combine Dry Ingredients: In a separate bowl, whisk together the cocoa powder, flour, salt, and baking powder. Gradually add the dry ingredients to the wet mixture, stirring until just combined.
- Incorporate Candy Canes: Fold in the crushed candy canes and chocolate chips (if using), ensuring they’re evenly distributed throughout the batter.
- Bake: Pour the batter into the prepared baking pan, spreading it evenly with a spatula. Bake in the preheated oven for 25-30 minutes or until a toothpick inserted into the center comes out with a few moist crumbs.
- Cool and Serve: Allow the brownies to cool in the pan on a wire rack for at least 15 minutes before cutting them into squares. Serve warm or at room temperature.
Extra Tips:
For best results, make sure not to overmix the batter once the dry ingredients have been added, as this can result in dense brownies.
If you prefer a more intense peppermint flavor, you can add a few drops of peppermint extract to the batter. Additionally, to achieve a festive presentation, sprinkle extra crushed candy canes over the top of the brownies immediately after removing them from the oven.
This will allow the candy to slightly melt and adhere to the surface, adding a beautiful touch to your holiday treat.
Peppermint Swirl Sugar Cookies
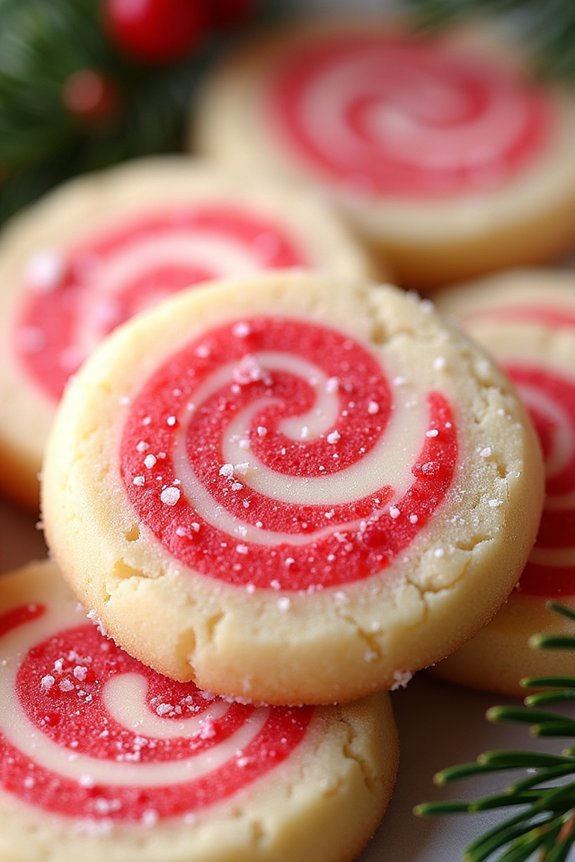
Indulge in the festive spirit with Peppermint Swirl Sugar Cookies, a delightful treat that perfectly captures the essence of the holiday season. These cookies aren’t only visually stunning with their red and white swirls, reminiscent of candy canes, but they also offer an invigorating peppermint flavor that will awaken your taste buds. Ideal for Christmas parties or as a homemade gift, these cookies are sure to be a hit with family and friends.
The recipe for Peppermint Swirl Sugar Cookies is simple to follow, making it a great baking project for both beginners and experienced bakers. With a few basic ingredients and some food coloring, you can create these charming cookies that embody the joy and warmth of Christmas. Gather your mixing bowls and prepare to fill your kitchen with the sweet aroma of peppermint and sugar.
Ingredients for 4-6 servings:
- 2 3/4 cups all-purpose flour
- 1 teaspoon baking powder
- 1/2 teaspoon salt
- 1 cup unsalted butter, softened
- 1 1/2 cups granulated sugar
- 1 large egg
- 1 teaspoon vanilla extract
- 1 teaspoon peppermint extract
- Red food coloring
- 1/4 cup granulated sugar (for rolling)
Cooking Instructions:
- Preheat and Prep: Preheat your oven to 350°F (175°C). Line two baking sheets with parchment paper or silicone baking mats to guarantee the cookies don’t stick during baking.
- Mix Dry Ingredients: In a medium-sized bowl, whisk together the flour, baking powder, and salt. This will guarantee even distribution of the baking powder and salt throughout the dough.
- Cream Butter and Sugar: In a large bowl, using an electric mixer, cream together the softened butter and 1 1/2 cups of granulated sugar until the mixture is light and fluffy, which should take about 2-3 minutes.
- Add Wet Ingredients: Beat in the egg, vanilla extract, and peppermint extract until well combined. Make sure the extracts are fully incorporated for a uniform flavor.
- Combine Mixtures: Gradually add the dry ingredients to the wet ingredients, mixing on a low speed until a dough forms. Be careful not to overmix as this can make the cookies tough.
- Divide and Color Dough: Divide the dough into two equal parts. In one portion, add a few drops of red food coloring and mix until the color is evenly distributed.
- Create Swirls: Take small pieces of each colored dough and roll them into small balls. Press two different colored balls together and gently roll them into a single ball to create a swirl effect. Repeat until all dough is used.
- Roll and Arrange: Roll each ball in the additional 1/4 cup of granulated sugar to coat. Place the balls on the prepared baking sheets about 2 inches apart.
- Bake: Bake in the preheated oven for 10-12 minutes or until the edges are lightly golden. Avoid overbaking to maintain a soft texture.
- Cool: Allow the cookies to cool on the baking sheets for 5 minutes before transferring them to a wire rack to cool completely.
Extra Tips:
For the best results, verify your butter is at room temperature before starting the recipe. This will help in achieving the right consistency when creaming with sugar.
When coloring the dough, start with a small amount of food coloring and gradually add more until you reach the desired shade. Remember, the dough will darken slightly upon baking.
If you prefer a more intense peppermint flavor, you can increase the peppermint extract slightly, but be cautious as it can quickly become overpowering.
Enjoy these cookies with a glass of milk or a warm cup of cocoa for the ultimate holiday treat.
White Chocolate Peppermint Fudge
White Chocolate Peppermint Fudge is a delightful holiday treat that combines the rich, creamy texture of white chocolate with the invigorating zing of peppermint. This easy-to-make fudge is perfect for Christmas gatherings, holiday cookie exchanges, or simply as a festive indulgence for yourself and your loved ones.
The harmonious blend of flavors and the smooth, melt-in-your-mouth consistency make it a crowd-pleaser that will have everyone asking for seconds. Creating this fudge doesn’t require much time or effort, making it a great choice for those who are new to candy-making.
The key ingredients are simple, yet the result is a luxurious, decadent fudge that looks as impressive as it tastes. This recipe serves 4-6 people and is perfect for enjoying with a cup of hot cocoa or sharing as a thoughtful homemade gift.
Ingredients (for 4-6 servings):
- 2 cups white chocolate chips
- 1 can (14 oz) sweetened condensed milk
- 1/4 teaspoon peppermint extract
- 1/2 cup crushed peppermint candies or candy canes
- 1 tablespoon unsalted butter
- A pinch of salt
Instructions:
- Prepare Your Tools: Line an 8×8-inch baking dish with parchment paper, leaving some overhang on the sides to easily lift the fudge out later. This will prevent the fudge from sticking and make it easier to cut into squares.
- Melt the Chocolate: In a medium saucepan over low heat, combine the white chocolate chips, sweetened condensed milk, and butter. Stir continuously with a rubber spatula until the mixture is completely melted and smooth. Be sure to keep the heat low to prevent the chocolate from seizing.
- Add Flavors: Once the chocolate mixture is smooth, remove the saucepan from the heat. Stir in the peppermint extract and a pinch of salt until well combined. The extract will infuse the fudge with a invigorating minty flavor.
- Incorporate the Candy: Gently fold in half of the crushed peppermint candies into the mixture. This will add a lovely crunch and a burst of peppermint flavor throughout the fudge.
- Pour and Set: Pour the fudge mixture into the prepared baking dish, using the spatula to spread it evenly. Sprinkle the remaining crushed peppermint candies on top, pressing them lightly into the surface.
- Chill: Allow the fudge to cool at room temperature for about 15 minutes, then transfer it to the refrigerator. Let it chill for at least 2 hours or until it’s firm enough to cut.
- Cut and Serve: Once set, remove the fudge from the baking dish using the parchment overhang. Cut it into small squares and serve. Enjoy the creamy, minty delight!
Extra Tips:
When melting the white chocolate, it’s essential to keep the heat low and stir constantly to prevent it from burning or becoming grainy. If you find the fudge mixture too thick while incorporating the peppermint extract, you can add a teaspoon of milk to achieve a smoother consistency.
Additionally, feel free to experiment with the amount of peppermint extract to suit your taste preference; a little goes a long way, so start with the suggested amount and adjust as needed. Finally, for a decorative touch, consider drizzling melted dark chocolate over the top before chilling.
Peppermint Mocha Cupcakes
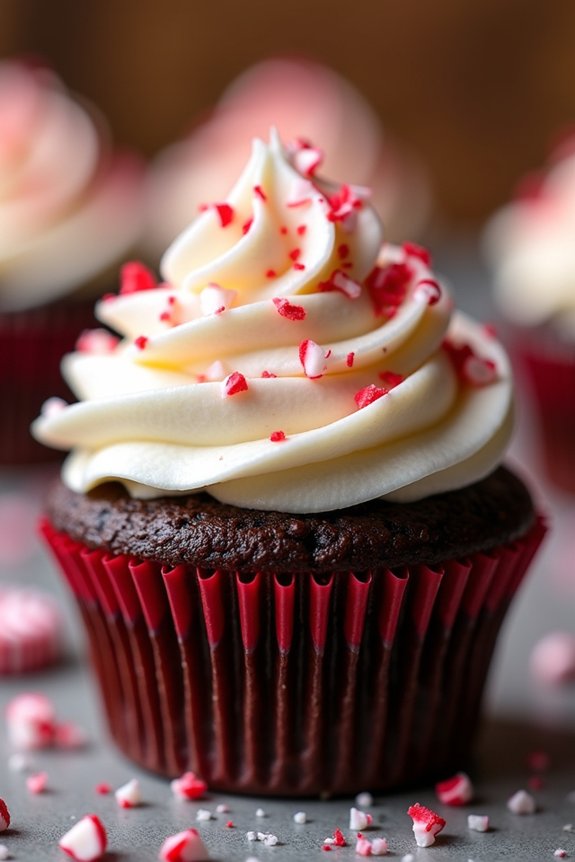
Peppermint Mocha Cupcakes are the perfect festive treat to add a touch of holiday cheer to any gathering. These cupcakes blend the rich flavors of chocolate and coffee with a revitalizing hint of peppermint, creating a delightful taste sensation that captures the essence of the holiday season.
Whether you’re hosting a holiday party or simply want to enjoy a cozy treat with a cup of hot cocoa, these cupcakes are sure to impress with their decadent taste and charming appearance.
The recipe is designed to make between 4-6 servings, guaranteeing there’s enough to share with friends and family, or just to indulge yourself! The moist chocolate cupcakes are topped with a creamy peppermint frosting and garnished with crushed peppermint candies for an extra festive flair.
These cupcakes not only taste delicious but also look stunning with their colorful presentation, making them a showstopper on any dessert table.
Ingredients:
- 1 cup all-purpose flour
- 1 cup granulated sugar
- 1/2 cup unsweetened cocoa powder
- 1 teaspoon baking powder
- 1/2 teaspoon baking soda
- 1/4 teaspoon salt
- 1/2 cup whole milk
- 1/4 cup vegetable oil
- 1 large egg
- 1 teaspoon vanilla extract
- 1/2 cup strong brewed coffee, cooled
- 1/2 teaspoon peppermint extract
For the Frosting:
- 1/2 cup unsalted butter, softened
- 2 cups powdered sugar
- 2 tablespoons heavy cream
- 1/2 teaspoon peppermint extract
- Red and green food coloring (optional)
- Crushed peppermint candies for garnish
Instructions:
1. Preheat and Prepare: Preheat your oven to 350°F (175°C) and line a cupcake pan with paper liners.
2. Mix Dry Ingredients: In a medium-sized bowl, whisk together the flour, sugar, cocoa powder, baking powder, baking soda, and salt until well combined.
3. Combine Wet Ingredients: In a separate large bowl, combine the milk, vegetable oil, egg, and vanilla extract. Mix until smooth.
4. Incorporate Coffee and Peppermint: Add the cooled coffee and peppermint extract to the wet ingredients and stir until fully incorporated.
5. Combine Mixtures: Gradually add the dry ingredients to the wet mixture, stirring gently until just combined. Be careful not to overmix.
6. Fill Cupcake Liners: Divide the batter evenly among the cupcake liners, filling each about two-thirds full.
7. Bake: Place the cupcakes in the preheated oven and bake for 18-20 minutes, or until a toothpick inserted into the center comes out clean. Allow them to cool completely on a wire rack.
8. Prepare Frosting: In a large bowl, beat the softened butter until creamy. Gradually add the powdered sugar, mixing well between each addition. Add the heavy cream and peppermint extract, beating until the frosting is light and fluffy.
If desired, add a few drops of red or green food coloring and mix until evenly colored.
9. Frost and Decorate: Once the cupcakes are completely cooled, frost them with the peppermint frosting. Garnish with crushed peppermint candies for a festive touch.
Extra Tips:
When making the Peppermint Mocha Cupcakes, be sure your butter for the frosting is soft, but not melted, for the best consistency.
If you don’t have brewed coffee on hand, instant coffee dissolved in hot water can be a quick substitute. For a more intense peppermint flavor, adjust the peppermint extract amount in both the cupcake and frosting to taste.
Finally, crushing peppermint candies can be done easily by placing them in a sealed plastic bag and gently pounding them with a rolling pin.
Peppermint Cheesecake Bars
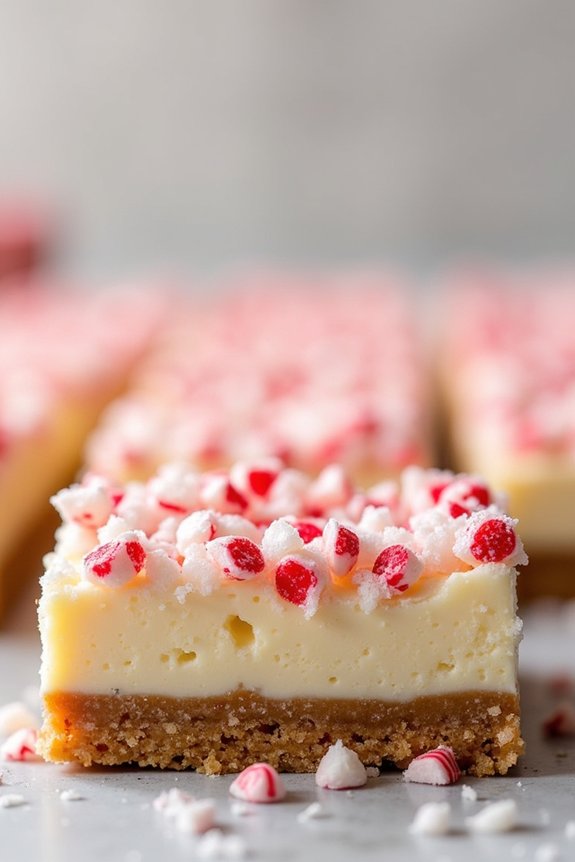
Peppermint Cheesecake Bars are a festive and delightful treat that combines the creamy richness of cheesecake with the invigorating kick of peppermint. Ideal for holiday gatherings or as a special treat for your loved ones, these bars are sure to be a hit. The peppermint flavor is perfectly balanced with the smooth, tangy cream cheese, making each bite a burst of holiday cheer.
With a buttery cookie crust and a sprinkle of crushed peppermint candies on top, these bars offer a delightful texture contrast that will leave everyone wanting more. Perfect for a serving size of 4-6 people, these Peppermint Cheesecake Bars are surprisingly easy to make. They require minimal preparation time, making them an ideal choice for busy holiday schedules.
Whether you’re an experienced baker or a novice in the kitchen, you’ll find this recipe straightforward and rewarding. Gather your ingredients, follow the step-by-step instructions, and in no time, you’ll have a tray of delectable peppermint-flavored cheesecake bars that capture the essence of Christmas in every bite.
Ingredients:
- 1 1/2 cups chocolate cookie crumbs
- 1/4 cup unsalted butter, melted
- 16 oz cream cheese, softened
- 3/4 cup granulated sugar
- 2 large eggs
- 1 teaspoon vanilla extract
- 1/2 teaspoon peppermint extract
- 1/2 cup sour cream
- 1/4 cup all-purpose flour
- 1/2 cup crushed peppermint candies
- Optional: whipped cream and additional peppermint candies for garnish
Cooking Instructions:
- Prepare the Oven and Pan: Preheat your oven to 325°F (165°C). Line an 8×8-inch baking pan with parchment paper, allowing some overhang on the sides for easy removal after baking.
- Make the Crust: In a medium bowl, combine the chocolate cookie crumbs and melted butter. Mix until the crumbs are evenly coated. Press the mixture firmly into the bottom of the prepared baking pan to form an even layer. Set aside.
- Prepare the Cheesecake Filling: In a large mixing bowl, beat the softened cream cheese with a hand mixer until smooth and creamy. Add the granulated sugar and continue to beat until well combined.
- Add Eggs and Flavorings: Beat in the eggs, one at a time, guaranteeing each is fully incorporated before adding the next. Mix in the vanilla and peppermint extracts.
- Incorporate Sour Cream and Flour: Add the sour cream to the mixture and beat until smooth. Gradually add the flour, mixing on low speed just until combined.
- Assemble the Bars: Pour the cheesecake mixture over the prepared crust, spreading it evenly. Sprinkle the crushed peppermint candies over the top.
- Bake the Cheesecake Bars: Place the pan in the preheated oven and bake for 30-35 minutes, or until the center is set and the edges are lightly golden.
- Cool and Chill: Remove the pan from the oven and allow the bars to cool completely at room temperature. Once cooled, cover the pan and refrigerate for at least 2 hours to allow the cheesecake to set fully.
- Serve and Garnish: Use the parchment paper overhangs to lift the cheesecake out of the pan. Cut into bars and, if desired, top with whipped cream and additional crushed peppermint candies.
Extra Tips:
For best results, make sure all your ingredients are at room temperature before starting. This guarantees a smooth and creamy cheesecake filling.
When cutting the bars, use a sharp knife and wipe it clean between each cut to maintain neat edges. If you prefer a stronger peppermint flavor, you can add a touch more peppermint extract to the filling. Finally, these bars can be made a day in advance, making them a convenient option for holiday parties.
Chocolate Peppermint Bundt Cake
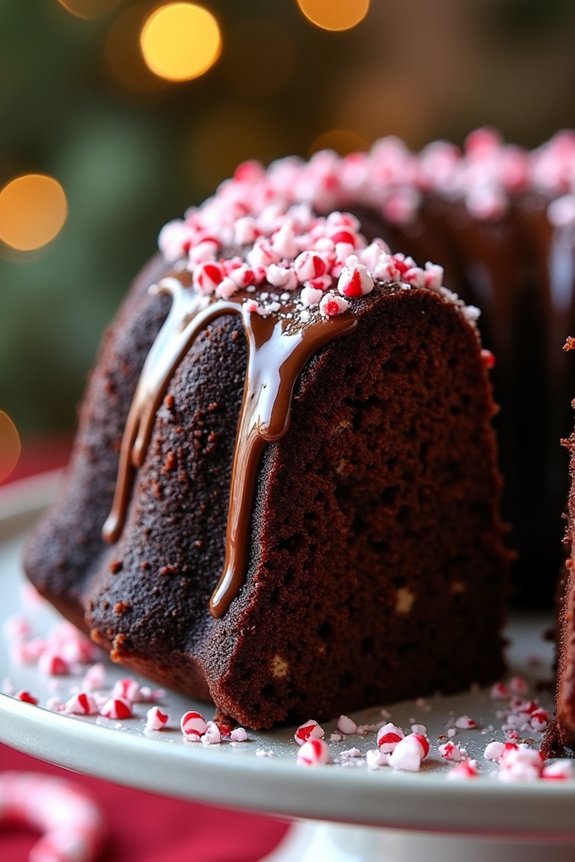
Celebrate the festive season with a luscious Chocolate Peppermint Bundt Cake that combines the rich, deep flavors of chocolate with the invigorating zing of peppermint. This delightful dessert is perfect for holiday gatherings and will surely impress your family and friends with its beautiful presentation and delectable taste.
The bundt cake is moist and tender, infused with chocolatey goodness and a hint of peppermint that will remind you of candy canes and snowy evenings. Topped with a glossy chocolate glaze and crushed peppermint candies, it’s a showstopper on any holiday table.
The recipe is designed to serve 4-6 people, making it an ideal choice for a small gathering or a family dessert night. With simple yet flavorful ingredients, the Chocolate Peppermint Bundt Cake is easy to prepare and will fill your kitchen with the warm and inviting scent of holiday baking.
Whether you’re an experienced baker or a novice in the kitchen, this cake is a surefire way to spread Christmas cheer and create lasting memories with loved ones.
Ingredients for Chocolate Peppermint Bundt Cake (Serves 4-6):
- 1 cup all-purpose flour
- 1/2 cup unsweetened cocoa powder
- 1/2 teaspoon baking soda
- 1/4 teaspoon baking powder
- 1/4 teaspoon salt
- 1/2 cup unsalted butter, softened
- 1 cup granulated sugar
- 2 large eggs
- 1 teaspoon vanilla extract
- 1 teaspoon peppermint extract
- 1/2 cup buttermilk
- 1/2 cup boiling water
- 1/2 cup mini chocolate chips
- 1/2 cup crushed peppermint candies
Cooking Instructions:
- Preheat and Prepare Pan: Preheat your oven to 350°F (175°C). Grease a bundt pan thoroughly with butter or non-stick spray and lightly dust it with cocoa powder to guarantee the cake releases easily after baking.
- Mix Dry Ingredients: In a medium bowl, sift together the flour, cocoa powder, baking soda, baking powder, and salt. Set aside.
- Cream Butter and Sugar: In a large bowl, using an electric mixer, cream the softened butter and granulated sugar together until light and fluffy. This should take about 3-4 minutes.
- Add Eggs and Extracts: Beat in the eggs one at a time, guaranteeing each is fully incorporated before adding the next. Add the vanilla and peppermint extracts, mixing until combined.
- Combine with Dry Ingredients: Gradually add the dry ingredients to the butter mixture, alternating with the buttermilk, starting and ending with the dry ingredients. Mix on low speed until just combined.
- Incorporate Boiling Water and Chocolate Chips: Slowly stir in the boiling water until the batter is smooth. Fold in the mini chocolate chips carefully.
- Bake the Cake: Pour the batter into the prepared bundt pan, smoothing the top with a spatula. Bake for 35-40 minutes, or until a toothpick inserted into the center comes out clean.
- Cool and Glaze: Allow the cake to cool in the pan for about 10 minutes before inverting it onto a wire rack to cool completely. Once cooled, drizzle with a chocolate glaze and sprinkle with crushed peppermint candies.
Extra Tips: For a glossy chocolate glaze, melt 1/2 cup of chocolate chips with 1 tablespoon of butter and 1 tablespoon of milk, stirring until smooth. Adjust the peppermint extract to your taste preference, as it can be quite potent.
If you don’t have buttermilk, you can make a substitute by adding 1/2 tablespoon of lemon juice or vinegar to 1/2 cup of milk and letting it sit for 5 minutes. Be sure to crush the peppermint candies just before serving to maintain their vibrant color and fresh taste.
Peppermint Meringue Cookies
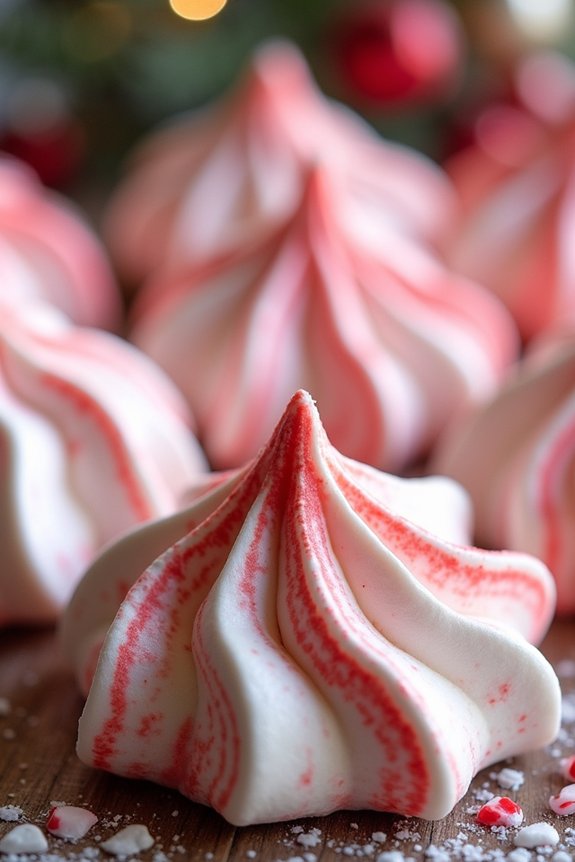
Peppermint Meringue Cookies are a delightful treat, perfect for adding a touch of festive cheer to your holiday baking. These light and airy cookies are infused with the invigorating taste of peppermint, making them a wonderful addition to any Christmas dessert spread. Their crisp exterior and melt-in-your-mouth texture make them an irresistible treat for both young and old alike.
The delicate swirl of red and white mimics the classic candy cane, adding a visually appealing element to your holiday table. Crafting these cookies requires a bit of patience and care, but the result is well worth the effort. With just a few simple ingredients, you can create a batch of these charming cookies that are sure to impress your family and friends.
Whether you’re looking to enjoy them with a cup of hot cocoa or share them as a holiday gift, Peppermint Meringue Cookies are a festive favorite that encapsulates the joy and flavor of the season.
Ingredients (Serves 4-6 people):
- 4 large egg whites
- 1 cup granulated sugar
- 1/4 teaspoon cream of tartar
- 1/4 teaspoon peppermint extract
- Red gel food coloring
Cooking Instructions:
- Preheat and Prepare: Preheat your oven to 225°F (110°C) and line two baking sheets with parchment paper. This low temperature is essential for slowly drying out the meringues without browning them.
- Beat Egg Whites: In a clean, dry bowl, start beating the egg whites on medium speed using an electric mixer until they become frothy. This initial whisking helps to incorporate air into the egg whites.
- Add Cream of Tartar and Sugar: Add the cream of tartar and gradually add the granulated sugar, one tablespoon at a time, while continuing to beat the mixture. Increase the mixer speed to high and beat until stiff, glossy peaks form. This can take about 5-7 minutes.
- Flavor and Color: Gently fold in the peppermint extract. If desired, take a small amount of the meringue and mix it with a few drops of red gel food coloring in a separate bowl. Return the colored meringue to the main bowl and gently swirl it in to create a marbled effect.
- Pipe the Meringues: Transfer the meringue mixture into a piping bag fitted with a star tip. Pipe small meringue kisses onto the prepared baking sheets, spacing them about an inch apart.
- Bake: Bake the meringues in the preheated oven for 90 minutes, then turn off the oven and leave the meringues inside to cool completely for at least another hour. This step guarantees that the meringues are crisp all the way through.
- Serve and Store: Once completely cool, carefully remove the Peppermint Meringue Cookies from the parchment paper. Store them in an airtight container at room temperature to keep them crisp.
Extra Tips:
For best results, make sure that no yolk contaminates the egg whites, as this can prevent them from whipping properly. It’s important to use a clean, dry bowl and beaters to achieve the stiff peaks needed for the meringue.
If you find your meringue isn’t stiffening, consider using superfine sugar, which dissolves more easily. Remember that humidity can affect meringues; they’re best made on a dry day. If your meringues start to soften over time, you can briefly re-crisp them in the oven at a low temperature.
Peppermint Pattie-Stuffed Chocolate Cookies
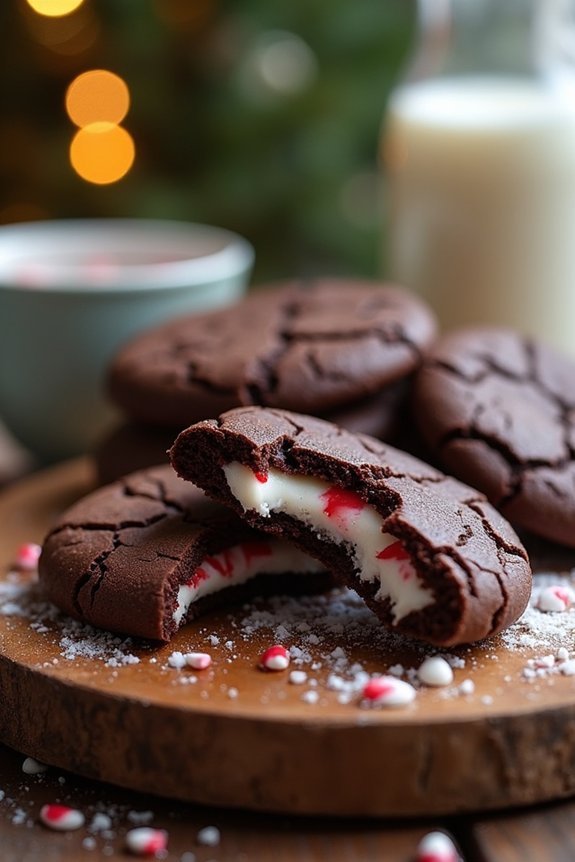
Peppermint Pattie-Stuffed Chocolate Cookies are the ultimate holiday indulgence, combining rich chocolate flavors with a revitalizing burst of peppermint. These decadent cookies are perfect for any Christmas gathering, offering a delightful surprise with every bite as the gooey peppermint center melts in your mouth.
The combination of dark cocoa and mint creates a beautiful contrast, making these cookies not only delicious but visually appealing as well. Prepare to delight your friends and family with a batch of these festive treats that capture the essence of the holiday season.
This recipe yields about 24 cookies, serving approximately 4-6 people, depending on how generous you’re with the portions. The key to achieving the perfect texture and flavor balance is to use high-quality ingredients and follow each step carefully.
The process involves creating a rich chocolate dough, enveloping a peppermint patty in the center, and baking them to perfection. Whether you’re an experienced baker or a novice, these cookies are a fun project that will fill your home with the warm, inviting aroma of chocolate and peppermint.
Ingredients
- 1 cup unsalted butter, softened
- 1 cup granulated sugar
- 1 cup packed brown sugar
- 2 large eggs
- 1 teaspoon vanilla extract
- 2 1/4 cups all-purpose flour
- 1 cup unsweetened cocoa powder
- 1 teaspoon baking soda
- 1/2 teaspoon salt
- 24 mini peppermint patties
Cooking Instructions
- Preheat the Oven: Start by preheating your oven to 350°F (175°C). Line two baking sheets with parchment paper to prevent the cookies from sticking.
- Prepare the Cookie Dough: In a large mixing bowl, cream together the softened butter, granulated sugar, and brown sugar until the mixture is light and fluffy. This should take about 3-4 minutes using an electric mixer on medium speed.
- Add Wet Ingredients: Beat in the eggs one at a time, making sure each egg is fully incorporated before adding the next. Mix in the vanilla extract until well combined.
- Combine Dry Ingredients: In a separate bowl, whisk together the flour, cocoa powder, baking soda, and salt. Gradually add the dry ingredients to the wet mixture, mixing on low speed until a dough forms.
- Assemble the Cookies: Scoop about 2 tablespoons of dough and flatten it into a disc. Place a peppermint patty in the center and fold the dough around it, sealing the edges to completely encase the patty. Roll the dough into a ball and place it on the prepared baking sheet. Repeat with the remaining dough and peppermint patties, spacing the cookies about 2 inches apart.
- Bake: Bake the cookies for 10-12 minutes, or until the edges are set and the tops look slightly cracked. Be careful not to overbake, as they’ll continue to firm up as they cool.
- Cool: Remove the cookies from the oven and let them cool on the baking sheets for 5 minutes before transferring them to a wire rack to cool completely.
Extra Tips
For best results, make certain that your butter is softened to room temperature before you start mixing. This allows for better incorporation of the sugars, resulting in a smoother dough.
Also, chilling the dough for about 30 minutes before baking can help maintain the cookies’ shape and prevent excessive spreading. If you prefer a chewier cookie, slightly underbake them and allow them to finish setting as they cool on the baking sheet.
Finally, feel free to experiment with different types of peppermint patties for unique flavor variations.
Peppermint Hot Chocolate Brownie Bites
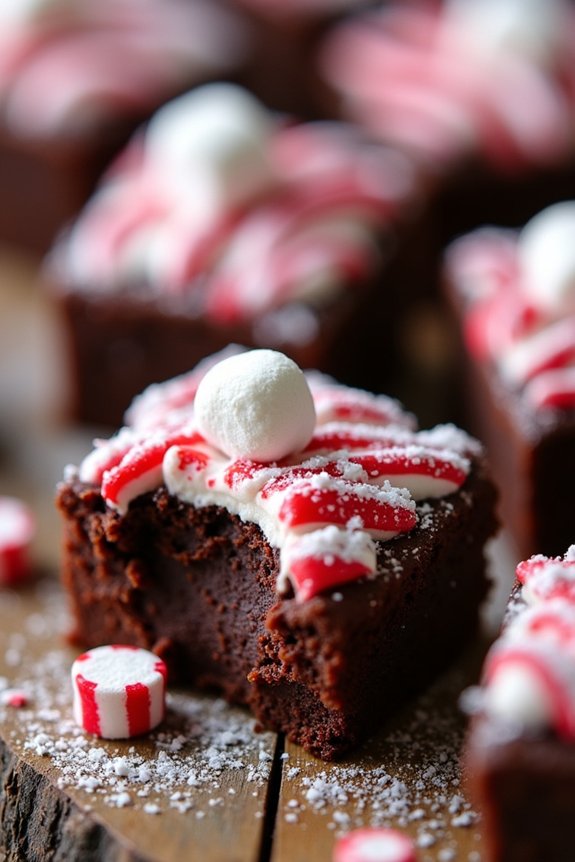
Peppermint Hot Chocolate Brownie Bites are a delightful fusion of rich chocolate, cool peppermint, and a touch of holiday magic. These bite-sized treats are perfect for Christmas gatherings, offering a luscious, fudgy center with a revitalizing hint of peppermint that will leave your guests asking for more.
Whether you’re preparing these for a holiday dessert table or as a thoughtful homemade gift, these brownie bites are sure to impress with their festive flavors and charming appearance.
The recipe is designed to serve 4-6 people, making it an ideal choice for small parties or family gatherings. Each bite is a harmonious blend of textures and flavors, with a gooey chocolate interior and a crunchy peppermint topping. The preparation is straightforward, allowing you to enjoy the baking process without any stress, even amidst the holiday rush.
If you’re looking to add a touch of elegance and festive spirit to your Christmas baking repertoire, Peppermint Hot Chocolate Brownie Bites are a must-try.
Ingredients:
- 1/2 cup unsalted butter
- 1 cup granulated sugar
- 2 large eggs
- 1 teaspoon vanilla extract
- 1/3 cup unsweetened cocoa powder
- 1/2 cup all-purpose flour
- 1/4 teaspoon salt
- 1/4 teaspoon baking powder
- 1/2 cup semi-sweet chocolate chips
- 1/2 cup crushed peppermint candies
- 1/4 cup heavy cream
- 1/2 teaspoon peppermint extract
- 1/2 cup mini marshmallows (optional)
- 1 tablespoon powdered sugar for dusting
Instructions:
- Preheat the Oven: Begin by preheating your oven to 350°F (175°C). Line a mini muffin tin with paper liners or lightly grease with non-stick spray.
- Prepare the Brownie Batter: In a medium saucepan, melt the unsalted butter over low heat. Once melted, remove from heat and stir in the granulated sugar until well combined. Allow the mixture to cool slightly.
- Mix the Wet Ingredients: Add the eggs one at a time, beating well after each addition. Stir in the vanilla extract until the mixture is smooth and glossy.
- Combine Dry Ingredients: In a separate bowl, whisk together the cocoa powder, all-purpose flour, salt, and baking powder. Gradually add the dry mixture to the wet ingredients, stirring until just combined.
- Add Chocolate and Peppermint: Gently fold in the semi-sweet chocolate chips and 1/4 cup of the crushed peppermint candies into the batter.
- Fill the Muffin Tin: Spoon the batter into the prepared mini muffin tin, filling each cup about 3/4 full.
- Bake the Brownie Bites: Place the muffin tin in the preheated oven and bake for 12-15 minutes, or until the brownie bites are set and a toothpick inserted into the center comes out clean.
- Prepare the Peppermint Ganache: While the brownie bites are baking, heat the heavy cream in a small saucepan over medium heat until it begins to simmer. Remove from heat and stir in the peppermint extract.
- Assemble the Toppings: Once the brownie bites have cooled slightly, drizzle the peppermint ganache over each bite. Sprinkle the remaining crushed peppermint candies on top and, if desired, add a few mini marshmallows for an extra touch.
- Final Touch: Allow the ganache to set for a few minutes, then dust the brownie bites with powdered sugar before serving.
Extra Tips:
For best results, make sure not to overmix the batter after adding the dry ingredients, as this can lead to denser brownies.
If you prefer a more intense peppermint flavor, consider adding a few drops of peppermint extract to the brownie batter itself.
Additionally, these brownie bites can be stored in an airtight container for up to three days, making them a convenient make-ahead option for your holiday celebrations. Enjoy them slightly warm for a gooey center, or at room temperature for a more classic brownie texture.
Peppermint Icebox Cake
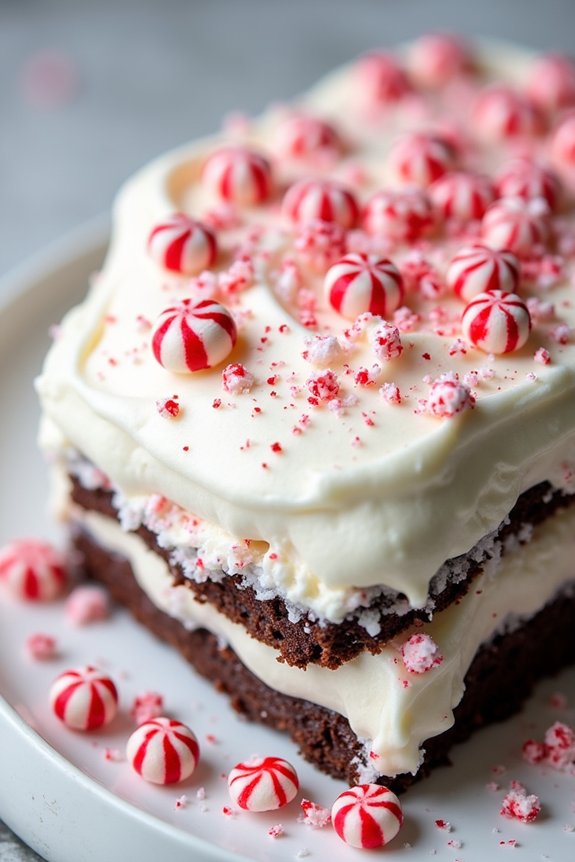
Peppermint Icebox Cake is a delightful and festive dessert that perfectly embodies the holiday spirit with its invigorating peppermint flavor and creamy texture. This no-bake dessert is incredibly easy to assemble, making it an ideal choice for busy holiday gatherings or last-minute Christmas celebrations. By simply layering peppermint-flavored cookies with a rich, creamy filling, you can create a delicious treat that will impress your family and friends.
The beauty of this icebox cake lies in its simplicity and versatility. With a few basic ingredients, you can create a dessert that looks as good as it tastes. As it chills in the refrigerator, the cookies soften, and the flavors meld together, resulting in a cake-like texture that’s both invigorating and indulgent. Perfect for serving 4-6 people, this Peppermint Icebox Cake is sure to be a hit at any holiday gathering.
Ingredients for 4-6 servings:
- 2 cups heavy whipping cream
- 1/4 cup powdered sugar
- 1 teaspoon vanilla extract
- 1/2 teaspoon peppermint extract
- 20-24 peppermint-flavored chocolate wafer cookies
- 1/4 cup crushed peppermint candies
- Optional: additional whole or crushed peppermint candies for garnish
Cooking Instructions:
- Prepare the Whipped Cream: In a large mixing bowl, pour in the heavy whipping cream. Add the powdered sugar, vanilla extract, and peppermint extract. Using an electric mixer, whip the cream on medium-high speed until stiff peaks form. This should take about 3-5 minutes. Be careful not to over-whip, as it may turn into butter.
- Layer the Cake: In a 9×5-inch loaf pan, spread a thin layer of the whipped cream mixture on the bottom. This helps hold the cookies in place. Next, arrange a layer of peppermint-flavored chocolate wafer cookies over the cream. It’s okay if they overlap slightly.
- Continue Layering: Spread another layer of whipped cream over the cookies, followed by another layer of cookies. Repeat the layers until all the cookies and whipped cream are used, finishing with a layer of whipped cream on top.
- Add Peppermint Candies: Sprinkle the crushed peppermint candies evenly over the top layer for added flavor and a festive appearance. You can also add additional whole or crushed peppermint candies as garnish if desired.
- Chill the Cake: Cover the loaf pan with plastic wrap and refrigerate for at least 4 hours, preferably overnight. This allows the cookies to soften and the flavors to meld beautifully.
- Serve the Cake: Once the cake is fully chilled, remove it from the refrigerator. Use a sharp knife to slice and serve the cake, ensuring each slice has a balanced combination of cream and cookies.
Extra Tips:
For an extra festive touch, consider adding a few drops of red food coloring to the whipped cream for a pink hue that echoes the peppermint theme. If you prefer a more intense peppermint flavor, increase the peppermint extract to taste, but be cautious as it can become overpowering.
You can also experiment with different types of cookies if you can’t find peppermint-flavored ones; simply add a bit more peppermint extract to the cream to balance the flavors.
Chocolate Peppermint Whoopie Pies
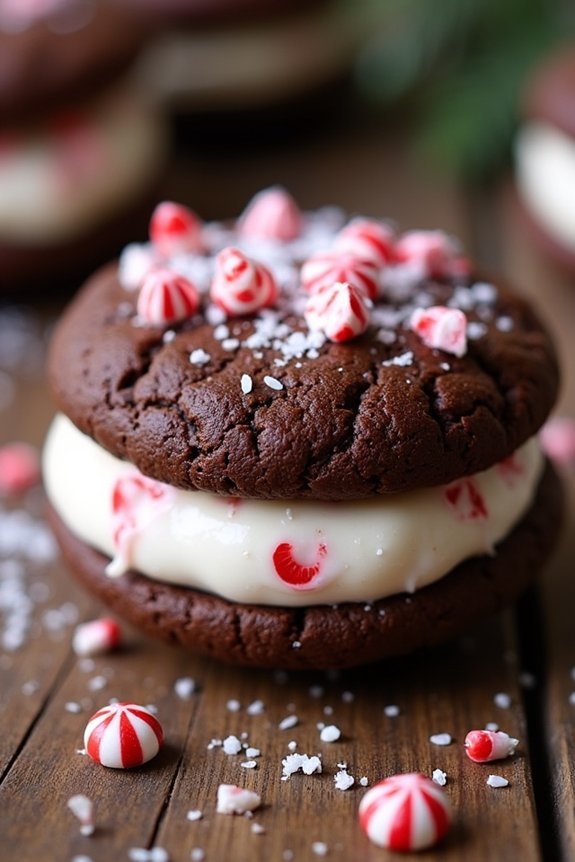
Chocolate Peppermint Whoopie Pies are the perfect blend of rich chocolate and invigorating peppermint, creating a festive treat that captures the essence of the holiday season. These delightful desserts consist of two soft, cake-like chocolate cookies sandwiched together with a creamy peppermint filling. The combination of flavors and textures makes them an irresistible addition to any holiday gathering or as a sweet gift for loved ones.
Whether you’re a seasoned baker or a novice in the kitchen, these whoopie pies are straightforward to make and will impress with their charming appearance and delicious taste.
The magic of Chocolate Peppermint Whoopie Pies lies in their ability to evoke the comforting warmth of chocolate while delivering a brisk hint of peppermint that feels like a cool winter breeze. The cookies are soft and tender, with a deep chocolate flavor that complements the creamy, slightly sweet peppermint frosting.
When assembled, they create a satisfying treat that’s both nostalgic and indulgent. Ideal for serving at a holiday party or as a delightful after-dinner dessert, these whoopie pies are sure to become a favorite in your festive baking repertoire.
Ingredients (Serves 4-6):
*For the Chocolate Cookies:*
- 1 3/4 cups all-purpose flour
- 3/4 cup unsweetened cocoa powder
- 1 1/2 teaspoons baking powder
- 1/2 teaspoon baking soda
- 1/2 teaspoon salt
- 1/2 cup unsalted butter, softened
- 1 cup granulated sugar
- 1 large egg
- 1 teaspoon vanilla extract
- 1 cup buttermilk
For the Peppermint Filling:
- 1/2 cup unsalted butter, softened
- 1 1/2 cups powdered sugar
- 1/8 teaspoon salt
- 1 teaspoon peppermint extract
- 2 tablespoons heavy cream
Optional Garnish:
– Crushed peppermint candies or candy canes
Cooking Instructions:
- Preheat the Oven: Begin by preheating your oven to 350°F (175°C). Line two baking sheets with parchment paper or silicone baking mats to prevent sticking.
- Mix Dry Ingredients: In a medium-sized bowl, whisk together the flour, cocoa powder, baking powder, baking soda, and salt. This guarantees that the leavening agents are evenly distributed throughout the flour mixture.
- Cream Butter and Sugar: In a large mixing bowl, use an electric mixer to cream together the softened butter and granulated sugar until light and fluffy, about 3 minutes. This step is essential for incorporating air into the mixture, which helps to create soft cookies.
- Add Egg and Vanilla: Beat in the egg and vanilla extract until well combined. This adds flavor and helps bind the ingredients together.
- Combine Wet and Dry Ingredients: With the mixer on low speed, alternate adding the dry flour mixture and the buttermilk to the creamed butter and sugar, starting and ending with the flour mixture. Mix until just combined, being careful not to overmix.
- Scoop and Bake: Using a cookie scoop or tablespoon, drop rounded tablespoons of dough onto the prepared baking sheets, spacing them about 2 inches apart. Bake for 10-12 minutes, or until the tops are set and the cookies spring back when lightly touched. Allow them to cool on the baking sheet for a few minutes before transferring to a wire rack to cool completely.
- Prepare the Filling: While the cookies cool, make the peppermint filling. In a medium bowl, beat the softened butter with an electric mixer until creamy. Gradually add the powdered sugar and salt, mixing until smooth and fluffy. Stir in the peppermint extract and heavy cream, beating until the filling is light and spreadable.
- Assemble the Whoopie Pies: Once the cookies are completely cool, spread or pipe a generous amount of peppermint filling onto the flat side of half of the cookies. Top with the remaining cookies, pressing gently to create a sandwich.
- Optional Garnish: Roll the edges of the whoopie pies in crushed peppermint candies or candy canes for a festive touch.
Extra Tips:
For the best results, make sure that all your ingredients are at room temperature before you start baking, especially the butter and eggs. This helps the ingredients mix more evenly and results in a smoother, more consistent batter.
If you find your filling is too thick to spread easily, you can add a little more cream, one teaspoon at a time, until the desired consistency is reached.
When storing whoopie pies, keep them in an airtight container to maintain their softness, and if you plan to keep them for more than a day or two, refrigerate them to preserve freshness.