

The holidays are the perfect time to indulge in some baking magic, and I’ve got just the thing for those of us who need gluten-free options.
Think gingerbread cookies that are perfectly spiced and a chocolate yule log that’s as rich as ever, all without the gluten.
I’ve rounded up 12 delightful gluten-free Christmas baking recipes that will fill your kitchen with festive cheer.
Let’s bring some holiday magic to our ovens!
Gluten-Free Gingerbread Cookies

Nothing says Christmas quite like the warm, spicy aroma of gingerbread cookies baking in the oven. For those who avoid gluten, creating the perfect gingerbread cookie can be a delightful challenge.
These gluten-free gingerbread cookies capture all the traditional flavors of the holiday season while guaranteeing that everyone can enjoy them, regardless of dietary restrictions. With a crisp edge and a slightly chewy center, each bite is infused with the perfect balance of ginger, cinnamon, and cloves, making them a must-have on your holiday baking list.
This recipe is designed to serve 4-6 people, making it perfect for a small gathering or for enjoying as a family. The dough is easy to handle and can be rolled out to create fun shapes like gingerbread men, stars, or even festive trees. Not only are these cookies delicious, but they’re also a fun project to decorate with family or friends, using your favorite icing and festive sprinkles.
Whether you’re new to gluten-free baking or a seasoned pro, these cookies are sure to become a holiday staple.
Ingredients:
- 2 1/4 cups gluten-free all-purpose flour
- 1 teaspoon xanthan gum (if not included in your flour mix)
- 1 teaspoon baking soda
- 1/2 teaspoon salt
- 1 tablespoon ground ginger
- 1 tablespoon ground cinnamon
- 1/2 teaspoon ground cloves
- 1/4 teaspoon ground nutmeg
- 1/2 cup unsalted butter, softened
- 1/2 cup brown sugar, packed
- 1 large egg
- 1/2 cup molasses
- 1 teaspoon vanilla extract
Instructions:
- Preheat Oven: Start by preheating your oven to 350°F (175°C). Line two baking sheets with parchment paper and set them aside.
- Mix Dry Ingredients: In a large bowl, whisk together the gluten-free flour, xanthan gum (if using), baking soda, salt, ginger, cinnamon, cloves, and nutmeg. This guarantees that all the dry ingredients are evenly distributed.
- Cream Butter and Sugar: In a separate bowl, using an electric mixer, cream together the softened butter and brown sugar until light and fluffy. This should take about 2-3 minutes.
- Add Wet Ingredients: Beat in the egg, molasses, and vanilla extract until well combined. The mixture should be smooth and slightly thick.
- Combine Mixtures: Gradually add the dry ingredients to the wet ingredients, mixing on low speed until a dough forms. The dough should be soft but not sticky.
- Chill Dough: Wrap the dough in plastic wrap and refrigerate for at least 1 hour. This helps to firm up the dough, making it easier to roll out and cut.
- Roll and Cut: On a lightly floured surface, roll out the dough to about 1/4-inch thickness. Use cookie cutters to cut out shapes and transfer them to the prepared baking sheets.
- Bake: Bake in the preheated oven for 8-10 minutes or until the edges are firm. Be careful not to overbake, as they’ll continue to firm up as they cool.
- Cool and Decorate: Allow the cookies to cool on the baking sheets for 5 minutes before transferring them to a wire rack to cool completely. Once cool, decorate with your choice of icing and sprinkles.
Extra Tips: When making gluten-free gingerbread cookies, it’s important to chill the dough thoroughly. This prevents the cookies from spreading too much while baking.
If you find the dough too sticky to handle, dust your rolling pin and surface with a bit of gluten-free flour. Additionally, confirm your baking soda and spices are fresh for the best flavor and texture. Enjoy decorating with family and friends for a festive touch to these delightful cookies!
Flourless Chocolate Yule Log
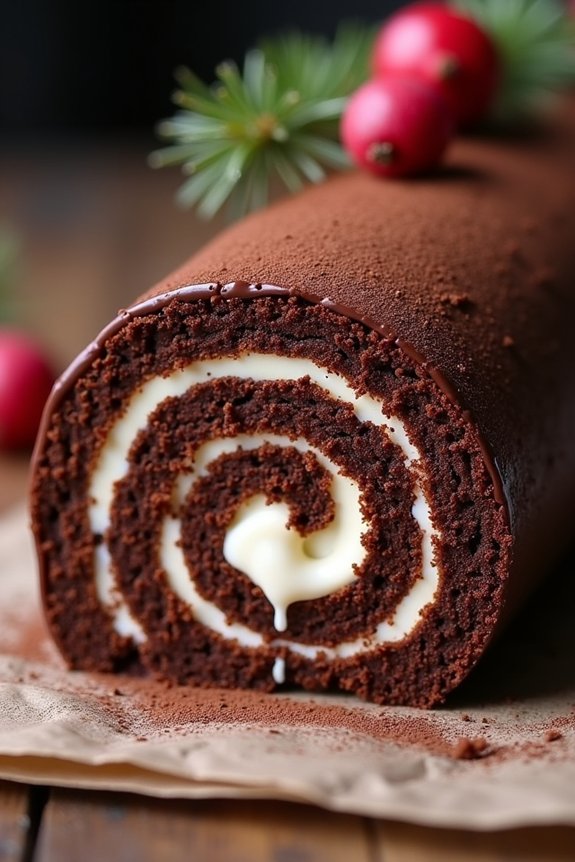
Flourless Chocolate Yule Log is a delightful gluten-free dessert perfect for Christmas celebrations. This traditional holiday dessert is reimagined to cater to those with gluten sensitivities without compromising on taste or indulgence.
The Flourless Chocolate Yule Log is a rich, moist, and decadent chocolate cake rolled with a creamy filling, wrapped in a luscious chocolate ganache. It’s the perfect showstopper for your festive table and will surely impress your guests with its stunning presentation and delicious flavor.
This Flourless Chocolate Yule Log serves 4-6 people and highlights the beauty of a flourless cake that relies on its chocolatey richness. The cake is made using a combination of eggs, sugar, and high-quality cocoa powder to achieve a spongy yet delicate texture.
It’s then filled with a smooth, sweetened whipped cream, and coated with a glossy chocolate ganache. This dessert isn’t only gluten-free but also a chocolate lover’s dream, making it an ideal choice for those who want to enjoy a classic Christmas treat without the gluten.
Ingredients for Flourless Chocolate Yule Log: (Serves 4-6)
- 6 large eggs, separated
- 1 cup granulated sugar, divided
- 1/2 cup unsweetened cocoa powder
- 1 teaspoon vanilla extract
- 1/4 teaspoon salt
- 1 cup heavy cream
- 2 tablespoons powdered sugar
- 1/2 teaspoon vanilla extract (for filling)
- 1 cup semi-sweet chocolate, chopped
- 1/2 cup heavy cream (for ganache)
Cooking Instructions:
- Preheat the Oven: Preheat your oven to 350°F (175°C). Line a 10×15-inch jelly roll pan with parchment paper, making sure the paper extends over the edges for easy removal.
- Prepare the Cake Batter: In a large mixing bowl, use an electric mixer to beat the egg yolks with 1/2 cup of granulated sugar until the mixture is thick and pale. Add the cocoa powder, vanilla extract, and salt, and mix until combined.
- Whip the Egg Whites: In a separate bowl, beat the egg whites until soft peaks form. Gradually add the remaining 1/2 cup of granulated sugar, continuing to beat until stiff peaks form.
- Combine the Mixtures: Gently fold the egg whites into the cocoa mixture in thirds, being careful not to deflate the batter. Pour the batter onto the prepared pan and spread evenly.
- Bake: Bake for 15-18 minutes, or until the cake springs back when lightly touched. Remove from the oven and let the cake cool in the pan for 5 minutes.
- Roll the Cake: Carefully lift the cake with the parchment paper and place it on a clean kitchen towel dusted with cocoa powder. Starting from the short end, roll the cake up with the towel and parchment paper inside. Cool completely.
- Prepare the Filling: In a medium bowl, beat the 1 cup heavy cream, powdered sugar, and 1/2 teaspoon vanilla extract until stiff peaks form.
- Fill and Roll: Unroll the cooled cake, remove the parchment paper, and spread the whipped cream filling evenly over the surface. Roll the cake back up without the towel.
- Make the Ganache: Heat 1/2 cup of heavy cream in a small saucepan until it simmers. Pour it over the chopped semi-sweet chocolate in a bowl. Let it sit for 2 minutes, then stir until smooth.
- Coat the Log: Place the rolled cake on a serving platter. Pour the ganache over the cake, spreading it evenly with a spatula. Allow the ganache to set for at least 30 minutes before serving.
Extra Tips:
When making the Flourless Chocolate Yule Log, make sure that the eggs are at room temperature for easier separation and better volume when whipped.
If you find the cake cracking slightly while rolling, don’t worry—this can be covered with the ganache or hidden with decorative elements like powdered sugar or cocoa powder.
For a festive touch, consider garnishing with fresh berries or edible gold leaf. Store any leftovers in the refrigerator and enjoy within 2-3 days for perfect freshness.
Almond Flour Sugar Cookies
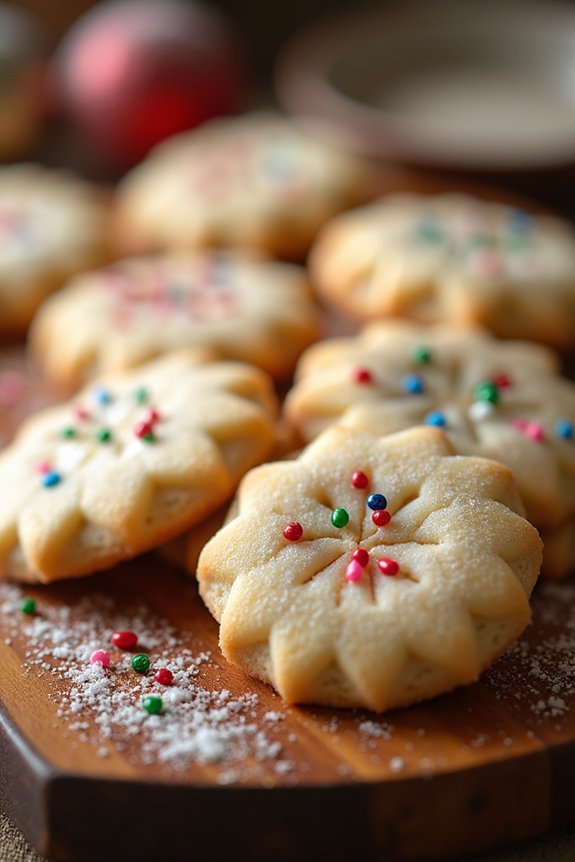
Celebrate the festive season with these delightful Almond Flour Sugar Cookies, a gluten-free twist on the classic holiday treat. These cookies boast a tender crumb and a gentle sweetness, making them a perfect addition to your Christmas cookie platter. Whether you’re sharing them with family or gifting them to friends, these cookies are sure to spread joy and cheer.
The almond flour provides a subtle nutty flavor while guaranteeing the cookies remain soft and chewy. These cookies are perfect for those who follow a gluten-free diet but still crave the nostalgia of holiday baking. Easy to make and decorate, they can be enjoyed plain or adorned with your favorite icing and sprinkles. Gather your loved ones in the kitchen, don your aprons, and enjoy the process of creating these delightful treats together.
Ingredients (Serves 4-6):
- 2 cups almond flour
- 1/4 cup coconut flour
- 1/2 teaspoon baking soda
- 1/4 teaspoon salt
- 1/2 cup unsalted butter, softened
- 1/2 cup granulated sugar
- 1 large egg
- 1 teaspoon vanilla extract
- 1/2 teaspoon almond extract
Cooking Instructions:
- Preheat and Prepare: Preheat your oven to 350°F (175°C). Line two baking sheets with parchment paper to guarantee the cookies don’t stick and for easy cleanup.
- Combine Dry Ingredients: In a medium-sized bowl, whisk together the almond flour, coconut flour, baking soda, and salt. This guarantees that all the dry ingredients are evenly distributed.
- Cream Butter and Sugar: In a large mixing bowl, cream the softened butter and granulated sugar together using an electric mixer on medium speed until light and fluffy, about 2-3 minutes. This step is vital for incorporating air into the mixture, which will result in a lighter cookie.
- Add Wet Ingredients: Beat in the egg, vanilla extract, and almond extract to the butter and sugar mixture. Mix until fully combined, guaranteeing the egg is well incorporated.
- Combine with Dry Ingredients: Gradually add the dry ingredients to the wet mixture, mixing on low speed until a dough forms. The dough should be soft but not sticky.
- Form Cookies: Using a tablespoon or cookie scoop, portion out the dough onto the prepared baking sheets, leaving about 2 inches between each cookie to allow for spreading. Gently flatten each ball with the back of a spoon.
- Bake: Place the baking sheets in the preheated oven and bake for 10-12 minutes or until the edges are lightly golden. Be careful not to overbake, as the cookies will continue to firm up as they cool.
- Cool: Allow the cookies to cool on the baking sheet for 5 minutes before transferring them to a wire rack to cool completely.
Extra Tips:
For a more festive touch, consider decorating your Almond Flour Sugar Cookies with a simple glaze made from powdered sugar and a few drops of milk, or opt for colorful icing and sprinkles.
If you prefer a more pronounced almond flavor, you can increase the almond extract slightly, but be cautious as it can quickly become overpowering. Additionally, if you find the dough too sticky to handle, chill it in the refrigerator for 15-20 minutes before forming the cookies. This will make shaping the cookies much easier.
Enjoy these cookies with a warm cup of cocoa or as part of a holiday dessert spread!
Gluten-Free Fruitcake
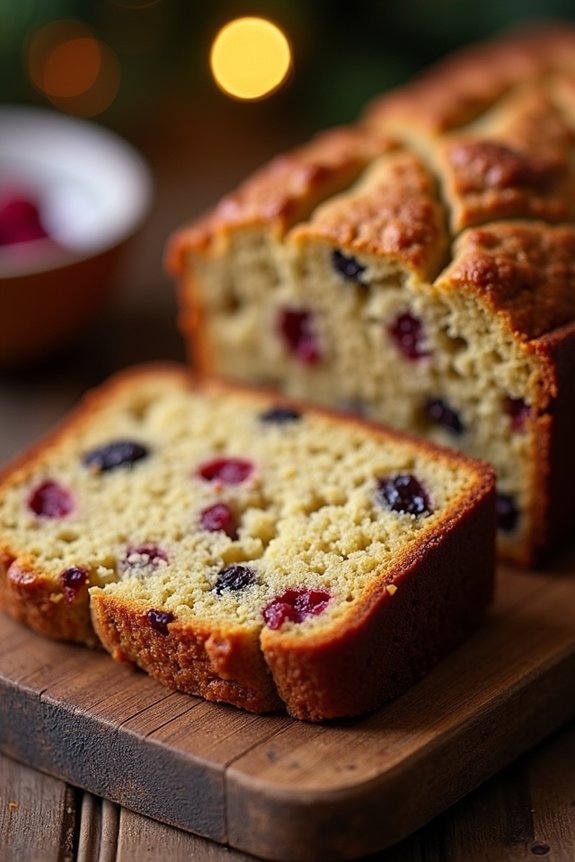
Indulge in the festive spirit with a deliciously moist and rich Gluten-Free Fruitcake that even those with dietary restrictions can enjoy. This luscious cake combines a variety of dried fruits and nuts, held together by a blend of gluten-free flours and warm spices, creating a treat that’s sure to be a hit at your holiday gatherings.
Perfectly paired with a hot cup of tea or coffee, this fruitcake bursts with flavor, making it an irresistible addition to your Christmas dessert table.
Whether you’re hosting a small family get-together or a larger festive celebration, this fruitcake is designed to serve 4-6 people, ensuring everyone gets a generous slice. Filled with the season’s best flavors, it’s a delightful way to accommodate gluten-free guests without compromising on taste or texture.
With a little preparation and the right ingredients, you can create a festive masterpiece that’s sure to impress.
Ingredients (serves 4-6):
- 1 cup mixed dried fruit (such as raisins, currants, and chopped dried apricots)
- 1/2 cup chopped nuts (such as walnuts or pecans)
- 1/4 cup candied peel
- 1/2 cup unsweetened applesauce
- 1/2 cup brown sugar
- 1/4 cup honey or maple syrup
- 2 large eggs
- 1/2 cup unsalted butter, melted
- 1 teaspoon vanilla extract
- 1 cup gluten-free all-purpose flour blend
- 1/2 cup almond flour
- 1 teaspoon baking powder
- 1 teaspoon ground cinnamon
- 1/2 teaspoon ground nutmeg
- 1/2 teaspoon ground ginger
- 1/4 teaspoon salt
Cooking Instructions:
- Preheat the Oven: Start by preheating your oven to 325°F (165°C). Grease a 9×5-inch loaf pan with butter or line it with parchment paper for easy removal.
- Prepare the Fruit and Nuts: In a large bowl, combine the mixed dried fruits, chopped nuts, and candied peel. Toss them together and set aside.
- Mix Wet Ingredients: In a separate bowl, combine the applesauce, brown sugar, honey (or maple syrup), eggs, melted butter, and vanilla extract. Whisk until the mixture is smooth and well-blended.
- Combine Dry Ingredients: In another bowl, whisk together the gluten-free all-purpose flour blend, almond flour, baking powder, cinnamon, nutmeg, ginger, and salt.
- Combine All Ingredients: Add the wet ingredients to the dry ingredients and stir until just combined. Gently fold in the dried fruit and nut mixture until evenly distributed throughout the batter.
- Bake the Cake: Pour the batter into the prepared loaf pan, smoothing the top with a spatula. Bake in the preheated oven for 60-70 minutes, or until a toothpick inserted into the center of the cake comes out clean.
- Cool and Serve: Allow the fruitcake to cool in the pan for about 10 minutes before removing it to a wire rack to cool completely. Once cooled, slice and serve.
Extra Tips:
To enhance the flavors, consider soaking the mixed dried fruits in a little orange juice or a splash of rum overnight before baking. This not only plumps up the fruits but also infuses the cake with additional moisture and aroma.
For those wishing to prepare ahead of time, this fruitcake can be made a few days in advance; simply wrap it tightly in plastic wrap and store it in an airtight container to maintain freshness.
If you prefer a more traditional fruitcake taste, feel free to adjust the spices to your liking or add a splash of almond extract for an extra depth of flavor.
Coconut Macaroons

Coconut macaroons are a delightful and easy-to-make gluten-free treat, perfect for the festive Christmas season. These chewy, sweet morsels are a hit at any holiday gathering and can be enjoyed by everyone, regardless of dietary restrictions.
Made with simple ingredients, coconut macaroons are naturally gluten-free, making them an ideal choice for those who need to avoid gluten but still want to indulge in some holiday baking.
The crispy exterior and soft, chewy center of these macaroons make them irresistible. Whether served as a dessert or a sweet snack with a cup of tea or coffee, coconut macaroons add a touch of tropical flavor to the chilly Christmas season.
This recipe yields approximately 24-30 macaroons, perfect for serving 4-6 people and guaranteeing everyone has a taste of this delightful treat.
Ingredients:
- 4 cups sweetened shredded coconut
- 1 cup sweetened condensed milk
- 1 teaspoon vanilla extract
- 2 large egg whites
- 1/4 teaspoon salt
Instructions:
- Preheat the Oven: Preheat your oven to 325°F (165°C). Line a baking sheet with parchment paper to prevent the macaroons from sticking.
- Mix the Ingredients: In a large mixing bowl, combine the shredded coconut, sweetened condensed milk, and vanilla extract. Stir until all ingredients are well mixed, ensuring the coconut is evenly coated with the milk and vanilla.
- Beat the Egg Whites: In a separate bowl, using an electric mixer, beat the egg whites and salt on medium-high speed until stiff peaks form. This process should take about 3-5 minutes.
- Fold in Egg Whites: Gently fold the beaten egg whites into the coconut mixture. Be careful not to deflate the egg whites; use a spatula to fold in a circular motion until the mixture is fully combined and fluffy.
- Shape the Macaroons: Using a tablespoon or a small ice cream scoop, drop heaping spoonfuls of the mixture onto the prepared baking sheet. Leave about an inch of space between each macaroon to allow for slight spreading during baking.
- Bake: Place the baking sheet in the preheated oven and bake for 20-25 minutes, or until the macaroons are golden brown on the edges and set in the center.
- Cool and Serve: Remove the macaroons from the oven and let them cool on the baking sheet for about 10 minutes. Transfer them to a wire rack to cool completely before serving.
Extra Tips:
For an added touch of decadence, consider dipping the bottom of each cooled macaroon in melted dark chocolate and letting them set on parchment paper before serving. This not only adds a layer of rich flavor but also enhances the presentation.
Additionally, verify your egg whites are at room temperature before beating to achieve maximum volume. Store any leftover macaroons in an airtight container at room temperature for up to a week, or freeze them for longer storage.
Enjoy these coconut macaroons as a delicious gluten-free treat during the holiday season!
Flourless Peanut Butter Blossoms
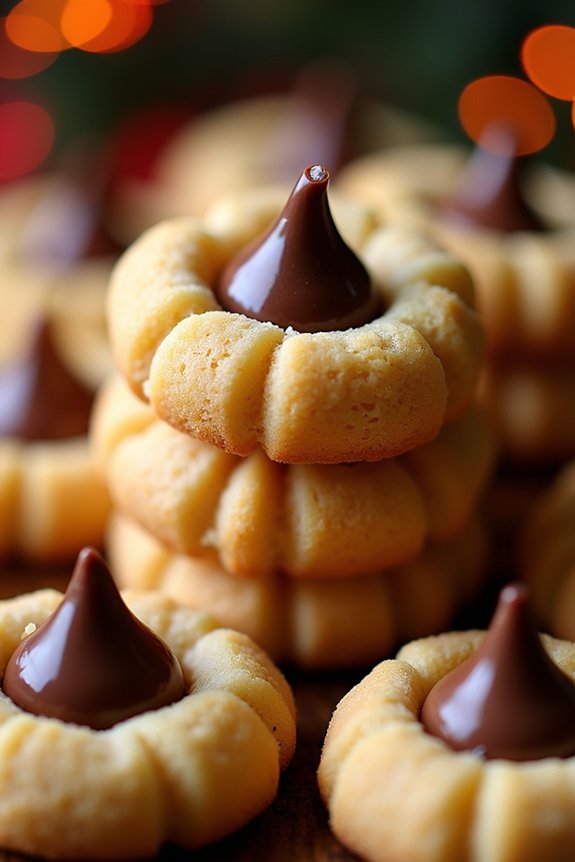
Flourless Peanut Butter Blossoms are a delightful treat that combines the classic flavors of peanut butter and chocolate, without the need for any flour. Perfect for those following a gluten-free diet, these cookies aren’t only easy to make but also incredibly delicious. They’re ideal for sharing with family and friends during the holiday season or any special occasion.
The soft and chewy texture of the peanut butter cookie, topped with a rich chocolate kiss, makes these blossoms a favorite among both kids and adults. This gluten-free recipe guarantees that everyone, regardless of dietary restrictions, can enjoy the sweet and nutty goodness of these cookies.
The preparation is simple, requiring only a few everyday ingredients that you likely already have in your pantry. The absence of flour doesn’t compromise the taste or texture but instead enhances the natural flavors of peanut butter and chocolate. Flourless Peanut Butter Blossoms are sure to become a staple in your holiday baking repertoire, bringing joy and warmth to your festive gatherings.
Ingredients (serves 4-6):
- 1 cup creamy peanut butter
- 1 cup granulated sugar
- 1 large egg
- 1 teaspoon vanilla extract
- 1/2 teaspoon baking soda
- 24 chocolate kisses, unwrapped
Cooking Instructions:
- Preheat the Oven: Begin by preheating your oven to 350°F (175°C). This guarantees that the cookies will bake evenly once they’re placed inside.
- Mix the Ingredients: In a large mixing bowl, combine the peanut butter, granulated sugar, egg, vanilla extract, and baking soda. Stir the ingredients together until the mixture is smooth and well-blended.
- Form the Dough Balls: Using your hands or a cookie scoop, shape the dough into 1-inch balls. Place the dough balls onto a baking sheet lined with parchment paper, spacing them about 2 inches apart.
- Bake the Cookies: Place the baking sheet in the preheated oven and bake the cookies for 8-10 minutes, or until the edges are lightly browned.
- Add the Chocolate Kiss: Remove the cookies from the oven and immediately press a chocolate kiss into the center of each cookie. The heat from the cookie will slightly melt the chocolate, helping it to adhere.
- Cool the Cookies: Let the cookies cool on the baking sheet for about 5 minutes before transferring them to a wire rack to cool completely. This helps them to set without breaking apart.
Extra Tips:
For the best results, make sure to use creamy peanut butter rather than chunky, as it creates a smoother dough and cookie texture. If you prefer a less sweet cookie, you can reduce the amount of sugar slightly, though this may affect the final texture.
Storing these cookies in an airtight container at room temperature will keep them fresh for several days. If you wish to prepare the dough in advance, you can refrigerate it for up to 24 hours before baking. Just guarantee that the dough is at room temperature before forming the balls and baking.
Gluten-Free Shortbread
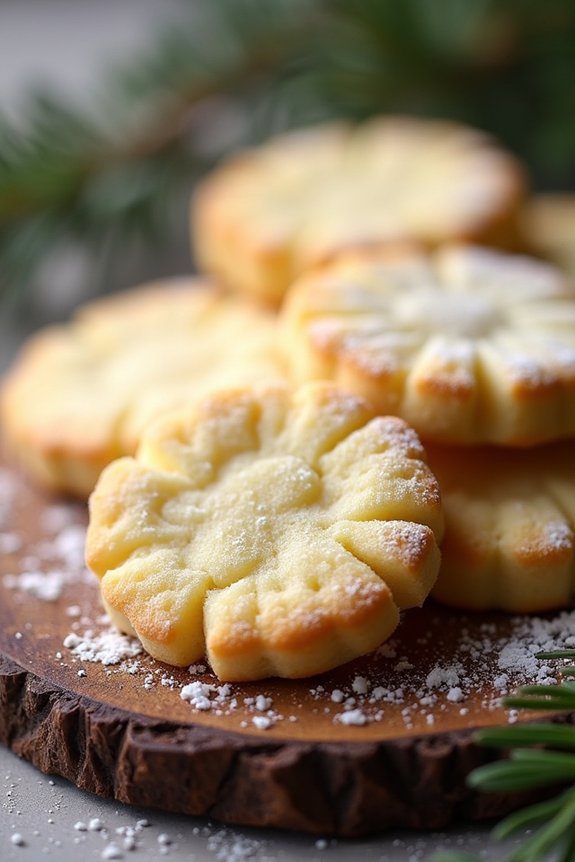
Shortbread is a classic holiday treat that’s rich, buttery, and crumbly, making it a favorite during Christmas festivities. For those who are gluten intolerant or choose to avoid gluten, this gluten-free version will be a delightful addition to your Christmas baking repertoire. The recipe uses a blend of gluten-free flours to achieve the perfect texture and flavor, guaranteeing that everyone can enjoy this quintessential holiday cookie.
This gluten-free shortbread recipe maintains the traditional simplicity of shortbread, while offering a delightful buttery taste with a light and tender crumb. Perfect for a serving size of 4-6 people, these cookies can be enjoyed on their own or as a part of a festive dessert platter. Whether served with a cup of hot cocoa or packaged up as a gift, these cookies are sure to be a hit.
Ingredients (for 4-6 people):
- 1 cup (2 sticks) unsalted butter, softened
- 1/2 cup granulated sugar
- 1/4 teaspoon salt
- 1 teaspoon pure vanilla extract
- 1 1/2 cups gluten-free all-purpose flour
- 1/4 cup cornstarch
Instructions:
- Preheat the Oven: Start by preheating your oven to 325°F (165°C). Line a baking sheet with parchment paper to prevent sticking.
- Cream Butter and Sugar: In a large mixing bowl, beat the softened butter and granulated sugar together with an electric mixer on medium speed until the mixture is light and fluffy, about 2-3 minutes.
- Add Vanilla and Salt: Add the vanilla extract and salt to the creamed mixture, and mix until well combined.
- Mix in Dry Ingredients: Gradually add the gluten-free all-purpose flour and cornstarch to the butter mixture. Mix on low speed until the dough comes together and is smooth. The dough should be soft but not sticky.
- Shape the Cookies: Turn the dough out onto a lightly floured surface. Roll the dough to about 1/2-inch thickness. Use a cookie cutter to cut out your desired shapes, and place them on the prepared baking sheet.
- Chill the Dough: Place the baking sheet in the refrigerator for about 15 minutes to chill the dough. This helps the cookies hold their shape during baking.
- Bake the Cookies: Bake in the preheated oven for 18-20 minutes, or until the edges are lightly golden. Be careful not to overbake as they can become too crisp.
- Cool and Serve: Remove the cookies from the oven and let them cool on the baking sheet for 5 minutes before transferring to a wire rack to cool completely. Enjoy your delicious gluten-free shortbread!
Extra Tips:
For best results, make sure your butter is at room temperature to guarantee it creams well with the sugar. If the dough feels too sticky to handle, you can add a little more gluten-free flour, a tablespoon at a time, until it reaches the desired consistency.
Additionally, if you prefer your shortbread with a little more flavor, consider adding a pinch of cinnamon or a few drops of almond extract to the dough. Finally, storing the cookies in an airtight container will keep them fresh for up to a week, making them a perfect make-ahead treat for your holiday celebrations.
Pistachio Cranberry Biscotti
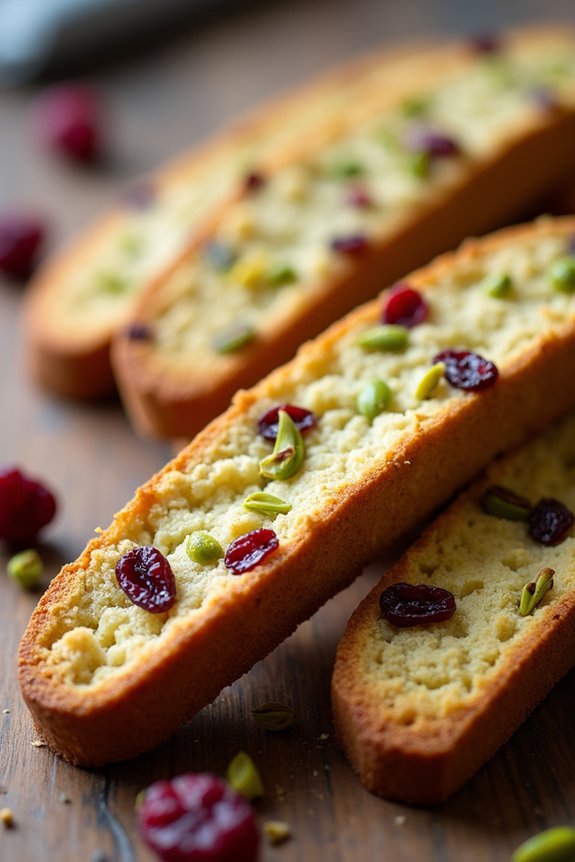
Gluten-Free Pistachio Cranberry Biscotti is a delightful treat that adds a festive touch to your holiday baking repertoire. This crunchy, twice-baked Italian cookie combines the nutty flavor of pistachios with the tartness of cranberries, creating a perfect balance of flavors. It’s an ideal accompaniment to your morning coffee or an elegant conclusion to your Christmas dinner.
Being gluten-free, it’s a wonderful option for those who are sensitive to gluten, allowing everyone to enjoy a traditional holiday favorite without worry.
The beauty of biscotti lies in its versatility. Once you master the basic recipe, you can experiment with various nuts and dried fruits to suit your taste or to incorporate seasonal ingredients. For this recipe, we’re focusing on pistachios and cranberries, which not only taste incredible but also provide a beautiful color contrast, making these biscotti visually appealing as well.
This recipe will yield about 24 biscotti pieces, serving 4-6 people.
Ingredients:
- 2 cups gluten-free all-purpose flour
- 1 teaspoon baking powder
- 1/4 teaspoon salt
- 1/2 cup unsalted butter, softened
- 3/4 cup granulated sugar
- 2 large eggs
- 1 teaspoon vanilla extract
- 1/2 teaspoon almond extract
- 3/4 cup pistachios, shelled and roughly chopped
- 3/4 cup dried cranberries
Instructions:
- Preheat the Oven: Start by preheating your oven to 350°F (175°C). Line a baking sheet with parchment paper or a silicone baking mat.
- Mix Dry Ingredients: In a medium-sized bowl, whisk together the gluten-free all-purpose flour, baking powder, and salt. Set aside.
- Cream Butter and Sugar: In a large mixing bowl, cream the softened butter and granulated sugar until light and fluffy. This should take about 2-3 minutes using an electric mixer.
- Add Eggs and Extracts: Beat in the eggs one at a time, making certain each is fully incorporated before adding the next. Mix in the vanilla and almond extracts.
- Combine Wet and Dry Ingredients: Gradually add the dry ingredients to the wet mixture, mixing until just combined. Avoid over-mixing to keep the biscotti tender.
- Fold in Nuts and Fruit: Gently fold in the chopped pistachios and dried cranberries with a spatula or wooden spoon until evenly distributed throughout the dough.
- Shape the Dough: Transfer the dough onto the prepared baking sheet. Shape it into a log about 12 inches long and 3-4 inches wide. Flatten the top slightly with your hands.
- First Bake: Bake in the preheated oven for 25-30 minutes, or until the log is golden brown and firm to the touch. Remove from the oven and let it cool on the baking sheet for 10 minutes.
- Slice and Second Bake: Reduce the oven temperature to 325°F (160°C). Using a sharp serrated knife, carefully slice the log into 1/2-inch thick slices. Lay the slices cut side down on the baking sheet.
- Final Bake: Return the slices to the oven and bake for an additional 10-12 minutes. Flip each slice over and bake for another 10-12 minutes, or until crisp and golden on both sides.
- Cool Completely: Allow the biscotti to cool completely on a wire rack before serving or storing.
Extra Tips:
To guarantee the biscotti holds together well, make sure not to skip the cooling step after the first bake. This helps the dough firm up, making it easier to slice without crumbling.
If you prefer a softer biscotti, you can reduce the second bake time slightly. You can also drizzle or dip the biscotti in melted dark or white chocolate for an extra decadent touch, making them even more festive for Christmas.
Store the biscotti in an airtight container at room temperature for up to two weeks, maintaining their crunchiness.
Flourless Chocolate Peppermint Brownies
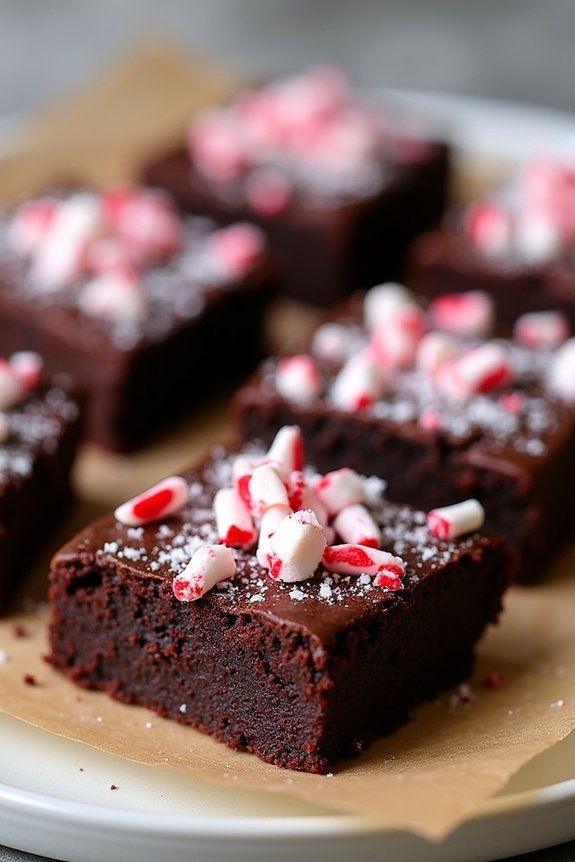
Flourless Chocolate Peppermint Brownies are a decadent and festive treat that perfectly capture the spirit of the holiday season. With their rich chocolate flavor and invigorating hint of peppermint, these brownies are sure to delight both gluten-free and non-gluten-free guests alike.
These brownies aren’t only delicious but also incredibly simple to make, relying on just a few key ingredients to achieve their fudgy texture without the need for flour. Perfect for sharing at holiday gatherings or as a sweet gift for friends, these brownies are best enjoyed with a warm cup of cocoa or coffee.
The combination of chocolate and peppermint is a classic one that evokes holiday cheer, making these brownies a must-have addition to your Christmas baking repertoire. With this easy-to-follow recipe, you can whip up a batch of these delightful treats in under an hour, making them an ideal last-minute dessert option.
Ingredients (Serves 4-6):
- 1 cup semisweet chocolate chips
- 1/2 cup unsalted butter
- 3/4 cup granulated sugar
- 3 large eggs
- 1/4 cup unsweetened cocoa powder
- 1/2 teaspoon baking powder
- 1/4 teaspoon salt
- 1 teaspoon vanilla extract
- 1/2 teaspoon peppermint extract
- 1/4 cup crushed candy canes
Instructions:
- Preheat and Prepare: Preheat your oven to 350°F (175°C). Line an 8×8-inch baking pan with parchment paper, allowing the edges to hang over the sides for easy removal later.
- Melt Chocolate and Butter: In a medium saucepan over low heat, melt the chocolate chips and butter together, stirring continuously until smooth and well combined. Remove from heat and let it cool slightly.
- Mix Wet Ingredients: In a large mixing bowl, beat the sugar and eggs together until the mixture is light and fluffy. Stir in the melted chocolate mixture, followed by the vanilla and peppermint extracts.
- Combine Dry Ingredients: In a separate bowl, whisk together the cocoa powder, baking powder, and salt. Gradually fold these dry ingredients into the wet mixture until just combined.
- Pour and Sprinkle: Pour the batter into the prepared baking pan, spreading it evenly. Sprinkle the crushed candy canes over the top of the batter.
- Bake: Bake in the preheated oven for 25-30 minutes, or until the edges are set and a toothpick inserted into the center comes out mostly clean.
- Cool and Serve: Allow the brownies to cool completely in the pan on a wire rack. Once cooled, lift them out using the parchment paper edges, cut into squares, and serve.
Extra Tips: For an even richer flavor, consider using high-quality chocolate chips with a higher cocoa content. Be careful not to overbake the brownies; they should remain slightly gooey in the center for the best texture.
You can also customize the topping with additional festive sprinkles or more crushed candy canes for extra holiday flair. If you prefer a stronger peppermint flavor, simply adjust the amount of peppermint extract to suit your taste. Enjoy these brownies fresh, or store them in an airtight container for up to three days.
Gluten-Free Pecan Pie Bars
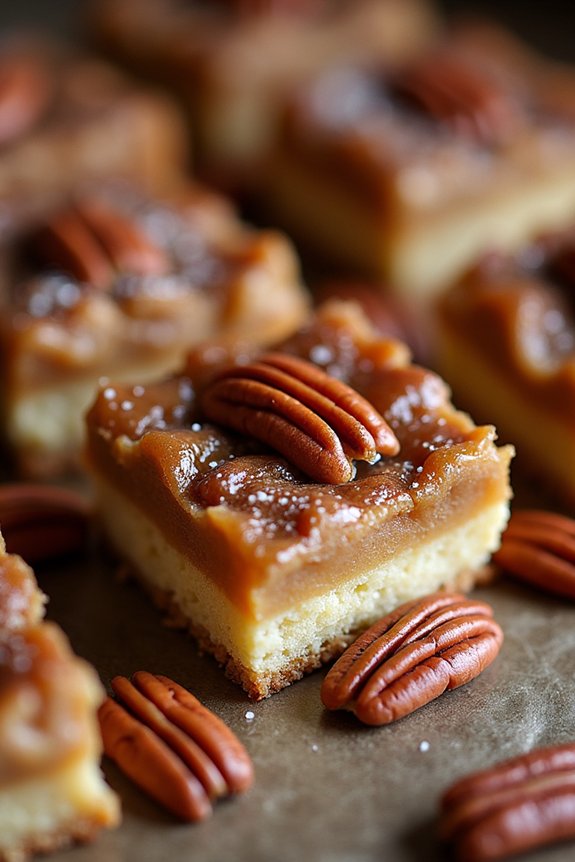
Gluten-Free Pecan Pie Bars are a delightful twist on the classic pecan pie, perfect for your holiday baking repertoire. These bars offer the same rich, nutty flavor and gooey texture that you love in a pecan pie, but with the added convenience of a bar form—making them easy to serve at festive gatherings. Plus, they’re completely gluten-free, catering to those with dietary restrictions without sacrificing taste.
These bars start with a tender gluten-free shortbread crust, topped with a luscious pecan filling that’s sweetened with brown sugar and maple syrup. The combination of crunchy pecans and a sticky, buttery filling creates a dessert that’s both decadent and satisfying. Serve these bars as a holiday dessert alongside a scoop of vanilla ice cream or a dollop of whipped cream for an extra-special treat.
Ingredients for 4-6 servings:
- 1 cup gluten-free all-purpose flour
- 1/4 cup granulated sugar
- 1/4 teaspoon salt
- 1/2 cup unsalted butter, melted
- 1 cup packed brown sugar
- 1/2 cup pure maple syrup
- 1/4 cup unsalted butter, melted
- 2 large eggs
- 1 teaspoon pure vanilla extract
- 1 1/2 cups pecan halves
Instructions:
- Preheat the Oven: Begin by preheating your oven to 350°F (175°C). Line an 8×8-inch baking pan with parchment paper, allowing some overhang for easy removal.
- Make the Crust: In a medium bowl, combine the gluten-free flour, granulated sugar, and salt. Pour in the 1/2 cup of melted butter and mix until a crumbly dough forms. Press the mixture evenly into the prepared baking pan to form the crust.
- Bake the Crust: Place the pan in the oven and bake for 15 minutes, or until the edges begin to turn golden. Remove from the oven and set aside to cool slightly.
- Prepare the Filling: In a large mixing bowl, whisk together the brown sugar, maple syrup, remaining 1/4 cup of melted butter, eggs, and vanilla extract until smooth and well combined.
- Add the Pecans: Stir in the pecan halves until they’re thoroughly coated with the filling mixture.
- Assemble the Bars: Pour the pecan filling over the pre-baked crust, spreading it evenly with a spatula.
- Bake the Bars: Return the pan to the oven and bake for 25-30 minutes, or until the filling is set and the top is golden brown. The center should be slightly jiggly but will firm up as it cools.
- Cool and Cut: Allow the bars to cool completely in the pan on a wire rack. Once cooled, use the parchment overhang to lift the bars out of the pan. Cut into squares or bars for serving.
Extra Tips:
For best results, verify all your ingredients are at room temperature before starting, as this helps them blend more smoothly. When pressing the crust into the pan, use your fingers or the back of a spoon to create an even layer.
If you find the pecan filling too sweet, consider reducing the amount of brown sugar slightly or using a darker maple syrup for a richer flavor. These bars can be stored in an airtight container at room temperature for up to three days or refrigerated for up to a week.
Almond Flour Christmas Stollen
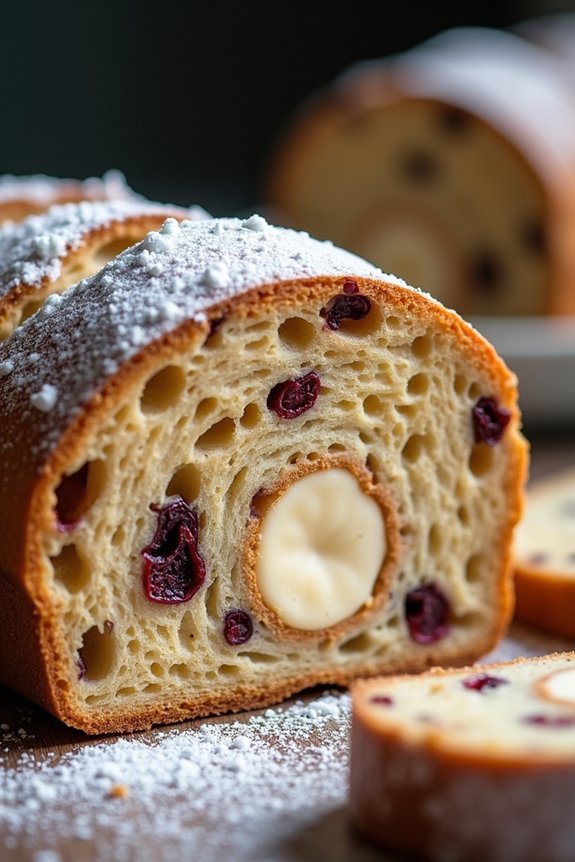
Almond Flour Christmas Stollen is a delightful gluten-free twist on the traditional German holiday bread. This festive treat is known for its rich, buttery flavor and is packed with dried fruits and nuts, making it a perfect addition to your holiday baking repertoire.
By using almond flour, this recipe not only accommodates those with gluten sensitivities but also imparts a deliciously nutty flavor that complements the traditional spices and fruits of the classic stollen.
Making Almond Flour Christmas Stollen at home allows you to enjoy a cherished holiday loaf without the gluten. This recipe maintains the moist texture and delightful taste of the original, guaranteeing that everyone at your holiday table can indulge.
Whether you’re serving it with a hot cup of coffee or as a centerpiece on your holiday dessert table, this gluten-free version will certainly become a cherished tradition in your home.
Ingredients (Serves 4-6 people):
- 2 ¼ cups almond flour
- ½ teaspoon baking powder
- ¼ teaspoon salt
- 1 teaspoon ground cinnamon
- ½ teaspoon ground nutmeg
- ½ cup unsalted butter, softened
- ½ cup granulated sugar
- 2 large eggs
- 1 teaspoon vanilla extract
- 1 teaspoon almond extract
- 1 cup mixed dried fruits (such as raisins, cranberries, and chopped apricots)
- ½ cup chopped nuts (such as almonds or walnuts)
- ¼ cup rum or orange juice
- ¼ cup powdered sugar for dusting
- Optional: Marzipan for filling (about 100 grams)
Instructions:
- Prepare the Fruit Mixture: In a small bowl, combine the mixed dried fruits with the rum or orange juice. Let them soak for at least 30 minutes to plump up and absorb the liquid, enhancing their flavor.
- Preheat the Oven: While the fruits are soaking, preheat your oven to 350°F (175°C). Line a baking sheet with parchment paper to prevent sticking.
- Mix the Dry Ingredients: In a medium bowl, whisk together the almond flour, baking powder, salt, cinnamon, and nutmeg. Confirm that the ingredients are well combined to distribute the flavors evenly.
- Cream the Butter and Sugar: In a large mixing bowl, beat the softened butter and granulated sugar together until light and fluffy. This should take about 3-4 minutes using an electric mixer on medium speed.
- Add Eggs and Extracts: Add the eggs, one at a time, mixing well after each addition. Stir in the vanilla and almond extracts until fully incorporated, guaranteeing a smooth batter.
- Combine the Wet and Dry Ingredients: Gradually add the dry ingredients to the wet mixture, stirring gently until just combined. Be careful not to overmix to maintain a tender crumb.
- Incorporate the Fruits and Nuts: Fold the soaked fruits and chopped nuts into the batter. If you’re using marzipan, you can roll it into a log and place it in the center of the dough, folding the dough over to encase it entirely.
- Shape and Bake the Stollen: Transfer the dough to the prepared baking sheet. Shape it into a log about 12 inches long. Bake in the preheated oven for 35-40 minutes, or until golden brown and a toothpick inserted into the center comes out clean.
- Cool and Dust with Sugar: Allow the stollen to cool on a wire rack. Once cooled, dust generously with powdered sugar to create the traditional snowy appearance.
Extra Tips: For a more pronounced almond flavor, consider adding some finely chopped almonds to the batter. If you prefer a non-alcoholic version, the orange juice will work perfectly to soak the fruits.
Additionally, stollen improves with age, so consider making it a few days ahead of when you plan to serve it to allow the flavors to meld beautifully. Store it wrapped in foil or in an airtight container to maintain its freshness.
Gluten-Free Snickerdoodles
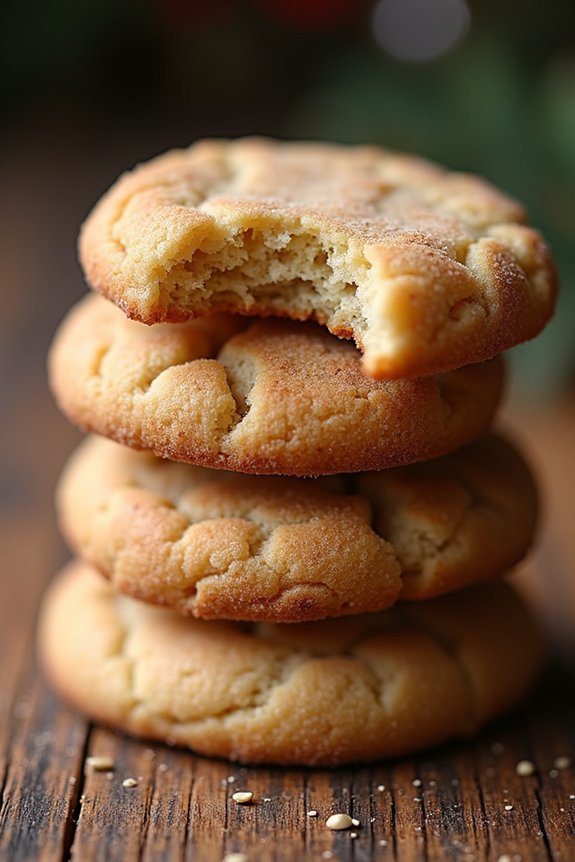
Snickerdoodles are a classic cookie favorite, especially around the holidays. Their delightful crackled tops and cinnamon-sugar coating make them a must-have treat for any festive occasion. For those following a gluten-free diet, this recipe offers all the flavor and texture you love without the gluten.
These gluten-free snickerdoodles are soft, chewy, and have the perfect amount of cinnamon spice, making them a wonderful addition to your Christmas baking. Whether you’re baking for yourself, family, or friends, these cookies are sure to be a hit.
This gluten-free version uses a combination of gluten-free flour and traditional baking ingredients to achieve that perfect snickerdoodle texture. The recipe is simple to follow, allowing you to enjoy delicious cookies without the worry of gluten. Perfect for sharing, this recipe serves 4-6 people, making it an ideal choice for small gatherings or holiday gift-giving.
Ingredients:
- 1 1/2 cups gluten-free all-purpose flour
- 1 teaspoon cream of tartar
- 1/2 teaspoon baking soda
- 1/4 teaspoon salt
- 1/2 cup unsalted butter, softened
- 3/4 cup granulated sugar
- 1 large egg
- 1 teaspoon vanilla extract
- 2 tablespoons granulated sugar (for coating)
- 1 tablespoon ground cinnamon (for coating)
Instructions:
- Preheat the Oven: Start by preheating your oven to 350°F (175°C). Line a baking sheet with parchment paper to prevent the cookies from sticking and to guarantee even baking.
- Mix Dry Ingredients: In a medium-sized bowl, whisk together the gluten-free all-purpose flour, cream of tartar, baking soda, and salt. This guarantees that the leavening agents are evenly distributed throughout the flour.
- Cream Butter and Sugar: In a large mixing bowl, beat the softened butter and 3/4 cup of granulated sugar together until light and fluffy. This should take about 2-3 minutes with an electric mixer on medium speed.
- Add Wet Ingredients: Beat in the egg and vanilla extract until well combined. The mixture should be smooth and creamy.
- Combine Mixtures: Gradually add the dry ingredients to the wet mixture, mixing until just combined. Be careful not to overmix, as this can affect the texture of the cookies.
- Prepare Coating: In a small bowl, combine the 2 tablespoons of granulated sugar with the ground cinnamon. Mix well to create the coating for the snickerdoodles.
- Shape the Cookies: Scoop about 1 1/2 tablespoons of cookie dough and roll it into a ball. Roll each ball in the cinnamon-sugar mixture until fully coated.
- Bake the Cookies: Place the coated cookie balls on the prepared baking sheet, about 2 inches apart to allow for spreading. Bake in the preheated oven for 10-12 minutes, or until the edges are slightly golden and the tops are crackled.
- Cool and Serve: Remove the cookies from the oven and let them cool on the baking sheet for about 5 minutes before transferring them to a wire rack to cool completely. Enjoy your gluten-free snickerdoodles with a glass of milk or your favorite holiday beverage.
Extra Tips: For the best results, verify your gluten-free flour is a blend that includes xanthan gum, as this helps mimic the texture of traditional flour. If your dough feels too sticky, you can chill it in the refrigerator for 15-20 minutes before rolling into balls.
Additionally, storing the cookies in an airtight container will keep them fresh and chewy for several days. If you’re feeling adventurous, try adding a pinch of nutmeg to the cinnamon-sugar coating for an extra layer of flavor.