

The holiday season is here, and there’s nothing like the scent of freshly baked treats to bring everyone together.
This year, I’m on a mission to whip up dairy-free indulgences that everyone at the table can enjoy.
Think creamy eggnog cookies and a rich chocolate yule log that melts in your mouth.
These festive goodies are sure to spread joy and warmth among family and friends.
Let’s make this holiday season deliciously inclusive!
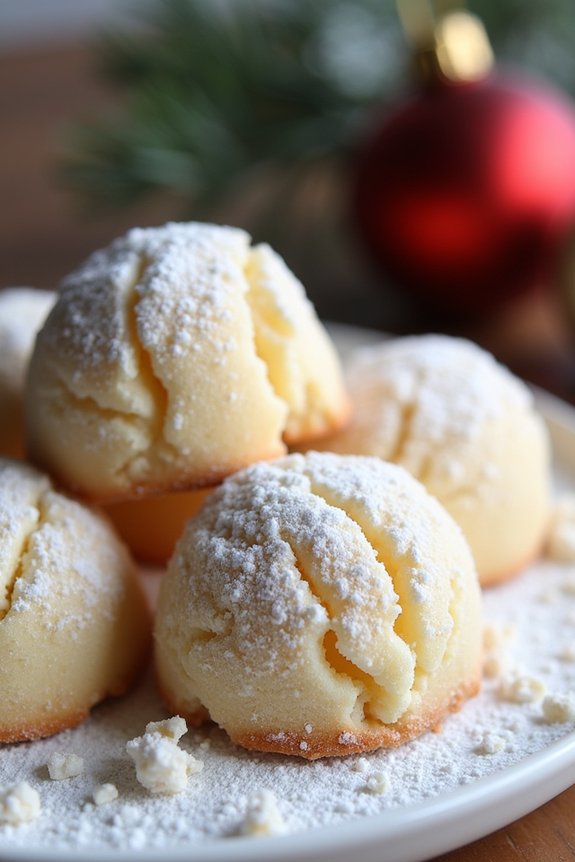
Creamy Dairy-Free Eggnog Cookies
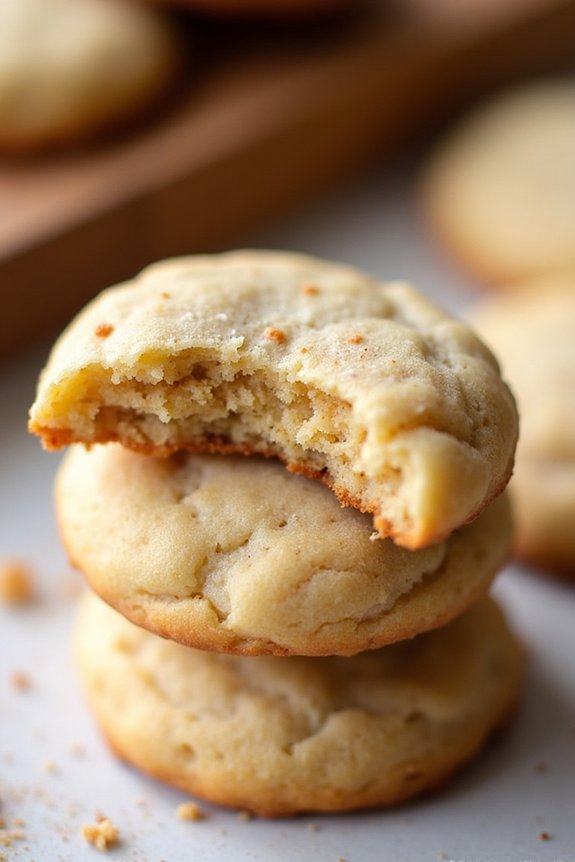
Creamy Dairy-Free Eggnog Cookies are the perfect treat to bring holiday cheer without the dairy. These scrumptious cookies capture the festive flavors of traditional eggnog using plant-based ingredients, making them suitable for everyone, including those with dairy sensitivities.
With a soft and chewy texture, these cookies are infused with warm spices and a hint of rum extract, offering a delightful taste of Christmas in every bite. Whether you’re hosting a holiday party or simply want to enjoy a cozy baking session at home, these cookies are sure to be a hit.
These cookies aren’t only delicious but also easy to make, requiring simple ingredients that you may already have in your pantry. The recipe yields 20-24 cookies, perfect for serving 4-6 people.
These delightful treats are perfect to enjoy with a warm cup of dairy-free hot chocolate or to share with loved ones during the festive season. Let’s plunge into the ingredients and the baking process to create these mouthwatering cookies.
Ingredients (Serves 4-6):
- 1/2 cup coconut oil, softened
- 1/2 cup granulated sugar
- 1/2 cup brown sugar, packed
- 1/4 cup dairy-free eggnog
- 1 teaspoon vanilla extract
- 1 teaspoon rum extract
- 2 cups all-purpose flour
- 1 teaspoon baking soda
- 1/2 teaspoon salt
- 1 teaspoon ground nutmeg
- 1/2 teaspoon ground cinnamon
- 1 tablespoon ground flaxseed
- 2 tablespoons water
Cooking Instructions:
- Prepare the Flax Egg: In a small bowl, combine 1 tablespoon of ground flaxseed with 2 tablespoons of water. Stir well and let it sit for about 5 minutes until it thickens. This mixture will act as a binding agent in place of eggs.
- Cream the Oils and Sugars: In a large mixing bowl, beat the softened coconut oil, granulated sugar, and brown sugar together until light and fluffy. This should take about 2-3 minutes using an electric mixer.
- Add Wet Ingredients: Add the prepared flax egg, dairy-free eggnog, vanilla extract, and rum extract to the sugar mixture. Beat until all ingredients are well combined and smooth.
- Mix Dry Ingredients: In a separate bowl, whisk together the all-purpose flour, baking soda, salt, ground nutmeg, and ground cinnamon. These will provide the structure and flavor for your cookies.
- Combine Wet and Dry Ingredients: Gradually add the dry ingredient mixture to the wet ingredients, stirring until just combined. Be careful not to over-mix, as this can make the cookies tough.
- Chill the Dough: Cover the dough with plastic wrap and refrigerate for at least 30 minutes. Chilling helps the dough firm up and develop the flavors.
- Preheat and Prepare Baking Sheet: Preheat your oven to 350°F (175°C) and line a baking sheet with parchment paper.
- Form the Cookies: Once the dough is chilled, scoop out tablespoon-sized portions and roll them into balls. Place them on the prepared baking sheet, spacing them about 2 inches apart.
- Bake the Cookies: Bake the cookies in the preheated oven for 10-12 minutes or until the edges are lightly golden. Remove from the oven and let them cool on the baking sheet for 5 minutes before transferring to a wire rack to cool completely.
Extra Tips:
When baking Creamy Dairy-Free Eggnog Cookies, verify your coconut oil is softened but not melted. This helps in achieving the right texture for the cookies.
If you prefer a more pronounced eggnog flavor, you can increase the amount of nutmeg and cinnamon slightly. Additionally, if you don’t have ground flaxseed on hand, you can use chia seeds as an alternative for the flax egg.
Finally, these cookies can be stored in an airtight container at room temperature for up to a week, retaining their delightful texture and flavor.
Rich Chocolate Yule Log
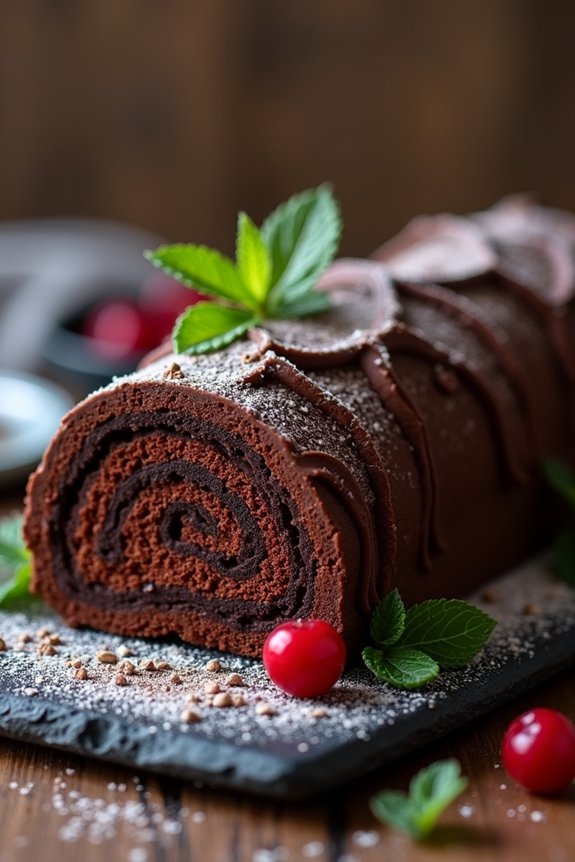
The Rich Chocolate Yule Log is a festive dessert that brings a touch of elegance and indulgence to your dairy-free Christmas celebrations. This classic holiday treat is made with a light and fluffy chocolate sponge cake that’s rolled with a creamy chocolate filling, all without a hint of dairy. The result is a rich and decadent dessert that’s certain to impress your family and guests.
Whether you’re adhering to a dairy-free lifestyle or simply looking to try something new this holiday season, this chocolate yule log is a perfect choice. Not only is this dessert visually stunning, resembling a wooden log complete with bark-like texture, but it’s also simple to make with a few key ingredients.
The secret to its soft, sponge-like texture lies in the careful folding of the batter, guaranteeing the cake remains airy and light. The chocolate filling is smooth and velvety, providing a luscious contrast to the cake’s subtle sweetness. With this recipe, you can create a beautiful centerpiece for your holiday table that tastes as good as it looks.
Ingredients for 4-6 Servings:
- 4 large eggs, separated
- 1/2 cup granulated sugar
- 1/3 cup unsweetened cocoa powder
- 1 teaspoon vanilla extract
- 1/4 teaspoon salt
- 1/2 cup almond milk (or other dairy-free milk)
- 1 cup dairy-free dark chocolate chips
- 1 tablespoon coconut oil
- 1 cup powdered sugar
- 1/2 teaspoon almond extract
- Fresh berries and mint leaves for garnish (optional)
Instructions:
- Prepare the Baking Sheet: Preheat your oven to 350°F (175°C). Line a 10×15 inch jelly roll pan with parchment paper, allowing the paper to hang over the sides for easy removal.
- Make the Sponge Cake: In a large bowl, beat the egg yolks and granulated sugar together until thick and pale. Gradually add the cocoa powder, vanilla extract, and salt, mixing until well incorporated.
- Whip Egg Whites: In a separate bowl, beat the egg whites until soft peaks form. Gently fold the egg whites into the cocoa mixture, being careful not to deflate the batter.
- Bake the Cake: Spread the batter evenly into the prepared pan. Bake for 10-12 minutes, or until the cake springs back when lightly touched. Remove from oven and cool for a few minutes.
- Roll the Cake: While the cake is still warm, use the parchment paper to roll the cake into a log shape. Let it cool completely in this rolled position.
- Prepare the Filling: In a small saucepan over low heat, combine the almond milk, dark chocolate chips, and coconut oil. Stir until completely melted and smooth.
- Fill and Roll the Cake: Carefully unroll the cooled cake and spread the chocolate filling evenly over the surface. Re-roll the cake without the parchment paper and place it seam-side down on a serving platter.
- Prepare the Frosting: In a bowl, combine powdered sugar, almond extract, and enough water to create a thick consistency. Spread over the rolled cake to resemble bark.
- Decorate: Optional – Garnish with fresh berries and mint leaves for a festive touch.
Extra Tips:
To guarantee your Rich Chocolate Yule Log turns out perfectly, make sure to beat the egg whites until they form soft peaks; this will help create the light, airy texture of the sponge.
Be gentle when folding the egg whites into the cocoa mixture to maintain the airiness. When rolling the cake, do it while it’s warm to prevent cracking. If cracks do occur, the frosting will help cover them up.
Finally, let the cake chill in the fridge for about an hour before serving to allow the flavors to meld and the filling to set firmly.
Vegan Gingerbread Men

Vegan Gingerbread Men are a delightful and festive treat perfect for the holiday season, bringing a touch of nostalgia and warmth to any Christmas gathering. These charming cookies aren’t only delicious but also dairy-free, making them suitable for a variety of dietary preferences. The rich flavors of molasses, ginger, and cinnamon create a wonderfully spiced cookie that’s both soft and slightly chewy, ideal for enjoying with a hot cup of cocoa or tea.
Whether you’re making these gingerbread men for a family decorating session or as a thoughtful homemade gift, they’re sure to be a hit. Creating Vegan Gingerbread Men is an enjoyable process that can be shared with family or friends, adding to the holiday fun. The recipe is straightforward, and you’ll find that these cookies come together quickly.
With a serving size of 4-6 people, this recipe allows you to make a good batch of gingerbread men that can be decorated with icing, candy, or left simple and elegant. Gather your ingredients and enjoy the festive aroma that fills your kitchen as you bake these delightful cookies.
Ingredients (Serving Size: 4-6 people):
- 2 1/4 cups all-purpose flour
- 1/2 teaspoon baking soda
- 1/4 teaspoon salt
- 1 teaspoon ground ginger
- 1 teaspoon ground cinnamon
- 1/2 teaspoon ground cloves
- 1/2 teaspoon allspice
- 1/2 cup vegan butter, softened
- 1/3 cup brown sugar, packed
- 1/3 cup molasses
- 1 tablespoon ground flaxseed
- 3 tablespoons water
- 1 teaspoon vanilla extract
Cooking Instructions:
- Prepare the flaxseed mixture: In a small bowl, combine the ground flaxseed with water. Stir well and set aside to thicken for about 5 minutes. This will act as a binding agent, similar to an egg.
- Mix dry ingredients: In a medium-sized bowl, whisk together the all-purpose flour, baking soda, salt, ginger, cinnamon, cloves, and allspice. Confirm the spices are evenly distributed throughout the flour.
- Cream the butter and sugar: In a large mixing bowl, beat the vegan butter and brown sugar together until creamy and smooth. You can use a hand mixer or stand mixer for this step.
- Combine wet ingredients: Add the molasses, thickened flaxseed mixture, and vanilla extract to the creamed butter and sugar. Mix until fully incorporated.
- Combine wet and dry ingredients: Gradually add the dry ingredients to the wet mixture, stirring until a dough forms. The dough should be soft but not sticky. If it seems too dry, add a teaspoon of water at a time until the desired consistency is reached.
- Chill the dough: Wrap the dough in plastic wrap and refrigerate for at least 1 hour. This helps the dough firm up, making it easier to roll out.
- Roll and cut the dough: Preheat your oven to 350°F (175°C). On a lightly floured surface, roll out the dough to about 1/4 inch thickness. Use gingerbread man cookie cutters to cut out shapes, and place them on a lined baking sheet.
- Bake the cookies: Bake in the preheated oven for 8-10 minutes, or until the edges are just beginning to brown. Be careful not to overbake, as they’ll continue to firm up as they cool.
- Cool and decorate: Allow the cookies to cool on the baking sheet for a few minutes before transferring them to a wire rack. Once completely cooled, decorate with vegan icing or toppings of your choice.
Extra Tips:
For best results, confirm that the dough is well-chilled before rolling it out; this prevents it from spreading too much during baking. If you prefer softer cookies, slightly underbake them and let them rest on the baking sheet for a minute or two longer after removing them from the oven.
Feel free to get creative with decorations—use colorful icing, sprinkles, or dried fruit to give your gingerbread men a festive look. Store any leftover cookies in an airtight container to keep them fresh for up to a week. Enjoy the process and have fun creating these delightful holiday treats!
Spiced Apple Cider Donuts
Spiced Apple Cider Donuts are the perfect dairy-free indulgence to enjoy during the festive season. These donuts are infused with the warm, comforting flavors of apple cider and traditional holiday spices. They’re soft, moist, and dusted with a delightful cinnamon-sugar coating that makes them an irresistible treat.
Whether you’re serving them for breakfast, a snack, or a dessert, these donuts are certain to bring a touch of holiday magic to your table.
Making Spiced Apple Cider Donuts dairy-free is easy with simple substitutions that don’t compromise flavor or texture. The recipe uses apple cider to add moisture and depth of flavor, while a blend of spices like cinnamon, nutmeg, and cloves brings warmth and aroma.
Baked instead of fried, these donuts are lighter on the palate but still offer the satisfying comfort of a classic donut. Perfect for a serving size of 4-6 people, these donuts aren’t only delicious but also a breeze to make.
Ingredients:
- 2 cups all-purpose flour
- 1/2 cup granulated sugar
- 1/2 cup packed light brown sugar
- 1 teaspoon baking powder
- 1/2 teaspoon baking soda
- 1 teaspoon ground cinnamon
- 1/2 teaspoon ground nutmeg
- 1/4 teaspoon ground cloves
- 1/4 teaspoon salt
- 3/4 cup apple cider
- 1/4 cup unsweetened applesauce
- 2 tablespoons vegetable oil
- 2 teaspoons vanilla extract
- 2 large eggs
For the Cinnamon-Sugar Coating:
- 1/2 cup granulated sugar
- 1 teaspoon ground cinnamon
Cooking Instructions:
- Preheat the Oven: Begin by preheating your oven to 350°F (175°C). Lightly grease a donut pan with non-stick spray or oil to prevent sticking.
- Combine Dry Ingredients: In a large bowl, whisk together the flour, granulated sugar, brown sugar, baking powder, baking soda, cinnamon, nutmeg, cloves, and salt. Confirm the spices are evenly distributed throughout the flour mixture.
- Mix Wet Ingredients: In a separate bowl, whisk together the apple cider, applesauce, vegetable oil, vanilla extract, and eggs until well combined.
- Form the Batter: Gradually add the wet ingredients to the dry ingredients, stirring just until combined. Be careful not to overmix, as this can result in dense donuts.
- Fill the Pan: Using a piping bag or a spoon, carefully fill each cavity of the donut pan about two-thirds full with the batter.
- Bake the Donuts: Place the pan in the preheated oven and bake for 10-12 minutes, or until the donuts spring back when lightly touched and a toothpick inserted into the center comes out clean.
- Prepare the Coating: While the donuts are baking, mix together the granulated sugar and cinnamon in a shallow dish.
- Coat the Donuts: Once the donuts are done baking, allow them to cool in the pan for about 5 minutes. Then, remove them from the pan and gently toss in the cinnamon-sugar mixture to coat evenly.
- Serve: Serve the donuts warm or at room temperature, and enjoy the spiced flavors with a cup of your favorite dairy-free beverage.
Extra Tips:
For the best flavor, use quality apple cider that’s rich and full-bodied. If you prefer a stronger apple flavor, you can reduce the apple cider by simmering it on the stove until it thickens slightly, then use it in the recipe.
Make sure to grease the donut pan well to guarantee easy removal, and use a piping bag for a cleaner and easier way to fill the donut cavities. These donuts are best enjoyed fresh but can be stored in an airtight container for up to two days.
Decadent Dairy-Free Fudge
Indulge in the rich, creamy delight of Decadent Dairy-Free Fudge, a perfect addition to your Christmas baking repertoire. This recipe transforms simple, plant-based ingredients into a luxurious treat that will impress even the most discerning palates.
Whether you’re accommodating dietary restrictions or simply seeking a healthier alternative, this fudge offers all the satisfaction without any dairy. Its smooth texture and deep chocolate flavor make it a festive favorite, perfect for holiday gatherings or as a thoughtful homemade gift.
The secret to achieving the perfect texture lies in the combination of coconut milk and coconut oil, which provide a creamy base without the need for traditional dairy products. Paired with high-quality cocoa powder and natural sweeteners, this fudge delivers a decadent experience that everyone can enjoy.
Best of all, it’s straightforward to make, requiring minimal time and effort, allowing you to focus on enjoying the holiday season with your loved ones.
Ingredients (Serves 4-6):
- 1 can (13.5 ounces) full-fat coconut milk
- 1/2 cup coconut oil
- 1 cup cocoa powder
- 1 cup maple syrup
- 1 teaspoon vanilla extract
- 1/4 teaspoon salt
- 1/4 cup chopped nuts (optional)
- 1/4 cup dairy-free chocolate chips (optional)
Cooking Instructions:
- Prepare the Ingredients: Gather all your ingredients and measure them out to guarantee a smooth cooking process. If using, chop the nuts finely and set aside.
- Combine Coconut Milk and Oil: In a medium saucepan over low heat, combine the canned coconut milk and coconut oil. Stir occasionally until the coconut oil is completely melted and the mixture is warm but not boiling.
- Mix in Cocoa Powder and Sweetener: Gradually add the cocoa powder, stirring continuously to prevent lumps from forming. Once fully incorporated, pour in the maple syrup and continue to stir until the mixture is smooth and well combined.
- Flavor and Season: Add the vanilla extract and salt to the chocolate mixture. Stir well to guarantee even distribution of flavors throughout the fudge base.
- Incorporate Optional Ingredients: If desired, fold in the chopped nuts and dairy-free chocolate chips, ensuring they’re evenly distributed throughout the mixture.
- Pour and Set: Line a small square baking pan (about 8×8 inches) with parchment paper. Pour the fudge mixture into the prepared pan, spreading it evenly with a spatula. Tap the pan gently on the counter to remove any air bubbles.
- Chill: Place the pan in the refrigerator for at least 2-3 hours, or until the fudge is firm to the touch. For quicker setting, you can also place it in the freezer for about 1 hour.
- Cut and Serve: Once set, remove the fudge from the pan using the parchment paper edges. Cut into small squares and serve immediately, or store in an airtight container in the refrigerator until ready to enjoy.
Extra Tips:
For a smoother texture, verify that the coconut oil and coconut milk are well combined before adding the cocoa powder. If you find the mixture too thick, you can add a splash more coconut milk to reach your desired consistency.
Feel free to experiment with additional flavors like peppermint extract or orange zest for a festive twist. When cutting the fudge, use a sharp knife and wipe it clean between cuts to maintain clean edges. Enjoy this delightful treat knowing it’s a healthier choice without compromising on flavor.
Almond Flour Snowball Cookies
Almond Flour Snowball Cookies are a delightful dairy-free treat perfect for the holiday season. These light and nutty cookies aren’t only gluten-free but also boast a rich almond flavor that pairs beautifully with the sweetness of powdered sugar. Traditionally known as Russian Tea Cakes or Mexican Wedding Cookies, these cookies are a festive addition to any Christmas dessert spread.
The use of almond flour gives them a tender crumb while also providing a subtle nuttiness that’s enhanced by the addition of chopped nuts. These snowball cookies are easy to make and require just a handful of ingredients. Perfect for those who need a dairy-free alternative, they maintain the classic taste and crumbly texture that everyone loves.
They make an excellent gift, wrapped neatly in a decorative tin, or a sweet treat to share with family and friends during holiday gatherings. With this recipe, you’ll have approximately 24 cookies, making it suitable for serving 4-6 people.
Ingredients:
- 2 cups almond flour
- 1 cup chopped nuts (pecans or walnuts work well)
- 1/4 cup granulated sugar
- 1/4 teaspoon salt
- 1 teaspoon vanilla extract
- 1/2 cup coconut oil, solidified
- 1 cup powdered sugar, for rolling
Instructions:
- Preheat the Oven: Begin by preheating your oven to 350°F (175°C). Line a baking sheet with parchment paper to prevent the cookies from sticking.
- Mix Dry Ingredients: In a large mixing bowl, combine the almond flour, chopped nuts, granulated sugar, and salt. Stir these dry ingredients together until they’re evenly distributed.
- Incorporate Wet Ingredients: Add the vanilla extract and solidified coconut oil to the dry ingredients. Using a hand mixer or a wooden spoon, mix until the dough comes together. It should be slightly crumbly but hold together when pressed.
- Shape the Cookies: Scoop about a tablespoon of dough and roll it between your palms to form a ball. Place the balls onto the prepared baking sheet, leaving a little space between each one.
- Bake: Place the baking sheet in the preheated oven. Bake the cookies for 12-15 minutes, or until they’re lightly golden on the bottom. Be careful not to over-bake, as this will dry them out.
- Cool and Coat: Let the cookies cool on the baking sheet for about 5 minutes. Then, while they’re still warm but not hot, roll each cookie in the powdered sugar until fully coated. Place them on a wire rack to cool completely.
- Final Coating: Once the cookies are completely cooled, roll them in powdered sugar a second time for a generous snowy coating.
Extra Tips:
For the best results, make sure that your coconut oil is at a solid state before mixing it into the dough. This helps in achieving the right texture for the cookies. If the dough feels too dry and crumbly to form balls, you can add an extra tablespoon of coconut oil.
Remember to coat the cookies twice in powdered sugar for that classic snowball appearance. Store these cookies in an airtight container to keep them fresh and to maintain their delightful texture.
Festive Cranberry Orange Muffins
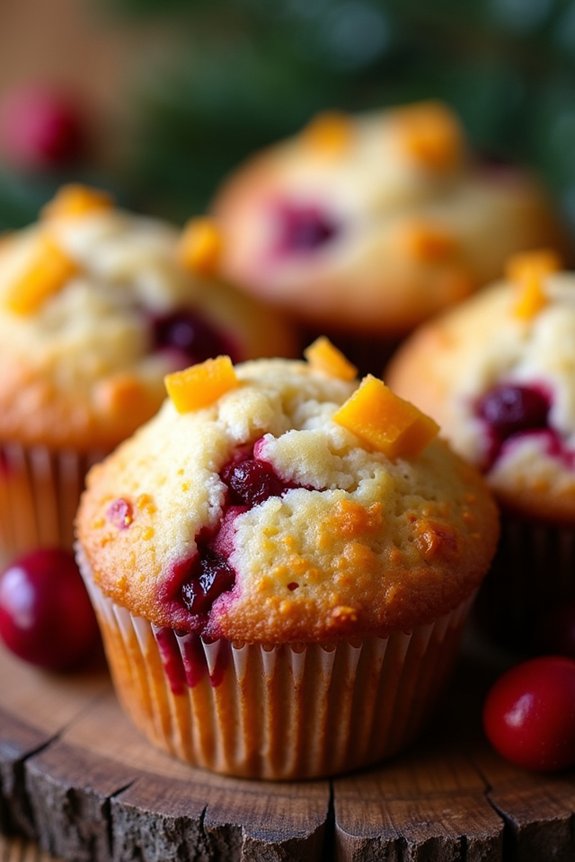
Festive Cranberry Orange Muffins are a delightful treat that brings the bright, citrusy flavors of orange together with the tartness of cranberries, making them a perfect addition to your holiday spread.
These muffins aren’t only delicious but also dairy-free, making them suitable for those with dietary restrictions. The combination of fresh cranberries and orange zest creates a perfect harmony of flavors that will fill your kitchen with the scent of Christmas.
Whether you’re enjoying them for breakfast, as a snack, or as a dessert, these muffins are sure to be a hit with family and friends. Packed with seasonal flavors, these muffins are incredibly moist and fluffy, thanks to the use of almond milk and coconut oil.
The recipe is simple enough to whip up quickly, allowing you more time to enjoy the festivities. The muffins are also a great make-ahead option, as they can be stored or frozen for later, guaranteeing you have a tasty treat on hand throughout the holiday season.
Enjoy them warm from the oven, or pair them with your favorite dairy-free spread for an extra touch of indulgence.
Ingredients for Festive Cranberry Orange Muffins (Serves 4-6):
- 1 1/2 cups all-purpose flour
- 1/2 cup granulated sugar
- 2 tsp baking powder
- 1/2 tsp baking soda
- 1/4 tsp salt
- 1/2 cup almond milk (unsweetened)
- 1/3 cup coconut oil, melted
- 1 tsp vanilla extract
- 2 large eggs
- Zest of 1 large orange
- 1/2 cup fresh cranberries, chopped
- 1/4 cup fresh orange juice
- Optional: 1/4 cup chopped walnuts or pecans
Cooking Instructions:
- Preheat the Oven: Start by preheating your oven to 350°F (175°C). Line a muffin tin with paper liners or lightly grease it to prevent sticking.
- Combine Dry Ingredients: In a large bowl, whisk together the flour, sugar, baking powder, baking soda, and salt. Make sure these dry ingredients are well combined to guarantee even distribution throughout the batter.
- Prepare Wet Ingredients: In a separate bowl, mix the almond milk, melted coconut oil, vanilla extract, and eggs. Whisk these ingredients together until fully combined, forming a smooth mixture.
- Mix in Zest and Juice: Add the orange zest and orange juice to the wet ingredients, stirring to integrate the citrus flavors into the mixture thoroughly.
- Combine Wet and Dry Mixtures: Gradually add the wet mixture into the dry ingredients, stirring gently until just combined. Be careful not to overmix, as this can affect the muffins’ texture.
- Fold in Cranberries and Nuts: Carefully fold in the chopped cranberries and optional nuts, distributing them evenly throughout the batter.
- Fill Muffin Tins: Spoon the batter into the prepared muffin tin, filling each cup about two-thirds full to allow room for rising.
- Bake the Muffins: Place the muffin tin in the preheated oven and bake for 18-20 minutes or until a toothpick inserted into the center of a muffin comes out clean.
- Cool and Serve: Once baked, remove the muffins from the oven and let them cool in the tin for about 5 minutes. Then transfer them to a wire rack to cool completely. Serve warm or at room temperature.
Extra Tips:
For an extra festive touch, try glazing the muffins with a simple orange glaze made from powdered sugar and orange juice. You can also substitute dried cranberries if fresh ones are unavailable, but be sure to adjust the sweetness, as dried cranberries can be sweeter.
These muffins are best enjoyed fresh but can be stored in an airtight container for up to three days or frozen for up to a month. When ready to eat from the freezer, simply reheat them in the oven for a few minutes to restore their fluffy texture.
Chocolate Peppermint Bark

If you’re looking for a festive and dairy-free treat to share with family and friends during the holiday season, Chocolate Peppermint Bark is a perfect choice. This delightful confection combines the rich taste of chocolate with the invigorating zing of peppermint, creating a harmonious balance that captures the spirit of Christmas.
Best of all, it’s incredibly easy to make and requires only a handful of ingredients, making it a great option for both novice bakers and seasoned cooks.
Chocolate Peppermint Bark isn’t only delicious but also visually appealing, with its glossy chocolate base and a sprinkling of crushed peppermint candies that add a touch of holiday sparkle. Whether you serve it as a dessert, a snack, or a gift, this recipe is sure to impress.
Plus, it’s completely dairy-free, so everyone can enjoy it without worry.
Ingredients (Serves 4-6 people):
- 2 cups dairy-free dark chocolate chips
- 1 teaspoon peppermint extract
- 1 cup crushed peppermint candies
- 1 tablespoon coconut oil
Instructions:
- Prepare The Baking Sheet: Line a baking sheet with parchment paper or a silicone baking mat. This will prevent the chocolate from sticking and make it easier to remove once set.
- Melt The Chocolate: Place the dairy-free dark chocolate chips and coconut oil in a microwave-safe bowl. Microwave in 30-second intervals, stirring in between, until the chocolate is fully melted and smooth. This should take about 1-2 minutes. Alternatively, you can melt the chocolate over a double boiler.
- Add Peppermint Extract: Once the chocolate is melted, stir in the peppermint extract. Mix well to confirm that the peppermint flavor is evenly distributed throughout the chocolate.
- Spread The Chocolate: Pour the melted chocolate mixture onto the prepared baking sheet. Use a spatula to spread it into an even layer, about 1/4 inch thick.
- Sprinkle The Candy: Immediately sprinkle the crushed peppermint candies over the melted chocolate, pressing down lightly to adhere them to the surface. Be sure to distribute them evenly for a consistent peppermint flavor in each bite.
- Chill The Bark: Transfer the baking sheet to the refrigerator and let the chocolate set for about 1 hour, or until firm to the touch.
- Break Into Pieces: Once the chocolate is set, remove it from the refrigerator and break it into irregular pieces using your hands. Enjoy or package as gifts!
Extra Tips:
For the best results, confirm that the chocolate is thoroughly melted and smooth before spreading it onto the baking sheet. If you want to add a bit of texture, consider incorporating some crushed almonds or other nuts along with the peppermint candies.
To store your Chocolate Peppermint Bark, place it in an airtight container and keep it in a cool, dry place for up to two weeks. If you prefer a thicker bark, simply double the recipe and adjust the chilling time accordingly.
Coconut Milk Caramel Squares
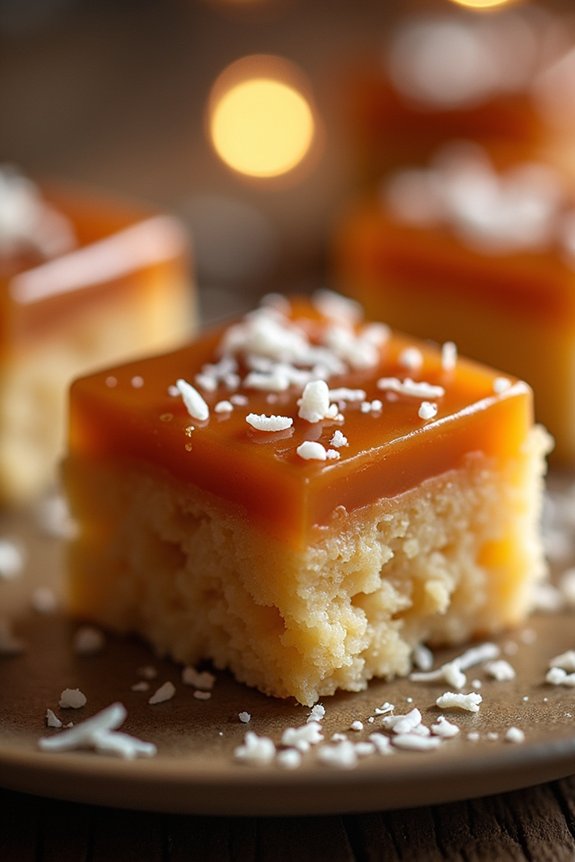
Coconut Milk Caramel Squares are the perfect treat to add a sweet and indulgent touch to your dairy-free Christmas baking collection. These squares combine the creamy richness of coconut milk with the sweet, buttery goodness of caramel, resulting in a deliciously decadent dessert. Ideal for sharing with family and friends during festive gatherings, these squares are sure to impress even those who aren’t following a dairy-free diet.
Their gooey center and crispy base offer a delightful texture that pairs perfectly with a cup of hot cocoa or your favorite holiday beverage.
These caramel squares aren’t only dairy-free but also surprisingly easy to make. By using coconut milk as a substitute for traditional cream, you can achieve a similar creamy texture without any dairy. The base is made with a combination of flour, sugar, and coconut oil, creating a firm and flavorful foundation for the caramel.
The caramel layer, made from coconut milk, sugar, and a hint of vanilla, brings a luxurious and mouth-watering finish to this dessert. Follow the recipe below to create a batch of Coconut Milk Caramel Squares that will be a hit at any holiday gathering.
Ingredients (Serves 4-6):
- 1 cup all-purpose flour
- 1/4 cup granulated sugar
- 1/2 cup coconut oil, melted
- 1 cup brown sugar
- 1/4 cup coconut milk (full fat)
- 1/4 cup light corn syrup
- 1 teaspoon vanilla extract
- 1/2 teaspoon sea salt
- 1/2 cup shredded coconut (optional, for topping)
Instructions:
1. Prepare the Base: Preheat your oven to 350°F (175°C). Line an 8×8 inch baking dish with parchment paper, leaving some overhang for easy removal. In a mixing bowl, combine the flour, granulated sugar, and melted coconut oil. Mix until a crumbly dough forms.
Press this mixture evenly into the bottom of the prepared baking dish to form the base. Bake for 10-12 minutes or until lightly golden. Remove from oven and set aside to cool.
2. Make the Caramel: In a medium saucepan over medium heat, combine the brown sugar, coconut milk, and corn syrup. Stir continuously until the mixture starts to boil. Reduce the heat to low and let it simmer for 8-10 minutes, stirring occasionally, until the caramel thickens and darkens in color.
Remove from heat and stir in the vanilla extract and sea salt.
3. Assemble the Squares: Pour the caramel mixture over the cooled base, spreading it evenly with a spatula. If desired, sprinkle shredded coconut on top for added texture and flavor. Allow the caramel to set at room temperature for about 2 hours, or until firm.
4. Cut and Serve: Once fully set, use the parchment paper overhang to lift the slab out of the baking dish. Place on a cutting board and use a sharp knife to cut into squares. Serve and enjoy!
Extra Tips:
When making Coconut Milk Caramel Squares, verify the caramel layer has reached the right consistency before removing it from the heat. If it’s too thin, it may not set properly, while a too-thick caramel could become overly chewy.
Also, for an extra festive touch, consider adding a sprinkle of sea salt on top of the completed squares or drizzling dairy-free chocolate over them once set. This won’t only enhance the flavor but also create a beautiful presentation, perfect for holiday gatherings.
Lemon Poppy Seed Loaf
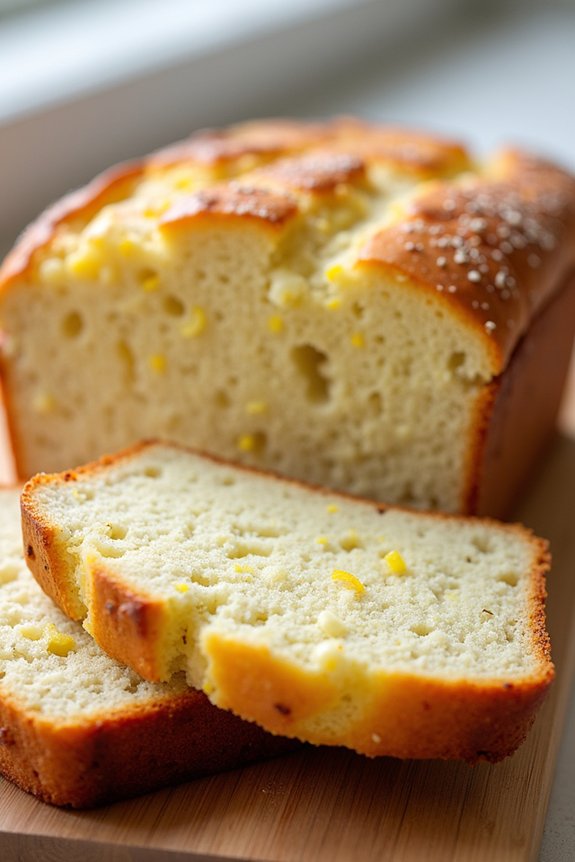
Lemon Poppy Seed Loaf is a delightful dairy-free treat that’s perfect for the holiday season. With its bright citrus flavor and delicate crunch from poppy seeds, this loaf is sure to be a hit at your Christmas gatherings. The recipe is simple to follow and uses plant-based ingredients to guarantee it suits those with dairy restrictions.
The loaf is moist and fluffy, making it a delightful accompaniment to a warm cup of tea or coffee during the cold winter months. This Lemon Poppy Seed Loaf is designed to serve 4-6 people, making it an ideal choice for small gatherings or family treats.
The combination of fresh lemon zest and juice with the nutty poppy seeds creates a harmonious balance of flavors, while the dairy-free approach guarantees that everyone can enjoy it without compromise. Whether you’re baking for loved ones or as a personal treat, this loaf is a delicious way to embrace the festive season.
Ingredients (Serves 4-6):
- 1 ½ cups all-purpose flour
- 1 tablespoon poppy seeds
- 1 teaspoon baking powder
- ½ teaspoon baking soda
- ¼ teaspoon salt
- ½ cup granulated sugar
- 1/3 cup vegetable oil
- 1 cup almond milk (or other plant-based milk)
- 1 tablespoon apple cider vinegar
- 1 teaspoon vanilla extract
- Zest of 2 lemons
- 3 tablespoons fresh lemon juice
Cooking Instructions:
- Preheat Oven and Prepare Pan: Start by preheating your oven to 350°F (175°C). Grease a loaf pan with a bit of vegetable oil or line it with parchment paper to prevent sticking.
- Mix Dry Ingredients: In a large bowl, combine the flour, poppy seeds, baking powder, baking soda, and salt. Stir until well mixed. This guarantees the poppy seeds and leavening agents are evenly distributed throughout the loaf.
- Combine Wet Ingredients: In another bowl, whisk together the sugar, vegetable oil, almond milk, apple cider vinegar, vanilla extract, lemon zest, and lemon juice. Whisk until the sugar is mostly dissolved and the mixture is smooth.
- Incorporate Dry and Wet Ingredients: Gradually add the dry ingredients to the wet mixture, stirring gently until just combined. Be careful not to over-mix; this will keep your loaf tender.
- Pour and Bake: Pour the batter into the prepared loaf pan and spread it evenly. Bake in the preheated oven for 45-50 minutes, or until a toothpick inserted into the center comes out clean.
- Cool the Loaf: Once baked, remove the loaf from the oven and allow it to cool in the pan for about 10 minutes. Then, transfer it to a wire rack to cool completely.
Extra Tips:
For an added festive touch, you can drizzle the cooled loaf with a simple glaze made of powdered sugar and lemon juice. This will enhance the lemony flavor and provide a beautiful finish.
If you prefer, you can substitute the almond milk with any other plant-based milk such as soy or oat. When zesting the lemons, make sure to avoid the white pith, as it can be bitter.
Finally, this loaf can be stored in an airtight container for up to three days, maintaining its moistness and flavor.
Maple Pecan Pie Bars

Maple Pecan Pie Bars are the perfect dairy-free treat to satisfy your holiday sweet tooth. These bars combine the classic flavors of pecan pie with a hint of maple syrup, providing a rich, nutty, and slightly caramelized flavor without the need for any dairy products. The base is a buttery, flaky crust that holds a gooey, sweet filling, topped with crunchy pecans. This dessert is ideal for serving at Christmas gatherings and is sure to impress both dairy-free and non-dairy-free guests alike.
Making Maple Pecan Pie Bars isn’t only delicious but also surprisingly easy. With a few simple ingredients and some basic baking techniques, you can whip up a batch of these bars in no time. The recipe is designed to serve 4-6 people, making it perfect for small family gatherings or holiday parties. The use of pure maple syrup as a sweetener not only complements the pecans beautifully but also provides a depth of flavor that’s both sophisticated and comforting.
Plus, these bars can be made ahead of time, allowing you to focus on entertaining your guests.
Ingredients (Serves 4-6)
- 1 cup all-purpose flour
- 1/4 cup coconut oil, melted
- 1/4 cup maple syrup
- 1 teaspoon vanilla extract
- 1/4 teaspoon salt
- 1 cup pecan halves
- 1/2 cup brown sugar
- 1/2 cup pure maple syrup
- 2 tablespoons almond milk
- 1 tablespoon cornstarch
Instructions
- Preheat and Prepare: Preheat your oven to 350°F (175°C). Line an 8×8-inch baking pan with parchment paper, leaving some overhang for easy removal.
- Make the Crust: In a medium bowl, combine the all-purpose flour, melted coconut oil, 1/4 cup maple syrup, vanilla extract, and salt. Stir until the mixture forms a dough. Press the dough evenly into the bottom of the prepared baking pan to form the crust. Bake the crust for 15 minutes or until it’s lightly golden.
- Prepare the Filling: While the crust is baking, prepare the filling. In a saucepan over medium heat, combine the brown sugar, 1/2 cup maple syrup, and almond milk. Stir until the sugar has dissolved. In a small bowl, mix the cornstarch with a tablespoon of water to create a slurry, then add this to the saucepan. Stir continuously until the mixture thickens.
- Combine and Bake: Remove the crust from the oven and pour the maple syrup filling over the crust. Arrange the pecan halves evenly on top. Return the pan to the oven and bake for an additional 20-25 minutes, or until the filling is set and the pecans are toasted.
- Cool and Serve: Allow the bars to cool completely in the pan on a wire rack. Once cooled, use the parchment paper overhang to lift the bars out of the pan. Cut into squares and serve.
Extra Tips
For a more pronounced maple flavor, consider using Grade B maple syrup, which is darker and has a stronger taste. Be sure to let the bars cool completely before cutting them, as this will help the filling set properly and make slicing easier.
If you’re preparing these bars ahead of time, store them in an airtight container at room temperature for up to three days or refrigerate them for up to a week. Enjoy these bars slightly warmed with a cup of dairy-free hot cocoa for an extra festive treat.
Gluten-Free Cinnamon Rolls
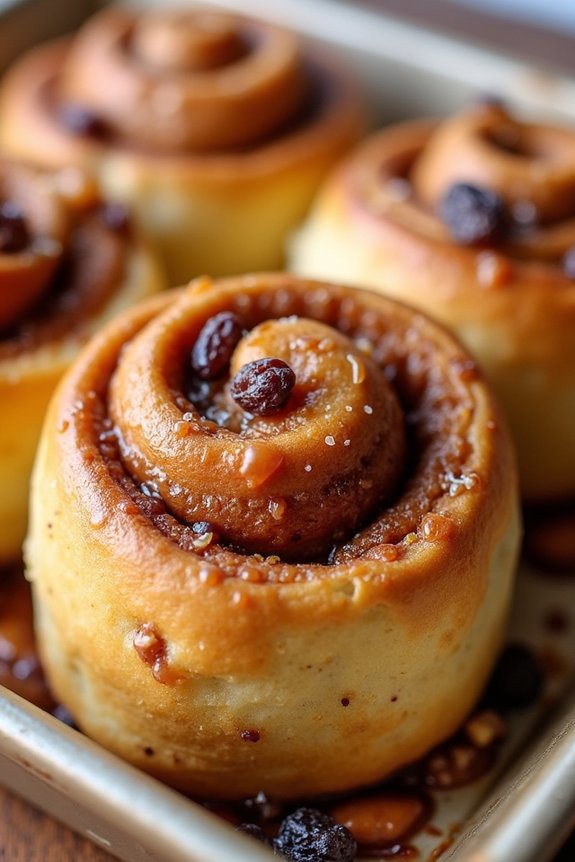
The holiday season is a time for indulging in sweet treats and sharing delicious moments with loved ones. However, for those following a dairy-free and gluten-free diet, finding the perfect Christmas baked goods can be a challenge. Enter Gluten-Free Cinnamon Rolls, a delightful, fluffy, and aromatic treat that everyone can enjoy.
These cinnamon rolls are soft, gooey, and bursting with the rich flavors of cinnamon and brown sugar, making them an irresistible addition to your festive celebrations. Perfect for a cozy morning breakfast or a sweet afternoon snack, these rolls are made with a blend of gluten-free flours that provide the ideal texture without compromising on flavor.
The dairy-free ingredients guarantee that even those with lactose intolerance can indulge without worry. Whether you’re serving these rolls fresh from the oven or reheating them for a quick treat, they’re sure to be a hit at your holiday gatherings.
Ingredients for 4-6 servings:
- 2 cups gluten-free all-purpose flour
- 1/2 cup almond flour
- 1/4 cup coconut sugar
- 1 packet (2 1/4 teaspoons) instant yeast
- 1/2 teaspoon salt
- 1 teaspoon ground cinnamon
- 3/4 cup almond milk, warmed
- 1/4 cup coconut oil, melted
- 1 teaspoon vanilla extract
- 1/4 cup brown sugar
- 2 tablespoons ground cinnamon
- 1/4 cup raisins (optional)
- 1/4 cup chopped nuts (optional)
Instructions:
- Activate the Yeast: In a small mixing bowl, combine the warm almond milk and instant yeast. Stir gently and let the mixture sit for about 5 minutes until it becomes frothy. This indicates that the yeast is active.
- Prepare the Dough: In a large mixing bowl, combine the gluten-free all-purpose flour, almond flour, coconut sugar, salt, and 1 teaspoon of cinnamon. Mix well. Add the yeast mixture, melted coconut oil, and vanilla extract. Stir until a soft dough forms.
- Knead and Rise: Turn the dough out onto a floured surface and knead gently for about 5 minutes until smooth. Place the dough in a lightly oiled bowl, cover with a damp cloth, and let it rise in a warm place for about 1 hour, or until it doubles in size.
- Roll Out the Dough: Once risen, punch down the dough and roll it out on a floured surface into a rectangle about 1/4 inch thick.
- Add Filling: In a small bowl, mix the brown sugar and 2 tablespoons of ground cinnamon. Spread this mixture evenly over the rolled-out dough. Sprinkle raisins and nuts on top, if using.
- Shape the Rolls: Starting from the long side, carefully roll the dough into a log. Cut the log into 1-inch thick slices and place them in a greased baking dish, cut side up.
- Second Rise: Cover the rolls with a damp cloth and let them rise for another 30 minutes in a warm place.
- Bake: Preheat your oven to 350°F (175°C). Bake the rolls for 20-25 minutes, or until they’re golden brown and cooked through.
- Serve: Once baked, let the rolls cool slightly before serving. Enjoy them warm for the best taste.
Extra Tips:
For an extra touch of sweetness, you can drizzle a simple glaze made from powdered sugar and almond milk over the warm cinnamon rolls. If you prefer a more traditional taste, you can substitute the coconut sugar with granulated sugar in the dough.
Additionally, confirm your baking dish is well-greased to prevent the rolls from sticking, and always check your yeast’s expiration date to guarantee a good rise. Enjoy these rolls fresh or store them in an airtight container for up to two days, reheating them slightly before serving to revive their soft texture.
Hazelnut Chocolate Truffles
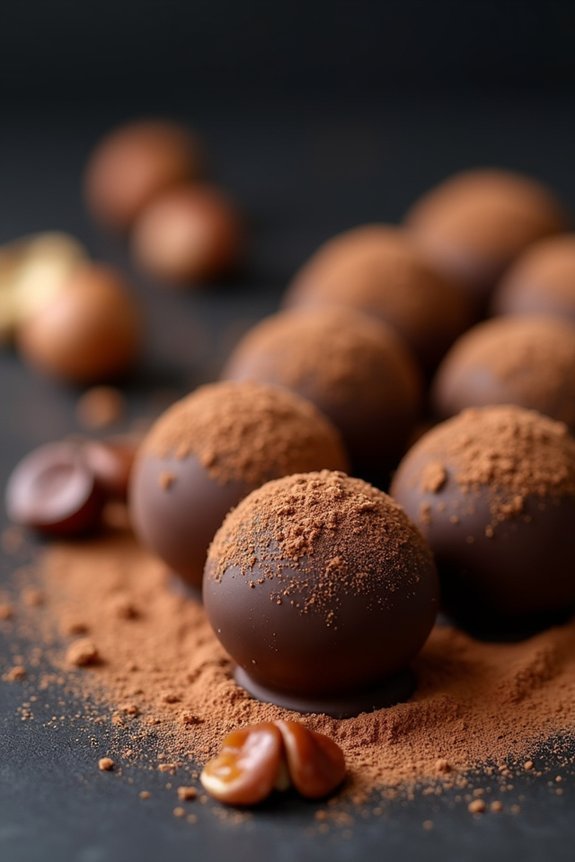
Hazelnut Chocolate Truffles are a delicious and indulgent treat, perfect for adding a touch of elegance to your dairy-free Christmas baking repertoire.
These rich and creamy truffles feature a delightful combination of roasted hazelnuts and smooth chocolate, offering a decadent experience without the use of dairy products. Whether you’re serving them at a holiday party or gifting them to loved ones, these truffles are bound to impress with their exquisite flavor and luxurious texture.
Made with simple ingredients and a straightforward process, these Hazelnut Chocolate Truffles are an excellent choice for anyone seeking a dairy-free dessert option. The roasted hazelnuts add a nutty depth, while the dark chocolate guarantees a rich, bold taste.
The truffles are rolled in cocoa powder to provide a classic finish, making them an elegant addition to any Christmas dessert table. Follow this recipe to create a batch of truffles that will delight both the eyes and the palate.
Ingredients for 4-6 servings:
- 200g dark chocolate (70% cocoa or higher), finely chopped
- 120ml full-fat coconut milk
- 1 tablespoon coconut oil
- 1 teaspoon vanilla extract
- 100g roasted hazelnuts, finely chopped
- 1/4 teaspoon sea salt
- Cocoa powder, for dusting
Cooking Instructions:
- Prepare the Chocolate Mixture:
- In a medium-sized heatproof bowl, combine the finely chopped dark chocolate and coconut oil. Set aside.
- Heat the Coconut Milk:
- In a small saucepan over medium heat, bring the coconut milk to a gentle simmer. Don’t let it boil.
- Combine and Melt:
- Pour the hot coconut milk over the chocolate and coconut oil mixture. Let it sit for 2-3 minutes, then stir until the chocolate is completely melted and the mixture is smooth.
- Add Flavorings:
- Stir in the vanilla extract, chopped roasted hazelnuts, and sea salt until well combined.
- Chill the Mixture:
- Cover the bowl with plastic wrap and refrigerate for at least 2 hours, or until the mixture is firm enough to scoop and shape.
- Form the Truffles:
- Using a small cookie scoop or a teaspoon, scoop out portions of the chocolate mixture and roll them into balls between your palms.
- Coat the Truffles:
- Roll each truffle in cocoa powder until fully coated. Shake off any excess cocoa powder and place the truffles on a lined baking sheet.
- Serve or Store:
- Serve immediately, or store the truffles in an airtight container in the refrigerator for up to one week.
Extra Tips:
For best results, use high-quality dark chocolate with a minimum of 70% cocoa to guarantee a smooth and rich flavor.
Be sure to finely chop the chocolate to help it melt evenly when combined with the hot coconut milk. If you prefer a sweeter truffle, you can add a tablespoon of maple syrup or agave nectar to the chocolate mixture before chilling.
Additionally, feel free to experiment with different coatings such as finely chopped nuts or shredded coconut for added texture and flavor.