

With the holiday season just around the corner, I’m thrilled to share some simple and delightful baking ideas with you all. Imagine your home filled with the comforting aroma of freshly baked cookies. For those new to baking, don’t fret; these 13 easy recipes are perfect for getting started. From classic sugar cookies to no-bake peppermint bark, we’ve got a little something for everyone. Let’s create sweet memories together, one delicious treat at a time.
Classic Sugar Cookies
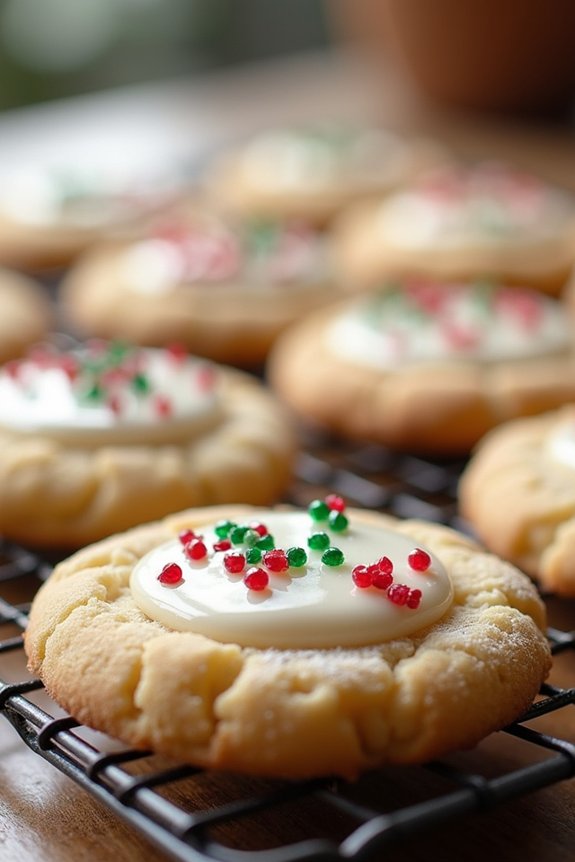
Christmas is the perfect time to indulge in some delightful baking, especially for beginners looking to create festive treats. One of the most cherished holiday treats is the classic sugar cookie. These cookies aren’t only simple to make but also provide a blank canvas for creative decoration. The buttery, crisp texture of sugar cookies makes them a favorite among both children and adults, and their versatility guarantees they can be adapted to suit any occasion or theme.
Whether you choose to decorate them with colorful icing, sprinkles, or simply enjoy them plain, classic sugar cookies are a must-have during the holiday season.
For those new to baking, this recipe for classic sugar cookies offers a straightforward approach with easy-to-follow steps. It’s designed to yield perfect results every time, assuring you end up with delicious cookies that are a delight to share with family and friends. The recipe below will make approximately 24 cookies, serving 4 to 6 people, and includes all the ingredients and instructions you need to get started.
Ingredients:
- 2 ¾ cups all-purpose flour
- 1 teaspoon baking soda
- ½ teaspoon baking powder
- 1 cup unsalted butter, softened
- 1 ½ cups granulated sugar
- 1 egg
- 1 teaspoon vanilla extract
- ½ teaspoon almond extract
- 3 to 4 tablespoons milk
- Optional: colored sugar or sprinkles for decorating
Instructions:
1. Preheat and Prepare Baking Sheets:
Preheat your oven to 375°F (190°C). Line two baking sheets with parchment paper to prevent the cookies from sticking.
2. Mix Dry Ingredients:
In a medium-sized bowl, whisk together the flour, baking soda, and baking powder until well combined. Set aside.
3. Cream Butter and Sugar:
In a large mixing bowl, cream the softened butter and granulated sugar together using an electric mixer on medium speed until the mixture is light and fluffy, about 2 to 3 minutes.
4. Add Wet Ingredients:
Beat in the egg, vanilla extract, and almond extract until fully incorporated into the butter mixture.
5. Combine Wet and Dry Mixtures:
Gradually add the dry ingredients to the wet ingredients, mixing on low speed. Add the milk one tablespoon at a time until the dough comes together and is smooth but not sticky.
6. Roll and Cut Dough:
On a lightly floured surface, roll out the dough to about ¼ inch thick. Use cookie cutters to cut out shapes and place them on the prepared baking sheets, leaving space between each cookie.
7. Bake:
Bake the cookies in the preheated oven for 8 to 10 minutes, or until the edges are lightly golden. Be careful not to overbake as sugar cookies can quickly become too hard.
8. Cool and Decorate:
Remove the cookies from the oven and allow them to cool on the baking sheets for a couple of minutes before transferring them to a wire rack to cool completely. Once cooled, decorate as desired.
Extra Tips:
For the best results, verify your butter is properly softened before you begin mixing. This will help achieve the ideal creamy texture in the dough.
If the dough becomes too warm or sticky while handling, place it in the refrigerator for about 15 minutes to firm up before rolling. Additionally, for a festive touch, consider using colored icing or edible glitter to decorate your cookies.
Simple Gingerbread Men

Gingerbread men are a classic festive treat that bring warmth and cheer to any holiday gathering. These delightful cookies aren’t only fun to bake but also perfect for beginners who are just getting started with Christmas baking. With their charming shapes and warm spices, gingerbread men are sure to become a family favorite during the holiday season. This simple recipe will guide you through the process of creating these iconic cookies, guaranteeing a delightful experience and delicious results.
The beauty of gingerbread men lies in their versatility; they can be decorated in countless ways to suit your personal style or the preferences of your loved ones. Whether you prefer them with a simple icing outline or adorned with a variety of candies, these cookies are as enjoyable to decorate as they’re to eat. Plus, the aroma of ginger, cinnamon, and cloves wafting through your kitchen is sure to evoke the cozy spirit of Christmas. This recipe yields enough cookies to serve 4-6 people, making it ideal for a small family gathering or a festive afternoon tea.
Ingredients for 4-6 Servings:
- 3 cups all-purpose flour
- 3/4 teaspoon baking soda
- 1 tablespoon ground ginger
- 1 tablespoon ground cinnamon
- 1/2 teaspoon ground cloves
- 1/2 teaspoon salt
- 1/4 teaspoon ground nutmeg
- 1/2 cup (1 stick) unsalted butter, softened
- 1/2 cup packed dark-brown sugar
- 1 large egg
- 1/2 cup unsulfured molasses
- 2 teaspoons vanilla extract
- Assorted candies and icing for decoration
Cooking Instructions:
- Prepare the Dry Ingredients: In a large bowl, whisk together the flour, baking soda, ginger, cinnamon, cloves, salt, and nutmeg. This guarantees that all the spices are evenly distributed throughout the dough, giving your gingerbread men a consistent flavor.
- Mix the Wet Ingredients: In a separate bowl, beat the softened butter and dark-brown sugar until smooth and creamy. Add the egg, molasses, and vanilla extract to the mixture and continue to beat until well combined and smooth.
- Combine the Mixtures: Gradually add the dry ingredients to the wet ingredients, mixing until a soft dough forms. It should be sticky yet firm enough to hold its shape. Divide the dough into two halves, flatten them into disks, wrap in plastic wrap, and refrigerate for at least 1 hour or until firm. This chilling process makes the dough easier to roll out and cut.
- Preheat and Roll: Preheat your oven to 350°F (175°C). On a lightly floured surface, roll out one disk of dough to about 1/4-inch thickness. Use gingerbread man cookie cutters to cut out shapes and place them on a baking sheet lined with parchment paper.
- Bake the Cookies: Bake the cookies for 8-10 minutes or until the edges are slightly browned. Remove them from the oven and let them cool on the baking sheet for a few minutes before transferring them to a wire rack to cool completely.
- Decorate: Once cooled, use icing and assorted candies to decorate your gingerbread men. Get creative with your designs and have fun with the process!
Extra Tips:
For the best results, make sure your butter is softened but not melted, as this will affect the texture of the dough. If the dough becomes too sticky to handle, dust it lightly with flour or return it to the fridge for a brief chill.
When rolling out the dough, try to maintain an even thickness to guarantee uniform baking. Finally, have fun with the decorations! Using different colors of icing and types of candies can make your gingerbread men more festive and personalized.
Festive Peppermint Bark
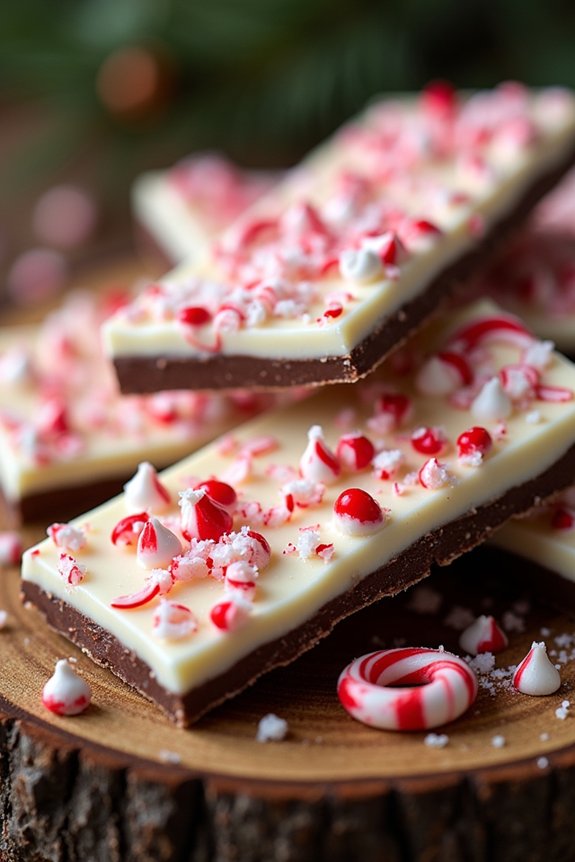
Peppermint bark is a classic holiday treat that’s simple to make and perfect for beginner bakers. This sweet and minty confection is a delightful combination of rich chocolate layers topped with crushed candy canes, creating a festive and colorful dessert that’s both pleasing to the eyes and the taste buds.
Making peppermint bark at home allows you to control the quality of ingredients and tailor the sweetness to your liking, making it an ideal homemade gift or a lovely addition to your holiday dessert spread.
This easy-to-follow recipe yields enough peppermint bark to satisfy a gathering of 4-6 people. With just a few ingredients and a little bit of time, you can create this delicious treat that embodies the spirit of the season. Whether it’s your first time in the kitchen or you’re looking for a quick holiday treat, this peppermint bark recipe will surely become a favorite.
Ingredients (for 4-6 people):
- 12 ounces of good-quality dark chocolate, chopped
- 12 ounces of good-quality white chocolate, chopped
- 1 teaspoon peppermint extract
- 8 candy canes, crushed
Instructions:
- Prepare Your Baking Sheet: Line a baking sheet with parchment paper or a silicone baking mat to prevent the bark from sticking and to make it easy to remove once it’s set.
- Melt the Dark Chocolate: In a microwave-safe bowl, melt the dark chocolate in 30-second intervals, stirring between each interval until smooth. Alternatively, use a double boiler over simmering water for a gentler melt.
- Spread the Dark Chocolate: Pour the melted dark chocolate onto the prepared baking sheet and use a spatula to spread it into an even layer, about 1/4-inch thick. Place the baking sheet in the refrigerator for about 20 minutes, or until the chocolate is firm.
- Melt the White Chocolate: While the dark chocolate is setting, melt the white chocolate in the same manner. Once melted, stir in the peppermint extract until well combined.
- Layer the White Chocolate: Remove the baking sheet from the refrigerator and pour the white chocolate over the hardened dark chocolate layer. Spread it evenly using a spatula.
- Add Crushed Candy Canes: Quickly sprinkle the crushed candy canes over the top of the white chocolate while it’s still soft, pressing lightly to confirm they adhere.
- Chill the Bark: Return the baking sheet to the refrigerator and let the bark chill for at least an hour, or until completely set.
- Break into Pieces: Once set, remove the peppermint bark from the refrigerator and break it into bite-sized pieces using your hands.
Extra Tips:
For the best results, use high-quality chocolate as it will greatly affect the taste and texture of your peppermint bark. Be careful not to overheat the chocolate, as this can cause it to seize and become unusable.
If your white chocolate isn’t quite as smooth as you’d like, adding a teaspoon of vegetable oil can help achieve a better consistency. Finally, store your peppermint bark in an airtight container in a cool place to maintain its freshness and crunch. Enjoy this festive treat with family and friends!
Easy Chocolate Crinkle Cookies
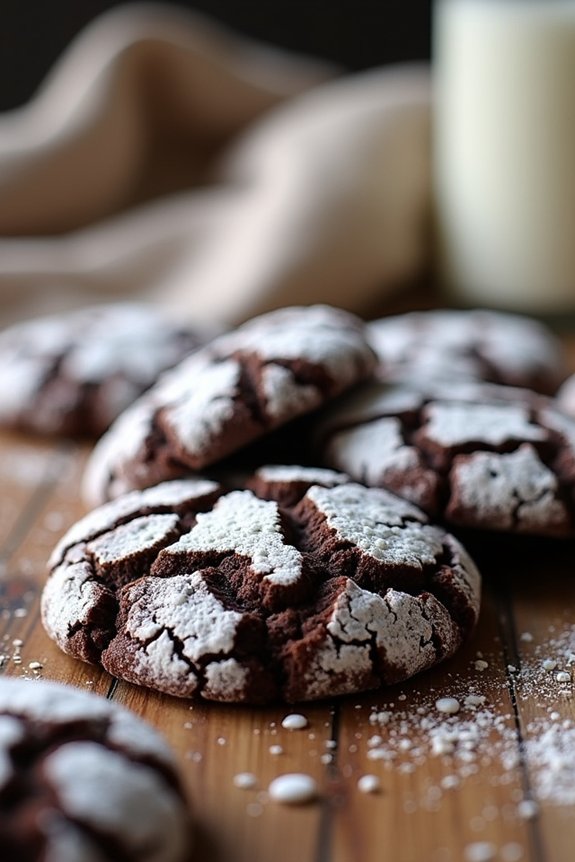
Chocolate Crinkle Cookies are a classic holiday treat that’s both delicious and visually appealing. These cookies are known for their soft and fudgy interior and a distinctive cracked appearance on the outside, created as they bake. Perfect for beginners, this recipe requires basic ingredients and straightforward steps, making it an ideal choice for those new to baking.
Whether you’re looking to create a delightful treat for your family or share a sweet gift with friends, these cookies will surely impress.
The beauty of this recipe lies in its simplicity. With just a few ingredients and a bit of time, you can create a batch of cookies that are sure to become a holiday favorite. The rich chocolate flavor, combined with a sugary coating, makes these cookies irresistible. This recipe yields approximately 24 to 30 cookies, which is perfect for serving 4-6 people, depending on how many cookies each person enjoys.
Ingredients:
- 1 cup unsweetened cocoa powder
- 2 cups granulated sugar
- 1/2 cup vegetable oil
- 4 large eggs
- 2 teaspoons vanilla extract
- 2 cups all-purpose flour
- 2 teaspoons baking powder
- 1/2 teaspoon salt
- 1 cup powdered sugar (for rolling)
Instructions:
- Prepare the Dough: In a large mixing bowl, combine the cocoa powder, granulated sugar, and vegetable oil. Mix until the mixture becomes homogenous and shiny. This creates a rich chocolate base for your cookies.
- Add the Eggs and Vanilla: Beat in the eggs one at a time, ensuring each egg is fully incorporated before adding the next. Stir in the vanilla extract, which will enhance the flavor of the chocolate.
- Mix Dry Ingredients: In a separate bowl, whisk together the flour, baking powder, and salt. This helps to evenly distribute the dry ingredients and eliminates clumps.
- Combine Ingredients: Gradually add the dry ingredients to the wet mixture, stirring until a sticky dough forms. Be careful not to overmix, as this can affect the texture of your cookies.
- Chill the Dough: Cover the dough with plastic wrap and refrigerate for at least 4 hours, or overnight. This step is essential, as it makes the dough easier to handle and helps achieve the signature crinkle effect.
- Preheat the Oven: Once your dough has chilled, preheat your oven to 350°F (175°C). Line two baking sheets with parchment paper.
- Form the Cookies: Scoop tablespoon-sized portions of dough and roll them into balls using your hands. Then, roll each ball in powdered sugar until fully coated. The generous coating of powdered sugar will create the striking crinkle appearance as the cookies bake.
- Bake the Cookies: Place the dough balls on the prepared baking sheets, spacing them about 2 inches apart. Bake in the preheated oven for 10-12 minutes. The cookies should be set around the edges but still soft in the center.
- Cool and Serve: Allow the cookies to cool on the baking sheet for about 5 minutes before transferring them to a wire rack to cool completely. Enjoy them warm or at room temperature.
Extra Tips:
For the best crinkle effect, make sure the dough is thoroughly chilled before baking. If you find the dough too sticky to handle, try dusting your hands with a bit of powdered sugar before rolling the dough into balls.
Additionally, you may experiment by adding a pinch of cinnamon or espresso powder for a unique twist to the traditional flavor. Remember, the key to perfect crinkle cookies isn’t to overbake them; they should be slightly underbaked for a fudgy texture.
Enjoy your baking and happy holidays!
Quick Shortbread Cookies
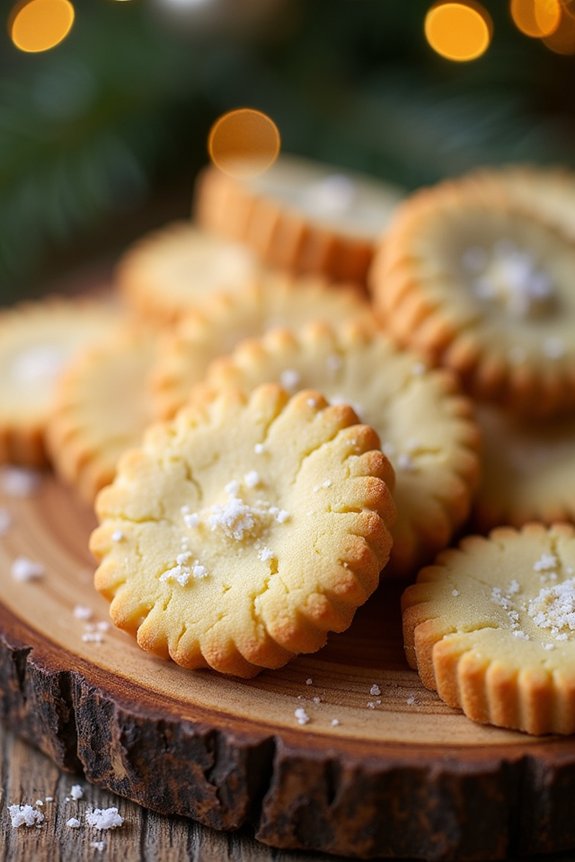
Shortbread cookies are a timeless classic, and their buttery richness makes them a perfect treat for the holiday season. If you’re new to baking, these Quick Shortbread Cookies are an excellent starting point. With only a few simple ingredients, you’ll be able to create a delightful dessert that will impress your family and friends. Their crumbly texture and melt-in-your-mouth flavor are sure to make them a favorite at your holiday gatherings.
The beauty of this recipe lies in its simplicity and speed. You can whip up a batch of these cookies in under an hour, making them an ideal option for beginners who want to add a homemade touch to their Christmas festivities. Whether you enjoy them plain or with a sprinkle of sugar on top, these cookies are versatile enough to suit any palate.
Let’s explore the ingredients and steps needed to make these delicious treats.
Ingredients (Serves 4-6):
- 1 cup (2 sticks) unsalted butter, softened
- 1/2 cup granulated sugar
- 1 teaspoon vanilla extract
- 2 cups all-purpose flour
- 1/4 teaspoon salt
- Optional: sugar for sprinkling
Cooking Instructions:
- Preheat the Oven: Start by preheating your oven to 325°F (165°C). This guarantees that your cookies will bake evenly once they’re prepared.
- Cream the Butter and Sugar: In a large mixing bowl, use an electric mixer to cream together the softened butter and granulated sugar until the mixture is light and fluffy. This should take about 2-3 minutes.
- Add Vanilla: Mix in the vanilla extract until fully incorporated. This will add a subtle flavor to your cookies.
- Combine Dry Ingredients: In a separate bowl, whisk together the all-purpose flour and salt. Gradually add this dry mixture to the wet ingredients, mixing on low speed until a dough forms.
- Form the Cookies: Roll the dough into a log shape and wrap it in plastic wrap, then refrigerate for about 15-20 minutes to firm up slightly. Once chilled, slice the dough into 1/4-inch thick rounds.
- Bake the Cookies: Place the sliced dough rounds onto a baking sheet lined with parchment paper, spacing them about 1 inch apart. Sprinkle the tops with a little extra sugar if desired. Bake in the preheated oven for 15-18 minutes or until the edges are a light golden color.
- Cool and Serve: Allow the cookies to cool on the baking sheet for a few minutes before transferring them to a wire rack to cool completely. Enjoy your Quick Shortbread Cookies with a warm beverage or as a sweet treat on their own.
Extra Tips:
For the best results, make sure your butter is softened to room temperature before you begin mixing. This helps in achieving the right consistency for the dough.
If you wish to customize your cookies, consider adding a teaspoon of lemon zest or a handful of mini chocolate chips to the dough. Additionally, be mindful not to overbake the cookies; they should be a pleasant pale shade to maintain their tender texture.
Enjoy experimenting with these delightful treats and making them part of your yearly Christmas baking tradition!
Holiday Rice Krispie Treats
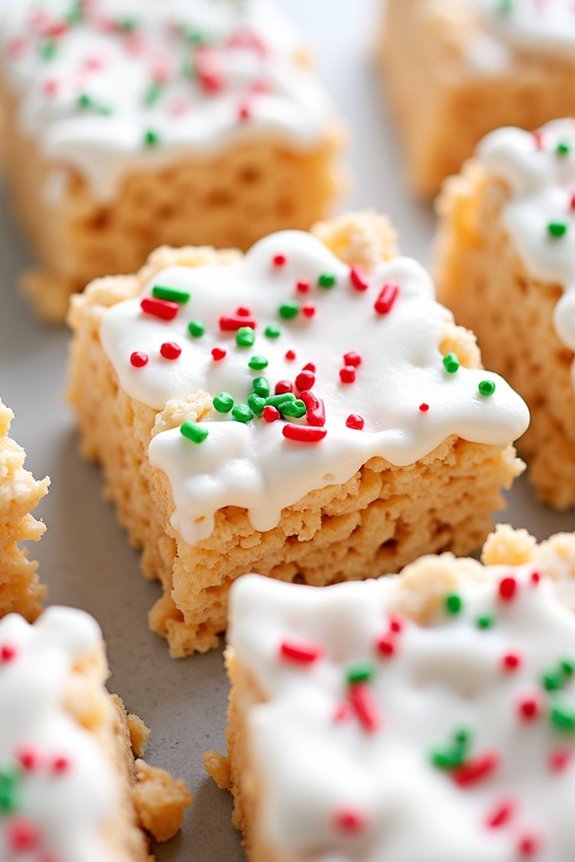
Holiday Rice Krispie Treats are a festive twist on the classic treat that has been loved by many for generations. Perfect for beginners, these no-bake goodies are quick and easy to whip up, making them an ideal choice for holiday gatherings or cozy family nights.
With the addition of holiday-colored sprinkles, these treats transform into a visually delightful dessert that captures the spirit of the season. Whether you’re hosting a Christmas party or simply looking to create some joyous kitchen memories with your family, Holiday Rice Krispie Treats are bound to please both adults and children alike.
The marshmallowy goodness combined with the satisfying crunch of Rice Krispies makes for a delightful texture that everyone will enjoy. Plus, this recipe is easy to customize with your favorite holiday-themed toppings.
Ingredients for 4-6 people:
- 6 cups Rice Krispies cereal
- 1 package (10 oz) mini marshmallows
- 3 tablespoons unsalted butter
- 1 teaspoon vanilla extract
- 1/2 cup red and green sprinkles
- Nonstick cooking spray or butter for the pan
Instructions:
- Prepare the Pan: Begin by lightly greasing a 9×13-inch baking pan with nonstick cooking spray or butter. This will guarantee that the Rice Krispie treats don’t stick to the pan.
- Melt the Butter: In a large saucepan, melt the unsalted butter over low heat. Stir the butter occasionally to prevent it from burning.
- Add Marshmallows: Once the butter is fully melted, add the mini marshmallows to the saucepan. Keep stirring continuously until the marshmallows have completely melted and blended with the butter, creating a smooth mixture.
- Incorporate Vanilla: Remove the saucepan from heat and quickly stir in the vanilla extract. This will add a lovely flavor to your treats.
- Mix in Rice Krispies: Gradually add the Rice Krispies cereal to the melted marshmallow mixture. Stir gently until all the cereal is coated with the marshmallow mixture.
- Add Sprinkles: Once the cereal is well-coated, fold in the red and green sprinkles, distributing them evenly throughout the mixture for a festive touch.
- Transfer to Pan: Pour the mixture into the prepared baking pan. Using a buttered spatula or wax paper, press the mixture evenly into the pan to form an even layer. Be careful not to press too hard, as this can make the treats too dense.
- Cool and Set: Allow the Rice Krispie treats to cool at room temperature for about 30 minutes, or until they’re set enough to cut into squares.
- Cut and Serve: Once cooled, cut the treats into squares and serve. Enjoy your festive creation!
Extra Tips:
For even more holiday flair, try drizzling melted white chocolate over the top of the treats before adding sprinkles.
You can also experiment with different types of sprinkles and add-ins, such as mini chocolate chips or crushed peppermint candies, to create a unique holiday treat tailored to your taste.
Remember to store any leftovers in an airtight container at room temperature to keep them fresh and chewy.
No-Bake Peanut Butter Balls
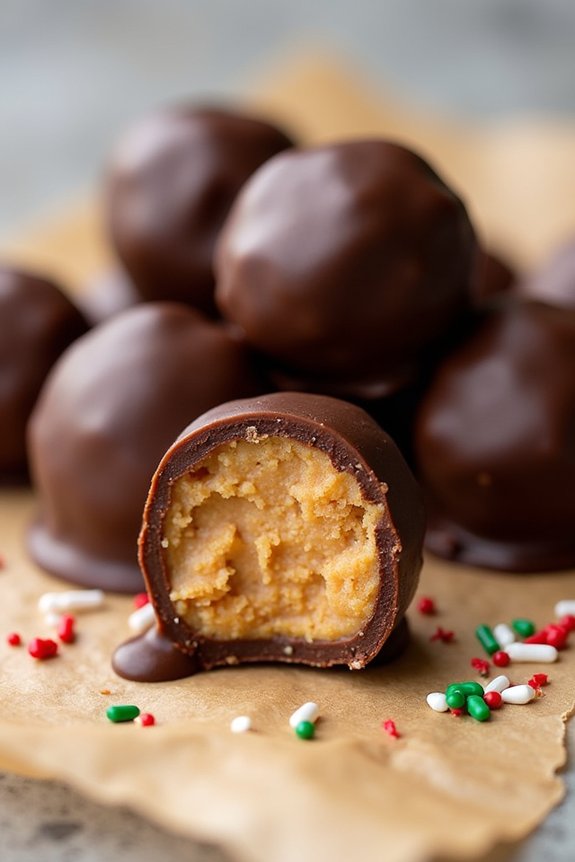
No-Bake Peanut Butter Balls are a delicious treat that’s perfect for the holiday season. These delightful snacks require no baking, making them an ideal choice for beginners looking to impress without the stress of complicated baking techniques.
With a rich peanut butter core encased in a smooth chocolate coating, these bite-sized delights are sure to be a hit at any Christmas gathering. Not only are they simple to make, but they also require minimal ingredients, making them both budget-friendly and easy to prepare at the last minute.
The combination of creamy peanut butter and chocolate is a classic that never fails to delight. This recipe is designed for a serving size of 4-6 people, ensuring you have enough to share without overwhelming your kitchen. The ingredients are straightforward, and the steps are easy to follow, making this an accessible recipe for anyone looking to add a homemade touch to their holiday festivities.
So gather your supplies, roll up your sleeves, and get ready to create a batch of these irresistible No-Bake Peanut Butter Balls.
Ingredients for 4-6 servings:
- 1 cup creamy peanut butter
- 1/2 cup unsalted butter, softened
- 2 cups powdered sugar
- 1 teaspoon vanilla extract
- 1/2 teaspoon salt
- 2 cups semi-sweet chocolate chips
- 1 tablespoon vegetable oil
Instructions:
- Prepare the Peanut Butter Mixture: In a large mixing bowl, combine the creamy peanut butter and softened unsalted butter. Mix until smooth and well combined. Add the powdered sugar, vanilla extract, and salt. Stir until the mixture forms a firm dough that holds together well. If the mixture is too sticky, you can add a little more powdered sugar.
- Shape the Balls: Using your hands or a small cookie scoop, form the peanut butter mixture into small balls, about 1 inch in diameter. Place them on a baking sheet lined with parchment paper. Once all the balls are formed, refrigerate them for at least 30 minutes to firm up.
- Melt the Chocolate: While the peanut butter balls are chilling, melt the chocolate chips. Place the chocolate chips and vegetable oil in a microwave-safe bowl. Microwave in 30-second intervals, stirring between each interval, until the chocolate is completely melted and smooth.
- Coat the Peanut Butter Balls: Remove the chilled peanut butter balls from the refrigerator. Using a fork or a toothpick, dip each ball into the melted chocolate, ensuring it’s fully coated. Let any excess chocolate drip off before placing the balls back onto the parchment-lined baking sheet.
- Set the Chocolate Coating: Once all the balls are coated, return them to the refrigerator to allow the chocolate to set completely. This should take about 15-20 minutes.
- Serve and Enjoy: Once the chocolate has hardened, your No-Bake Peanut Butter Balls are ready to serve. Arrange them on a festive plate and enjoy!
Extra Tips:
For a smoother texture, make sure that your peanut butter is at room temperature before mixing. If you prefer a bit of crunch, consider using crunchy peanut butter instead of creamy.
Additionally, you can customize these treats by drizzling white chocolate over the top or sprinkling them with festive holiday sprinkles before the chocolate sets. Store any leftovers in an airtight container in the refrigerator to keep them fresh for several days.
Mini Christmas Cupcakes

Mini Christmas Cupcakes are a delightful treat that can bring festive cheer to any gathering. Perfect for beginners, these cupcakes are easy to make and offer a fun opportunity to get creative with holiday-themed decorations. With their small size, they’re ideal for serving at parties or as part of a holiday dessert platter. The rich flavor of the cupcake combined with the creamy frosting is sure to be a hit with both kids and adults alike.
This recipe yields a batch of 24 mini cupcakes, making it suitable for a serving size of 4-6 people, depending on how many cupcakes each person enjoys. The cupcakes are made from scratch, allowing you to infuse them with the classic holiday flavors of vanilla and a hint of cinnamon. The frosting can be customized with a variety of colors and decorations, letting you tailor the look of your cupcakes to suit your holiday theme.
Ingredients (serving size for 4-6 people):
- 1 cup all-purpose flour
- 1/2 cup granulated sugar
- 1/4 cup unsalted butter, softened
- 1/2 cup milk
- 1 large egg
- 1 teaspoon vanilla extract
- 1 teaspoon baking powder
- 1/4 teaspoon salt
- 1/4 teaspoon ground cinnamon
- 1 cup powdered sugar
- 1/4 cup unsalted butter, softened (for frosting)
- 2 tablespoons milk (for frosting)
- Food coloring (optional)
- Sprinkles (optional)
Cooking Instructions:
- Preheat the Oven: Preheat your oven to 350°F (175°C). Line a mini cupcake pan with mini cupcake liners.
- Prepare the Batter: In a mixing bowl, cream together 1/4 cup of softened unsalted butter and 1/2 cup of granulated sugar until light and fluffy. Add the egg and vanilla extract, and continue to beat until well combined.
- Mix Dry Ingredients: In a separate bowl, sift together the flour, baking powder, salt, and ground cinnamon. Gradually add this dry mixture to the creamed butter mixture, alternating with the milk. Mix until just combined and smooth.
- Fill the Cupcake Liners: Carefully spoon the batter into the prepared cupcake liners, filling each about 2/3 full to allow room for rising.
- Bake the Cupcakes: Place the pan in the preheated oven and bake for 12-15 minutes, or until a toothpick inserted into the center of a cupcake comes out clean. Remove from the oven and allow them to cool in the pan for a few minutes before transferring to a wire rack to cool completely.
- Prepare the Frosting: While the cupcakes are cooling, prepare the frosting. In a bowl, beat together 1/4 cup of softened unsalted butter and 1 cup of powdered sugar until smooth. Gradually add 2 tablespoons of milk and continue to beat until the frosting is light and fluffy. If desired, add food coloring to achieve your preferred festive color.
- Decorate the Cupcakes: Once the cupcakes are completely cooled, use a piping bag or a knife to frost each cupcake. Sprinkle with holiday-themed sprinkles or any other decorations of your choice.
Extra Tips:
For best results, make sure all ingredients are at room temperature before you begin, as this helps them blend more smoothly. When adding food coloring to the frosting, start with a small amount and gradually add more to achieve the desired shade.
If you’re using sprinkles, add them immediately after frosting each cupcake to ensure they stick well. Additionally, feel free to experiment with different extracts or spices in the batter to create your own unique holiday flavor profile.
Soft Snickerdoodle Cookies
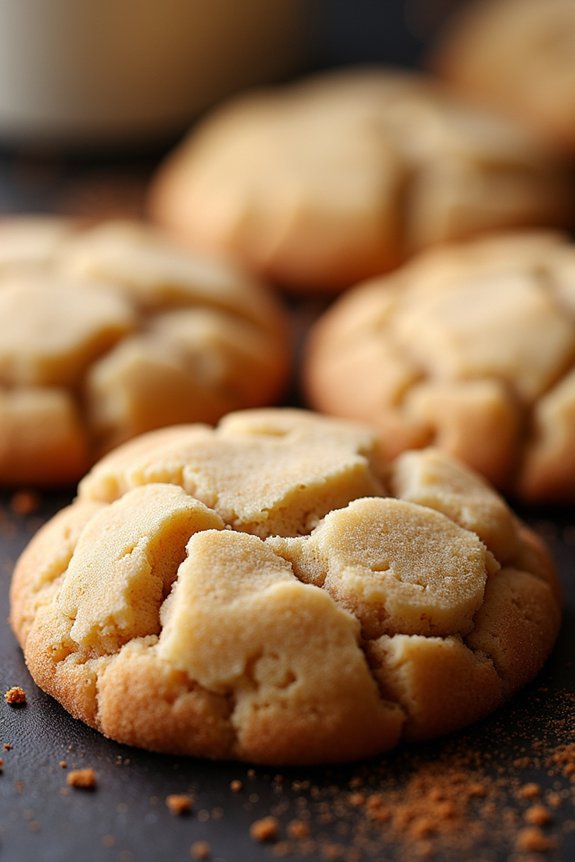
If you’re a beginner looking to try your hand at Christmas baking, Soft Snickerdoodle Cookies are a delightful choice. These cookies are a holiday classic, known for their chewy texture and warm cinnamon-sugar flavor. They’re relatively easy to make and require simple ingredients that you probably already have in your kitchen. Snickerdoodles are perfect for cookie exchanges, holiday parties, or simply enjoying with a cup of hot cocoa while you cozy up by the fire.
The magic of Snickerdoodles lies in their soft, pillowy centers and the slightly crisp edges that come from rolling the dough balls in a mixture of cinnamon and sugar before baking. Unlike regular sugar cookies, Snickerdoodles have a subtle tang from the cream of tartar, which is a key ingredient that gives these cookies their signature texture. This recipe will guide you through the process of making Soft Snickerdoodle Cookies for a serving size of 4-6 people, guaranteeing you have plenty to share with family and friends.
Ingredients:
- 1 cup unsalted butter, softened
- 1 1/2 cups granulated sugar
- 2 large eggs
- 2 3/4 cups all-purpose flour
- 2 teaspoons cream of tartar
- 1 teaspoon baking soda
- 1/4 teaspoon salt
- 1/4 cup granulated sugar (for rolling)
- 2 teaspoons ground cinnamon (for rolling)
Cooking Instructions:
- Preheat the Oven: Preheat your oven to 375°F (190°C). Line two baking sheets with parchment paper or silicone baking mats to guarantee the cookies bake evenly and don’t stick.
- Mix the Wet Ingredients: In a large mixing bowl, cream together the softened butter and 1 1/2 cups of granulated sugar until the mixture is light and fluffy. This should take about 3-4 minutes using an electric mixer. Add the eggs one at a time, mixing well after each addition until fully incorporated.
- Combine Dry Ingredients: In a separate bowl, whisk together the all-purpose flour, cream of tartar, baking soda, and salt. Make sure the dry ingredients are well combined to guarantee even distribution in the dough.
- Form the Dough: Gradually add the dry ingredients to the wet ingredients, mixing on low speed until just combined. Be careful not to overmix, as this can lead to tough cookies.
- Prepare Cinnamon-Sugar Coating: In a small bowl, mix 1/4 cup of granulated sugar with 2 teaspoons of ground cinnamon. Roll a tablespoon of dough into a ball and then roll it in the cinnamon-sugar mixture to coat it completely. Place the coated dough balls onto the prepared baking sheets, about 2 inches apart to allow room for spreading.
- Bake the Cookies: Bake in the preheated oven for 9-11 minutes, or until the edges are set and the tops have a slight crackle. The cookies will appear a bit underbaked when you remove them from the oven, which is perfect for achieving a soft texture.
- Cool the Cookies: Allow the cookies to cool on the baking sheets for about 5 minutes before transferring them to a wire rack to cool completely. This helps them set without becoming too firm.
Extra Tips:
To guarantee your Snickerdoodle Cookies remain soft, store them in an airtight container at room temperature. If you prefer a slightly chewier texture, you can reduce the cream of tartar by half, but remember this will change the classic flavor slightly.
For an extra festive touch, consider adding a pinch of nutmeg to the cinnamon-sugar mixture. If you’re preparing the dough in advance, you can refrigerate it for up to 24 hours before baking, which can enhance the flavor and make rolling the dough into balls a breeze. Enjoy your holiday baking adventure!
Basic Chocolate Fudge
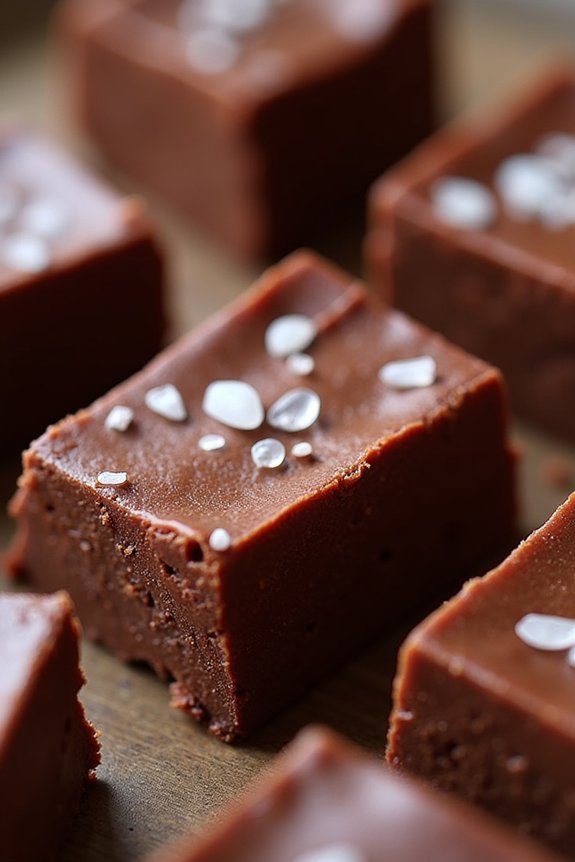
There’s nothing quite like the classic sweetness of Basic Chocolate Fudge during the holiday season. This rich and decadent treat is perfect for both gifting and enjoying with family and friends. Its simple preparation makes it an ideal recipe for beginners who are just starting to explore the world of Christmas baking.
With just a few ingredients, you can create a smooth and creamy fudge that will be the highlight of any dessert table. Chocolate fudge is a wonderful choice for a beginner’s baking project because it requires no baking and only a few basic steps. The key to this recipe is achieving the perfect balance of sweetness and creaminess, which is accomplished by carefully combining the right ingredients.
This recipe yields enough fudge to serve 4-6 people, making it perfect for a cozy holiday gathering.
Ingredients (serving size: 4-6 people):
- 2 cups of semi-sweet chocolate chips
- 1 can (14 ounces) of sweetened condensed milk
- 1/4 cup of unsalted butter
- 1 teaspoon of vanilla extract
- A pinch of salt
Cooking Instructions:
- Prepare the Pan: Line an 8×8-inch square baking pan with parchment paper or aluminum foil, allowing some extra to hang over the sides for easy lifting. This will help you remove the fudge easily once it has set.
- Melt the Ingredients: In a medium saucepan, combine the semi-sweet chocolate chips, sweetened condensed milk, and butter. Stir continuously over low heat until the chocolate chips and butter have completely melted and the mixture is smooth. Be careful not to let the mixture boil, as this can cause the fudge to become grainy.
- Add Flavoring: Remove the saucepan from the heat and stir in the vanilla extract and a pinch of salt. Mix until everything is well combined.
- Pour and Spread: Pour the chocolate mixture into the prepared baking pan. Use a spatula to spread the fudge evenly across the pan, making sure it reaches all corners.
- Chill the Fudge: Place the pan in the refrigerator and allow the fudge to chill for at least 2 hours or until it’s firm to the touch.
- Cut and Serve: Once the fudge has set, use the overhanging parchment paper or foil to lift it out of the pan. Cut the fudge into small squares for serving.
Extra Tips:
To guarantee the best texture, always use semi-sweet chocolate chips, as they offer the perfect balance of cocoa and sweetness. If you’d like to add a personal touch to your fudge, consider stirring in chopped nuts, mini marshmallows, or a sprinkle of sea salt before chilling.
For cleaner cuts, use a sharp knife and wipe it clean between cuts. Store any leftovers in an airtight container in the refrigerator for up to two weeks. Enjoy your homemade Basic Chocolate Fudge as a delightful holiday treat!
Cinnamon Sugar Pretzels
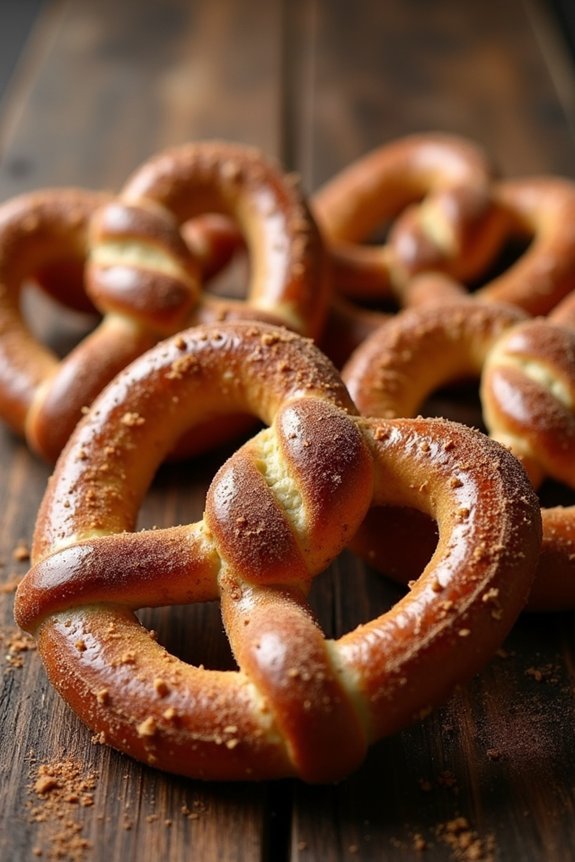
Cinnamon Sugar Pretzels are a delightful treat that can add a touch of sweetness and warmth to your Christmas baking repertoire. Perfect for beginners, these pretzels combine the classic salty crunch with a sugary cinnamon twist, making them an irresistible snack for the holiday season.
Whether you’re planning a cozy night in or hosting a festive gathering, these cinnamon sugar pretzels will surely impress your family and friends with their delicious flavor and inviting aroma.
The process of making these pretzels is straightforward and enjoyable, making it an excellent baking project for those looking to expand their culinary skills. The key is to strike the perfect balance between the soft, doughy interior and the crispy, cinnamon-coated exterior.
By following this simple recipe, you’ll be able to whip up a batch of these scrumptious pretzels in no time, guaranteeing that everyone gets to enjoy a taste of homemade holiday magic.
Ingredients (serving size: 4-6 people):
- 1 ½ cups warm water (110°F)
- 1 packet (2 ¼ teaspoons) active dry yeast
- 1 tablespoon granulated sugar
- 4 cups all-purpose flour
- 1 teaspoon salt
- ½ cup baking soda
- 10 cups water
- 6 tablespoons unsalted butter, melted
- ½ cup granulated sugar
- 2 teaspoons ground cinnamon
Cooking Instructions:
1. Activate the Yeast: In a large mixing bowl, combine the warm water and 1 tablespoon of granulated sugar. Sprinkle the yeast over the water, stir gently, and let it sit for about 5 minutes until it becomes frothy.
2. Prepare the Dough: Add the flour and salt to the yeast mixture. Mix until a dough begins to form. Knead the dough on a floured surface for about 5-7 minutes until it’s smooth and elastic.
Place the dough in a lightly oiled bowl, cover with a clean kitchen towel, and let it rise in a warm place for about 1 hour or until it doubles in size.
3. Shape the Pretzels: Preheat your oven to 450°F (230°C). Punch down the risen dough and divide it into 12 equal pieces. Roll each piece into a long rope and twist into a pretzel shape.
4. Prepare Baking Soda Bath: In a large pot, bring 10 cups of water to a boil. Add the baking soda carefully and stir to dissolve.
5. Boil the Pretzels: Gently place each pretzel into the boiling water for about 30 seconds. Remove with a slotted spoon and place on a baking sheet lined with parchment paper.
6. Bake the Pretzels: Brush each pretzel with melted butter and sprinkle generously with the cinnamon-sugar mixture made by combining the ½ cup of sugar and 2 teaspoons of cinnamon. Bake in the preheated oven for about 12-14 minutes or until golden brown.
7. Cool and Serve: Allow the pretzels to cool slightly on a wire rack before serving. Enjoy them warm for the best taste.
Extra Tips:
To guarantee your cinnamon sugar pretzels have the perfect texture, be mindful of the water temperature when activating the yeast; it should be warm, not hot, to avoid killing the yeast.
When shaping the pretzels, try to make the ropes of even thickness to ensure even baking. Don’t skip the baking soda bath as it gives the pretzels their characteristic chewy texture and golden-brown color.
Finally, feel free to adjust the cinnamon and sugar levels according to your taste preferences for a more personalized touch.
Lemon Glazed Pound Cake

Lemon Glazed Pound Cake is a delightful sweet treat that’s perfect for those new to holiday baking. With its moist, buttery crumb and invigorating lemon glaze, this pound cake is sure to impress family and friends alike. The recipe is straightforward, making it an excellent choice for beginners. It’s ideal for serving as a dessert or as a delightful accompaniment to your afternoon tea. The fresh lemon glaze adds a burst of citrus flavor, making each bite a blend of sweetness and tanginess.
This recipe serves 4-6 people, making it perfect for a small holiday gathering. With simple ingredients that you likely already have in your pantry, this Lemon Glazed Pound Cake can be whipped up in no time. The key to achieving the perfect texture is to verify all your ingredients are at room temperature before you begin mixing. Follow the detailed steps below, and you’ll have a delicious cake ready to enjoy in just a couple of hours.
Ingredients:
- 1 cup unsalted butter, softened
- 1 1/2 cups granulated sugar
- 4 large eggs, at room temperature
- 1 teaspoon vanilla extract
- 2 tablespoons lemon zest
- 3 cups all-purpose flour
- 1 teaspoon baking powder
- 1/2 teaspoon salt
- 1/2 cup whole milk, room temperature
- 1/2 cup freshly squeezed lemon juice
For the Glaze:
- 1 cup powdered sugar
- 2-3 tablespoons freshly squeezed lemon juice
Cooking Instructions:
- Preheat and Prepare the Pan: Preheat your oven to 350°F (175°C). Grease and flour a 9×5 inch loaf pan, or line it with parchment paper for easy removal of the cake.
- Cream Butter and Sugar: In a large mixing bowl, cream the softened butter and granulated sugar together using an electric mixer on medium speed until light and fluffy, about 3-4 minutes.
- Add Eggs and Flavoring: Beat in the eggs one at a time, verifying each is fully incorporated before adding the next. Mix in the vanilla extract and lemon zest until well combined.
- Combine Dry Ingredients: In a separate bowl, whisk together the flour, baking powder, and salt.
- Mix Wet and Dry Ingredients: Gradually add the dry ingredients to the creamed mixture, alternating with the milk and lemon juice. Begin and end with the flour mixture. Mix on low speed just until combined, being careful not to overmix.
- Bake the Cake: Pour the batter into the prepared loaf pan, smoothing the top with a spatula. Bake in the preheated oven for 55-65 minutes, or until a toothpick inserted into the center comes out clean.
- Cool the Cake: Allow the cake to cool in the pan for about 10 minutes, then remove it from the pan and transfer it to a wire rack to cool completely.
- Prepare the Glaze: Once the cake is cool, prepare the glaze by whisking together powdered sugar and lemon juice in a small bowl until smooth.
- Glaze the Cake: Drizzle the lemon glaze over the cooled cake, allowing it to drip down the sides. Let the glaze set for a few minutes before slicing and serving.
Extra Tips:
To make sure your Lemon Glazed Pound Cake turns out perfectly, make sure to measure your ingredients accurately. Using room temperature ingredients helps them blend more smoothly, resulting in a better texture.
If possible, use fresh lemons for both the zest and juice, as they provide a more vibrant flavor compared to bottled lemon juice. Be cautious not to overmix the batter once the flour is added, as this can result in a dense cake.
Finally, if you find the glaze too thick, you can add a little more lemon juice to reach your desired consistency. Enjoy your delightful Lemon Glazed Pound Cake!
Cranberry Orange Muffins

Cranberry Orange Muffins are a festive and delightful treat perfect for the holiday season. These muffins combine the tartness of fresh cranberries with the bright, citrusy flavor of oranges, making them a revitalizing addition to your Christmas baking repertoire. Ideal for beginners, this recipe is straightforward and easy to follow, guaranteeing that you can whip up a batch of these delicious muffins in no time.
Whether you’re serving them for breakfast, a snack, or a holiday brunch, these muffins are sure to impress your family and friends. The combination of cranberries and orange zest in this recipe not only adds a burst of flavor but also provides a beautiful contrast of colors. The muffins are moist, tender, and topped with a light sugar glaze that gives them a subtle sweetness.
They’re best enjoyed fresh out of the oven, with a cup of coffee or hot cocoa. This recipe makes about 12 muffins, which is perfect for serving 4-6 people, depending on how many each person enjoys.
Ingredients (for 4-6 people):
- 2 cups all-purpose flour
- 1 cup granulated sugar
- 1 tablespoon baking powder
- 1/2 teaspoon salt
- 1/2 cup unsalted butter, melted and cooled
- 2 large eggs
- 1/2 cup milk
- 1/2 cup fresh orange juice
- 1 tablespoon orange zest
- 1 cup fresh cranberries, coarsely chopped
- 1/4 cup powdered sugar (for glaze)
- 1 tablespoon orange juice (for glaze)
Cooking Instructions:
- Preheat the Oven: Begin by preheating your oven to 375°F (190°C). Line a 12-cup muffin tin with paper liners or lightly grease the cups to prevent sticking.
- Mix Dry Ingredients: In a large mixing bowl, whisk together the all-purpose flour, granulated sugar, baking powder, and salt until well combined. Set aside.
- Prepare Wet Ingredients: In a separate bowl, whisk together the melted butter, eggs, milk, orange juice, and orange zest until smooth.
- Combine Ingredients: Pour the wet ingredients into the dry ingredients, and gently fold the mixture until just combined. Be careful not to overmix, as this can make the muffins tough.
- Add Cranberries: Gently fold in the chopped cranberries until evenly distributed throughout the batter.
- Fill Muffin Cups: Divide the batter evenly among the prepared muffin cups, filling each about 3/4 full.
- Bake the Muffins: Place the muffin tin in the preheated oven and bake for 18-20 minutes, or until a toothpick inserted into the center of a muffin comes out clean.
- Cool and Glaze: Allow the muffins to cool in the tin for about 5 minutes, then transfer them to a wire rack to cool completely. While they cool, mix the powdered sugar and orange juice to make the glaze. Drizzle the glaze over the cooled muffins.
Extra Tips:
For a more intense orange flavor, consider using freshly squeezed orange juice and freshly grated orange zest. If you prefer a sweeter muffin, you can increase the sugar in the batter slightly.
Additionally, if fresh cranberries aren’t available, frozen cranberries can be used; just confirm they’re thoroughly thawed and drained before adding to the batter. Finally, to enhance the presentation, you can sprinkle a little extra orange zest on top of the glaze for a pop of color and flavor.