

When the holiday season is bustling, every minute counts more than ever. I adore having a collection of quick and delightful Christmas baking recipes on hand. Whipping up classic sugar cookies for decorating or rich chocolate crinkle cookies with their signature tops can be done in just 30 minutes. These festive treats will satisfy your sweet cravings without keeping you busy all day. Ready to explore some delicious options?
Classic Sugar Cookies
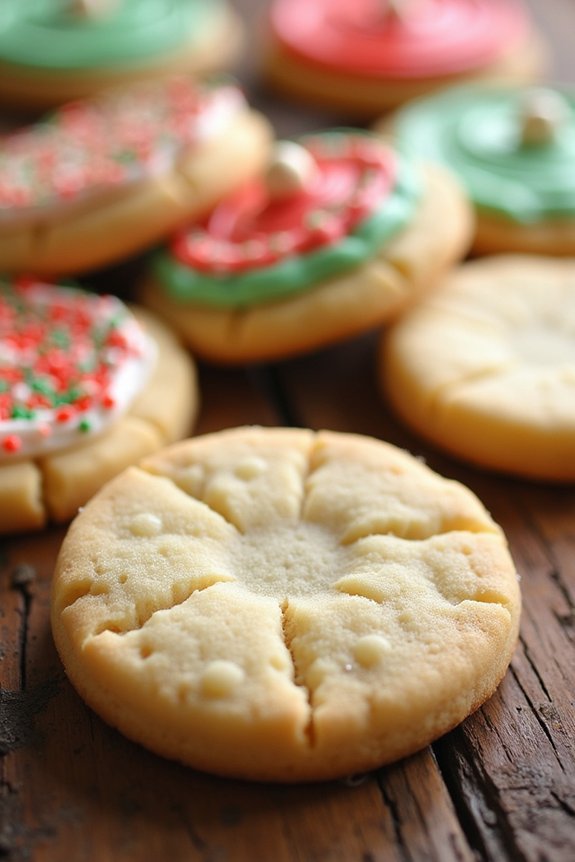
Classic Sugar Cookies are a staple during the holiday season, perfect for both decorating and enjoying plain. These delightful cookies are known for their soft, buttery texture and sweet vanilla flavor that melts in your mouth. The simplicity of the ingredients allows for a versatile base that can be customized with various toppings or icing designs to suit your festive mood.
Whether you’re baking with family or preparing a batch for a holiday party, these cookies are bound to bring joy and warmth to your Christmas celebrations.
Creating the perfect sugar cookie involves finding the right balance of ingredients and taking care to follow each step precisely. With a recipe that serves 4-6 people, you can expect to yield around two dozen cookies, depending on the size of your cookie cutters. This recipe is perfect for those looking to add a classic holiday treat to their table, with easy-to-follow instructions that guarantee success even for novice bakers.
Gather your ingredients, preheat your oven, and let’s get started on making these delightful Classic Sugar Cookies.
Ingredients (serves 4-6):
- 2 3/4 cups all-purpose flour
- 1 teaspoon baking soda
- 1/2 teaspoon baking powder
- 1 cup unsalted butter, softened
- 1 1/2 cups granulated sugar
- 1 egg
- 1 teaspoon vanilla extract
- 1/2 teaspoon almond extract
- 3-4 tablespoons of milk (as needed)
Instructions:
- Preheat the Oven and Prepare Baking Sheets: Preheat your oven to 375°F (190°C). Line two baking sheets with parchment paper or silicone baking mats to prevent the cookies from sticking.
- Mix Dry Ingredients: In a medium bowl, whisk together the flour, baking soda, and baking powder. This guarantees that the leavening agents are evenly distributed throughout the flour.
- Cream the Butter and Sugar: In a large mixing bowl, cream the softened butter and granulated sugar together using an electric mixer on medium speed until the mixture is light and fluffy. This should take about 2-3 minutes.
- Add Egg and Extracts: Beat in the egg, vanilla extract, and almond extract to the butter and sugar mixture. Mix until all ingredients are well incorporated.
- Combine Wet and Dry Ingredients: Gradually add the dry ingredients to the wet mixture, mixing on low speed just until combined. If the dough is too dry, add milk one tablespoon at a time until the dough holds together without being sticky.
- Chill the Dough: Divide the dough into two halves, wrap them in plastic wrap, and chill in the refrigerator for at least 1 hour. This makes the dough easier to roll out and helps the cookies maintain their shape during baking.
- Roll Out the Dough: On a lightly floured surface, roll out one half of the chilled dough to about 1/4 inch thickness. Use your favorite cookie cutters to cut out shapes and place them on the prepared baking sheets, leaving about 1 inch between each cookie.
- Bake the Cookies: Bake the cookies in the preheated oven for 8-10 minutes, or until the edges are just starting to turn golden. Be careful not to overbake to maintain a soft texture.
- Cool and Decorate: Allow the cookies to cool on the baking sheets for 2 minutes before transferring them to a wire rack to cool completely. Once cooled, you can decorate them with icing, sprinkles, or leave them plain to enjoy.
Extra Tips:
When baking sugar cookies, confirm that your butter is softened, not melted, to achieve the right texture. Chilling the dough is essential to prevent the cookies from spreading too much in the oven.
If you find the dough sticking to your rolling pin, lightly dust it with flour to make rolling easier. For uniform cookies, consider using a ruler to measure the thickness of the dough as you roll it out.
Finally, have fun with decorating! Whether you opt for colorful icing or a simple dusting of sugar, these cookies are sure to be a hit.
Peppermint Bark
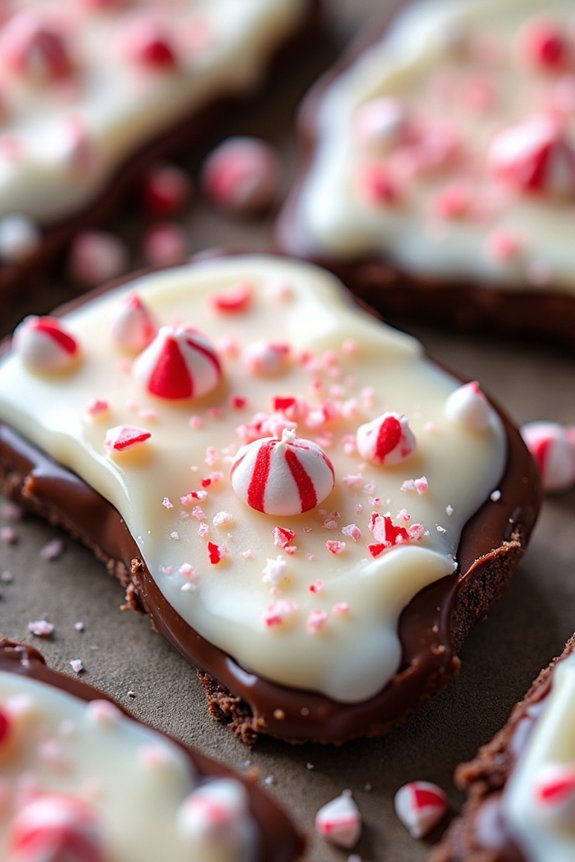
Peppermint Bark is a festive, delightful treat that’s perfect for the holiday season. This easy-to-make candy combines the rich creaminess of chocolate with the invigorating crunch of peppermint, creating a harmonious blend of flavors and textures. Ideal for gift-giving, party treats, or simply enjoying at home, Peppermint Bark is a crowd-pleaser that captures the essence of Christmas in every bite.
Whether you’re an experienced baker or a beginner, this recipe is straightforward and requires only a few ingredients, making it a must-try for anyone looking to add a homemade touch to their holiday celebrations.
The beauty of Peppermint Bark lies in its simplicity. It consists of two layers of chocolate—dark or semi-sweet on the bottom and white chocolate on top—finished with a generous sprinkle of crushed peppermint candies. The contrasting colors and flavors create a visually appealing and tasty treat that’s sure to impress.
The recipe yields enough for 4-6 people, making it perfect for sharing with family and friends. Follow the instructions below to create your own batch of this festive favorite.
Ingredients (serving size: 4-6 people):
- 8 ounces of semi-sweet or dark chocolate
- 8 ounces of white chocolate
- 1 teaspoon of peppermint extract
- 1/2 cup of crushed peppermint candies or candy canes
Cooking Instructions:
- Prepare the Baking Sheet: Line a baking sheet with parchment paper or a silicone baking mat to prevent the bark from sticking and to make it easier to remove once set.
- Melt the Dark Chocolate: In a microwave-safe bowl or using a double boiler, melt the semi-sweet or dark chocolate until smooth. If using a microwave, heat in 30-second intervals, stirring in between to avoid burning.
- Add Peppermint Extract: Once the chocolate is fully melted, stir in 1/2 teaspoon of peppermint extract to infuse the chocolate with a minty flavor.
- Spread the Chocolate Layer: Pour the melted dark chocolate onto the prepared baking sheet and spread it evenly into a thin layer using a spatula. Allow it to set at room temperature until firm, about 15-20 minutes.
- Melt the White Chocolate: Repeat the melting process with the white chocolate. Confirm it’s smooth and lump-free before proceeding.
- Add Peppermint Extract to White Chocolate: Stir the remaining 1/2 teaspoon of peppermint extract into the melted white chocolate for a consistent minty taste.
- Layer the White Chocolate: Carefully pour the melted white chocolate over the set dark chocolate layer. Spread it evenly with a spatula, ensuring it covers the dark chocolate completely.
- Add Crushed Peppermint: Immediately sprinkle the crushed peppermint candies or candy canes over the top layer while it’s still soft. Press them lightly into the chocolate to adhere.
- Let Set: Allow the Peppermint Bark to set at room temperature or in the refrigerator until completely firm, about 1-2 hours.
- Break into Pieces: Once fully set, break the bark into irregular pieces using your hands or a sharp knife.
Extra Tips:
To guarantee a smooth finish, make sure each layer of chocolate is fully set before adding the next. If you’re in a hurry, you can speed up the setting process by placing the bark in the refrigerator, but avoid freezing as it can cause the chocolate to bloom or discolor.
For an added twist, consider experimenting with layers of milk chocolate or adding nuts for additional texture. Store the Peppermint Bark in an airtight container at room temperature for up to two weeks, or keep it in the refrigerator for longer freshness. Enjoy your homemade Peppermint Bark as a delightful holiday indulgence!
Gingerbread Mug Cakes
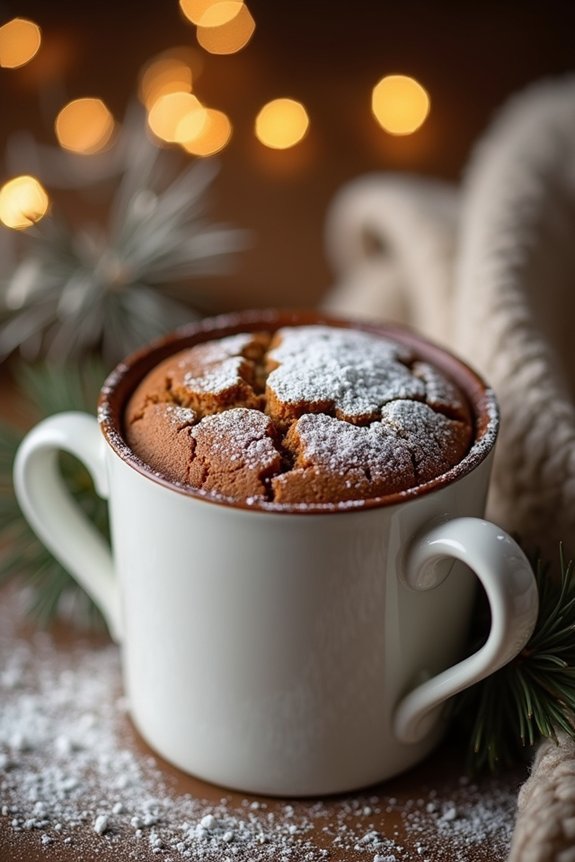
Gingerbread Mug Cakes are a delightful and quick way to enjoy the festive flavors of gingerbread without the need for extensive baking. Perfect for a cozy winter evening, these mug cakes combine the warm spices of ginger, cinnamon, and cloves with the rich sweetness of molasses and brown sugar. Not only do they capture the essence of traditional gingerbread, but they also offer the convenience of being prepared in individual servings, making them ideal for a small gathering or an intimate family dessert.
These mug cakes are perfect for when you want to whip up something special without the hassle of baking a full cake. In just a few minutes, you can create a warm, aromatic treat that pairs wonderfully with a scoop of vanilla ice cream or a dollop of whipped cream. Whether you’re hosting a holiday get-together or simply craving a taste of Christmas, these gingerbread mug cakes are a quick and satisfying solution.
Ingredients for Gingerbread Mug Cakes (Serves 4-6):
- 1 cup all-purpose flour
- 1 teaspoon baking powder
- 1 teaspoon ground ginger
- 1 teaspoon ground cinnamon
- 1/4 teaspoon ground cloves
- 1/4 teaspoon salt
- 1/2 cup brown sugar
- 1/2 cup milk
- 1/4 cup molasses
- 1/4 cup unsalted butter, melted
- 1 large egg
- 1 teaspoon vanilla extract
Cooking Instructions:
- Prepare the Mugs: Lightly grease 4-6 microwave-safe mugs with butter or non-stick spray to prevent sticking.
- Mix Dry Ingredients: In a medium-sized bowl, whisk together the flour, baking powder, ginger, cinnamon, cloves, and salt until well combined.
- Combine Wet Ingredients: In another bowl, beat together the brown sugar, milk, molasses, melted butter, egg, and vanilla extract until smooth and fully incorporated.
- Combine Mixtures: Gradually add the dry ingredients to the wet mixture, stirring gently until just combined. Be careful not to overmix, as this can make the cake dense.
- Fill the Mugs: Divide the batter evenly among the prepared mugs, filling each about halfway to allow room for the cake to rise.
- Microwave: Place one or two mugs in the microwave at a time and cook on high for 1 to 2 minutes, or until the cake has risen and set. Cooking times may vary depending on the microwave’s power, so check frequently to avoid overcooking.
- Cool and Serve: Allow the mug cakes to cool slightly before serving. They can be enjoyed directly from the mug or turned out onto a plate.
Extra Tips: For an extra special touch, consider adding a sprinkle of powdered sugar or a drizzle of icing on top of your gingerbread mug cakes before serving. If you prefer, you can also add a few raisins or chopped nuts to the batter for added texture.
Remember that microwaves vary, so it’s important to keep an eye on the cakes during cooking to prevent them from becoming dry. Finally, enjoy these mug cakes warm, as they tend to firm up as they cool.
Chocolate-Dipped Pretzels
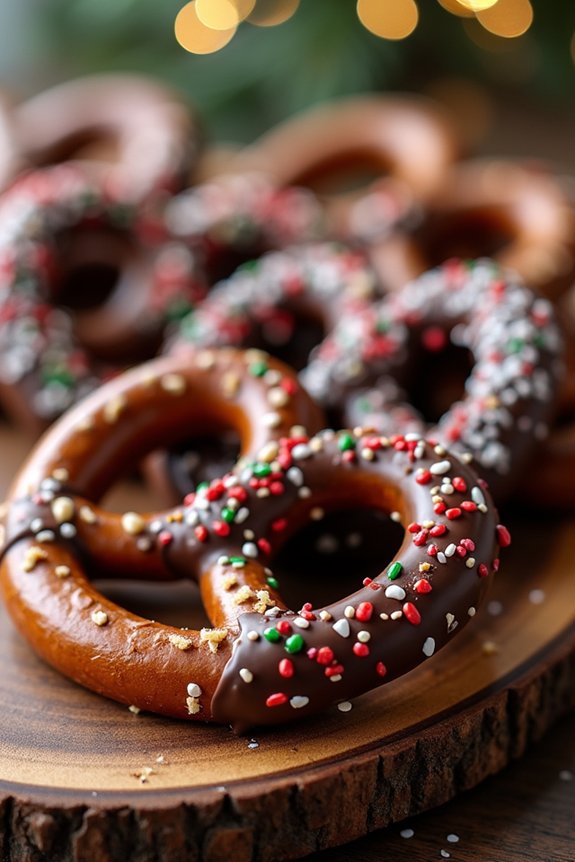
Chocolate-dipped pretzels are a delightful treat that perfectly balances the salty crunch of pretzels with the rich, sweet taste of chocolate. They make for an appealing addition to any festive gathering, combining simplicity and elegance in one bite. Ideal for holiday parties or as a homemade gift, these pretzels can be customized with different toppings to suit your personal taste or theme.
Whether you prefer milk, dark, or white chocolate, this recipe is easily adaptable and sure to satisfy any sweet tooth. Not only are chocolate-dipped pretzels easy to prepare, but they also require minimal ingredients, making them an excellent choice for both novice and experienced bakers.
This recipe serves 4-6 people and involves melting chocolate, dipping pretzels, and adding your choice of toppings. In no time, you’ll have an impressive and delicious snack that’s sure to be a hit during the holiday season.
Ingredients (Serves 4-6):
- 24 large pretzel rods or 48 mini pretzels
- 12 ounces of chocolate chips (milk, dark, or white)
- 2 tablespoons of vegetable oil
- Assorted toppings (sprinkles, crushed nuts, shredded coconut, or sea salt)
Instructions:
- Prepare the Baking Sheet: Line a baking sheet with parchment paper or wax paper. This will provide a non-stick surface for your chocolate-dipped pretzels to rest on while the chocolate sets.
- Melt the Chocolate: In a microwave-safe bowl, combine the chocolate chips and vegetable oil. Microwave on medium power in 30-second intervals, stirring after each, until the chocolate is fully melted and smooth. Alternatively, you can melt the chocolate using a double boiler on the stove.
- Dip the Pretzels: Hold a pretzel rod at one end and dip it into the melted chocolate, covering about two-thirds of the pretzel. Allow any excess chocolate to drip back into the bowl. For mini pretzels, use a fork to dip and lift them from the chocolate, ensuring they’re well-coated.
- Add Toppings: Before the chocolate sets, sprinkle your chosen toppings over the chocolate-coated portion of the pretzels. Be creative and mix different toppings to add variety and visual appeal.
- Let the Chocolate Set: Place the dipped pretzels on the prepared baking sheet. Allow them to sit at room temperature until the chocolate hardens, or speed up the process by placing them in the refrigerator for about 15-20 minutes.
- Store or Serve: Once the chocolate has set completely, transfer the pretzels to an airtight container if not serving immediately. They can be stored at room temperature for up to a week.
Extra Tips: For an extra festive touch, consider using colored chocolate melts in addition to or instead of standard chocolate chips. This can add a pop of color to your treats and make them even more fitting for the holiday season.
If you’re making a large batch, work in smaller batches to prevent the chocolate from hardening before you’ve finished dipping all the pretzels. Finally, be sure to have all your toppings ready before you start dipping, as the chocolate can set quickly, especially in cooler environments.
No-Bake Nutella Truffles
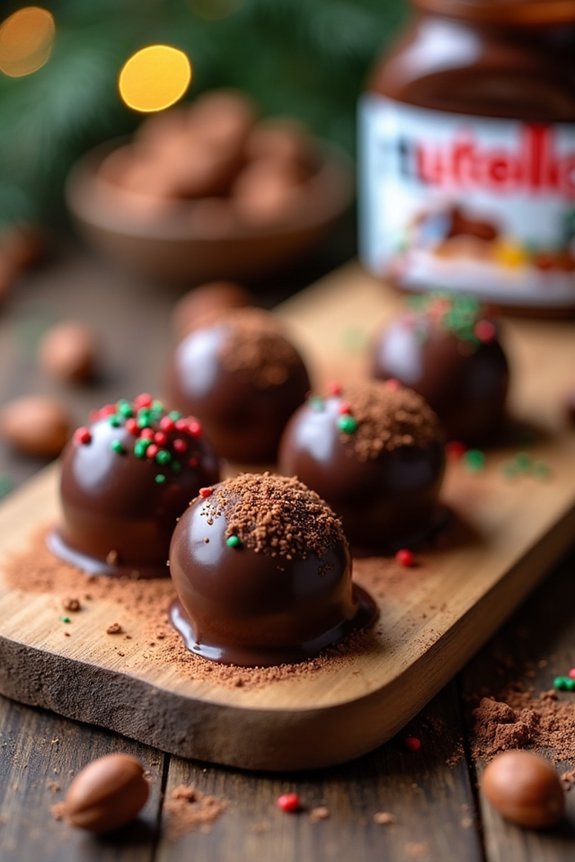
Indulging in the rich, creamy goodness of Nutella doesn’t always mean you need to bake. These No-Bake Nutella Truffles are the perfect treat to satisfy your chocolate cravings without turning on the oven. Perfect for the holiday season, they’re easy to make and require minimal ingredients, making them a great option for busy festive schedules.
The truffles are delightfully smooth on the inside with a satisfying chocolate coating, offering a melt-in-your-mouth experience that’s sure to impress your family and friends. Ideal for sharing, this recipe yields enough truffles for 4-6 people, making it suitable for small holiday gatherings or as a delightful addition to a dessert platter.
The combination of Nutella, crushed cookies, and a hint of hazelnut creates a decadent flavor profile that’s both luxurious and comforting. These truffles aren’t only a treat for the taste buds but also a feast for the eyes, as they can be decorated with festive sprinkles or a dusting of cocoa powder.
Ingredients for 4-6 servings:
- 1 cup Nutella
- 1 cup crushed digestive biscuits or graham crackers
- 1/2 cup ground hazelnuts (optional)
- 1 cup dark chocolate chips or chunks
- 2 tablespoons butter
- 1/4 cup heavy cream
- Pinch of sea salt
- Cocoa powder, sprinkles, or chopped nuts for decoration
Instructions:
- Prepare the Filling: In a mixing bowl, combine the Nutella, crushed biscuits or graham crackers, and ground hazelnuts (if using). Mix thoroughly until the ingredients are well incorporated and form a dough-like consistency. If the mixture feels too sticky, add a bit more crushed biscuits.
- Shape the Truffles: Using a small scoop or your hands, roll the mixture into small balls roughly the size of a walnut. Place them on a baking sheet lined with parchment paper. Once all the truffles are shaped, refrigerate them for about 30 minutes to firm up.
- Melt the Chocolate: While the truffles are chilling, melt the dark chocolate chips and butter in a heatproof bowl set over a pot of simmering water (double boiler method). Stir frequently until smooth and fully melted. Add a pinch of sea salt and stir in the heavy cream until the mixture is glossy.
- Coat the Truffles: Remove the chilled truffles from the refrigerator. Using a fork or dipping tool, dip each truffle into the melted chocolate, ensuring it’s completely covered. Allow any excess chocolate to drip off before placing the truffle back onto the parchment paper.
- Decorate: Before the chocolate sets, decorate the truffles with cocoa powder, sprinkles, or chopped nuts. This step not only adds visual appeal but also enhances the flavor and texture of the truffles.
- Set the Truffles: Once decorated, return the truffles to the refrigerator for another 15-20 minutes, or until the chocolate coating is firm.
Extra Tips: For a smoother finish on your truffles, make sure that the chocolate isn’t too thick when dipping, as this can lead to uneven coatings. If you find that the chocolate begins to thicken as you work, gently reheat it to keep it smooth.
Additionally, if you prefer a sweeter chocolate coating, you can use milk chocolate instead of dark chocolate. These truffles can be stored in an airtight container in the refrigerator for up to a week, making them an excellent make-ahead dessert option for the holiday season.
Cranberry Bliss Bars
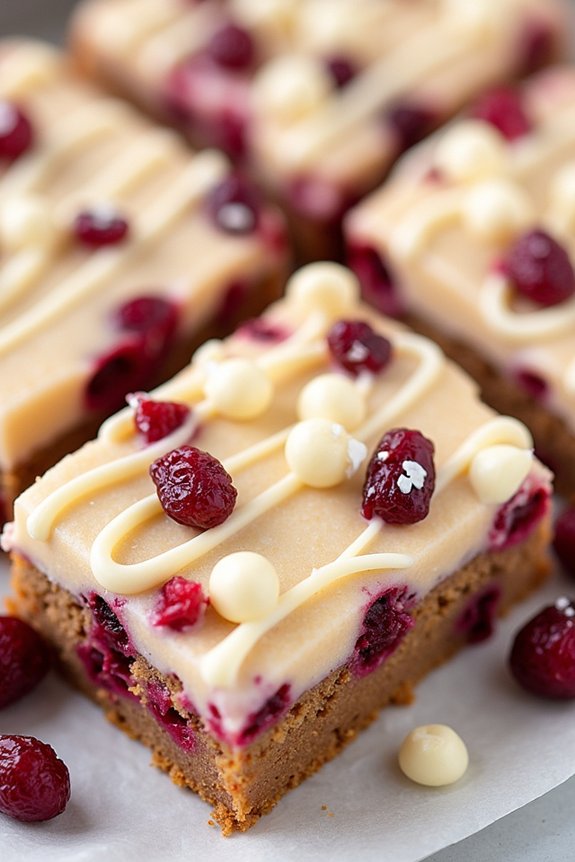
Cranberry Bliss Bars are a delightful treat that combines the tartness of cranberries with the sweetness of white chocolate, all held together by a delicious blondie-style base. These bars are perfect for the holiday season, offering a festive combination of flavors and colors that will brighten up any dessert table.
With their creamy frosting and a sprinkle of dried cranberries, they aren’t only a feast for the taste buds but also a visually appealing addition to your Christmas baking repertoire. Originating from a popular coffee chain, these bars have become a holiday staple for many.
They’re incredibly easy to make at home, allowing you to enjoy their rich, buttery flavors without having to leave the comfort of your kitchen. Whether you’re serving them at a holiday gathering or enjoying them with a cup of coffee on a quiet afternoon, Cranberry Bliss Bars are sure to become a favorite Christmas tradition.
Ingredients for 4-6 servings:
- 1 cup unsalted butter, softened
- 1 1/4 cups light brown sugar, packed
- 2 large eggs
- 1 teaspoon vanilla extract
- 1 teaspoon orange zest
- 2 cups all-purpose flour
- 1 1/2 teaspoons baking powder
- 1/4 teaspoon salt
- 1/2 cup dried cranberries
- 1/2 cup white chocolate chips
- 8 ounces cream cheese, softened
- 1 cup powdered sugar
- 1/2 teaspoon vanilla extract
- 1/2 cup dried cranberries, chopped (for topping)
- 1/4 cup white chocolate, melted (for drizzling)
Cooking Instructions:
- Preheat and Prep: Preheat your oven to 350°F (175°C). Line a 9×13-inch baking pan with parchment paper, allowing some excess to hang over the edges for easy removal.
- Mix Wet Ingredients: In a large mixing bowl, cream together the softened butter and brown sugar until light and fluffy. Add the eggs one at a time, mixing well after each addition. Stir in the vanilla extract and orange zest until fully incorporated.
- Combine Dry Ingredients: In another bowl, whisk together the flour, baking powder, and salt. Gradually add the dry ingredients to the wet ingredients, mixing until just combined.
- Add Mix-Ins: Fold in the dried cranberries and white chocolate chips. Spread the batter evenly into the prepared baking pan.
- Bake the Bars: Bake in the preheated oven for 18-22 minutes, or until the edges are golden brown and a toothpick inserted into the center comes out clean. Let the bars cool completely in the pan on a wire rack.
- Prepare the Frosting: In a medium bowl, beat the cream cheese until smooth. Gradually add the powdered sugar and vanilla extract, mixing until creamy and well blended.
- Frost and Decorate: Spread the cream cheese frosting over the cooled bars. Sprinkle the chopped dried cranberries on top, and drizzle with melted white chocolate.
- Slice and Serve: Once the frosting is set, lift the bars out of the pan using the parchment paper overhang. Cut into triangles or squares and serve.
Extra Tips:
For a more pronounced orange flavor, consider adding a tablespoon of orange juice to the batter. If you prefer a less sweet dessert, you can reduce the amount of white chocolate or substitute it with chopped nuts for added texture.
Be sure to let the bars cool completely before frosting to prevent the cream cheese topping from melting. Cranberry Bliss Bars can be stored in an airtight container in the refrigerator for up to a week, making them an excellent make-ahead option for busy holiday schedules.
Almond Snowball Cookies
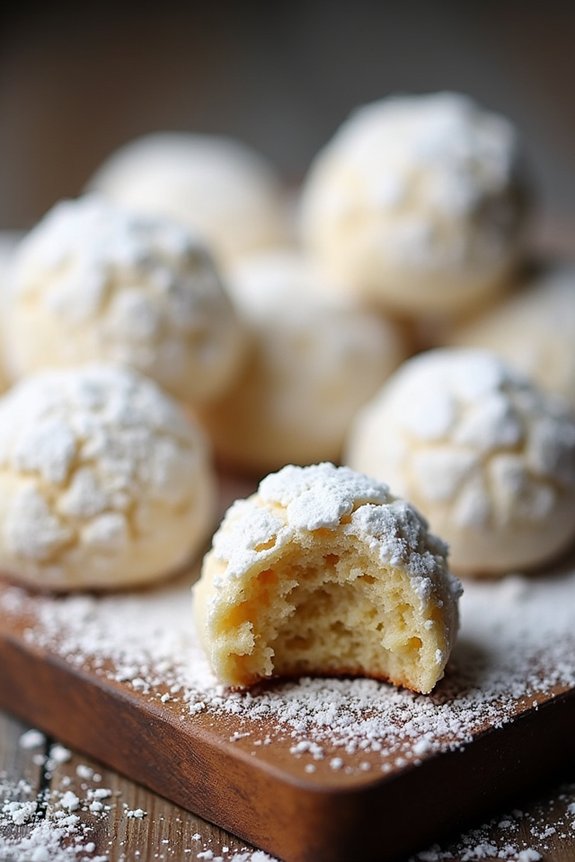
Almond Snowball Cookies are a delightful treat that perfectly encapsulates the essence of the holiday season. These cookies are known for their tender, crumbly texture and rich almond flavor, which is complemented by a generous coating of powdered sugar that resembles freshly fallen snow.
Whether you’re baking for a festive gathering or simply indulging in a cozy afternoon treat, these cookies are sure to bring cheer to your holiday celebrations.
The recipe for Almond Snowball Cookies is straightforward, making it an excellent choice for both novice and experienced bakers. The key to achieving the perfect texture lies in the balance of ingredients and the delicate process of forming the cookies.
Once baked, these cookies are coated in powdered sugar while still warm, which helps the sugar adhere better, creating a beautiful snowy appearance. Let’s plunge into the ingredients and instructions to create these delightful cookies that serve 4-6 people.
Ingredients:
- 1 cup unsalted butter, softened
- 1/2 cup powdered sugar (plus extra for coating)
- 1 teaspoon vanilla extract
- 2 cups all-purpose flour
- 1 cup finely ground almonds
- 1/4 teaspoon salt
Instructions:
- Preheat the Oven: Begin by preheating your oven to 350°F (175°C). Line a baking sheet with parchment paper to prevent the cookies from sticking.
- Cream the Butter and Sugar: In a large mixing bowl, use an electric mixer to cream the softened butter and 1/2 cup of powdered sugar together until the mixture is light and fluffy. This process usually takes about 2-3 minutes.
- Add Vanilla: Mix in the vanilla extract until it’s fully incorporated into the creamed butter and sugar.
- Combine Dry Ingredients: In a separate bowl, whisk together the all-purpose flour, finely ground almonds, and salt.
- Form the Dough: Gradually add the dry ingredients to the wet mixture, mixing on low speed until a dough forms. The dough should be soft but not sticky.
- Shape the Cookies: Scoop small portions of the dough and roll them into 1-inch balls using your hands. Place them on the prepared baking sheet, spacing them about 1 inch apart.
- Bake: Bake the cookies in the preheated oven for 15-18 minutes, or until the bottoms are lightly golden. Be careful not to overbake, as they should retain a pale color.
- Coat with Powdered Sugar: Once baked, remove the cookies from the oven and allow them to cool for about 5 minutes. While still warm, gently roll each cookie in a bowl of powdered sugar until fully coated. Place them on a wire rack to cool completely.
- Second Coating: Once the cookies are completely cooled, roll them in powdered sugar a second time for a thicker coating.
Extra Tips:
For best results, verify that the butter is softened to room temperature before starting the recipe, as this will help achieve the desired creamy texture when creaming with sugar.
When grinding the almonds, make sure they’re finely ground but not oily, as excess oil can affect the texture of the cookies. If you prefer a nut-free variation, you can substitute the almonds with finely ground pecans or walnuts.
Finally, store the cookies in an airtight container to maintain their freshness and prevent them from absorbing moisture. Enjoy your Almond Snowball Cookies with a hot cup of cocoa or tea for a truly festive experience!
Mini Cheese Danish
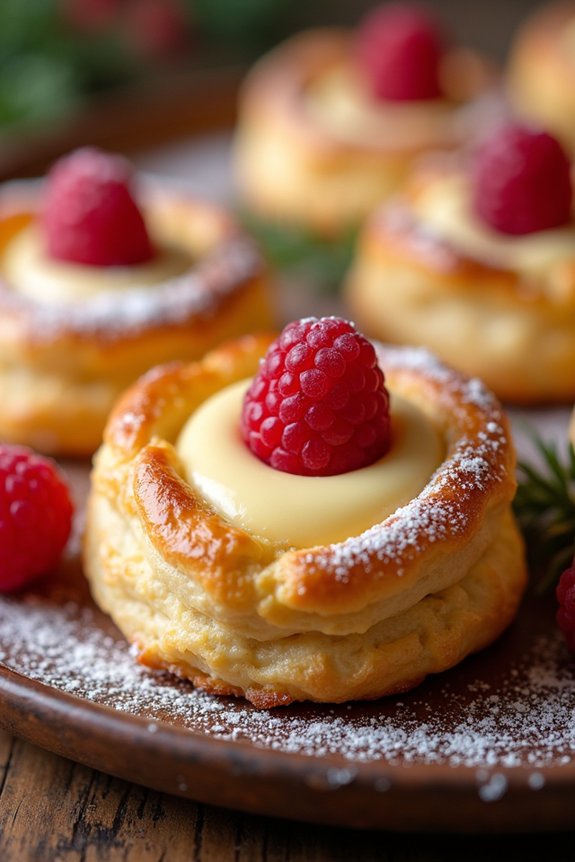
Start your Christmas morning with the delightful treat of Mini Cheese Danishes. These bite-sized pastries are perfect for a festive breakfast or a sweet addition to your holiday buffet.
These danishes are light, flaky, and filled with a rich, creamy cheese filling that melts in your mouth. Whether you’re serving them for a cozy family breakfast or a larger holiday gathering, these mini danishes are guaranteed to bring joy to all who try them.
One of the best things about making Mini Cheese Danishes is how simple they’re to prepare, yet they look and taste like a professional pastry. With the convenience of store-bought puff pastry and a few simple ingredients for the filling, you can whip up these delightful pastries in no time.
They’re perfect for serving 4-6 people, making them an ideal choice for a small gathering or a special treat for your family. Follow the recipe below to create these delectable pastries that are bound to become a holiday favorite.
Ingredients for 4-6 servings:
- 1 package of store-bought puff pastry (usually contains 2 sheets)
- 8 oz cream cheese, softened
- 1/4 cup granulated sugar
- 1 teaspoon vanilla extract
- 1 egg yolk
- 1 tablespoon lemon juice
- 1/4 cup powdered sugar (for dusting)
- 1 egg (for egg wash)
- 1 tablespoon water
Cooking Instructions:
- Prepare the Puff Pastry: Preheat your oven to 400°F (200°C). Thaw the puff pastry sheets according to package instructions. Once thawed, roll out each sheet on a lightly floured surface to smooth any creases.
- Make the Cheese Filling: In a medium bowl, combine the softened cream cheese, granulated sugar, vanilla extract, egg yolk, and lemon juice. Use an electric mixer or a whisk to blend the ingredients until they’re smooth and creamy.
- Cut and Shape the Pastry: Cut each puff pastry sheet into 9 equal squares. This should yield a total of 18 squares. Gently score a smaller square inside each piece, about 1/2 inch from the edge, being careful not to cut all the way through. This will help the edges to rise around the filling.
- Fill the Pastry Squares: Spoon a heaping teaspoon of the cream cheese mixture into the center of each scored square. Spread it slightly towards the edges but be sure to stay within the inner square.
- Egg Wash and Bake: In a small bowl, beat the egg with 1 tablespoon of water to create an egg wash. Brush the edges of each pastry square with the egg wash to help them turn golden brown during baking. Place the filled pastries on a baking sheet lined with parchment paper.
- Bake the Danishes: Bake in the preheated oven for 15-18 minutes, or until the pastries are puffed up and golden brown. Remove from the oven and let them cool slightly on a wire rack.
- Dust with Sugar: Once cooled, lightly dust the danishes with powdered sugar before serving for an extra touch of sweetness.
Extra Tips:
For the best results, confirm your cream cheese is at room temperature before mixing to achieve a smooth filling. If you want to add a festive touch, consider incorporating a small dollop of fruit preserves or a few fresh berries on top of the cheese filling before baking.
This will create a delightful contrast and add a burst of color to your pastries. Also, remember to keep the puff pastry chilled until you’re ready to use it, as this will help the pastries to puff up beautifully in the oven. Enjoy your Mini Cheese Danishes fresh from the oven or at room temperature for the best flavor and texture.
Chocolate Crinkle Cookies
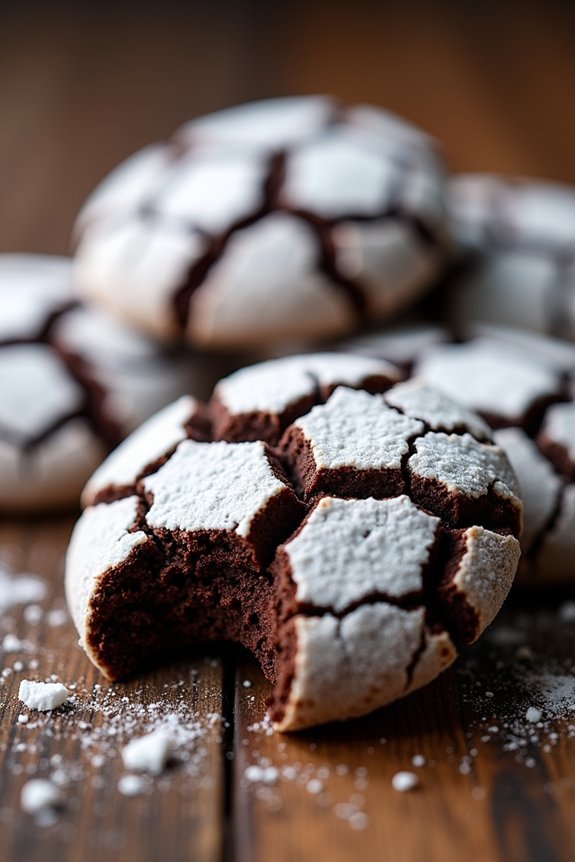
Chocolate Crinkle Cookies are a delightful treat that combines the rich flavor of chocolate with a unique crinkled appearance. These cookies are a Christmas classic, known for their soft, fudgy texture on the inside and a powdered sugar-coated exterior that cracks as they bake. Perfect for holiday gatherings, these cookies not only look festive but bring a deliciously sweet and slightly chewy bite that’s sure to satisfy any sweet tooth.
The contrast of the dark chocolate dough against the white powdered sugar makes them an eye-catching addition to any dessert table. This recipe is designed to serve 4-6 people, making it ideal for a small group or family gathering. The preparation involves chilling the dough to guarantee the crinkles form correctly during baking.
As you prepare these cookies, the aroma of chocolate will fill your kitchen, creating a warm and inviting atmosphere that encapsulates the spirit of the holiday season. Whether you’re an experienced baker or trying your hand at holiday baking for the first time, these cookies are straightforward to make and will impress.
Ingredients (serves 4-6):
- 1 cup all-purpose flour
- 1/2 cup unsweetened cocoa powder
- 1 teaspoon baking powder
- 1/4 teaspoon salt
- 1 cup granulated sugar
- 1/4 cup vegetable oil
- 2 large eggs
- 1 teaspoon vanilla extract
- 1/2 cup powdered sugar
Instructions:
- Prepare the Dry Ingredients: In a medium bowl, whisk together the flour, cocoa powder, baking powder, and salt until well combined. Set aside.
- Mix the Wet Ingredients: In a large bowl, using a hand mixer or stand mixer, beat the granulated sugar and vegetable oil together until smooth. Add the eggs one at a time, mixing well after each addition. Stir in the vanilla extract.
- Combine: Gradually add the dry ingredients to the wet ingredients, mixing on low speed until just combined. The dough will be quite sticky.
- Chill the Dough: Cover the dough with plastic wrap and refrigerate for at least 2 hours or overnight. Chilling is essential to prevent the cookies from spreading too much and to help form the characteristic crinkles.
- Preheat the Oven: Preheat your oven to 350°F (175°C) and line two baking sheets with parchment paper.
- Form the Cookies: Scoop tablespoon-sized portions of dough and roll them into balls. Roll each ball generously in powdered sugar before placing them on the prepared baking sheets, spaced about 2 inches apart.
- Bake: Bake in the preheated oven for 10-12 minutes, or until the cookies have puffed up and the tops have cracked. The cookies should be set around the edges but still soft in the center.
- Cool: Remove the cookies from the oven and allow them to cool on the baking sheet for about 5 minutes before transferring them to a wire rack to cool completely.
Extra Tips:
To guarantee your Chocolate Crinkle Cookies turn out perfectly, make sure the dough is well chilled before baking. This helps maintain the shape and creates those beautiful crinkles.
If you find the dough too sticky to handle, lightly oil your hands or dust them with a bit of flour. Additionally, don’t skip rolling the dough balls in powdered sugar as this is key to achieving the classic crinkle look.
Finally, avoid overbaking; the cookies should be slightly underdone in the center when you remove them from the oven to secure a soft, chewy texture. Enjoy your festive baking!
Quick Pecan Pie Bars
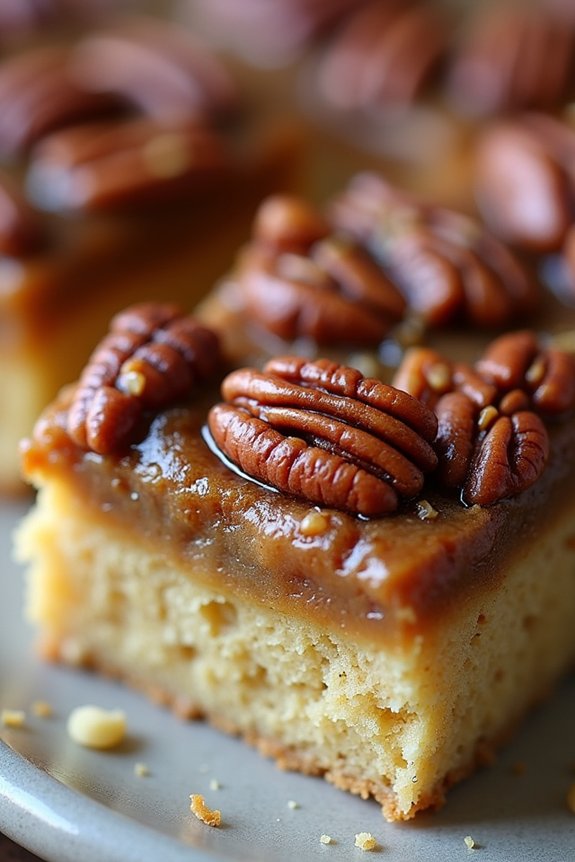
Quick Pecan Pie Bars are a delightful treat that captures all the rich, nutty flavors of a traditional pecan pie but in a convenient, easy-to-share bar form. Perfect for holiday gatherings or as a sweet indulgence during the festive season, these bars simplify the pecan pie-making process without sacrificing taste.
With a buttery shortbread crust and a gooey, caramelized pecan topping, they’re sure to be a hit with family and friends. These bars aren’t only delicious but also quick and easy to prepare, making them a great option for last-minute holiday baking. Their make-ahead nature allows you to focus on other aspects of your holiday meal while guaranteeing you have a decadent dessert ready to go.
Whether you’re a seasoned baker or a novice in the kitchen, this recipe is designed to deliver scrumptious results every time.
Ingredients (serves 4-6):
- 1 cup all-purpose flour
- 1/4 cup granulated sugar
- 1/2 cup unsalted butter, softened
- 1 cup light brown sugar, packed
- 1/2 cup light corn syrup
- 3 large eggs
- 1 tablespoon vanilla extract
- 1 1/2 cups pecan halves
- 1/4 teaspoon salt
Cooking Instructions:
- Preheat the Oven: Begin by preheating your oven to 350°F (175°C). This guarantees that the oven reaches the correct temperature by the time your bars are ready to bake.
- Prepare the Crust: In a mixing bowl, combine the all-purpose flour and granulated sugar. Add the softened butter and mix until the ingredients form a crumbly dough. Press this mixture firmly and evenly into the bottom of a greased 9×9-inch baking pan.
- Bake the Crust: Place the baking pan in the preheated oven and bake for about 15-20 minutes or until the edges are lightly golden. Remove from the oven and set aside to cool slightly.
- Make the Pecan Filling: In another bowl, whisk together the brown sugar, corn syrup, eggs, and vanilla extract until smooth and well combined. Stir in the pecan halves and salt, ensuring the pecans are evenly coated with the mixture.
- Assemble and Bake: Pour the pecan mixture over the slightly cooled crust, spreading it evenly. Return the pan to the oven and bake for an additional 30-35 minutes, or until the filling is set and golden brown.
- Cool and Serve: Allow the bars to cool completely in the pan on a wire rack. Once cooled, cut into squares or bars and serve.
Extra Tips:
When preparing the crust, make sure the butter is soft enough to mix easily with the flour and sugar, as this will help create a uniform base.
For an extra hint of flavor, you can toast the pecans briefly in a dry skillet before adding them to the filling. This enhances the nutty flavor and adds a bit of crunch.
Finally, if you find the bars are sticking to the pan, line the pan with parchment paper before pressing in the crust to make removal easier after baking.
Lemon Glazed Shortbread
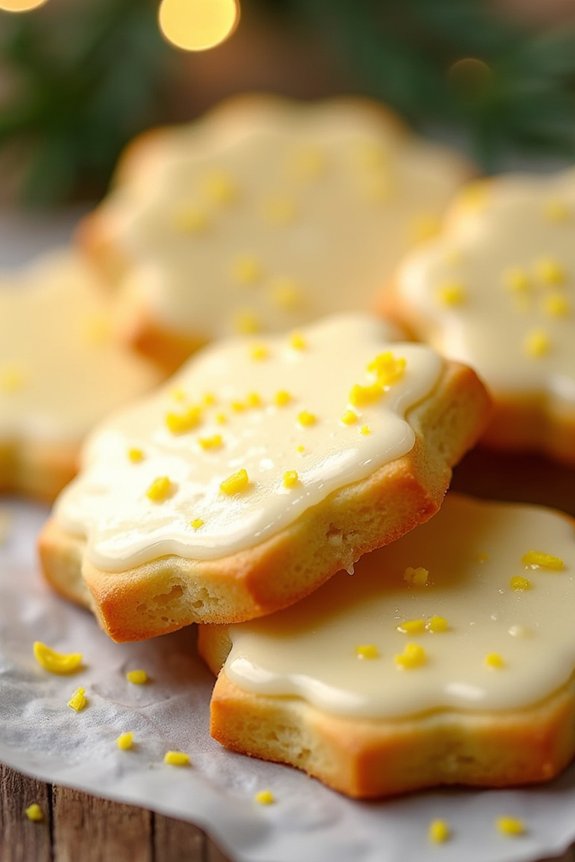
Lemon Glazed Shortbread is a delightful holiday treat that combines the buttery goodness of classic shortbread with a revitalizing lemon glaze. This cookie is perfect for those who love a balance between sweet and tangy flavors. Whether you’re hosting a Christmas gathering or simply want to enjoy some festive baking, this recipe will surely add a zesty twist to your holiday dessert table.
The buttery shortbread pairs wonderfully with the bright lemon glaze, creating a cookie that’s both rich and invigorating. Shortbread is a traditional Scottish biscuit that’s simple yet luxurious. By adding a lemon glaze, this recipe elevates the classic shortbread into something truly special. The lemon glaze is made with fresh lemon juice and zest, which infuses the cookie with a burst of citrus flavor.
This recipe serves 4-6 people, making it perfect for a small gathering or for gifting to friends and family. Let’s explore the ingredients and the step-by-step instructions to make this delectable Lemon Glazed Shortbread.
Ingredients (Serves 4-6):
- 1 cup unsalted butter, softened
- 1/2 cup powdered sugar
- 1 teaspoon vanilla extract
- 2 cups all-purpose flour
- 1/4 teaspoon salt
- Zest of 1 lemon
- 1 cup powdered sugar (for glaze)
- 2 tablespoons fresh lemon juice
Instructions:
- Prepare the Dough: In a large mixing bowl, cream together the softened butter and 1/2 cup powdered sugar until light and fluffy. This should take about 2-3 minutes with an electric mixer. Add the vanilla extract and mix until combined.
- Mix Dry Ingredients: In a separate bowl, whisk together the all-purpose flour, salt, and lemon zest. Slowly add the dry ingredients to the butter mixture, mixing on low speed until the dough comes together. The dough should be soft but not sticky.
- Shape the Cookies: Roll out the dough on a lightly floured surface to about 1/4 inch thickness. Use a cookie cutter to cut out shapes, and place the cookies on a baking sheet lined with parchment paper.
- Chill the Dough: Place the baking sheet in the refrigerator and chill the cookies for about 15-20 minutes. This helps the cookies maintain their shape during baking.
- Bake: Preheat your oven to 350°F (175°C). Bake the cookies for 10-12 minutes, or until the edges are lightly golden. Remove from the oven and let them cool on the baking sheet for 5 minutes before transferring to a wire rack to cool completely.
- Prepare the Glaze: In a small bowl, whisk together 1 cup powdered sugar and 2 tablespoons of fresh lemon juice until smooth. The glaze should be thick but pourable.
- Glaze the Cookies: Once the cookies are completely cool, drizzle the lemon glaze over each cookie. Allow the glaze to set for at least 15 minutes before serving.
Extra Tips:
When making Lemon Glazed Shortbread, it’s important to verify your butter is at room temperature for easy mixing. If you prefer a more pronounced lemon flavor, add a tablespoon of lemon zest to the glaze as well.
For a festive touch, consider decorating the glazed cookies with edible glitter or small sprinkles. Remember to store the cookies in an airtight container to keep them fresh and crisp. Enjoy your homemade Lemon Glazed Shortbread with a cup of tea or coffee for a perfect holiday treat!