

The holiday season is upon us, and the joy of Christmas baking is in the air. This year, I’ve decided to give our beloved traditions a stylish twist with some modern recipes. Think matcha and white chocolate coming together in a yule log or cranberry orange macarons adding a pop of color to the dessert table. These fresh ideas are perfect for adding a little flair to your festive celebrations. Let’s explore these twelve modern Christmas baking recipes that will surely inspire your holiday treats.
Spiced Chai Latte Cookies
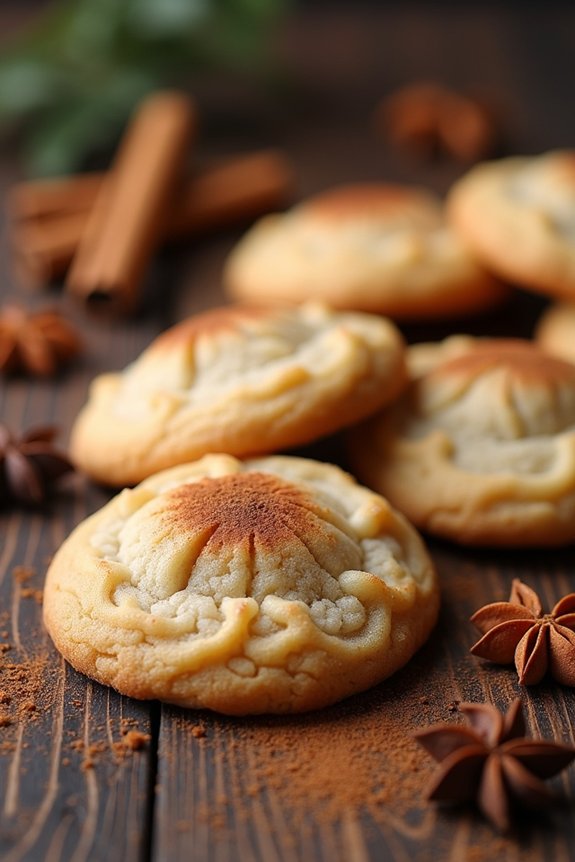
Spiced Chai Latte Cookies are a delicious fusion of the warm, comforting flavors of a chai latte and the classic appeal of a cookie. These cookies are perfect for the holiday season, offering a unique twist with their rich blend of spices like cinnamon, cardamom, ginger, and cloves. The scent of these spices wafting through the house is sure to evoke a festive spirit, making them a delightful addition to your Christmas baking repertoire.
These cookies aren’t only aromatic but also have a soft, chewy texture that pairs perfectly with a cup of tea or coffee. They’re ideal for sharing with family and friends during holiday gatherings or as a thoughtful homemade gift. With a serving size of 4-6 people, this recipe guarantees there’s enough to go around, so everyone can enjoy the sweet and spicy goodness of these Spiced Chai Latte Cookies.
Ingredients (Serving Size: 4-6 people):
- 1 cup unsalted butter, softened
- 1 cup granulated sugar
- 1/2 cup packed brown sugar
- 2 large eggs
- 2 teaspoons vanilla extract
- 2 3/4 cups all-purpose flour
- 1 teaspoon baking powder
- 1/2 teaspoon baking soda
- 1/2 teaspoon salt
- 1 teaspoon ground cinnamon
- 1 teaspoon ground cardamom
- 1 teaspoon ground ginger
- 1/2 teaspoon ground cloves
- 1/2 teaspoon ground nutmeg
- 1/4 teaspoon ground black pepper
Instructions:
- Preheat the Oven and Prepare Baking Sheets: Preheat your oven to 350°F (175°C). Line two baking sheets with parchment paper and set aside.
- Cream the Butter and Sugars: In a large mixing bowl, cream together the softened butter, granulated sugar, and brown sugar until light and fluffy. This should take about 3-4 minutes with an electric mixer on medium speed.
- Add Eggs and Vanilla: Beat in the eggs one at a time, making sure each is fully incorporated before adding the next. Stir in the vanilla extract.
- Mix Dry Ingredients: In a separate bowl, whisk together the flour, baking powder, baking soda, salt, cinnamon, cardamom, ginger, cloves, nutmeg, and black pepper until well combined.
- Combine Wet and Dry Ingredients: Gradually add the dry ingredients to the wet ingredients, mixing on low speed until just combined. Be careful not to overmix, as this can cause the cookies to become tough.
- Form Cookies and Bake: Use a tablespoon to scoop dough and roll into balls. Place them on the prepared baking sheets about 2 inches apart. Bake for 10-12 minutes, or until the edges are golden brown. The centers might look slightly underbaked, but they’ll firm up as they cool.
- Cool and Serve: Allow the cookies to cool on the baking sheets for 5 minutes before transferring to a wire rack to cool completely. Enjoy them warm or at room temperature.
Extra Tips: For an extra burst of flavor, you can roll the dough balls in a mixture of cinnamon and sugar before baking. If you prefer a stronger chai flavor, you can adjust the spice quantities to suit your taste. Additionally, these cookies can be stored in an airtight container at room temperature for up to a week, making them a convenient option for holiday planning. If you’re gifting these cookies, consider packaging them with a small bag of chai tea for a thoughtful touch.
Matcha and White Chocolate Yule Log
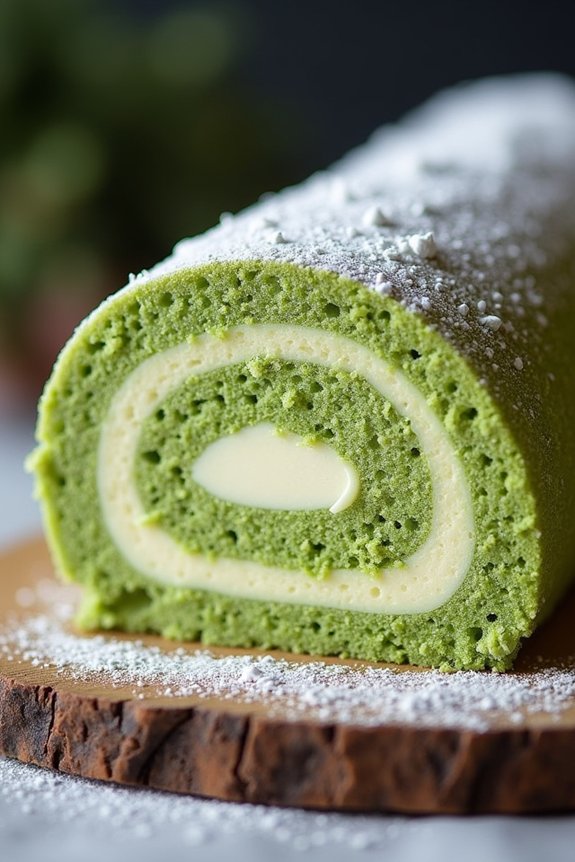
The Matcha and White Chocolate Yule Log combines the earthy, rich flavors of matcha green tea with the smooth sweetness of white chocolate, creating a festive dessert that’s as visually stunning as it’s delicious.
This modern take on the traditional Yule Log, or “Bûche de Noël,” offers an elegant green and white swirl that draws oohs and aahs from your holiday guests. Perfect for 4-6 people, this recipe will bring a sophisticated touch to your Christmas table, providing a delightful alternative to the usual chocolate log.
This dessert isn’t only a feast for the eyes but also a treat for the taste buds, combining the light, airy texture of sponge cake with a creamy, decadent filling. The matcha powder not only imparts a unique flavor but also a beautiful green color that contrasts beautifully with the white chocolate.
This recipe may require a bit of patience and precision, but the end result is a show-stopping dessert that will make your Christmas celebrations truly memorable.
Ingredients (Serves 4-6):
- 4 large eggs, separated
- 100g granulated sugar
- 75g all-purpose flour
- 2 tablespoons matcha powder
- 1 teaspoon baking powder
- 100g white chocolate, chopped
- 150ml heavy cream
- 1 teaspoon vanilla extract
- 50g powdered sugar, plus extra for dusting
- 1 tablespoon hot water
Cooking Instructions:
- Preheat and Prepare: Preheat your oven to 180°C (350°F). Line a 10×15-inch jelly roll pan with parchment paper, making certain it hangs over the edges for easy removal.
- Beat Egg Yolks: In a large mixing bowl, beat the egg yolks and sugar together until pale and thick. This should take about 3-4 minutes with an electric mixer.
- Sift Dry Ingredients: Sift together the flour, matcha powder, and baking powder. Gradually fold the dry ingredients into the egg yolk mixture using a spatula, making certain no lumps remain.
- Whip Egg Whites: In a separate bowl, beat the egg whites until stiff peaks form. Gently fold the egg whites into the matcha mixture in three parts to maintain the airiness.
- Bake the Sponge: Pour the batter into the prepared pan, spreading it evenly. Bake for 10-12 minutes or until the sponge is springy to the touch.
- Roll the Cake: While the cake is still warm, dust a clean kitchen towel with powdered sugar. Turn the cake out onto the towel, peel off the parchment, and roll the cake up with the towel inside. Let it cool completely.
- Prepare the Filling: Melt the white chocolate in a heatproof bowl over a pot of simmering water. Once melted, remove from heat. In a separate bowl, whip the heavy cream, powdered sugar, and vanilla extract until soft peaks form. Gently fold the melted white chocolate into the whipped cream.
- Assemble the Yule Log: Unroll the cooled cake and spread the white chocolate filling evenly over the surface. Carefully roll the cake back up without the towel, ensuring the seam is on the bottom.
- Chill and Serve: Wrap the log in plastic wrap and chill for at least 1 hour. Before serving, dust with extra powdered sugar and slice into pieces.
Extra Tips:
When making the Matcha and White Chocolate Yule Log, make certain that the egg whites are beaten to stiff peaks to provide the sponge with the right amount of volume and lightness.
Be gentle when folding them into the matcha mixture to prevent deflating the batter. If you find the white chocolate filling too sweet, you can adjust the powdered sugar to your taste.
As the cake is delicate, roll it carefully to avoid cracks—if small cracks do appear, they can be easily concealed with a dusting of powdered sugar before serving.
Pomegranate and Pistachio Biscotti
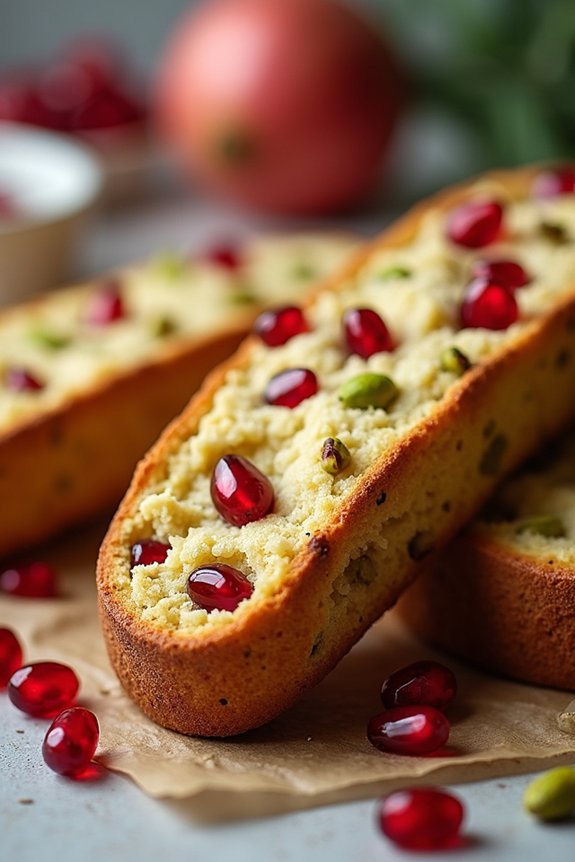
Pomegranate and Pistachio Biscotti is a delightful festive treat that combines the tartness of pomegranate seeds with the rich, nutty flavor of pistachios. This twice-baked Italian cookie is perfect for the holiday season, adding a touch of elegance to your Christmas baking repertoire.
Whether served as a snack or alongside a hot cup of coffee or tea, these biscotti are certain to be a hit at your festive gatherings. The combination of vibrant red pomegranate seeds and green pistachios not only captures the essence of Christmas colors but also provides a delightful contrast in texture and flavor.
This recipe will guide you through the process of making approximately 24 biscotti, which is perfect for serving 4-6 people. Enjoy the crunchiness of the biscotti with the surprise bursts of juicy pomegranate and the creaminess of pistachios in every bite.
Ingredients (Serves 4-6):
- 2 cups all-purpose flour
- 1 teaspoon baking powder
- 1/2 teaspoon salt
- 3/4 cup granulated sugar
- 3 large eggs
- 1 teaspoon vanilla extract
- 1 cup shelled pistachios, roughly chopped
- 1/2 cup fresh pomegranate seeds
- Zest of 1 orange
Cooking Instructions:
- Preheat the Oven: Start by preheating your oven to 350°F (175°C). Line a baking sheet with parchment paper to prevent sticking.
- Mix Dry Ingredients: In a medium bowl, whisk together the all-purpose flour, baking powder, and salt. Set this aside for later use.
- Prepare Wet Mixture: In a large mixing bowl, beat the sugar and eggs together until pale and thick. This should take about 3-4 minutes using an electric mixer. Add the vanilla extract and orange zest, and mix until well combined.
- Combine Wet and Dry Ingredients: Gradually add the dry flour mixture to the wet ingredients, mixing until just combined. Be careful not to overmix, as this can make the biscotti tough.
- Add Pistachios and Pomegranate Seeds: Fold in the chopped pistachios and pomegranate seeds gently, making sure they’re evenly distributed throughout the dough.
- Shape the Dough: Divide the dough in half and shape each portion into a log approximately 10 inches long and 2 inches wide. Place the logs on the prepared baking sheet, leaving space between them as they’ll expand during baking.
- First Bake: Bake in the preheated oven for about 25-30 minutes, or until the logs are golden brown and firm to the touch. Remove from the oven and allow them to cool for about 10 minutes.
- Slice the Biscotti: Once slightly cooled, use a sharp serrated knife to slice the logs diagonally into 1/2-inch thick slices.
- Second Bake: Arrange the slices cut side down on the baking sheet and return them to the oven. Bake for an additional 10-15 minutes, flipping halfway through, until the biscotti are dry and crisp.
- Cool and Serve: Remove from the oven and let the biscotti cool completely on a wire rack before serving or storing.
Extra Tips:
When making Pomegranate and Pistachio Biscotti, be gentle when folding in the pomegranate seeds to prevent them from bursting and releasing juice into the dough.
If fresh pomegranate seeds aren’t available, dried cranberries can be a suitable substitute. Also, confirm that the biscotti logs have cooled slightly before slicing to prevent crumbling.
These biscotti can be stored in an airtight container at room temperature for up to a week, making them a perfect make-ahead holiday treat.
Salted Caramel Gingerbread Bars
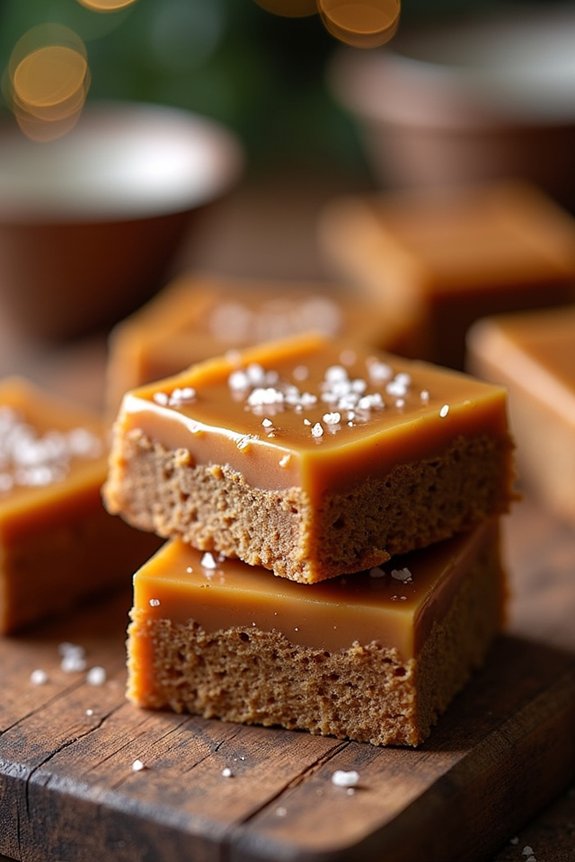
Salted Caramel Gingerbread Bars are the perfect treat to add a festive touch to your holiday baking repertoire. Combining the classic flavors of gingerbread with the indulgence of salted caramel, these bars are a delightful blend of sweet and spicy. The chewy gingerbread base is enriched with molasses and a warm blend of spices, while the salted caramel topping adds a decadent layer of flavor.
Whether you’re serving them at a holiday party or enjoying them with a cup of hot cocoa, these bars are sure to be a hit. The recipe is designed for a serving size of 4-6 people, making it ideal for a small gathering or family dessert. Each bite offers a harmonious blend of textures and flavors, with the gingerbread providing a soft, spiced foundation and the salted caramel adding a sweet, slightly salty finish.
The bars are easy to make and can be prepared in advance, allowing you to spend more time enjoying the festivities and less time in the kitchen.
Ingredients:
- 1 cup all-purpose flour
- 1 tsp ground ginger
- 1 tsp ground cinnamon
- 1/4 tsp ground cloves
- 1/4 tsp ground nutmeg
- 1/2 tsp baking soda
- 1/4 tsp salt
- 1/2 cup unsalted butter, softened
- 1/3 cup packed brown sugar
- 1/3 cup molasses
- 1 large egg
- 1 tsp vanilla extract
- 1 cup caramel sauce
- 1/2 tsp sea salt
Instructions:
- Preheat the Oven: Begin by preheating your oven to 350°F (175°C). Line an 8×8 inch baking pan with parchment paper, leaving some overhang on the sides for easy removal after baking.
- Mix Dry Ingredients: In a medium bowl, whisk together the flour, ground ginger, cinnamon, cloves, nutmeg, baking soda, and salt. Set aside.
- Cream Butter and Sugar: In a large bowl, beat the softened butter and brown sugar together using an electric mixer on medium speed until the mixture is light and fluffy, about 2-3 minutes.
- Add Wet Ingredients: Add the molasses, egg, and vanilla extract to the butter mixture. Mix until fully combined, scraping down the sides of the bowl as needed.
- Combine Wet and Dry Ingredients: Gradually add the dry ingredients to the wet ingredients, mixing on low speed until just combined. Be careful not to overmix.
- Bake the Gingerbread Base: Spread the gingerbread batter evenly into the prepared baking pan. Bake for 20-25 minutes or until a toothpick inserted into the center comes out clean.
- Prepare Caramel Topping: Once the gingerbread has cooled slightly, pour the caramel sauce over the top, spreading it evenly with a spatula. Sprinkle the sea salt over the caramel layer.
- Cool and Set: Allow the bars to cool completely at room temperature, then refrigerate for at least 1 hour to set the caramel topping.
- Slice and Serve: Once set, use the parchment paper overhang to lift the bars out of the pan. Cut into squares and serve.
Extra Tips:
For the best results, make sure your butter is at room temperature before starting the recipe, as this will help create a smooth and creamy batter. If you prefer a thicker caramel layer, feel free to increase the amount of caramel sauce.
To make slicing easier, use a sharp knife that has been dipped in hot water, and wipe the knife clean between cuts. These bars can be stored in an airtight container in the refrigerator for up to a week, but they’re best enjoyed within the first few days.
Cranberry Orange Macarons
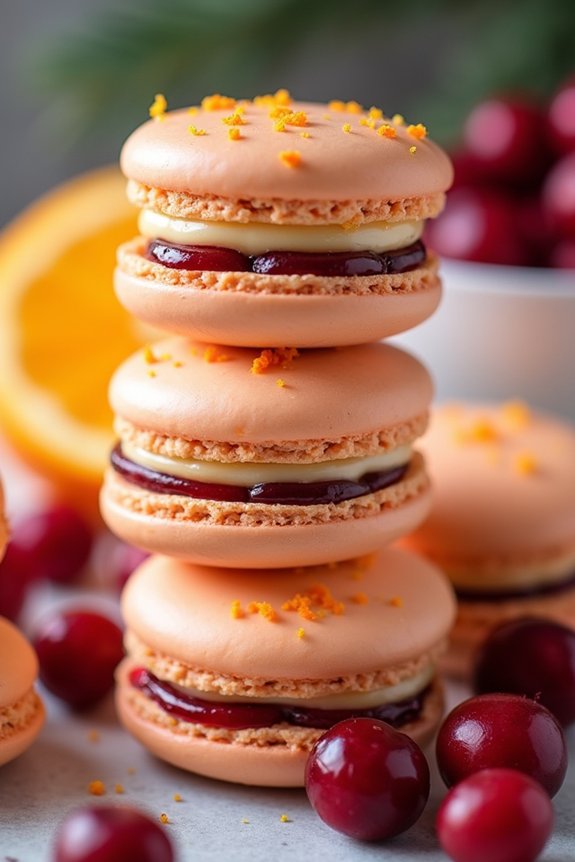
Cranberry Orange Macarons are a delightful twist on the traditional French macaron, bringing together the tartness of cranberries with the zesty brightness of oranges. These delicate pastries make for a festive treat, perfect for holiday gatherings or as a homemade gift for loved ones.
The light, airy shells are sandwiched with a creamy, flavorful filling that bursts with holiday flavors in every bite. Whether you’re an experienced baker or trying your hand at macarons for the first time, this recipe will guide you through the process to achieve perfect macarons with a holiday twist.
Macarons can be a bit tricky to master, but with patience and attention to detail, you can create these beautiful confections at home. The key to a successful macaron lies in properly beaten egg whites and careful folding of ingredients.
This recipe for Cranberry Orange Macarons serves 4-6 people, making it a great option for small gatherings or as a special treat to enjoy over the holiday season. With a little practice and these step-by-step instructions, you’ll find that making macarons is both rewarding and delicious.
Ingredients
- 100g almond flour
- 100g powdered sugar
- 70g egg whites (about 2 large eggs), room temperature
- 50g granulated sugar
- 1/2 teaspoon vanilla extract
- Zest of 1 orange
- Red and orange food coloring (optional)
- 1/2 cup fresh or dried cranberries
- 1/4 cup orange juice
- 1/2 cup unsalted butter, softened
- 1 1/2 cups powdered sugar (for filling)
- 1 teaspoon orange extract
Instructions
- Prepare the Baking Sheet: Line two baking sheets with parchment paper. If you have macaron templates, place them underneath the parchment paper to guarantee uniform sizing.
- Mix Dry Ingredients: In a bowl, sift together the almond flour and powdered sugar. Discard any large particles that remain in the sifter to guarantee a smooth batter.
- Make the Meringue: In a clean, dry bowl, beat the egg whites on medium speed until they become frothy. Gradually add the granulated sugar and increase the speed to high. Continue to beat until stiff, glossy peaks form. At this point, add the vanilla extract and orange zest.
- Color the Meringue: If using, add a few drops of red and orange food coloring to achieve a light peach color, gently folding until the color is evenly distributed.
- Combine Ingredients: Gently fold the almond flour mixture into the meringue in batches. Use a spatula to fold the mixture, scraping from the bottom of the bowl to incorporate evenly. The final batter should be smooth and fall in ribbons when the spatula is lifted.
- Pipe the Macarons: Transfer the batter to a piping bag fitted with a round tip. Pipe small circles onto the prepared baking sheets, leaving space between each macaron. Tap the baking sheets on the counter to release any air bubbles.
- Rest the Macarons: Allow the macarons to sit at room temperature for 30-60 minutes, or until a thin, dry skin forms on the surface. This helps in developing the signature “feet” when baked.
- Bake: Preheat the oven to 300°F (150°C). Bake the macarons for 15-18 minutes, rotating the baking sheet halfway through to guarantee even baking. The macarons are done when they’re firm to the touch. Let them cool completely on the baking sheets.
- Prepare the Filling: In a small saucepan, combine cranberries and orange juice. Simmer over medium heat until the cranberries are soft and the mixture thickens slightly. Allow to cool completely.
- Make the Buttercream: In a bowl, beat the softened butter until creamy. Gradually add powdered sugar and beat until smooth. Add the orange extract and cooled cranberry mixture, mixing until fully combined.
- Assemble the Macarons: Match macaron shells of similar size. Pipe a small amount of filling onto the flat side of one shell, and gently press another shell on top to create a sandwich. Repeat with remaining shells.
- Chill and Serve: Place the assembled macarons in an airtight container and refrigerate for at least 24 hours to allow the flavors to meld. Bring to room temperature before serving.
Extra Tips
When making macarons, it’s important to measure your ingredients accurately, as precision is key to achieving the perfect texture. Using a kitchen scale rather than measuring cups can help guarantee accuracy.
Additionally, confirm your mixing bowl and beaters are completely grease-free to achieve the best results with your meringue. If you’re new to macarons, practice patience and don’t be discouraged by any initial mishaps—macarons can be finicky, but they’re well worth the effort once you get the hang of it.
Cardamom and Almond Snowflake Cookies

Cardamom and Almond Snowflake Cookies are a delightful twist on traditional holiday cookies, combining the warm, aromatic flavor of cardamom with the nutty richness of almonds.
These cookies aren’t only visually stunning with their snowflake cutouts but also melt-in-your-mouth delicious, making them perfect for festive gatherings. The elegant design and exquisite taste make them a standout treat on any holiday dessert table.
Ideal for the Christmas season, these cookies can be enjoyed with a warm cup of tea or coffee, making them a cozy treat on a cold winter day.
Whether you’re baking them for a holiday party or as a homemade gift, Cardamom and Almond Snowflake Cookies are sure to impress your friends and family. This recipe is designed to serve 4-6 people, so you can share the joy of holiday baking with your loved ones.
Ingredients:
- 1 cup unsalted butter, room temperature
- 3/4 cup granulated sugar
- 1 large egg
- 1 teaspoon vanilla extract
- 1 teaspoon almond extract
- 2 cups all-purpose flour
- 1/2 teaspoon ground cardamom
- 1/4 teaspoon salt
- 1/2 cup finely ground almonds
- Powdered sugar for dusting
Instructions:
- Preheat the Oven: Begin by preheating your oven to 350°F (175°C). This guarantees that your cookies bake evenly and are ready as soon as the dough is prepared.
- Cream the Butter and Sugar: In a large mixing bowl, cream together the room temperature butter and granulated sugar using an electric mixer until the mixture is light and fluffy, about 3 minutes.
- Add Egg and Extracts: Beat in the egg, vanilla extract, and almond extract until the mixture is well combined and smooth.
- Mix Dry Ingredients: In a separate bowl, whisk together the all-purpose flour, ground cardamom, and salt until they’re evenly mixed.
- Combine Ingredients: Gradually add the dry ingredient mixture to the wet ingredients, mixing until just combined. Stir in the finely ground almonds to form a dough.
- Chill the Dough: Wrap the dough in plastic wrap and refrigerate for at least 1 hour. Chilling the dough makes it easier to roll out and helps the cookies hold their shape during baking.
- Roll and Cut the Dough: On a lightly floured surface, roll out the dough to about 1/4 inch thickness. Use a snowflake-shaped cookie cutter to cut out the cookies and place them on a baking sheet lined with parchment paper.
- Bake the Cookies: Bake in the preheated oven for 10-12 minutes, or until the edges are just starting to turn golden brown. Remove from the oven and let cool on the baking sheet for a few minutes before transferring to a wire rack to cool completely.
- Dust with Powdered Sugar: Once the cookies are completely cooled, dust them with a light coating of powdered sugar for a festive touch.
Extra Tips:
For the best results, confirm your butter is at room temperature before you start, as this will help achieve the right texture for the creamed mixture.
When rolling out the dough, keep it evenly thick to guarantee uniform baking. If you don’t have a snowflake cookie cutter, any festive shape will do, though the snowflake shape adds a special touch.
Finally, if you prefer a more pronounced almond flavor, consider adding a few drops of almond extract to the powdered sugar before dusting the cookies.
Enjoy your Cardamom and Almond Snowflake Cookies with a warm beverage for the perfect holiday indulgence.
Dark Chocolate Peppermint Bark Tart
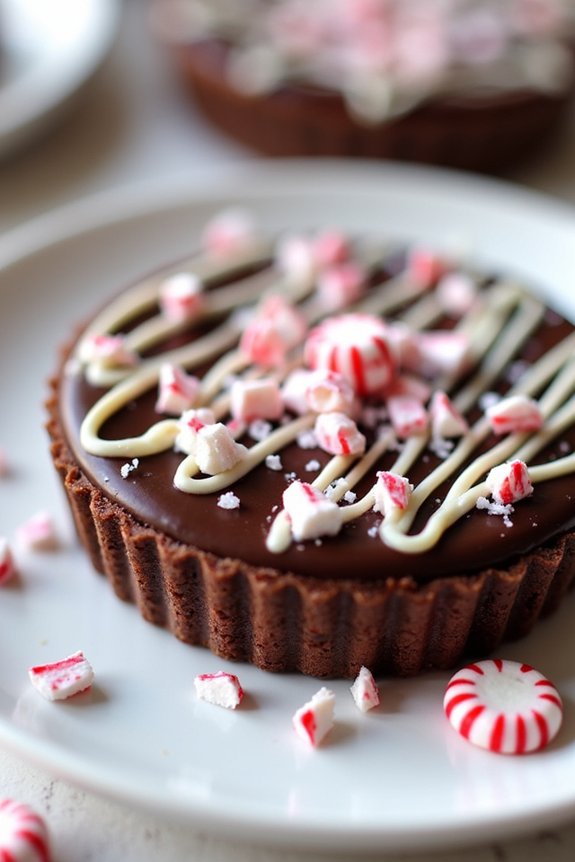
Dark Chocolate Peppermint Bark Tart is a delightful holiday dessert that combines the rich flavor of dark chocolate with the invigorating taste of peppermint. This decadent tart is perfect for a festive gathering, offering a beautiful presentation and a taste that captures the essence of the holiday season.
Whether you’re a seasoned baker or a novice in the kitchen, this recipe is straightforward and rewarding, providing a delicious treat that everyone will enjoy.
The tart consists of a crisp chocolate crust filled with a luscious dark chocolate ganache, topped with a layer of homemade peppermint bark. The contrast between the smooth, creamy chocolate and the crunchy peppermint pieces makes this tart an irresistible dessert. Serve this tart with a dollop of whipped cream or a scoop of vanilla ice cream for an extra touch of indulgence.
Designed to serve 4-6 people, this recipe guarantees that everyone at your holiday table will get a taste of this festive treat.
Ingredients (serves 4-6):
- 1 1/2 cups chocolate wafer cookies, crushed
- 1/4 cup unsalted butter, melted
- 1/4 teaspoon salt
- 1 cup heavy cream
- 8 ounces dark chocolate, finely chopped
- 1/2 teaspoon peppermint extract
- 1/2 cup crushed peppermint candies
- 1/4 cup white chocolate, melted
Instructions:
1. Prepare the Crust: Preheat your oven to 350°F (175°C). In a medium bowl, combine the crushed chocolate wafer cookies with the melted butter and salt. Mix until the crumbs are evenly coated and the mixture resembles wet sand.
Press the mixture firmly into the bottom and up the sides of a tart pan with a removable bottom. Bake the crust for 10 minutes, then set aside to cool.
2. Make the Ganache Filling: In a small saucepan, heat the heavy cream over medium heat until it just begins to simmer. Remove from heat and pour over the finely chopped dark chocolate in a heatproof bowl.
Let it sit for 2 minutes to melt the chocolate, then gently stir until smooth and glossy. Stir in the peppermint extract.
3. Assemble the Tart: Pour the chocolate ganache into the cooled tart crust, spreading it evenly with a spatula. Sprinkle the crushed peppermint candies over the top of the ganache in an even layer.
4. Decorate with White Chocolate: Drizzle the melted white chocolate over the top of the tart, creating a decorative pattern. You can use a spoon or a piping bag for more precision.
5. Chill and Serve: Place the tart in the refrigerator for at least 2 hours or until the ganache is set. Once set, remove the tart from the pan and slice it into wedges to serve.
Extra Tips: For the best results, use high-quality dark chocolate, as it will greatly enhance the flavor of the tart. If you have extra time, chilling the crust before baking can help it hold its shape better.
When melting the white chocolate, be careful not to overheat it, as it can seize and become unusable. If you don’t have a tart pan with a removable bottom, a regular pie dish will work, but it will be more challenging to remove the tart from the pan cleanly.
Enjoy your Dark Chocolate Peppermint Bark Tart as a delightful end to your holiday meal!
Citrus-Infused Shortbread Stars
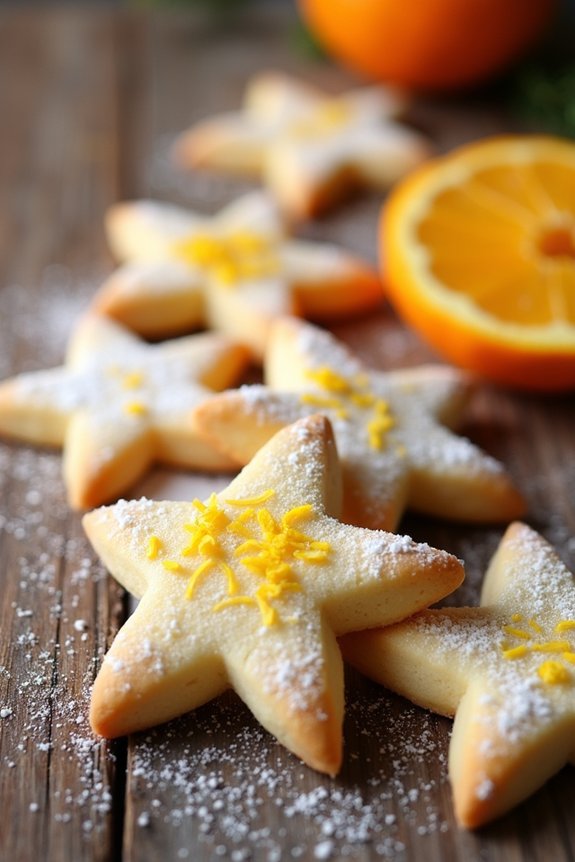
This holiday season, delight your family and friends with Citrus-Infused Shortbread Stars, a festive twist on the classic shortbread cookie. These buttery cookies are delicately flavored with the vibrant zest of oranges and lemons, adding an invigorating zing to each bite. Perfect for cookie exchanges, holiday parties, or simply enjoying with a cup of tea, these shortbread stars will bring a touch of elegance and a burst of citrus to your Christmas baking repertoire.
The recipe yields about 24-30 cookies, ideal for serving 4-6 people. The combination of citrus zest not only enhances the flavor but also adds a beautiful aroma that fills your kitchen with the spirit of the season. The dough is easy to work with and can be made ahead of time, making these cookies a convenient and delightful addition to your holiday baking list.
Ingredients:
- 1 cup unsalted butter, softened
- 1/2 cup granulated sugar
- 1/4 cup powdered sugar
- 1 teaspoon vanilla extract
- 1 teaspoon orange zest
- 1 teaspoon lemon zest
- 2 cups all-purpose flour
- 1/4 teaspoon salt
- Optional: additional powdered sugar for dusting
Instructions:
- Prepare the Dough: In a large mixing bowl, cream together the softened butter, granulated sugar, and powdered sugar using an electric mixer until the mixture is light and fluffy. This should take about 2-3 minutes.
- Add Flavors: Mix in the vanilla extract, orange zest, and lemon zest. Continue to beat until the zest is evenly distributed throughout the dough.
- Incorporate Dry Ingredients: Gradually add the all-purpose flour and salt to the butter mixture. Beat on low speed until the dough begins to come together. It should be smooth and slightly firm.
- Chill the Dough: Shape the dough into a flat disk and wrap it in plastic wrap. Refrigerate for at least 1 hour. This will make the dough easier to roll out and will help the cookies hold their shape during baking.
- Preheat and Prepare Baking Sheets: Preheat your oven to 350°F (175°C). Line two baking sheets with parchment paper.
- Roll Out the Dough: On a lightly floured surface, roll out the chilled dough to about 1/4 inch thickness. Use a star-shaped cookie cutter to cut out the cookies. Gather the scraps, re-roll, and cut out additional cookies.
- Bake the Cookies: Place the stars on the prepared baking sheets, leaving a little space between each cookie. Bake for 12-14 minutes, or until the edges are just beginning to turn golden. Be mindful not to overbake.
- Cool and Dust: Allow the cookies to cool on the baking sheets for 5 minutes before transferring them to a wire rack to cool completely. If desired, dust with additional powdered sugar for a festive touch.
Extra Tips: To guarantee your shortbread cookies retain their shape and have a perfect texture, make sure the butter is at room temperature before you begin. This ensures even mixing and a smooth dough.
If you prefer a more intense citrus flavor, you can add a bit more zest or a few drops of citrus extract. Additionally, if you’re making these cookies in advance, they can be stored in an airtight container for up to a week, allowing you to enjoy the citrus-infused goodness throughout the holiday season.
Eggnog Cheesecake With Gingersnap Crust
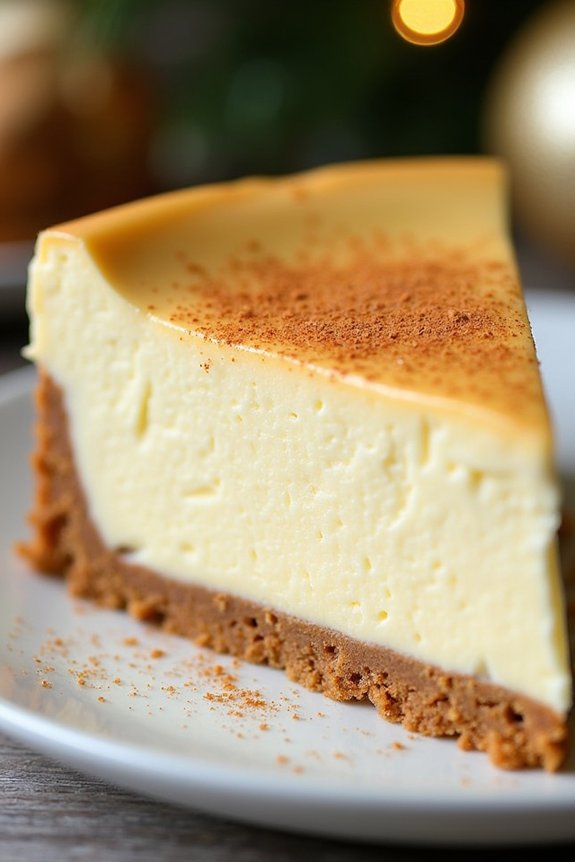
Eggnog Cheesecake With Gingersnap Crust is a delightful holiday dessert that combines the rich, creamy texture of cheesecake with the warm, spiced flavors of eggnog and gingersnaps. This festive treat is perfect for gatherings and celebrations, capturing the essence of Christmas in every bite.
The gingersnap crust adds a crunchy texture and a spiced base that perfectly complements the velvety eggnog-infused filling. Whether you’re an experienced baker or a novice in the kitchen, this recipe is both approachable and certain to impress your guests.
The following recipe serves 4-6 people, making it an ideal choice for a small holiday gathering or family dinner. The distinct layers of flavor in this cheesecake will leave everyone asking for seconds. With a few simple ingredients and easy-to-follow instructions, you can create a dessert that’s both visually stunning and deliciously satisfying.
Gather your ingredients, preheat your oven, and get ready to bake a cheesecake that embodies the spirit of the season.
Ingredients:
- 1 1/2 cups gingersnap cookie crumbs
- 1/4 cup unsalted butter, melted
- 16 oz cream cheese, softened
- 3/4 cup granulated sugar
- 2 tablespoons all-purpose flour
- 1/2 cup eggnog
- 2 large eggs
- 1/2 teaspoon vanilla extract
- 1/2 teaspoon ground nutmeg
Instructions:
- Prepare the Crust: Preheat your oven to 325°F (160°C). In a medium bowl, combine the gingersnap cookie crumbs and melted butter. Mix until the crumbs are evenly coated with butter. Press the mixture firmly into the bottom of an 8-inch springform pan to form an even crust layer. Bake the crust for 10 minutes, then remove from the oven and let it cool slightly.
- Make the Cheesecake Filling: In a large mixing bowl, beat the softened cream cheese until smooth and creamy. Gradually add the granulated sugar and flour, mixing until well combined. Slowly pour in the eggnog, continuing to beat the mixture until smooth. Add the eggs one at a time, mixing on low speed after each addition just until blended. Stir in the vanilla extract and ground nutmeg.
- Assemble the Cheesecake: Pour the cheesecake filling over the cooled gingersnap crust in the springform pan. Smooth the top with a spatula to guarantee an even surface.
- Bake the Cheesecake: Place the springform pan on a baking sheet to catch any potential drips. Bake in the preheated oven for 45-50 minutes or until the center is set but still slightly jiggly. Turn off the oven and leave the cheesecake inside to cool gradually with the oven door slightly ajar for about 1 hour.
- Chill and Serve: Remove the cheesecake from the oven and let it cool completely at room temperature. Once cooled, refrigerate the cheesecake for at least 4 hours or overnight to allow it to set fully. Before serving, carefully remove the cheesecake from the springform pan and transfer it to a serving plate. Optionally, garnish with a sprinkle of nutmeg or a dollop of whipped cream.
Extra Tips:
To prevent cracking, make sure all your ingredients are at room temperature before mixing. Avoid overmixing the batter to keep air bubbles to a minimum, which can cause cracking during baking.
If you notice the edges browning too quickly, cover them loosely with foil. For an extra festive touch, you can decorate the top of the cheesecake with holiday-themed toppings like sugared cranberries or a dusting of cinnamon.
Enjoy your Eggnog Cheesecake With Gingersnap Crust as a show-stopping centerpiece at your holiday table!
Maple Walnut Scones With Vanilla Glaze

Maple Walnut Scones with Vanilla Glaze are a delightful treat that combines the warm, nutty flavors of maple syrup and walnuts with the sweet, creamy texture of a vanilla glaze. Perfect for a cozy morning breakfast or an afternoon tea, these scones are rich in flavor and have a tender crumb. Their lightly crisp exterior and soft, buttery interior make them irresistible, especially when served warm.
These scones are relatively quick and easy to prepare, requiring just a few simple steps to achieve a bakery-quality result at home. The key to the perfect scone lies in the balance of ingredients and proper technique, guaranteeing that each bite is a harmonious blend of sweet and savory. Follow this recipe to create a batch of Maple Walnut Scones with Vanilla Glaze that will impress your family and friends.
Ingredients (serves 4-6):
- 2 cups all-purpose flour
- 1/3 cup granulated sugar
- 1 tablespoon baking powder
- 1/2 teaspoon salt
- 1/2 cup unsalted butter, chilled and cubed
- 1/2 cup milk
- 1/4 cup pure maple syrup
- 1 teaspoon vanilla extract
- 1/2 cup chopped walnuts
- 1 large egg, beaten
Vanilla Glaze:
- 1 cup powdered sugar
- 2 tablespoons milk
- 1 teaspoon vanilla extract
Cooking Instructions:
- Preheat the Oven: Begin by preheating your oven to 400°F (200°C). Line a baking sheet with parchment paper to prevent the scones from sticking.
- Mix Dry Ingredients: In a large mixing bowl, whisk together the flour, sugar, baking powder, and salt until well combined.
- Incorporate Butter: Add the chilled, cubed butter to the dry ingredients. Use a pastry cutter or your fingers to work the butter into the flour mixture until it resembles coarse crumbs.
- Combine Wet Ingredients: In a separate bowl, mix the milk, maple syrup, and vanilla extract. Pour this mixture into the dry ingredients and gently stir until just combined. Be careful not to overmix.
- Add Walnuts: Fold the chopped walnuts into the dough, ensuring they’re evenly distributed.
- Shape the Dough: Turn the dough out onto a lightly floured surface. Gently knead it a few times, then shape it into a 1-inch thick round. Cut the round into 8 wedges and place them on the prepared baking sheet.
- Egg Wash: Brush the tops of the scones with the beaten egg to give them a golden finish once baked.
- Bake: Bake the scones in the preheated oven for 15-18 minutes, or until they’re golden brown and a toothpick inserted into the center comes out clean.
- Prepare the Glaze: While the scones are baking, prepare the vanilla glaze by whisking together the powdered sugar, milk, and vanilla extract until smooth.
- Glaze the Scones: Allow the scones to cool slightly on a wire rack before drizzling the vanilla glaze over the top. Serve warm or at room temperature.
Extra Tips:
For the best texture, confirm that your butter is cold and work quickly to incorporate it into the flour mixture. This helps create light, flaky layers.
If you prefer a stronger maple flavor, you can add a teaspoon of maple extract to the wet ingredients. Additionally, feel free to experiment with different nuts or add-ins, such as pecans or dried cranberries, to customize your scones.
Finally, if you find the glaze too thick, you can thin it with a little extra milk until it reaches your desired consistency.
Red Velvet and Cream Cheese Swirl Brownies
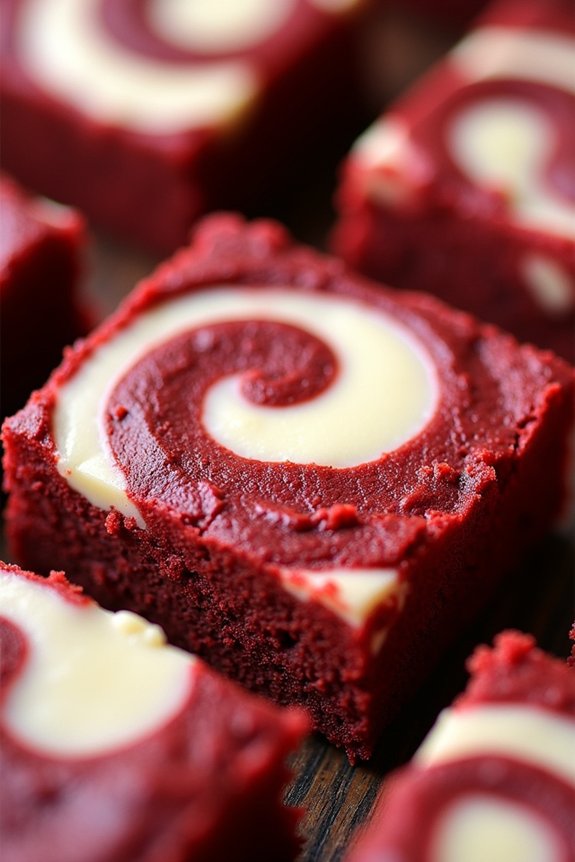
Red Velvet and Cream Cheese Swirl Brownies are a delightful treat perfect for holiday gatherings or cozy nights in. These decadent brownies combine the rich flavor of red velvet cake with a luscious cream cheese swirl, creating a visually stunning and deliciously indulgent dessert. The contrast of flavors and textures makes this a crowd-pleaser, and the festive colors are perfect for Christmas celebrations.
Whether you’re a seasoned baker or a beginner, this recipe is straightforward and rewarding, resulting in a batch of brownies that are certain to impress family and friends.
These brownies aren’t only beautiful but also incredibly moist and tender, with a subtle cocoa flavor that complements the creamy, tangy swirl of cream cheese. The red velvet base provides a perfect canvas for the marbled cream cheese topping, guaranteeing each bite is as flavorful as it’s visually appealing.
This recipe yields enough for 4-6 people, making it ideal for sharing during holiday festivities or as a special treat for loved ones.
Ingredients for 4-6 servings:
- 1 cup all-purpose flour
- 1 cup granulated sugar
- 1/4 cup unsweetened cocoa powder
- 1/2 teaspoon baking powder
- 1/4 teaspoon salt
- 1/2 cup unsalted butter, melted
- 2 large eggs
- 1 tablespoon red food coloring
- 1 teaspoon vanilla extract
- 8 oz cream cheese, softened
- 1/3 cup granulated sugar (for cream cheese mixture)
- 1 large egg (for cream cheese mixture)
- 1/2 teaspoon vanilla extract (for cream cheese mixture)
Cooking Instructions:
1. Preheat the Oven:
Preheat your oven to 350°F (175°C). Grease an 8×8-inch baking pan and line it with parchment paper, leaving an overhang on the sides for easy removal of the brownies.
2. Prepare the Red Velvet Batter:
In a large mixing bowl, whisk together the flour, granulated sugar, cocoa powder, baking powder, and salt. In a separate bowl, combine the melted butter, eggs, red food coloring, and vanilla extract. Stir the wet ingredients into the dry ingredients until well combined, but don’t overmix.
3. Prepare the Cream Cheese Mixture:
In another bowl, beat the softened cream cheese until smooth. Add the granulated sugar, egg, and vanilla extract, and continue to beat until the mixture is creamy and well blended.
4. Layer the Batter:
Pour about two-thirds of the red velvet batter into the prepared baking pan, spreading it evenly. Then, pour the cream cheese mixture over the red velvet layer, spreading it gently. Drop spoonfuls of the remaining red velvet batter on top.
5. Create the Swirl:
Using a knife or a skewer, gently swirl the cream cheese mixture with the red velvet batter to create a marbled effect. Be careful not to over-swirl, as you want distinct layers of color.
6. Bake:
Place the baking pan in the preheated oven and bake for 30-35 minutes, or until a toothpick inserted into the center comes out with just a few moist crumbs. Avoid overbaking to guarantee the brownies remain moist.
7. Cool and Serve:
Allow the brownies to cool completely in the pan on a wire rack. Once cooled, use the parchment paper overhang to lift the brownies out of the pan. Cut into squares and serve.
Extra Tips:
For a deeper red color, you can adjust the amount of red food coloring as desired. Make sure the cream cheese is at room temperature before mixing to avoid lumps in your swirl.
If you prefer a more intense chocolate flavor, you can increase the cocoa powder slightly, but keep in mind this will affect the red velvet color.
These brownies can be stored in an airtight container at room temperature for up to three days or refrigerated for up to a week. Enjoy these brownies with a glass of milk or a hot cup of cocoa for a perfect holiday indulgence.
Rosemary and Lemon Olive Oil Cake
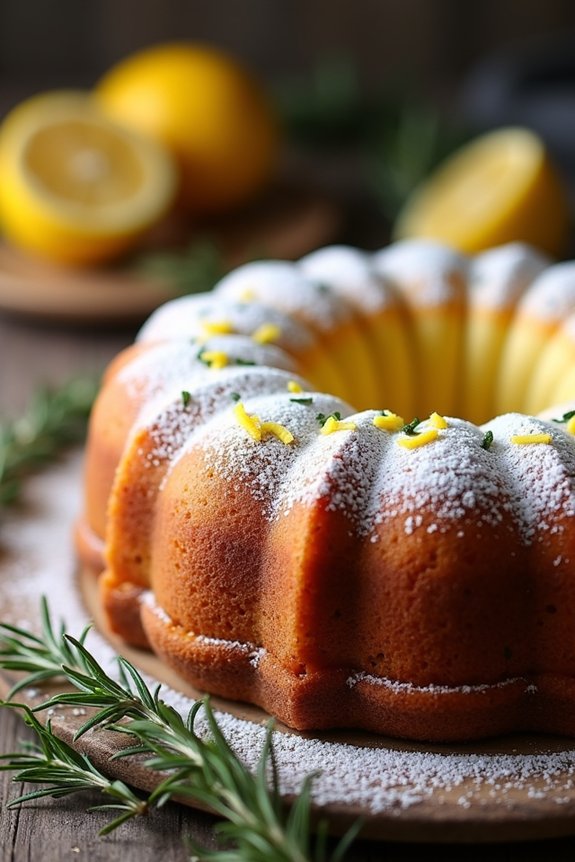
Rosemary and Lemon Olive Oil Cake is a delightful dessert that brings a sophisticated twist to traditional holiday baking. The combination of fragrant rosemary and zesty lemon in an olive oil cake creates a unique flavor profile that’s both invigorating and comforting. This cake is perfect for those looking to add a touch of gourmet flair to their Christmas celebrations. Its moist texture and aromatic qualities make it an ideal choice for a holiday dessert that will impress your guests.
This cake isn’t only delicious but also simple to make, using ingredients that are likely already in your pantry. The olive oil adds a richness and depth of flavor, while the rosemary provides an unexpected herbal note that pairs beautifully with the bright citrus of the lemon. Whether you’re a seasoned baker or a beginner, this recipe is straightforward and rewarding, making it a great addition to your holiday baking repertoire.
Ingredients (Serving Size: 4-6 people):
- 1 1/2 cups all-purpose flour
- 1 cup granulated sugar
- 1/2 teaspoon baking powder
- 1/2 teaspoon baking soda
- 1/4 teaspoon salt
- 3/4 cup extra virgin olive oil
- 3 large eggs
- Zest of 2 lemons
- 1/4 cup freshly squeezed lemon juice
- 1 tablespoon chopped fresh rosemary
- 1/2 teaspoon vanilla extract
- Confectioners’ sugar, for dusting
Instructions:
- Preheat the Oven: Start by preheating your oven to 350°F (175°C). This guarantees that your cake bakes evenly and is ready to go as soon as the batter is prepared.
- Prepare the Pan: Grease a 9-inch round cake pan with olive oil or line it with parchment paper. This will help in easily removing the cake from the pan once baked.
- Mix Dry Ingredients: In a medium-sized bowl, whisk together the flour, sugar, baking powder, baking soda, and salt. This step guarantees all dry ingredients are well combined and helps prevent lumps in your batter.
- Combine Wet Ingredients: In a large bowl, beat together the olive oil and eggs until well combined. Then, add the lemon zest, lemon juice, chopped rosemary, and vanilla extract. Mix thoroughly to guarantee all the flavors are evenly distributed.
- Incorporate Dry Ingredients: Gradually add the dry ingredients to the wet mixture. Stir gently with a spatula until just combined, being careful not to overmix, as this can result in a dense cake.
- Pour and Bake: Pour the batter into the prepared cake pan, smoothing the top with a spatula. Place in the preheated oven and bake for 35-40 minutes, or until a toothpick inserted into the center comes out clean.
- Cool and Serve: Allow the cake to cool in the pan for about 15 minutes before transferring it to a wire rack to cool completely. Once cooled, dust the cake with confectioners’ sugar before serving.
Extra Tips: For an enhanced flavor, consider using Meyer lemons if available, as they provide a sweeter and more fragrant zest. If you prefer a stronger rosemary flavor, you can increase the quantity slightly, but be cautious as it can overpower the other flavors.
This cake pairs beautifully with a dollop of whipped cream or a scoop of vanilla ice cream for an extra indulgent treat. Additionally, it can be made a day in advance, as the flavors tend to meld and intensify, making it even more delicious.