

The scent of freshly baked cookies in Grandma’s kitchen was always a holiday highlight. A blend of sugar and spice that promised warmth and love with every bite. These vintage Christmas cookie recipes are more than just delicious treats; they are cherished family memories. From the nostalgia of gingerbread men to the delight of chocolate crinkle cookies, baking these classics brings a touch of magic to the season. Curious to explore these timeless favorites?
Classic Sugar Cookies
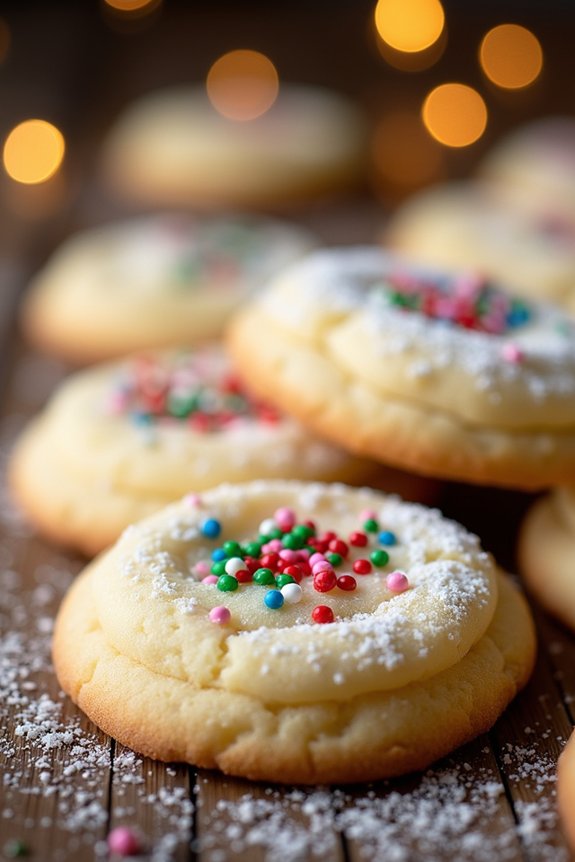
Classic Sugar Cookies are a delightful staple of the holiday season, bringing a sweet, buttery flavor that pairs perfectly with an array of decorative toppings. These cookies aren’t only delicious but also simple to make, making them an ideal choice for baking with family and friends.
The basic dough serves as a blank canvas for creativity, allowing you to cut them into festive shapes and decorate them with colorful icing, sprinkles, or even a dusting of powdered sugar. With a tender, crumbly texture and a rich vanilla aroma, Classic Sugar Cookies are certain to be a hit at any holiday gathering or cookie swap.
Perfect for a serving size of 4-6 people, this recipe is designed to yield enough cookies to share while also leaving room for plenty of personalization. The dough is easy to prepare and handle, even for novice bakers, and the resulting cookies strike a balance between crisp edges and soft centers.
Whether you’re planning to indulge in these cookies fresh from the oven or package them up as a heartfelt holiday gift, Classic Sugar Cookies are a timeless treat that captures the essence of Christmas cheer.
Ingredients:
- 2 3/4 cups all-purpose flour
- 1 teaspoon baking soda
- 1/2 teaspoon baking powder
- 1 cup unsalted butter, softened
- 1 1/2 cups granulated sugar
- 1 egg
- 1 teaspoon vanilla extract
- 1/2 teaspoon almond extract
- 3-4 tablespoons heavy cream (optional, for softer cookies)
- Assorted decorations (sprinkles, colored sugar, icing, etc.)
Instructions:
- Preheat and Prepare: Begin by preheating your oven to 350°F (175°C). Line two baking sheets with parchment paper to guarantee the cookies don’t stick during baking.
- Mix Dry Ingredients: In a medium bowl, whisk together the all-purpose flour, baking soda, and baking powder. This step guarantees that the leavening agents are evenly distributed throughout the flour.
- Cream Butter and Sugar: In a large mixing bowl, cream together the softened butter and granulated sugar until the mixture is light and fluffy. This should take about 2-3 minutes using an electric mixer at medium speed.
- Combine Wet Ingredients: Add the egg, vanilla extract, and almond extract to the butter-sugar mixture. Mix until well combined, ensuring that the egg is fully incorporated.
- Incorporate Dry Ingredients: Gradually add the dry ingredients to the wet mixture, mixing on low speed until just combined. Be careful not to overmix, as this can result in tougher cookies.
- Optional Cream Addition: If you desire softer cookies, mix in 3-4 tablespoons of heavy cream until the dough reaches your desired consistency.
- Shape the Cookies: Roll tablespoons of dough into balls and place them on the prepared baking sheets, leaving about 2 inches of space between each cookie. For a classic sugar cookie appearance, gently flatten each ball with your hand or a flat-bottomed glass.
- Decorate: Before baking, sprinkle the cookies with your choice of decorations like colored sugar or sprinkles.
- Bake: Place the baking sheets in the preheated oven and bake for 8-10 minutes, or until the edges are just beginning to turn golden brown. Be careful not to overbake, as the cookies will continue to firm up as they cool.
- Cool and Serve: Allow the cookies to cool on the baking sheets for 5 minutes before transferring them to a wire rack to cool completely. Once cool, you can further decorate them with icing if desired.
Extra Tips:
For the best results, confirm that your butter is at room temperature, as this will help it cream more effectively with the sugar. If you’re decorating with icing, make sure the cookies are completely cooled to avoid melting the icing.
For added flavor, consider adding a teaspoon of citrus zest to the dough. Additionally, chilling the dough for 30 minutes before baking can help prevent the cookies from spreading too much in the oven, maintaining their shape better.
Enjoy the process of decorating and be as creative as you like – after all, these cookies are all about spreading joy and holiday spirit!
Gingerbread Men

Gingerbread Men are a timeless holiday treat that brings nostalgia and warmth to the Christmas season. With their fragrant blend of spices and delightful shapes, they’re as fun to make as they’re to eat. Perfect as a festive snack, or a charming gift, these cookies are sure to add a touch of magic to your holiday celebrations. The following recipe serves 4-6 people, providing enough cookies to share with family and friends or to enjoy throughout the holiday season.
Creating Gingerbread Men involves a combination of rich molasses and warming spices like ginger, cinnamon, and cloves. The dough is rolled out and cut into the classic gingerbread man shape, then baked to perfection. Once cooled, the cookies can be decorated with icing, candies, or left plain to enjoy the full depth of their spiced flavor.
Let’s plunge into the ingredients and steps needed to create these delightful holiday cookies.
Ingredients for Serving Size of 4-6 People:
- 3 cups all-purpose flour
- 3/4 teaspoon baking soda
- 1 tablespoon ground ginger
- 1 tablespoon ground cinnamon
- 1/2 teaspoon ground cloves
- 1/2 teaspoon salt
- 1/4 teaspoon ground nutmeg
- 1/2 cup (1 stick) unsalted butter, room temperature
- 1/2 cup packed dark-brown sugar
- 1 large egg
- 1/2 cup unsulfured molasses
- 2 teaspoons pure vanilla extract
Cooking Instructions:
- Prepare the Dry Ingredients: In a large bowl, whisk together the flour, baking soda, ginger, cinnamon, cloves, salt, and nutmeg. This will guarantee that all the spices are evenly distributed throughout the dough.
- Cream the Butter and Sugar: In a separate large bowl, using an electric mixer, cream the butter and brown sugar together on medium speed until the mixture is light and fluffy, about 3 minutes.
- Add Wet Ingredients: Beat in the egg, molasses, and vanilla extract until fully combined. The mixture should be smooth and well-blended.
- Combine Dry and Wet Ingredients: Gradually add the dry ingredients to the wet ingredients, mixing on low speed until the dough is just combined. Be careful not to overmix, as this can make the cookies tough.
- Chill the Dough: Divide the dough into two equal parts, flatten into disks, wrap in plastic wrap, and refrigerate for at least 1 hour. Chilling the dough will make it easier to roll out and cut.
- Preheat the Oven: Preheat your oven to 350°F (175°C) and line two baking sheets with parchment paper.
- Roll Out the Dough: On a lightly floured surface, roll out one disk of dough to about 1/4-inch thickness. Use a gingerbread man cookie cutter to cut out shapes, and transfer them to the prepared baking sheets, leaving some space between each cookie.
- Bake the Cookies: Bake in the preheated oven for 8-10 minutes, or until the edges are firm and the cookies are fragrant. Allow them to cool on the baking sheet for a few minutes before transferring them to a wire rack to cool completely.
- Decorate: Once cooled, decorate the gingerbread men with icing, candies, or other toppings of your choice.
Extra Tips:
When preparing your gingerbread men, be sure not to overwork the dough; this can result in tough cookies rather than the desired tender and slightly chewy texture.
If you find the dough is too sticky to work with, add a little more flour during the rolling process. For a deeper flavor, consider making the dough a day in advance to allow the spices to fully infuse.
Finally, let your creativity shine with the decorations—these cookies are as much about fun as they’re about flavor!
Peanut Butter Blossoms
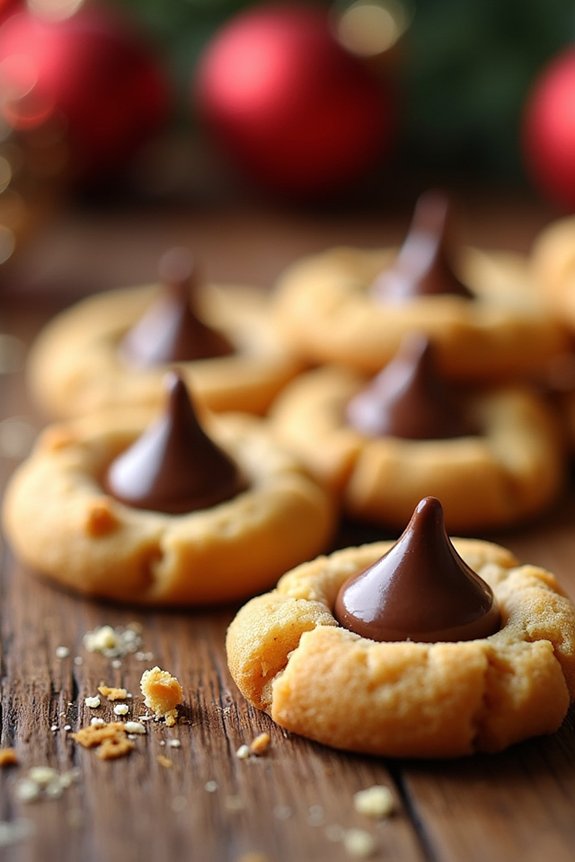
Peanut Butter Blossoms are a classic holiday treat that combines the rich, creamy taste of peanut butter with the sweet, decadent flavor of chocolate. Perfectly soft and chewy, these cookies are a delightful addition to any Christmas cookie platter. With a chocolate kiss nestled in the center of each cookie, Peanut Butter Blossoms are as visually appealing as they’re delicious. They’re a nostalgic favorite that brings back memories of festive gatherings and family celebrations.
Originating in the mid-20th century, Peanut Butter Blossoms have remained a beloved staple in holiday baking. They’re simple to make yet always impressive, making them ideal for both novice and seasoned bakers. This recipe yields approximately 24-30 cookies, which is perfect for serving 4-6 people. So gather your ingredients and preheat your oven, as these mouthwatering cookies are bound to become a beloved tradition in your home.
Ingredients:
- 1/2 cup granulated sugar
- 1/2 cup packed brown sugar
- 1/2 cup creamy peanut butter
- 1/2 cup unsalted butter, softened
- 1 large egg
- 1 teaspoon vanilla extract
- 1 1/2 cups all-purpose flour
- 3/4 teaspoon baking soda
- 1/2 teaspoon baking powder
- 1/4 teaspoon salt
- Additional granulated sugar for rolling
- 24-30 chocolate kisses, unwrapped
Instructions:
- Preheat the Oven: Start by preheating your oven to 375°F (190°C) to guarantee it’s at the right temperature when your cookies are ready to bake.
- Mix Wet Ingredients: In a large mixing bowl, combine the granulated sugar, brown sugar, peanut butter, and softened butter. Use an electric mixer on medium speed to blend these ingredients until the mixture is smooth and creamy.
- Add Egg and Vanilla: Crack the egg into the bowl and add the vanilla extract. Mix again until the egg is fully incorporated and the mixture is well combined.
- Combine Dry Ingredients: In a separate bowl, whisk together the flour, baking soda, baking powder, and salt. Gradually add this dry mixture to the wet mixture, stirring well after each addition, until a dough forms.
- Shape the Cookies: Scoop out rounded teaspoons of dough and roll them into balls. Roll each ball in additional granulated sugar to coat.
- Bake the Cookies: Place the dough balls on an ungreased cookie sheet, about 2 inches apart. Bake in the preheated oven for 8-10 minutes, or until the edges are lightly golden but the centers are still soft.
- Add the Chocolate Kiss: Remove the cookies from the oven and immediately press a chocolate kiss into the center of each cookie. The cookie will crack slightly, which is normal. Allow the cookies to cool on the baking sheet for about 2 minutes before transferring them to a wire rack to cool completely.
Extra Tips:
For best results, make sure all your ingredients are at room temperature before you start mixing. This helps the dough come together more smoothly.
If you want a more intense peanut butter flavor, consider using natural peanut butter. Also, be careful not to overbake the cookies; they should be soft and chewy, not hard.
To prevent the chocolate kisses from melting too much, wait a few seconds after removing the cookies from the oven before pressing them in. Enjoy your Peanut Butter Blossoms with a tall glass of milk or a warm cup of cocoa for the perfect holiday treat.
Snickerdoodles

Snickerdoodles are a classic holiday cookie that bring warmth and nostalgia to any festive gathering. With their soft, chewy texture and distinctive cinnamon-sugar coating, these cookies are a perennial favorite during the Christmas season. Perfect for sharing with family and friends or enjoying with a warm cup of cocoa, Snickerdoodles are a delightful addition to any cookie platter.
The vintage recipe has been passed down through generations, preserving the cherished flavors and comforting memories associated with these sweet treats.
Creating Snickerdoodles is a straightforward process that yields delightful results. The key to their unique flavor is the combination of cream of tartar and cinnamon, which gives them a slight tang and a spicy warmth. This recipe is designed to make enough cookies to serve 4-6 people, making it ideal for a small gathering or as part of a larger holiday spread.
With just a few simple ingredients and steps, you can easily whip up a batch of these beloved cookies and fill your home with the inviting aroma of cinnamon and sugar.
Ingredients (Serving Size: 4-6 people):
- 1 cup (2 sticks) unsalted butter, softened
- 1 1/2 cups granulated sugar
- 2 large eggs
- 2 3/4 cups all-purpose flour
- 2 teaspoons cream of tartar
- 1 teaspoon baking soda
- 1/4 teaspoon salt
- 2 tablespoons ground cinnamon
Cooking Instructions:
- Preheat the Oven: Begin by preheating your oven to 375°F (190°C). Line two baking sheets with parchment paper to prevent the cookies from sticking.
- Cream the Butter and Sugar: In a large mixing bowl, cream together the softened butter and 1 1/2 cups of granulated sugar using an electric mixer on medium speed until the mixture is light and fluffy. This should take about 2-3 minutes.
- Add Eggs: Beat in the eggs one at a time, making certain each is fully incorporated before adding the next. Continue to mix until well combined.
- Combine Dry Ingredients: In a separate bowl, whisk together the flour, cream of tartar, baking soda, and salt. This guarantees that the dry ingredients are evenly distributed before mixing with the wet ingredients.
- Mix Dry and Wet Ingredients: Gradually add the dry mixture to the wet ingredients, mixing on a low speed to avoid overworking the dough. Mix until just combined and a sticky dough forms.
- Prepare Cinnamon-Sugar Coating: In a small bowl, combine the remaining 1/4 cup of granulated sugar with the ground cinnamon. Mix well.
- Shape and Coat the Dough: Roll tablespoon-sized amounts of dough into balls, then roll each ball in the cinnamon-sugar mixture until fully coated.
- Bake the Cookies: Place the coated dough balls onto the prepared baking sheets, spacing them about 2 inches apart to allow for spreading. Bake in the preheated oven for 9-11 minutes, or until the edges are lightly golden. The centers should remain soft.
- Cool the Cookies: Remove the cookies from the oven and allow them to cool on the baking sheets for about 5 minutes before transferring them to wire racks to cool completely.
Extra Tips: For perfectly chewy Snickerdoodles, make sure not to overbake them; the cookies should feel soft in the center when you take them out of the oven, as they continue to firm up as they cool.
If you prefer a more pronounced cinnamon flavor, consider adjusting the cinnamon-sugar ratio to your liking. Additionally, using room temperature ingredients guarantees a smoother dough and even baking.
Enjoy your homemade Snickerdoodles fresh with a glass of milk or store them in an airtight container to preserve their delightful texture for up to a week.
Spritz Cookies
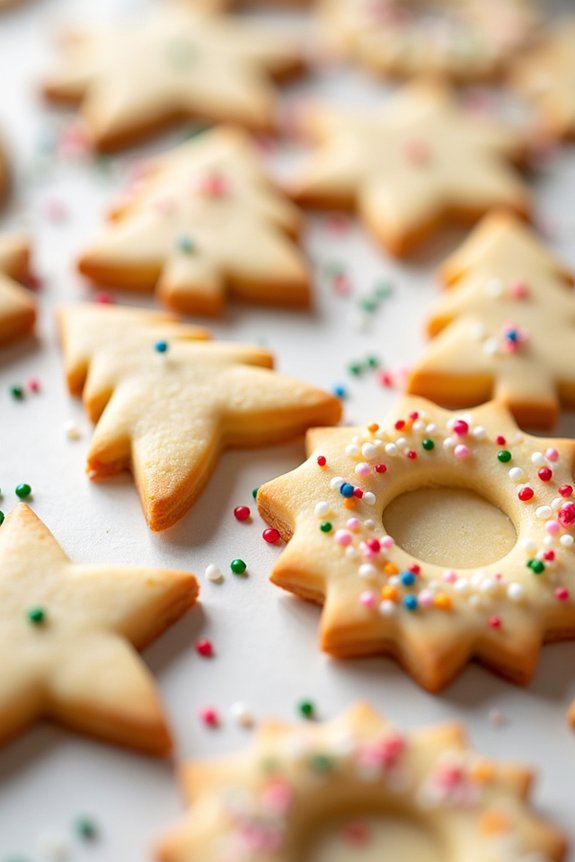
Spritz Cookies are a classic holiday treat that have been enjoyed for generations. These delightful cookies are known for their buttery texture and their ability to hold an intricate shape, thanks to the use of a cookie press.
Originating from Scandinavian traditions, Spritz Cookies are often adorned with colorful sprinkles or a light dusting of sugar, making them an appealing addition to any holiday cookie platter. Their delicate flavor and festive appearance make them a favorite during the Christmas season.
To create the perfect batch of Spritz Cookies, it’s important to use high-quality ingredients and a reliable cookie press. This recipe yields approximately 4 to 6 dozen cookies, depending on the size of your cookie press and the shapes you choose. The dough comes together quickly, allowing you to focus on the creative aspect of pressing out beautifully shaped cookies.
Whether you prefer traditional stars, wreaths, or trees, these cookies are sure to bring a touch of nostalgia and joy to your holiday gatherings.
Ingredients (Serves 4-6):
- 1 cup unsalted butter, softened
- 3/4 cup granulated sugar
- 1 large egg
- 1 teaspoon vanilla extract
- 1/2 teaspoon almond extract
- 2 1/4 cups all-purpose flour
- 1/4 teaspoon salt
- Colored sugar or sprinkles for decoration (optional)
Cooking Instructions:
- Preheat the Oven: Begin by preheating your oven to 375°F (190°C). This guarantees your cookies bake evenly and hold their shape.
- Cream the Butter and Sugar: In a large mixing bowl, cream together the softened butter and granulated sugar until light and fluffy. This usually takes about 2-3 minutes using an electric mixer on medium speed.
- Add the Egg and Extracts: Beat in the egg, vanilla extract, and almond extract until well combined. These flavors add depth to the cookies and complement the buttery base.
- Incorporate the Dry Ingredients: Gradually add the flour and salt to the wet mixture, mixing on low speed until a smooth dough forms. Be careful not to overmix, as this can make the cookies tough.
- Prepare the Cookie Press: Fill your cookie press with the dough and choose your desired disk shape. Press the cookies onto ungreased baking sheets, spacing them about 1 inch apart.
- Decorate (Optional): If desired, sprinkle the cookies with colored sugar or sprinkles before baking to add a festive touch.
- Bake the Cookies: Place the baking sheets in the preheated oven and bake for 8-10 minutes, or until the edges are just beginning to turn golden. Avoid over-baking to keep the cookies tender.
- Cool: Remove the cookies from the oven and allow them to cool on the baking sheets for 2 minutes before transferring them to wire racks to cool completely.
Extra Tips:
To make sure your Spritz Cookies retain their shape, use room-temperature ingredients, as colder dough can be difficult to press. If the dough becomes too soft during the process, refrigerate it for a few minutes to firm it up.
Experiment with different shapes and decorations to personalize your cookies for various holiday celebrations. Finally, store the cookies in an airtight container to maintain their freshness and buttery taste.
Thumbprint Jam Cookies
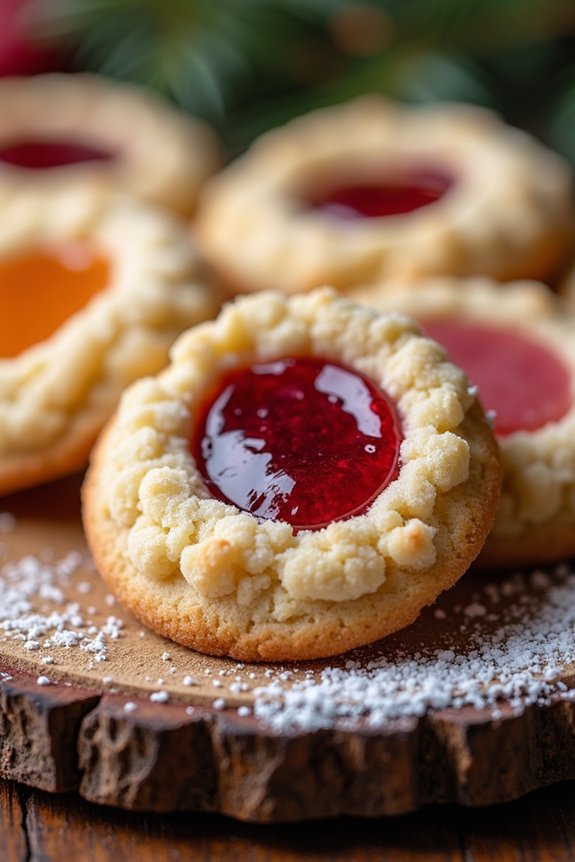
Thumbprint Jam Cookies are a classic treat that brings a touch of nostalgia to any holiday gathering. These delicious cookies are characterized by their buttery, crumbly texture and the sweet burst of jam nestled in the center. Perfect for a holiday cookie swap or as a sweet gift, these cookies offer a delightful combination of flavors and textures that are certain to please both young and old alike.
The history of thumbprint cookies can be traced back to Sweden, where they’re known as “Hollongrotta,” meaning “raspberry cave.” In this recipe, the rich buttery dough is rolled into balls, pressed with the thumb to create a small well, and filled with your choice of jam. Whether you prefer raspberry, apricot, or strawberry, the jam adds a vibrant pop of color and a sweet tang that perfectly complements the tender crumb of the cookie.
Ingredients (Serves 4-6 people):
- 1 cup unsalted butter, softened
- 2/3 cup granulated sugar
- 1/2 teaspoon vanilla extract
- 2 cups all-purpose flour
- 1/2 teaspoon salt
- 1/2 cup of your favorite jam (raspberry, apricot, or strawberry)
- Optional: powdered sugar for dusting
Cooking Instructions:
- Preheat and Prepare: Preheat your oven to 350°F (175°C). Line two baking sheets with parchment paper or silicone baking mats to guarantee the cookies don’t stick.
- Cream Butter and Sugar: In a large mixing bowl, cream together the softened butter and granulated sugar using an electric mixer on medium speed until the mixture is light and fluffy, about 3-4 minutes. Add the vanilla extract and mix until combined.
- Combine Dry Ingredients: In a separate bowl, whisk together the all-purpose flour and salt. Gradually add the dry ingredients to the butter mixture, mixing on low speed until the dough begins to come together.
- Shape the Cookies: Scoop tablespoon-sized portions of dough and roll them into smooth balls. Place the balls on the prepared baking sheets, spacing them about 2 inches apart.
- Create Thumbprints: Using your thumb or the back of a spoon, gently press down into the center of each dough ball to create a small well or indentation.
- Fill with Jam: Spoon about 1/2 teaspoon of your chosen jam into each indentation, being careful not to overfill.
- Bake: Bake the cookies in the preheated oven for 12-15 minutes, or until the edges are lightly golden. Keep an eye on the cookies to confirm they don’t overbake.
- Cool and Serve: Allow the cookies to cool on the baking sheet for a few minutes before transferring them to wire racks to cool completely. If desired, lightly dust with powdered sugar before serving.
Extra Tips: For the best results, make sure your butter is at room temperature, as this guarantees a smooth dough consistency. If you find the dough too sticky, refrigerate it for 20-30 minutes before rolling into balls.
When adding the jam, consider using a piping bag for more precise filling. Experiment with different jams or even lemon curd for a unique twist. Storing the cookies in an airtight container will keep them fresh for up to a week, making them perfect for holiday preparations.
Chocolate Crinkle Cookies
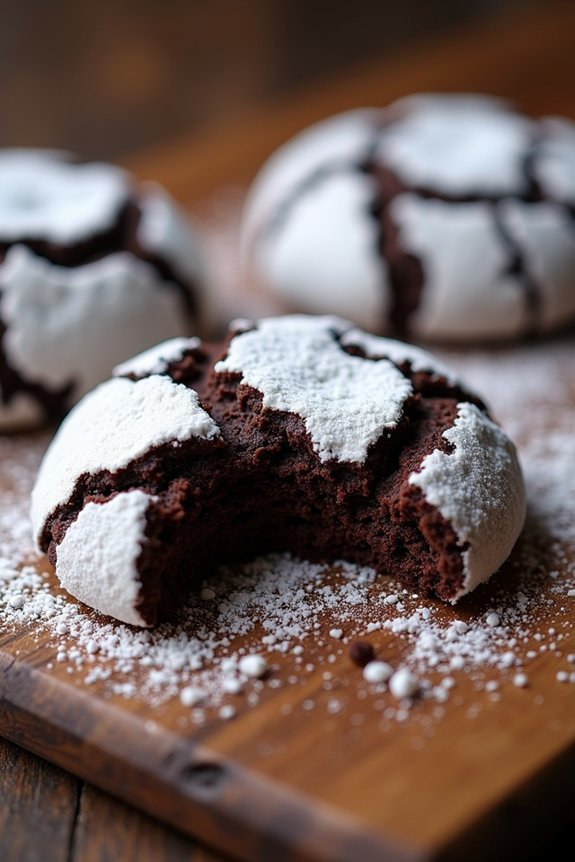
Chocolate Crinkle Cookies are a classic treat that perfectly encapsulate the festive spirit with their rich, fudgy interior and a beautifully crackled exterior dusted with powdered sugar.
These cookies are an ideal addition to any holiday dessert table, offering a delicious contrast of textures and a deep chocolate flavor that’s both indulgent and comforting. Whether you’re baking for a holiday party or for a cozy night in by the fire, Chocolate Crinkle Cookies are sure to impress with their striking appearance and irresistible taste.
This vintage recipe has been passed down through generations, bringing joy and warmth to countless holiday gatherings. The secret to achieving the perfect crinkle lies in the chilling of the dough, which allows the cookies to crack beautifully during baking.
This recipe makes approximately 24-30 cookies, suitable for serving 4-6 people, guaranteeing everyone gets their fair share of this holiday delight.
Ingredients for 4-6 servings:
- 1 cup unsweetened cocoa powder
- 2 cups granulated sugar
- 1/2 cup vegetable oil
- 4 large eggs
- 2 teaspoons vanilla extract
- 2 cups all-purpose flour
- 2 teaspoons baking powder
- 1/2 teaspoon salt
- 1 cup powdered sugar
Cooking Instructions:
- Prepare the Dough: In a large mixing bowl, combine 1 cup of unsweetened cocoa powder, 2 cups of granulated sugar, and 1/2 cup of vegetable oil. Mix until the ingredients are well combined and the mixture is smooth.
- Add Wet Ingredients: Add 4 large eggs to the cocoa mixture, one at a time, stirring well after each addition. Then, incorporate 2 teaspoons of vanilla extract into the mixture, making sure everything is well blended.
- Dry Ingredients: In another bowl, whisk together 2 cups of all-purpose flour, 2 teaspoons of baking powder, and 1/2 teaspoon of salt. Gradually add the dry ingredients to the wet mixture, stirring until a sticky dough forms.
- Chill the Dough: Cover the bowl with plastic wrap and refrigerate the dough for at least 4 hours or overnight. This chilling process is vital for achieving the characteristic crinkle.
- Preheat and Prepare Baking Sheets: Preheat your oven to 350°F (175°C). Line two baking sheets with parchment paper to prevent the cookies from sticking.
- Form the Cookies: Once chilled, scoop tablespoon-sized portions of dough and roll them into balls. Roll each ball generously in a bowl of powdered sugar, making sure they’re completely coated.
- Bake the Cookies: Place the dough balls onto the prepared baking sheets, spacing them about 2 inches apart. Bake for 10 to 12 minutes, or until the cookies have spread slightly and have a cracked appearance. Avoid overbaking to keep the centers soft and chewy.
- Cool and Serve: Remove the cookies from the oven and allow them to cool on the baking sheets for a few minutes before transferring them to a wire rack to cool completely. Serve with a dusting of extra powdered sugar if desired.
Extra Tips: For best results, make sure the dough is thoroughly chilled, as this helps the cookies maintain their shape and achieve perfect crinkles.
If you find your hands are sticky while rolling the dough, lightly coat them with powdered sugar to make handling easier. Additionally, storing the cookies in an airtight container will keep them fresh for several days, allowing you to enjoy them throughout the holiday season.
Linzer Cookies
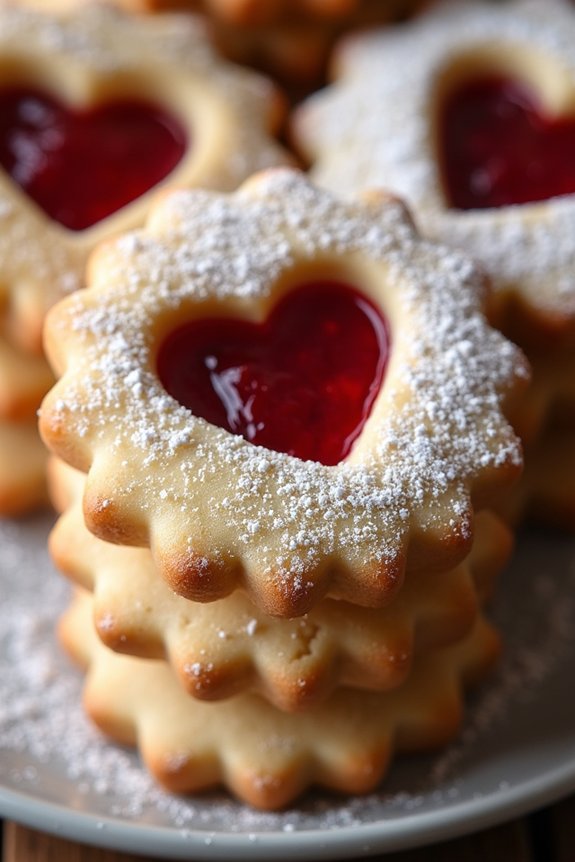
Linzer Cookies are a delightful treat that brings elegance and a touch of nostalgia to any holiday table. Originating from the Austrian city of Linz, these cookies are recognized by their distinctive sandwich structure, featuring a delicate nutty dough and a sweet jam filling. The top cookie typically has a small window cut out, allowing the vibrant jam to peek through. Traditionally enjoyed during the Christmas season, Linzer Cookies are perfect for festive gatherings and make a wonderful gift for friends and family.
The combination of ground nuts, usually almonds or hazelnuts, with butter and sugar, creates a rich, tender cookie that pairs harmoniously with the tartness of raspberry or apricot preserves. The flavors meld together beautifully, making each bite a delightful balance of sweetness and nuttiness.
Making Linzer Cookies is both a culinary and artistic endeavor, requiring a bit of patience and care, but the result is certainly worth the effort.
Ingredients (for 4-6 people):
- 1 1/2 cups all-purpose flour
- 3/4 cup ground almonds or hazelnuts
- 1/2 cup granulated sugar
- 1/2 teaspoon ground cinnamon
- 1/4 teaspoon salt
- 1/2 cup unsalted butter, softened
- 1 large egg yolk
- 1 teaspoon vanilla extract
- 1/2 cup raspberry or apricot preserves
- Powdered sugar, for dusting
Instructions:
- Prepare the Dough: In a medium bowl, whisk together the flour, ground nuts, sugar, cinnamon, and salt. In a separate large bowl, beat the softened butter with an electric mixer until creamy. Add the egg yolk and vanilla extract, continue to beat until well combined.
- Combine Ingredients: Gradually add the dry ingredients to the butter mixture, mixing just until the dough comes together. Be careful not to overmix, as this can make the dough tough.
- Chill the Dough: Divide the dough into two equal parts, flatten each into a disk, and wrap in plastic wrap. Refrigerate for at least 1 hour or until firm. This step is essential to guarantee the dough retains its shape when baked.
- Roll and Cut: Preheat the oven to 350°F (175°C). On a lightly floured surface, roll out one disk of dough to about 1/8-inch thickness. Use a round cookie cutter to cut out shapes, and transfer half of them to a baking sheet lined with parchment paper.
- Create the Linzer Top: For the remaining cookies, use a smaller cookie cutter to cut out the center of each round, creating a “window”. Place these cookies on another lined baking sheet.
- Bake the Cookies: Bake each batch in the preheated oven for 10-12 minutes, or until the edges are lightly golden. Allow the cookies to cool on the baking sheet for 5 minutes before transferring to a wire rack to cool completely.
- Assemble the Cookies: Once cooled, spread about 1 teaspoon of preserves on the flat side of each solid cookie. Dust the top cookies (those with the cut-out centers) lightly with powdered sugar, then gently press onto the jam-covered base to form a sandwich.
Extra Tips:
When making Linzer Cookies, it’s important to maintain a consistent dough thickness to guarantee even baking. If the dough becomes too warm while rolling, return it to the refrigerator for a few minutes.
For a more professional look, consider using a Linzer cookie cutter set, which includes both the outer round and the smaller cutter for the window. Remember, these cookies can be made a few days in advance, and the flavors will continue to develop, making them even more delicious over time. Store them in an airtight container to keep them fresh and crisp.
Rum Balls
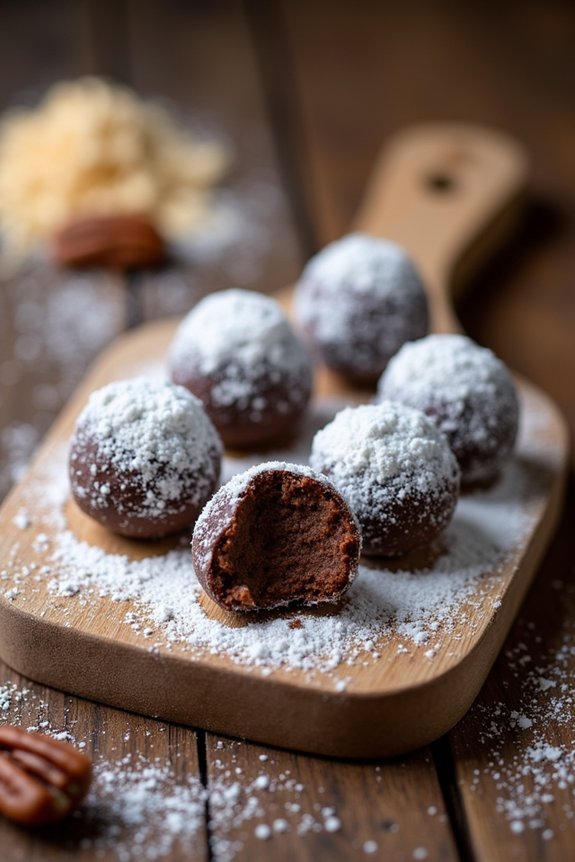
Rum Balls are a classic holiday treat that combines the warmth of rum with the richness of chocolate and nuts, making them a perennial favorite for Christmas cookie exchanges and festive gatherings.
These no-bake confections are incredibly easy to prepare, requiring minimal time and effort while delivering a punch of flavor. Perfect for those who enjoy a boozy twist to their holiday treats, Rum Balls can be made ahead of time, allowing the flavors to meld for an even more delicious experience.
This vintage recipe is designed to serve 4-6 people, making it ideal for sharing with friends and family. The key to a successful batch of Rum Balls lies in using quality ingredients, including good-quality rum that will enhance the overall flavor.
With a few simple steps, you can create these indulgent, bite-sized delights that are sure to add a touch of nostalgia and cheer to any holiday celebration.
Ingredients:
- 1 cup crushed vanilla wafers
- 1 cup powdered sugar
- 2 tablespoons unsweetened cocoa powder
- 1 cup finely chopped pecans
- 2 tablespoons light corn syrup
- 1/4 cup dark rum
- Additional powdered sugar for coating
Instructions:
- Prepare the Dry Ingredients: In a large mixing bowl, combine the crushed vanilla wafers, powdered sugar, cocoa powder, and chopped pecans. Mix thoroughly until all the dry ingredients are evenly distributed.
- Incorporate the Wet Ingredients: Add the light corn syrup and dark rum to the dry mixture. Use a spatula or your hands to mix until all ingredients are well incorporated and the mixture is moist enough to hold together when pressed.
- Shape the Balls: Taking about one tablespoon of the mixture at a time, roll it between your palms to form a smooth, round ball. Continue this process until all the mixture has been used up.
- Coat with Sugar: Place the additional powdered sugar in a shallow dish. Roll each rum ball in the powdered sugar until fully coated, giving them a festive, snowy appearance.
- Set and Store: Arrange the coated rum balls on a tray lined with parchment paper. Allow them to set for at least an hour at room temperature. Once set, store them in an airtight container in the refrigerator for up to two weeks.
Extra Tips: For a more intense flavor, consider making the Rum Balls a few days in advance. The rum flavor will deepen as they sit, creating a more robust taste.
If you prefer a less alcoholic version, reduce the amount of rum and add a bit more corn syrup for moisture. Additionally, for a different flavor profile, you can substitute the pecans with walnuts or almonds, or experiment with spiced or flavored rums for a unique twist.
Russian Tea Cakes
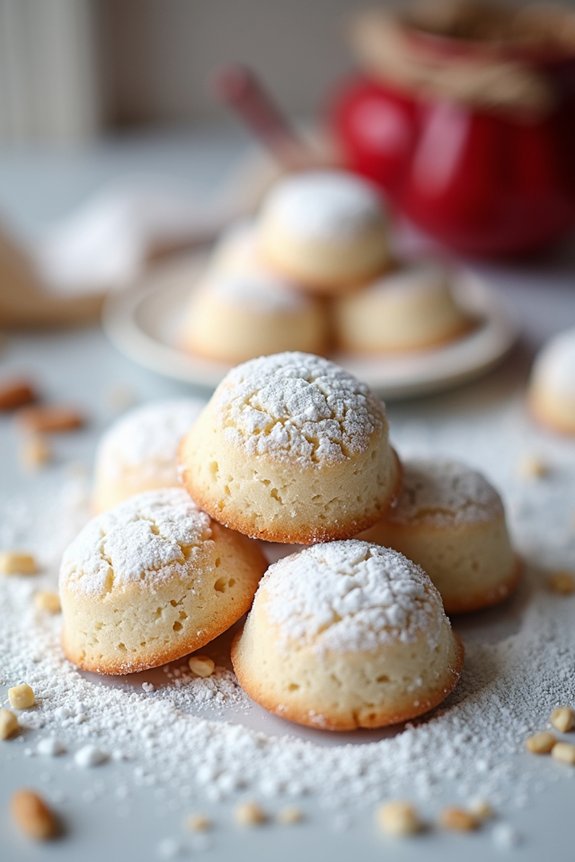
Russian Tea Cakes, also known as Mexican Wedding Cookies or Snowball Cookies, are a classic holiday treat that have been delighting taste buds for generations.
These delicate, round cookies are known for their buttery texture and the generous dusting of powdered sugar that gives them a festive, snowy appearance. Perfect for sharing with family and friends during the holiday season, Russian Tea Cakes are a simple yet elegant addition to any cookie platter.
The origins of Russian Tea Cakes are a bit mysterious, with similar recipes appearing in various countries under different names. Despite their disputed origins, these cookies have become a beloved part of holiday traditions around the world.
Their melt-in-your-mouth texture and nutty flavor, often accompanied by a hint of vanilla, make them a timeless treat that’s certain to please both young and old alike.
Ingredients (Serves 4-6):
- 1 cup unsalted butter, softened
- 1/2 cup powdered sugar
- 1 teaspoon vanilla extract
- 2 1/4 cups all-purpose flour
- 1/4 teaspoon salt
- 3/4 cup finely chopped nuts (walnuts or pecans work well)
- Additional powdered sugar for rolling
Cooking Instructions:
- Preheat and Prepare: Begin by preheating your oven to 350°F (175°C). Line two baking sheets with parchment paper or silicone baking mats to prevent the cookies from sticking.
- Cream the Butter and Sugar: In a large mixing bowl, cream together the softened butter and 1/2 cup of powdered sugar until light and fluffy. This will usually take about 3-5 minutes using an electric hand mixer or stand mixer.
- Add Vanilla and Dry Ingredients: Add the vanilla extract to the creamed mixture and mix until combined. Gradually add the flour and salt, mixing on low speed until the dough begins to come together. Stir in the finely chopped nuts by hand to guarantee even distribution.
- Shape into Balls: Once the dough is well-mixed, use a tablespoon or small cookie scoop to form 1-inch balls. Place the balls about 1 inch apart on the prepared baking sheets.
- Bake the Cookies: Bake in the preheated oven for 12-15 minutes, or until the bottoms of the cookies are just beginning to turn golden. Be careful not to overbake, as the cookies should remain pale and not brown.
- Roll in Sugar: Allow the cookies to cool on the baking sheet for about 5 minutes, then roll each warm cookie in powdered sugar. This initial coating will create a base layer for the final sugar dusting.
- Cool and Coat Again: Transfer the cookies to a wire rack to cool completely. Once cooled, roll them in powdered sugar once more to achieve the classic “snowball” appearance.
Extra Tips:
For the best results, make certain your butter is at room temperature before creaming it with the sugar. This guarantees a smooth and well-incorporated dough.
Additionally, you can experiment with different nuts, such as almonds or hazelnuts, to customize the flavor of your Russian Tea Cakes. If the dough feels too dry or crumbly, a teaspoon of milk can be added to help bring it together.
Enjoy these cookies with a hot cup of tea or coffee for a truly delightful holiday experience.