

When the holidays roll around, the scent of freshly baked cookies fills the air and brings back cherished memories. Chocolate Christmas cookies have a special way of adding warmth to even the coldest winter days. The combination of rich cocoa with flavors like peppermint or cinnamon brings festive joy to every bite. Whether you’re getting ready for a cookie swap or a cozy night in, these sweet treats are sure to bring delight. Ready to find your new holiday favorite?
Double Chocolate Peppermint Crunch Cookies

Double Chocolate Peppermint Crunch Cookies are the perfect blend of rich chocolate and invigorating peppermint, making them an irresistible treat during the holiday season.
These cookies combine the decadence of double chocolate with the delightful crunch of peppermint candy, creating a festive and flavorful experience in every bite. Ideal for cookie swaps, holiday parties, or simply enjoying with a warm cup of cocoa by the fire, these cookies are sure to become a new Christmas favorite.
The recipe is designed to yield approximately 24 cookies, perfect for serving 4-6 people. Each cookie bursts with the intense flavor of chocolate, enhanced by the subtle, yet energizing taste of peppermint. The texture is perfectly balanced between soft and chewy, with a delightful crunch from the crushed peppermint candies.
Whether you’re an experienced baker or a novice in the kitchen, this recipe promises to deliver cookies that aren’t only delicious but also easy to make.
Ingredients:
- 1 cup unsalted butter, softened
- 1 cup granulated sugar
- 1 cup packed brown sugar
- 2 large eggs
- 2 teaspoons vanilla extract
- 1 teaspoon peppermint extract
- 2 cups all-purpose flour
- 3/4 cup unsweetened cocoa powder
- 1 teaspoon baking soda
- 1/2 teaspoon salt
- 1 cup semi-sweet chocolate chips
- 1 cup white chocolate chips
- 1/2 cup crushed peppermint candies
Instructions:
- Preheat the Oven: Start by preheating your oven to 350°F (175°C). Line two baking sheets with parchment paper or silicone baking mats to confirm your cookies bake evenly and don’t stick.
- Cream the Butter and Sugars: In a large mixing bowl, combine the softened butter, granulated sugar, and brown sugar. Use an electric mixer to cream the ingredients together until the mixture is light and fluffy, about 3-4 minutes.
- Add Eggs and Extracts: Add in the eggs, one at a time, beating well after each addition. Then, mix in the vanilla extract and peppermint extract until fully incorporated.
- Mix Dry Ingredients: In a separate bowl, whisk together the all-purpose flour, cocoa powder, baking soda, and salt. Slowly add the dry ingredients to the wet ingredients, mixing until just combined.
- Fold in Chocolate Chips and Peppermint: Gently fold in the semi-sweet chocolate chips, white chocolate chips, and crushed peppermint candies using a spatula or wooden spoon.
- Shape the Cookies: Use a cookie scoop or tablespoon to drop rounded balls of dough onto the prepared baking sheets, leaving about 2 inches between each cookie.
- Bake the Cookies: Place the baking sheets in the preheated oven and bake for 10-12 minutes, or until the edges are set, but the centers are still slightly soft. The cookies will continue to firm up as they cool.
- Cool the Cookies: Remove the cookies from the oven and allow them to cool on the baking sheets for about 5 minutes before transferring them to a wire rack to cool completely.
Extra Tips:
For the best results, make sure your butter is properly softened; this will help in achieving the right consistency for the dough.
If you’re looking for an even more intense peppermint flavor, consider increasing the peppermint extract slightly, but be careful not to overpower the chocolate.
Additionally, you can use different types of chocolate chips depending on your preference, such as dark or milk chocolate.
If you prefer a more uniform cookie size, using a cookie scoop can help maintain consistency.
Finally, storing the cookies in an airtight container will keep them fresh and chewy for up to a week.
Spiced Mexican Hot Chocolate Cookies

Spiced Mexican Hot Chocolate Cookies are a delightful twist on the classic holiday treat, infusing the rich, comforting flavor of hot chocolate with a spicy kick. These cookies capture the essence of Mexican hot chocolate, combining cocoa, cinnamon, and a touch of cayenne pepper to create a truly unique and festive cookie perfect for Christmas gatherings.
The blend of spices warms the palate and complements the chocolate, making these cookies an enticing addition to any holiday dessert table. This recipe yields approximately 24 cookies, making it ideal for serving 4-6 people, depending on appetites. The cookies are soft and chewy on the inside with a slightly crisp edge, offering a satisfying texture in every bite.
Whether you’re making these cookies for a Christmas party, as a homemade gift, or simply to enjoy with a cup of hot cocoa by the fire, they’re sure to impress and delight anyone who tastes them.
Ingredients:
- 1 cup unsalted butter, softened
- 1 cup granulated sugar
- 1 cup packed light brown sugar
- 2 large eggs
- 1 teaspoon vanilla extract
- 2 1/4 cups all-purpose flour
- 1/2 cup unsweetened cocoa powder
- 1 teaspoon baking soda
- 1/2 teaspoon salt
- 1 teaspoon ground cinnamon
- 1/4 teaspoon cayenne pepper
- 1 cup semi-sweet chocolate chips
- 1/2 cup chopped pecans (optional)
Cooking Instructions:
- Preheat Oven: Preheat your oven to 350°F (175°C) and line two baking sheets with parchment paper to prevent the cookies from sticking.
- Mix Wet Ingredients: In a large bowl, cream together the softened butter, granulated sugar, and brown sugar until the mixture is light and fluffy. This should take approximately 3-4 minutes using an electric mixer on medium speed.
- Add Eggs and Vanilla: Beat in the eggs one at a time, ensuring each egg is fully incorporated before adding the next. Then, mix in the vanilla extract.
- Combine Dry Ingredients: In a separate bowl, whisk together the flour, cocoa powder, baking soda, salt, cinnamon, and cayenne pepper.
- Combine Wet and Dry Ingredients: Gradually add the dry ingredients to the wet ingredients, mixing on low speed until just combined. Be careful not to overmix, as this can make the cookies tough.
- Fold in Chocolate Chips and Pecans: Gently fold in the chocolate chips and pecans, ensuring they’re evenly distributed throughout the dough.
- Form Cookies: Using a tablespoon or cookie scoop, drop rounded tablespoons of dough onto the prepared baking sheets, spacing them about 2 inches apart to allow for spreading.
- Bake: Bake the cookies in the preheated oven for 10-12 minutes, or until the edges are set and the centers are soft. The cookies will continue to firm up as they cool.
- Cool: Allow the cookies to cool on the baking sheets for 5 minutes before transferring them to a wire rack to cool completely.
Extra Tips:
To enhance the flavors, you can toast the pecans before adding them to the dough. This will bring out a nuttier flavor and add an extra layer of complexity to the cookies.
If you prefer your cookies with an extra kick, you can increase the cayenne pepper to 1/2 teaspoon or adjust it to your taste preference. Additionally, storing the cookies in an airtight container for a day or two allows the flavors to meld and intensify.
Enjoy your Spiced Mexican Hot Chocolate Cookies with a glass of milk or a cup of hot cocoa for a perfect holiday treat!
Dark Chocolate Raspberry Thumbprints
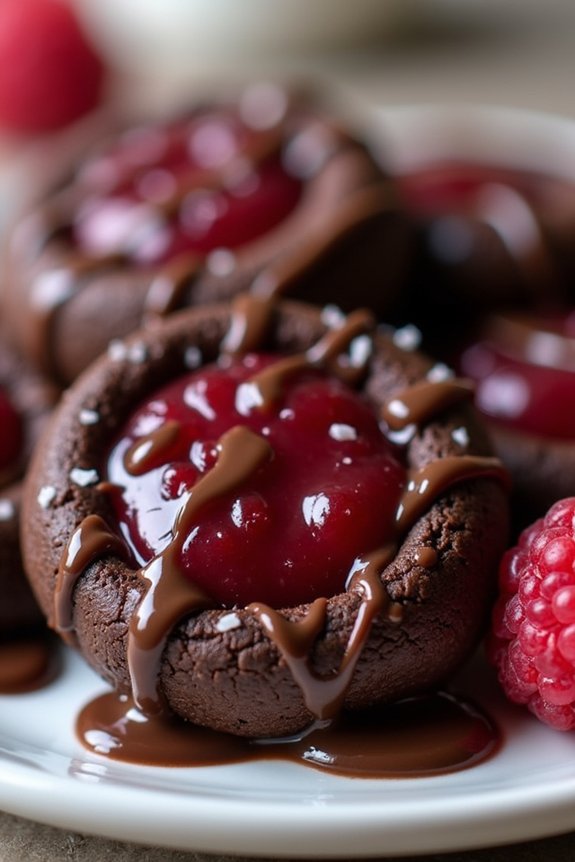
Dark Chocolate Raspberry Thumbprints are a delightful treat that combines the richness of dark chocolate with the sweet and tart flavor of raspberry. These cookies not only taste incredible but also look beautiful on any holiday cookie tray. Perfect for those who enjoy a sophisticated twist on traditional thumbprint cookies, these treats are sure to impress family and friends during your holiday gatherings.
The combination of flavors in these cookies is enhanced by using high-quality dark chocolate and fresh raspberry preserves. The thumbprint design allows the raspberry filling to settle perfectly in the center of each cookie, ensuring a burst of flavor with every bite. Easy to make and even easier to enjoy, this recipe is ideal for serving 4-6 people, making it perfect for small holiday get-togethers or as a contribution to a festive potluck.
Ingredients:
- 1 cup all-purpose flour
- 1/3 cup unsweetened cocoa powder
- 1/4 teaspoon salt
- 1/2 cup unsalted butter, softened
- 2/3 cup granulated sugar
- 1 large egg yolk
- 1 teaspoon vanilla extract
- 1/4 cup raspberry preserves
- 1/4 cup dark chocolate chips
- 1 teaspoon vegetable oil
Cooking Instructions:
- Preheat and Prepare Baking Sheet: Preheat your oven to 350°F (175°C). Line a baking sheet with parchment paper or a silicone baking mat to prevent the cookies from sticking.
- Mix Dry Ingredients: In a medium-sized bowl, whisk together the flour, cocoa powder, and salt until well combined. Set aside.
- Cream Butter and Sugar: In a large mixing bowl, use an electric mixer to beat the softened butter and granulated sugar together on medium speed until light and fluffy, about 2-3 minutes.
- Add Egg and Vanilla: Add the egg yolk and vanilla extract to the butter mixture. Beat until fully incorporated.
- Combine with Dry Ingredients: Gradually add the dry ingredients to the wet ingredients, mixing on low speed until a soft dough forms.
- Shape the Cookies: Scoop tablespoon-sized portions of dough and roll them into balls. Place the balls on the prepared baking sheet, spacing them about 2 inches apart.
- Create Indentations: Use your thumb or the back of a small spoon to gently press an indentation into the center of each dough ball.
- Fill with Raspberry Preserves: Fill each indentation with about 1/2 teaspoon of raspberry preserves.
- Bake the Cookies: Place the baking sheet in the preheated oven and bake for 10-12 minutes, or until the edges of the cookies are set. Remove from the oven and let cool on the baking sheet for 5 minutes before transferring to a wire rack to cool completely.
- Melt Chocolate: While the cookies are cooling, melt the dark chocolate chips with the vegetable oil in a microwave-safe bowl or over a double boiler, stirring until smooth.
- Drizzle Chocolate: Using a spoon or a piping bag, drizzle the melted chocolate over the cooled cookies. Allow the chocolate to set before serving.
Extra Tips:
For an extra touch of elegance, sprinkle a pinch of sea salt over the chocolate drizzle before it sets to enhance the flavor contrast. If you prefer a different fruit flavor, you can substitute the raspberry preserves with another type of jam, such as strawberry or apricot.
Make sure to store any leftover cookies in an airtight container at room temperature for up to a week, ensuring they remain fresh and delicious.
White Chocolate Cranberry Pistachio Cookies
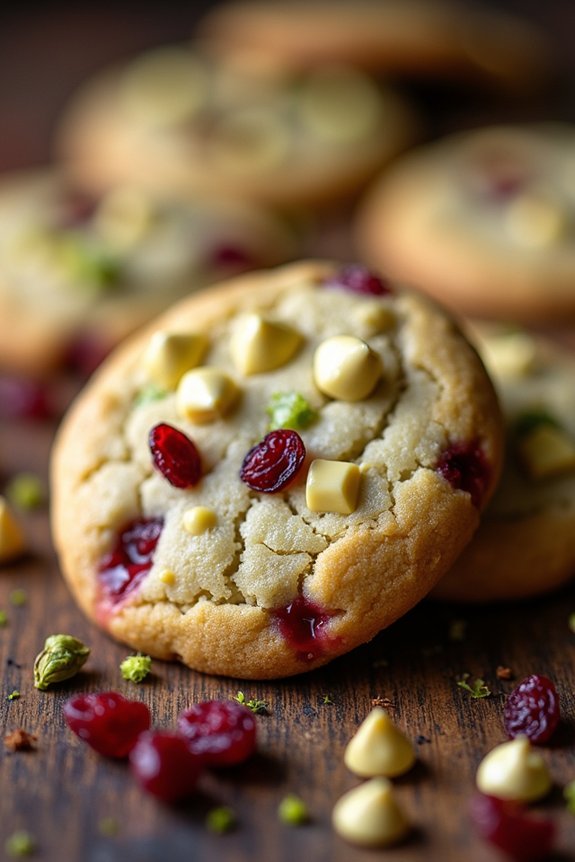
White Chocolate Cranberry Pistachio Cookies are a delightful treat that perfectly capture the spirit of the holiday season. These cookies combine the tartness of dried cranberries with the richness of white chocolate and the salty crunch of pistachios. The vibrant colors of the cranberries and pistachios also make these cookies a festive addition to any holiday cookie platter.
Perfect for a cozy night in or as a gift for friends and family, these cookies are certain to bring joy to your holiday celebrations. The balance of flavors in these cookies makes them irresistible. The white chocolate provides a creamy sweetness that complements the slight tartness of the cranberries, while the pistachios add a nutty flavor and a satisfying crunch.
This recipe makes enough cookies to serve 4-6 people, making it ideal for small gatherings or an indulgent treat for yourself. Whether you’re a baking novice or a seasoned pro, these cookies are simple to make and bound to impress.
Ingredients (serving size: 4-6 people):
- 1 cup unsalted butter, softened
- 1 cup granulated sugar
- 1/2 cup light brown sugar, packed
- 2 large eggs
- 2 teaspoons vanilla extract
- 2 1/2 cups all-purpose flour
- 1 teaspoon baking soda
- 1/2 teaspoon baking powder
- 1/2 teaspoon salt
- 1 cup white chocolate chips
- 1 cup dried cranberries
- 1 cup shelled pistachios, roughly chopped
Cooking Instructions:
- Preheat the Oven: Begin by preheating your oven to 350°F (175°C). This guarantees your oven is at the right temperature when you’re ready to bake the cookies.
- Prepare the Wet Ingredients: In a large mixing bowl, cream together the softened butter, granulated sugar, and brown sugar until the mixture is light and fluffy. This should take about 2-3 minutes with an electric mixer on medium speed. Add the eggs, one at a time, beating well after each addition. Stir in the vanilla extract until fully combined.
- Mix the Dry Ingredients: In a separate bowl, whisk together the flour, baking soda, baking powder, and salt. This helps to evenly distribute the leavening agents throughout the flour.
- Combine Wet and Dry Mixtures: Gradually add the dry ingredient mixture to the wet ingredients, mixing until just combined. Be careful not to overmix as this can result in tough cookies.
- Add Mix-ins: Gently fold in the white chocolate chips, dried cranberries, and chopped pistachios until they’re evenly distributed throughout the dough.
- Shape the Cookies: Use a tablespoon or a cookie scoop to drop rounded tablespoons of dough onto a baking sheet lined with parchment paper, spacing them about 2 inches apart to allow for spreading.
- Bake the Cookies: Place the baking sheet in the preheated oven and bake for 10-12 minutes, or until the edges are lightly golden. The centers may look slightly underbaked, but they’ll firm up as the cookies cool.
- Cool and Serve: Remove the cookies from the oven and let them cool on the baking sheet for about 5 minutes before transferring them to a wire rack to cool completely. Serve once completely cooled.
Extra Tips:
For the best results, make sure your butter is at room temperature before you begin mixing. This helps to achieve a smooth and creamy texture when creaming the butter and sugars.
If you prefer a chewier cookie, you can try substituting half of the all-purpose flour with bread flour. Additionally, feel free to experiment with different types of nuts or dried fruits, such as macadamia nuts or dried cherries, to suit your personal taste preferences.
Enjoy these cookies with a glass of milk or a warm cup of cocoa for the ultimate holiday treat!
Triple Chocolate Fudge Brownie Cookies
Indulging in a batch of Triple Chocolate Fudge Brownie Cookies is the perfect way to celebrate the holidays. These cookies are a chocolate lover’s dream, combining the rich, gooey texture of brownies with the convenience and shape of cookies.
Whether you’re hosting a festive gathering or simply treating yourself, these delightful treats are bound to bring joy and satisfaction to the taste buds. The secret to their irresistible taste lies in the triple chocolate combination: cocoa powder, semi-sweet chocolate chips, and white chocolate chunks, creating a symphony of flavors that melt in your mouth.
With a serving size of 4-6 people, this recipe is ideal for sharing with family and friends. These cookies are perfect for those who enjoy a deep, intense chocolate flavor with a slightly crisp exterior and a soft, fudgy center. The recipe is straightforward, allowing even novice bakers to achieve delicious results.
So, gather your ingredients and prepare to bake a batch of these decadent cookies that will surely become a holiday favorite.
Ingredients:
- 1 cup all-purpose flour
- 1/3 cup unsweetened cocoa powder
- 1/2 teaspoon baking powder
- 1/4 teaspoon salt
- 1/2 cup unsalted butter, softened
- 3/4 cup granulated sugar
- 1/4 cup brown sugar, packed
- 1 large egg
- 1 teaspoon vanilla extract
- 1/2 cup semi-sweet chocolate chips
- 1/2 cup white chocolate chunks
Cooking Instructions:
- Preheat the Oven: Start by preheating your oven to 350°F (175°C) to guarantee it reaches the desired temperature by the time your cookie dough is ready. Line two baking sheets with parchment paper to prevent sticking.
- Mix Dry Ingredients: In a medium-sized bowl, whisk together the all-purpose flour, unsweetened cocoa powder, baking powder, and salt. This helps to evenly distribute the baking powder and cocoa throughout the flour.
- Cream Butter and Sugars: In a large mixing bowl, cream the softened butter, granulated sugar, and brown sugar together using an electric mixer on medium speed until the mixture is light and fluffy, about 2-3 minutes.
- Add Wet Ingredients: Beat in the egg and vanilla extract to the butter-sugar mixture until well incorporated. This helps to blend the flavors and adds moisture to the dough.
- Combine Wet and Dry Mixes: Gradually add the dry ingredient mixture to the wet ingredients, mixing on low speed until just combined. Avoid over-mixing to guarantee the cookies remain tender.
- Fold in Chocolate: Gently fold in the semi-sweet chocolate chips and white chocolate chunks using a spatula or a wooden spoon until they’re evenly distributed throughout the dough.
- Shape and Bake: Scoop tablespoon-sized portions of dough onto the prepared baking sheets, spacing them about 2 inches apart. Gently flatten each ball of dough slightly. Bake in the preheated oven for 10-12 minutes, or until the edges are firm but the centers are still soft.
- Cool and Serve: Remove the cookies from the oven and allow them to cool on the baking sheets for 5 minutes before transferring them to a wire rack to cool completely. Serve warm or at room temperature.
Extra Tips:
For the best results, verify your butter is at room temperature before starting the recipe. This helps achieve the desired creamy texture when mixing with sugar.
If you prefer a chewier cookie, consider slightly underbaking them by a minute or two, as they’ll continue to set while cooling on the baking sheet.
Feel free to experiment with different types of chocolate chips or nuts to customize the flavor to your liking. Enjoy these cookies with a cold glass of milk or a hot cup of cocoa for the ultimate holiday treat.
Chocolate Hazelnut Snowball Cookies
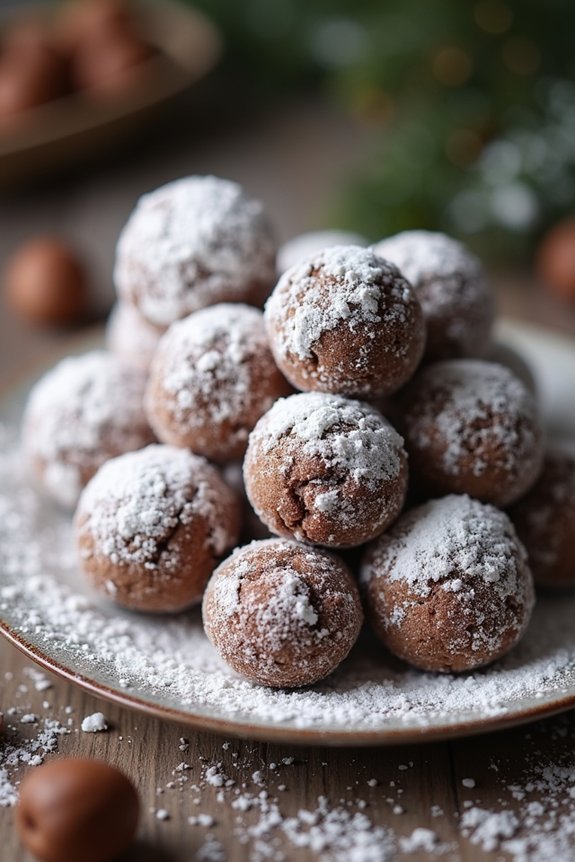
Chocolate Hazelnut Snowball Cookies are a delightful treat that encapsulates the festive spirit of the holiday season. These cookies feature a delicate, buttery texture combined with the rich flavors of chocolate and hazelnut, making them a perfect addition to any Christmas cookie platter. The powdered sugar coating adds a touch of sweetness and a snowball-like appearance, capturing the essence of a winter wonderland.
Whether you’re enjoying them with a warm cup of cocoa or gifting them to friends and family, these cookies are guaranteed to spread holiday cheer.
The recipe for Chocolate Hazelnut Snowball Cookies is straightforward, allowing you to whip up a batch with ease. The key to their irresistible flavor lies in the combination of finely ground hazelnuts and high-quality cocoa powder, which lend a nutty richness and deep chocolate taste.
By following a few simple steps, you’ll have a batch of these delectable cookies ready to delight your taste buds and those of your loved ones. This recipe yields about 24-30 cookies, perfect for serving 4-6 people.
Ingredients:
- 1 cup unsalted butter, softened
- 1/2 cup powdered sugar
- 1 teaspoon vanilla extract
- 1 3/4 cups all-purpose flour
- 1/4 cup unsweetened cocoa powder
- 1/2 cup finely ground hazelnuts
- 1/4 teaspoon salt
- 1 cup powdered sugar, for coating
Instructions:
- Preheat and Prepare: Preheat your oven to 350°F (175°C). Line two baking sheets with parchment paper or silicone baking mats to prevent the cookies from sticking.
- Cream Butter and Sugar: In a large mixing bowl, cream together the softened butter and 1/2 cup of powdered sugar until the mixture is light and fluffy. This should take about 2-3 minutes with an electric mixer on medium speed.
- Add Vanilla: Stir in the vanilla extract, mixing until fully incorporated into the creamed mixture.
- Combine Dry Ingredients: In a separate bowl, whisk together the flour, cocoa powder, ground hazelnuts, and salt. Confirm that the dry ingredients are well combined to prevent any lumps.
- Mix Dough: Gradually add the dry ingredients to the wet mixture, mixing on low speed until a soft dough forms. Verify all ingredients are thoroughly incorporated, but be careful not to overmix.
- Shape Cookies: Using a tablespoon, scoop out dough and roll it between your palms to form 1-inch balls. Place the balls on the prepared baking sheets, spacing them about 1 inch apart.
- Bake: Bake the cookies in the preheated oven for 12-15 minutes, or until the edges are set and the bottoms are just beginning to turn golden. Be careful not to overbake, as the cookies should remain soft.
- Cool and Coat: Allow the cookies to cool on the baking sheets for about 5 minutes, then transfer them to a wire rack. While they’re still warm, roll each cookie in the remaining powdered sugar until fully coated. Repeat the coating process once the cookies have cooled completely for an even snowier appearance.
Extra Tips:
To ascertain the best texture and flavor, use high-quality cocoa powder and fresh hazelnuts. If you can’t find ground hazelnuts, you can make your own by toasting whole hazelnuts in the oven, then pulsing them in a food processor until finely ground.
Be sure not to overprocess, as this can turn them into hazelnut butter. Additionally, these cookies can be stored in an airtight container for up to a week, making them a great make-ahead option for holiday gatherings.
Salted Caramel Chocolate Chip Cookies

Salted Caramel Chocolate Chip Cookies are a delightful twist on the classic chocolate chip cookie, adding a touch of elegance and a hit of savory saltiness to the traditional sweet treat. These cookies are perfect for the holiday season, offering a rich, buttery flavor with gooey caramel bits and just the right amount of chocolate.
The sprinkle of sea salt on top adds a sophisticated finish, making them a crowd favorite at any festive gathering. Ideal for serving a group of 4-6 people, these cookies are both indulgent and easy to make.
Whether you’re a seasoned baker or a novice in the kitchen, this recipe will guide you through each step to guarantee your cookies turn out perfectly every time. The combination of textures from the crispy edges, soft centers, and chewy caramel pieces will have everyone reaching for seconds.
Ingredients:
- 1 cup (2 sticks) unsalted butter, softened
- 1 cup packed light brown sugar
- 1/2 cup granulated sugar
- 2 large eggs
- 2 teaspoons pure vanilla extract
- 2 3/4 cups all-purpose flour
- 1 teaspoon baking soda
- 1/2 teaspoon baking powder
- 1/2 teaspoon salt
- 1 cup semi-sweet chocolate chips
- 1 cup caramel bits
- Sea salt, for sprinkling
Instructions:
1. Prepare the Oven and Baking Sheet: Preheat your oven to 350°F (175°C). Line two baking sheets with parchment paper or silicone baking mats to guarantee the cookies bake evenly and don’t stick.
2. Cream the Butter and Sugars: In a large mixing bowl, cream together the softened butter, brown sugar, and granulated sugar until the mixture is light and fluffy. This should take about 2-3 minutes using an electric mixer on medium speed.
3. Add Eggs and Vanilla: Beat in the eggs one at a time, guaranteeing each egg is fully incorporated before adding the next. Then, mix in the vanilla extract until combined.
4. Combine Dry Ingredients: In a separate bowl, whisk together the flour, baking soda, baking powder, and salt. Gradually add this dry mixture to the wet ingredients, mixing on low speed until just combined.
Be careful not to overmix, as this can make the cookies tough.
5. Fold in the Mix-ins: Using a spatula, gently fold in the chocolate chips and caramel bits, guaranteeing they’re evenly distributed throughout the dough.
6. Shape the Dough: Using a cookie scoop or tablespoon, drop rounded tablespoons of dough onto the prepared baking sheets, leaving about 2 inches of space between each cookie to allow for spreading.
7. Sprinkle with Sea Salt: Lightly sprinkle a pinch of sea salt on top of each cookie dough mound. This will enhance the flavor and add a pleasant contrast to the sweetness.
8. Bake the Cookies: Bake in the preheated oven for 10-12 minutes, or until the edges are golden brown and the centers are set but still soft. The cookies will continue to firm up as they cool.
9. Cool and Serve: Allow the cookies to cool on the baking sheets for about 5 minutes before transferring them to a wire rack to cool completely. Serve warm or at room temperature.
Extra Tips:
When making Salted Caramel Chocolate Chip Cookies, it’s important to use high-quality caramel bits that can withstand the heat of baking without melting too much.
If you can’t find caramel bits, you can chop soft caramel candies into smaller pieces. Additionally, if your dough seems too soft, refrigerate it for about 30 minutes before baking to prevent the cookies from spreading too much.
Finally, for a more rustic appearance, you can press a few extra chocolate chips and caramel pieces onto the tops of the dough balls before baking. Enjoy these cookies with a cold glass of milk or a hot cup of cocoa for the ultimate holiday treat.
Chocolate Espresso Crinkle Cookies
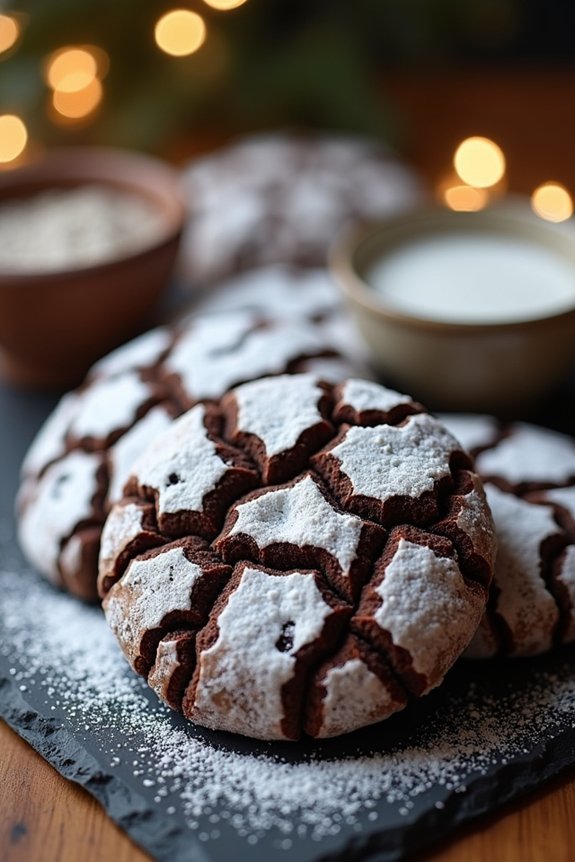
Chocolate Espresso Crinkle Cookies are a delightful holiday treat combining the rich flavors of chocolate and coffee.
These cookies feature a soft, fudgy interior with a slightly crisp outer layer, dusted with a perfect coating of powdered sugar that gives them their signature crinkled appearance. Perfect for chocolate lovers and coffee enthusiasts, these cookies are sure to be a hit at any holiday gathering or cozy night by the fire with a cup of hot cocoa.
The espresso in the recipe not only enhances the chocolate flavor but also adds a subtle depth and richness that makes each bite irresistible.
These cookies aren’t only delicious but also visually appealing, making them an ideal addition to your Christmas cookie platter. Whether you’re baking for family, friends, or just to treat yourself, these Chocolate Espresso Crinkle Cookies are sure to become a festive favorite.
Ingredients (Serves 4-6)
- 1 cup all-purpose flour
- 1/2 cup unsweetened cocoa powder
- 1 teaspoon baking powder
- 1/4 teaspoon salt
- 1 tablespoon instant espresso powder
- 1 cup granulated sugar
- 1/4 cup vegetable oil
- 2 large eggs
- 1 teaspoon vanilla extract
- 1 cup powdered sugar (for rolling)
Cooking Instructions
- Prepare the Dry Ingredients: In a medium bowl, whisk together the all-purpose flour, unsweetened cocoa powder, baking powder, salt, and instant espresso powder until well combined. Set aside.
- Mix the Wet Ingredients: In a large bowl, combine the granulated sugar and vegetable oil, mixing until smooth. Add the eggs one at a time, beating well after each addition. Stir in the vanilla extract.
- Combine the Ingredients: Gradually add the dry ingredients to the wet mixture, stirring until a thick dough forms. Cover the bowl with plastic wrap and refrigerate the dough for at least 2 hours or until firm.
- Preheat the Oven: Preheat the oven to 350°F (175°C). Line a baking sheet with parchment paper.
- Shape the Cookies: Using a tablespoon or cookie scoop, scoop out portions of the dough and roll them into balls (about 1 inch in diameter). Roll each ball thoroughly in the powdered sugar, ensuring a generous coating.
- Bake the Cookies: Place the powdered sugar-coated dough balls on the prepared baking sheet, spacing them about 2 inches apart. Bake in the preheated oven for 10-12 minutes. The cookies should be set around the edges but still soft in the center.
- Cool and Serve: Allow the cookies to cool on the baking sheet for about 5 minutes before transferring them to a wire rack to cool completely. Serve once cooled.
Extra Tips
For the best crinkle effect, make sure the cookie dough is well-chilled before baking. This helps the sugar adhere better and enhances the appearance of the crinkles.
If you prefer a stronger coffee flavor, you can increase the amount of espresso powder slightly, but be cautious as it can become overpowering.
These cookies can be stored in an airtight container at room temperature for up to a week, maintaining their chewy texture and rich taste.
Chocolate Dipped Macaroon Cookies

Chocolate Dipped Macaroon Cookies are a delightful treat that combines the chewy texture of coconut macaroons with the rich, smooth taste of chocolate. These cookies are perfect for the holiday season, bringing a touch of elegance to any Christmas cookie platter.
The combination of sweet, shredded coconut with a crisp chocolate shell creates a harmonious balance of flavors that’s sure to impress family and friends alike.
Making these cookies is a simple yet rewarding process. The key to a perfect macaroon lies in the quality of the coconut and the consistency of the meringue that binds the ingredients together.
Once baked to golden perfection, the macaroons are then dipped in melted chocolate, adding a layer of decadence that will leave everyone reaching for more. These cookies aren’t only delicious but also a beautiful addition to any festive gathering.
Ingredients for 4-6 people:
- 3 cups sweetened shredded coconut
- 4 large egg whites
- 3/4 cup granulated sugar
- 1 teaspoon pure vanilla extract
- 1/4 teaspoon salt
- 8 ounces semi-sweet chocolate, chopped
Cooking Instructions:
- Preheat and Prepare: Preheat your oven to 325°F (163°C). Line two baking sheets with parchment paper.
- Mix Ingredients: In a medium bowl, combine the shredded coconut, egg whites, sugar, vanilla extract, and salt. Stir until the mixture is thoroughly combined and the coconut is well-coated.
- Shape Macaroons: Using a small cookie scoop or your hands, form the mixture into small, tightly packed balls (about 1 inch in diameter) and place them on the prepared baking sheets, spacing them about 1 inch apart.
- Bake: Bake the macaroons in the preheated oven for 18-20 minutes, or until they’re golden brown around the edges. Remove from the oven and allow them to cool on the baking sheets for about 5 minutes before transferring to a wire rack to cool completely.
- Melt Chocolate: While the macaroons are cooling, melt the chopped chocolate in a heatproof bowl set over a pot of simmering water, stirring occasionally until smooth. Alternatively, you can melt the chocolate in the microwave in 30-second intervals, stirring in between, until fully melted.
- Dip Macaroons: Once the macaroons are completely cool, dip the bottoms into the melted chocolate, allowing any excess to drip off. Place them back on the parchment-lined baking sheets.
- Set Chocolate: Allow the chocolate to set by either leaving the cookies at room temperature or placing them in the refrigerator for a quicker setting.
Extra Tips:
For the best results, make certain that the egg whites are at room temperature before whipping them with the sugar, as this will help achieve the best consistency for binding the ingredients.
If you find that the macaroons are spreading too much during baking, try chilling the mixture for about 30 minutes before shaping them.
Additionally, you can experiment with different types of chocolate, such as dark or milk chocolate, to tailor the flavor to your liking.
Finally, storing the cookies in an airtight container will keep them fresh and chewy for up to a week.
Chocolate Cherry Almond Biscotti
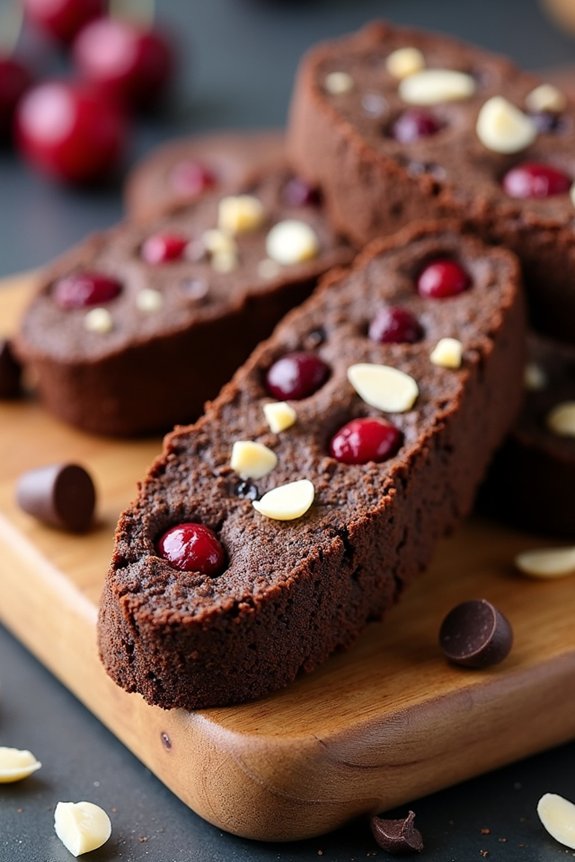
Chocolate Cherry Almond Biscotti is a delightful treat that combines the rich flavors of chocolate, the tangy sweetness of cherries, and the nutty crunch of almonds.
These twice-baked Italian cookies are perfect for dunking into a warm cup of coffee or enjoying on their own as a satisfying snack. Ideal for the holiday season, these biscotti offer a unique twist on traditional Christmas cookies, bringing a touch of elegance and a burst of flavor to any festive gathering.
Preparing Chocolate Cherry Almond Biscotti is a wonderful way to infuse your holiday baking with something special. The combination of chocolate and cherries creates a harmonious balance, while the addition of almonds adds a delightful texture.
This recipe serves 4-6 people, making it perfect for sharing with family and friends or for gifting to loved ones during the Christmas season. Now let’s gather the ingredients and begin the journey to creating these delectable biscotti.
Ingredients:
- 2 cups all-purpose flour
- 1/2 cup unsweetened cocoa powder
- 1 teaspoon baking soda
- 1/2 teaspoon salt
- 3/4 cup granulated sugar
- 1/2 cup unsalted butter, softened
- 2 large eggs
- 1 teaspoon vanilla extract
- 1 cup dried cherries
- 3/4 cup chopped almonds
- 1/2 cup chocolate chips
Cooking Instructions:
- Preheat and Prep: Preheat your oven to 350°F (175°C). Line a baking sheet with parchment paper to prevent the biscotti from sticking.
- Mix Dry Ingredients: In a medium bowl, whisk together the flour, cocoa powder, baking soda, and salt. This guarantees that the dry ingredients are well combined and free of lumps.
- Cream Butter and Sugar: In a large mixing bowl, beat the softened butter and granulated sugar together using an electric mixer until light and fluffy. This should take about 2-3 minutes.
- Add Eggs and Vanilla: Beat in the eggs one at a time, mixing well after each addition. Stir in the vanilla extract to combine.
- Combine Wet and Dry Ingredients: Gradually add the dry ingredients to the butter mixture, mixing on low speed until just combined. Be careful not to overmix.
- Fold in Extras: Gently fold in the dried cherries, chopped almonds, and chocolate chips. Confirm that they’re evenly distributed throughout the dough.
- Shape the Dough: Divide the dough in half and shape each half into a log about 12 inches long and 2 inches wide. Place the logs on the prepared baking sheet, leaving space between them.
- First Bake: Bake in the preheated oven for 25-30 minutes, or until the logs are firm to the touch. Remove from the oven and let cool on the baking sheet for 10 minutes.
- Slice and Second Bake: Reduce the oven temperature to 325°F (160°C). Using a serrated knife, slice the logs diagonally into 3/4-inch thick slices. Arrange the slices cut side down on the baking sheet.
- Final Bake: Bake the slices for an additional 10-12 minutes, flip them over, and bake for another 10-12 minutes, until the biscotti are dry and crisp. Allow to cool completely on a wire rack.
Extra Tips:
To guarantee that your biscotti have the perfect texture, be sure to allow them to cool completely between the first and second baking. This helps them firm up and makes slicing easier.
If you prefer a softer biscotti, you can reduce the second bake time slightly. Feel free to experiment with different nuts or add-ins like white chocolate chips or dried cranberries for a personalized twist.
Store the biscotti in an airtight container to keep them fresh for up to two weeks.
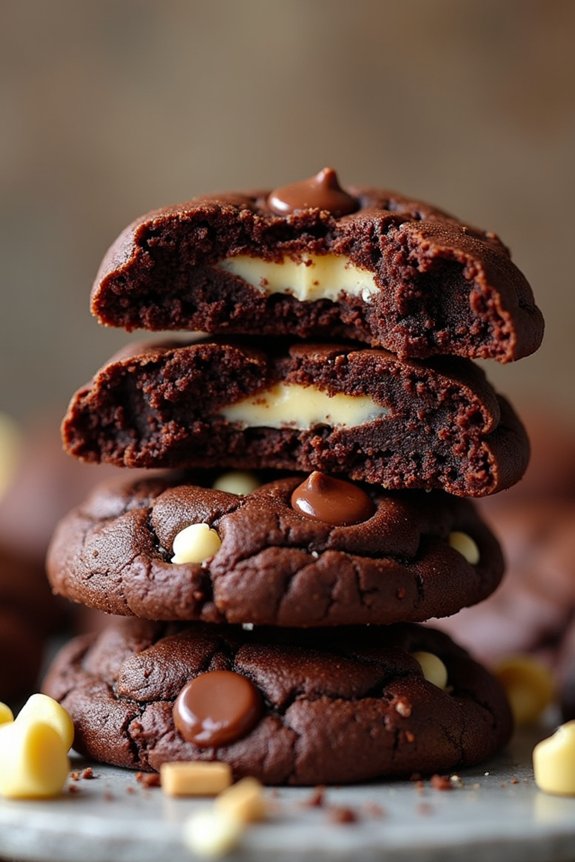
Nutella Stuffed Chocolate Chip Cookies

Nutella Stuffed Chocolate Chip Cookies are the ultimate holiday treat that combines the classic taste of chocolate chip cookies with a delightful surprise inside. Perfect for Christmas festivities, these cookies will satisfy any sweet tooth with their gooey Nutella center wrapped in a soft, chewy cookie dough.
Not only are they delicious, but they also add a touch of indulgence to your holiday dessert spread, making them a surefire hit with family and friends. These cookies are ideal for those who love the combination of chocolate and hazelnut, offering a rich and decadent flavor profile.
The preparation process is straightforward, and the reward is a batch of irresistibly delicious cookies that are perfect for gifting or enjoying with a cup of hot cocoa by the fireplace. With a serving size of 4-6 people, these Nutella Stuffed Chocolate Chip Cookies are sure to spread cheer and warmth during your Christmas celebrations.
Ingredients:
- 1 cup unsalted butter, softened
- 1 cup brown sugar
- 1/2 cup granulated sugar
- 2 large eggs
- 1 teaspoon vanilla extract
- 2 3/4 cups all-purpose flour
- 1 teaspoon baking soda
- 1/2 teaspoon salt
- 1 1/2 cups semi-sweet chocolate chips
- 1 cup Nutella (or any chocolate-hazelnut spread)
- 1/2 cup chopped hazelnuts (optional)
Instructions:
- Prepare the Nutella Centers: Line a baking sheet with parchment paper. Using a teaspoon, scoop out small dollops of Nutella and place them onto the parchment paper. Place the sheet in the freezer for about 30 minutes or until the Nutella is firm.
- Make the Dough: In a large mixing bowl, cream together the softened butter, brown sugar, and granulated sugar until light and fluffy. This should take about 3-4 minutes using a hand mixer or stand mixer on medium speed.
- Add Wet Ingredients: Beat in the eggs one at a time, ensuring each is fully incorporated before adding the next. Mix in the vanilla extract.
- Combine Dry Ingredients: In a separate bowl, whisk together the all-purpose flour, baking soda, and salt. Gradually add the dry ingredients to the wet mixture, mixing on low speed until just combined.
- Stir in Chocolate Chips: Fold in the semi-sweet chocolate chips and optional chopped hazelnuts, ensuring they’re evenly distributed throughout the dough.
- Assemble the Cookies: Preheat your oven to 350°F (175°C). Scoop out about 2 tablespoons of cookie dough for each cookie. Flatten the dough slightly and place a frozen Nutella dollop in the center. Wrap the dough around the Nutella, ensuring it’s completely sealed.
- Bake the Cookies: Place the cookies on a baking sheet lined with parchment paper, spaced about 2 inches apart. Bake in the preheated oven for 12-15 minutes or until the edges are golden brown. Allow the cookies to cool on the baking sheet for 5 minutes before transferring them to a wire rack to cool completely.
Extra Tips: For the best results, make sure your butter is at room temperature before starting, as this will help the sugars blend more smoothly and create a better texture for the cookies.
Freezing the Nutella is essential for maintaining its shape during baking, so don’t skip this step. If you prefer a nut-free version, simply omit the chopped hazelnuts. These cookies can be stored in an airtight container for up to a week, but they’re best enjoyed warm when the Nutella center is still oozy and delicious.
Chocolate Orange Shortbread Cookies

Indulge in the perfect blend of rich chocolate and zesty orange with these Chocolate Orange Shortbread Cookies. These cookies are a delightful treat for the holiday season, combining buttery shortbread with the bright, citrusy notes of orange and the deep flavors of chocolate.
Whether you’re enjoying them with a cup of tea on a chilly afternoon or sharing them with friends and family during holiday gatherings, these cookies are sure to bring warmth and joy to your table.
The recipe makes approximately 24 cookies, perfect for serving to a group of 4-6 people. These cookies are easy to make and are a wonderful addition to your holiday baking repertoire. The combination of simple ingredients and the contrast of flavors make these cookies a standout treat.
Ingredients:
- 1 cup (2 sticks) unsalted butter, softened
- 1/2 cup granulated sugar
- Zest of 1 large orange
- 2 cups all-purpose flour
- 1/4 teaspoon salt
- 1/2 cup semi-sweet chocolate chips, melted
- 1 teaspoon vanilla extract
- 2 tablespoons cocoa powder
Instructions:
- Prepare the Dough: In a large mixing bowl, cream together the softened butter and granulated sugar until light and fluffy. Add the orange zest and vanilla extract, mixing well to incorporate the flavors evenly throughout the dough.
- Mix Dry Ingredients: In a separate bowl, whisk together the all-purpose flour, salt, and cocoa powder. Gradually add the dry ingredients to the butter mixture, stirring until just combined. Be careful not to over-mix, as this can result in tough cookies.
- Chill the Dough: Divide the dough into two equal portions. Shape each portion into a log approximately 2 inches in diameter. Wrap each log tightly in plastic wrap and refrigerate for at least 1 hour, or until firm. This step is essential for easy slicing and maintaining the shape of the cookies during baking.
- Preheat the Oven: Preheat your oven to 350°F (175°C) and line a baking sheet with parchment paper.
- Slice and Bake: Remove the dough from the refrigerator and unwrap. Using a sharp knife, slice the dough into 1/4-inch thick rounds. Arrange the slices on the prepared baking sheet, leaving about 1 inch of space between each cookie to allow for spreading during baking.
- Bake the Cookies: Bake the cookies in the preheated oven for 10-12 minutes, or until the edges are lightly golden. Remove from the oven and let the cookies cool on the baking sheet for a few minutes before transferring them to a wire rack to cool completely.
- Decorate with Chocolate: Once the cookies are completely cooled, drizzle the melted semi-sweet chocolate over the top of each cookie. Allow the chocolate to set before serving.
Extra Tips:
For an added touch of elegance, you can sprinkle a little sea salt over the chocolate drizzle before it sets, enhancing the flavor profile of the cookies.
If you prefer a more intense orange flavor, consider adding a few drops of orange extract to the dough. These cookies can be stored in an airtight container for up to a week, making them a convenient make-ahead option for holiday gatherings.
Enjoy these delightful Chocolate Orange Shortbread Cookies with your loved ones this festive season!
Chocolate Gingerbread Cookies

The holiday season is the perfect time to indulge in sweet treats, and Chocolate Gingerbread Cookies are a delightful twist on a classic favorite. These cookies combine the rich, velvety taste of chocolate with the warm, spicy notes of gingerbread, creating a delicious harmony of flavors.
Perfect for a cozy family gathering or a festive holiday party, these cookies are sure to become a new favorite in your holiday baking repertoire.
With a hint of molasses and a touch of cocoa, Chocolate Gingerbread Cookies bring together the best of both worlds. They’re soft and chewy, with a slightly crisp edge, making them an irresistible treat. The recipe below provides enough ingredients to serve 4-6 people, guaranteeing there’s plenty to share with friends and family or to keep all to yourself for a special treat.
Ingredients (Serves 4-6):
- 1 3/4 cups all-purpose flour
- 1/4 cup unsweetened cocoa powder
- 1 teaspoon baking soda
- 1 teaspoon ground ginger
- 1 teaspoon ground cinnamon
- 1/4 teaspoon ground cloves
- 1/4 teaspoon salt
- 1/2 cup unsalted butter, softened
- 1/2 cup dark brown sugar, packed
- 1/4 cup unsulfured molasses
- 1 large egg
- 3/4 cup semisweet chocolate chips
- Granulated sugar, for rolling (optional)
Cooking Instructions:
- Prepare the Dry Ingredients: In a medium-sized bowl, whisk together the all-purpose flour, cocoa powder, baking soda, ground ginger, ground cinnamon, ground cloves, and salt until thoroughly combined. Set aside.
- Cream the Butter and Sugar: In a large mixing bowl, use an electric mixer to cream the softened butter and dark brown sugar together until the mixture is light and fluffy. This should take about 2-3 minutes on medium speed.
- Add Molasses and Egg: Add the unsulfured molasses and the large egg to the butter and sugar mixture. Beat on medium speed until everything is well incorporated.
- Combine Wet and Dry Ingredients: Gradually add the dry ingredient mixture to the wet ingredients, mixing on low speed. Once combined, fold in the semisweet chocolate chips using a spatula.
- Chill the Dough: Cover the dough with plastic wrap and refrigerate for at least 1 hour. This step is essential for the cookies to maintain their shape during baking.
- Preheat the Oven: Preheat your oven to 350°F (175°C) and line a baking sheet with parchment paper.
- Shape the Cookies: Scoop tablespoons of dough and roll them into balls. If desired, roll each ball in granulated sugar for added sweetness and sparkle.
- Bake the Cookies: Place the cookie balls on the prepared baking sheet, spacing them about 2 inches apart. Bake for 10-12 minutes, or until the edges are set and the tops are slightly cracked.
- Cool and Serve: Allow the cookies to cool on the baking sheet for 5 minutes before transferring them to a wire rack to cool completely. Enjoy!
Extra Tips:
For best results, confirm that all your ingredients are at room temperature before starting, particularly the butter and egg. This will help your cookie dough mix more evenly.
If you prefer a more intense chocolate flavor, consider adding a handful of dark chocolate chunks along with the chocolate chips. Additionally, for an extra festive touch, you can drizzle the finished cookies with white chocolate or decorate them with icing once they’ve cooled completely.
Store leftover cookies in an airtight container to keep them fresh for up to a week.
Chocolate Toffee Pecan Cookies

Chocolate Toffee Pecan Cookies are a delightful treat that brings together the rich flavors of chocolate, the buttery crunch of toffee, and the nutty goodness of pecans. These cookies are perfect for the holiday season, offering a festive twist on the classic chocolate cookie.
The combination of textures and flavors makes these cookies an irresistible addition to your Christmas cookie platter. These cookies aren’t only delicious but also relatively easy to make, making them an excellent choice for both novice and experienced bakers.
The key to these cookies is to use high-quality chocolate and freshly toasted pecans, which enhance the overall flavor profile. Whether you’re hosting a holiday party or looking for a sweet gift idea, these Chocolate Toffee Pecan Cookies are bound to impress.
Ingredients (Serves 4-6):
- 1 cup unsalted butter, softened
- 1 cup granulated sugar
- 1/2 cup packed light brown sugar
- 2 large eggs
- 1 teaspoon vanilla extract
- 2 1/4 cups all-purpose flour
- 1 teaspoon baking soda
- 1/2 teaspoon salt
- 1 cup semisweet chocolate chips
- 1 cup toffee bits
- 1 cup chopped pecans, toasted
Cooking Instructions:
- Preheat Your Oven: Start by preheating your oven to 350°F (175°C). Line two baking sheets with parchment paper to prevent the cookies from sticking.
- Cream the Butter and Sugars: In a large mixing bowl, cream together the softened butter, granulated sugar, and brown sugar until light and fluffy. This should take about 2-3 minutes using an electric mixer on medium speed.
- Add Eggs and Vanilla: Beat in the eggs one at a time, making sure each egg is fully incorporated before adding the next. Stir in the vanilla extract until well combined.
- Combine Dry Ingredients: In a separate bowl, whisk together the all-purpose flour, baking soda, and salt. Gradually add this dry mixture to the wet ingredients, mixing until just combined.
- Fold in Mix-Ins: Using a spatula, gently fold in the chocolate chips, toffee bits, and toasted pecans. Make sure that the mix-ins are evenly distributed throughout the dough.
- Scoop and Shape: Use a cookie scoop or tablespoon to drop rounded tablespoons of dough onto the prepared baking sheets, spacing them about 2 inches apart to allow room for spreading.
- Bake: Bake in the preheated oven for 10-12 minutes, or until the edges are golden brown and the centers are set but still soft. Be careful not to overbake, as the cookies will continue to firm up as they cool.
- Cool: Allow the cookies to cool on the baking sheets for 5 minutes before transferring them to a wire rack to cool completely.
Extra Tips:
For the best results, make sure your butter is at room temperature before starting the recipe. This guarantees it creams properly with the sugars, creating a light and fluffy texture.
To toast the pecans, spread them in a single layer on a baking sheet and bake at 350°F (175°C) for about 5-7 minutes, or until fragrant. Additionally, if you prefer a chewier cookie, slightly underbake them and let them cool on the baking sheet.
Enjoy your delicious Chocolate Toffee Pecan Cookies with a glass of milk or a warm cup of cocoa!
Mint Chocolate Sandwich Cookies
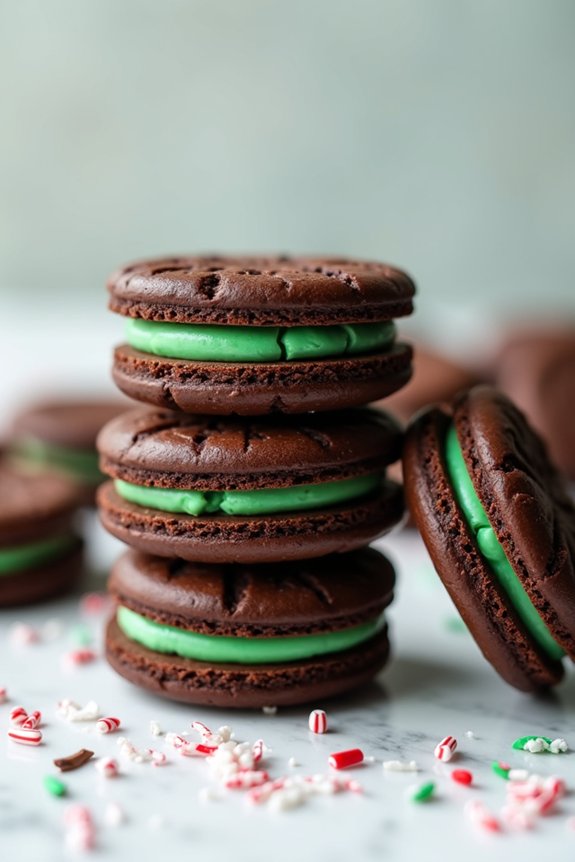
Mint Chocolate Sandwich Cookies are the perfect holiday treat, combining the rich flavors of chocolate with a rejuvenating hint of mint. These delightful cookies are versatile and can be enjoyed as a festive dessert or a sweet addition to your Christmas cookie tray.
With their elegant appearance and irresistible taste, they’re sure to impress both family and friends during the holiday season. The cookies consist of two chocolate wafers filled with a creamy mint-flavored frosting, creating a delightful balance of flavors and textures.
Making Mint Chocolate Sandwich Cookies at home is a rewarding experience that allows you to indulge in the joy of baking while creating a memorable treat for your loved ones. The process involves crafting tender chocolate cookies from scratch, preparing a smooth minty filling, and assembling the sandwiches into a perfect holiday delicacy.
By following this recipe, you’ll be able to effortlessly produce a batch of cookies that aren’t only visually appealing but also a delightful explosion of flavors with every bite.
Ingredients (Serves 4-6):
- 1 cup all-purpose flour
- 1/2 cup unsweetened cocoa powder
- 1/2 teaspoon baking soda
- 1/4 teaspoon salt
- 1/2 cup unsalted butter, softened
- 3/4 cup granulated sugar
- 1 large egg
- 1 teaspoon vanilla extract
- 1/2 cup confectioners’ sugar
- 2 tablespoons unsalted butter, softened
- 1/2 teaspoon peppermint extract
- 2-3 drops green food coloring (optional)
Instructions:
1. Prepare the Cookie Dough: In a medium bowl, whisk together the flour, cocoa powder, baking soda, and salt. In a separate large bowl, beat the softened butter and granulated sugar together using an electric mixer on medium speed until light and fluffy.
Add the egg and vanilla extract, beating until well combined. Gradually add the dry ingredients to the wet ingredients, mixing until a dough forms.
2. Chill the Dough: Wrap the dough in plastic wrap and refrigerate for at least 1 hour. Chilling the dough helps to firm it up, making it easier to roll out and cut into shapes.
3. Preheat the Oven: Preheat your oven to 350°F (175°C). Line a baking sheet with parchment paper.
4. Roll and Cut the Cookies: On a lightly floured surface, roll out the dough to about 1/4 inch thickness. Use a round cookie cutter to cut out cookies and place them on the prepared baking sheet, leaving a little space between each cookie.
5. Bake the Cookies: Bake the cookies in the preheated oven for 8-10 minutes, or until they’re set. Remove from the oven and allow them to cool on the baking sheet for a few minutes before transferring them to a wire rack to cool completely.
6. Prepare the Mint Filling: In a medium bowl, beat the confectioners’ sugar, softened butter, peppermint extract, and food coloring (if using) together until smooth and creamy.
7. Assemble the Sandwich Cookies: Once the cookies are completely cooled, spread a generous amount of the mint filling on the bottom side of one cookie and sandwich it with another cookie. Press gently to spread the filling to the edges.
8. Serve and Enjoy: Arrange the Mint Chocolate Sandwich Cookies on a serving platter and enjoy them with your loved ones.
Extra Tips:
For an extra festive touch, consider rolling the edges of the filled cookies in crushed candy canes or holiday sprinkles before serving. This adds a colorful and crunchy element to the cookies.
If you prefer a stronger mint flavor, you can adjust the amount of peppermint extract to your liking. Additionally, verify the cookies are completely cooled before assembling to prevent the filling from melting.
These cookies can be stored in an airtight container at room temperature for up to a week, making them an excellent make-ahead option for holiday gatherings.