

When the holiday hustle sneaks up on us, I often find myself searching for quick solutions that still bring that warm, festive cheer. That’s where these 10 easy Christmas cookie recipes come in handy. From classic sugar cookies that remind me of childhood decorating marathons to speedy no-bake peanut butter balls, these recipes offer simplicity without compromising on flavor. Let’s see how these treats can be your festive lifesavers this season.
Classic Sugar Cookies

When it comes to baking during the holiday season, few treats capture the spirit of Christmas quite like classic sugar cookies. These delightful cookies are a staple in many households, cherished for their simplicity and versatility. With their buttery texture and perfectly sweet flavor, sugar cookies are the ideal canvas for creative decoration, whether you prefer to adorn them with festive icing, colorful sprinkles, or simply enjoy them plain.
Making sugar cookies is a wonderful family activity, allowing adults and children alike to join in the fun of rolling, cutting, and decorating. Creating the ideal sugar cookie involves a few key steps, starting with a well-balanced dough. The dough should be firm enough to hold its shape when cut, yet soft enough to yield a tender cookie.
Once baked, these cookies should have a slight golden edge, an indication of their buttery richness. Whether you’re a novice baker or a seasoned pro, following this classic sugar cookie recipe will guarantee you end up with a batch of delicious cookies that are sure to impress your family and friends.
Ingredients for Classic Sugar Cookies (serving size: 4-6 people):
- 3 cups all-purpose flour
- 1 teaspoon baking powder
- 1/2 teaspoon salt
- 1 cup unsalted butter, softened
- 1 cup granulated sugar
- 1 large egg
- 1 1/2 teaspoons vanilla extract
- 1/2 teaspoon almond extract (optional)
Cooking Instructions:
- Prepare the Dry Ingredients: In a medium-sized bowl, whisk together the all-purpose flour, baking powder, and salt. This guarantees that the baking powder is evenly distributed throughout the flour, which will help the cookies rise uniformly.
- Cream the Butter and Sugar: In a large mixing bowl, use an electric mixer to beat the softened butter and granulated sugar until the mixture is light and fluffy. This should take about 2-3 minutes. Creaming the butter and sugar incorporates air, which is essential for achieving a tender texture.
- Add the Egg and Extracts: Beat in the egg, vanilla extract, and almond extract (if using) to the butter and sugar mixture. Mix until everything is well combined. The extracts add depth of flavor to the cookies.
- Combine Wet and Dry Ingredients: Gradually add the dry ingredients to the wet mixture, mixing on low speed until the dough begins to come together. Be cautious not to overmix, as this can result in tough cookies.
- Chill the Dough: Form the dough into a disk, wrap it in plastic wrap, and refrigerate for at least 1 hour. Chilling the dough makes it easier to handle and helps prevent the cookies from spreading too much during baking.
- Preheat and Prepare for Baking: Preheat your oven to 350°F (175°C). Line baking sheets with parchment paper or silicone baking mats to prevent sticking.
- Roll and Cut the Dough: On a lightly floured surface, roll out the dough to about 1/4-inch thickness. Use cookie cutters to cut out shapes and place them on the prepared baking sheets, leaving about 1 inch between each cookie.
- Bake the Cookies: Bake in the preheated oven for 8-10 minutes, or until the edges are just starting to turn golden brown. Keep an eye on them to avoid overbaking.
- Cool and Decorate: Allow the cookies to cool on the baking sheets for a few minutes before transferring them to a wire rack to cool completely. Once cooled, decorate as desired with icing, sprinkles, or any other toppings you prefer.
Extra Tips:
For best results, verify your butter is at room temperature before starting the recipe, as this aids in achieving the ideal texture when creaming with sugar. If you find your dough is too sticky to work with, dust your rolling pin and work surface with a bit more flour to prevent sticking.
When using cookie cutters, dip them in flour before each use to help them cut cleanly through the dough. Finally, store your baked cookies in an airtight container to keep them fresh and maintain their delightful texture for up to a week. Enjoy your holiday baking!
Chocolate Crinkle Cookies
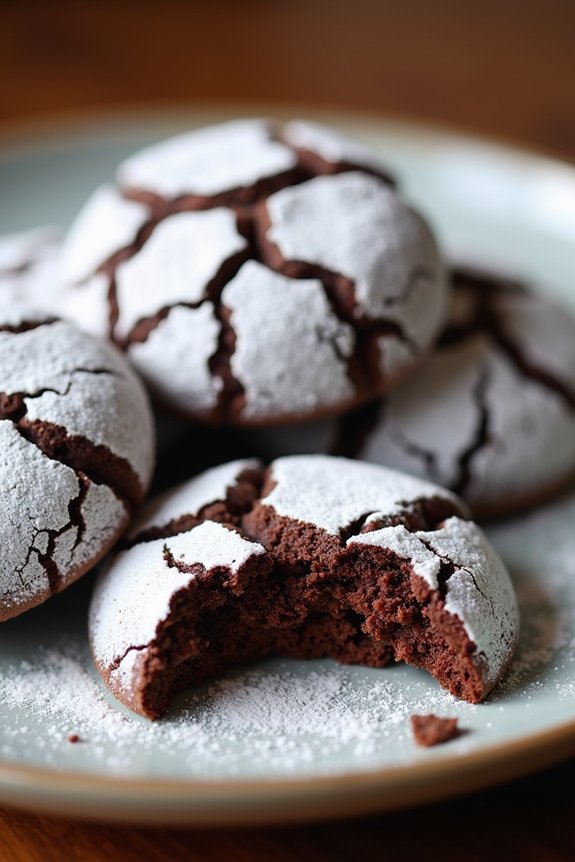
Chocolate Crinkle Cookies are a classic holiday treat known for their rich, fudgy centers and beautifully cracked exteriors. These cookies are a delightful addition to any Christmas cookie platter, offering a perfect balance of chocolatey goodness with a hint of sweetness. Their unique appearance, with powdered sugar-covered tops that crack during baking, makes them as festive to look at as they’re delicious to eat.
Ideal for sharing with family and friends, this recipe yields a batch perfect for serving 4-6 people. The cookies are straightforward to make, and the dough can be prepared in advance, allowing you to have fresh-baked cookies ready in no time. The following recipe includes all the essentials you’ll need to create these irresistible cookies, as well as some tips to guarantee your baking experience is both successful and enjoyable.
Ingredients:
- 1 cup all-purpose flour
- 1/2 cup unsweetened cocoa powder
- 1 teaspoon baking powder
- 1/4 teaspoon salt
- 1/2 cup granulated sugar
- 1/4 cup vegetable oil
- 2 large eggs
- 1 teaspoon vanilla extract
- 1/2 cup confectioners’ sugar (for rolling)
Instructions:
- Prepare the Dough: In a medium-sized bowl, whisk together the flour, cocoa powder, baking powder, and salt. In a separate large bowl, beat the granulated sugar and vegetable oil together until well combined. Add the eggs one at a time, mixing well after each addition. Stir in the vanilla extract.
- Combine Ingredients: Gradually add the dry ingredients to the wet ingredients, stirring until a thick, sticky dough forms. Cover the bowl with plastic wrap and refrigerate for at least 2 hours, or overnight if preferred. Chilling the dough is crucial to make it easier to handle and to achieve the characteristic crinkle effect when baked.
- Preheat the Oven: Preheat your oven to 350°F (175°C) and line two baking sheets with parchment paper.
- Shape the Cookies: Place the confectioners’ sugar in a small bowl. Using a tablespoon or a cookie scoop, scoop out dough and shape it into 1-inch balls. Roll each ball in the confectioners’ sugar until completely coated. This sugar coating is what creates the distinct crinkle pattern.
- Bake the Cookies: Arrange the dough balls on the prepared baking sheets, spacing them about 2 inches apart. Bake in the preheated oven for 10-12 minutes, or until the cookies have spread and the tops are cracked. The cookies should be set around the edges but still soft in the center.
- Cool and Serve: Allow the cookies to cool on the baking sheets for 5 minutes before transferring them to a wire rack to cool completely. Once cooled, serve and enjoy!
Extra Tips:
For the best crinkle effect, make sure that the dough is thoroughly chilled before rolling in confectioners’ sugar. If the dough is too warm, the cookies may spread too much in the oven.
Also, don’t skip the step of rolling the dough balls generously in powdered sugar, as this won’t only add sweetness but also enhance the visual crackling effect.
If you prefer an even richer chocolate flavor, consider adding a handful of chocolate chips to the dough before chilling. Enjoy your baking and happy holidays!
No-Bake Peanut Butter Balls

No-Bake Peanut Butter Balls are a deliciously simple treat that requires no oven time, making them perfect for quick holiday preparations. These delightful morsels combine the creamy richness of peanut butter with the sweetness of powdered sugar, resulting in a smooth and satisfying bite. The chocolate coating adds a decadent touch, while the crunchy texture of rice cereal provides a delightful contrast. Perfect for sharing at festive gatherings, these treats are loved by both kids and adults alike.
This no-bake recipe is ideal for anyone looking to whip up a batch of delightful cookies without the hassle of traditional baking. With minimal ingredients and straightforward preparation, you can create a batch in less than an hour. The best part is that you can customize them with your favorite toppings like chopped nuts, sprinkles, or a drizzle of white chocolate.
Let’s explore the recipe that yields approximately 24-30 peanut butter balls, enough to serve 4-6 people.
Ingredients:
- 1 cup creamy peanut butter
- 1/4 cup unsalted butter, softened
- 1 1/2 cups powdered sugar
- 2 cups crispy rice cereal
- 1 teaspoon vanilla extract
- 1 1/2 cups semi-sweet chocolate chips
- 1 tablespoon coconut oil or shortening (optional, for smoother chocolate coating)
Instructions:
- Prepare the Peanut Butter Mixture: In a large mixing bowl, combine the creamy peanut butter and softened unsalted butter. Use a spatula or a hand mixer to blend them until smooth and well incorporated.
- Add Dry Ingredients: Gradually add the powdered sugar to the peanut butter mixture, mixing slowly to avoid a sugar cloud. Once the sugar is fully incorporated, gently fold in the crispy rice cereal and vanilla extract. The mixture should be thick and hold together when pressed.
- Shape the Balls: Using your hands or a small cookie scoop, form the peanut butter mixture into 1-inch balls. Place the balls on a baking sheet lined with parchment paper or wax paper. Once all the mixture is shaped, refrigerate the balls for about 30 minutes to firm up.
- Melt the Chocolate: While the peanut butter balls are chilling, melt the semi-sweet chocolate chips in a microwave-safe bowl. Heat in 30-second intervals, stirring in between, until fully melted and smooth. If desired, stir in the coconut oil or shortening for a smoother coating.
- Coat the Peanut Butter Balls: Remove the chilled peanut butter balls from the refrigerator. Using a fork or toothpick, dip each ball into the melted chocolate, ensuring it’s completely coated. Allow excess chocolate to drip off before placing back onto the parchment-lined baking sheet.
- Set the Chocolate: Once all the balls are coated, return them to the refrigerator to set for about 15-20 minutes or until the chocolate is firm.
- Serve and Enjoy: Once the chocolate has hardened, serve the No-Bake Peanut Butter Balls on a festive platter and enjoy!
Extra Tips:
For an extra festive touch, consider sprinkling colored sugar, holiday sprinkles, or crushed candy canes on top of the balls before the chocolate sets. If you find the peanut butter mixture too sticky to handle, lightly dust your hands with powdered sugar to make shaping easier.
Additionally, you can store the peanut butter balls in an airtight container in the refrigerator for up to a week, making them a convenient make-ahead option for holiday gatherings.
Gingerbread Men

Gingerbread Men are a timeless holiday favorite, bringing both delightful flavor and festive fun to any Christmas gathering. These charming cookies, shaped like little people, are made from a deliciously spiced dough that fills the kitchen with the warm aroma of ginger, cinnamon, and cloves.
Perfect for decorating with friends and family, Gingerbread Men can be customized with icing, candies, and other embellishments, making them a joyous activity as well as a tasty treat.
Creating Gingerbread Men is an enjoyable culinary project that combines baking skills with creative artistry. The recipe involves a simple dough that can be easily rolled out and cut into shapes, allowing bakers of all ages to participate.
Once baked to a perfect golden brown, these cookies become a canvas for decoration, each one a unique masterpiece. Whether they’re part of a dessert platter or wrapped as gifts, Gingerbread Men encapsulate the spirit of the season with their cheerful appearance and comforting flavors.
Ingredients for Gingerbread Men (serving size: 4-6 people):
- 3 cups all-purpose flour
- 3/4 cup packed dark brown sugar
- 3/4 teaspoon baking soda
- 1 tablespoon ground ginger
- 1 tablespoon ground cinnamon
- 1/2 teaspoon ground cloves
- 1/2 teaspoon salt
- 12 tablespoons (1 1/2 sticks) unsalted butter, softened
- 3/4 cup molasses
- 2 tablespoons milk
- Royal icing (for decorating)
- Assorted candies (for decorating)
Cooking Instructions:
1. Prepare the Dry Ingredients:
In a large mixing bowl, combine the flour, dark brown sugar, baking soda, ginger, cinnamon, cloves, and salt. Use a whisk or a sifter to make sure all ingredients are mixed evenly and there are no lumps.
2. Mix the Dough:
Add the softened butter to the dry ingredients and mix using an electric mixer on medium speed until the mixture resembles coarse crumbs. Gradually add the molasses and milk, mixing until the dough is well combined and smooth.
3. Chill the Dough:
Divide the dough into two portions and wrap each in plastic wrap. Refrigerate the dough for at least 1 hour until it’s firm enough to roll out. Chilling is essential to prevent the dough from sticking and makes it easier to handle.
4. Preheat the Oven:
Preheat your oven to 350°F (175°C) and line two baking sheets with parchment paper.
5. Roll Out the Dough:
On a lightly floured surface, roll out one portion of dough to about 1/4-inch thickness. Keep the other half refrigerated until ready to use. Use gingerbread men cookie cutters to cut out shapes, and transfer them to the prepared baking sheets, leaving some space between each cookie.
6. Bake the Cookies:
Place the baking sheets in the preheated oven and bake for 8-10 minutes, or until the edges are firm and the cookies are slightly puffed. Be careful not to overbake, as they’ll continue to firm up as they cool. Remove from the oven and allow the cookies to cool completely on a wire rack.
7. Decorate the Cookies:
Once the cookies have cooled, use royal icing to decorate your gingerbread men. Add candies for buttons, eyes, and other details as desired. Allow the icing to set before serving or packaging the cookies.
Extra Tips:
When making Gingerbread Men, consider adding a bit of orange zest to the dough for an extra burst of holiday flavor.
If you’re working with younger children, prepare the dough ahead of time to allow them to focus on the fun part—decorating! If you plan to hang the cookies as ornaments, make a small hole at the top of each one before baking using a straw.
This way, you can thread a ribbon through once they’re decorated and dry. Finally, store the cookies in an airtight container to keep them fresh and crisp for up to a week.
Snickerdoodle Drops
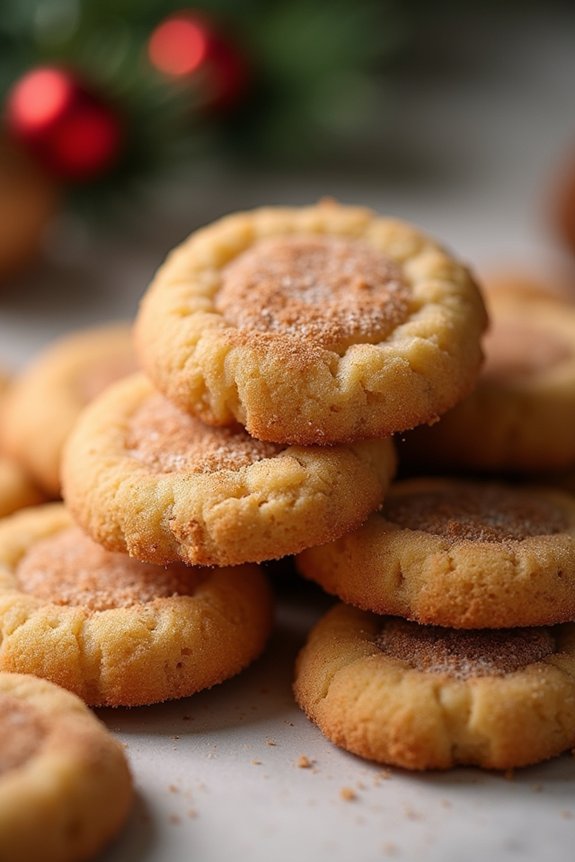
Snickerdoodle Drops are a delightful twist on the classic snickerdoodle cookie, perfect for the holiday season. These drop cookies are soft, buttery, and flavored with a hint of cinnamon, making them an irresistible treat for family gatherings or just a cozy night in. The cinnamon-sugar coating gives them their signature flavor and a slightly crispy exterior, while the inside remains tender and chewy.
This recipe is designed to serve 4-6 people, making it ideal for small gatherings or a festive family dessert. The preparation is straightforward, and the ingredients are simple, so you can easily whip up a batch in no time. Whether you’re an experienced baker or a novice, these Snickerdoodle Drops are sure to become a holiday favorite.
Ingredients (Serves 4-6)
- 1 cup unsalted butter, softened
- 1 1/2 cups granulated sugar
- 2 large eggs
- 2 teaspoons vanilla extract
- 2 3/4 cups all-purpose flour
- 2 teaspoons cream of tartar
- 1 teaspoon baking soda
- 1/4 teaspoon salt
- 2 teaspoons ground cinnamon
- 1/4 cup granulated sugar (for rolling)
- 1 teaspoon ground cinnamon (for rolling)
Instructions
- Preheat and Prepare: Preheat your oven to 350°F (175°C). Line two baking sheets with parchment paper or silicone baking mats and set aside.
- Mix Wet Ingredients: In a large bowl, beat the softened butter with 1 1/2 cups of granulated sugar until light and fluffy. This should take about 2-3 minutes using an electric mixer. Add the eggs one at a time, beating well after each addition, then mix in the vanilla extract.
- Combine Dry Ingredients: In a separate bowl, whisk together the flour, cream of tartar, baking soda, and salt. Gradually add the dry mixture to the wet ingredients, mixing until just combined. Be careful not to overmix.
- Create Cinnamon-Sugar Mixture: In a small bowl, combine 1/4 cup of granulated sugar with 1 teaspoon of ground cinnamon. Stir until well mixed.
- Shape and Coat Dough: Using a small cookie scoop or tablespoon, scoop dough and shape into 1-inch balls. Roll each ball in the cinnamon-sugar mixture until fully coated, then place them on the prepared baking sheets, spacing them about 2 inches apart.
- Bake: Bake in the preheated oven for 10-12 minutes, or until the edges are lightly golden. The centers may look slightly underbaked, but they’ll set as they cool.
- Cool: Allow the cookies to cool on the baking sheets for about 5 minutes before transferring them to a wire rack to cool completely.
Extra Tips
For the best texture, make sure your butter is at room temperature before you begin mixing. This helps achieve a smooth and creamy batter. If you prefer a slightly crispier cookie, you can bake them for an additional 1-2 minutes.
Also, storing the cookies in an airtight container will help them retain their softness. If you find yourself with leftovers, Snickerdoodle Drops can be frozen for up to three months—just be sure to let them defrost at room temperature before serving. Enjoy your festive baking!
Holiday Shortbread Bites
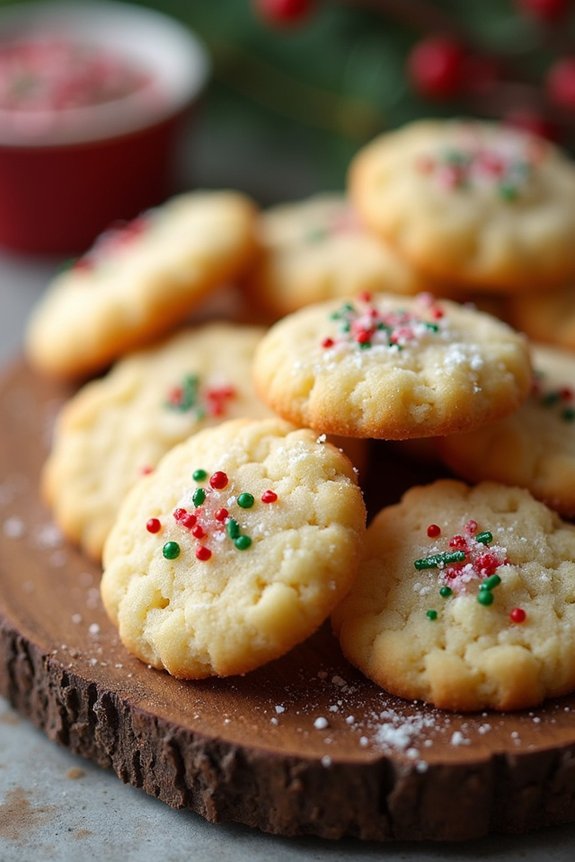
Holiday Shortbread Bites are a delightful treat that embodies the spirit of the festive season. These small, buttery cookies are perfect for sharing with friends and family or as a thoughtful homemade gift. With their crumbly texture and melt-in-your-mouth goodness, these bites are certain to be a hit at any holiday gathering. The simplicity of this recipe allows even novice bakers to achieve impressive results, making it an ideal choice for your holiday baking repertoire.
The beauty of Holiday Shortbread Bites lies in their versatility. You can customize them with your favorite holiday-themed decorations, such as colored sugar, chocolate drizzle, or festive sprinkles. Whether you enjoy them with a cup of hot cocoa or leave them out for Santa on Christmas Eve, these cookies are a quintessential part of the holiday experience. This recipe serves 4-6 people, making it a perfect option for intimate gatherings or cozy family nights.
Ingredients (Serves 4-6):
- 1 cup unsalted butter, softened
- 3/4 cup powdered sugar
- 1 teaspoon vanilla extract
- 2 cups all-purpose flour
- 1/4 teaspoon salt
- Optional: colored sugar, chocolate drizzle, or sprinkles
Instructions:
- Preheat the Oven: Begin by preheating your oven to 350°F (175°C). This guarantees that your oven is at the right temperature when you’re ready to bake the cookies.
- Cream the Butter and Sugar: In a large mixing bowl, combine the softened butter and powdered sugar. Use an electric mixer to cream them together until the mixture is light and fluffy.
- Add Vanilla Extract: Add the vanilla extract to the creamed butter and sugar, and mix until well incorporated.
- Mix the Dry Ingredients: In a separate bowl, whisk together the all-purpose flour and salt. Gradually add the dry ingredients to the wet mixture, mixing on low speed until a dough forms.
- Shape the Dough: On a lightly floured surface, roll out the dough to about 1/2-inch thickness. Use a sharp knife or cookie cutter to cut the dough into bite-sized squares or desired shapes.
- Prepare for Baking: Place the cut dough pieces onto a baking sheet lined with parchment paper. If desired, sprinkle colored sugar or add sprinkles on top for decoration.
- Bake: Bake in the preheated oven for 10-12 minutes or until the edges are lightly golden. Keep an eye on them to avoid over-baking.
- Cool: Remove the cookies from the oven and let them cool on the baking sheet for a few minutes before transferring them to a wire rack to cool completely.
Extra Tips:
For the best results, make sure that your butter is at room temperature before starting, as this will help achieve the perfect texture. If the dough feels too sticky, refrigerate it for 15-20 minutes before rolling.
Additionally, you can experiment with different flavor extracts such as almond or peppermint to add a unique twist to your cookies. Remember, decorating is a fun part of the process, so feel free to get creative with your toppings to match the holiday theme!
Festive Thumbprint Cookies
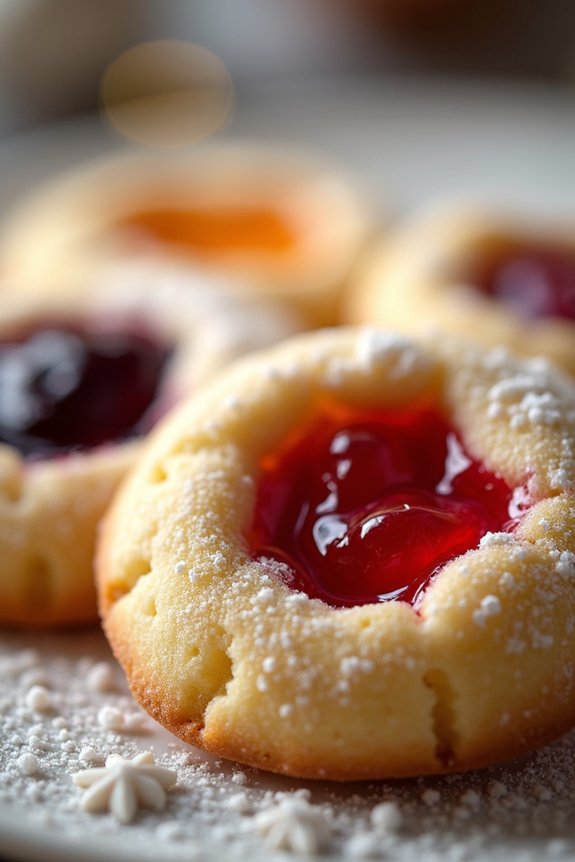
Festive Thumbprint Cookies are a delightful treat that add a splash of color and flavor to any holiday spread. These cookies are named for the small indentation made by your thumb, which is later filled with a sweet jam or preserve of your choice.
They’re a beautiful addition to cookie platters and are certain to be a hit with both children and adults alike. Their buttery texture, combined with the sweetness of the jam, makes them irresistible.
Perfect for a serving size of 4-6 people, Festive Thumbprint Cookies can be customized to your liking with different types of jams or preserves. Whether you choose raspberry, apricot, or a mix of your favorite fruit flavors, these cookies are guaranteed to be a crowd-pleaser.
Their charming appearance and mouth-watering taste make them a must-have for your Christmas celebrations.
Ingredients:
- 1 cup unsalted butter, softened
- 2/3 cup granulated sugar
- 1 teaspoon vanilla extract
- 2 cups all-purpose flour
- 1/4 teaspoon salt
- 1/2 cup assorted fruit jams or preserves
- 1/4 cup powdered sugar (optional, for dusting)
Instructions:
- Preheat the Oven: Start by preheating your oven to 350°F (175°C). Line a baking sheet with parchment paper to prevent the cookies from sticking.
- Cream the Butter and Sugar: In a large mixing bowl, cream together the softened butter and granulated sugar using an electric mixer until the mixture is light and fluffy. This should take about 2-3 minutes.
- Add Vanilla and Dry Ingredients: Mix in the vanilla extract. Gradually add the all-purpose flour and salt to the creamed mixture, blending until the dough comes together. The dough should be soft but not sticky.
- Shape the Cookies: Roll the dough into 1-inch balls and place them about 2 inches apart on the prepared baking sheet. Use your thumb or the back of a small spoon to press a small indentation into the center of each ball.
- Fill with Jam: Fill each indentation with about 1/2 teaspoon of your chosen jam or preserve. Be careful not to overfill as the jam will spread during baking.
- Bake: Place the baking sheet in the preheated oven and bake for 12-15 minutes, or until the edges of the cookies are lightly golden. Remove from the oven and allow them to cool on the baking sheet for a few minutes before transferring to a wire rack to cool completely.
- Dust with Powdered Sugar: Once the cookies are completely cool, you can dust them with powdered sugar for an extra festive touch.
Extra Tips:
When making Festive Thumbprint Cookies, make certain that your butter is at room temperature for easy mixing. If you find the dough too soft to work with, refrigerate it for 15-20 minutes before shaping the cookies.
Using a variety of jams adds more color and flavor to your cookie platter. Remember to store the cookies in an airtight container to keep them fresh for up to a week.
Additionally, if you prefer a nuttier flavor, you can roll the cookie dough balls in finely chopped nuts before making the thumbprint and adding the jam.
Peppermint Bark Cookies

Peppermint Bark Cookies are a delightful holiday treat that combines the classic flavors of peppermint and chocolate into a delicious cookie form. These cookies are perfect for festive gatherings, cookie exchanges, or simply enjoying with a cup of hot cocoa.
The combination of a rich chocolate cookie base, creamy white chocolate, and a sprinkle of crushed peppermint candies makes these cookies a visually appealing and flavorful addition to any Christmas cookie platter. This recipe serves 4-6 people and is ideal for those who enjoy a balance of sweet and minty flavors.
The cookies are relatively easy to make, requiring some basic baking skills and a little patience as the layers set. The end result is a crisp and chewy cookie that captures the essence of peppermint bark in each bite. Follow the recipe carefully to guarantee your Peppermint Bark Cookies turn out perfectly every time.
Ingredients (Serves 4-6):
- 1 cup all-purpose flour
- 1/3 cup unsweetened cocoa powder
- 1/2 teaspoon baking soda
- 1/4 teaspoon salt
- 1/2 cup unsalted butter, softened
- 1/2 cup granulated sugar
- 1/4 cup packed light brown sugar
- 1 large egg
- 1 teaspoon vanilla extract
- 1 cup white chocolate chips or chopped white chocolate
- 1/2 cup crushed peppermint candies or candy canes
Instructions:
- Preheat the Oven: Begin by preheating your oven to 350°F (175°C). Line two baking sheets with parchment paper to prevent the cookies from sticking and guarantee even baking.
- Mix Dry Ingredients: In a medium bowl, whisk together the flour, cocoa powder, baking soda, and salt. This guarantees that all the dry ingredients are evenly distributed throughout the cookie dough.
- Cream Butter and Sugars: In a large mixing bowl, beat the softened butter, granulated sugar, and brown sugar until light and fluffy. This should take about 3-4 minutes. Proper creaming helps to create a tender cookie texture.
- Add Egg and Vanilla: Beat in the egg and vanilla extract until well combined. Make sure to scrape down the sides of the bowl to incorporate all ingredients evenly.
- Combine Wet and Dry Ingredients: Gradually add the dry ingredient mixture to the wet ingredients, mixing on low speed until just combined. Be careful not to overmix, as this can lead to tough cookies.
- Shape the Cookies: Using a tablespoon or cookie scoop, drop rounded balls of dough onto the prepared baking sheets, spacing them about 2 inches apart to allow for spreading during baking.
- Bake: Bake the cookies in the preheated oven for 10-12 minutes, or until the edges are set and the centers are still slightly soft. Avoid overbaking to retain a chewy texture.
- Melt White Chocolate: While the cookies are cooling on the baking sheets, melt the white chocolate in a microwave-safe bowl or over a double boiler, stirring frequently until smooth.
- Decorate with Peppermint: Once the cookies have cooled slightly, drizzle the melted white chocolate over the top of each cookie. Immediately sprinkle with crushed peppermint candies before the chocolate sets.
- Set and Serve: Allow the cookies to set at room temperature or in the refrigerator until the white chocolate has hardened. Serve and enjoy!
Extra Tips:
For an extra festive touch, you can add a few drops of peppermint extract to the cookie dough to enhance the minty flavor. If you prefer a less sweet cookie, reduce the amount of white chocolate used for drizzling.
To crush the peppermint candies, place them in a zip-top bag and gently crush them with a rolling pin or a meat mallet. Store the cookies in an airtight container at room temperature for up to a week. If you find the dough too sticky, refrigerate it for about 30 minutes before shaping the cookies. Enjoy your Peppermint Bark Cookies with a warm beverage for the perfect holiday treat!
Almond Crescent Cookies

Almond Crescent Cookies are a delightful addition to any Christmas cookie platter, offering a nutty and slightly sweet flavor that perfectly complements a variety of holiday treats.
These cookies are known for their delicate texture and distinctive crescent shape, making them an elegant choice for festive gatherings. Traditionally made with ground almonds, these cookies are rolled in powdered sugar after baking, giving them a snowy appearance reminiscent of a winter wonderland.
They’re perfect for those who enjoy a subtle, buttery sweetness with a hint of almond flavor.
To create the perfect Almond Crescent Cookies, it’s crucial to use high-quality ingredients and follow the recipe meticulously. This recipe yields about 24-36 cookies, making it perfect for serving 4-6 people at a holiday get-together.
The process involves creating a simple dough, shaping it into crescents, and baking until golden. Once cooled, the cookies are rolled in powdered sugar to give them their signature look and taste. These cookies can be made ahead of time and stored in an airtight container, making them a convenient option for busy holiday schedules.
Ingredients:
- 1 cup (2 sticks) unsalted butter, softened
- 2/3 cup granulated sugar
- 1 teaspoon vanilla extract
- 1/2 teaspoon almond extract
- 2 cups all-purpose flour
- 1 cup finely ground almonds (almond meal)
- 1/4 teaspoon salt
- 1 cup powdered sugar, for dusting
Cooking Instructions:
- Preheat the Oven: Begin by preheating your oven to 350°F (175°C) and line two baking sheets with parchment paper to prevent sticking.
- Cream the Butter and Sugar: In a large mixing bowl, cream together the softened butter and granulated sugar until light and fluffy. This should take about 3-4 minutes using an electric mixer. Add in the vanilla and almond extracts, mixing until well incorporated.
- Combine Dry Ingredients: In a separate bowl, whisk together the all-purpose flour, ground almonds, and salt. Gradually add this dry mixture to the creamed butter and sugar, mixing just until a dough forms.
- Shape the Cookies: Take small pieces of dough and roll them into balls, then gently shape into crescents, using about a tablespoon of dough for each cookie. Place the crescents onto the prepared baking sheets, leaving about 2 inches between each cookie.
- Bake the Cookies: Place the baking sheets in the preheated oven and bake for 12-15 minutes, or until the edges are lightly golden. Keep a close eye to make certain they don’t overbake, as this can cause them to become too dry.
- Cool and Dust with Sugar: Allow the cookies to cool on the baking sheets for about 5 minutes before transferring them to a wire rack. Once completely cooled, roll each cookie in powdered sugar, making sure they’re evenly coated.
Extra Tips:
For the best results, make sure the butter is at room temperature to facilitate easy mixing.
If you prefer a less sweet cookie, you can reduce the amount of powdered sugar used for dusting. Almond Crescent Cookies are quite fragile, so handle them gently when transferring and dusting.
For an extra touch of flavor, consider adding a pinch of cinnamon to the powdered sugar before coating the cookies. These cookies can be stored in an airtight container for up to a week, maintaining their freshness and flavor.
Quick Oatmeal Raisin Cookies
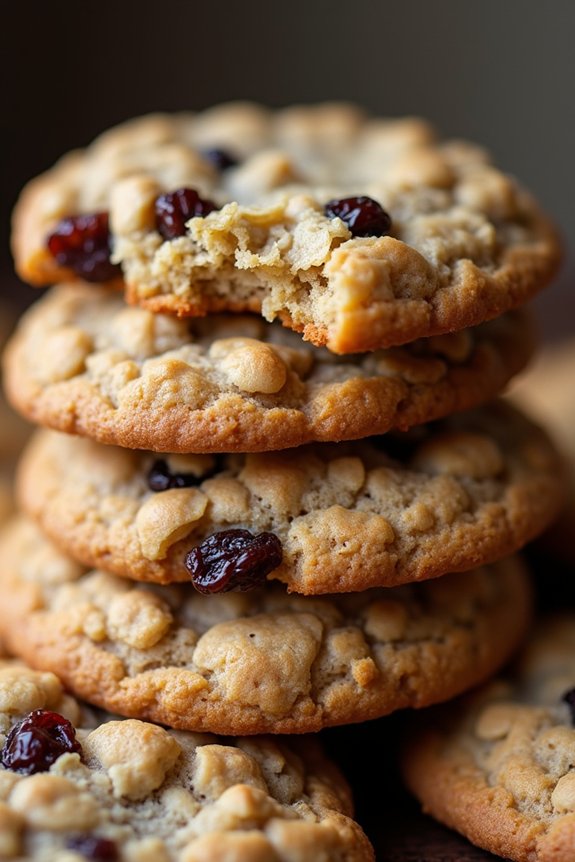
There’s nothing quite like the aroma of freshly baked cookies wafting through the house, especially during the festive Christmas season. Quick Oatmeal Raisin Cookies offer a delightful combination of chewy oats and sweet raisins, making them a perfect treat for both kids and adults.
These cookies aren’t only quick to make but also bring a classic touch to your holiday dessert spread. Whether you’re a seasoned baker or a beginner in the kitchen, this recipe is straightforward and rewarding, producing a batch that will surely disappear fast at any holiday gathering.
With their wholesome ingredients, these cookies are a slightly healthier option compared to traditional sugar cookies, allowing you to indulge without the guilt. The oats provide a satisfying texture, while the raisins add a burst of natural sweetness.
This recipe is designed to serve 4 to 6 people, making it ideal for a family treat or a small gathering. If you’re looking to add a homemade touch to your Christmas cookie platter, these Quick Oatmeal Raisin Cookies are the way to go.
Ingredients:
- 1 cup unsalted butter, softened
- 3/4 cup brown sugar, packed
- 1/2 cup granulated sugar
- 2 large eggs
- 1 teaspoon vanilla extract
- 1 1/2 cups all-purpose flour
- 1 teaspoon baking soda
- 1 teaspoon ground cinnamon
- 1/2 teaspoon salt
- 3 cups old-fashioned oats
- 1 cup raisins
Cooking Instructions:
- Preheat the Oven: Begin by preheating your oven to 350°F (175°C). Line two baking sheets with parchment paper to prevent the cookies from sticking.
- Cream the Butter and Sugars: In a large mixing bowl, beat the softened butter, brown sugar, and granulated sugar together until light and fluffy. This should take about 2-3 minutes using an electric mixer.
- Add Eggs and Vanilla: Add the eggs one at a time, mixing well after each addition. Stir in the vanilla extract until the mixture is smooth and well combined.
- Mix Dry Ingredients: In a separate bowl, whisk together the flour, baking soda, cinnamon, and salt. Gradually add this dry mixture to the wet ingredients, mixing just until combined.
- Incorporate Oats and Raisins: Stir in the oats and raisins using a spatula or wooden spoon until they’re evenly distributed throughout the dough.
- Shape the Cookies: Drop rounded tablespoons of dough onto the prepared baking sheets, spacing them about 2 inches apart to allow room for spreading.
- Bake the Cookies: Place the baking sheets in the preheated oven and bake for 10-12 minutes, or until the edges of the cookies are golden brown. The centers may appear slightly undercooked, but they’ll firm up as they cool.
- Cool and Serve: Allow the cookies to cool on the baking sheets for 5 minutes before transferring them to a wire rack to cool completely. Serve and enjoy!
Extra Tips:
For an added twist, consider substituting half of the raisins with your favorite nuts, like walnuts or pecans, for a crunchy contrast.
If you prefer softer cookies, remove them from the oven when the centers are still a bit soft, as they’ll continue to cook slightly on the hot baking sheet.
Make sure to store any leftover cookies in an airtight container to keep them fresh for several days. For those who love a spiced cookie, adding a pinch of nutmeg or a dash of ginger can enhance the festive flavor profile of these delightful treats.