

Holiday baking is such a joy, but let’s be honest, sometimes we just don’t have the time. I completely understand that feeling. That’s why I’ve curated these 12 no-bake cookie recipes to make your festive treats quick and easy. Picture rich chocolate peppermint or sweet coconut flavors, all without turning on the oven. These delightful, time-saving treats are sure to wow your guests and satisfy your sweet tooth.
Chocolate Peppermint No-Bake Cookies
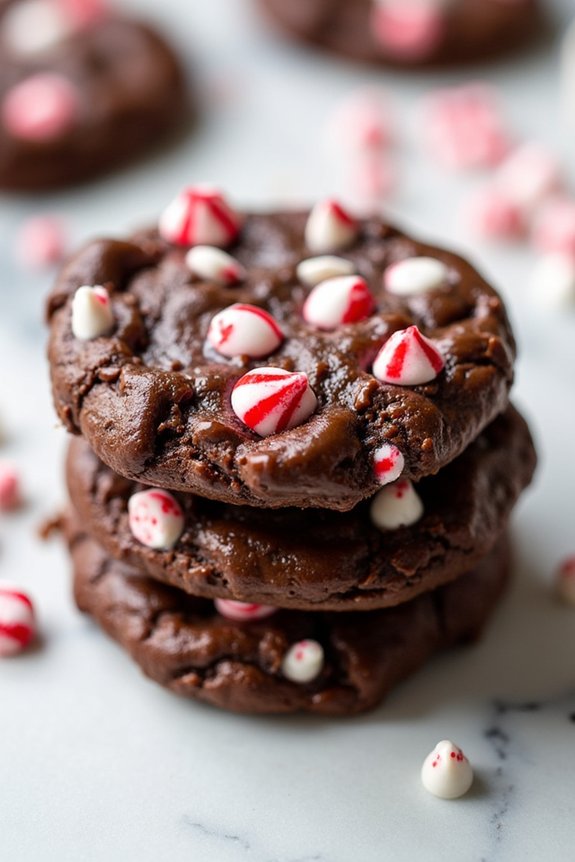
Indulge in the festive flavors of the holiday season with these Chocolate Peppermint No-Bake Cookies. Perfect for those who love the combination of chocolate and mint, these cookies are a delightful treat that requires no baking, making them an easy and quick option for holiday gatherings or a cozy night in.
The rich chocolate base is perfectly complemented by the invigorating hint of peppermint, creating a deliciously addictive cookie that will surely impress your family and friends.
These no-bake cookies come together in just a few simple steps and are a fantastic way to get kids involved in holiday baking without the worry of using the oven. The recipe yields approximately 18-24 cookies, making it ideal for serving a group of 4-6 people.
Whether you’re looking for a last-minute dessert or want to add a new favorite to your holiday cookie repertoire, these Chocolate Peppermint No-Bake Cookies are sure to become a beloved tradition.
Ingredients (Serves 4-6):
- 2 cups granulated sugar
- 1/2 cup unsalted butter
- 1/2 cup whole milk
- 1/4 cup unsweetened cocoa powder
- 1/2 teaspoon salt
- 3 cups quick-cooking oats
- 1 cup semi-sweet chocolate chips
- 1 teaspoon vanilla extract
- 1/2 teaspoon peppermint extract
- 1/2 cup crushed peppermint candies or candy canes
Instructions:
- Prepare the Base: In a medium saucepan, combine the granulated sugar, unsalted butter, whole milk, cocoa powder, and salt. Place the saucepan over medium heat and stir the mixture until the butter is completely melted and the ingredients are well combined.
- Bring to a Boil: Increase the heat to medium-high and bring the mixture to a rolling boil. Allow it to boil for 1 minute, stirring continuously to prevent any burning or sticking at the bottom of the pan.
- Mix the Oats and Chocolate: Remove the saucepan from the heat and quickly stir in the quick-cooking oats, semi-sweet chocolate chips, vanilla extract, and peppermint extract. Mix until the oats and chocolate chips are fully coated with the chocolate sauce.
- Shape the Cookies: Using a tablespoon or cookie scoop, drop spoonfuls of the mixture onto a baking sheet lined with parchment paper. Gently press the cookies down slightly and sprinkle the tops with crushed peppermint candies or candy canes.
- Cooling Time: Allow the cookies to cool at room temperature for at least 30 minutes or until they’ve set. For quicker setting, you can refrigerate them for about 15 minutes.
- Serve and Enjoy: Once the cookies have fully set, serve them on a festive platter and enjoy the rich, minty goodness with your loved ones.
Extra Tips: For a smoother texture, make sure that you use quick-cooking oats, as old-fashioned oats may result in a chewier cookie. If you prefer a stronger peppermint flavor, you can increase the peppermint extract by a quarter teaspoon.
Be cautious when boiling the chocolate mixture, as it can quickly overcook and affect the final texture of the cookies. For an added festive touch, consider drizzling melted white chocolate over the cookies before they set.
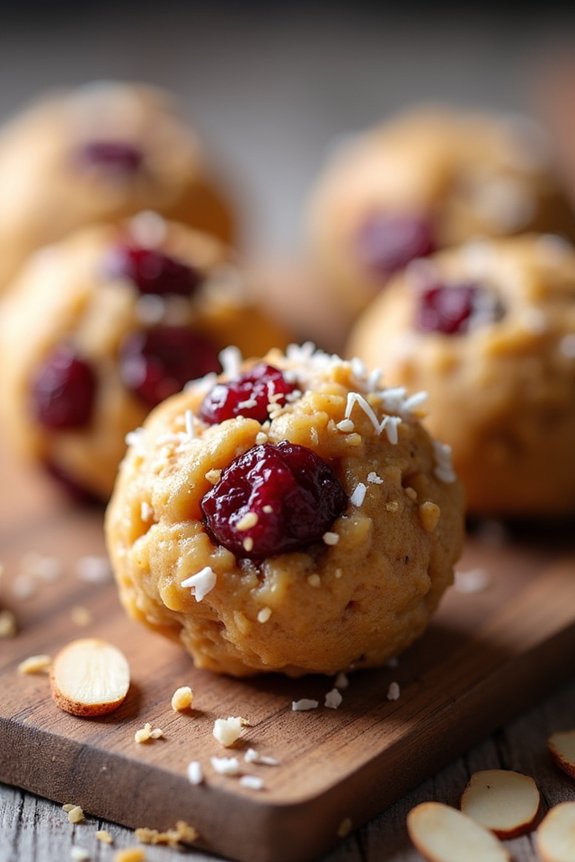
No-Bake Peanut Butter Snowballs
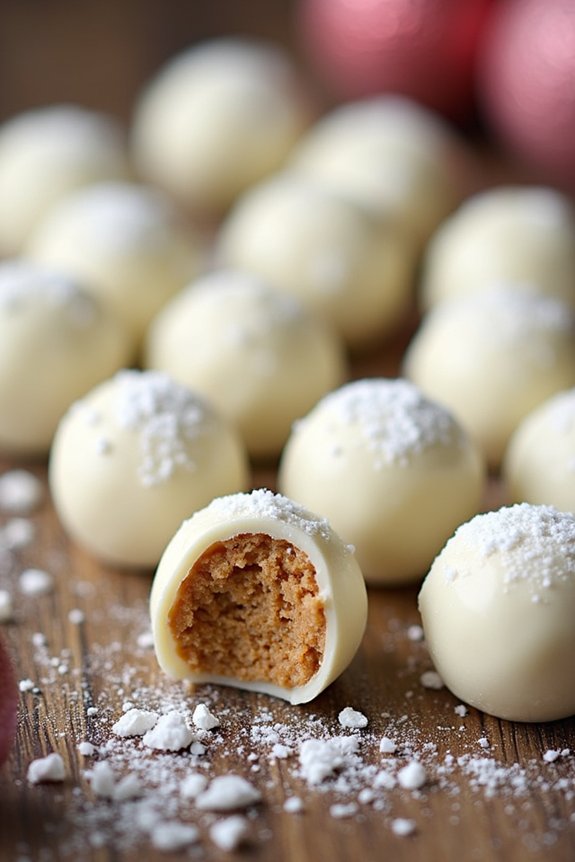
No-Bake Peanut Butter Snowballs are a delightful and easy treat that brings festive joy to any holiday gathering. These delicious bites are perfect for those who want to whip up something sweet without the need for an oven. With their creamy peanut butter center and a sweet, crunchy outer layer, these snowballs are bound to be a hit among family and friends.
Not only are they simple to prepare, but they also make for a fun activity to do with kids, who’ll love rolling the mixture into snowball shapes and coating them in powdered sugar. Perfect for serving a group of 4-6 people, these no-bake treats capture the essence of the holiday season with their snowball-like appearance while delivering a rich, nutty flavor.
Ideal for last-minute holiday preparations, these Peanut Butter Snowballs can be made in advance and stored in the refrigerator until ready to serve. Whether you’re making them for a party, a family dinner, or simply as a sweet snack, they’re sure to become a new holiday tradition.
Ingredients:
- 1 cup creamy peanut butter
- 1 cup powdered sugar
- 1 cup crushed graham crackers
- 1/2 teaspoon vanilla extract
- 1 cup white chocolate chips
- 2 tablespoons coconut oil
- Additional powdered sugar for coating
Instructions:
- Prepare the Base: In a large mixing bowl, combine the creamy peanut butter, powdered sugar, crushed graham crackers, and vanilla extract. Stir the mixture until well combined and it forms a dough-like consistency.
- Shape the Snowballs: Scoop out tablespoon-sized portions of the mixture and roll them between your palms to form smooth balls. Place the balls on a baking sheet lined with parchment paper.
- Melt the Chocolate: In a microwave-safe bowl, combine white chocolate chips and coconut oil. Microwave in 30-second intervals, stirring in between, until the chocolate is fully melted and smooth.
- Coat the Snowballs: Dip each peanut butter ball into the melted white chocolate, making sure it’s completely covered. Use a fork to lift the ball out, allowing any excess chocolate to drip off, and place it back on the parchment-lined baking sheet.
- Chill and Set: Once all the balls are coated, transfer the baking sheet to the refrigerator and chill for about 30 minutes, or until the chocolate coating is firm.
- Final Touch: After the chocolate has set, roll each snowball in additional powdered sugar to give them a snowy appearance. Serve immediately or store them in an airtight container in the refrigerator until ready to serve.
Extra Tips: When making No-Bake Peanut Butter Snowballs, using a high-quality white chocolate will enhance the flavor and texture of your treats. If the mixture becomes too sticky to handle, refrigerate it for about 10 minutes to firm up before shaping.
For a different twist, consider adding a pinch of sea salt on top of the snowballs after dipping them in chocolate. This will create a delightful contrast to the sweetness of the chocolate and peanut butter. Finally, confirm the snowballs are stored in a cool place to prevent the chocolate from melting, especially if you plan to make them ahead of time.
Coconut Macaroon No-Bake Bites

Coconut Macaroon No-Bake Bites are the perfect treat to add a tropical twist to your holiday dessert table. These delightful bites aren’t only incredibly easy to make, but they also require no baking, making them an ideal choice for busy holiday seasons.
With a rich coconut flavor and a hint of sweetness, these bites offer a chewy texture that’s sure to impress your family and friends. The best part? You can whip them up in no time, and they’re a great activity to involve your kids in the kitchen, too.
These no-bake treats aren’t only delicious but also versatile. You can easily adapt the recipe to suit different dietary needs or preferences, such as making them vegan or gluten-free.
With a few simple ingredients, you can create a batch of these Coconut Macaroon No-Bake Bites that serve 4-6 people, bringing a little bit of tropical warmth to your holiday festivities. Whether you’re serving them at a holiday gathering or as a sweet snack, these bites are sure to be a hit.
Ingredients for Coconut Macaroon No-Bake Bites (Serves 4-6)
- 2 cups shredded coconut
- 1/2 cup sweetened condensed milk
- 1 teaspoon vanilla extract
- 1/4 teaspoon salt
- 1/2 cup dark chocolate chips
- 1 tablespoon coconut oil
Instructions
- Prepare the Coconut Mixture: In a large mixing bowl, combine the shredded coconut, sweetened condensed milk, vanilla extract, and salt. Stir the ingredients together until they’re well combined and the coconut is thoroughly coated with the milk mixture.
- Shape the Bites: Using your hands, scoop out small portions of the coconut mixture and form them into bite-sized balls, about one inch in diameter. Place each formed bite onto a baking sheet lined with parchment paper. Repeat the process until all the mixture is used.
- Chill the Bites: Transfer the baking sheet to the refrigerator and let the bites chill for at least 30 minutes. This will help them firm up and hold their shape.
- Melt the Chocolate: While the bites are chilling, melt the dark chocolate chips with the coconut oil in a microwave-safe bowl. Heat in 30-second intervals, stirring in between, until the chocolate is fully melted and smooth.
- Coat the Bites: Once the bites have chilled, remove them from the refrigerator. Dip each one into the melted chocolate, making certain they’re evenly coated. Return them to the parchment-lined baking sheet.
- Set the Chocolate: Place the chocolate-coated bites back in the refrigerator for another 15-20 minutes, or until the chocolate has hardened.
- Serve: Once the chocolate is set, your Coconut Macaroon No-Bake Bites are ready to be served. Enjoy them as a holiday treat or a delightful snack.
Extra Tips
To make these Coconut Macaroon No-Bake Bites vegan, substitute the sweetened condensed milk with a plant-based alternative, such as sweetened condensed coconut milk.
For a gluten-free version, ascertain that all your ingredients, particularly the chocolate chips, are certified gluten-free. You can also try rolling the bites in crushed nuts or drizzle them with white chocolate for an added festive touch.
Store any leftovers in an airtight container in the refrigerator to keep them fresh for several days.
No-Bake Gingerbread Cookie Truffles

No-Bake Gingerbread Cookie Truffles are a delightful and festive treat that captures the essence of the holiday season without requiring any oven time. Perfect for those who love the warm, spicy flavors of gingerbread but want a quick and easy option, these truffles are the ideal sweet indulgence. They combine the traditional spices of gingerbread with a creamy, rich filling, all wrapped in a smooth chocolate coating.
These truffles make a great addition to any holiday dessert table or can be packaged beautifully for gift-giving. The beauty of No-Bake Gingerbread Cookie Truffles lies in their simplicity and versatility. With just a handful of ingredients and minimal prep time, you can have a batch of these delicious truffles ready to enjoy or share in under an hour.
They’re perfect for those who enjoy getting creative in the kitchen, as you can easily customize them with your favorite toppings or mix-ins. Gather your family or friends, and enjoy making this holiday treat together!
Ingredients (Serves 4-6):
- 2 cups of crushed gingersnap cookies
- 8 ounces of cream cheese, softened
- 1 teaspoon of ground ginger
- 1 teaspoon of ground cinnamon
- 1/4 teaspoon of ground nutmeg
- 1/4 teaspoon of ground cloves
- 1 teaspoon of vanilla extract
- 10 ounces of semi-sweet chocolate chips
- Optional toppings: sprinkles, crushed nuts, or a dusting of powdered sugar
Instructions:
- Prepare the Cookie Base:
- Begin by placing the gingersnap cookies in a food processor. Pulse until they’re finely crushed, yielding about 2 cups of cookie crumbs. Transfer the crumbs to a mixing bowl.
- Mix the Truffle Filling:
- Add the softened cream cheese, ground ginger, cinnamon, nutmeg, cloves, and vanilla extract to the bowl with the cookie crumbs. Mix thoroughly until all the ingredients are well combined and form a smooth, cohesive dough.
- Shape the Truffles:
- Using a small cookie scoop or your hands, roll the mixture into small balls, roughly 1 inch in diameter. Place the balls onto a baking sheet lined with parchment paper. Once all the balls are shaped, place the baking sheet in the refrigerator to chill for about 20 minutes.
- Melt the Chocolate:
- While the truffles are chilling, melt the semi-sweet chocolate chips in a microwave-safe bowl or using a double boiler. If microwaving, heat in 30-second intervals, stirring between each interval until completely melted and smooth.
- Coat the Truffles:
- Remove the chilled truffle balls from the refrigerator. Using a fork or a dipping tool, dip each ball into the melted chocolate, allowing any excess chocolate to drip back into the bowl. Place the coated truffles back onto the parchment-lined baking sheet.
- Add Toppings:
- While the chocolate is still wet, sprinkle your choice of toppings over the truffles. This can include festive sprinkles, crushed nuts, or a light dusting of powdered sugar.
- Set the Truffles:
- Once all the truffles are coated and decorated, return them to the refrigerator to set for at least 15 minutes or until the chocolate is firm.
Extra Tips:
For a more intense ginger flavor, consider adding a bit of freshly grated ginger to the truffle mixture. If you find the mixture too sticky to handle, slightly chill it before rolling into balls.
For an added twist, try using different types of chocolate for coating, such as white or dark chocolate, to suit your taste preferences. If you plan to store the truffles for a longer period, keep them in an airtight container in the refrigerator for up to a week.
Enjoy experimenting with different toppings to make your No-Bake Gingerbread Cookie Truffles uniquely festive!
No-Bake Salted Caramel Pretzel Cookies

No-Bake Salted Caramel Pretzel Cookies are the perfect combination of sweet and salty flavors, making them a delightful treat for the holiday season. These cookies are incredibly easy to prepare, requiring no oven time, which means you can save precious space for other festive dishes.
The crunchy pretzels combined with creamy caramel and a touch of salt create an irresistible texture and taste that will leave your guests asking for more. This recipe is ideal for when you’re short on time but still want to impress your friends and family with a homemade treat.
With simple ingredients and straightforward instructions, you’ll have these delicious cookies ready in no time. Perfect for a serving size of 4-6 people, these cookies are great for holiday gatherings or as a sweet gift to share with loved ones. So, let’s explore the ingredients and steps needed to create these delectable no-bake cookies.
Ingredients:
- 1 cup crushed pretzels
- 1/2 cup caramel sauce
- 1/2 cup creamy peanut butter
- 2 tablespoons butter
- 1 teaspoon vanilla extract
- 1/4 teaspoon sea salt
- 1 cup chocolate chips
- 1 tablespoon vegetable oil
- Additional sea salt for sprinkling
Instructions:
- Prepare the Pretzels: Begin by crushing the pretzels into small pieces. You can do this by placing them in a zip-top bag and using a rolling pin to gently crush them. Set aside.
- Make the Caramel Mixture: In a medium saucepan over low heat, combine the caramel sauce, peanut butter, butter, and vanilla extract. Stir until the mixture is smooth and fully combined. Remove from heat and mix in the sea salt.
- Form the Cookies: In a large mixing bowl, combine the crushed pretzels with the caramel mixture. Stir until the pretzels are evenly coated. Using a tablespoon, drop spoonfuls of the mixture onto a parchment-lined baking sheet, forming cookie shapes.
- Melt the Chocolate: In a small microwave-safe bowl, combine the chocolate chips and vegetable oil. Microwave in 30-second intervals, stirring in between, until the chocolate is completely melted and smooth.
- Coat the Cookies: Drizzle the melted chocolate over the top of each cookie. Use a spoon to spread the chocolate if needed. While the chocolate is still wet, sprinkle a pinch of sea salt on top of each cookie.
- Chill: Place the baking sheet in the refrigerator for at least 30 minutes, or until the cookies are firm and the chocolate has set.
Extra Tips:
For an added layer of flavor, try using different types of pretzels such as butter-flavored or honey wheat. If you prefer a more intense chocolate flavor, opt for dark chocolate chips instead of regular ones.
To store the cookies, keep them in an airtight container in the refrigerator to maintain their texture and flavor. These no-bake cookies can also be made ahead of time and stored for up to a week, making them an excellent option for holiday planning.
No-Bake White Chocolate Cranberry Clusters
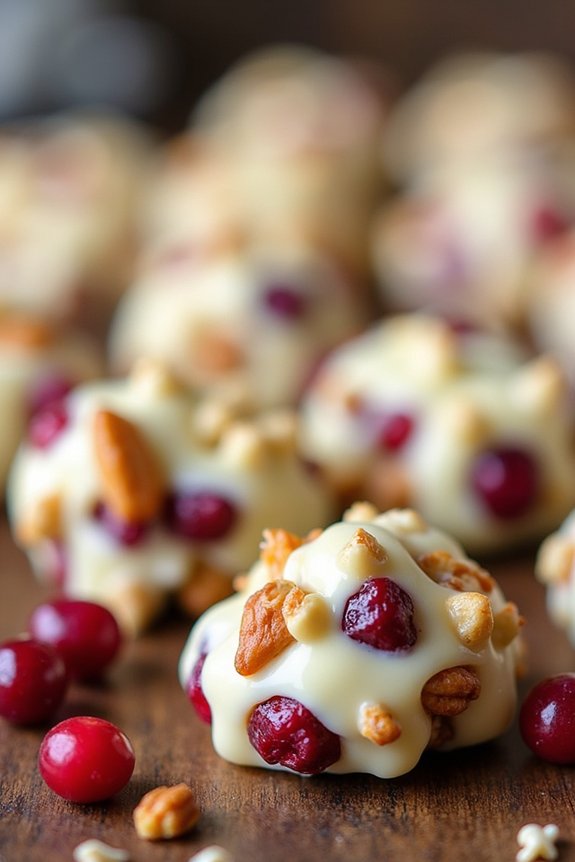
No-Bake White Chocolate Cranberry Clusters are a delightful and easy-to-make treat that perfectly captures the festive spirit of the holiday season. These clusters combine the rich, creamy taste of white chocolate with the tartness of dried cranberries and the satisfying crunch of nuts to create a deliciously balanced bite. Perfect for gifting or serving at holiday gatherings, these no-bake treats aren’t only quick to prepare but also a fun activity to enjoy with family and friends.
The beauty of these clusters lies in their simplicity and versatility. With minimal ingredients and no need for an oven, you can whip up a batch in no time, leaving you more time to enjoy the festivities. These clusters can also be customized to suit your taste preferences; whether you prefer almonds, pecans, or pistachios, they all pair wonderfully with the smoothness of white chocolate and the zing of cranberries. Designed to serve 4-6 people, this recipe is sure to become a holiday favorite.
Ingredients:
- 12 ounces white chocolate chips
- 1 cup dried cranberries
- 1 cup mixed nuts (such as almonds, pecans, or walnuts)
- 1 teaspoon vanilla extract
- A pinch of salt
Instructions:
1. Prepare the Ingredients:
Start by gathering all your ingredients and equipment. This includes a microwave-safe bowl, a spatula, a baking sheet lined with parchment paper, and a spoon for scooping.
2. Melt the White Chocolate:
Place the white chocolate chips in the microwave-safe bowl. Microwave the chocolate in 20-second intervals, stirring in between each interval, until the chocolate is completely melted and smooth. This process typically takes about 1 to 2 minutes. Be careful not to overheat the chocolate to prevent it from burning.
3. Mix in Cranberries and Nuts:
Once the chocolate is melted, stir in the vanilla extract and a pinch of salt. Add the dried cranberries and mixed nuts to the bowl. Mix everything together until the cranberries and nuts are evenly coated with the white chocolate.
4. Form the Clusters:
Use a spoon to scoop out small mounds of the mixture and place them onto the parchment-lined baking sheet. You can make the clusters as large or small as you prefer, but aim for uniform sizes to guarantee even setting.
5. Set the Clusters:
Allow the clusters to sit at room temperature until the chocolate has hardened and the clusters hold together firmly. This can take about 30 minutes to an hour. If you’re in a hurry, you can place the baking sheet in the refrigerator for about 15 minutes to speed up the process.
6. Serve and Enjoy:
Once the clusters are set, they’re ready to be served. Transfer them to a serving platter or store them in an airtight container until ready to enjoy.
Extra Tips:
For an extra touch of flavor, consider adding a sprinkle of sea salt on top of each cluster before the chocolate sets. If you want to add more variety, you can include other dried fruits such as apricots or raisins.
When melting the chocolate, be patient and stir frequently to guarantee a smooth, even consistency. Finally, these clusters can be stored in an airtight container for up to two weeks, making them perfect for preparing in advance of holiday events.
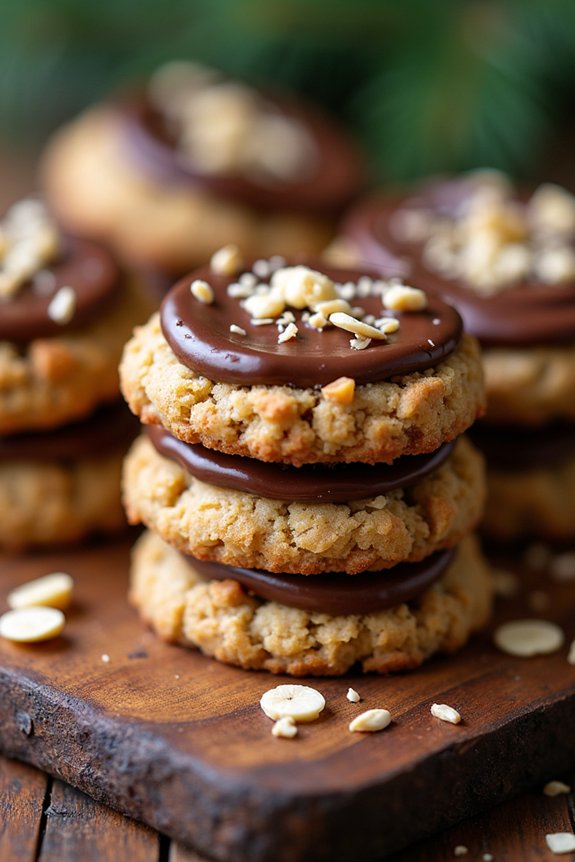
No-Bake Almond Joy Cookies

No-Bake Almond Joy Cookies are a delightful treat that captures the deliciousness of everyone’s favorite candy bar in a simple, no-bake format. Perfect for the busy holiday season, these cookies combine rich chocolate, crunchy almonds, and sweet coconut to create a burst of flavor in every bite.
Ideal for holiday parties or a cozy night in, Almond Joy Cookies are certain to bring joy to your festive celebrations without the hassle of traditional baking.
These cookies aren’t only incredibly easy to make, but they also require minimal ingredients and time. By following this straightforward recipe, you can whip up a batch in no time, allowing you to focus on enjoying the company of friends and family.
Whether you’re an experienced baker or a beginner in the kitchen, these No-Bake Almond Joy Cookies are a must-try addition to your holiday dessert repertoire.
Ingredients (serving size: 4-6 people)
- 2 cups semi-sweet chocolate chips
- 1/2 cup creamy peanut butter
- 1/4 cup unsalted butter
- 2 cups old-fashioned oats
- 1 cup sweetened shredded coconut
- 1 cup whole almonds
- 1 teaspoon vanilla extract
Instructions
- Melt the Chocolate Mixture: In a medium saucepan over low heat, combine the semi-sweet chocolate chips, peanut butter, and unsalted butter. Stir constantly until the mixture is smooth and fully melted. Be careful not to overheat, as chocolate can scorch easily.
- Combine Dry Ingredients: In a large mixing bowl, combine the oats, shredded coconut, and whole almonds. Mix them together to guarantee even distribution of ingredients.
- Incorporate the Chocolate Mixture: Pour the melted chocolate mixture over the dry ingredients. Add the vanilla extract and stir until all the ingredients are evenly coated with the chocolate.
- Form Cookies: Line a baking sheet with parchment paper. Using a spoon or a cookie scoop, drop spoonfuls of the mixture onto the prepared sheet, spacing them about 1 inch apart.
- Set the Cookies: Allow the cookies to set at room temperature for about 30-60 minutes or until firm. For faster setting, you can place the baking sheet in the refrigerator for about 15-20 minutes.
- Serve and Enjoy: Once set, serve the cookies as they’re or with a festive garnish of your choice. Enjoy these delightful treats with loved ones.
Extra Tips
For an extra touch of holiday spirit, consider drizzling the cookies with white chocolate or sprinkling them with festive colored sugar before they set.
If you prefer a different nut flavor, feel free to substitute the almonds with your favorite variety. These cookies are also highly adaptable for dietary preferences; try using almond butter instead of peanut butter for a different taste or to accommodate peanut allergies.
Remember that these cookies can be stored in an airtight container at room temperature for up to a week, making them a convenient make-ahead option for holiday entertaining.
No-Bake Eggnog Pecan Pralines
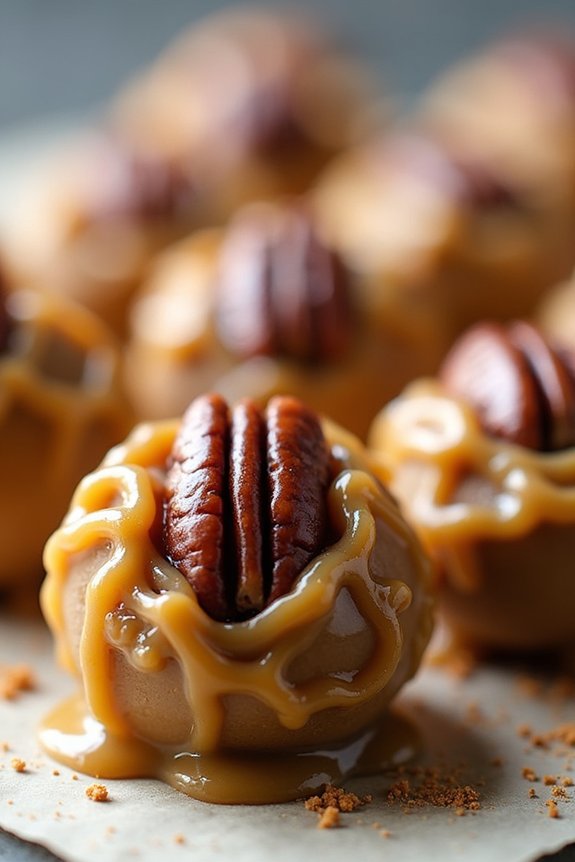
Indulge in the rich, festive flavors of the holiday season with these delightful No-Bake Eggnog Pecan Pralines. Perfectly capturing the essence of Christmas, these pralines combine the creamy, spiced notes of eggnog with the nutty crunch of pecans. Ideal for those who want to skip the oven and still create something special, these treats aren’t only delicious but also quick and easy to prepare.
Whether you’re looking to add a new favorite to your holiday dessert repertoire or simply want to impress your guests without the hassle, these pralines are sure to become a staple at your festive gatherings.
The No-Bake Eggnog Pecan Pralines are a wonderful treat to share, making them perfect for gifting or serving at holiday parties. The recipe yields enough pralines to satisfy a crowd, serving 4-6 people comfortably. With just a few simple ingredients, you can create a sweet, crunchy, and utterly addictive dessert that everyone will love.
Plus, without the need for baking, you’ll have more time to enjoy the festivities with friends and family. Let’s explore the ingredients and steps needed to make these delicious pralines.
Ingredients:
- 1 cup granulated sugar
- 1/2 cup eggnog
- 1/4 cup unsalted butter
- 1/4 teaspoon ground cinnamon
- 1/4 teaspoon ground nutmeg
- 1 teaspoon pure vanilla extract
- 2 cups pecan halves
Instructions:
- Prepare the Ingredients: Begin by gathering all the ingredients. Measure out the sugar, eggnog, and butter, and have your spices and vanilla extract ready for easy access. This will guarantee a smooth cooking process.
- Combine Sugar and Eggnog: In a medium saucepan, mix together the granulated sugar and eggnog. Stir the mixture over medium heat until the sugar fully dissolves, creating a smooth base for your pralines.
- Melt the Butter: Add the unsalted butter to the saucepan and continue stirring until it melts completely. This will add richness and a silky texture to the pralines.
- Incorporate Spices and Vanilla: Stir in the ground cinnamon, ground nutmeg, and vanilla extract. These spices will infuse the pralines with the warm, comforting flavors of the holiday season.
- Boil the Mixture: Increase the heat to medium-high and bring the mixture to a boil. Allow it to boil for 3 minutes without stirring. This step is vital for achieving the correct consistency for your pralines.
- Add Pecans: After boiling, remove the saucepan from the heat and immediately stir in the pecan halves. Confirm the pecans are evenly coated with the eggnog mixture.
- Form the Pralines: Quickly spoon the praline mixture onto a parchment-lined baking sheet, creating small clusters. Work swiftly as the mixture will begin to set as it cools.
- Cool and Set: Allow the pralines to cool completely at room temperature. Once set, they’ll harden and be ready to serve or package as gifts.
Extra Tips:
When making No-Bake Eggnog Pecan Pralines, timing is essential. Make sure to work quickly once the pecans are added to the mixture, as the pralines will begin to set fast.
If you find the mixture hardening too quickly, you can briefly return the saucepan to low heat to loosen it. Additionally, using a candy thermometer can help guarantee the mixture reaches the correct temperature for setting.
For those who prefer a less sweet treat, you can reduce the sugar slightly without compromising the praline’s texture. Enjoy these pralines with a warm cup of eggnog or alongside your other favorite holiday desserts!
No-Bake Nutella Hazelnut Cookies
No-Bake Nutella Hazelnut Cookies are a delightful treat that combines the rich, creamy flavor of Nutella with the crunchy goodness of hazelnuts. These no-bake cookies are perfect for the holiday season, offering a quick and easy way to satisfy your sweet tooth without the need for an oven.
With just a few simple ingredients, you can whip up a batch of these delectable cookies in no time, making them an ideal choice for busy holiday preparations or last-minute gatherings.
The magic of these cookies lies in their simplicity and the harmonious blend of textures and flavors. The Nutella provides a luscious and smooth base, while the rolled oats offer a chewy bite, and the hazelnuts contribute a satisfying crunch.
Whether you’re a seasoned baker or a novice in the kitchen, this recipe is foolproof and certain to impress your family and friends. Gather your ingredients, and let’s get started on creating these irresistible No-Bake Nutella Hazelnut Cookies!
Ingredients (Serves 4-6):
- 1 cup Nutella
- 1/2 cup whole hazelnuts, chopped
- 1 1/2 cups quick-cooking oats
- 1/4 cup unsalted butter
- 1/4 cup milk
- 1/2 cup granulated sugar
- 1 teaspoon vanilla extract
- A pinch of salt
Instructions:
1. Prepare the Wet Mixture: In a medium saucepan, combine the unsalted butter, milk, and granulated sugar. Heat the mixture over medium heat, stirring occasionally, until the butter has melted completely and the sugar has dissolved.
Bring the mixture to a gentle boil and let it simmer for about 1 minute. This process helps to guarantee the sugar is fully dissolved and the mixture is well-incorporated.
2. Incorporate Nutella and Flavoring: Remove the saucepan from heat and stir in the Nutella until it’s fully melted and smooth. Add the vanilla extract and a pinch of salt, mixing well to guarantee the flavors are evenly distributed throughout the mixture.
3. Combine with Dry Ingredients: In a large mixing bowl, combine the quick-cooking oats and chopped hazelnuts. Pour the Nutella mixture over the oats and hazelnuts, and stir until all the dry ingredients are well coated and a uniform cookie batter is formed.
4. Shape the Cookies: Line a baking sheet with parchment paper. Using a tablespoon or small cookie scoop, drop portions of the cookie mixture onto the prepared baking sheet, spacing them about an inch apart.
Slightly flatten each portion with the back of the spoon to give them a cookie shape.
5. Set the Cookies: Allow the cookies to cool at room temperature for at least 30 minutes, or until they’ve set and firmed up. If you’re short on time, you can place the baking sheet in the refrigerator to speed up the setting process.
Extra Tips:
For an extra festive touch, consider dusting your No-Bake Nutella Hazelnut Cookies with a light sprinkling of powdered sugar or adding a drizzle of melted white chocolate once they’ve set.
To enhance the flavor, you can lightly toast the hazelnuts before chopping them, which will bring out their natural oils and deepen the nutty aroma.
These cookies can be stored in an airtight container at room temperature for up to a week, making them a convenient option for preparing in advance for holiday gatherings.
No-Bake Lemon Coconut Snowflakes
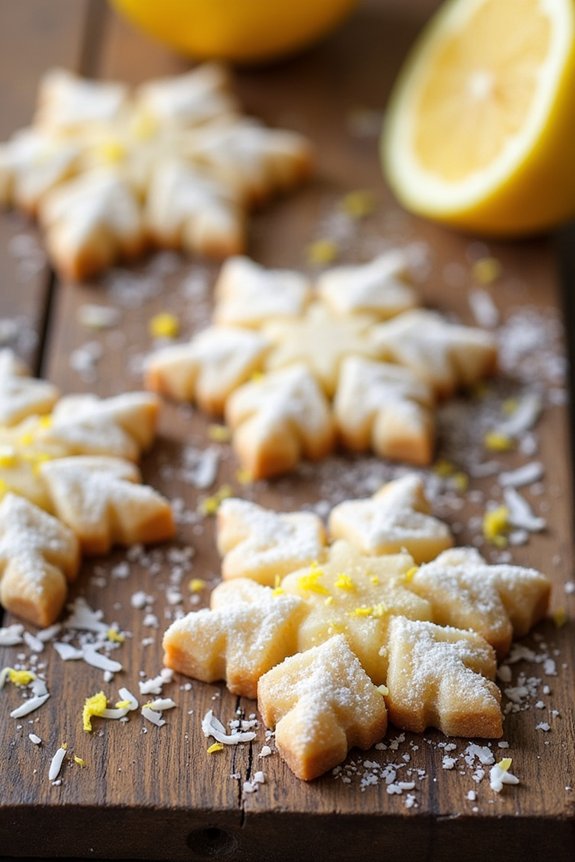
No-Bake Lemon Coconut Snowflakes are a delightful and zesty treat perfect for the holiday season. These cookies are a revitalizing twist on traditional Christmas sweets, combining the tangy flavor of lemon with the rich, nutty taste of coconut. With their snowy appearance and light texture, they’re sure to be a hit at any festive gathering.
Best of all, these cookies are no-bake, meaning you can whip them up quickly and easily without the need for an oven. Ideal for serving 4-6 people, these cookies aren’t only delicious but also incredibly simple to make. Perfect for beginners or anyone short on time, this recipe calls for a few basic ingredients and involves minimal preparation.
The result is a batch of cookies that aren’t only visually appealing but also bursting with flavor, making them a perfect addition to your holiday dessert table.
Ingredients:
- 1 cup unsweetened shredded coconut
- 1 cup almond flour
- 1/4 cup honey or maple syrup
- 1/4 cup coconut oil, melted
- 1 tablespoon lemon zest
- 1 teaspoon vanilla extract
- Pinch of salt
Instructions:
- Prepare the Base Mixture: In a large mixing bowl, combine the unsweetened shredded coconut and almond flour. Stir together until the mixture is even and free of lumps.
- Add Wet Ingredients: To the dry ingredients, add the honey or maple syrup, melted coconut oil, lemon zest, vanilla extract, and a pinch of salt. Mix well until all the ingredients are fully incorporated and the mixture holds together when pressed.
- Shape the Cookies: Using your hands or a small cookie scoop, form the mixture into small, snowflake-shaped cookies. If desired, use a snowflake cookie cutter to achieve more precise shapes.
- Chill the Cookies: Place the shaped cookies onto a baking sheet lined with parchment paper. Transfer the baking sheet to the refrigerator and allow the cookies to chill for at least 30 minutes. This will help them firm up and maintain their shape.
- Serve and Enjoy: Once chilled, remove the cookies from the refrigerator. They’re now ready to be served. Enjoy these revitalizing No-Bake Lemon Coconut Snowflakes with a hot cup of tea or coffee.
Extra Tips:
For a more intense lemon flavor, consider adding an additional tablespoon of lemon zest or a few drops of lemon extract. If you prefer a sweeter cookie, increase the honey or maple syrup slightly.
These cookies can also be stored in an airtight container in the refrigerator for up to a week, making them a convenient make-ahead option for your holiday festivities.
No-Bake Mocha Mint Cookies
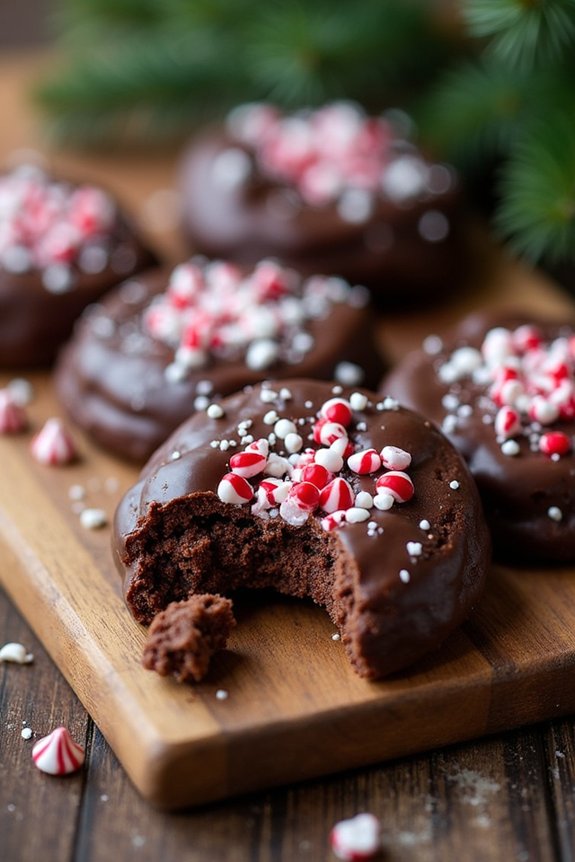
No-Bake Mocha Mint Cookies are a delightful treat that combines the rich flavors of coffee and mint, perfect for satisfying your sweet cravings during the festive season. These cookies are incredibly easy to prepare, requiring no oven time, making them an ideal choice for busy holiday schedules.
The combination of chocolate, coffee, and mint creates a rejuvenating and indulgent dessert that’s sure to impress your family and friends. This recipe yields approximately 20-24 cookies, making it perfect for serving 4-6 people at a holiday gathering or as a delightful homemade gift.
With just a few simple ingredients and minimal effort, you can create these delicious no-bake cookies that capture the essence of Christmas flavors in every bite.
Ingredients:
- 2 cups semi-sweet chocolate chips
- 1 tablespoon instant coffee granules
- 1 teaspoon peppermint extract
- 1/2 cup crushed peppermint candies or candy canes
- 3 cups quick oats
- 1/2 cup unsalted butter
- 1/2 cup granulated sugar
- 1/4 cup milk
- 1 teaspoon vanilla extract
- Pinch of salt
Instructions:
- Prepare the Chocolate Mixture: In a medium saucepan, combine the semi-sweet chocolate chips, unsalted butter, granulated sugar, milk, and instant coffee granules. Place the saucepan over medium heat and stir continuously until the mixture is completely melted and smooth.
- Add Flavorings: Once the chocolate mixture is smooth, remove the saucepan from the heat. Stir in the peppermint extract and vanilla extract until well combined.
- Incorporate Dry Ingredients: Add the quick oats, crushed peppermint candies, and a pinch of salt to the chocolate mixture. Stir the mixture thoroughly until all the dry ingredients are evenly coated with the chocolate mixture.
- Shape the Cookies: Line a baking sheet with parchment paper. Using a tablespoon or cookie scoop, drop spoonfuls of the cookie mixture onto the lined baking sheet, leaving some space between each cookie.
- Chill the Cookies: Place the baking sheet in the refrigerator and allow the cookies to chill and set for at least 1 hour, or until they’re firm to the touch.
- Serve and Enjoy: Once the cookies are set, remove them from the refrigerator and serve them on a festive platter. Enjoy these delicious No-Bake Mocha Mint Cookies with a cup of hot cocoa or coffee.
Extra Tips:
For an extra festive touch, consider sprinkling additional crushed peppermint candies on top of the cookies before chilling them. If you prefer a stronger coffee flavor, you can increase the amount of instant coffee granules to 1 1/2 tablespoons.
Be sure to use quick oats rather than old-fashioned oats, as they absorb the chocolate mixture better, resulting in a more cohesive cookie. Store any leftover cookies in an airtight container in the refrigerator for up to a week.
No-Bake Cherry Almond Delights
No-Bake Cherry Almond Delights are a scrumptious addition to your holiday treat collection, offering a delightful combination of flavors with minimal effort required. Perfect for those who prefer a no-fuss dessert, these cookies are a blend of juicy cherries, creamy almond butter, and crunchy almonds, all encapsulated in a sweet, melt-in-your-mouth bite.
Ideal for sharing with family and friends, these delights add a touch of elegance to your dessert table without the need for an oven.
These No-Bake Cherry Almond Delights aren’t only simple to make, but they also cater to a variety of dietary preferences, being naturally gluten-free and easily adaptable to be vegan. With the perfect balance of sweet and nutty flavors, these cookies make for a festive treat that will impress your holiday guests.
Whether you’re short on time or just want an easy yet impressive dessert, these no-bake cookies are sure to become a holiday favorite.
Ingredients (Serves 4-6)
- 1 cup dried cherries
- 1/2 cup almond butter
- 1/4 cup honey or maple syrup (for vegan option)
- 1 teaspoon vanilla extract
- 1/2 teaspoon almond extract
- 1/4 teaspoon salt
- 1 cup rolled oats
- 1/2 cup chopped almonds
- 1/2 cup shredded coconut
- Optional: 1/4 cup mini chocolate chips for garnish
Cooking Instructions
- Prepare the Cherry Mixture: Chop the dried cherries into smaller pieces if they’re large. In a medium-sized bowl, combine the chopped cherries, almond butter, honey (or maple syrup), vanilla extract, almond extract, and salt. Stir until all the ingredients are well blended and form a uniform mixture.
- Add Dry Ingredients: To the cherry mixture, add the rolled oats, chopped almonds, and shredded coconut. Mix until everything is evenly coated and the mixture holds together. If the mixture seems too dry, add a little more almond butter or honey to achieve the desired consistency.
- Shape the Cookies: Line a baking sheet with parchment paper. Using a tablespoon or cookie scoop, portion out the mixture and roll it into balls. Place each ball onto the prepared baking sheet, leaving a small gap between them.
- Chill the Cookies: Refrigerate the cookies for at least 30 minutes to allow them to firm up. This will help them maintain their shape and make them easier to handle when serving.
- Garnish (Optional): If desired, melt the mini chocolate chips in a microwave-safe bowl, heating in 20-second intervals and stirring in between until smooth. Drizzle the melted chocolate over the chilled cookies for an extra touch of sweetness and decoration.
Extra Tips
When preparing No-Bake Cherry Almond Delights, verify that the almond butter you use is smooth and well-mixed, as separation might affect the binding of your cookies.
If you find the mixture too sticky, a quick chill in the refrigerator before rolling can make the process easier. Additionally, these cookies can be stored in an airtight container in the refrigerator for up to a week, making them a perfect make-ahead treat for your holiday gatherings.
Feel free to experiment with different dried fruits or nuts to suit your taste preferences.