

There’s something truly comforting about the aroma of freshly baked cookies filling your home, wouldn’t you agree? Growing up, my grandma’s kitchen was a haven of delightful scents and flavors, especially during the Christmas season. Her cookie recipes, like buttery shortbread and chewy ginger snaps, hold a cherished spot in my heart. They are timeless, just like the love she infused into each batch. Ready to explore these classic treats that never go out of style?
Classic Sugar Cookies
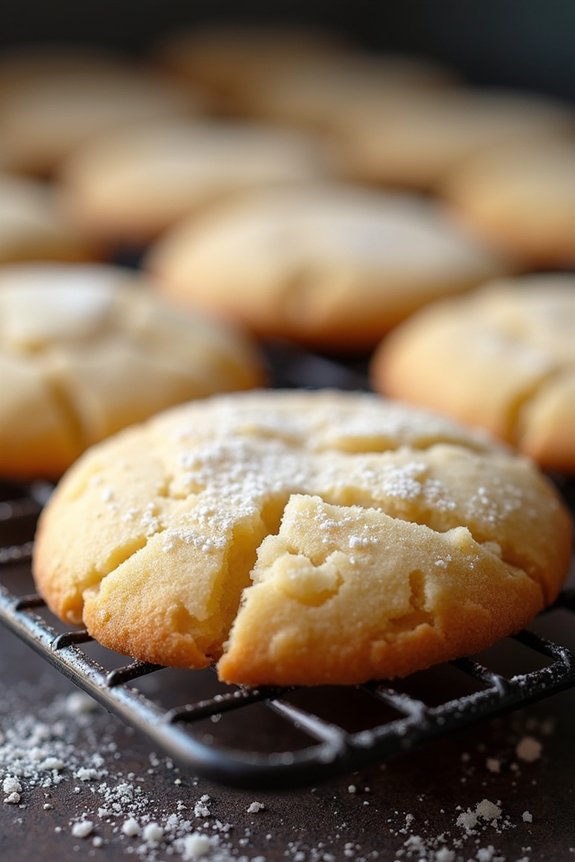
There’s something truly magical about the aroma of freshly baked sugar cookies wafting through the house during the holiday season. Grandma’s classic sugar cookies are a beloved tradition that brings warmth and joy to family gatherings.
These cookies aren’t only delicious but also versatile, perfect for decorating with festive icing or enjoying plain with a cup of hot cocoa. Whether you’re an experienced baker or trying your hand at holiday baking for the first time, this recipe will guide you to create perfectly sweet and buttery cookies that melt in your mouth.
The simplicity of sugar cookies allows the flavors of butter and vanilla to shine, creating a delightful balance of sweetness and richness. The key to their success lies in the quality of ingredients and the love you put into each step of the process.
Embrace the nostalgia of baking with this timeless recipe, ideal for a serving size of 4-6 people, guaranteeing everyone gets a taste of this holiday classic.
Ingredients:
- 2 3/4 cups all-purpose flour
- 1 teaspoon baking soda
- 1/2 teaspoon baking powder
- 1 cup unsalted butter, softened
- 1 1/2 cups white sugar
- 1 egg
- 1 teaspoon vanilla extract
- 1/2 teaspoon almond extract
- 3 tablespoons heavy cream
- Additional sugar for rolling
Instructions:
- Preheat the Oven: Begin by preheating your oven to 375°F (190°C). This guarantees that your cookies bake evenly and have the perfect texture once they go into the oven.
- Mix Dry Ingredients: In a medium bowl, whisk together the all-purpose flour, baking soda, and baking powder. This helps to evenly distribute the leavening agents throughout the flour, ensuring your cookies rise properly.
- Cream Butter and Sugar: In a large mixing bowl, cream together the softened butter and white sugar until light and fluffy. This usually takes about 2-3 minutes and is essential for creating a tender cookie texture.
- Add Wet Ingredients: Beat in the egg, vanilla extract, and almond extract to the butter mixture. Mix until well combined, then gradually add in the heavy cream. The cream adds moisture and a rich flavor to the dough.
- Combine Ingredients: Slowly incorporate the dry ingredients into the wet mixture, mixing until just combined. Be careful not to overmix, as this can lead to tough cookies.
- Form Cookie Balls: Scoop tablespoon-sized amounts of dough and roll them into balls. Roll each ball in additional sugar to give the cookies a sweet, sparkly finish.
- Bake the Cookies: Place the cookie balls onto an ungreased cookie sheet, ensuring they’re at least 2 inches apart to allow for spreading. Bake for 8-10 minutes or until the edges are just beginning to turn golden.
- Cool and Enjoy: Allow the cookies to cool on the cookie sheet for about 2 minutes before transferring them to a wire rack to cool completely. This prevents them from breaking apart.
Extra Tips:
To achieve perfectly uniform cookies, consider using a cookie scoop to portion your dough. This guarantees that all the cookies are the same size and bake evenly.
If you prefer a softer cookie, be sure not to overbake; they should be just set when you remove them from the oven as they’ll continue to firm up while cooling.
For an added touch, you can sprinkle the tops with colored sugar before baking for a festive appearance. Enjoy these cookies as they are, or get creative with icing and decorations to make them truly your own.
Buttery Shortbread Delights
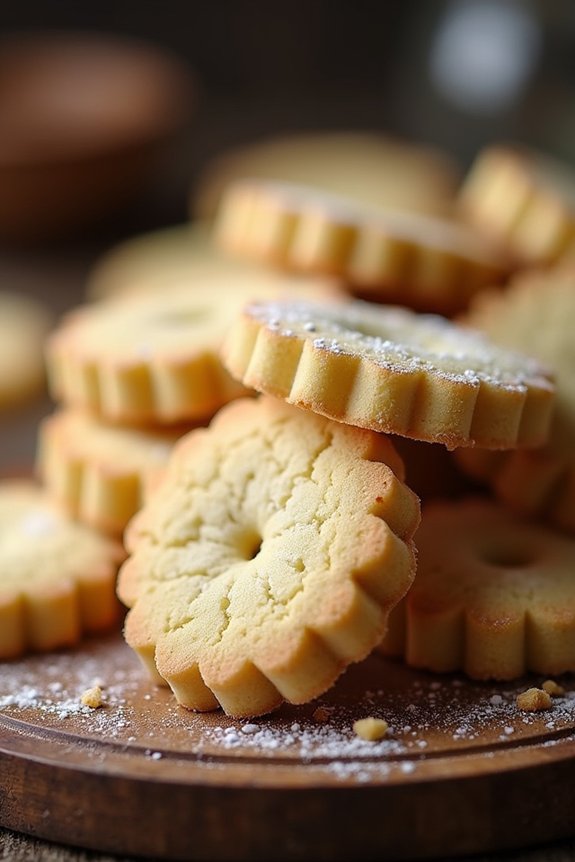
Grandma’s Christmas spread wouldn’t be complete without the crumbly, melt-in-your-mouth goodness of her Buttery Shortbread Delights. These cookies encapsulate the holiday spirit with their rich, buttery flavor and delicate texture. Perfect for gatherings or as a thoughtful homemade gift, these cookies are simple yet elegant, making them a perennial favorite.
The secret to their irresistible taste lies in the high-quality butter and a hint of vanilla that brings out the sweetness without overwhelming the palate. This recipe yields enough cookies to serve 4-6 people, guaranteeing you have just the right amount for a small group.
With a few pantry staples and a touch of love, you can recreate these timeless treats in your own kitchen. Follow the straightforward steps below to bring a piece of Grandma’s cherished holiday tradition to your table.
Ingredients:
- 2 cups all-purpose flour
- 1 cup unsalted butter, softened
- 1/2 cup powdered sugar
- 1 teaspoon vanilla extract
- 1/4 teaspoon salt
Cooking Instructions:
- Preheat the Oven: Begin by preheating your oven to 325°F (165°C). This guarantees that the cookies bake evenly and achieve the perfect texture.
- Cream the Butter and Sugar: In a large mixing bowl, cream together the softened butter and powdered sugar until light and fluffy. This should take about 2-3 minutes using an electric mixer on medium speed. The mixture should be pale in color and well-incorporated.
- Add Vanilla and Salt: Add the vanilla extract and salt to the creamed mixture. Mix until just combined. The vanilla adds depth to the flavor, while the salt enhances the sweetness without being overpowering.
- Incorporate Flour: Gradually add the flour to the butter mixture, mixing on low speed until a dough forms. Be careful not to overmix; the dough should be smooth and pliable.
- Shape the Cookies: On a lightly floured surface, roll the dough to about 1/2 inch thickness. Use a cookie cutter to cut out shapes of your choice. Alternatively, you can roll the dough into small balls and flatten them slightly with your palms.
- Bake the Cookies: Place the cookies on a parchment-lined baking sheet, leaving about an inch between each cookie. Bake in the preheated oven for 18-20 minutes, or until the edges are lightly golden. Be cautious not to overbake, as this can affect the texture.
- Cool and Serve: Allow the baked cookies to cool on the baking sheet for 5 minutes before transferring them to a wire rack to cool completely. Once cooled, the cookies can be served immediately or stored in an airtight container.
Extra Tips:
For an extra festive touch, consider adding a sprinkle of coarse sugar or a drizzle of melted chocolate once the cookies have cooled. If you prefer a more crumbly texture, substitute a portion of the all-purpose flour with rice flour.
When cutting the dough, dip the cookie cutter in flour to prevent sticking. Remember, the key to perfect shortbread is handling the dough as little as possible to maintain its tender texture. Enjoy your Buttery Shortbread Delights with a cup of tea or hot cocoa for the ultimate holiday treat!
Chewy Ginger Snaps
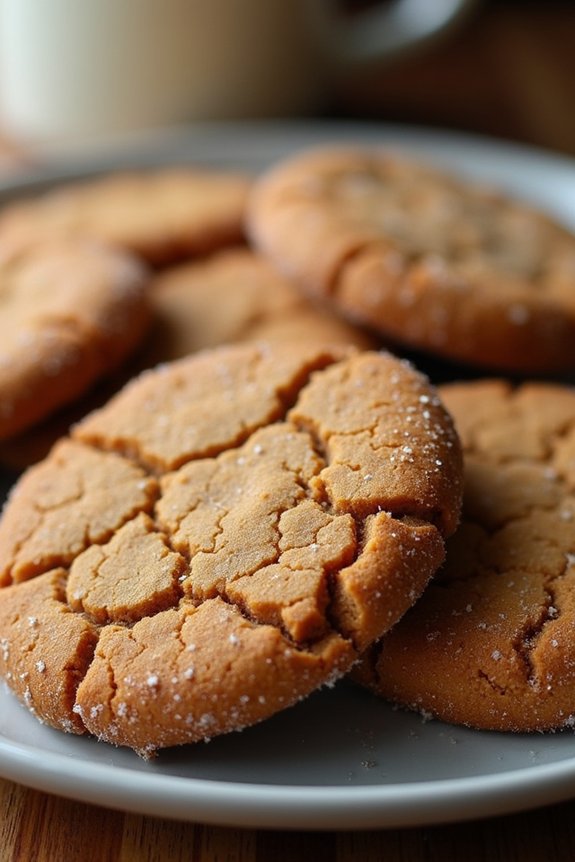
Chewy Ginger Snaps are a classic holiday treat that brings warmth and nostalgia into every bite. These cookies, with their perfect blend of spices and molasses, are a staple in many households during the Christmas season. They’ve a delightful chewy texture with a slight crispiness at the edges, making them irresistible for anyone who loves a good ginger-flavored cookie.
Whether you’re baking for a holiday party or simply enjoying a cozy evening at home, these ginger snaps are sure to bring a smile to everyone’s face.
Baking Chewy Ginger Snaps is a wonderful way to fill your home with the comforting aromas of ginger, cinnamon, and cloves. This recipe serves 4-6 people, making it perfect for a small gathering or for guaranteeing you have some leftovers to enjoy throughout the week. Each bite offers a delicious taste of holiday cheer, and they’re so easy to make that even beginner bakers can achieve perfect results.
Now, let’s plunge into the list of ingredients and the step-by-step instructions to create this delightful holiday cookie.
Ingredients:
- 2 cups all-purpose flour
- 1 teaspoon baking soda
- 1 1/2 teaspoons ground ginger
- 1 teaspoon ground cinnamon
- 1/2 teaspoon ground cloves
- 1/4 teaspoon salt
- 3/4 cup unsalted butter, softened
- 1 cup granulated sugar
- 1 large egg
- 1/4 cup molasses
- 1/4 cup additional granulated sugar (for rolling)
Instructions:
- Preheat the Oven: Begin by preheating your oven to 350°F (175°C). Line two baking sheets with parchment paper to prevent the cookies from sticking.
- Mix Dry Ingredients: In a medium bowl, whisk together the all-purpose flour, baking soda, ground ginger, ground cinnamon, ground cloves, and salt. This will guarantee that the spices are evenly distributed throughout the dough.
- Cream Butter and Sugar: In a large mixing bowl, use an electric mixer to cream the softened butter and the granulated sugar until the mixture is light and fluffy. This should take about 2-3 minutes.
- Add Wet Ingredients: Beat in the large egg and molasses into the butter and sugar mixture until everything is well combined. The molasses will give the cookies their characteristic rich flavor and chewy texture.
- Combine Mixtures: Gradually add the dry ingredients to the wet ingredients, mixing on low speed until a smooth dough forms. Be careful not to overmix, as this can result in tough cookies.
- Shape Cookies: Use a tablespoon or small ice cream scoop to portion out the dough, rolling each into a ball. Roll each ball in the additional granulated sugar to coat it evenly.
- Bake: Place the sugar-coated dough balls onto the prepared baking sheets, leaving about 2 inches of space between each ball to allow for spreading. Bake in the preheated oven for 10-12 minutes, or until the edges are set but the centers are still soft.
- Cool: Let the cookies cool on the baking sheets for about 5 minutes before transferring them to a wire rack to cool completely. This will help them maintain their chewy texture.
Extra Tips:
For the best results, make sure your butter is at room temperature before you begin the recipe, as this will help it cream more easily with the sugar.
If you prefer a spicier cookie, feel free to increase the amount of ground ginger or add a pinch of cayenne pepper for an extra kick.
These cookies also freeze well, so consider doubling the batch and storing some in the freezer to enjoy throughout the holiday season. Just be sure to store them in an airtight container to maintain their freshness.
Old-Fashioned Oatmeal Raisin Cookies
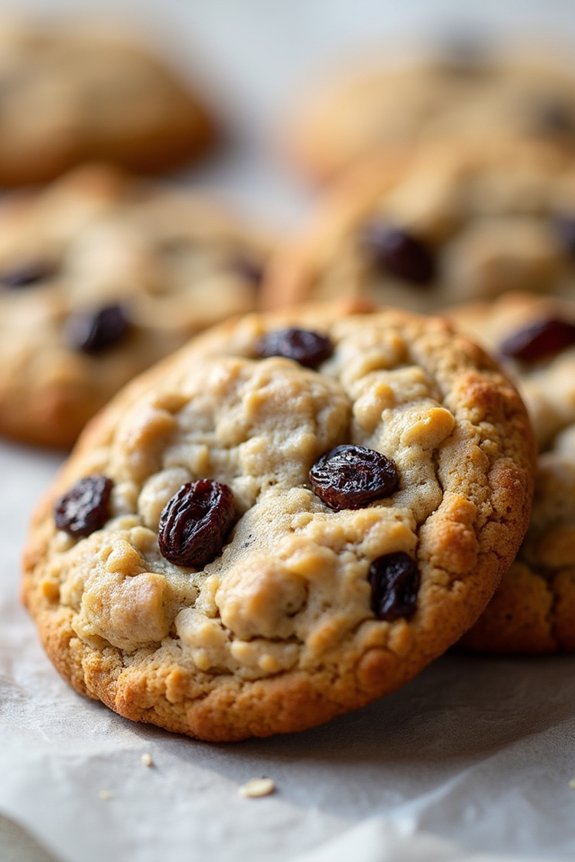
Old-Fashioned Oatmeal Raisin Cookies are a timeless treat that bring back warm memories of grandma’s kitchen. With their chewy texture, aromatic spices, and bursts of raisin sweetness, these cookies have been a holiday staple for generations. Perfect for a cozy winter afternoon or a festive gathering, they offer a comforting reminder of simpler times.
Whether you’re a seasoned baker or trying your hand at cookies for the first time, this recipe is approachable and guarantees delicious results.
The beauty of Old-Fashioned Oatmeal Raisin Cookies lies in their simplicity and the quality of ingredients. The combination of oats, raisins, and a hint of cinnamon creates a delightful balance of flavors and textures. These cookies aren’t only delicious but also offer a nostalgic experience with every bite.
Gather your ingredients and prepare to fill your home with the irresistible aroma of freshly baked cookies.
Ingredients (serves 4-6 people):
- 1 cup (2 sticks) unsalted butter, softened
- 1 cup packed brown sugar
- 1/2 cup granulated sugar
- 2 large eggs
- 1 teaspoon vanilla extract
- 1 1/2 cups all-purpose flour
- 1 teaspoon baking soda
- 1 teaspoon ground cinnamon
- 1/2 teaspoon salt
- 3 cups old-fashioned rolled oats
- 1 cup raisins
Cooking Instructions:
- Preheat the Oven: Begin by preheating your oven to 350°F (175°C). This guarantees that your oven is at the right temperature when it’s time to bake the cookies.
- Cream the Butter and Sugars: In a large mixing bowl, cream together the softened butter, brown sugar, and granulated sugar until the mixture is light and fluffy. This should take about 2-3 minutes using an electric mixer on medium speed.
- Add Eggs and Vanilla: Beat in the eggs, one at a time, mixing well after each addition. Stir in the vanilla extract and continue to mix until fully incorporated.
- Mix Dry Ingredients: In a separate bowl, combine the flour, baking soda, cinnamon, and salt. Gradually add this dry mixture to the wet ingredients, stirring until just combined.
- Incorporate Oats and Raisins: Gently fold in the oats and raisins using a spatula or wooden spoon. Confirm that they’re evenly distributed throughout the dough.
- Form the Cookies: Drop rounded tablespoons of dough onto ungreased baking sheets, leaving about 2 inches of space between each cookie to allow for spreading.
- Bake: Place the baking sheets in the preheated oven and bake for 10-12 minutes, or until the edges are golden brown. The centers may appear slightly undercooked but will firm up as they cool.
- Cool: Remove from the oven and let the cookies cool on the baking sheets for about 5 minutes before transferring them to wire racks to cool completely.
Extra Tips:
To guarantee the best texture and flavor, use old-fashioned rolled oats rather than quick oats, as they provide a heartier bite and less mushiness.
For a fun twist, consider adding a handful of chopped nuts or swapping half of the raisins for chocolate chips. If you prefer plumper raisins, soak them in warm water for about 10 minutes before adding them to the dough, then drain and pat dry.
Store any leftover cookies in an airtight container to keep them fresh and chewy for days.
Traditional Peanut Butter Blossoms

Traditional Peanut Butter Blossoms are a cherished holiday treat that combines the classic flavors of peanut butter and chocolate into a delightful cookie. These cookies are a staple in many households during the festive season, often evoking nostalgia and warm memories of baking with family.
The contrasting textures of the soft, chewy peanut butter cookie and the smooth, melty chocolate kiss make these cookies irresistible. The recipe is straightforward and ideal for both novice and experienced bakers. With their signature chocolate kiss pressed into the center, these cookies not only taste divine but also look festive and inviting.
Perfect for holiday gatherings or as a homemade gift, Traditional Peanut Butter Blossoms are bound to become a beloved part of your Christmas cookie traditions.
Ingredients for 4-6 People:
- 1/2 cup granulated sugar
- 1/2 cup packed brown sugar
- 1/2 cup unsalted butter, softened
- 1/2 cup creamy peanut butter
- 1 large egg
- 1 teaspoon vanilla extract
- 1 1/2 cups all-purpose flour
- 1 teaspoon baking soda
- 1/4 teaspoon salt
- Additional granulated sugar for rolling
- 24 chocolate kisses, unwrapped
Cooking Instructions:
- Preheat the Oven: Begin by preheating your oven to 375°F (190°C). This guarantees that the cookies will bake evenly and achieve the perfect texture.
- Mix Sugars and Butter: In a large mixing bowl, combine the granulated sugar, brown sugar, softened butter, and peanut butter. Beat with an electric mixer on medium speed until the mixture is smooth and creamy.
- Add Egg and Vanilla: Beat in the egg and vanilla extract until well combined. This step helps to incorporate the flavors evenly throughout the dough.
- Combine Dry Ingredients: In a separate bowl, whisk together the flour, baking soda, and salt. Gradually add these dry ingredients to the wet mixture, beating on low speed until a soft dough forms.
- Shape the Cookies: Scoop out rounded teaspoonfuls of dough and roll them into balls. Roll each ball in additional granulated sugar to coat, then place them on an ungreased cookie sheet about 2 inches apart.
- Bake the Cookies: Bake in the preheated oven for 8-10 minutes, or until the edges are lightly golden. Don’t overbake, as you want the cookies to remain soft.
- Add the Chocolate Kiss: Immediately after removing the cookies from the oven, press a chocolate kiss into the center of each cookie. The heat from the cookie will slightly melt the chocolate, securing it in place.
- Cool the Cookies: Allow the cookies to cool on the baking sheet for about 2 minutes before transferring them to a wire rack to cool completely.
Extra Tips: For an even richer flavor, try using dark chocolate kisses instead of the traditional milk chocolate ones. To make certain your cookies have a soft and chewy texture, avoid over-mixing the dough once the flour is added.
If you prefer a slightly crunchier cookie, bake them for an additional 1-2 minutes. Remember, the cookies will continue to firm up as they cool, so it’s better to err on the side of underbaking. Enjoy your Traditional Peanut Butter Blossoms with a glass of cold milk or a hot cup of cocoa for the ultimate holiday indulgence.
Holiday Linzer Cookies
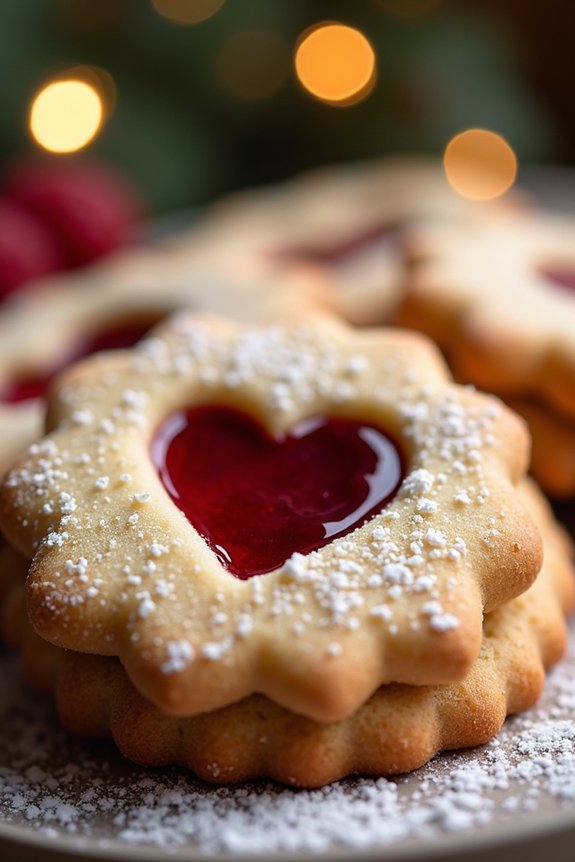
Holiday Linzer Cookies are a delightful treat that can add a touch of elegance and nostalgia to any festive gathering. Originating from Austria, these cookies are known for their buttery texture and the sweet, tangy filling that peeks through a charmingly cut-out window. The cookies are traditionally made with ground nuts and filled with raspberry or apricot jam, making them a scrumptious addition to your holiday cookie platter.
They not only taste divine but also look like little pieces of art, with their powdered sugar dusting and jewel-like centers. Making Holiday Linzer Cookies is a fun activity that brings warmth and joy to the kitchen, perfect for sharing with family and friends. The process involves creating a nutty dough, cutting out shapes, and sandwiching them with a fruity preserve.
While they may require a bit more effort than your average cookie, the result is certainly worth it. These cookies are sure to impress your guests and become a cherished tradition in your home.
Ingredients (Serves 4-6 people):
- 2 cups all-purpose flour
- 1 cup almond flour
- 1/2 teaspoon salt
- 1/2 teaspoon ground cinnamon
- 1 cup unsalted butter, softened
- 1 cup granulated sugar
- 1 large egg
- 1 teaspoon vanilla extract
- 1/2 teaspoon almond extract
- 3/4 cup raspberry jam or apricot jam
- Powdered sugar for dusting
Cooking Instructions:
- Prepare the Dough: In a medium bowl, whisk together the all-purpose flour, almond flour, salt, and ground cinnamon. Set aside. In a large mixing bowl, beat the softened butter and granulated sugar until light and fluffy, about 3 minutes. Add the egg, vanilla extract, and almond extract, and mix until well combined.
- Combine Ingredients: Gradually add the dry ingredients to the wet ingredients, mixing on low speed until the dough comes together. Divide the dough into two equal portions, flatten each into a disk, wrap in plastic wrap, and refrigerate for at least 1 hour or until firm.
- Roll and Cut the Dough: Preheat your oven to 350°F (175°C). Line two baking sheets with parchment paper. On a lightly floured surface, roll out one disk of dough to about 1/8-inch thickness. Using a cookie cutter, cut out an equal number of solid and windowed shapes (use a smaller cutter to make a window in half of the cookies).
- Bake the Cookies: Place the cookies on the prepared baking sheets and bake for 10-12 minutes or until the edges are lightly golden. Allow the cookies to cool on the baking sheets for 5 minutes before transferring them to a wire rack to cool completely.
- Assemble the Cookies: Once the cookies are cool, spread about 1 teaspoon of raspberry or apricot jam on the flat side of each solid cookie. Place the windowed cookies on top, pressing gently to sandwich them together.
- Finish with Sugar: Dust the tops of the cookies with powdered sugar for a festive finish. Store in an airtight container for up to a week.
Extra Tips: For the best flavor, use high-quality jam, as the filling is a key component of the cookies. If you prefer a smoother jam, consider warming it slightly and straining it to remove any seeds before using it as a filling.
When cutting the windowed cookies, make certain your cutters are sharp to achieve clean edges. If the dough becomes too soft while working, refrigerate it briefly to make handling easier. Finally, be patient while assembling the cookies; a gentle touch will prevent them from breaking or the filling from oozing out.
Spiced Molasses Cookies

There’s nothing quite like the warm, inviting aroma of freshly baked Spiced Molasses Cookies filling your home during the holiday season. These cookies are a cherished family tradition, passed down through generations, and are sure to add a touch of nostalgia to your Christmas festivities.
With their rich, dark sweetness and a hint of spice, Spiced Molasses Cookies are perfect for enjoying with a cup of hot cocoa or leaving out for Santa on Christmas Eve. The magic of these cookies lies in the combination of spices and molasses, creating a depth of flavor that’s both comforting and delightful.
Ideal for sharing, this recipe yields a batch large enough to serve 4-6 people, guaranteeing there’s plenty to go around. Whether you’re a seasoned baker or trying your hand at holiday baking for the first time, these cookies are straightforward to make and are bound to become a staple in your festive baking repertoire.
Ingredients (Serves 4-6):
- 2 cups all-purpose flour
- 1 teaspoon baking soda
- 1/2 teaspoon baking powder
- 1/2 teaspoon salt
- 1 teaspoon ground cinnamon
- 1 teaspoon ground ginger
- 1/2 teaspoon ground cloves
- 1/2 cup unsalted butter, softened
- 1/2 cup granulated sugar
- 1/2 cup brown sugar, packed
- 1/3 cup molasses
- 1 large egg
- 1 teaspoon vanilla extract
Cooking Instructions:
- Preheat the Oven:
- Begin by preheating your oven to 350°F (175°C). Line two baking sheets with parchment paper or silicone baking mats to prevent the cookies from sticking.
- Mix the Dry Ingredients:
- In a medium-sized bowl, whisk together the flour, baking soda, baking powder, salt, cinnamon, ginger, and cloves. This guarantees that the spices are evenly distributed throughout the dough.
- Cream the Butter and Sugars:
- In a large mixing bowl, use an electric mixer to cream together the softened butter, granulated sugar, and brown sugar until the mixture is light and fluffy. This should take about 3-4 minutes.
- Add Wet Ingredients:
- Beat in the molasses, egg, and vanilla extract to the butter-sugar mixture until well combined. The mixture should be smooth and fully incorporated.
- Combine Wet and Dry Ingredients:
- Gradually add the dry ingredients to the wet ingredients, mixing on low speed until just combined. Be careful not to overmix as this can result in tough cookies.
- Form the Cookies:
- Using a tablespoon or cookie scoop, drop rounded balls of dough onto the prepared baking sheets, spacing them about 2 inches apart to allow for spreading.
- Bake:
- Place the baking sheets in the preheated oven and bake for 10-12 minutes, or until the edges are set and the tops are slightly cracked. The cookies should be soft in the center but will firm up as they cool.
- Cool:
- Remove the cookies from the oven and let them cool on the baking sheets for 5 minutes before transferring them to a wire rack to cool completely.
Extra Tips:
For the best texture, make sure not to overbake your cookies; they should remain soft and chewy in the center.
Feel free to roll the dough balls in granulated sugar before baking for an extra touch of sweetness and a delightful crunch. If you’re planning to make these cookies well in advance, the dough can be refrigerated for up to 48 hours before baking.
Just allow it to come to room temperature before scooping and baking. Enjoy your Spiced Molasses Cookies with a sprinkling of powdered sugar on top for an added festive touch!
Almond Crescent Cookies
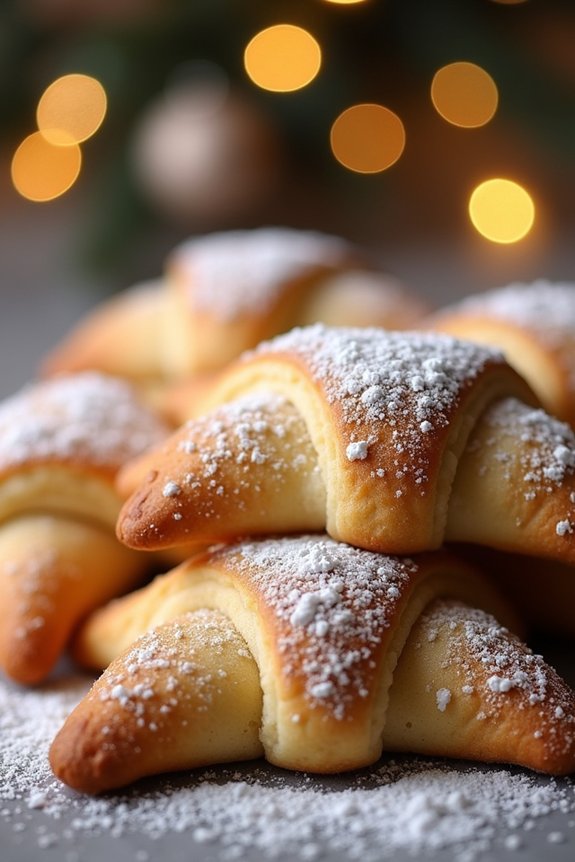
Almond Crescent Cookies are a holiday favorite that brings warmth and joy to any festive gathering. Their delicate, nutty flavor and charming crescent shape make them a delightful addition to any Christmas cookie platter.
These tender cookies are made with ground almonds and a hint of vanilla, then dusted with a generous coating of powdered sugar, creating a melt-in-your-mouth experience that will have you reaching for more.
Perfect for serving 4-6 people, this recipe combines simple ingredients to create a batch of cookies that are as beautiful as they’re delicious. Whether you’re baking them for a holiday party or as a sweet gift for loved ones, these Almond Crescent Cookies are bound to impress.
Follow this recipe to bring a touch of tradition and a lot of flavor to your holiday season.
Ingredients:
- 1 cup unsalted butter, softened
- 2/3 cup granulated sugar
- 1 teaspoon vanilla extract
- 1 cup ground almonds
- 2 1/2 cups all-purpose flour
- 1/4 teaspoon salt
- 1 cup powdered sugar (for dusting)
Cooking Instructions:
- Preheat the Oven: Begin by preheating your oven to 350°F (175°C). This guarantees that it’s at the right temperature for baking once your dough is ready.
- Cream Butter and Sugar: In a large mixing bowl, cream together the softened butter and granulated sugar until the mixture is light and fluffy. This should take about 3-5 minutes using an electric mixer on medium speed.
- Add Vanilla and Almonds: Mix in the vanilla extract and ground almonds. Continue to blend until the ingredients are well incorporated, ensuring that the almond flavor is evenly distributed throughout the dough.
- Combine Dry Ingredients: In a separate bowl, whisk together the all-purpose flour and salt. Gradually add this dry mixture to the wet ingredients, mixing just until combined. Avoid overmixing to prevent tough cookies.
- Shape the Cookies: Take small portions of dough, approximately 1 tablespoon each, and roll them into logs about 2 inches long. Gently shape each log into a crescent shape by bending it slightly in the middle.
- Bake: Place the shaped cookies on a baking sheet lined with parchment paper, leaving about an inch of space between each one. Bake in the preheated oven for 12-15 minutes or until the edges are just beginning to turn golden. Be cautious not to overbake, as they should remain light in color.
- Cool and Dust: Allow the cookies to cool on the baking sheet for a few minutes before transferring them to a wire rack. Once completely cooled, generously dust them with powdered sugar, ensuring each cookie is fully coated.
Extra Tips:
To achieve the perfect crescent shape, use your fingertips to gently press and form the dough. If the dough is too sticky, chill it in the refrigerator for about 30 minutes before shaping.
For even baking, ensure that all cookies are similar in size and thickness. Store the finished cookies in an airtight container to maintain their freshness and prevent them from absorbing moisture.
These cookies can be made a few days in advance and are often even more flavorful as they sit, making them a convenient option for holiday preparations.
Festive Spritz Cookies

Spritz cookies are a holiday classic, known for their buttery texture and charming shapes. These delightful cookies, often crafted using a cookie press, are perfect for adding a festive touch to your holiday gatherings. Their name, “Spritz,” is derived from the German word “spritzen,” which means “to squirt” or “to spray,” aptly describing how the dough is pushed through a cookie press to create intricate designs.
This recipe combines a few simple ingredients to create a batch of cookies that will melt in your mouth and decorate your holiday table with cheer.
The beauty of Festive Spritz Cookies lies in their versatility. With the right food coloring and decorative touches, you can tailor them to suit any festive theme. While primarily enjoyed during Christmas, these cookies can be adapted for any special occasion.
Whether you choose to keep them simple with a delicate sugar dusting or jazz them up with colorful sprinkles and edible glitter, these cookies are sure to be a hit. Let’s plunge into the recipe for creating a batch that serves 4-6 people, perfect for sharing with family and friends.
Ingredients (Serves 4-6):
- 1 cup unsalted butter, softened
- 3/4 cup granulated sugar
- 1 large egg
- 1 teaspoon vanilla extract
- 1/2 teaspoon almond extract
- 2 1/4 cups all-purpose flour
- 1/4 teaspoon salt
- Food coloring (optional)
- Sprinkles or colored sugar for decoration (optional)
Cooking Instructions:
- Preheat the Oven: Begin by preheating your oven to 375°F (190°C). This guarantees your cookies will bake evenly right from the start.
- Cream the Butter and Sugar: In a large mixing bowl, use an electric mixer to cream together the softened butter and granulated sugar until the mixture is light and fluffy. This usually takes about 3-5 minutes.
- Add Egg and Extracts: Once the butter and sugar are fully combined, add in the egg, vanilla extract, and almond extract. Beat the mixture until smooth and well incorporated.
- Combine Dry Ingredients: In a separate bowl, whisk together the all-purpose flour and salt. Gradually add this dry mixture to the wet ingredients, mixing on low speed until just combined. Don’t overmix.
- Color the Dough (Optional): If you wish to add color to your cookies, divide the dough into portions and add a few drops of food coloring to each. Knead the dough until the color is evenly distributed.
- Prepare the Cookie Press: Fill your cookie press with the dough. Choose your desired shape plate and attach it to the press.
- Press the Cookies: On an ungreased baking sheet, press the cookies out in your chosen shapes. Leave enough space between the cookies for them to expand slightly during baking.
- Decorate: If desired, sprinkle the cookies with colored sugar or sprinkles before baking for an extra festive touch.
- Bake: Place the baking sheet in the preheated oven and bake for 6-8 minutes, or until the edges of the cookies are just beginning to turn golden. Be careful not to overbake.
- Cool the Cookies: Remove the cookies from the oven and allow them to cool on the baking sheet for a few minutes before transferring them to a wire rack to cool completely.
Extra Tips:
When making Spritz cookies, the consistency of the dough is key. It should be soft enough to press through the cookie press easily but firm enough to hold its shape once on the baking sheet.
If the dough is too soft, refrigerate it for a short time before using. Conversely, if it’s too stiff, let it sit at room temperature briefly. Additionally, verify the baking sheets are ungreased and cool for the best results, as warm sheets can cause the cookies to spread too much.
Finally, have fun with the decorations; these cookies are an excellent canvas for creative holiday flair!
Rum-Infused Fruitcake Cookies
Grandma’s Christmas Cookie Recipes have been a cherished tradition in our family for generations, and one of the standout treats from her collection is the Rum-Infused Fruitcake Cookies. These cookies are a delightful twist on the classic fruitcake, offering all the rich, festive flavors in a bite-sized form. The combination of dried fruits, warm spices, and a hint of rum creates a cozy and indulgent treat that’s perfect for the holiday season.
Whether you’re a fan of fruitcake or not, these cookies are bound to win you over with their moist texture and irresistible aroma. The Rum-Infused Fruitcake Cookies aren’t only delicious but also a wonderful way to bring a touch of nostalgia to your holiday gatherings. The recipe is straightforward, making it an ideal choice for both novice bakers and seasoned pros looking to add something special to their cookie trays.
With a serving size designed for 4-6 people, these cookies are perfect for sharing with family and friends, or for keeping a few extras around for yourself to enjoy with a warm cup of tea or coffee.
Ingredients (Serves 4-6):
- 1 cup unsalted butter, softened
- 1 cup brown sugar
- 2 large eggs
- 1/4 cup dark rum
- 1 teaspoon vanilla extract
- 2 1/2 cups all-purpose flour
- 1 teaspoon baking soda
- 1/2 teaspoon salt
- 1 teaspoon ground cinnamon
- 1/2 teaspoon ground nutmeg
- 1 cup chopped pecans
- 1 cup chopped dried fruit (e.g., raisins, currants, chopped apricots)
- 1/2 cup candied cherries, chopped
Cooking Instructions:
- Preheat the oven: Start by preheating your oven to 350°F (175°C). This guarantees that your cookies bake evenly once they’re ready to go in.
- Cream the butter and sugar: In a large mixing bowl, cream the softened butter and brown sugar together until light and fluffy. This should take about 3-4 minutes with an electric mixer.
- Add wet ingredients: Beat in the eggs one at a time, making sure each is fully incorporated before adding the next. Then, mix in the dark rum and vanilla extract until well combined.
- Combine dry ingredients: In a separate bowl, whisk together the all-purpose flour, baking soda, salt, ground cinnamon, and ground nutmeg. Gradually add the dry mixture to the wet ingredients, mixing until just combined.
- Fold in the fruits and nuts: Gently fold in the chopped pecans, dried fruit, and candied cherries, making sure of an even distribution throughout the dough.
- Shape and bake the cookies: Drop heaping tablespoons of dough onto ungreased baking sheets, spacing them about 2 inches apart. Bake in the preheated oven for 12-15 minutes, or until the edges are golden brown.
- Cool and serve: Allow the cookies to cool on the baking sheets for 5 minutes before transferring them to wire racks to cool completely. Serve and enjoy!
Extra Tips:
For an extra punch of flavor, consider soaking the dried fruits in the rum for an hour or two before you start baking. This will infuse the fruits with a deeper rum flavor and make the cookies even more moist.
If you prefer a non-alcoholic version, you can substitute the rum with apple juice or orange juice. Also, feel free to get creative with the types of dried fruits and nuts you use—experiment with different combinations to find your perfect balance.
Finally, store the cookies in an airtight container to keep them fresh and chewy for up to a week.
Crispy Snickerdoodles
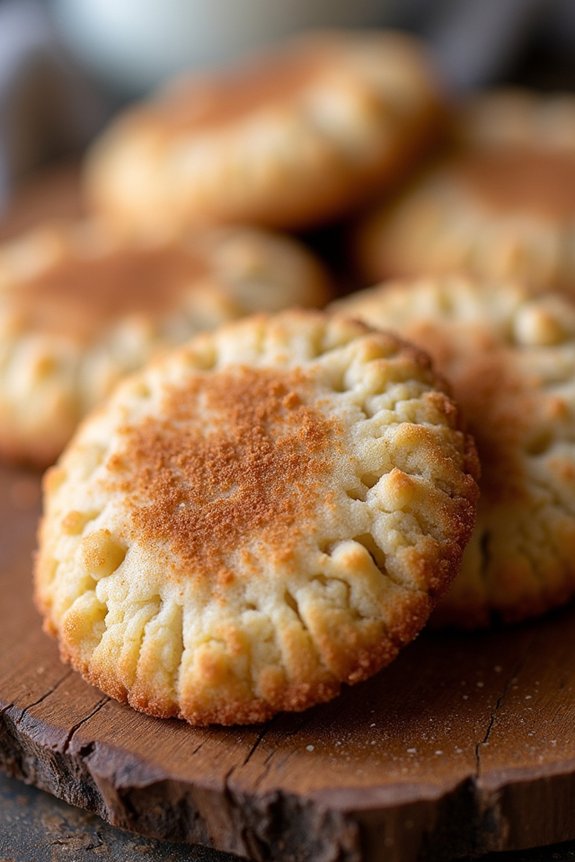
Grandma’s Christmas Cookie Recipes are a cherished part of holiday traditions for many families, and her Crispy Snickerdoodles are no exception. These delightful cookies are a classic treat that combines a slightly crispy exterior with a soft, chewy center, all enveloped in a sweet cinnamon-sugar coating. Perfect for sharing with family and friends, these snickerdoodles are a must-have for your holiday cookie platter.
The secret to Grandma’s Crispy Snickerdoodles lies in the balance of ingredients that create the perfect texture and flavor. The use of cream of tartar gives the cookies their signature tang and guarantees they maintain that lovely soft center, while rolling them in cinnamon and sugar adds a warm, festive touch.
Whether you’re a seasoned baker or trying your hand at holiday baking for the first time, these cookies are sure to bring joy to your festivities.
Ingredients (Serves 4-6 people):
- 1 cup unsalted butter, softened
- 1 1/2 cups granulated sugar
- 2 large eggs
- 2 3/4 cups all-purpose flour
- 2 teaspoons cream of tartar
- 1 teaspoon baking soda
- 1/4 teaspoon salt
- 3 tablespoons granulated sugar (for rolling)
- 3 teaspoons ground cinnamon (for rolling)
Cooking Instructions:
- Preheat the Oven: Begin by preheating your oven to 375°F (190°C). This guarantees that your cookies bake evenly once they’re ready to go in the oven.
- Prepare the Dough: In a large mixing bowl, cream together the softened butter and 1 1/2 cups of granulated sugar until the mixture is light and fluffy. Add the eggs, one at a time, beating well after each addition to confirm they’re fully incorporated.
- Combine Dry Ingredients: In a separate bowl, whisk together the flour, cream of tartar, baking soda, and salt. Gradually add the dry ingredients to the wet mixture, mixing just until the dough comes together and is smooth.
- Prepare Cinnamon-Sugar Coating: In a small bowl, combine the 3 tablespoons of granulated sugar with the ground cinnamon. Mix well to confirm an even distribution of cinnamon.
- Shape and Coat the Cookies: Scoop out tablespoon-sized portions of dough and roll them into balls. Roll each ball in the cinnamon-sugar mixture until fully coated.
- Bake the Cookies: Place the coated dough balls onto ungreased baking sheets, ensuring they’re spaced about 2 inches apart. Bake in the preheated oven for 8-10 minutes, or until the edges are lightly golden. Be careful not to overbake; the centers should remain soft.
- Cool and Serve: Allow the cookies to cool on the baking sheet for a few minutes before transferring them to a wire rack to cool completely. Enjoy these cookies warm or store them in an airtight container for later.
Extra Tips:
For the best results, make sure your butter is at room temperature before you begin. This allows for better creaming with the sugar, leading to a more even texture in the finished cookies.
If you prefer a slightly softer cookie, you can bake them for a minute less. Additionally, consider chilling the dough for about 30 minutes before rolling and baking if you find your dough is too sticky to handle. This can help the cookies maintain their shape better during baking.
Enjoy your baking and the delightful aroma of these festive snickerdoodles!
Double Chocolate Crinkle Cookies
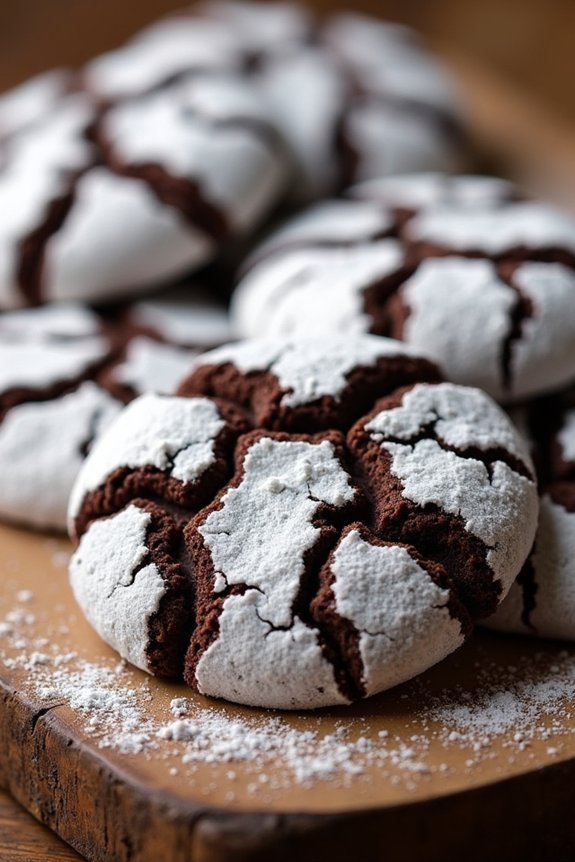
There’s something magical about the combination of rich chocolate and the festive appearance of crinkle cookies that captures the spirit of the holiday season. Grandma’s Double Chocolate Crinkle Cookies are a family favorite, bringing warmth and joy to every Christmas gathering.
These cookies aren’t only delicious but also visually stunning, with their contrasting dark chocolate interior and the snowy white powdered sugar exterior. Perfectly soft and chewy, they’re the ideal treat to enjoy with a cup of hot cocoa by the fireplace.
This recipe yields cookies that are decadent and satisfying, making them perfect for serving at a holiday party or as a thoughtful homemade gift. Whether you’re an experienced baker or a beginner, these cookies are simple to make and guaranteed to impress. The following recipe is designed to serve 4-6 people, making sure everyone gets to enjoy these delightful treats.
Ingredients (Serves 4-6):
- 1 cup all-purpose flour
- 1/2 cup unsweetened cocoa powder
- 1 teaspoon baking powder
- 1/4 teaspoon salt
- 3/4 cup granulated sugar
- 1/4 cup vegetable oil
- 2 large eggs
- 1 teaspoon vanilla extract
- 1/2 cup semi-sweet chocolate chips
- 1/2 cup powdered sugar
Cooking Instructions:
- Prepare the Dry Ingredients: In a medium-sized bowl, whisk together the all-purpose flour, unsweetened cocoa powder, baking powder, and salt until well combined. This will guarantee that the baking powder is evenly distributed, which is essential for the cookies to rise properly.
- Mix the Wet Ingredients: In a large bowl, beat together the granulated sugar and vegetable oil until the mixture is smooth and creamy. Add the eggs one at a time, beating well after each addition. Stir in the vanilla extract to enhance the flavor of the chocolate.
- Combine the Mixtures: Gradually add the dry ingredients to the wet ingredients, mixing until just combined. Be careful not to overmix, as this can make the cookies tough. Fold in the semi-sweet chocolate chips until they’re evenly distributed throughout the dough.
- Chill the Dough: Cover the bowl with plastic wrap and refrigerate the dough for at least 2 hours or until firm. Chilling the dough is vital for achieving the characteristic crinkle effect, as it helps the cookies hold their shape during baking.
- Preheat the Oven: Preheat your oven to 350°F (175°C) and line a baking sheet with parchment paper to prevent the cookies from sticking.
- Shape the Cookies: Roll the chilled dough into 1-inch balls. Generously coat each ball in powdered sugar, making sure they’re completely covered. This will create the beautiful, snowy exterior as the cookies bake.
- Bake the Cookies: Place the coated dough balls on the prepared baking sheet, spacing them about 2 inches apart. Bake in the preheated oven for 10-12 minutes, or until the cookies have spread and have a crinkled appearance. They should be slightly underbaked in the center to maintain a soft texture.
- Cool and Serve: Allow the cookies to cool on the baking sheet for 5 minutes before transferring them to a wire rack to cool completely. Enjoy them warm or at room temperature.
Extra Tips:
For best results, make sure the dough is well chilled before baking, as this will help the cookies maintain their shape and achieve the distinctive crinkle effect.
If you prefer a more intense chocolate flavor, use Dutch-processed cocoa powder for a deeper color and richer taste. Additionally, you can experiment with different types of chocolate chips, such as dark or white chocolate, to suit your personal preference.
Finally, store the cookies in an airtight container to keep them fresh and chewy for up to a week.
Pecan Sandies
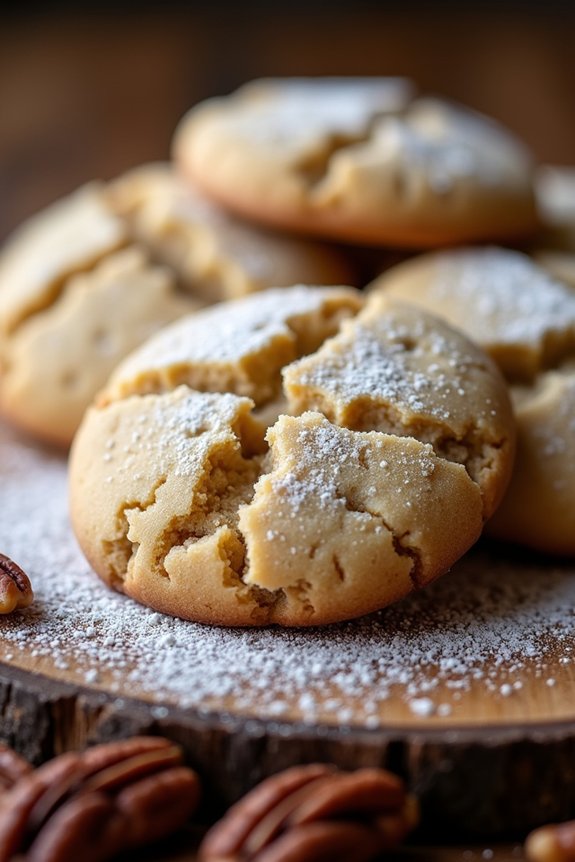
Pecan Sandies are a classic holiday treat that brings warmth and nostalgia to any Christmas gathering. These delicate, buttery cookies are speckled with crunchy pecans, offering a delightful contrast in texture. Their melt-in-your-mouth quality makes them a favorite among both children and adults, and they pair perfectly with a cup of tea or coffee.
While there are many variations of this beloved cookie, this recipe stays true to the traditional flavors that Grandma used to make during the festive season. Perfect for sharing, this recipe yields enough Pecan Sandies to serve 4-6 people. The secret to their rich taste lies in the quality of the ingredients, especially the real butter and fresh pecans.
With just a few simple steps, you can recreate these scrumptious cookies in your own kitchen, filling your home with the comforting aroma of freshly baked treats. Whether you’re looking to add to your holiday cookie platter or simply indulge in some seasonal baking, Pecan Sandies are sure to be a hit.
Ingredients (Serves 4-6):
- 1 cup unsalted butter, softened
- 1/2 cup granulated sugar
- 1 teaspoon vanilla extract
- 2 cups all-purpose flour
- 1/2 teaspoon salt
- 1 cup pecans, finely chopped
- Powdered sugar, for dusting
Instructions:
- Preheat and Prepare: Preheat your oven to 350°F (175°C). Line two baking sheets with parchment paper to prevent the cookies from sticking and guarantee even baking.
- Cream Butter and Sugar: In a large mixing bowl, cream together the softened butter and granulated sugar using an electric mixer on medium speed until the mixture is light and fluffy. This should take about 2-3 minutes.
- Add Vanilla: Add the vanilla extract to the butter and sugar mixture, and mix until fully incorporated.
- Combine Dry Ingredients: In a separate bowl, whisk together the all-purpose flour and salt until well combined.
- Mix Dough: Gradually add the dry ingredients to the butter mixture, mixing on low speed until just combined. Be careful not to overmix, as this can result in tough cookies.
- Incorporate Pecans: Gently fold in the chopped pecans using a spatula or wooden spoon, making sure they’re evenly distributed throughout the dough.
- Shape Cookies: Scoop tablespoons of dough, rolling each into a ball with your hands. Place the dough balls onto the prepared baking sheets, spacing them about 2 inches apart.
- Bake: Bake in the preheated oven for 15-18 minutes, or until the edges of the cookies are lightly golden. Rotate the baking sheets halfway through to guarantee even baking.
- Cool and Dust: Allow the cookies to cool on the baking sheets for 5 minutes before transferring them to a wire rack. Once cooled, dust lightly with powdered sugar.
Extra Tips: For the best flavor, toast the pecans lightly in a dry skillet over medium heat for 5-7 minutes before chopping them. This enhances their natural oils and adds a depth of flavor to the cookies.
Additionally, make sure the butter is at room temperature for easy creaming, and consider chilling the dough for 30 minutes before baking to help the cookies maintain their shape. Enjoy these Pecan Sandies with a sprinkle of extra powdered sugar for a festive touch!