

I recently came across some stunning Christmas baking recipes that look like they were made for Pinterest. These treats, like snowflake sugar cookies and peppermint mocha layer cakes, are not only delicious but also visually captivating. They are perfect for impressing your guests or adding a personal touch to your holiday gifts. Curious about the magic behind these festive creations? Let’s explore these wonders of holiday baking together.
Snowflake Sugar Cookies
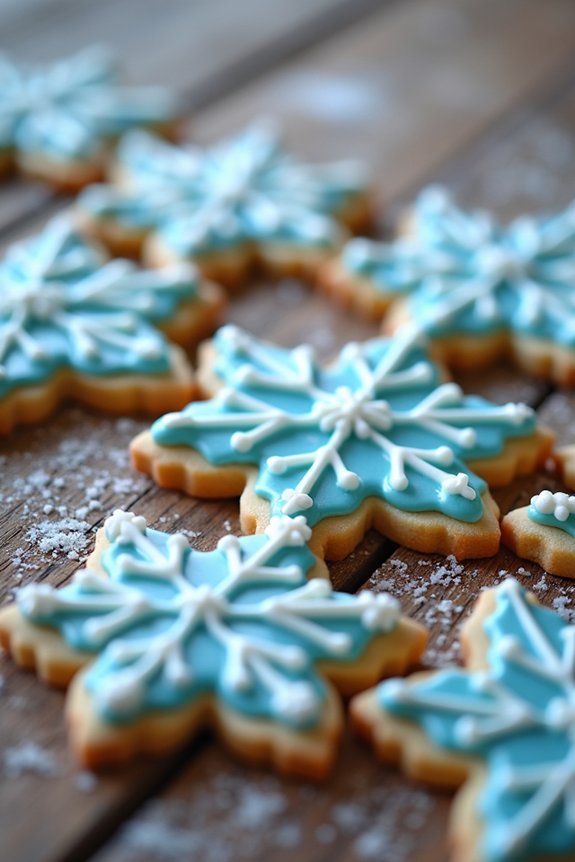
Snowflake Sugar Cookies are a delightful treat that not only taste delicious but also add a touch of holiday magic to your dessert table. With their intricate designs and sweet flavor, these cookies are perfect for both gifting and indulging in yourself. The subtle vanilla and almond flavors in the dough complement the sweetness of the icing, creating a harmonious balance that’s certain to please any palate.
These cookies aren’t only delicious but also a fun and creative project to undertake with family or friends. The process of cutting out the snowflake shapes and decorating them with royal icing is a wonderful way to spend a winter afternoon. Whether you’re an experienced baker or just starting out, these cookies are a great way to showcase your creativity and bring a bit of festive cheer into your home.
Ingredients for 4-6 servings:
- 3 cups all-purpose flour
- 1 teaspoon baking powder
- 1/2 teaspoon salt
- 1 cup unsalted butter, softened
- 1 cup granulated sugar
- 1 large egg
- 1 teaspoon vanilla extract
- 1/2 teaspoon almond extract
- Royal icing (for decorating)
- Blue and white food coloring (optional)
- Edible glitter or sugar sprinkles (optional)
Cooking Instructions:
- Preheat the Oven: Start by preheating your oven to 350°F (175°C). This guarantees that the cookies bake evenly.
- Prepare the Dough: In a medium bowl, whisk together flour, baking powder, and salt. In a separate large bowl, beat the softened butter and sugar together with an electric mixer until light and fluffy, about 2-3 minutes. Add the egg, vanilla extract, and almond extract, mixing until well combined.
- Combine Ingredients: Gradually add the dry ingredients to the wet ingredients, mixing on low speed until a dough forms. If the dough is too sticky, add a little more flour, one tablespoon at a time.
- Roll Out the Dough: Divide the dough into two equal parts. Roll out each portion on a lightly floured surface to about 1/4-inch thickness. Use snowflake-shaped cookie cutters to cut out shapes and place them on a baking sheet lined with parchment paper.
- Bake the Cookies: Place the baking sheet in the preheated oven and bake for 8-10 minutes, or until the edges are lightly golden. Remove from oven and let the cookies cool on the baking sheet for 5 minutes before transferring to a wire rack to cool completely.
- Decorate the Cookies: Once the cookies are completely cooled, prepare the royal icing according to the package instructions or your preferred recipe. Divide the icing into small bowls and add food coloring as desired. Use a piping bag fitted with a small round tip to decorate the cookies. Add edible glitter or sprinkles for extra sparkle.
Extra Tips: The key to perfect Snowflake Sugar Cookies is verifying the dough is the right consistency—not too sticky or too dry. If your dough is too sticky, a little extra flour can help.
When rolling out the dough, using parchment paper not only prevents sticking but also makes transferring the cookies to the baking sheet easier. For intricate designs, practice piping on parchment paper before decorating the actual cookies.
Patience is essential; allow the icing to dry completely before stacking or storing the cookies to prevent smudging. Enjoy your beautiful, festive creations!
Peppermint Mocha Layer Cake
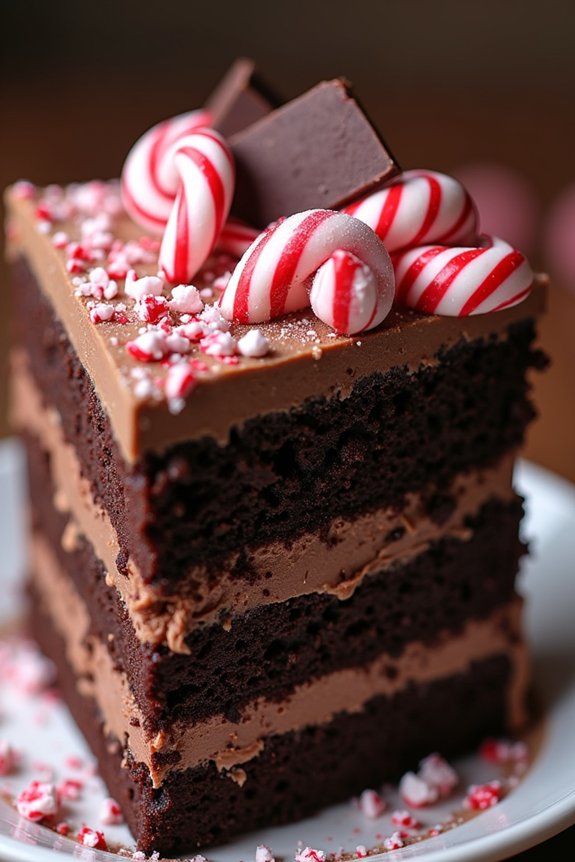
The Peppermint Mocha Layer Cake is a festive and elegant dessert that combines the rich flavors of chocolate and coffee with the invigorating touch of peppermint. This cake is perfect for holiday gatherings and is sure to impress your friends and family with its beautiful presentation and delightful taste. The decadent layers of moist chocolate cake are enhanced by a silky mocha buttercream and a hint of peppermint, creating a harmonious blend of flavors that will leave everyone asking for seconds.
This cake isn’t only delicious but also visually stunning with its striking layers and festive decorations. It serves 4-6 people, making it an ideal choice for smaller holiday celebrations. Whether you’re an experienced baker or a novice in the kitchen, this recipe is easy to follow and will yield a show-stopping centerpiece for your holiday dessert table.
Ingredients (Serves 4-6):
- 1 3/4 cups all-purpose flour
- 3/4 cup unsweetened cocoa powder
- 2 cups granulated sugar
- 1 1/2 teaspoons baking powder
- 1 1/2 teaspoons baking soda
- 1 teaspoon salt
- 2 large eggs
- 1 cup whole milk
- 1/2 cup vegetable oil
- 2 teaspoons vanilla extract
- 1 cup boiling water
- 1 tablespoon instant coffee granules
- 1 teaspoon peppermint extract
- 1 1/2 cups unsalted butter, softened
- 4 1/2 cups powdered sugar
- 1/4 cup heavy cream
- Crushed candy canes for garnish
- Chocolate shavings for garnish
Instructions:
- Preheat the Oven: Preheat your oven to 350°F (175°C). Grease and flour two 9-inch round cake pans and set them aside.
- Prepare the Cake Batter: In a large mixing bowl, sift together the flour, cocoa powder, sugar, baking powder, baking soda, and salt. In another bowl, beat the eggs and combine them with milk, vegetable oil, and vanilla extract. Gradually mix the wet ingredients with the dry ingredients until well combined.
- Add Coffee and Peppermint: Dissolve the instant coffee granules in boiling water and add it to the cake batter along with the peppermint extract. Stir until the batter is smooth and well mixed.
- Bake the Cakes: Divide the batter evenly between the prepared pans. Bake for 30-35 minutes or until a toothpick inserted in the center comes out clean. Allow the cakes to cool in the pans for 10 minutes, then remove them from the pans and transfer to a wire rack to cool completely.
- Make the Mocha Buttercream: In a large bowl, beat the softened butter until creamy. Gradually add the powdered sugar, heavy cream, and vanilla extract, beating until smooth and fluffy. Mix in any remaining coffee granules for an extra mocha kick.
- Assemble the Cake: Place one cake layer on a serving platter. Spread a generous amount of mocha buttercream over the top. Place the second layer on top and frost the entire cake with the remaining buttercream.
- Decorate: Sprinkle the top of the cake with crushed candy canes and chocolate shavings for a festive touch. Refrigerate for at least 30 minutes before serving to allow the flavors to meld and the frosting to set.
Extra Tips:
When making the Peppermint Mocha Layer Cake, verify all your ingredients are at room temperature before you start baking. This will help them incorporate more smoothly and result in a better-textured cake.
Additionally, if you find that the cake is browning too quickly in the oven, cover it loosely with aluminum foil to prevent over-browning. For an extra hint of peppermint, you can add a drop of peppermint extract to the buttercream as well.
Store any leftover cake in an airtight container in the refrigerator for up to three days. Enjoy this delightful cake with a hot cup of coffee or peppermint tea to enhance the festive experience.
Gingerbread House Cupcakes
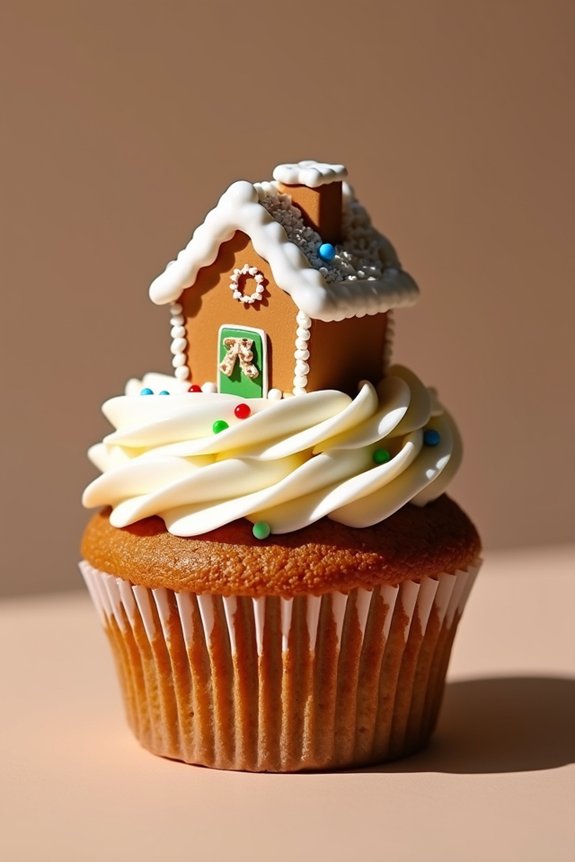
Gingerbread House Cupcakes are a delightful and festive way to bring the joy of Christmas into your home. These charming cupcakes combine the rich, spiced flavors of gingerbread with the whimsy of a miniature gingerbread house perched on top. Perfect for a holiday party or as a family baking project, these cupcakes not only taste amazing but also make for a beautiful centerpiece on your dessert table.
The process of making these cupcakes involves creating the gingerbread cupcake base, a creamy frosting, and assembling the decorative gingerbread house toppers, guaranteeing a fun and creative baking experience.
The gingerbread cupcake itself is a moist and flavorful base made from a blend of warm spices like ginger, cinnamon, and cloves. Once the cupcakes are baked and cooled, they’re topped with a smooth and sweet cream cheese frosting. The pièce de résistance, however, is the miniature gingerbread house that sits atop each cupcake, crafted from gingerbread cookie pieces and adorned with colorful candies and icing.
This recipe serves 4-6 people, making it ideal for a small gathering or as a delightful treat to enjoy throughout the holiday season.
Ingredients (for 4-6 servings)
For the Gingerbread Cupcakes:
- 1 ½ cups all-purpose flour
- 1 teaspoon baking powder
- ½ teaspoon baking soda
- 1 tablespoon ground ginger
- 1 teaspoon ground cinnamon
- ¼ teaspoon ground cloves
- ¼ teaspoon salt
- ½ cup unsalted butter, softened
- ½ cup brown sugar
- ¼ cup molasses
- 1 large egg
- ½ cup buttermilk
For the Cream Cheese Frosting:
- 1 cup cream cheese, softened
- ½ cup unsalted butter, softened
- 2 cups powdered sugar
- 1 teaspoon vanilla extract
For the Mini Gingerbread Houses:
- Gingerbread cookie dough (store-bought or homemade)
- Royal icing (store-bought or homemade)
- Assorted candies for decoration
Instructions
- Prepare the Gingerbread Cupcakes:
- Preheat your oven to 350°F (175°C) and line a muffin tin with cupcake liners.
- In a medium bowl, sift together the flour, baking powder, baking soda, ginger, cinnamon, cloves, and salt.
- In a large bowl, cream the butter and brown sugar until light and fluffy. Add the molasses and egg, mixing well.
- Gradually add the dry ingredients to the wet ingredients, alternating with the buttermilk, beginning and ending with the dry ingredients. Mix until just combined.
- Divide the batter evenly among the prepared cupcake liners, filling each about two-thirds full.
- Bake for 18-20 minutes, or until a toothpick inserted into the center comes out clean. Allow to cool completely on a wire rack.
- Make the Cream Cheese Frosting:
- In a large bowl, beat the cream cheese and butter together until smooth.
- Gradually add the powdered sugar, one cup at a time, beating until smooth and creamy.
- Mix in the vanilla extract. Set aside or refrigerate until ready to use.
- Assemble the Mini Gingerbread Houses:
- Roll out the gingerbread cookie dough on a floured surface to about 1/8 inch thick. Cut out house shapes using a small gingerbread house cookie cutter set.
- Bake according to the recipe or package instructions, then cool completely.
- Use the royal icing to assemble the mini houses by attaching the pieces together. Allow the icing to set for a few minutes.
- Decorate the houses with candies, attaching them with royal icing as desired. Let them dry completely.
- Decorate the Cupcakes:
- Once the cupcakes are cool, frost them with the cream cheese frosting using a piping bag or spatula.
- Carefully place a mini gingerbread house on top of each frosted cupcake.
- Optionally, dust the cupcakes with powdered sugar for a snowy effect.
Extra Tips
When making the gingerbread houses, patience is key. Allowing sufficient time for the royal icing to dry between steps will guarantee that your houses are sturdy and won’t collapse.
Additionally, you can prepare the gingerbread cookie pieces a day in advance to streamline the process. If you don’t have mini gingerbread house cutters, you can design your own templates from cardboard and use them as guides for cutting the dough.
Finally, feel free to get creative with the candy decorations, using various colors and shapes to add a personal touch to your gingerbread house cupcakes.
Cranberry Pistachio Biscotti
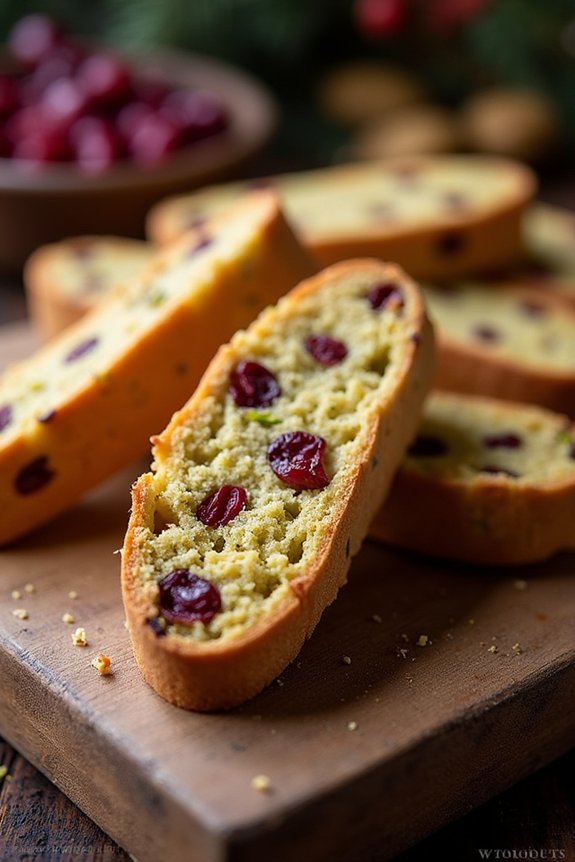
Cranberry Pistachio Biscotti is a delightful and festive treat that can add a touch of elegance to your holiday baking. The vibrant colors of cranberries and pistachios make these biscotti not only delicious but also visually appealing, perfect for any Christmas dessert table.
These twice-baked Italian cookies are crunchy and pair wonderfully with a hot cup of coffee or tea, making them a splendid holiday gift or an indulgent treat for yourself. The combination of tart cranberries and nutty pistachios gives these biscotti a uniquely balanced flavor.
The biscotti are easy to make, and their hard texture allows them to be stored for a longer period, which means you can prepare them well in advance. Whether you’re an experienced baker or a novice in the kitchen, this recipe is straightforward and rewarding.
Ingredients for 4-6 servings:
- 2 cups all-purpose flour
- 1 cup granulated sugar
- 1 teaspoon baking powder
- 1/2 teaspoon salt
- 3 large eggs
- 1 teaspoon vanilla extract
- 1/2 teaspoon almond extract
- 1 cup dried cranberries
- 1 cup shelled unsalted pistachios
- Zest of 1 orange
Cooking Instructions:
- Preheat and Prepare: Preheat your oven to 350°F (175°C). Line a baking sheet with parchment paper or a silicone baking mat.
- Mix Dry Ingredients: In a large bowl, whisk together the all-purpose flour, granulated sugar, baking powder, and salt until well combined.
- Combine Wet Ingredients: In a separate bowl, beat the eggs, vanilla extract, and almond extract until the mixture is slightly frothy. Add the orange zest to this mixture and stir.
- Form the Dough: Gradually add the wet ingredients to the dry ingredients, stirring until a dough forms. It should be slightly sticky. Fold in the dried cranberries and pistachios until evenly distributed.
- Shape and Bake: Divide the dough in half. On a floured surface, shape each half into a log about 10 inches long and 2 inches wide. Place the logs on the prepared baking sheet. Bake for 25-30 minutes, or until lightly golden and firm to the touch.
- Cool and Slice: Remove from the oven and let the logs cool on a wire rack for about 10 minutes. Reduce the oven temperature to 325°F (160°C). Using a serrated knife, slice the logs diagonally into 1/2-inch thick slices.
- Second Bake: Arrange the slices cut side down back on the baking sheet. Bake for an additional 10 minutes, flip them over, and bake for another 10 minutes. They should be golden and crisp.
- Cool Completely: Allow the biscotti to cool completely on the wire rack before serving or storing.
Extra Tips:
When making Cranberry Pistachio Biscotti, it’s essential not to overbake the first round, as the biscotti will continue to bake during the second round in the oven.
If you find the dough too sticky to handle, lightly flour your hands or add a bit more flour to the dough. For an extra decorative touch, consider drizzling the finished biscotti with melted white chocolate or dark chocolate after they’ve cooled completely. This adds a nice contrast and enhances the aesthetic appeal of your cookies.
White Chocolate Raspberry Cheesecake
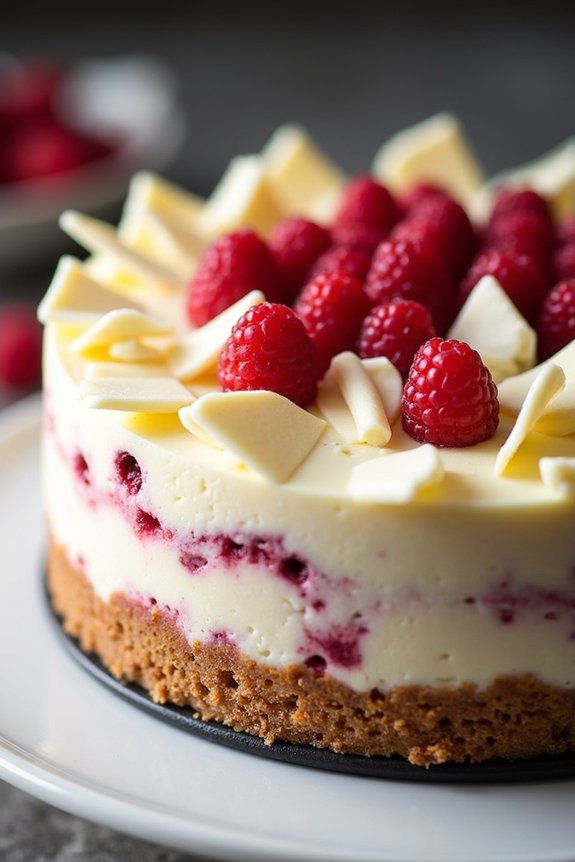
Indulge in the luxurious flavors of a White Chocolate Raspberry Cheesecake this holiday season. This dessert brings together the creamy richness of white chocolate with the tart sweetness of fresh raspberries, creating a perfect blend for a festive treat.
The smooth cheesecake layer sits atop a buttery graham cracker crust, offering a delightful contrast in texture. Topped with a drizzle of raspberry sauce and white chocolate shavings, this cheesecake isn’t just a feast for the taste buds but also a beautiful centerpiece for your Christmas dessert table.
Whether you’re hosting a cozy family gathering or a festive party, this cheesecake will surely impress your guests. The recipe is designed to serve 4-6 people, making it ideal for an intimate celebration.
With a few simple ingredients and some patience, you can create this stunning dessert that looks as good as it tastes. Follow the instructions carefully to guarantee your cheesecake comes out perfectly every time.
Ingredients:
- 1 1/2 cups graham cracker crumbs
- 1/4 cup unsalted butter, melted
- 1 cup white chocolate chips
- 1/4 cup heavy cream
- 16 oz cream cheese, softened
- 1 cup granulated sugar
- 2 large eggs
- 1 tsp vanilla extract
- 1 cup fresh raspberries
- 1/4 cup raspberry preserves
- White chocolate shavings for garnish
Cooking Instructions:
- Preheat and Prepare: Preheat your oven to 325°F (165°C). Grease a 9-inch springform pan lightly with butter or non-stick spray.
- Make the Crust: In a medium bowl, combine the graham cracker crumbs and melted butter, mixing until the crumbs are well-coated. Press the mixture firmly and evenly into the bottom of the prepared springform pan to form the crust.
- Melt the Chocolate: In a microwave-safe bowl, combine the white chocolate chips and heavy cream. Microwave in 30-second intervals, stirring after each, until the mixture is smooth and fully melted. Set aside to cool slightly.
- Prepare the Cheesecake Mixture: In a large mixing bowl, beat the softened cream cheese and sugar with an electric mixer until smooth and fluffy. Add in the eggs, one at a time, mixing well after each addition. Stir in the vanilla extract and the melted white chocolate mixture until fully incorporated.
- Assemble the Cheesecake: Pour half of the cheesecake batter over the prepared crust. Scatter half of the fresh raspberries over the batter. Spoon the remaining batter on top, and gently spread it evenly. Drop small spoonfuls of raspberry preserves over the cheesecake and use a knife to swirl it into the batter.
- Bake: Place the cheesecake on a baking sheet and bake in the preheated oven for 45-50 minutes, or until the center is set and the edges are slightly golden. Remove from the oven and allow it to cool at room temperature for about 1 hour.
- Chill and Serve: Once cooled, refrigerate the cheesecake for at least 4 hours, or overnight, to set completely. Before serving, decorate with remaining fresh raspberries and sprinkle with white chocolate shavings.
Extra Tips:
For the best results, confirm that all your ingredients are at room temperature before you start mixing. This will help in achieving a smooth, lump-free cheesecake batter.
When swirling the raspberry preserves, be gentle to maintain the beautiful marbling effect. If you don’t have a springform pan, use parchment paper to line a regular pan for easy removal.
Finally, always allow the cheesecake to chill thoroughly; this helps the flavors meld beautifully and makes slicing easier.
Red Velvet Christmas Wreath Cake
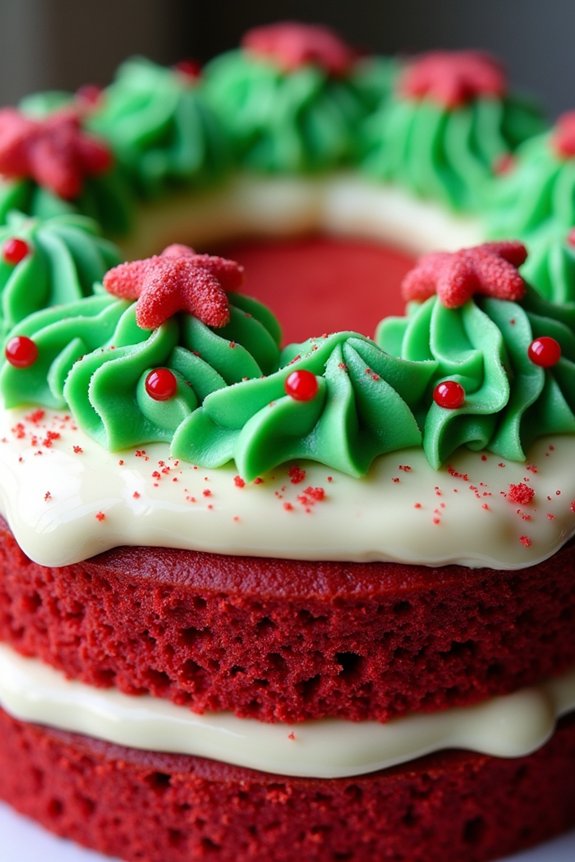
The Red Velvet Christmas Wreath Cake is a stunning centerpiece for your holiday table, combining the rich, velvety flavor of classic red velvet with a festive presentation. This cake isn’t only delicious but also visually impressive, designed to resemble a beautiful holiday wreath. The vibrant red hue of the cake contrasts beautifully with creamy white frosting and green decorative elements, creating a dessert that’s as delightful to the eyes as it’s to the taste buds.
Perfect for sharing with family and friends, this cake is sure to be a memorable part of your holiday celebrations. This recipe is crafted to serve 4-6 people, making it ideal for intimate gatherings or as a show-stopping addition to a larger dessert spread. The ingredients are simple yet effective, allowing the flavors and presentation to shine.
The cake itself is moist and flavorful, while the frosting is smooth and creamy, providing the perfect canvas for artistic decoration. Whether you’re an experienced baker or trying your hand at something new, this recipe is straightforward and rewarding, offering a satisfying baking experience that results in a truly special dessert.
Ingredients:
- 1 1/2 cups all-purpose flour
- 1 cup granulated sugar
- 1 teaspoon baking soda
- 1 teaspoon cocoa powder
- 1/2 teaspoon salt
- 1 cup buttermilk
- 1 cup vegetable oil
- 2 large eggs
- 1 teaspoon vanilla extract
- 2 teaspoons red food coloring
- 1 teaspoon white vinegar
- 1/2 cup unsalted butter, softened
- 8 oz cream cheese, softened
- 3 1/2 cups powdered sugar
- 1 teaspoon vanilla extract (for frosting)
- Green food coloring
- Assorted decorations (e.g., red sugar pearls, edible glitter)
Cooking Instructions:
- Preheat and Prepare: Preheat your oven to 350°F (175°C). Grease and flour a bundt cake pan to prevent sticking.
- Mix Dry Ingredients: In a large bowl, combine the flour, sugar, baking soda, cocoa powder, and salt. Stir until well mixed.
- Combine Wet Ingredients: In another bowl, whisk together the buttermilk, vegetable oil, eggs, vanilla extract, red food coloring, and vinegar until fully incorporated.
- Combine and Bake: Gradually add the wet ingredients to the dry ingredients, mixing until just combined. Pour the batter into the prepared bundt pan.
- Bake the Cake: Bake in the preheated oven for 30-35 minutes, or until a toothpick inserted into the center comes out clean. Cool the cake in the pan for 10 minutes, then turn it out onto a wire rack to cool completely.
- Prepare the Frosting: In a large bowl, beat the softened butter and cream cheese until smooth. Gradually add the powdered sugar and vanilla extract, mixing until the frosting is creamy.
- Decorate the Cake: Once the cake is completely cool, spread a layer of white cream cheese frosting over the entire cake. Tint a portion of the frosting with green food coloring and pipe it onto the cake to create a wreath-like design. Add red sugar pearls and edible glitter for extra decoration.
Extra Tips:
When making the Red Velvet Christmas Wreath Cake, it’s important to verify that all ingredients are at room temperature before beginning, as this helps them to combine more smoothly and evenly.
Be careful not to overmix the batter; mix just until the ingredients are combined to keep the cake tender. When decorating, you can get creative with your choice of toppings to match your holiday theme, such as adding small candy canes or gold accents.
Finally, if you don’t have a bundt pan, you can use a regular cake pan and cut out the center after baking to create the wreath shape.
Spiced Orange Bundt Cake
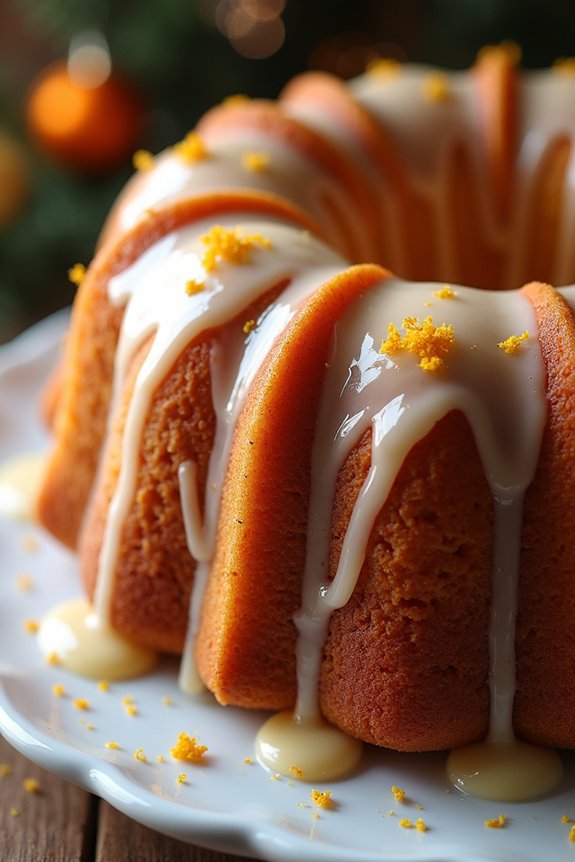
Embrace the holiday spirit with the delightful aroma and taste of a Spiced Orange Bundt Cake. This cake combines the zestiness of fresh oranges with a medley of warm spices, making it a perfect festive treat for your Christmas gatherings. The cake is designed to impress with its beautiful bundt shape and the enchanting scent that fills your kitchen as it bakes.
Whether you’re hosting a holiday brunch or need a show-stopping dessert, this cake is a wonderful addition to your Christmas baking repertoire. Not only is this Spiced Orange Bundt Cake delicious, but it’s also visually stunning, perfect for those Instagram-worthy moments.
The cake is moist and flavorful, with a rich orange flavor complemented by spices like cinnamon, nutmeg, and cloves. It’s finished with a simple glaze that adds a touch of sweetness and shine, making it truly irresistible. This recipe serves 4-6 people, guaranteeing everyone at your table gets a taste of this holiday delight.
Ingredients for 4-6 servings:
- 2 cups all-purpose flour
- 1 1/2 teaspoons baking powder
- 1/2 teaspoon baking soda
- 1 teaspoon ground cinnamon
- 1/2 teaspoon ground nutmeg
- 1/2 teaspoon ground cloves
- 1/4 teaspoon salt
- 1 cup unsalted butter, softened
- 1 cup granulated sugar
- 1/2 cup brown sugar
- 3 large eggs
- 1 tablespoon orange zest
- 1/2 cup freshly squeezed orange juice
- 1/2 cup buttermilk
- 1 teaspoon vanilla extract
For the Glaze:
- 1 cup powdered sugar
- 2 tablespoons freshly squeezed orange juice
- 1 teaspoon orange zest
Cooking Instructions:
- Preheat and Prepare Pan: Preheat your oven to 350°F (175°C). Grease a bundt pan thoroughly with butter or non-stick spray, making certain all crevices are covered, then lightly dust with flour to prevent sticking.
- Mix Dry Ingredients: In a medium bowl, whisk together the flour, baking powder, baking soda, cinnamon, nutmeg, cloves, and salt. Set aside.
- Cream Butter and Sugars: In a large mixing bowl, cream together the softened butter, granulated sugar, and brown sugar until light and fluffy, about 3-5 minutes using an electric mixer.
- Add Eggs and Flavorings: Add the eggs one at a time, beating well after each addition. Mix in the orange zest, orange juice, and vanilla extract.
- Combine Dry and Wet Ingredients: Gradually add the dry ingredients to the wet mixture, alternating with the buttermilk. Begin and end with the dry ingredients, mixing until just combined. Be careful not to overmix.
- Pour and Bake: Pour the batter into the prepared bundt pan, smoothing the top with a spatula. Bake in the preheated oven for 45-50 minutes, or until a toothpick inserted into the center comes out clean.
- Cool and Glaze: Allow the cake to cool in the pan for about 15 minutes, then turn it out onto a wire rack to cool completely. Once cooled, whisk together the powdered sugar, orange juice, and orange zest to make the glaze. Drizzle the glaze over the cake, allowing it to cascade down the sides.
Extra Tips:
For the best flavor, use freshly squeezed orange juice and zest from ripe oranges. Confirm your butter is at room temperature for easy creaming with the sugars. If you don’t have buttermilk on hand, you can make a substitute by mixing 1/2 cup of milk with 1/2 tablespoon of lemon juice or vinegar and letting it sit for 5 minutes.
Additionally, allow your cake to cool completely before glazing to guarantee the glaze sets properly for a beautiful finish. Enjoy your Spiced Orange Bundt Cake with a cup of tea or coffee for a perfect holiday treat!
Chocolate Hazelnut Yule Log
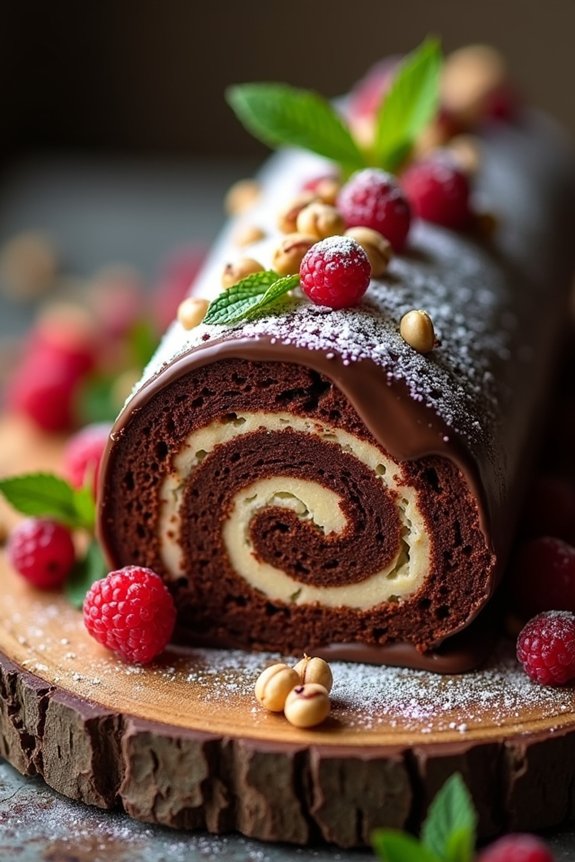
The Chocolate Hazelnut Yule Log is an elegant and indulgent dessert that embodies the festive spirit of Christmas. This traditional French Bûche de Noël is a rolled sponge cake filled with creamy chocolate-hazelnut filling and covered with a rich chocolate ganache that mimics the appearance of a log. The addition of hazelnuts adds a delightful crunch to the smooth and velvety textures, making it a show-stopping centerpiece for any holiday table.
Perfect for a cozy gathering with family and friends, this Yule Log isn’t only delicious but also a beautiful addition to your Christmas dessert lineup.
Creating a Chocolate Hazelnut Yule Log involves several components: a tender sponge cake, a luscious hazelnut cream filling, and a glossy chocolate ganache. It’s vital to plan ahead and allocate enough time for each step, allowing the components to cool and set properly.
This recipe serves 4-6 people, making it ideal for a small festive celebration. With a little patience and attention to detail, you can create a Yule Log that looks as stunning as it tastes.
Ingredients:
- 4 large eggs
- 100g granulated sugar
- 1 teaspoon vanilla extract
- 80g all-purpose flour
- 20g cocoa powder
- 1/4 teaspoon salt
- 200g chocolate hazelnut spread
- 250ml heavy cream
- 100g dark chocolate, chopped
- 50g hazelnuts, toasted and chopped
- Powdered sugar, for dusting
- Fresh berries and mint leaves, for decoration (optional)
Cooking Instructions:
- Preheat the Oven: Preheat your oven to 180°C (350°F). Line a 10×15 inch Swiss roll pan with parchment paper, guaranteeing it extends over the sides for easy removal.
- Prepare the Sponge Cake: In a large mixing bowl, beat the eggs and granulated sugar together using an electric mixer until the mixture is pale and thick, about 5 minutes. Mix in the vanilla extract.
- Combine Dry Ingredients: In a separate bowl, sift together the flour, cocoa powder, and salt. Gradually fold the dry ingredients into the egg mixture, guaranteeing a light and fluffy batter.
- Bake the Sponge Cake: Pour the batter into the prepared pan, smoothing the top with a spatula. Bake for 10-12 minutes, or until the cake is springy to the touch.
- Roll the Cake: While the cake is still warm, turn it out onto a clean kitchen towel dusted with powdered sugar. Peel off the parchment paper, then gently roll the cake with the towel from a short end. Let it cool completely in this rolled form.
- Prepare the Filling: In a bowl, whip the heavy cream until soft peaks form. Carefully fold in the chocolate hazelnut spread until fully combined and smooth.
- Fill and Roll the Cake: Unroll the cooled cake and spread the hazelnut cream evenly over the surface. Reroll the cake without the towel, then transfer it to a serving platter seam side down.
- Make the Ganache: Heat the chopped dark chocolate in a microwave-safe bowl in 30-second intervals until melted. Pour it over the yule log, spreading it evenly with a spatula.
- Decorate: Sprinkle the top with chopped hazelnuts and dust with powdered sugar. For a festive touch, add fresh berries and mint leaves.
Extra Tips:
When making the sponge cake, be careful not to overmix the batter as it can deflate and become dense. Rolling the cake while it’s warm helps prevent cracking, so work swiftly but gently.
When spreading the filling, guarantee it’s evenly distributed for a uniform roll. The ganache should be slightly cooled to avoid melting the filling but still pourable for easy spreading.
For added flavor, consider adding a tablespoon of coffee or hazelnut liqueur to the ganache or filling. Enjoy your creation as a delightful end to your Christmas feast!
Eggnog Macarons
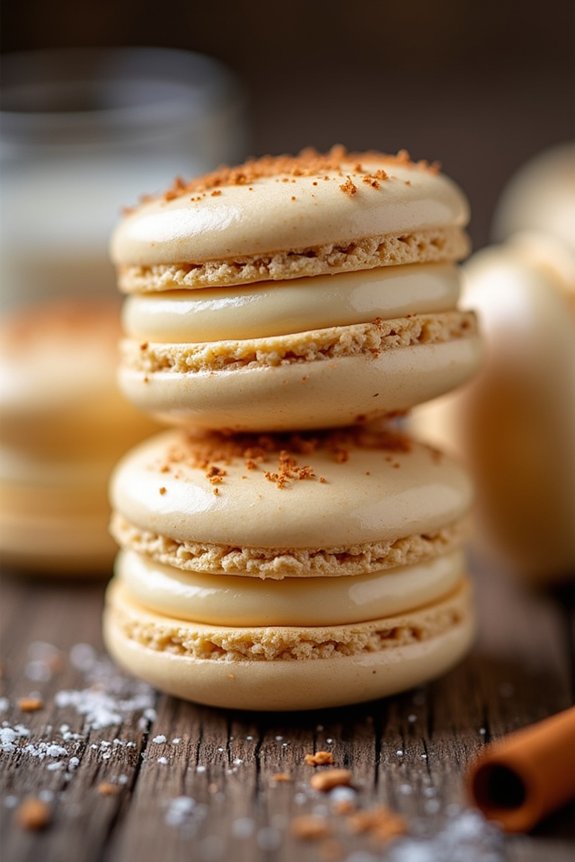
Eggnog Macarons are the perfect festive treat for your holiday celebrations, marrying the beloved flavors of creamy eggnog with delicate French macarons. These delightful cookies capture the essence of Christmas with their warm notes of nutmeg and cinnamon, combined with a silky eggnog-infused filling. Not only are they delicious, but they also make a stunning addition to your holiday dessert spread, bound to impress guests with their elegant appearance and unique flavor profile.
Crafting these macarons requires a bit of patience and precision, but the end result is well worth the effort. The key to achieving the perfect macaron shell lies in mastering the macaronage technique, guaranteeing the batter is neither too runny nor too stiff. Once baked to perfection, these macarons are sandwiched with a luscious eggnog-flavored buttercream, creating a heavenly combination that melts in your mouth. This recipe makes enough for 4-6 people, providing ample opportunity to share this aesthetic delight with family and friends.
Ingredients (Serves 4-6):
- 1 3/4 cups powdered sugar
- 1 cup almond flour
- 3 large egg whites, at room temperature
- 1/4 cup granulated sugar
- 1/4 teaspoon cream of tartar
- 1/4 teaspoon ground nutmeg
- 1/4 teaspoon ground cinnamon
- 1/2 cup unsalted butter, softened
- 1 1/2 cups confectioners’ sugar
- 3 tablespoons eggnog
- 1/2 teaspoon vanilla extract
- A pinch of salt
Instructions:
- Prepare the Dry Ingredients: In a medium bowl, sift together the powdered sugar and almond flour. This will guarantee a smooth macaron shell. Add the ground nutmeg and cinnamon, and mix well to incorporate the spices into the dry ingredients.
- Make the Meringue: In a separate large bowl, beat the egg whites on medium speed until foamy. Add the cream of tartar and gradually increase the speed to high. Slowly add the granulated sugar, beating until stiff peaks form and the meringue is glossy.
- Macaronage: Carefully fold the dry ingredients into the meringue in three additions, using a spatula. Gently fold and mix until the batter flows like lava when the spatula is lifted, being careful not to overmix.
- Pipe the Macarons: Transfer the batter into a piping bag fitted with a round tip. Pipe 1-inch circles onto a baking sheet lined with parchment paper, spacing them about 1 inch apart. Tap the baking sheet on the counter to release any air bubbles. Allow them to sit at room temperature for 30-45 minutes until a skin forms on the surface.
- Bake the Shells: Preheat the oven to 300°F (150°C). Bake the macarons for 15-18 minutes, or until they can be easily lifted from the parchment paper. Allow them to cool completely on the baking sheet.
- Prepare the Filling: In a mixing bowl, beat the softened butter until creamy. Gradually add the confectioners’ sugar and beat until light and fluffy. Mix in the eggnog, vanilla extract, and a pinch of salt until well combined and smooth.
- Assemble the Macarons: Once the shells have cooled completely, pair them by size. Pipe a small amount of eggnog buttercream onto the flat side of one shell, then gently press another shell on top to create a sandwich.
- Let Them Mature: For the best flavor, refrigerate the assembled macarons for at least 24 hours before serving. Allow them to come to room temperature before enjoying.
Extra Tips:
When making macarons, precision is key, so weigh your ingredients carefully for the best results. If you’re new to macarons, practice patience with the macaronage process to get the right consistency.
Additionally, consider using a silicon macaron mat to guarantee even sizes and uniform baking. If you find your macarons sticking to the parchment after baking, they may need a bit more time in the oven.
Finally, don’t rush the resting period before baking; it’s essential for developing the smooth, shiny top surface typical of a well-made macaron.
Almond Snowball Cookies
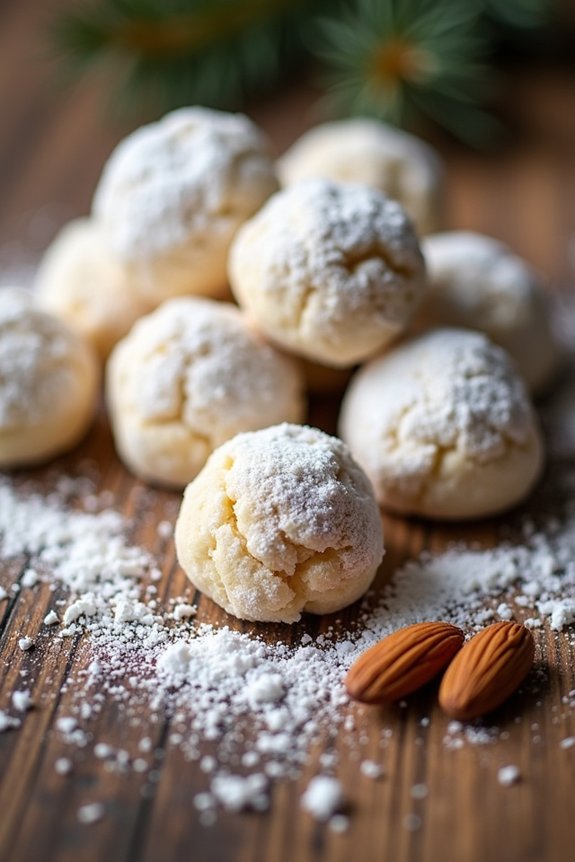
Almond Snowball Cookies are the epitome of holiday cheer, offering a delightful melt-in-your-mouth experience with each bite. These cookies, dusted with a generous coating of powdered sugar, resemble little snowballs, making them the perfect addition to any festive dessert table. Not only do they look stunning on a holiday platter, but their nutty almond flavor combined with the delicate texture makes them a favorite among cookie enthusiasts.
Their simplicity is part of their charm; these cookies require just a handful of ingredients and minimal preparation time. They’re perfect for baking with family and friends, creating memories that will last a lifetime. Whether you’re a seasoned baker or a novice in the kitchen, Almond Snowball Cookies are an approachable recipe that delivers a beautiful presentation and exquisite taste.
Ingredients (serves 4-6):
- 1 cup unsalted butter, softened
- 1/2 cup powdered sugar (for dough)
- 1 teaspoon vanilla extract
- 2 cups all-purpose flour
- 1 cup finely ground almonds
- 1/4 teaspoon salt
- 1 cup powdered sugar (for dusting)
Instructions:
1. Prepare the Dough:
Begin by preheating your oven to 350°F (175°C). In a large mixing bowl, cream the softened butter and 1/2 cup of powdered sugar together until the mixture is light and fluffy. This should take about 3-5 minutes using an electric mixer on medium speed. Add the vanilla extract and mix until well combined.
2. Combine Dry Ingredients:
In a separate bowl, whisk together the all-purpose flour, finely ground almonds, and salt. Gradually add this dry mixture to the creamed butter and sugar mixture. Mix on low speed until the dough comes together and is thoroughly combined. The dough should be soft but not sticky.
3. Shape and Bake:
Roll the dough into 1-inch balls and place them on a baking sheet lined with parchment paper, spacing them about 1 inch apart. Bake in the preheated oven for 15-18 minutes or until the edges are just beginning to turn golden. The tops of the cookies should remain pale.
4. Coat with Sugar:
Once baked, remove the cookies from the oven and allow them to cool slightly on the baking sheet for about 5 minutes. While the cookies are still warm, roll them gently in the additional cup of powdered sugar until fully coated. Transfer the sugar-coated cookies to a wire rack to cool completely.
Extra Tips:
For the best results, make sure the butter is at room temperature to achieve that perfect creamy texture when mixing with the sugar. If you prefer a more pronounced almond flavor, consider adding a few drops of almond extract along with the vanilla.
It’s also essential to handle the dough gently to maintain its tender texture; overworking the dough can result in denser cookies. For a festive touch, you can mix a tiny bit of edible glitter with the powdered sugar to give the snowballs an extra sparkle.
Christmas Tree Meringue Pops
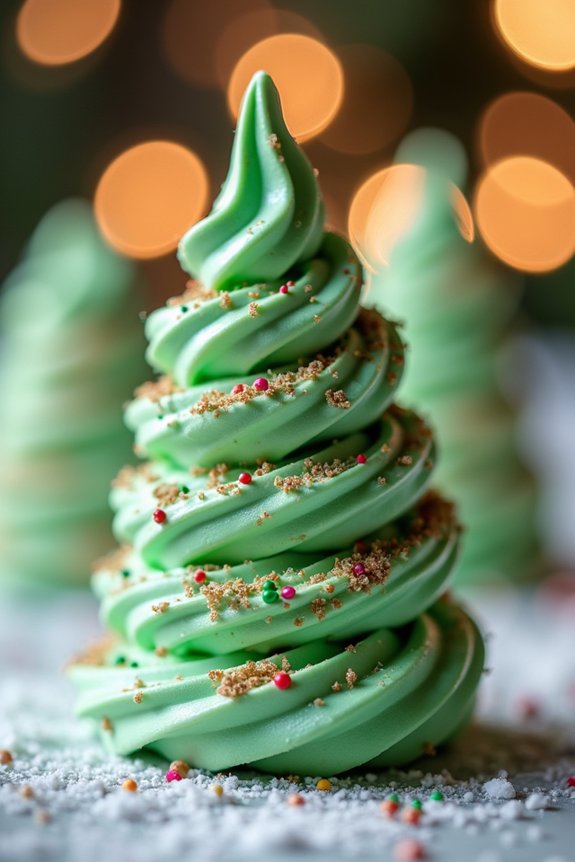
Celebrate the festive season with these delightful Christmas Tree Meringue Pops, a whimsical treat that brings together the charm of holiday décor and the sweetness of meringue. These pops are light, airy, and melt-in-your-mouth delicious, making them a perfect addition to your holiday dessert table. Their vibrant green color and decorative sprinkles capture the essence of Christmas, making them not only a treat for your taste buds but also a feast for your eyes.
Crafting these pops is a simple and enjoyable process that even beginners can perfect. With just a few ingredients and a bit of creativity, you can create a batch of these joyful meringue trees to share with family and friends. Whether you use them as a centerpiece for your dessert spread or as a fun activity for a holiday gathering, these Christmas Tree Meringue Pops are sure to bring a touch of whimsy and delight to your festivities.
Ingredients (Serving Size: 4-6 people):
- 4 large egg whites
- 1 cup granulated sugar
- 1/4 teaspoon cream of tartar
- Green gel food coloring
- 1/2 teaspoon vanilla extract
- Assorted sprinkles or edible stars for decoration
- Lollipop sticks
Instructions:
- Preheat the Oven: Begin by preheating your oven to 200°F (93°C). Line two baking sheets with parchment paper. This low temperature will guarantee your meringues dry out perfectly without browning.
- Prepare the Meringue: In a clean, dry mixing bowl, combine the egg whites and cream of tartar. Beat with an electric mixer on medium speed until soft peaks form. This process adds stability to the meringue.
- Add Sugar: Gradually add the granulated sugar, one tablespoon at a time, while continuing to beat the mixture. Increase the mixer speed to high, and beat until stiff peaks form and the meringue mixture is glossy. This should take about 5-7 minutes.
- Color and Flavor: Add a few drops of green gel food coloring and the vanilla extract, then gently fold them into the meringue with a spatula until evenly mixed. Be careful not to deflate the meringue.
- Pipe the Meringues: Fit a piping bag with a large star tip and fill it with the meringue mixture. Pipe tree shapes onto the prepared baking sheets by starting with a large base and spiraling upward to create a tree shape. Insert a lollipop stick into the base of each tree.
- Decorate: Sprinkle your meringue trees with assorted sprinkles or edible stars to resemble ornaments and lights on a Christmas tree.
- Bake the Meringues: Place the baking sheets in the preheated oven and bake for 1.5 to 2 hours, or until the meringues are dry to the touch and can easily be lifted off the parchment paper. Turn off the oven and let the meringues cool inside to guarantee they’re completely dry.
- Serve and Enjoy: Once cooled, your Christmas Tree Meringue Pops are ready to be enjoyed. Arrange them in a decorative manner or wrap them individually as gifts.
Extra Tips:
To achieve the best meringue consistency, make sure that your mixing bowl and beaters are completely clean and free of any grease, as this can prevent the egg whites from whipping properly.
If you don’t have a piping bag, you can use a plastic sandwich bag with a corner snipped off. Be careful not to over-color your meringue, as a little gel food coloring goes a long way.
Additionally, store the finished meringue pops in an airtight container if you’re not serving them immediately to maintain their crisp texture.
Candy Cane Brownie Bites
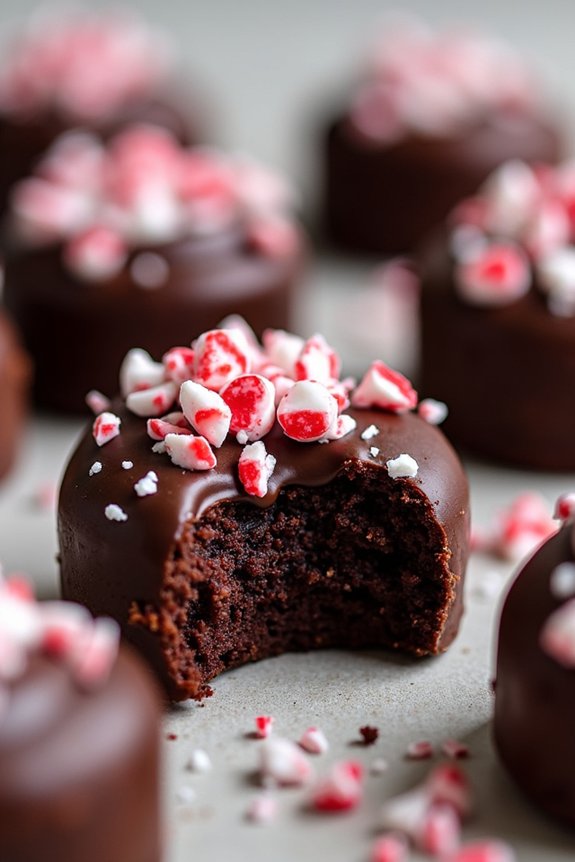
Candy Cane Brownie Bites are a festive twist on classic brownies, perfect for adding a touch of holiday magic to your dessert table. These bite-sized treats aren’t only visually appealing but also pack a delightful combination of rich chocolate and invigorating peppermint flavors. The brownie base is dense and fudgy, providing a perfect contrast to the crunchy, minty candy cane pieces sprinkled on top. This recipe is sure to impress both kids and adults alike, making it an ideal choice for Christmas gatherings.
These delightful bites are easy to prepare and can be made in advance, allowing you to focus on other holiday preparations. The recipe yields enough for 4-6 people, making it a great option for small parties or family gatherings. With minimal ingredients and straightforward steps, even novice bakers can achieve impressive results. Let’s plunge into the ingredients and instructions to create these beautiful holiday treats.
Ingredients (Serves 4-6):
- 1/2 cup (1 stick) unsalted butter
- 1 cup granulated sugar
- 2 large eggs
- 1 teaspoon vanilla extract
- 1/3 cup unsweetened cocoa powder
- 1/2 cup all-purpose flour
- 1/4 teaspoon salt
- 1/4 teaspoon baking powder
- 1/2 cup crushed candy canes
- Additional crushed candy canes for topping
Instructions:
- Preheat and Prep: Preheat your oven to 350°F (175°C). Line a mini muffin tin with paper liners or grease with cooking spray to prevent sticking.
- Melt the Butter: In a medium saucepan, melt the butter over low heat. Once melted, remove from heat and stir in the sugar until well combined.
- Mix Wet Ingredients: Add the eggs one at a time, beating well after each addition. Stir in the vanilla extract until the mixture is smooth and well blended.
- Combine Dry Ingredients: In a separate bowl, whisk together the cocoa powder, flour, salt, and baking powder. Gradually add this dry mixture to the wet ingredients, stirring until just combined.
- Fold in Candy Canes: Gently fold in the crushed candy canes, ensuring they’re evenly distributed throughout the batter.
- Fill the Muffin Tin: Spoon the batter into the prepared mini muffin tin, filling each cup about 3/4 full.
- Bake: Place the muffin tin in the preheated oven and bake for 12-15 minutes, or until a toothpick inserted into the center of a brownie bite comes out mostly clean.
- Cool and Decorate: Let the brownie bites cool in the tin for a few minutes before transferring them to a wire rack. While still warm, sprinkle additional crushed candy canes on top for a festive touch.
Extra Tips:
For a more pronounced peppermint flavor, consider adding a few drops of peppermint extract to the batter. Be cautious with the amount, as peppermint can easily overpower other flavors.
When crushing the candy canes, try to achieve a mix of fine crumbs and small chunks to add texture and visual appeal to the brownie bites.
To prevent the candy canes from melting too much during baking, add them just before serving or after the brownies have cooled slightly.
These brownie bites can be stored in an airtight container for up to three days, making them a convenient make-ahead treat for your holiday festivities.
Iced Cinnamon Star Cookies
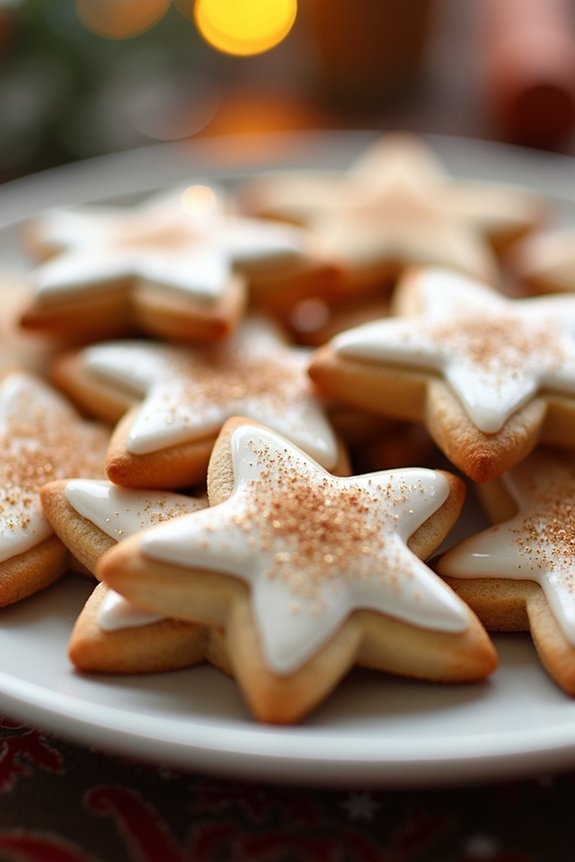
Perfect for serving 4-6 people, these cookies require some patience and precision, ensuring the end result is as stunning as it’s delicious. The combination of a crisp, cinnamon-infused base and the smooth, sweet icing makes them irresistible to both children and adults alike.
Whether you’re an experienced baker or a novice, this recipe is designed to bring a little culinary magic to your Christmas festivities.
Ingredients:
- 2 cups all-purpose flour
- 1 cup granulated sugar
- 1/2 cup unsalted butter, softened
- 1 large egg
- 1 teaspoon vanilla extract
- 1 tablespoon ground cinnamon
- 1/2 teaspoon baking powder
- 1/4 teaspoon salt
- 2 cups powdered sugar
- 3-4 tablespoons milk
- 1 teaspoon almond extract (optional)
- Food coloring (optional)
Cooking Instructions:
- Prepare the Dough: In a large mixing bowl, cream together the softened butter and granulated sugar until light and fluffy. Add in the egg and vanilla extract, mixing until well combined.
- Combine Dry Ingredients: In a separate bowl, whisk together the flour, ground cinnamon, baking powder, and salt. Gradually add the dry mixture to the wet ingredients, mixing until a smooth dough forms.
- Chill the Dough: Wrap the dough in plastic wrap and refrigerate for at least 1 hour. This allows the dough to firm up, making it easier to roll out and cut.
- Preheat and Roll Out: Preheat your oven to 350°F (175°C). Once chilled, remove the dough from the refrigerator and roll it out on a lightly floured surface to about 1/4-inch thickness.
- Cut and Bake: Use a star-shaped cookie cutter to cut out cookies and place them on a baking sheet lined with parchment paper. Bake for 8-10 minutes, or until the edges are just starting to turn golden. Allow to cool completely on a wire rack.
- Make the Icing: In a small bowl, combine the powdered sugar, milk, and almond extract (if using). Stir until smooth, adding more milk if necessary to reach a spreadable consistency. For colored icing, divide and add a few drops of food coloring to each portion.
- Decorate the Cookies: Once the cookies are completely cool, use a small spatula or piping bag to spread or drizzle the icing over each star. Allow the icing to set before serving or storing.
Extra Tips: When rolling out the dough, make sure your surface and rolling pin are well-floured to prevent sticking. If you find the dough becoming too soft as you work, return it to the fridge for a few minutes to firm up.
For an extra touch of holiday spirit, consider adding edible glitter or sprinkles to the icing before it sets. Additionally, these cookies can be stored in an airtight container for up to a week, making them a convenient make-ahead option for holiday celebrations.
Festive Fruitcake Trifle
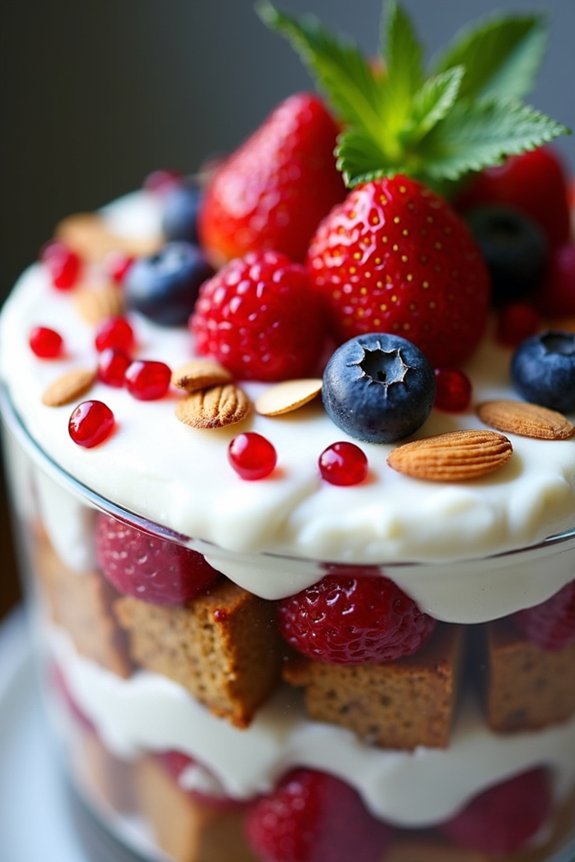
Festive Fruitcake Trifle is a delightful and vibrant dessert that brings together the traditional flavors of fruitcake with the elegance and ease of a trifle. This dish is perfect for those who enjoy the rich and spiced nature of fruitcake but want a lighter and more visually appealing way to serve it during Christmas celebrations.
The combination of moist fruitcake, creamy layers, and fresh fruit creates a balance of textures and flavors that’s certain to impress your guests.
Preparing a Festive Fruitcake Trifle is an enjoyable experience, allowing for creativity and personalization. You can prepare it ahead of time, making it a convenient choice for busy holiday gatherings. The trifle’s layers are visually stunning, showcasing the vibrant colors of fresh fruits, the lushness of cream, and the richness of the fruitcake. This recipe serves 4-6 people, making it ideal for small to medium-sized gatherings.
Ingredients for Festive Fruitcake Trifle:
- 1 pound fruitcake, cut into 1-inch cubes
- 2 cups heavy cream
- 2 tablespoons powdered sugar
- 1 teaspoon vanilla extract
- 1/3 cup orange liqueur (optional)
- 2 cups mixed fresh berries (such as strawberries, raspberries, and blueberries)
- 1/2 cup pomegranate seeds
- 1/4 cup sliced almonds
- Fresh mint leaves for garnish
Instructions:
- Prepare the Fruitcake Base: Begin by cutting the fruitcake into 1-inch cubes. If desired, sprinkle the cubes with orange liqueur for added flavor and moisture. Allow them to soak for about 10 minutes to absorb the liqueur.
- Whip the Cream: In a large mixing bowl, combine the heavy cream, powdered sugar, and vanilla extract. Use an electric mixer to whip the cream until soft peaks form. Be careful not to overwhip, as you want the cream to be smooth and fluffy.
- Assemble the Trifle Layers: In a large trifle dish or individual serving glasses, start by placing a layer of fruitcake cubes at the bottom. Follow with a layer of whipped cream, spreading it evenly over the fruitcake. Add a layer of mixed berries, using a combination of your favorite selections.
- Repeat the Layers: Continue layering with more fruitcake cubes, whipped cream, and berries until you reach the top of the dish or glass. Make sure the top layer is a generous amount of whipped cream.
- Add Final Touches: Sprinkle the top of the trifle with pomegranate seeds and sliced almonds for added texture and flavor. Garnish with fresh mint leaves to enhance the trifle’s aesthetic appeal.
- Chill and Serve: Cover the trifle with plastic wrap and refrigerate for at least 2 hours before serving. This allows the flavors to meld and the dessert to firm up slightly.
Extra Tips:
When making the Festive Fruitcake Trifle, feel free to customize it with your favorite fruits or nuts. If you prefer a non-alcoholic version, simply omit the orange liqueur or replace it with a splash of orange juice.
For a more festive touch, consider adding a sprinkle of edible gold dust or glitter to the top layer. Ascertain that the fruitcake you use is fresh and moist, as this will greatly enhance the overall texture of the trifle.
This dessert can be prepared a day in advance, making it a stress-free option for holiday entertaining.