

There’s something magical about decorating sugar cookies for the holidays.
With designs ranging from intricate snowflakes to charming gingerbread men, these ideas will make your treats truly special.
Think of it as painting with icing, adding a personal touch to each cookie.
From shimmering icicle patterns to cheerful Santa Claus faces, these festive designs are sure to bring joy to your gatherings.
Ready to add some sparkle to your cookie tray?
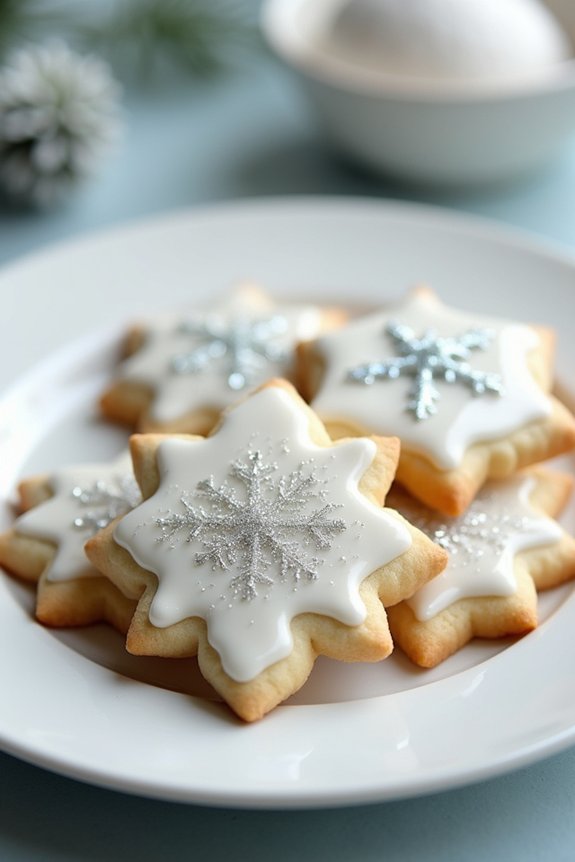
Classic Snowflake Elegance
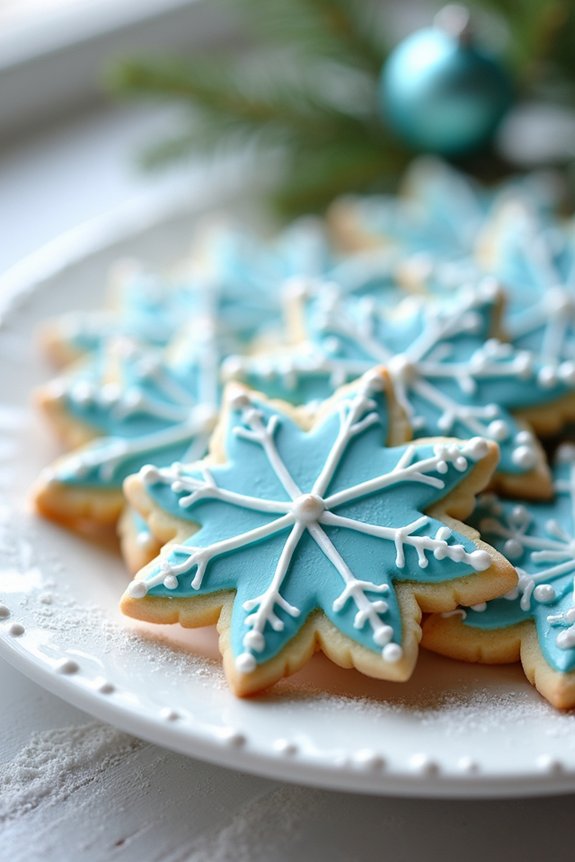
Indulge in the timeless tradition of holiday baking with these Classic Snowflake Elegance Sugar Cookies. These delightful treats aren’t only a joy to bake but also to decorate, allowing you to showcase your creativity and spread festive cheer.
The delicate patterns of the snowflake designs capture the essence of winter, making them perfect for gifts, gatherings, or simply enjoying with a cup of hot cocoa. The balance of buttery sweetness and the intricate beauty of the icing will enchant both the young and the young at heart.
To create these charming cookies, start with a classic sugar cookie dough that provides a sturdy yet tender canvas for your snowflake designs. The icing, a simple royal icing, is the key to achieving those fine, elegant details. With a serving size of 4-6 people, this recipe yields a batch of cookies that aren’t only visually stunning but also deliciously satisfying.
Gather your supplies and let your imagination guide you in crafting snowflakes that are as unique as the ones that fall from the sky.
Ingredients:
- 2 ¾ cups all-purpose flour
- 1 teaspoon baking powder
- ½ teaspoon salt
- 1 cup unsalted butter, softened
- 1 ½ cups granulated sugar
- 1 large egg
- 2 teaspoons pure vanilla extract
- ¼ teaspoon almond extract
- Royal icing (made from 3 cups powdered sugar, 2 tablespoons meringue powder, and 5-6 tablespoons water)
- Blue and white gel food coloring
- Edible silver pearls or glitter (optional)
Cooking Instructions:
- Prepare the Dough: In a medium bowl, whisk together the flour, baking powder, and salt. In a large bowl, beat the softened butter and granulated sugar until light and fluffy. Mix in the egg, vanilla extract, and almond extract until well combined. Gradually add the dry ingredients to the wet ingredients, mixing until a dough forms.
- Chill the Dough: Divide the dough in half, flatten each half into a disk, and wrap in plastic wrap. Refrigerate for at least 1 hour or until firm.
- Roll and Cut: Preheat the oven to 350°F (175°C) and line baking sheets with parchment paper. Roll out one disk of dough on a lightly floured surface to about ¼ inch thickness. Cut into snowflake shapes using cookie cutters and place on prepared baking sheets.
- Bake the Cookies: Bake in the preheated oven for 8-10 minutes, or until the edges are lightly golden. Allow the cookies to cool on the baking sheet for a few minutes before transferring to a wire rack to cool completely.
- Prepare the Royal Icing: In a large mixing bowl, combine the powdered sugar, meringue powder, and water. Beat until the mixture is smooth and glossy, and forms stiff peaks. Divide the icing into bowls, tinting one with blue food coloring and leaving the other white.
- Decorate the Cookies: Fit piping bags with fine tips and fill with the prepared royal icing. Use the white icing to outline and fill the snowflake designs on the cookies. Add details using the blue icing, and, if desired, embellish with edible silver pearls or glitter for added elegance.
- Let the Icing Set: Allow the decorated cookies to dry completely at room temperature, which may take several hours or overnight, before serving or packaging.
Extra Tips:
For the best results in decorating your Classic Snowflake Elegance Sugar Cookies, confirm that your royal icing is at the correct consistency for both flooding and detailing.
If the icing is too thick, add a few drops of water to thin it out; if too thin, add more powdered sugar. Practice your icing technique on parchment paper before decorating the cookies to gain confidence in your designs.
Additionally, keeping a damp cloth over your piping tips will prevent the icing from hardening while you work. Enjoy the process and let each cookie be a unique expression of winter wonder!
Whimsical Winter Wonderland
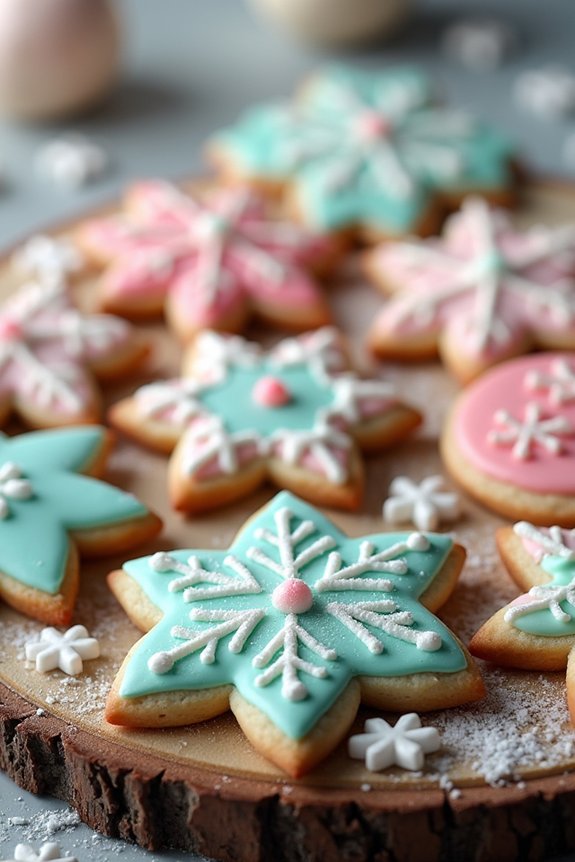
Step into a frosty fantasy with these Whimsical Winter Wonderland Sugar Cookies. These delightful treats are perfect for indulging your creative side while celebrating the beauty of the winter season. The sugar cookies form a perfect canvas for snowy scenes, glittering snowflakes, and adorable winter creatures, making them not just a treat for the taste buds, but also a feast for the eyes.
Whether you’re decorating cookies for a holiday gathering or a cozy night in, these cookies are bound to bring a touch of magic to your winter festivities.
To create these enchanting cookies, you’ll start with a classic sugar cookie base, known for its sweet, buttery flavor and sturdy texture, perfect for decorating. Once baked and cooled, let your imagination run wild with royal icing and a variety of edible decorations. From shimmering edible glitter to tiny candy snowmen, the possibilities are endless.
Gather your friends or family for a fun-filled decorating session, and enjoy these whimsical creations with a mug of hot cocoa or a glass of cold milk.
Ingredients (Serves 4-6)
- 2 ¾ cups all-purpose flour
- 1 teaspoon baking soda
- ½ teaspoon baking powder
- 1 cup unsalted butter, softened
- 1 ½ cups granulated sugar
- 1 large egg
- 1 teaspoon vanilla extract
- ½ teaspoon almond extract
- 3 cups powdered sugar
- 3 tablespoons meringue powder
- 5-6 tablespoons water
- Food coloring (optional)
- Edible glitter, candy snowflakes, and other decorations
Cooking Instructions
- Prepare the Dough: In a medium bowl, whisk together the flour, baking soda, and baking powder. In a large bowl, cream the softened butter and granulated sugar together until light and fluffy. Beat in the egg, vanilla extract, and almond extract. Gradually add the dry ingredients to the wet ingredients, mixing until a dough forms.
- Chill the Dough: Divide the dough in half, shape into discs, and wrap each in plastic wrap. Refrigerate for at least 1 hour to allow the dough to firm up.
- Preheat and Prepare: Preheat your oven to 350°F (175°C). Line two baking sheets with parchment paper.
- Roll and Cut: Remove the dough from the refrigerator and roll out on a lightly floured surface to about ¼ inch thickness. Use winter-themed cookie cutters (such as snowflakes, mittens, or snowmen) to cut out shapes. Place them on the prepared baking sheets.
- Bake the Cookies: Bake in the preheated oven for 8-10 minutes, or until the edges are just starting to turn golden brown. Allow the cookies to cool on the baking sheet for 5 minutes before transferring to a wire rack to cool completely.
- Make the Royal Icing: In a large bowl, combine powdered sugar and meringue powder. Gradually add water, mixing on low speed until the icing is spreadable. Divide into bowls and add food coloring if desired.
- Decorate: Use the royal icing to decorate the cookies. Start with a base layer of icing and add details using more icing and various decorations such as edible glitter and candy snowflakes. Let the icing set for several hours or overnight.
Extra Tips
For best results, verify your butter is softened, not melted, to achieve the right cookie texture. When rolling out the dough, sprinkle flour on both the rolling pin and the surface to prevent sticking.
If you find your icing is too thick, add a bit more water a teaspoon at a time until you reach the desired consistency. Allow plenty of time for the decorated cookies to dry completely before stacking or storing them.
These cookies are also lovely as gifts, so consider wrapping them in cellophane bags tied with a festive ribbon for a special wintery gift.
Festive Candy Cane Stripes
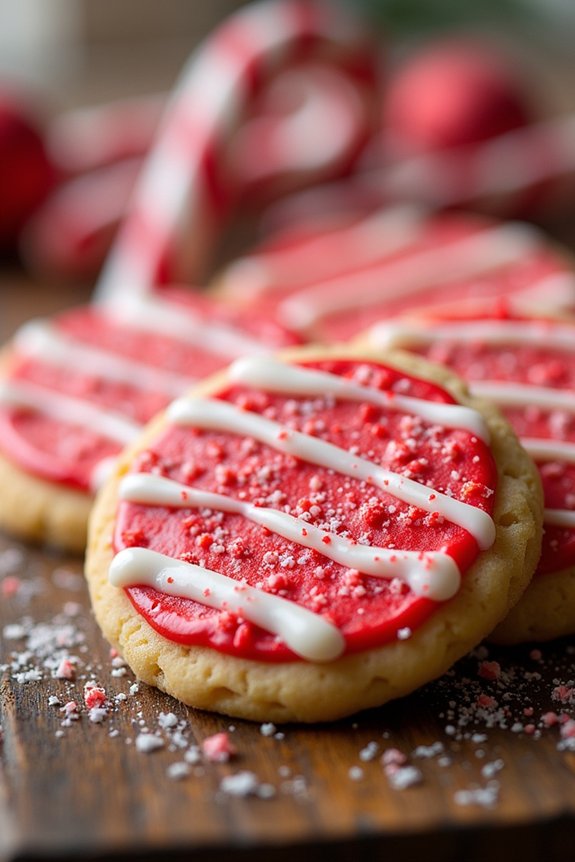
Get ready to transform your ordinary sugar cookies into a festive treat with these delightful Candy Cane Stripes! This decorating idea is perfect for the holiday season, adding a splash of color and a touch of whimsy to your dessert table. The combination of crisp, buttery sugar cookies and the vibrant candy cane stripes will surely make them a favorite among family and friends.
This decoration technique is simple enough for beginners, yet impressive enough to delight even the most discerning cookie connoisseurs. The following recipe will yield enough cookies to serve 4-6 people, making it ideal for small gatherings or as a sweet treat to share. Gather your ingredients and follow these instructions to create cookies that are as beautiful as they’re delicious.
Ingredients for Festive Candy Cane Stripes Sugar Cookies:
- 2 3/4 cups all-purpose flour
- 1 teaspoon baking soda
- 1/2 teaspoon baking powder
- 1 cup unsalted butter, softened
- 1 1/2 cups white sugar
- 1 egg
- 1 teaspoon vanilla extract
- 1/2 teaspoon almond extract
- Red food coloring gel
- White royal icing
- Piping bags with small round tips
- Optional: edible glitter or sprinkles
Cooking Instructions:
- Prepare the Dough: Preheat your oven to 350°F (175°C). In a medium bowl, whisk together the flour, baking soda, and baking powder. In a separate large bowl, cream the softened butter and sugar together until light and fluffy. Beat in the egg, vanilla extract, and almond extract until well combined. Gradually blend in the dry ingredients to form a soft dough.
- Rolling and Cutting: Lightly flour a flat surface and roll out the dough to about 1/4 inch thickness. Use cookie cutters to cut out shapes of your choice, then place them on a baking sheet lined with parchment paper.
- Baking the Cookies: Bake the cookies in the preheated oven for 8 to 10 minutes, or until the edges are lightly golden. Remove from the oven and allow them to cool on the baking sheet for 5 minutes before transferring to a wire rack to cool completely.
- Preparing the Icing: While the cookies cool, prepare the white royal icing according to your preferred recipe or package instructions. Divide the icing into two bowls, leaving one white and tinting the other with red food coloring gel to achieve a bright, festive red.
- Decorating with Stripes: Fill two piping bags with the red and white icings. Use the small round tips to pipe alternating red and white stripes across each cookie, mimicking the look of a candy cane. For a more polished look, follow the natural curve of the cookie shape.
- Finishing Touches: Let the icing set and harden completely. If desired, add a sprinkle of edible glitter or sprinkles on top for an extra festive touch.
Extra Tips:
When adding the red food coloring gel, start with a small amount and gradually add more to achieve the desired shade of red. Remember that the color will deepen as it sets.
Confirm that your cookies are completely cool before decorating, as warm cookies will cause the icing to melt and run.
If you’re new to piping, practice on a piece of parchment paper before starting on your cookies. This will help you gain confidence and control over the icing flow, resulting in cleaner, more precise stripes.
Enjoy your beautifully decorated Festive Candy Cane Stripes Sugar Cookies!
Charming Gingerbread Men

Charming Gingerbread Men are a delightful addition to any holiday cookie platter, combining the classic appeal of gingerbread with a whimsical twist. These cookies aren’t only fun to make but also offer endless opportunities for creativity in decoration.
Whether you’re crafting them for a family gathering, a festive event, or simply to enjoy at home, these cookies are sure to bring smiles to all who encounter them.
The recipe for Charming Gingerbread Men is perfect for a serving size of 4-6 people, making about 20-24 cookies depending on their size. The dough is infused with warm spices and molasses, creating a rich and flavorful base that pairs perfectly with royal icing and other decorative elements.
Preparing these cookies is a wonderful activity for kids and adults alike, as everyone can get involved in rolling, cutting, and decorating their gingerbread characters.
Ingredients:
- 3 cups all-purpose flour
- 3/4 cup packed brown sugar
- 3/4 cup unsalted butter, softened
- 1/2 cup molasses
- 1 large egg
- 1 teaspoon baking soda
- 1 tablespoon ground ginger
- 1 tablespoon ground cinnamon
- 1/2 teaspoon ground cloves
- 1/2 teaspoon ground nutmeg
- 1/2 teaspoon salt
- Royal icing (for decoration)
- Assorted candies and sprinkles (for decoration)
Instructions:
1. Prepare the Dough: In a large mixing bowl, cream together the butter and brown sugar until light and fluffy. Add the molasses and egg, mixing until well combined.
In a separate bowl, whisk together the flour, baking soda, ginger, cinnamon, cloves, nutmeg, and salt.
2. Combine Ingredients: Gradually add the dry ingredients to the wet mixture, stirring until a smooth dough forms. Divide the dough into two equal parts, wrap in plastic wrap, and refrigerate for at least 1 hour to firm up.
3. Roll Out the Dough: Preheat the oven to 350°F (175°C). On a lightly floured surface, roll out one portion of dough to about 1/4-inch thickness. Use gingerbread man cookie cutters to cut out shapes and place them on a baking sheet lined with parchment paper.
4. Bake the Cookies: Bake for 8-10 minutes or until the edges are firm. Let the cookies cool on the baking sheet for 5 minutes before transferring them to a wire rack to cool completely.
5. Decorate the Cookies: Once cooled, use royal icing to pipe outlines and features on the gingerbread men. Get creative by adding candies, sprinkles, and any other embellishments to bring your gingerbread characters to life.
Extra Tips:
For the best results, make certain the dough is well chilled before rolling it out, as this prevents sticking and makes for easier handling.
When decorating, use piping bags fitted with a small round tip for precision, and let each layer of icing dry before adding another to avoid smudging.
If you want to add a little sparkle, consider using edible glitter or luster dust on the icing. Enjoy the process, and remember, the more unique your gingerbread men, the more charming they’ll be!
Dazzling Christmas Tree Ornaments

Dazzling Christmas Tree Ornaments are a delightful way to celebrate the holiday season with a sweet twist. These sugar cookies, decorated to resemble sparkling ornaments, are both a treat for the eyes and the taste buds. Perfect for holiday gatherings, they can be hung on the tree or displayed as a centerpiece. The buttery, crisp texture of the sugar cookies pairs wonderfully with the royal icing, which can be colored and designed to your heart’s content. This recipe will guide you through creating stunning ornaments that are almost too beautiful to eat, making enough to serve 4-6 people.
Creating these Dazzling Christmas Tree Ornaments isn’t only a fun activity but also allows you to express your creativity. With a simple sugar cookie base, you can experiment with different shapes, colors, and decorations. Whether you’re a novice baker or a seasoned pro, this recipe provides a canvas for you to create your very own edible works of art. The key is to take your time, enjoy the process, and let your imagination run wild.
Ingredients:
- 2 3/4 cups all-purpose flour
- 1 teaspoon baking soda
- 1/2 teaspoon baking powder
- 1 cup unsalted butter, softened
- 1 1/2 cups granulated sugar
- 1 egg
- 1 teaspoon vanilla extract
- 1/2 teaspoon almond extract
- 3-4 cups royal icing
- Food coloring (various colors)
- Edible glitter and sprinkles (optional)
- Ribbon or string (for hanging)
Cooking Instructions:
- Prepare the Dough: In a medium bowl, whisk together the flour, baking soda, and baking powder. In a large bowl, cream the butter and sugar until light and fluffy. Beat in the egg, vanilla extract, and almond extract. Gradually blend in the dry ingredients until well combined.
- Chill the Dough: Divide the dough in half, flatten into discs, and wrap in plastic wrap. Chill in the refrigerator for at least 1 hour.
- Preheat the Oven: Preheat your oven to 350°F (175°C). Line baking sheets with parchment paper.
- Roll Out the Dough: On a floured surface, roll out one disc of dough to about 1/4 inch thickness. Use ornament-shaped cookie cutters to cut out shapes. Place them on the prepared baking sheets about 1 inch apart.
- Bake the Cookies: Bake in the preheated oven for 8-10 minutes, or until the edges are lightly golden. Allow cookies to cool on the baking sheet for 5 minutes before transferring to a wire rack to cool completely.
- Decorate the Cookies: Divide royal icing into separate bowls and tint with desired food coloring. Use a piping bag or a small spatula to apply the icing onto the cooled cookies. Add edible glitter, sprinkles, or any other decorative toppings while the icing is still wet.
- Dry and String: Allow the icing to dry completely. Once dry, use a skewer to make a small hole near the top of each cookie and thread a ribbon or string through for hanging.
Extra Tips:
When making Dazzling Christmas Tree Ornaments, it’s important to guarantee that the cookies are completely cooled before icing to prevent the icing from melting. If you’re new to using royal icing, practice your designs on a piece of parchment paper first.
Also, try using a toothpick to create intricate designs or to drag colors together for a marbled effect. For an added touch of elegance, consider using metallic edible paint to highlight certain areas of your design.
Playful Reindeer Faces

Transform your ordinary sugar cookies into delightful, festive treats with playful reindeer faces that are bound to bring a smile to anyone’s face. These charming cookies are perfect for holiday gatherings, cookie exchanges, or simply enjoying with a cup of hot cocoa. With a little bit of creativity and some simple decorating techniques, you can create adorable reindeer faces that will be the highlight of your holiday cookie platter.
To start, you’ll need a batch of your favorite sugar cookie dough, which can be homemade or store-bought, depending on your preference. The key to making these cookies stand out is in the decoration. Using basic ingredients like icing, pretzels, and chocolate candies, you can create reindeer faces that are both cute and delicious. This recipe is designed to make 4-6 servings, perfect for sharing with family and friends during the festive season.
Ingredients:
- 2 cups all-purpose flour
- 1/2 teaspoon baking powder
- 1/4 teaspoon salt
- 1/2 cup unsalted butter, softened
- 3/4 cup granulated sugar
- 1 large egg
- 1 teaspoon vanilla extract
- 1/2 teaspoon almond extract (optional)
- Pretzels (for antlers)
- Mini chocolate chips or chocolate candies (for eyes)
- Red or brown candy-coated chocolates (for noses)
- 1 cup royal icing
- Food coloring (optional, for icing)
Instructions:
- Prepare the Dough: In a medium bowl, whisk together the flour, baking powder, and salt. In a separate large bowl, cream the softened butter and sugar together until light and fluffy. Beat in the egg, vanilla extract, and almond extract until well combined.
- Combine Ingredients: Gradually add the dry ingredients to the wet ingredients, mixing until fully incorporated. Form the dough into a disk, wrap it in plastic wrap, and refrigerate for at least 1 hour to chill.
- Preheat and Roll Out: Preheat your oven to 350°F (175°C). On a lightly floured surface, roll out the dough to about 1/4 inch thickness. Use a round cookie cutter to cut out circles and place them on a baking sheet lined with parchment paper.
- Bake the Cookies: Bake in the preheated oven for 8-10 minutes, or until the edges are lightly golden. Remove from the oven and let the cookies cool on the baking sheet for a few minutes before transferring them to a wire rack to cool completely.
- Decorate the Cookies: Once the cookies are cool, prepare your royal icing according to the package instructions or your own recipe. Use food coloring to tint the icing if desired. Pipe a small amount of icing on the back of each pretzel and attach two pretzels to the top of each cookie as antlers.
- Add the Features: Using the royal icing, pipe two small dots where the eyes will go and press on mini chocolate chips or chocolate candies. Pipe another dot for the nose and add a red or brown candy-coated chocolate.
- Set the Icing: Allow the icing to set completely before serving. This may take an hour or two, depending on the humidity.
Extra Tips:
For the best results when decorating, verify your cookies are completely cooled before adding the icing and decorations. If you want to add some extra flair, consider using edible glitter or colored sugar to give your reindeer a festive sparkle.
You can also experiment with different shapes for the antlers by breaking the pretzels into various sizes. To make the decorating process easier, transfer your icing into a piping bag or a squeeze bottle for more precise application. Enjoy creating these playful reindeer faces with family and friends for a fun and festive holiday activity!
Sparkling Starry Night

The Sparkling Starry Night sugar cookies are a delightful treat that combines the classic taste of sugar cookies with a visually stunning decoration inspired by a starry night sky. These cookies are perfect for a festive gathering or to add some sparkle to any occasion. The combination of a buttery, sweet cookie base with a rich royal icing and shimmering accents will make these treats the highlight of your dessert spread.
To create these beautiful cookies, you’ll first need to bake a batch of classic sugar cookies. Once your cookies are cooled, you’ll use royal icing to create a smooth canvas, then decorate them with edible stars and glitter, mimicking the serene beauty of a night sky. The result isn’t only delicious but also a feast for the eyes, making them an unforgettable treat for both children and adults alike.
Ingredients (Serving Size: 4-6 people):
- 2 1/2 cups all-purpose flour
- 1 cup unsalted butter, softened
- 1 cup granulated sugar
- 1 large egg
- 1 teaspoon vanilla extract
- 1/2 teaspoon almond extract
- 1/2 teaspoon baking powder
- 1/2 teaspoon salt
- 3 cups powdered sugar (for royal icing)
- 2 large egg whites (for royal icing)
- 1/2 teaspoon cream of tartar (for royal icing)
- Edible blue food coloring
- Edible silver glitter
- Edible white and silver star sprinkles
Cooking Instructions:
- Prepare the Dough: In a large mixing bowl, cream together the softened butter and granulated sugar until light and fluffy. Add the egg, vanilla extract, and almond extract, mixing until fully incorporated. In a separate bowl, whisk together the all-purpose flour, baking powder, and salt. Gradually add the dry ingredients to the wet ingredients, mixing until a dough forms.
- Chill the Dough: Divide the dough into two portions, flatten into discs, wrap in plastic wrap, and refrigerate for at least one hour. Chilling the dough helps to prevent spreading during baking.
- Roll and Cut the Cookies: Preheat your oven to 350°F (175°C). Roll out one disc of dough on a lightly floured surface to about 1/4 inch thick. Use star-shaped cookie cutters to cut out cookies, placing them on a baking sheet lined with parchment paper.
- Bake the Cookies: Bake in the preheated oven for 8-10 minutes or until the edges are lightly golden. Remove from the oven and allow to cool on the baking sheet for 5 minutes, then transfer to a wire rack to cool completely.
- Make the Royal Icing: In a large bowl, combine the powdered sugar, egg whites, and cream of tartar. Beat on low speed until the mixture becomes smooth and glossy. Add blue food coloring until you achieve the desired shade of night sky blue.
- Decorate the Cookies: Once the cookies are completely cooled, use a small offset spatula or a piping bag to spread or pipe a thin layer of blue royal icing over the top of each cookie. Immediately sprinkle with edible silver glitter and gently press on the white and silver star sprinkles to create a starry night effect.
- Set and Serve: Allow the icing to set completely at room temperature before serving, which may take 1 to 2 hours.
Extra Tips:
To guarantee a flawless finish for your Sparkling Starry Night cookies, use gel-based food coloring for a rich blue hue that won’t alter the consistency of the icing. If you’re short on time, consider preparing the dough a day in advance to allow for ample chilling time.
For a more pronounced sparkle, lightly spray the cookies with a small amount of edible glitter spray as a final touch. Remember, the key to striking designs is patience during the decorating phase, ensuring each element is carefully placed for maximum visual impact.
Cozy Sweater Patterns
Transform your sugar cookies into adorable cozy sweater patterns for the perfect festive treat. These delightful cookies aren’t only delicious but also provide an opportunity to get creative and crafty in the kitchen. Perfect for a winter gathering or as a charming homemade gift, these cookies are sure to bring warmth and joy to any occasion.
Start by preparing a classic sugar cookie dough, which offers a sturdy yet tender base for your detailed decorations. Once baked, these cookies serve as a blank canvas for your icing artistry. With a few simple tools and ingredients, you can create intricate sweater patterns that mimic cable knits, fair isle designs, or even personalize them with your favorite colors and motifs.
Ingredients (Serves 4-6 people):
- 2 ½ cups all-purpose flour
- 1 teaspoon baking powder
- ½ teaspoon salt
- ¾ cup unsalted butter, softened
- 1 cup granulated sugar
- 1 large egg
- 1 teaspoon vanilla extract
- 1 tablespoon milk
- Royal icing in assorted colors
- Piping bags and assorted piping tips
Cooking Instructions:
- Prepare the Dough: In a medium bowl, whisk together the flour, baking powder, and salt. Set aside. In a large bowl, beat the softened butter and sugar with an electric mixer on medium speed until light and fluffy, about 2 minutes. Add the egg, vanilla extract, and milk, mixing until fully combined. Gradually add the dry ingredients to the wet ingredients, mixing on low speed until a dough forms.
- Chill the Dough: Divide the dough into two portions. Flatten each portion into a disk, wrap in plastic wrap, and refrigerate for at least 1 hour or until firm.
- Roll and Cut the Cookies: Preheat your oven to 350°F (175°C). On a lightly floured surface, roll out the dough to about ¼ inch thickness. Using sweater-shaped cookie cutters, cut out the cookies and place them on a baking sheet lined with parchment paper.
- Bake the Cookies: Bake the cookies in the preheated oven for 8-10 minutes or until the edges are lightly golden. Remove from the oven and let them cool on the baking sheet for 5 minutes before transferring to a wire rack to cool completely.
- Prepare the Icing: While the cookies cool, prepare your royal icing according to the package instructions. Divide the icing into different bowls if using multiple colors, and tint with food coloring as desired.
- Decorate the Cookies: Once the cookies are completely cool, fill your piping bags with the colored icing. Use a small round tip to outline the sweater pattern on each cookie. Let the outline dry for a few minutes before flooding the inside with thinner icing. Use different tips to create patterns such as stripes, dots, or intricate knit designs.
- Set the Decorations: Allow the decorated cookies to dry completely at room temperature, which may take several hours or overnight, before serving or packaging.
Extra Tips:
When decorating your sugar cookies with sweater patterns, it’s helpful to practice your designs on parchment paper before applying them to the cookies. This will help you refine your technique and guarantee consistent patterns.
Additionally, if you don’t have sweater-shaped cookie cutters, you can use a simple rectangle cutter and create your sweater designs by piping the outlines freehand. Remember to keep your piping bags covered with a damp cloth when not in use to prevent the icing from drying out.
Happy decorating!
Elegant Poinsettia Blooms
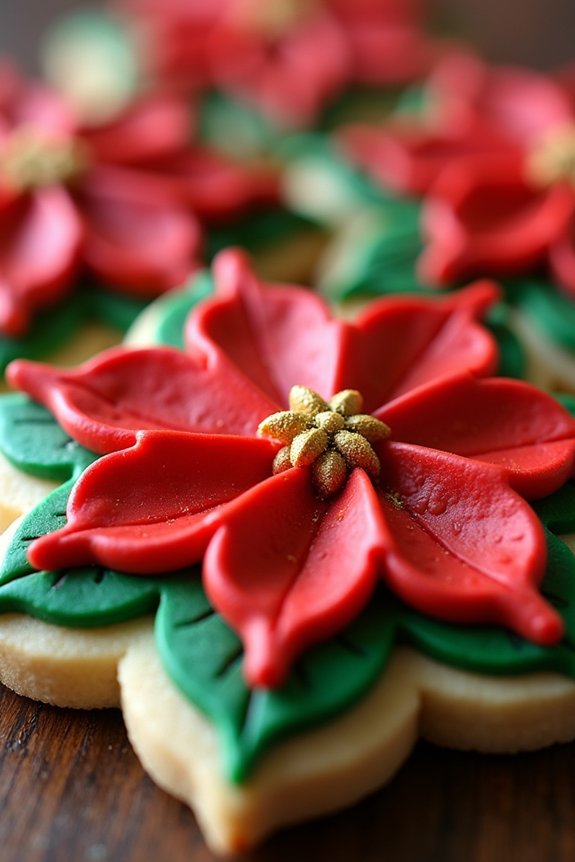
Transform your holiday baking with these stunning Elegant Poinsettia Blooms Sugar Cookies. These cookies not only taste delicious but also serve as a beautiful centerpiece for your festive gatherings. With a delicate balance of vanilla and almond flavors, these cookies provide a delightful crunch that complements the sweet, royal icing decoration.
Whether you’re a seasoned baker or a novice, these cookies are a perfect choice for adding a touch of sophistication to your holiday festivities. The centerpiece of these cookies is the intricate poinsettia design, which can be achieved with a bit of practice and patience. Using royal icing, you can create vibrant red petals, lush green leaves, and a sprinkle of edible gold dust to mimic the elegant look of this iconic holiday flower.
This recipe will guide you through the process of baking the cookies, preparing the icing, and decorating them to perfection. With a serving size of 4-6 people, this recipe yields enough cookies to share with family and friends, spreading holiday cheer one bite at a time.
Ingredients (Serving Size: 4-6 people)
For the Sugar Cookies:
- 2 ¾ cups all-purpose flour
- 1 teaspoon baking soda
- ½ teaspoon baking powder
- 1 cup unsalted butter, softened
- 1 ½ cups white sugar
- 1 egg
- 1 teaspoon vanilla extract
- ½ teaspoon almond extract
For the Royal Icing:
- 4 cups powdered sugar
- 3 tablespoons meringue powder
- 6 tablespoons water
- Red and green gel food coloring
- Edible gold dust (optional)
Instructions
- Prepare the Cookie Dough: In a medium bowl, whisk together the flour, baking soda, and baking powder. In a large bowl, cream together the butter and sugar until smooth. Beat in the egg, vanilla extract, and almond extract. Gradually blend in the dry ingredients until well combined. Cover and chill dough for at least one hour in the refrigerator.
- Bake the Cookies: Preheat your oven to 375°F (190°C). Roll out chilled dough on a lightly floured surface to about 1/4-inch thickness. Cut into desired shapes using a cookie cutter. Place cookies 1 inch apart on ungreased baking sheets. Bake in the preheated oven for 8 to 10 minutes, or until edges are golden brown. Let cookies cool on the baking sheets for a few minutes before transferring to wire racks to cool completely.
- Prepare the Royal Icing: In a large bowl, mix together the powdered sugar, meringue powder, and water until smooth and glossy. Divide icing into separate bowls and tint with red and green food coloring for the poinsettia blooms and leaves. Transfer icing into piping bags fitted with small round and petal tips.
- Decorate the Cookies: Once the cookies are completely cooled, use the red icing to pipe petals for the poinsettia blooms, starting from the center and working outward. Use the green icing to add leaves around the petals. Allow the icing to dry completely before handling. For an extra touch of elegance, lightly brush the centers of the flowers with edible gold dust.
Extra Tips
To achieve a smooth and even icing consistency, make sure your royal icing isn’t too thick or too thin. You can adjust the thickness by adding a few drops of water for a thinner consistency or more powdered sugar for a thicker one.
When decorating, practice on parchment paper before moving to the cookies to get comfortable with the piping technique. Keep the cookies in an airtight container to maintain freshness and prevent the icing from smudging. Happy decorating!
Frosty the Snowman Creations
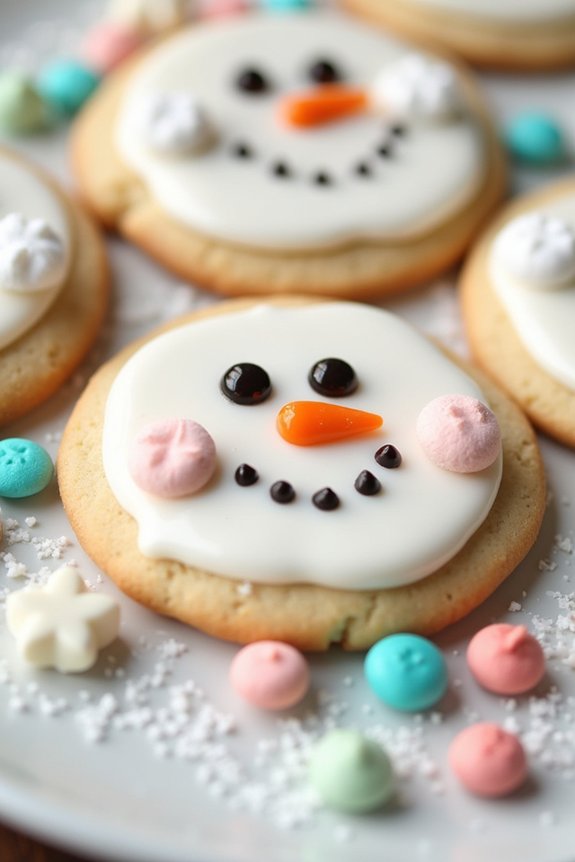
Creating delightful sugar cookies that resemble Frosty the Snowman can bring a touch of magic and whimsy to your holiday celebrations. These charming cookies aren’t just fun to make but also delightful to eat, making them a perfect family activity.
Whether you’re an expert baker or a novice in the kitchen, crafting these snowman-shaped treats will certainly bring smiles to all who see them. The key to these delightful creations lies in a perfectly baked sugar cookie base and a creative touch with your decorating skills.
To begin, you’ll need to prepare a classic sugar cookie dough that’s easy to shape and holds up well during baking. Once baked and cooled, the cookies will be transformed into adorable snowmen using a combination of royal icing and candies for decoration. This recipe serves 4-6 people, making it ideal for a small gathering or family treat.
Let’s explore the ingredients and the step-by-step process for creating these frosty delights.
Ingredients:
- 2 1/2 cups all-purpose flour
- 1 teaspoon baking powder
- 1/2 teaspoon salt
- 3/4 cup unsalted butter, softened
- 1 cup granulated sugar
- 1 large egg
- 1 teaspoon vanilla extract
- 1/2 teaspoon almond extract (optional)
- 2 cups powdered sugar
- 3 tablespoons meringue powder
- 5-6 tablespoons water
- Gel food coloring (black, orange, and any other colors as desired)
- Mini chocolate chips or black candies for eyes
- Orange candies or icing for noses
- Miniature marshmallows, sprinkles, or additional candies for decoration
Cooking Instructions:
- Prepare the Dough: In a medium bowl, whisk together the flour, baking powder, and salt. In a separate large bowl, beat the softened butter and granulated sugar until light and fluffy. Add the egg, vanilla extract, and almond extract, mixing until combined. Gradually add the dry ingredients to the wet ingredients, mixing until a dough forms.
- Chill the Dough: Divide the dough into two discs, wrap them in plastic wrap, and refrigerate for at least one hour. Chilling the dough helps prevent the cookies from spreading too much during baking.
- Preheat and Roll: Preheat your oven to 350°F (175°C). Line a baking sheet with parchment paper. Roll out the chilled dough on a floured surface to about 1/4-inch thickness. Use snowman-shaped cookie cutters to cut out shapes, and place them on the prepared baking sheet.
- Bake the Cookies: Bake the cookies in the preheated oven for 8-10 minutes, or until the edges are lightly golden. Let them cool on the baking sheet for a few minutes before transferring them to a wire rack to cool completely.
- Prepare the Royal Icing: In a mixing bowl, combine powdered sugar, meringue powder, and 5 tablespoons of water. Beat on low speed until the icing is thick and smooth. Add more water if needed to reach your desired consistency. Divide the icing into separate bowls and add gel food coloring as desired.
- Decorate: Using a piping bag or a plastic zip-top bag with the corner snipped off, pipe the royal icing onto the cooled cookies, starting with a white base layer for the snowman. Use mini chocolate chips or black candies for eyes, orange candies or icing for the nose, and additional candies for buttons and scarves. Let the decorated cookies set for at least an hour.
Extra Tips:
When decorating your Frosty the Snowman cookies, remember to have fun and be creative with your designs. You can personalize each cookie with different expressions and accessories like hats and scarves made from icing or candies.
If your icing is too thick to pipe smoothly, simply add a bit more water to reach the desired consistency. Additionally, allowing the cookies to cool completely before decorating is essential, as any residual warmth can cause the icing to melt and not set properly.
These cookies also make thoughtful homemade gifts, presented in decorative boxes or bags. Enjoy the process and the delightful results!
Shimmering Icicle Designs
Creating shimmering icicle designs on sugar cookies can transform your holiday treats into a winter wonderland delight. These beautifully decorated cookies are perfect for festive occasions, offering a touch of elegance with their sparkling appearance. The art of decorating sugar cookies with shimmering icicle designs combines the rich, buttery flavor of classic sugar cookies with the delicate, frosty aesthetics of winter, making them a hit at any gathering.
Whether you’re hosting a holiday party or simply want to indulge your family with a special treat, these cookies are sure to impress with their intricate design and delightful taste.
To achieve the shimmering icicle effect, you’ll start with a batch of your favorite sugar cookies, using a simple and reliable recipe. Once baked and cooled, the cookies will serve as a blank canvas for your creativity. The key to the shimmering effect lies in the use of royal icing and edible glitter or shimmering sugar, applied with precision to mimic the crystalline beauty of icicles. With a few handy tips and a little patience, even a beginner can create these stunning, frosty decorations that are as delicious as they’re beautiful.
Ingredients (Serving Size: 4-6 people)
- 2 1/2 cups all-purpose flour
- 1/2 teaspoon baking powder
- 1/4 teaspoon salt
- 3/4 cup unsalted butter, softened
- 1 cup granulated sugar
- 1 large egg
- 1 teaspoon vanilla extract
- 1/2 teaspoon almond extract (optional)
For Royal Icing:
- 3 cups powdered sugar
- 2 large egg whites or 4 tablespoons meringue powder
- 1/4 teaspoon cream of tartar
- 1/2 teaspoon vanilla extract
- Gel food coloring, in desired colors
- Edible glitter or shimmering sugar
Instructions
- Prepare the Dough: In a medium bowl, whisk together the flour, baking powder, and salt. In a large bowl, beat the butter and sugar with an electric mixer on medium speed until light and fluffy. Add the egg, vanilla extract, and almond extract (if using), and mix until well combined. Gradually add the dry ingredients, mixing until the dough comes together.
- Chill the Dough: Divide the dough in half, shape each into a disk, and wrap in plastic wrap. Refrigerate for at least 1 hour or until firm.
- Roll and Cut Cookies: Preheat the oven to 350°F (175°C). Roll out the dough on a lightly floured surface to about 1/4-inch thickness. Cut out shapes using cookie cutters. Place cookies on a baking sheet lined with parchment paper.
- Bake the Cookies: Bake in the preheated oven for 8-10 minutes or until the edges are lightly golden. Allow cookies to cool on the baking sheet for 5 minutes before transferring to a wire rack to cool completely.
- Prepare the Royal Icing: In a large bowl, combine powdered sugar, egg whites or meringue powder, cream of tartar, and vanilla extract. Beat on low speed until combined, then increase to high speed and beat until stiff peaks form. Divide icing into separate bowls to tint with gel food coloring as desired.
- Decorate the Cookies: Using piping bags fitted with small round tips, outline and fill the cookies with a base layer of royal icing. Let it set for at least 30 minutes. Then, using a contrasting color, pipe icicle designs starting from the top edge of each cookie, letting lines drip down for the icicle effect. Sprinkle with edible glitter or shimmering sugar while the icing is still wet.
- Set the Cookies: Allow the decorated cookies to dry completely, preferably overnight, so the icing sets hard and the shimmer adheres well.
Extra Tips
When working with royal icing, make certain your mixing bowls and utensils are grease-free to achieve the best consistency. If the icing is too thick, add water a few drops at a time; if too thin, add more powdered sugar.
For a more realistic icicle effect, experiment with varying the lengths and thicknesses of your piped lines. To maintain the shimmer, store the cookies in a single layer in an airtight container, as stacking them may dull the glitter. Finally, practice patience; allowing the icing to dry properly is essential for both appearance and texture.
Joyful Santa Claus Cookies
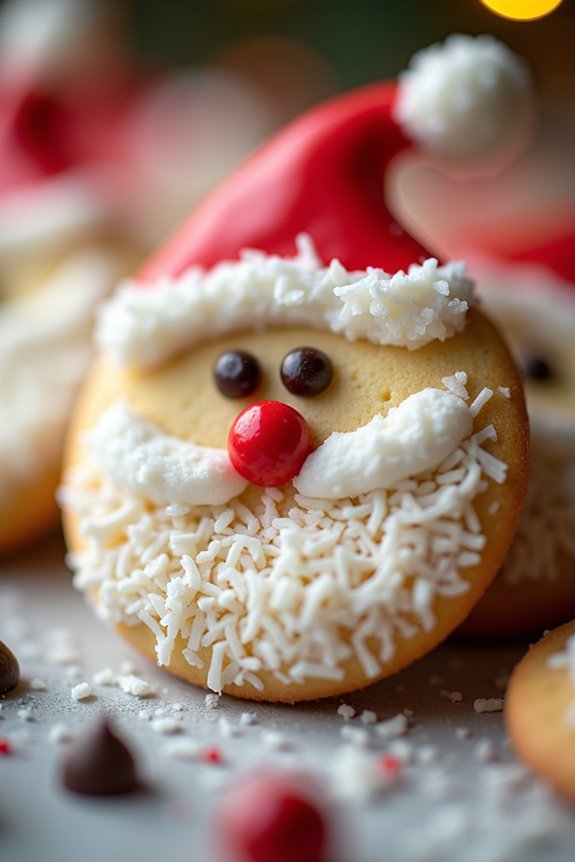
Transform your holiday gatherings with delightful Joyful Santa Claus Cookies. These charming treats are perfect for bringing festive cheer to your dessert table. The combination of a sweet, buttery sugar cookie base and vibrant decorations will capture the hearts of both children and adults alike.
These cookies aren’t only a feast for the eyes but also a delicious indulgence that embodies the spirit of the season. Crafting these cookies is a fun and creative process. You start with a basic sugar cookie dough, which serves as the perfect canvas for your artistic endeavors.
Once baked, the real fun begins as you decorate each cookie to resemble jolly old Saint Nick. This recipe provides enough ingredients to serve 4-6 people, making it ideal for a cozy family gathering or a small holiday party.
Ingredients:
- 2 ¾ cups all-purpose flour
- 1 teaspoon baking soda
- ½ teaspoon baking powder
- 1 cup unsalted butter, softened
- 1 ½ cups granulated sugar
- 1 egg
- 1 teaspoon vanilla extract
- Red and white royal icing
- Mini chocolate chips (for eyes)
- Coconut flakes (for Santa’s beard)
- Red candy-coated chocolates (for nose)
- Assorted sprinkles (optional)
Instructions:
1. Prepare the Cookie Dough:
Preheat your oven to 375°F (190°C). In a medium bowl, whisk together the flour, baking soda, and baking powder. In a large bowl, cream the softened butter and granulated sugar until light and fluffy. Beat in the egg and vanilla extract until well combined.
2. Combine and Chill:
Gradually add the dry mixture to the wet ingredients, mixing until a dough forms. Divide the dough into two portions and flatten into discs. Wrap each disc in plastic wrap and refrigerate for at least 1 hour, ensuring the dough is firm enough to roll out.
3. Roll and Cut:
On a lightly floured surface, roll out one dough disc to about ¼ inch thickness. Use a round cookie cutter to cut out circles for Santa’s face. Place the cookies on a baking sheet lined with parchment paper.
4. Bake:
Bake in the preheated oven for 8-10 minutes, or until the edges are lightly golden. Allow the cookies to cool on the baking sheet for 5 minutes before transferring to a wire rack to cool completely.
5. Decorate:
Using red royal icing, pipe a hat on the top third of each cookie. Use white icing to add a brim and a pom-pom at the tip of the hat. Add mini chocolate chips as eyes and a red candy-coated chocolate as Santa’s nose. Finish by applying a generous amount of coconut flakes to create a beard. Add any additional sprinkles for extra holiday flair.
Extra Tips:
For a more uniform look, use a piping bag with a small tip to control the icing flow. If the royal icing is too thick, add a few drops of water to achieve the desired consistency.
To prevent the coconut flakes from falling off, make sure the icing is still wet when applying them. If you’re making these cookies with children, prepare all the decorative elements in advance to make the process smoother and more enjoyable.
Enjoy the creation of these Joyful Santa Claus Cookies as a delightful holiday tradition!
Cheerful Holiday Plaid
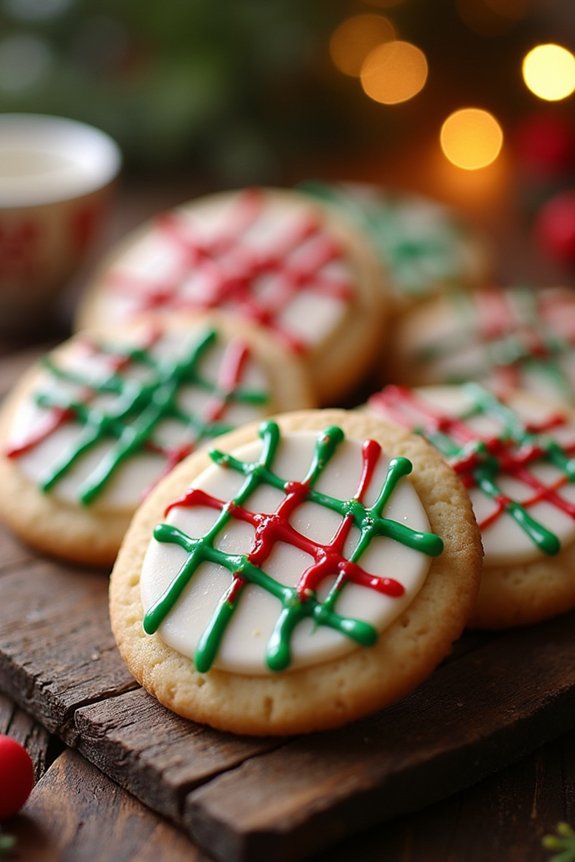
Bring a touch of festive charm to your holiday gatherings with Cheerful Holiday Plaid Sugar Cookies. These delightful treats combine the nostalgia of classic sugar cookies with the elegance of plaid patterns, making them a perfect addition to your holiday dessert table.
Using a simple sugar cookie base, these cookies are decorated with colorful icing to create a plaid effect that’s sure to impress your guests. Creating these beautifully patterned cookies is a fun and creative process that can be enjoyed by the whole family. Not only do they look stunning, but they also taste delicious, with a soft, buttery texture that melts in your mouth.
Whether you’re an experienced baker or a novice in the kitchen, these cookies are approachable and rewarding to make. Follow the instructions below to create a batch of 24-30 Cheerful Holiday Plaid Sugar Cookies.
Ingredients (Serves 4-6 people):
- 3 cups all-purpose flour
- 1 teaspoon baking powder
- 1/4 teaspoon salt
- 1 cup unsalted butter, softened
- 1 cup granulated sugar
- 1 large egg
- 1 teaspoon vanilla extract
- 1/2 teaspoon almond extract (optional)
- Assorted food coloring (red, green, and blue)
- 2 cups confectioners’ sugar
- 3-4 tablespoons milk
- 1 teaspoon light corn syrup
- Piping bags and fine tips
Cooking Instructions:
- Prepare the Dough: In a medium bowl, whisk together the flour, baking powder, and salt. In a large bowl, beat the softened butter and granulated sugar until light and fluffy. Add the egg, vanilla extract, and almond extract (if using), and mix until combined. Gradually add the dry ingredients to the wet ingredients, mixing until a dough forms.
- Chill the Dough: Divide the dough into two equal portions, flatten each into a disk, and wrap in plastic wrap. Refrigerate for at least 1 hour or until firm.
- Preheat the Oven: Preheat your oven to 350°F (175°C) and line baking sheets with parchment paper.
- Roll and Cut the Cookies: On a lightly floured surface, roll out one dough disk to about 1/4-inch thickness. Use a round or square cookie cutter to cut out shapes and transfer them to the prepared baking sheets.
- Bake the Cookies: Bake the cookies for 8-10 minutes or until the edges are lightly golden. Allow them to cool on the baking sheet for 5 minutes before transferring to a wire rack to cool completely.
- Prepare the Icing: In a medium bowl, whisk together the confectioners’ sugar, milk, and corn syrup until smooth. Divide the icing into separate bowls and tint each with your desired food coloring.
- Decorate the Cookies: Use piping bags with fine tips to draw plaid patterns on the cooled cookies. Start with horizontal lines, followed by vertical lines, alternating colors to achieve the plaid effect. Allow the icing to set completely before serving.
Extra Tips:
For a more vibrant plaid pattern, consider using gel food coloring, which provides more intense colors without altering the consistency of the icing. If you find the icing too thick, add a small amount of milk, a teaspoon at a time, until you reach the desired consistency.
When piping the lines, maintain steady pressure on the piping bag for even lines. Practicing on parchment paper before decorating the cookies can help you perfect your technique. Enjoy these cookies fresh, or store them in an airtight container for up to a week to savor the holiday cheer.
Magical Nutcracker Scenes

Transform your traditional holiday baking into a whimsical experience by creating Magical Nutcracker Scenes on sugar cookies. Combining the classic appeal of sugar cookies with the enchanting world of the Nutcracker, these cookies make a delightful treat for both the eyes and the taste buds. Perfect for holiday gatherings, these cookies will capture the attention and imagination of your friends and family, offering a sweet homage to a beloved holiday tradition.
To get started, you’ll first need to bake a batch of sugar cookies. From there, it’s all about letting your creativity shine with colorful icing, candies, and sprinkles to bring the Nutcracker scenes to life. These decorative cookies serve as both an artistic outlet and a tasty dessert, making them the perfect project for a cozy winter afternoon.
Whether you’re depicting the Nutcracker himself, the Sugar Plum Fairy, or the iconic battle scene, these cookies are sure to be the highlight of any holiday celebration.
Ingredients (Serves 4-6 people)
- 3 cups all-purpose flour
- 1 teaspoon baking powder
- 1/2 teaspoon salt
- 1 cup unsalted butter, softened
- 1 cup granulated sugar
- 1 large egg
- 1 teaspoon vanilla extract
- 1/2 teaspoon almond extract
- Royal icing (homemade or store-bought)
- Food coloring (red, green, blue, yellow, etc.)
- Edible glitter and sprinkles
- Assorted candies for decoration
Cooking Instructions
- Preheat and Prepare: Preheat your oven to 350°F (175°C). Line two baking sheets with parchment paper or silicone mats.
- Mix Dry Ingredients: In a medium bowl, whisk together the flour, baking powder, and salt. Set aside.
- Cream Butter and Sugar: In a large bowl, cream together the softened butter and granulated sugar until light and fluffy, about 3-5 minutes using an electric mixer.
- Add Egg and Extracts: Beat in the egg, vanilla extract, and almond extract until well combined.
- Combine Mixtures: Gradually add the dry ingredients to the wet ingredients, mixing until just combined. Don’t overmix.
- Chill Dough: Divide the dough into two equal portions, wrap each in plastic wrap, and refrigerate for at least 1 hour.
- Roll and Cut Dough: On a lightly floured surface, roll out one dough portion to about 1/4-inch thickness. Cut into desired shapes using cookie cutters.
- Bake Cookies: Place cookies onto prepared baking sheets and bake for 8-10 minutes or until the edges are lightly golden. Allow cookies to cool completely on wire racks.
- Prepare Icing: Divide royal icing into small bowls and add a few drops of food coloring to each bowl to create different colors.
- Decorate Cookies: Use a piping bag or a small spatula to decorate the cookies with colorful icing. Add edible glitter, sprinkles, and candies to create intricate Nutcracker scenes.
- Set Icing: Allow the icing to set completely before serving or storing the cookies.
Extra Tips
When decorating your Magical Nutcracker Scenes, consider using a variety of textures and colors to create depth and interest.
If you’re new to using royal icing, practice on a piece of parchment paper before decorating your cookies. You can also use toothpicks to add fine details with the icing.
For a more vibrant look, gel food coloring is recommended as it provides deeper colors without altering the icing’s consistency.
Finally, confirm your cookies are completely cooled before starting your decorating to prevent the icing from melting. Happy decorating!