

When it comes to holiday baking, there’s a special kind of joy in creating festive treats that everyone loves. Growing up, my mom and I cherished the tradition of baking a variety of cookies each Christmas. Each one was a little different, but all were equally delicious. From classic sugar cookies to rich chocolate crinkles, these recipes are sure to become your go-to holiday favorites. Ready to discover which cookies made the list?
Classic Sugar Cookies
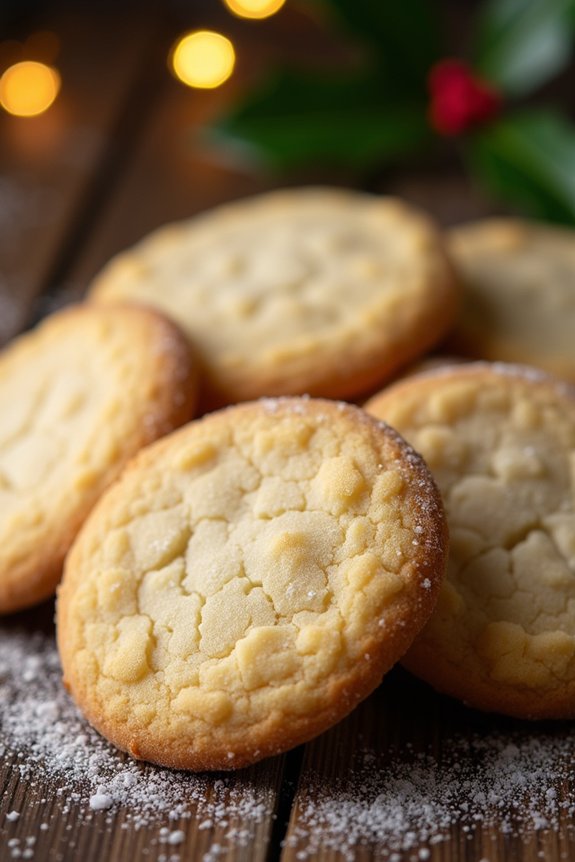
There’s something incredibly nostalgic and comforting about Classic Sugar Cookies, especially during the festive season. These cookies are known for their simplicity and versatility, making them a favorite in many households.
Whether you’re a seasoned baker or a novice in the kitchen, this sugar cookie recipe is easy to follow and promises a delightful treat. The cookies are soft on the inside with a slight crispness on the edges, and they can be decorated in countless ways to suit your holiday theme. Perfect for sharing with family and friends or leaving out for Santa, these cookies are sure to bring joy to your holiday celebrations.
This recipe yields approximately 24-30 cookies, serving a crowd of 4-6 people. The key to making the perfect sugar cookie is using high-quality ingredients and guaranteeing that they’re mixed and baked with care. Once baked, these cookies can be enjoyed as is, or you can release your creativity with icing, sprinkles, or colored sugar.
Here’s how you can create your own batch of delicious classic sugar cookies:
Ingredients:
- 2 ¾ cups all-purpose flour
- 1 teaspoon baking soda
- ½ teaspoon baking powder
- 1 cup unsalted butter, softened
- 1 ½ cups granulated sugar
- 1 egg
- 1 teaspoon vanilla extract
- ½ teaspoon almond extract (optional)
- 1 tablespoon milk
- Additional granulated sugar for rolling (optional)
Instructions:
- Preheat and Prepare: Start by preheating your oven to 375°F (190°C). Line two baking sheets with parchment paper or silicone baking mats for an easy clean-up and to prevent sticking.
- Mix Dry Ingredients: In a medium bowl, whisk together the flour, baking soda, and baking powder. This guarantees that the baking soda and powder are evenly distributed throughout the flour, which helps the cookies rise evenly.
- Cream Butter and Sugar: In a large mixing bowl, beat the softened butter with the granulated sugar using an electric mixer on medium speed until the mixture is light and fluffy. This should take about 2-3 minutes. Creaming the butter and sugar well is essential for creating a tender cookie.
- Add Egg and Extracts: Beat in the egg, vanilla extract, and almond extract (if using) until well combined. The addition of almond extract gives a subtle, nutty flavor that complements the vanilla.
- Combine Dry and Wet Ingredients: Gradually add the dry ingredients to the butter mixture, mixing on low speed until just combined. Don’t overmix; the dough should be soft and slightly sticky.
- Shape the Cookies: Scoop about a tablespoon of dough, roll it into a ball, and if desired, roll it in additional granulated sugar. Place the dough balls on the prepared baking sheets about 2 inches apart to allow for spreading.
- Bake: Bake in the preheated oven for 8-10 minutes, or until the edges are lightly golden. Avoid overbaking as this can lead to hard cookies. The centers should still look soft when you take them out.
- Cool: Remove from the oven and let the cookies cool on the baking sheets for about 2 minutes before transferring them to a wire rack to cool completely.
Extra Tips:
For the best results, make sure your butter is at room temperature before you start baking. This helps the butter cream properly with the sugar, resulting in a light and fluffy cookie.
If you find your dough is too sticky to handle, you can refrigerate it for about 30 minutes to make it easier to work with. When decorating, wait until the cookies are completely cool before adding any icing or sprinkles to prevent them from melting or sliding off.
Store the cookies in an airtight container to keep them fresh for up to a week. Enjoy these classic sugar cookies with a glass of milk or a cup of tea for a delightful holiday treat!
Gingerbread Men

Gingerbread Men are a classic holiday treat that brings nostalgic warmth and festive charm to any gathering. These adorable cookies aren’t only fun to make but also delightful to eat, with their aromatic blend of spices and rich molasses flavor. Perfect for family baking sessions, this recipe yields cookies that are both soft and chewy, making them a favorite among both children and adults.
Whether you choose to decorate them with icing, candies, or leave them plain, Gingerbread Men are sure to make your Christmas celebrations a bit more magical. Creating Gingerbread Men is a wonderful way to bond with loved ones while embracing the holiday spirit. The process involves mixing a blend of spices like ginger, cinnamon, and cloves, which fill the kitchen with a warm and inviting aroma.
Once baked, these cookies can be decorated with icing to give them character and personality, making each one unique. With this recipe, you’ll have enough cookies to share with family and friends or bring to a holiday party, and they make for delightful gifts as well.
Ingredients for 4-6 servings:
- 3 cups all-purpose flour
- 3/4 cup packed brown sugar
- 3/4 cup molasses
- 1/2 cup unsalted butter, softened
- 1 large egg
- 1 teaspoon baking soda
- 1 tablespoon ground ginger
- 1 tablespoon ground cinnamon
- 1/2 teaspoon ground cloves
- 1/2 teaspoon salt
- Assorted decorative candies and icing (optional)
Cooking Instructions:
- Prepare the Dough: In a large mixing bowl, cream together the softened butter and brown sugar until light and fluffy. Add in the egg and molasses, mixing well to combine.
- Combine Dry Ingredients: In a separate bowl, whisk together the flour, baking soda, ground ginger, cinnamon, cloves, and salt until well combined.
- Mix Wet and Dry Ingredients: Gradually add the dry ingredients to the wet mixture, stirring until a soft dough forms. Confirm all ingredients are thoroughly incorporated.
- Chill the Dough: Divide the dough into two portions, flatten each into a disk, and wrap in plastic wrap. Refrigerate for at least 2 hours or until firm. This step is essential for making the dough easier to roll out.
- Preheat Oven: Preheat your oven to 350°F (175°C) and line two baking sheets with parchment paper.
- Roll Out the Dough: On a lightly floured surface, roll out one portion of dough to about 1/4 inch thickness. Use a gingerbread man cookie cutter to cut out shapes and place them on the prepared baking sheets.
- Bake the Cookies: Bake the cookies in the preheated oven for 8-10 minutes or until the edges are firm. Allow them to cool on the baking sheets for a few minutes before transferring to a wire rack to cool completely.
- Decorate: Once cooled, use icing and candies to decorate the Gingerbread Men as desired.
Extra Tips:
For best results, confirm your butter is adequately softened before beginning the recipe to achieve a smooth and creamy dough. Chilling the dough is vital as it prevents the cookies from spreading too much in the oven, helping them maintain their shape.
When decorating, allow your creativity to shine—use a variety of colored icings and candies to give each cookie a unique personality. And remember, these cookies can be stored in an airtight container for up to a week, allowing you to enjoy them throughout the holiday season.
Chocolate Crinkle Cookies
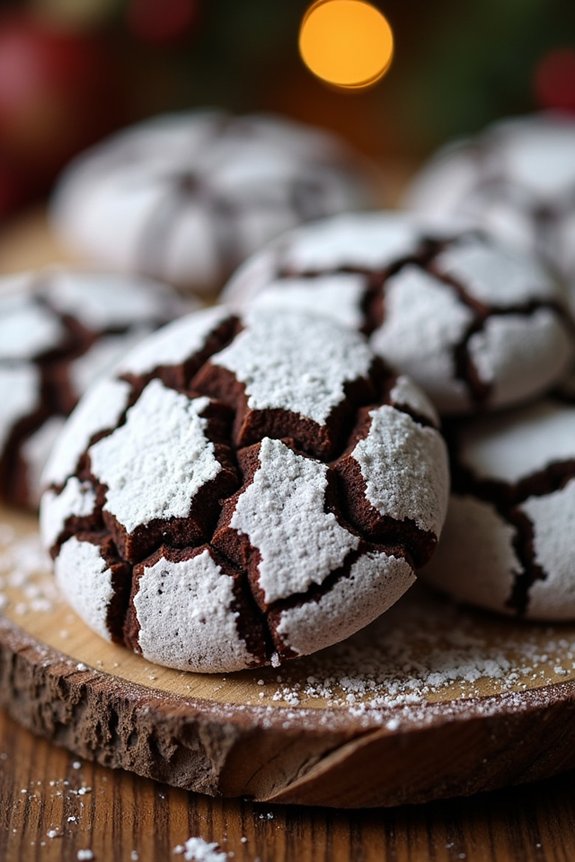
Chocolate Crinkle Cookies are a holiday favorite, combining the rich, decadent taste of chocolate with a festive appearance. These cookies are soft and chewy on the inside with a slightly crisp exterior. The powdered sugar coating creates a beautiful crinkle effect as the cookies bake and expand, making them not only delicious but also visually appealing. Perfect for Christmas gatherings or as a sweet gift, these cookies are sure to delight anyone who tries them.
Baking Chocolate Crinkle Cookies is a delightful activity that can be enjoyed with family or friends. The process is simple, and the results are incredibly rewarding. The dough for these cookies is quite sticky, so be prepared to get a little messy. However, the end result—a tray of beautifully crinkled, chocolatey goodness—is well worth the effort. This recipe serves 4-6 people, making it ideal for small gatherings or as a treat to share with loved ones.
Ingredients (serving size: 4-6 people):
- 1 cup unsweetened cocoa powder
- 2 cups granulated sugar
- 1/2 cup vegetable oil
- 4 large eggs
- 2 teaspoons vanilla extract
- 2 cups all-purpose flour
- 2 teaspoons baking powder
- 1/2 teaspoon salt
- 1/2 cup confectioners’ sugar (for coating)
Cooking Instructions:
- Mixing the Wet Ingredients: In a large bowl, combine the cocoa powder, granulated sugar, and vegetable oil. Mix until the ingredients form a smooth, shiny paste. Add the eggs, one at a time, beating well after each addition. Stir in the vanilla extract until fully incorporated.
- Preparing the Dry Ingredients: In a separate bowl, whisk together the flour, baking powder, and salt. Gradually add the dry mixture to the wet ingredients, mixing until just combined. The dough will be thick and sticky.
- Chilling the Dough: Cover the dough with plastic wrap or a lid and refrigerate for at least 4 hours or overnight. Chilling the dough is crucial to make it easier to handle and to guarantee the cookies maintain their shape while baking.
- Preheating the Oven: Preheat your oven to 350°F (175°C). Line two baking sheets with parchment paper to prevent the cookies from sticking.
- Forming the Cookies: Using a tablespoon or small ice cream scoop, scoop out small amounts of dough and roll them into balls approximately 1 inch in diameter. This size will allow the cookies to bake evenly.
- Coating the Cookies: Generously roll each dough ball in confectioners’ sugar until fully coated. The sugar coating will create the signature crinkle effect as the cookies bake.
- Baking the Cookies: Place the coated dough balls onto the prepared baking sheets, spacing them about 2 inches apart. Bake in the preheated oven for 10-12 minutes. The cookies will puff up and crack, but should remain soft in the center.
- Cooling: Allow the cookies to cool on the baking sheet for about 5 minutes before transferring them to a wire rack to cool completely. This helps the cookies firm up and develop their chewy texture.
Extra Tips:
For best results, confirm that the dough is thoroughly chilled, as this makes it easier to handle and roll into balls. If the dough becomes too sticky while shaping the cookies, you can lightly coat your hands with confectioners’ sugar.
Additionally, using a high-quality cocoa powder will enhance the chocolate flavor and make these cookies even more irresistible. Finally, store any leftover cookies in an airtight container to keep them fresh and maintain their delightful texture.
Snickerdoodle Delights
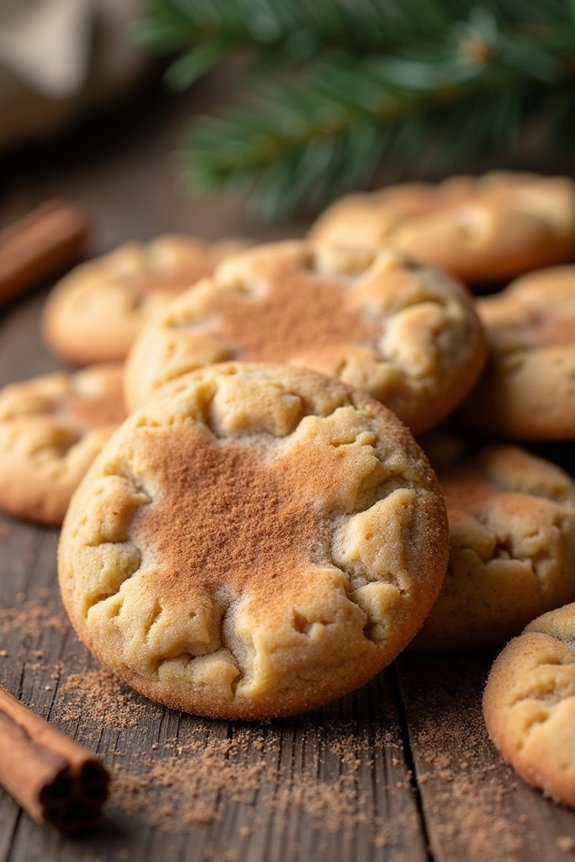
Snickerdoodle Delights are the quintessential holiday cookie, offering a perfect balance of sweetness and spice. Their soft, chewy texture combined with a delightful cinnamon-sugar coating makes them a festive favorite. These cookies are ideal for cozy gatherings with family and friends, and their heartwarming aroma is bound to fill your home with the spirit of the season.
Whether you’re an experienced baker or a novice, Snickerdoodle Delights are easy to make and incredibly rewarding to share.
Originally stemming from Germany, these cookies have become a staple in Christmas celebrations across the globe. With their signature crinkly tops and a hint of tang from the cream of tartar, Snickerdoodle Delights are a classic treat that never goes out of style.
Perfect for enjoying with a cup of hot cocoa or eggnog, these cookies are a must-have for any holiday dessert spread. Gather your ingredients and get ready to bake a batch of these timeless and delicious cookies.
Ingredients (Serves 4-6):
- 1 cup unsalted butter, softened
- 1 ½ cups granulated sugar
- 2 large eggs
- 2 ¾ cups all-purpose flour
- 2 teaspoons cream of tartar
- 1 teaspoon baking soda
- ½ teaspoon salt
- 3 tablespoons granulated sugar (for coating)
- 3 teaspoons ground cinnamon (for coating)
Instructions:
- Preheat the Oven: Start by preheating your oven to 375°F (190°C). Line two baking sheets with parchment paper to prevent the cookies from sticking.
- Cream the Butter and Sugar: In a large mixing bowl, use an electric mixer to cream the softened butter and sugar together until the mixture is light and fluffy. This should take about 3 minutes.
- Add Eggs: Add the eggs one at a time, mixing well after each addition to guarantee they’re fully incorporated.
- Mix Dry Ingredients: In a separate bowl, whisk together the flour, cream of tartar, baking soda, and salt.
- Combine Mixtures: Gradually add the dry ingredients to the wet ingredients, mixing just until combined. Be careful not to overmix, as this can make the cookies tough.
- Prepare Cinnamon Sugar Coating: In a small bowl, combine the 3 tablespoons of granulated sugar with the ground cinnamon.
- Shape the Cookies: Scoop out tablespoon-sized portions of dough and roll them into balls. Roll each ball in the cinnamon-sugar mixture until fully coated.
- Bake: Place the coated dough balls on the prepared baking sheets, leaving about 2 inches between each cookie to allow for spreading. Bake in the preheated oven for 8-10 minutes, or until the edges are set but the centers are still soft.
- Cool: Remove the cookies from the oven and let them cool on the baking sheets for about 5 minutes before transferring them to a wire rack to cool completely.
Extra Tips:
To guarantee your Snickerdoodle Delights have the perfect texture, avoid overbaking; the cookies should be soft in the center when you remove them from the oven. If you prefer a crisper cookie, bake them for an additional 1-2 minutes.
For a festive touch, consider adding a dash of nutmeg to the cinnamon-sugar coating. Finally, storing these cookies in an airtight container will keep them fresh and chewy for up to a week, making them a convenient and delightful treat to enjoy throughout the holiday season.
Peppermint Bark Cookies

Peppermint Bark Cookies are a delightful holiday treat that combines the rich flavors of chocolate and peppermint in a crisp cookie. These cookies are perfect for sharing during festive gatherings or for gifting to friends and family. The combination of a buttery cookie base, a layer of dark chocolate, and a sprinkling of crushed peppermint candies makes these cookies both visually appealing and irresistibly delicious.
Whether you’re a fan of peppermint or a chocolate lover, these cookies are sure to become a new favorite in your holiday baking repertoire. The recipe for Peppermint Bark Cookies is straightforward and can be easily prepared in an afternoon. With a serving size of 4-6 people, this recipe guarantees there are plenty of cookies to go around.
The key to achieving the perfect texture and flavor lies in using high-quality chocolate and fresh peppermint candies. These cookies are best enjoyed fresh but can also be stored in an airtight container to maintain their crispness. Gather your ingredients and get ready to spread some holiday cheer with these festive treats!
Ingredients (Serves 4-6 people):
- 1 cup unsalted butter, softened
- 1 cup granulated sugar
- 1 large egg
- 1 teaspoon vanilla extract
- 2 ½ cups all-purpose flour
- ½ teaspoon baking powder
- ¼ teaspoon salt
- 8 ounces dark chocolate, chopped
- ½ teaspoon peppermint extract
- ½ cup crushed peppermint candies
Cooking Instructions:
- Preheat the Oven: Preheat your oven to 350°F (175°C). Line two baking sheets with parchment paper and set them aside.
- Prepare the Cookie Dough: In a large mixing bowl, cream together the softened butter and granulated sugar using an electric mixer until the mixture is light and fluffy. Beat in the egg and vanilla extract until well combined.
- Mix Dry Ingredients: In a separate bowl, whisk together the flour, baking powder, and salt. Gradually add the dry ingredients to the creamed mixture, mixing until just combined. Be careful not to overmix the dough.
- Shape and Bake the Cookies: Roll the dough into 1-inch balls and place them onto the prepared baking sheets, spacing them about 2 inches apart. Flatten each ball slightly with the palm of your hand. Bake in the preheated oven for 10-12 minutes or until the edges are lightly golden. Remove from the oven and allow the cookies to cool on the baking sheets for 5 minutes before transferring them to a wire rack to cool completely.
- Melt the Chocolate: In a microwave-safe bowl, melt the chopped dark chocolate in 30-second intervals, stirring in between, until smooth. Stir in the peppermint extract.
- Assemble the Peppermint Bark Cookies: Once the cookies are completely cooled, dip the top of each cookie into the melted chocolate, allowing the excess to drip off. Place the cookies back onto the parchment paper and immediately sprinkle with crushed peppermint candies.
- Set and Serve: Allow the chocolate to set completely at room temperature or place the cookies in the refrigerator for a quicker set. Once the chocolate is firm, serve the cookies or store them in an airtight container.
Extra Tips:
For the best results, verify that the butter is fully softened before beginning the recipe, as this will help achieve the right cookie consistency. When melting the chocolate, be careful not to overheat it, as this can cause it to seize. Crushing peppermint candies can be done easily by placing them in a sealed plastic bag and gently pounding them with a rolling pin.
If you prefer a more intense peppermint flavor, you can increase the peppermint extract slightly, but be cautious as a little goes a long way. Enjoy your Peppermint Bark Cookies with a warm cup of cocoa for the ultimate holiday treat!
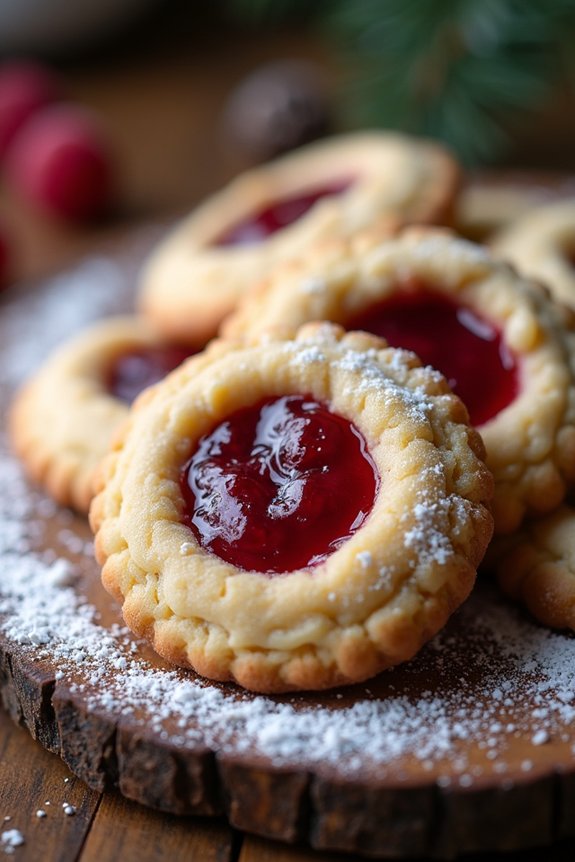
Linzer Cookies With Jam

Linzer Cookies With Jam are a delightful treat that combines buttery, nutty cookies with a tangy, sweet jam filling. These cookies originate from Austria and are traditionally served during the Christmas season, making them a festive addition to any holiday cookie platter. The dough is flavored with ground nuts, usually almonds or hazelnuts, which give the cookies their distinct texture and rich taste. The top cookie has a small cut-out, often in the shape of a heart or star, allowing the vibrant jam to peek through, adding a touch of elegance and charm.
To prepare Linzer Cookies With Jam for 4-6 people, it’s important to have a bit of patience and attention to detail, as the cookies require chilling time to guarantee they hold their shape during baking. Choose your favorite seedless jam, such as raspberry or apricot, to spread between the cookie layers, providing a burst of fruity flavor with every bite. These cookies are perfect for holiday gatherings or as a thoughtful homemade gift.
Ingredients:
- 1 cup unsalted butter, softened
- 1/2 cup granulated sugar
- 1 large egg yolk
- 1 teaspoon vanilla extract
- 1/2 teaspoon almond extract
- 2 cups all-purpose flour
- 1 cup ground almonds or hazelnuts
- 1/4 teaspoon salt
- 1/2 cup seedless raspberry or apricot jam
- Powdered sugar for dusting
Cooking Instructions:
- Prepare the Dough: In a large mixing bowl, cream together the softened butter and granulated sugar until light and fluffy. Add the egg yolk, vanilla extract, and almond extract, mixing until well combined.
- Incorporate Dry Ingredients: Gradually add the flour, ground nuts, and salt to the wet ingredients, mixing until a soft dough forms. Divide the dough into two equal portions, flatten each into a disk, wrap them in plastic wrap, and refrigerate for at least 1 hour or until firm.
- Roll and Cut the Cookies: Preheat the oven to 350°F (175°C). On a lightly floured surface, roll out one portion of dough to about 1/8-inch thickness. Use a cookie cutter to cut out rounds, and place them on a baking sheet lined with parchment paper. Roll out the second portion of dough, and use the same cookie cutter to cut rounds. Then, use a smaller cutter to create a cut-out in the center of each round for the tops.
- Bake the Cookies: Bake in the preheated oven for 10-12 minutes or until the edges are lightly golden brown. Allow the cookies to cool completely on a wire rack.
- Assemble the Cookies: Spread a thin layer of jam on the flat side of each bottom cookie. Place the top cookie with the cut-out over the jam-covered cookie, gently pressing them together.
- Finish with Powdered Sugar: Dust the tops of the assembled cookies with powdered sugar, allowing it to fall lightly over the jam-filled cut-out.
Extra Tips: When making Linzer Cookies With Jam, verify the dough is well chilled before cutting to prevent the cookies from spreading too much during baking. If the dough becomes too soft while working with it, return it to the refrigerator to firm up. For the best flavor, choose high-quality jam, and consider experimenting with different flavors to suit your taste. If you don’t have ground nuts, you can grind whole almonds or hazelnuts in a food processor until fine. Remember to let the cookies cool completely before assembling to prevent the jam from becoming too runny.
Almond Biscotti
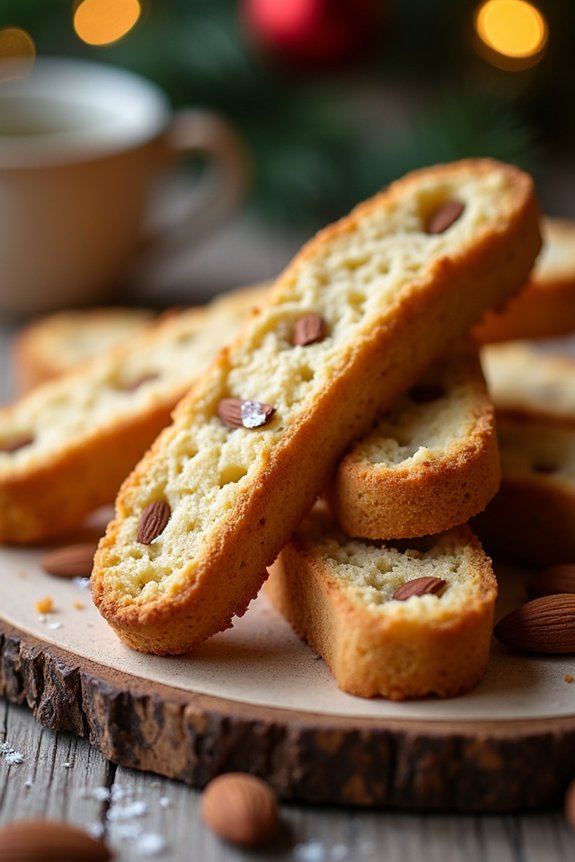
Almond Biscotti is a classic Italian cookie that’s perfect for the holiday season. With its delightful crunch and rich almond flavor, it’s an ideal companion to a cup of coffee or tea.
These twice-baked cookies are easy to make and store well, making them a great option for gifting or enjoying throughout the festive period. Whether you’re serving them to guests or savoring them during a quiet moment, Almond Biscotti brings a touch of elegance to your Christmas cookie platter.
To make Almond Biscotti for 4-6 people, you’ll start by preparing a dough enriched with almonds and flavored with a hint of vanilla and almond extract. The dough is then shaped into logs, baked, and sliced before being baked again to achieve that perfect crispiness.
This recipe provides a simple yet satisfying treat that captures the essence of the holiday spirit, with the added bonus of being a delightful homemade gift for friends and family.
Ingredients (serving size: 4-6 people):
- 2 cups all-purpose flour
- 1 cup granulated sugar
- 1 teaspoon baking powder
- 1/2 teaspoon salt
- 3 large eggs
- 1 teaspoon vanilla extract
- 1/2 teaspoon almond extract
- 1 cup whole almonds, toasted and coarsely chopped
Instructions:
- Preheat the Oven: Preheat your oven to 350°F (175°C). Line a baking sheet with parchment paper or a silicone baking mat.
- Prepare the Dry Ingredients: In a large mixing bowl, whisk together the all-purpose flour, granulated sugar, baking powder, and salt until well combined.
- Mix Wet Ingredients: In a separate bowl, beat the eggs, vanilla extract, and almond extract until the mixture is well combined and frothy.
- Combine Ingredients: Gradually add the wet mixture to the dry ingredients, stirring with a wooden spoon or rubber spatula until a dough begins to form.
- Add Almonds: Gently fold in the chopped almonds, making certain they’re evenly distributed throughout the dough.
- Shape the Dough: Divide the dough in half and shape each portion into a log approximately 12 inches long and 2 inches wide. Place the logs onto the prepared baking sheet, leaving space between them for spreading.
- First Bake: Bake the logs in the preheated oven for 25-30 minutes or until they’re firm to the touch and lightly browned.
- Cool and Slice: Remove the logs from the oven and allow them to cool on the baking sheet for about 10 minutes. Using a serrated knife, slice the logs diagonally into 1/2-inch thick slices.
- Second Bake: Arrange the sliced biscotti cut side down on the baking sheet. Bake for an additional 10-12 minutes, then flip the biscotti and bake for another 10-12 minutes, or until they’re golden and crisp.
- Cool Completely: Remove the biscotti from the oven and transfer them to a wire rack to cool completely before serving or storing.
Extra Tips:
When making Almond Biscotti, toasting the almonds beforehand enhances their flavor and adds an extra layer of depth to the cookies.
Make certain that the baked biscotti are fully cooled before storing them in an airtight container to maintain their crispness. If you prefer a softer biscotti, reduce the second baking time slightly.
Additionally, you can experiment with adding other ingredients such as dried cranberries or a drizzle of melted chocolate for a festive twist.
Red Velvet Cookies

Red Velvet Cookies are a delightful treat that combine the rich, chocolatey flavor of traditional red velvet cake with the convenience and satisfaction of a cookie. Perfect for the Christmas season, these cookies are certain to impress with their vibrant red color and creamy white chocolate chips. They aren’t only visually appealing but also incredibly delicious, making them a favorite for holiday gatherings or as a charming gift for loved ones.
The recipe for Red Velvet Cookies is straightforward, guaranteeing that even novice bakers can achieve confectionary success. The balance of cocoa powder and red food coloring creates the distinctive red velvet hue, while the addition of white chocolate chips provides a delightful contrast both in flavor and appearance. This recipe yields 24-30 cookies, which is perfect for serving 4-6 people.
Ingredients (for 24-30 cookies, serving 4-6 people):
- 1 cup unsalted butter, softened
- 1 cup granulated sugar
- 1 cup light brown sugar, packed
- 2 large eggs
- 1 tablespoon vanilla extract
- 1 teaspoon red food coloring
- 2 ½ cups all-purpose flour
- ¼ cup unsweetened cocoa powder
- 1 teaspoon baking soda
- 1 teaspoon salt
- 1 ½ cups white chocolate chips
Instructions:
- Preheat the Oven: Begin by preheating your oven to 350°F (175°C). Line two baking sheets with parchment paper or silicone baking mats to prevent sticking.
- Mix the Wet Ingredients: In a large mixing bowl, cream together the softened butter, granulated sugar, and brown sugar until the mixture is light and fluffy. This should take about 3-4 minutes with an electric mixer. Add the eggs one at a time, mixing well after each addition. Then, blend in the vanilla extract and red food coloring until fully incorporated.
- Combine Dry Ingredients: In a separate bowl, whisk together the flour, cocoa powder, baking soda, and salt. Ensure there are no lumps in the cocoa powder for a smooth mix.
- Create the Dough: Gradually add the dry ingredients to the wet ingredients, mixing on low speed until just combined. Be careful not to overmix. Once the dry and wet ingredients are combined, gently fold in the white chocolate chips with a spatula.
- Shape the Cookies: Using a tablespoon or a cookie scoop, drop rounded tablespoons of dough onto the prepared baking sheets, spacing them about 2 inches apart to allow for spreading.
- Bake the Cookies: Place the baking sheets in the preheated oven and bake for 10-12 minutes, or until the edges are set and the centers are soft. The cookies will continue to bake on the sheets after they’re removed from the oven.
- Cool and Serve: Allow the cookies to cool on the baking sheets for 5 minutes before transferring them to a wire rack to cool completely. Enjoy warm or store in an airtight container.
Extra Tips: For a more intense red color, you can add an extra teaspoon of red food coloring, but be cautious as too much can alter the taste. If you prefer a softer cookie, slightly underbake them and let them firm up as they cool. For added flavor, consider adding a teaspoon of espresso powder to enhance the chocolate taste. If you want to switch up the chips, you could use dark or milk chocolate chips for a different flavor profile.
Thumbprint Cookies
Thumbprint cookies are a delightful addition to your Christmas cookie collection, known for their buttery base and the sweet surprise in their center. These cookies aren’t only visually appealing with their jam-filled center but are also incredibly versatile, allowing you to customize the filling to your preference, whether it be raspberry jam, lemon curd, or even a dollop of Nutella.
Perfect for a holiday gathering or as a homemade gift, these cookies are bound to bring joy to anyone who tastes them. This recipe will guide you in creating approximately 24-30 thumbprint cookies, ideal for serving 4-6 people. With a few simple ingredients and easy preparation, you’ll have these delicious treats ready in no time.
Whether you’re a seasoned baker or a novice in the kitchen, these thumbprint cookies are a must-try for the holiday season.
Ingredients:
- 2 cups all-purpose flour
- 1/2 teaspoon salt
- 1 cup unsalted butter, softened
- 2/3 cup granulated sugar
- 1 teaspoon vanilla extract
- 1 large egg yolk
- 1/3 cup jam or preserve of your choice (e.g., raspberry, apricot, or strawberry)
Instructions:
- Preheat Oven: Begin by preheating your oven to 350°F (175°C). Line a baking sheet with parchment paper to prevent the cookies from sticking.
- Mix Dry Ingredients: In a medium bowl, whisk together the all-purpose flour and salt. Set this aside for later use.
- Cream Butter and Sugar: In a large mixing bowl, beat the softened butter and granulated sugar together using an electric mixer on medium speed until the mixture is light and fluffy, about 2-3 minutes.
- Add Flavorings: Add the vanilla extract and the egg yolk to the butter mixture and continue to beat until everything is well combined.
- Combine Dry and Wet Ingredients: Gradually add the dry flour mixture to the wet ingredients, mixing on low speed until the dough just comes together. Be careful not to overmix.
- Shape the Cookies: Roll the dough into 1-inch balls and place them onto the prepared baking sheet, leaving about 2 inches of space between each cookie.
- Create Thumbprints: Using your thumb or the back of a small spoon, gently press down in the center of each dough ball to create a small indentation.
- Fill with Jam: Carefully fill each indentation with about 1/2 teaspoon of your chosen jam or preserve. Be careful not to overfill, as the jam can spill over during baking.
- Bake: Place the baking sheet in the preheated oven and bake for 12-15 minutes, or until the edges of the cookies are lightly golden.
- Cool and Enjoy: Remove the cookies from the oven and let them cool on the baking sheet for a few minutes before transferring them to a wire rack to cool completely.
Extra Tips:
For the best results, make sure that your butter is at room temperature before starting the recipe, as this will help create a smooth and creamy dough.
If you find that the dough is too sticky to handle, chilling it in the refrigerator for about 30 minutes can make it easier to shape. Additionally, feel free to experiment with different fillings for a unique flavor combination, and consider dusting the finished cookies with a light sprinkle of powdered sugar for an extra festive touch.
Oatmeal Raisin Cookies
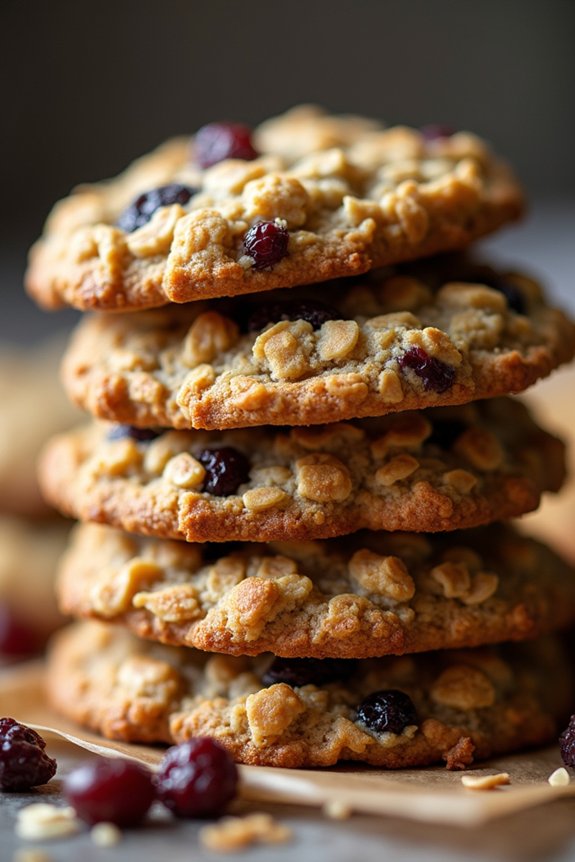
Oatmeal Raisin Cookies are a delightful treat that perfectly blend the wholesome goodness of oats with the natural sweetness of raisins. These cookies are a classic favorite, ideal for the holiday season or any time you crave a comforting snack. The chewy texture of oats combined with the juicy bursts of raisins creates a cookie that’s both satisfying and heartwarming, making it a great addition to your Christmas cookie collection.
This recipe yields about 24 cookies, making it perfect for a serving size of 4-6 people, depending on how many cookies your guests can enjoy. The recipe is straightforward, requiring simple ingredients that you likely already have in your pantry. These cookies not only taste delicious but also fill your home with a warm, inviting aroma that embodies the spirit of Christmas.
Ingredients:
- 1 cup (2 sticks) unsalted butter, softened
- 1 cup packed light brown sugar
- 1/2 cup granulated sugar
- 2 large eggs
- 1 teaspoon vanilla extract
- 1 1/2 cups all-purpose flour
- 1 teaspoon baking soda
- 1 teaspoon ground cinnamon
- 1/2 teaspoon salt
- 3 cups old-fashioned rolled oats
- 1 cup raisins
Cooking Instructions:
- Preheat the Oven: Begin by preheating your oven to 350°F (175°C). Line two baking sheets with parchment paper or silicone baking mats to prevent the cookies from sticking.
- Cream the Butter and Sugars: In a large mixing bowl, beat the softened butter, brown sugar, and granulated sugar together until creamy and smooth. This should take about 2-3 minutes using an electric mixer on medium speed.
- Add Eggs and Vanilla: Add the eggs one at a time, beating well after each addition. Stir in the vanilla extract until fully incorporated.
- Mix Dry Ingredients: In a separate bowl, whisk together the flour, baking soda, cinnamon, and salt. Gradually add this dry mixture to the wet ingredients, mixing just until combined.
- Stir in Oats and Raisins: Gently fold in the oats and raisins using a spatula or wooden spoon, verifying they’re evenly distributed throughout the dough.
- Shape the Cookies: Use a tablespoon or cookie scoop to drop rounded balls of dough onto the prepared baking sheets, leaving about 2 inches between each cookie.
- Bake: Place the baking sheets in the preheated oven and bake for 10-12 minutes, or until the cookies are golden brown around the edges but still soft in the center.
- Cool: Remove the cookies from the oven and let them cool on the baking sheets for about 5 minutes before transferring them to a wire rack to cool completely.
Extra Tips:
For the best results, make certain your butter is at room temperature to blend seamlessly with the sugars. If you prefer plumper raisins, soak them in warm water for about 10 minutes before adding them to the dough, then drain thoroughly.
To keep your cookies soft and chewy, store them in an airtight container with a slice of bread, which helps maintain moisture. Enjoy these cookies with a glass of milk or a warm cup of tea for a cozy holiday treat!
Chocolate Chip Snowballs
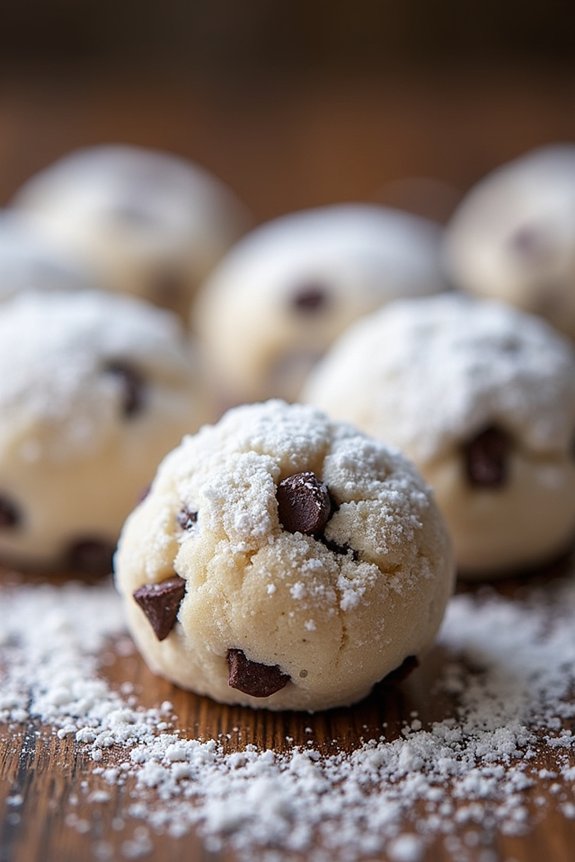
Indulge in a delightful treat this holiday season with Chocolate Chip Snowballs. These cookies combine the classic flavor of chocolate chips with a melt-in-your-mouth texture that’s perfect for sharing with family and friends. As they bake, the aroma of buttery dough and sweet chocolate will fill your home, creating a warm and inviting atmosphere.
These cookies aren’t only delicious but also visually appealing, resembling snowballs dusted with a gentle layer of powdered sugar. Chocolate Chip Snowballs are a perfect addition to your Christmas cookie platter. They’re relatively simple to make, requiring just a few basic ingredients that you likely already have in your pantry.
The dough comes together quickly, and the cookies bake to perfection in just minutes. Once they’re out of the oven, a generous coating of powdered sugar completes their transformation into snowy delights. Share them as gifts, serve them at holiday gatherings, or enjoy them with a cup of hot cocoa by the fire.
Ingredients (Serving Size: 4-6 people):
- 1 cup unsalted butter, softened
- 1/2 cup powdered sugar (plus extra for coating)
- 1 teaspoon vanilla extract
- 2 cups all-purpose flour
- 1/4 teaspoon salt
- 1 cup mini chocolate chips
Cooking Instructions:
- Preheat the Oven: Start by preheating your oven to 350°F (175°C). Line two baking sheets with parchment paper or silicone baking mats.
- Cream Butter and Sugar: In a large mixing bowl, beat the softened butter and 1/2 cup of powdered sugar together with an electric mixer on medium speed until light and fluffy, about 2-3 minutes. Add the vanilla extract and mix until combined.
- Mix Dry Ingredients: In a separate bowl, whisk together the flour and salt. Gradually add the flour mixture to the cream mixture, beating on low speed until just combined.
- Add Chocolate Chips: Gently fold in the mini chocolate chips into the dough using a spatula or wooden spoon.
- Shape the Cookies: Scoop tablespoon-sized portions of dough and roll them into balls with your hands. Place the balls on the prepared baking sheets, spacing them about 1 inch apart.
- Bake: Bake the cookies in the preheated oven for 10-12 minutes, or until the edges are lightly golden. The cookies will be soft, so be careful not to overbake.
- Coat with Powdered Sugar: Allow the cookies to cool on the baking sheets for about 5 minutes. Then, roll each warm cookie in powdered sugar to coat completely. Let them cool completely on a wire rack.
- Second Coating: Once the cookies have cooled, give them another coat of powdered sugar for a snowy appearance.
Extra Tips:
When making Chocolate Chip Snowballs, make certain your butter is properly softened to achieve the perfect creamy texture for the dough. If your dough feels too crumbly to form balls, you can add a teaspoon of milk to help bind the mixture.
For a variation, try adding a pinch of cinnamon or nutmeg to the dough for a spiced twist. These cookies can be stored in an airtight container at room temperature for up to a week, making them a convenient option for holiday pre-preparation. Enjoy your festive baking and the joy these cookies bring!
Shortbread Nut Cookies
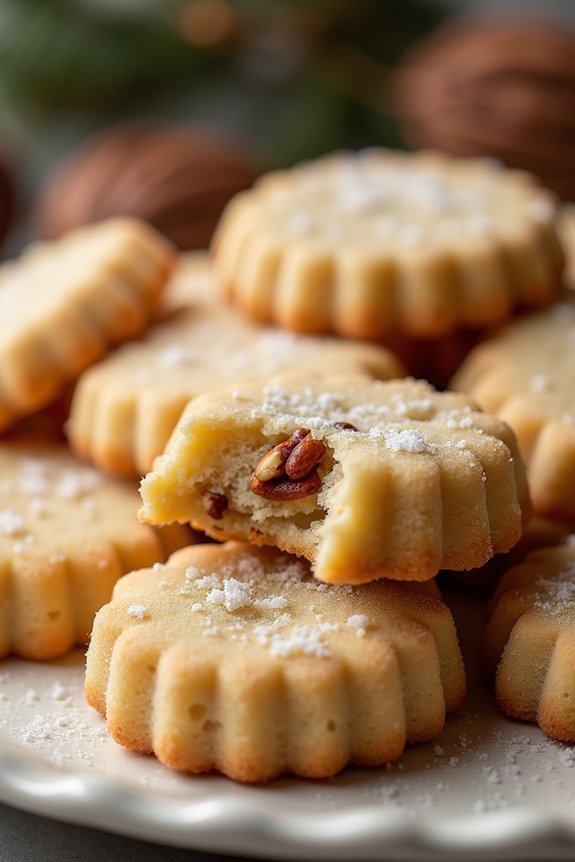
Shortbread Nut Cookies are a delightful treat that combines the classic buttery texture of shortbread with the rich flavors of nuts. Perfect for the holiday season, these cookies are easy to make and are guaranteed to impress your family and friends with their delicious taste and beautiful presentation.
Whether you’re serving them at a festive gathering or gifting them as a thoughtful homemade present, Shortbread Nut Cookies are a versatile addition to your holiday cookie repertoire.
This recipe yields approximately 24-30 cookies, making it ideal for a serving size of 4-6 people. The nutty crunch paired with the melt-in-your-mouth shortbread is simply irresistible. Choose your favorite type of nuts to customize the flavor, or mix several kinds for a more complex taste.
These cookies are best enjoyed with a warm beverage or alongside a scoop of ice cream for a delightful dessert experience.
Ingredients:
- 1 cup unsalted butter, softened
- 1/2 cup powdered sugar
- 1 teaspoon vanilla extract
- 2 cups all-purpose flour
- 1/2 teaspoon salt
- 1 cup chopped nuts (such as pecans, walnuts, or almonds)
- Optional: 1/4 cup granulated sugar for rolling
Cooking Instructions:
- Preheat and Prepare: Preheat your oven to 350°F (175°C). Line two baking sheets with parchment paper or silicone baking mats to prevent sticking.
- Cream Butter and Sugar: In a large mixing bowl, cream together the softened butter and powdered sugar until light and fluffy. This should take about 2-3 minutes on medium speed using an electric mixer. Add in the vanilla extract and mix until well combined.
- Combine Dry Ingredients: In a separate bowl, whisk together the all-purpose flour and salt. Gradually add the dry ingredients to the butter mixture, mixing on low speed until a dough forms.
- Incorporate Nuts: Gently fold the chopped nuts into the dough using a spatula or wooden spoon until evenly distributed.
- Shape the Cookies: Using your hands, roll tablespoon-sized portions of dough into balls. If desired, roll the balls in granulated sugar for a sweet outer coating. Place the balls 2 inches apart on the prepared baking sheets.
- Flatten and Bake: Using the bottom of a glass or your palm, gently flatten each ball to about 1/2 inch thickness. Bake in the preheated oven for 12-15 minutes, or until the edges are lightly golden.
- Cool and Serve: Allow the cookies to cool on the baking sheets for 5 minutes before transferring them to a wire rack to cool completely. Serve at room temperature or store in an airtight container.
Extra Tips:
For the best texture and flavor, make sure your butter is at room temperature before starting the recipe. This will guarantee it creams well with the sugar, creating a light and airy dough.
If you prefer a more pronounced nut flavor, toast the nuts lightly in a dry skillet before chopping and adding them to the dough. Additionally, these cookies can be made ahead of time and stored in the freezer for up to a month. Simply defrost at room temperature before serving.
Enjoy your festive baking!