

As the holiday season draws near, I’m filled with excitement for baking chocolate treats that truly melt hearts. The aroma of classic chocolate fudge brownies fills the kitchen with warmth. The crisp snap of dark chocolate peppermint bark is so satisfying. These recipes are more than just desserts; they’re cherished memories in the making. If you’re ready to create festive magic and treat your sweet tooth, get ready for an irresistible journey ahead.
Classic Chocolate Fudge Brownies
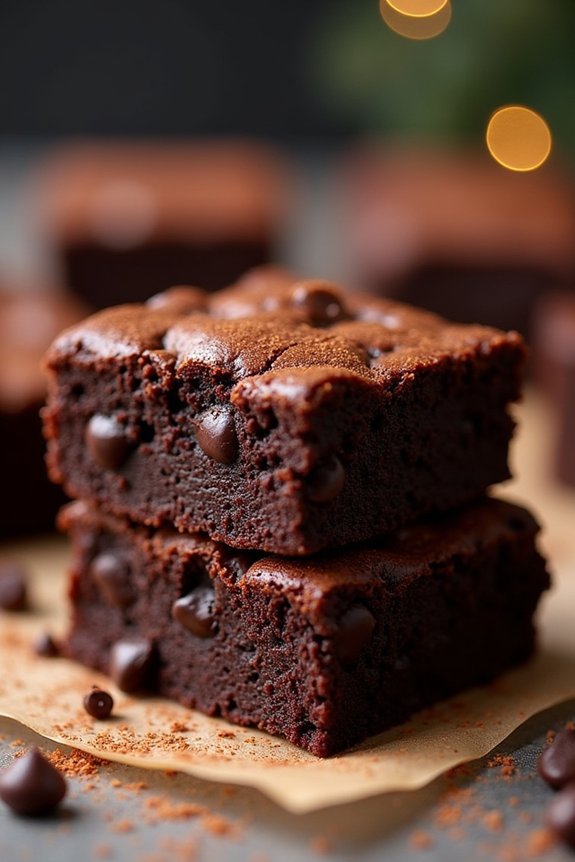
Classic Chocolate Fudge Brownies are a timeless dessert that never fails to delight, especially during the festive Christmas season. Known for their rich, chocolaty flavor and irresistibly fudgy texture, these brownies are perfect for sharing with family and friends.
Whether you’re hosting a holiday gathering or cozying up with a warm mug of cocoa, these brownies are sure to be a hit. With a perfect balance of cocoa, sugar, and butter, these brownies offer a decadent taste that’s both nostalgic and comforting.
The secret to making the best chocolate fudge brownies lies in using high-quality ingredients and paying close attention to your baking process. The recipe is simple, yet the results are truly spectacular, with a chewy interior and a thin, crackly top.
For this recipe, we’ve designed a serving size that comfortably serves 4-6 people, making it perfect for small gatherings or intimate family dinners. Let’s explore the ingredients and steps needed to create these delicious treats.
Ingredients (Serves 4-6):
- 1/2 cup (115g) unsalted butter, melted
- 1 cup (200g) granulated sugar
- 2 large eggs
- 1 teaspoon vanilla extract
- 1/3 cup (40g) unsweetened cocoa powder
- 1/2 cup (65g) all-purpose flour
- 1/4 teaspoon salt
- 1/4 teaspoon baking powder
- 1/2 cup (90g) semi-sweet chocolate chips
Cooking Instructions:
- Preheat and Prepare Pan: Preheat your oven to 350°F (175°C). Lightly grease an 8×8 inch (20×20 cm) baking pan or line it with parchment paper, leaving an overhang on the edges for easy removal of the brownies.
- Mix Wet Ingredients: In a large mixing bowl, combine the melted butter and sugar. Whisk together until the mixture is smooth and well combined. Add the eggs and vanilla extract, and continue to whisk until the mixture is creamy and slightly thickened.
- Combine Dry Ingredients: In a separate medium bowl, sift together the cocoa powder, flour, salt, and baking powder. Confirming there are no lumps in the dry ingredients will help achieve a smooth batter.
- Create Brownie Batter: Gradually add the dry ingredients to the wet ingredients. Gently fold the mixture using a rubber spatula or wooden spoon until just combined. Be careful not to overmix, as this can lead to dense brownies.
- Add Chocolate Chips: Stir in the semi-sweet chocolate chips, ensuring they’re evenly distributed throughout the batter.
- Bake the Brownies: Pour the brownie batter into the prepared baking pan, spreading it evenly with the spatula. Place the pan in the preheated oven and bake for 25-30 minutes, or until a toothpick inserted in the center comes out with a few moist crumbs attached.
- Cool and Serve: Allow the brownies to cool in the pan on a wire rack for about 15 minutes. Use the parchment paper overhang to lift the brownies out of the pan, and let them cool completely before slicing into squares.
Extra Tips:
For the best fudgy texture, avoid overbaking your brownies. They should still be slightly gooey in the center when you take them out of the oven.
If you prefer a nuttier flavor, consider adding a handful of chopped walnuts or pecans to the batter. For a festive touch, you can also sprinkle some crushed peppermint or drizzle white chocolate over the top once cooled.
Dark Chocolate Peppermint Bark
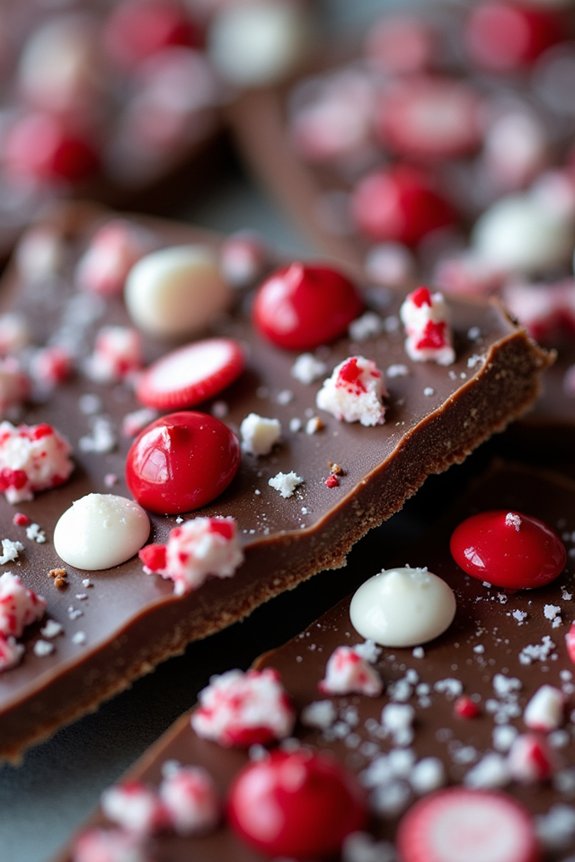
Dark Chocolate Peppermint Bark is a delightful and festive treat that’s perfect for the holiday season. This simple yet exquisite dessert combines the rich, slightly bitter taste of dark chocolate with the invigorating, cool flavor of peppermint, offering a luxurious and satisfying bite. Ideal for gifting or as a sweet addition to your Christmas dessert table, this bark isn’t only delicious but also visually appealing with its smooth chocolate base and sprinkle of crunchy peppermint candy on top.
Making Dark Chocolate Peppermint Bark at home is surprisingly easy and requires minimal ingredients, making it a go-to recipe for busy holiday schedules. The key to success lies in using high-quality dark chocolate and verifying the peppermint candies are crushed to the perfect size to provide texture without overwhelming each bite. With just a little bit of preparation and a few simple steps, you’ll have a batch of this delectable bark ready to enjoy or share with loved ones.
Ingredients (serving size: 4-6 people):
- 12 ounces high-quality dark chocolate (at least 70% cacao)
- 1/2 teaspoon peppermint extract
- 1/2 cup crushed peppermint candies or candy canes
Cooking Instructions:
- Prepare the Baking Sheet: Line a baking sheet with parchment paper or a silicone baking mat to prevent the bark from sticking. This will also make it easier to remove once set.
- Melt the Chocolate: Break the dark chocolate into small pieces and place them in a heatproof bowl. Melt the chocolate using a double boiler by placing the bowl over a pot of simmering water. Stir occasionally until the chocolate is completely melted and smooth. Alternatively, you can melt the chocolate in the microwave in 30-second intervals, stirring in between, until smooth.
- Add Peppermint Extract: Once the chocolate is melted, remove it from heat and stir in the peppermint extract. Mix thoroughly to verify the extract is evenly distributed throughout the chocolate.
- Pour and Spread: Pour the melted chocolate onto the prepared baking sheet. Use a spatula to spread the chocolate into an even layer, about 1/4 inch thick.
- Add Crushed Peppermint: Sprinkle the crushed peppermint candies evenly over the top of the chocolate. Gently press any larger pieces into the chocolate to verify they adhere as it sets.
- Set the Bark: Allow the chocolate to cool and harden at room temperature for at least 2 hours. If you’re in a hurry, you can place the baking sheet in the refrigerator for about 30 minutes to speed up the setting process.
- Break into Pieces: Once the chocolate is fully set, remove it from the baking sheet and break it into bite-sized pieces using your hands or a sharp knife.
Extra Tips:
To enhance the presentation of your Dark Chocolate Peppermint Bark, consider drizzling some white chocolate over the dark chocolate before adding the peppermint candies for a visually striking contrast.
When crushing your peppermint candies, place them in a sealed plastic bag and gently tap them with a rolling pin to achieve the desired size without making too much dust.
Store the finished bark in an airtight container to keep it fresh; it will last for up to two weeks, making it perfect for preparing in advance of any holiday gatherings.
Chocolate-Dipped Gingerbread Cookies
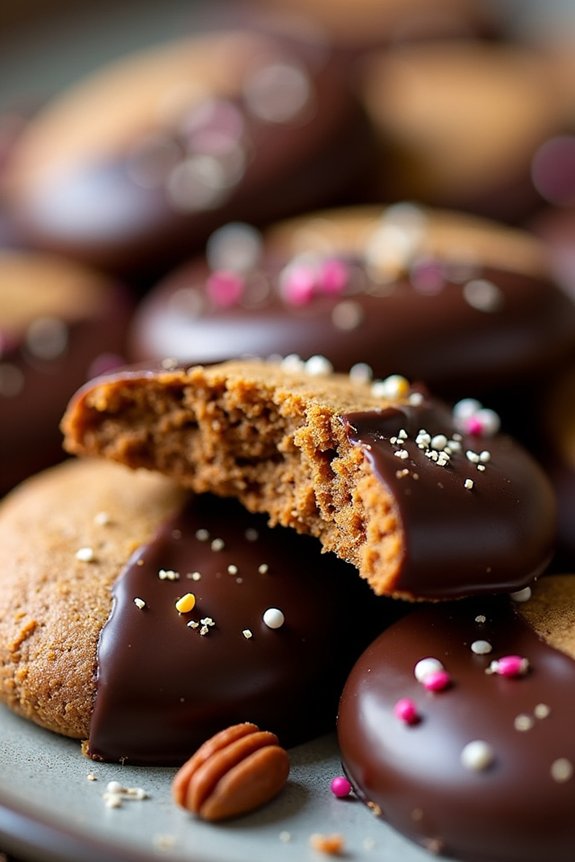
Indulge in the perfect blend of spicy gingerbread and rich chocolate with this delightful recipe for Chocolate-Dipped Gingerbread Cookies. These cookies are an irresistible treat, combining the warm flavors of ginger, cinnamon, and cloves with a luscious chocolate coating. Perfect for holiday gatherings or as a homemade gift, they bring a festive touch to any occasion.
With their crisp exterior and chewy center, these cookies are sure to become a family favorite. Preparing these chocolate-dipped gingerbread cookies is a fun and rewarding experience, ideal for a cozy baking day with family and friends. The process involves making a fragrant gingerbread dough, baking it to perfection, and then dipping each cookie in melted chocolate for an extra layer of decadence.
The result is a batch of cookies that are as beautiful as they’re delicious, making them a show-stopping addition to your Christmas cookie platter.
Ingredients (Serves 4-6 people):
- 3 cups all-purpose flour
- 1 teaspoon baking soda
- 2 teaspoons ground ginger
- 1 teaspoon ground cinnamon
- 1/2 teaspoon ground cloves
- 1/4 teaspoon salt
- 3/4 cup unsalted butter, softened
- 3/4 cup dark brown sugar, packed
- 1 large egg
- 1/2 cup molasses
- 1 teaspoon vanilla extract
- 8 ounces semi-sweet chocolate, chopped (or chocolate chips)
- 1 tablespoon vegetable oil
Cooking Instructions:
- Prepare the Dough: In a medium bowl, whisk together the flour, baking soda, ginger, cinnamon, cloves, and salt. In a separate large bowl, beat the softened butter and brown sugar together until creamy. Add the egg, molasses, and vanilla extract, mixing until fully combined.
- Combine Ingredients: Gradually add the dry ingredients to the wet ingredients, mixing until a dough forms. Divide the dough into two discs, wrap them in plastic wrap, and refrigerate for at least 1 hour until firm.
- Preheat and Roll: Preheat your oven to 350°F (175°C). On a lightly floured surface, roll out one disc of dough to about 1/4-inch thickness. Use cookie cutters to cut out desired shapes, and place them on a baking sheet lined with parchment paper.
- Bake the Cookies: Bake the cookies in the preheated oven for 8-10 minutes, or until the edges are lightly browned. Remove from the oven and allow the cookies to cool on the baking sheet for 5 minutes, then transfer to a wire rack to cool completely.
- Melt the Chocolate: In a microwave-safe bowl, combine the chopped chocolate and vegetable oil. Microwave in 30-second intervals, stirring in between, until the chocolate is completely melted and smooth.
- Dip and Cool: Dip each cooled cookie halfway into the melted chocolate, allowing the excess to drip off. Place the dipped cookies back onto the parchment-lined baking sheet and let them sit until the chocolate is set.
Extra Tips:
For a more decorative touch, sprinkle crushed nuts, festive sprinkles, or a pinch of sea salt onto the chocolate before it sets. If you prefer a darker chocolate taste, you can substitute semi-sweet chocolate with dark chocolate.
Store the cookies in an airtight container at room temperature for up to one week. To save time, the dough can be prepared a day in advance and refrigerated until ready to use.
Decadent Chocolate Truffle Cake
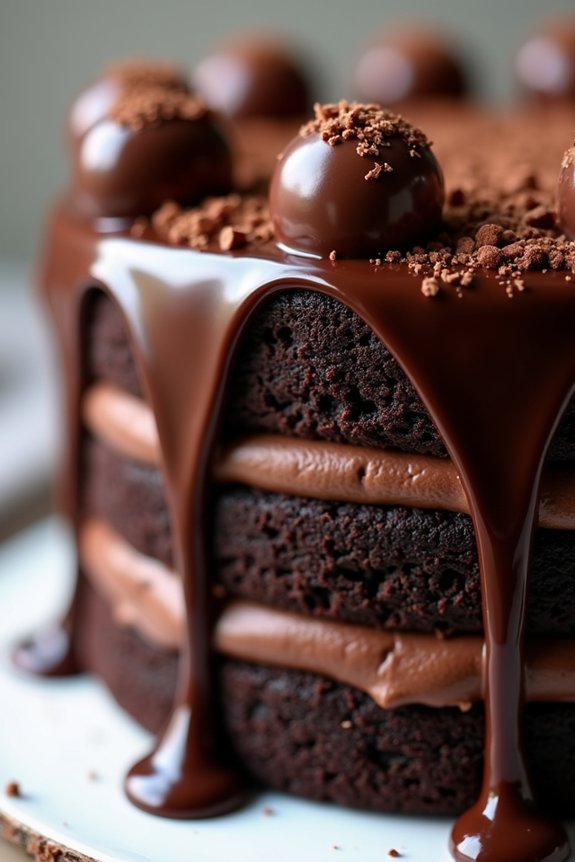
Indulge in the rich and luxurious flavors of Decadent Chocolate Truffle Cake this holiday season. This cake is a showstopper, perfect for any festive gathering or a cozy night at home. With its dense chocolate layers and velvety truffle ganache, this cake promises to be a chocolate lover’s dream.
The smooth and creamy texture of the truffle filling paired with the moist chocolate cake creates a melt-in-your-mouth experience that will leave your guests asking for seconds.
Preparing this dessert is an opportunity to showcase your baking skills and impress your friends and family. The recipe is straightforward, yet the outcome is a cake that looks like it came from a professional bakery. It combines high-quality cocoa, rich dark chocolate, and heavy cream to achieve depth and complexity in flavor.
Whether you’re a seasoned baker or a novice, this Decadent Chocolate Truffle Cake is approachable and rewarding to make.
Ingredients for 4-6 servings:
- 1 cup all-purpose flour
- 1 cup granulated sugar
- 1/2 cup unsweetened cocoa powder
- 1 teaspoon baking powder
- 1/2 teaspoon baking soda
- 1/2 teaspoon salt
- 2 large eggs
- 1/2 cup whole milk
- 1/2 cup vegetable oil
- 1 teaspoon vanilla extract
- 1/2 cup boiling water
- 8 ounces dark chocolate, chopped
- 1 cup heavy cream
- 2 tablespoons unsalted butter
Cooking Instructions:
- Preheat and Prepare: Preheat your oven to 350°F (175°C). Grease and flour a 9-inch round cake pan, ensuring the sides and bottom are fully coated to prevent sticking.
- Mix Dry Ingredients: In a large mixing bowl, combine the flour, sugar, cocoa powder, baking powder, baking soda, and salt. Whisk them together until evenly mixed.
- Incorporate Wet Ingredients: Add the eggs, milk, vegetable oil, and vanilla extract to the dry ingredients. Beat on medium speed for about 2 minutes until the batter is smooth and well combined.
- Add Boiling Water: Carefully stir in the boiling water. The batter will be thin, but this is expected. Pour the batter into the prepared cake pan.
- Bake the Cake: Place the pan in the preheated oven and bake for 30-35 minutes, or until a toothpick inserted into the center comes out clean. Allow the cake to cool in the pan for 10 minutes, then transfer it to a wire rack to cool completely.
- Prepare Truffle Ganache: In a heatproof bowl, combine the chopped dark chocolate and butter. In a small saucepan, bring the heavy cream to a simmer over medium heat. Pour the hot cream over the chocolate and butter, letting it sit for 2 minutes, then stir until smooth and shiny.
- Assemble the Cake: Once the cake is completely cooled, spread the truffle ganache evenly over the top and sides using a spatula. Allow the ganache to set slightly before slicing.
Extra Tips:
For the best results, use high-quality dark chocolate for the ganache, as this will greatly enhance the overall flavor of the cake.
If you want to add a bit of festive flair, consider topping the cake with chocolate shavings or a dusting of cocoa powder. For an added touch of elegance, serve each slice with a dollop of whipped cream or a scoop of vanilla ice cream.
This cake can be made a day in advance and stored in an airtight container at room temperature, which allows the flavors to develop even more.
White Chocolate Cranberry Blondies
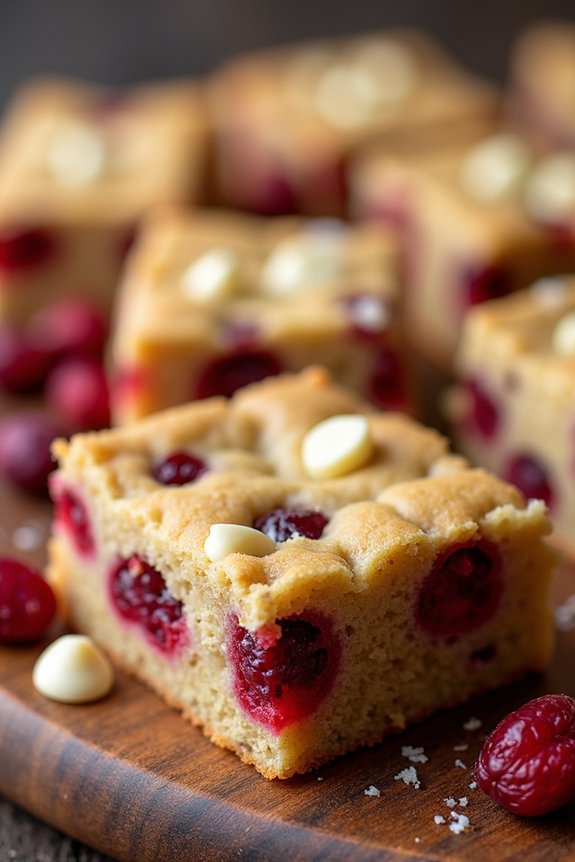
White Chocolate Cranberry Blondies are a delightful holiday treat that combines the rich flavor of white chocolate with the tartness of cranberries. These blondies are perfect for sharing during Christmas gatherings or wrapping up as a homemade gift. Their soft, chewy texture and festive colors make them a standout addition to any holiday dessert table.
Whether you’re a seasoned baker or new to the kitchen, this recipe is simple to follow and certain to impress your family and friends. This recipe makes enough for 4-6 people, with each bite offering a balanced blend of creamy white chocolate and juicy cranberries. The batter comes together quickly and bakes to a beautiful golden perfection.
The resulting blondies not only taste amazing but also look stunning with their jewel-like cranberries and creamy chocolate flecks. Serve them warm with a scoop of vanilla ice cream or at room temperature with a mug of hot cocoa for a cozy holiday treat.
Ingredients:
- 1 cup all-purpose flour
- 1/2 teaspoon baking powder
- 1/4 teaspoon salt
- 1/2 cup unsalted butter, melted
- 1 cup packed light brown sugar
- 1 large egg
- 1 1/2 teaspoons vanilla extract
- 1/2 cup white chocolate chips
- 1/2 cup dried cranberries
Cooking Instructions:
- Preheat the Oven: Start by preheating your oven to 350°F (175°C). This guarantees that the oven is at the right temperature when you’re ready to bake.
- Prepare the Pan: Line an 8×8-inch baking pan with parchment paper, allowing some overhang on the sides for easy removal of the blondies after baking.
- Mix Dry Ingredients: In a medium bowl, whisk together the flour, baking powder, and salt. This helps to evenly distribute the leavening agent throughout the flour.
- Combine Wet Ingredients: In a large bowl, mix the melted butter and brown sugar until well combined. Add the egg and vanilla extract, and mix until smooth and creamy.
- Incorporate Dry Ingredients: Gradually add the dry mixture to the wet ingredients, stirring gently until just combined. Be careful not to overmix, as this can result in tougher blondies.
- Fold in Add-ins: Gently fold in the white chocolate chips and dried cranberries until they’re evenly distributed throughout the batter.
- Transfer to Baking Pan: Pour the batter into the prepared baking pan and spread it out evenly using a spatula.
- Bake: Place the pan in the preheated oven and bake for 25-30 minutes, or until the blondies are golden brown and a toothpick inserted into the center comes out clean.
- Cool and Serve: Allow the blondies to cool in the pan for about 10 minutes. Then, use the parchment paper overhang to lift them out of the pan and transfer to a wire rack to cool completely before cutting into squares.
Extra Tips:
For an added festive touch, you can sprinkle a handful of extra white chocolate chips and cranberries on top of the batter before baking. If you prefer a nuttier flavor, consider adding a half cup of chopped walnuts or pecans to the batter.
To guarantee your blondies are chewy and not dry, be careful not to overbake them; they should be slightly soft in the center when you take them out of the oven as they’ll continue to firm up as they cool. Enjoy your White Chocolate Cranberry Blondies as a sweet and satisfying holiday treat!
Hot Chocolate Cupcakes With Marshmallow Frosting
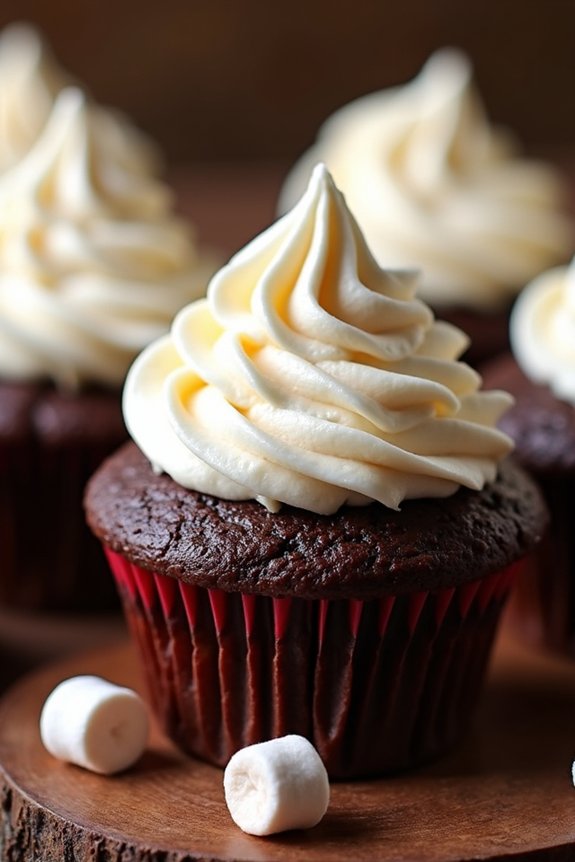
Indulge in the festive spirit with these delightful Hot Chocolate Cupcakes With Marshmallow Frosting. This recipe brings together the comforting flavors of hot chocolate and the gooey sweetness of marshmallows, all in a cupcake form.
Perfect for a cozy winter gathering or a holiday party, these cupcakes are bound to be a hit with both kids and adults. The cupcakes are rich and moist, with a decadent chocolate base topped with a fluffy marshmallow frosting that melts in your mouth.
Ideal for serving 4-6 people, this recipe is both simple and rewarding. Whether you’re an experienced baker or a beginner, you’ll find that these cupcakes are easy to make and will fill your kitchen with the warm, inviting aroma of chocolate. Gather your ingredients and follow the steps below to create these scrumptious holiday treats.
Ingredients:
For the Cupcakes:
- 1 cup all-purpose flour
- 1/2 cup unsweetened cocoa powder
- 1 cup granulated sugar
- 1 teaspoon baking powder
- 1/2 teaspoon baking soda
- 1/4 teaspoon salt
- 1/2 cup unsalted butter, melted
- 2 large eggs
- 1 teaspoon vanilla extract
- 1/2 cup whole milk
- 1/2 cup hot water
For the Marshmallow Frosting:
- 1/2 cup unsalted butter, softened
- 1 cup marshmallow fluff
- 1 teaspoon vanilla extract
- 2 cups powdered sugar
- 2-3 tablespoons heavy cream
Instructions:
- Preheat and Prepare: Preheat your oven to 350°F (175°C) and line a muffin tin with cupcake liners to prepare for baking.
- Mix Dry Ingredients: In a medium bowl, whisk together the flour, cocoa powder, sugar, baking powder, baking soda, and salt until well combined.
- Combine Wet Ingredients: In a separate large bowl, mix the melted butter, eggs, and vanilla extract. Gradually add the milk and hot water, stirring until the mixture is smooth.
- Create Batter: Slowly add the dry ingredients to the wet ingredients, stirring gently until the batter is just combined. Be careful not to overmix.
- Fill and Bake: Divide the batter evenly among the prepared cupcake liners, filling each about two-thirds full. Bake in the preheated oven for 18-20 minutes, or until a toothpick inserted into the center comes out clean.
- Cool Cupcakes: Remove the cupcakes from the oven and let them cool in the pan for 5 minutes. Then transfer them to a wire rack to cool completely before frosting.
- Prepare Frosting: In a large mixing bowl, beat the softened butter until creamy. Add the marshmallow fluff and vanilla extract, mixing until smooth. Gradually add the powdered sugar and beat until fully incorporated. Add heavy cream, one tablespoon at a time, until you reach the desired frosting consistency.
- Frost Cupcakes: Once the cupcakes are completely cool, use a piping bag or a spatula to frost each cupcake with the marshmallow frosting.
Extra Tips:
To guarantee your cupcakes are perfectly moist, be careful not to overbake them, as this can lead to dryness.
When making the frosting, if you find it too stiff, add a little more cream to reach the right consistency. For an added festive touch, consider topping your cupcakes with mini marshmallows or a sprinkle of cocoa powder.
These cupcakes are best enjoyed fresh but can be stored in an airtight container for up to two days.
Double Chocolate Yule Log
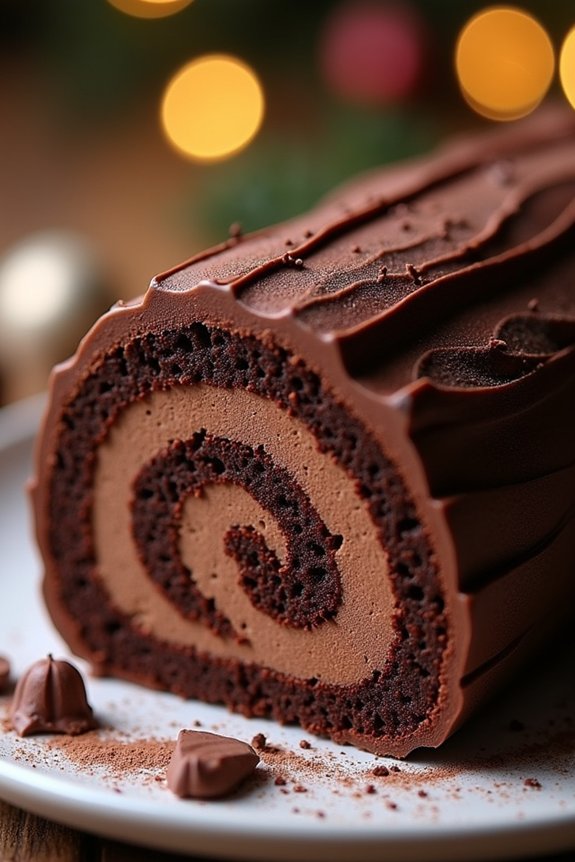
The Double Chocolate Yule Log is a festive and indulgent dessert perfect for celebrating the holiday season. This classic French Bûche de Noël is given a decadent twist with a rich chocolate sponge cake filled with creamy chocolate ganache, rolled into a log shape, and then covered in a luscious chocolate buttercream.
The Double Chocolate Yule Log isn’t only a treat for the taste buds but also a stunning centerpiece for your Christmas table that will impress your guests with its beautiful presentation and heavenly taste.
This recipe yields a Double Chocolate Yule Log that serves 4-6 people, making it ideal for an intimate family gathering or a cozy holiday dinner. The combination of different textures and flavors – from the soft sponge to the creamy filling and the smooth buttercream – guarantees each bite is a delightful experience.
The following recipe provides detailed instructions to help you create this festive dessert with ease, making certain that your Christmas celebration includes a touch of chocolatey joy.
Ingredients:
- 4 large eggs
- 100g (1/2 cup) granulated sugar
- 1 tsp vanilla extract
- 65g (1/2 cup) all-purpose flour
- 30g (1/4 cup) unsweetened cocoa powder
- 1/4 tsp salt
- 100g (3.5 oz) dark chocolate, chopped
- 200ml (3/4 cup) heavy cream
- 150g (2/3 cup) unsalted butter, softened
- 250g (2 cups) powdered sugar
- 2 tbsp milk
- Chocolate shavings or curls for garnish (optional)
Instructions:
- Preheat and Prep: Preheat your oven to 180°C (350°F). Line a 10×15 inch jelly roll pan with parchment paper, making certain the paper extends over the edges for easy removal.
- Make the Sponge Cake: In a large mixing bowl, beat the eggs, granulated sugar, and vanilla extract together until the mixture becomes thick and pale. In a separate bowl, sift together the flour, cocoa powder, and salt. Gently fold the dry ingredients into the egg mixture until just combined.
- Bake the Cake: Pour the batter into the prepared pan, spreading it evenly. Bake for 10-12 minutes, or until the cake springs back when lightly touched. Once baked, carefully invert the cake onto a clean kitchen towel dusted with powdered sugar. Peel off the parchment paper and roll the cake up with the towel from the short end. Let it cool completely.
- Prepare the Chocolate Ganache Filling: Heat the heavy cream in a saucepan over medium heat until it just begins to simmer. Remove from heat and pour over the chopped dark chocolate. Let it sit for a minute, then stir until smooth. Allow it to cool until it thickens to a spreadable consistency.
- Make the Chocolate Buttercream: In a medium bowl, beat the softened butter until creamy. Gradually add the powdered sugar, cocoa powder, and milk, beating until smooth and fluffy.
- Assemble the Yule Log: Unroll the cooled sponge cake and spread the chocolate ganache evenly over the surface. Roll the cake back up tightly without the towel, forming a log. Trim the ends for a neater appearance.
- Decorate: Spread the chocolate buttercream over the entire surface of the log. Use a fork to create bark-like lines for a realistic look. Optionally, decorate with chocolate shavings or curls for added flair.
Extra Tips:
When making the Double Chocolate Yule Log, make certain that the sponge cake is rolled while still warm to prevent cracking. Cooling it in the rolled shape helps it maintain flexibility.
For the ganache, allow it to cool and thicken adequately before spreading to avoid a runny filling. When spreading the buttercream, a palette knife or spatula is helpful for achieving a smooth finish.
If desired, you can add festive decorations such as powdered sugar “snow” or edible glitter for extra holiday charm.
Chocolate Hazelnut Biscotti
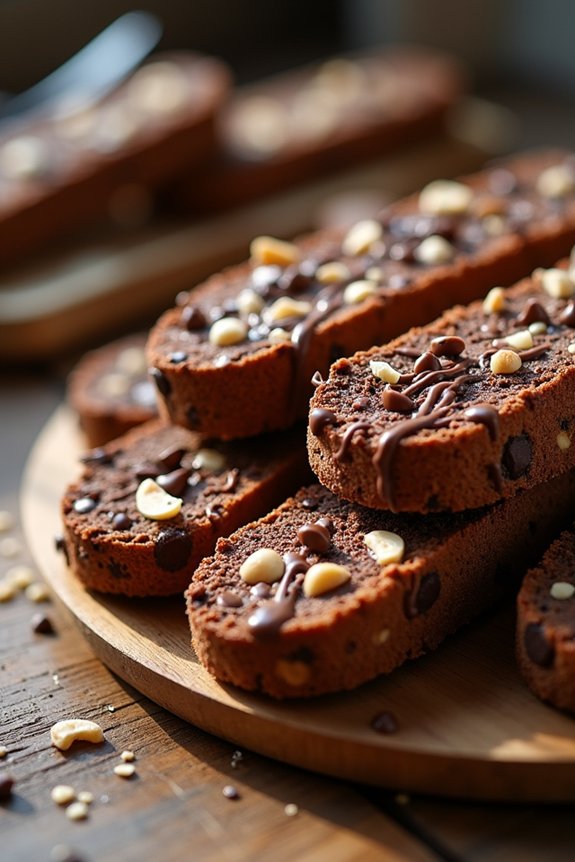
Indulge in the delightful crunch and rich flavors of Chocolate Hazelnut Biscotti, a perfect treat for the holiday season. This traditional Italian biscuit is twice-baked, giving it its characteristic crispy texture, which pairs beautifully with the deep, nutty taste of hazelnuts and the decadent allure of chocolate.
Whether you’re serving it as a sweet accompaniment to coffee or packaging it as a homemade gift, Chocolate Hazelnut Biscotti is certain to bring festive joy to your Christmas celebrations.
Biscotti are known for their long shelf life, making them an ideal choice for holiday baking when you’re preparing an array of treats in advance. The combination of chocolate and hazelnuts in this recipe provides a delightful contrast of flavors, with just the right amount of sweetness to satisfy your holiday cravings.
With a baking process that’s straightforward, yet rewarding, you’ll find that making this biscotti is as enjoyable as sharing it with loved ones.
Ingredients for 4-6 Servings:
- 2 cups all-purpose flour
- 1/2 cup unsweetened cocoa powder
- 1 teaspoon baking soda
- 1/4 teaspoon salt
- 1 cup granulated sugar
- 3 large eggs
- 1 teaspoon vanilla extract
- 1 cup hazelnuts, toasted and chopped
- 3/4 cup semisweet chocolate chips
Cooking Instructions:
- Preheat and Prepare: Begin by preheating your oven to 350°F (175°C). Line a baking sheet with parchment paper to facilitate easy removal of the biscotti later.
- Mix Dry Ingredients: In a medium bowl, whisk together the flour, cocoa powder, baking soda, and salt until well combined. This helps to evenly distribute the cocoa and guarantees a consistent taste and texture throughout the biscotti.
- Beat Wet Ingredients: In a large mixing bowl, beat the sugar and eggs together using an electric mixer on medium speed until the mixture is pale and thick, about 2 minutes. Add in the vanilla extract and mix until just combined.
- Combine and Fold: Gradually add the dry ingredient mixture to the wet ingredients, stirring until a dough forms. Fold in the chopped hazelnuts and chocolate chips, ensuring they’re evenly dispersed throughout the dough.
- Shape the Dough: Divide the dough in half and transfer to the prepared baking sheet. Shape each half into a log about 12 inches long and 2 inches wide. Leave enough space between the logs as they’ll spread during baking.
- First Bake: Bake the logs in the preheated oven for 25-30 minutes, or until they’re firm to the touch. Remove from the oven and allow them to cool on the baking sheet for about 10 minutes.
- Slice and Second Bake: Reduce the oven temperature to 325°F (160°C). Using a serrated knife, carefully slice the logs diagonally into 1/2-inch thick slices. Place the slices cut side down back onto the baking sheet.
- Final Bake: Return the biscotti to the oven and bake for an additional 10-15 minutes, flipping halfway through to guarantee even crispness. Once baked, transfer to a wire rack to cool completely.
Extra Tips:
For the best texture, make sure that the biscotti logs are completely cooled before slicing to prevent crumbling. If you prefer a more chocolatey taste, consider drizzling melted chocolate over the cooled biscotti or dipping one end into chocolate for an elegant touch.
Additionally, storing the biscotti in an airtight container will preserve its crispness and flavor, allowing you to enjoy this festive treat throughout the holiday season.
Chocolate-Covered Cherry Thumbprint Cookies
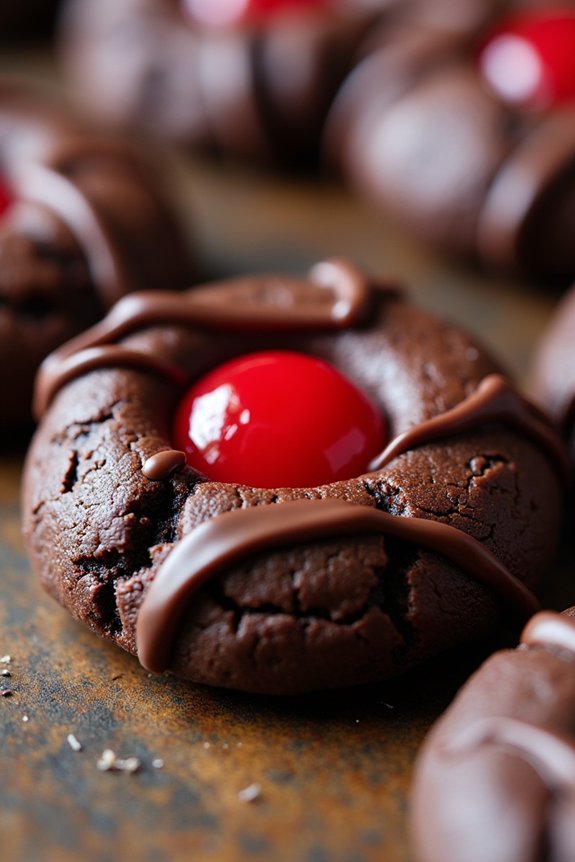
Chocolate-Covered Cherry Thumbprint Cookies are a delightful treat perfect for the festive season. These cookies combine the rich taste of chocolate with the sweet and slightly tart flavor of cherries, making them an irresistible addition to any holiday dessert spread.
The thumbprint design not only makes them visually appealing but also provides the perfect cavity to hold the luscious cherry filling. Whether you’re serving these at a Christmas party or gifting them as part of a homemade cookie platter, they’re bound to impress with both their taste and presentation.
The process of making Chocolate-Covered Cherry Thumbprint Cookies is as enjoyable as they’re to eat. The dough is prepared with a rich chocolate base, and then each cookie is indented to hold a cherry center. After baking, these cookies are finished off with a drizzle of melted chocolate, enhancing their decadent flavor.
This recipe yields about 24 cookies, making it suitable for serving 4-6 people, depending on their sweet tooth.
Ingredients (serves 4-6 people):
- 1 cup unsalted butter, softened
- 2/3 cup granulated sugar
- 2 large egg yolks
- 1 teaspoon vanilla extract
- 2 cups all-purpose flour
- 1/2 cup unsweetened cocoa powder
- 1/4 teaspoon salt
- 1 jar (12 oz) maraschino cherries, drained and patted dry
- 1/2 cup semi-sweet chocolate chips
- 1 tablespoon vegetable oil
Instructions:
- Prepare the Dough: In a large mixing bowl, cream together the softened butter and sugar until light and fluffy. Beat in the egg yolks and vanilla extract until well combined.
- Combine Dry Ingredients: In a separate bowl, whisk together the flour, cocoa powder, and salt. Gradually add the dry mixture to the wet ingredients, mixing until a dough forms.
- Shape and Indent: Preheat your oven to 350°F (175°C). Roll the dough into 1-inch balls and place them on a baking sheet lined with parchment paper. Use your thumb or the back of a teaspoon to gently press an indentation into the center of each cookie.
- Add Cherries: Place one maraschino cherry in the center of each indented cookie.
- Bake: Bake the cookies in the preheated oven for 10-12 minutes, or until the edges are set. Allow them to cool on the baking sheet for a few minutes before transferring to a wire rack to cool completely.
- Melt Chocolate: In a small microwave-safe bowl, combine the chocolate chips and vegetable oil. Microwave in 30-second intervals, stirring in between, until the chocolate is fully melted and smooth.
- Drizzle Chocolate: Using a spoon or a piping bag, drizzle the melted chocolate over the cooled cookies. Allow the chocolate to set before serving or storing.
Extra Tips:
For best results, confirm the maraschino cherries are well-drained and patted dry to prevent excess moisture from affecting the texture of the cookies.
If you’re short on time, the dough can be made a day ahead and refrigerated; just let it come to room temperature before shaping.
For an extra festive touch, consider sprinkling a bit of edible glitter on top of the chocolate drizzle before it sets.
These cookies also store well in an airtight container for up to a week, making them a great make-ahead option for busy holiday schedules.
Spiced Hot Chocolate Bundt Cake
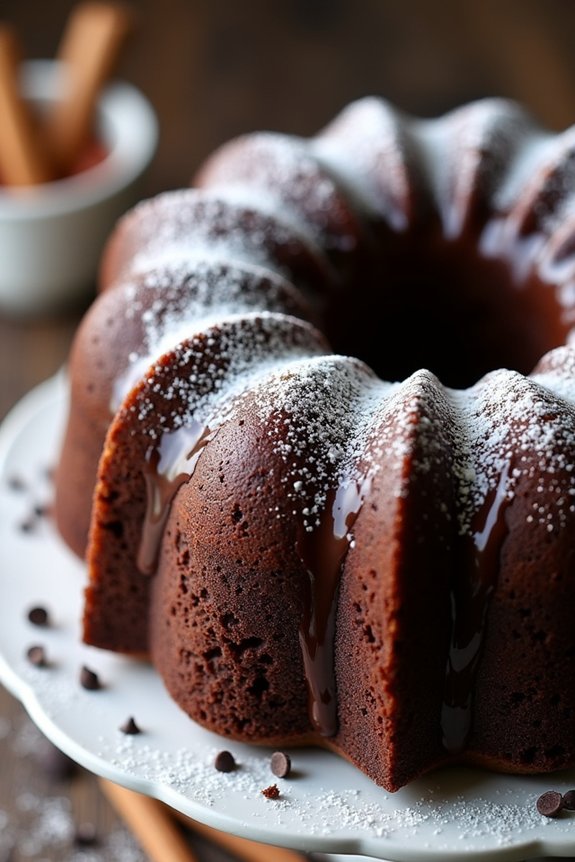
Indulge in the rich and aromatic flavors of this Spiced Hot Chocolate Bundt Cake, a delightful addition to your holiday dessert table. This cake combines the deep, luxurious essence of chocolate with a warm blend of spices, creating a comforting and festive treat that’s perfect for the winter season.
With its moist texture and spicy undertones, this bundt cake is sure to be a hit at any Christmas gathering, providing the perfect end to a holiday meal. The star of this cake is its unique blend of spices, which infuse the chocolate with a cozy, warming sensation.
The cake is simple to make, yet impressive in presentation, showcasing a beautiful bundt shape that’s both elegant and inviting. Serve it with a dusting of powdered sugar or a drizzle of chocolate glaze for an extra touch of sweetness.
Whether you’re hosting a holiday party or looking for a special dessert to share with family, this Spiced Hot Chocolate Bundt Cake is sure to bring joy and warmth to your celebrations.
Ingredients for 4-6 Servings:
- 1 cup unsalted butter, softened
- 1 cup granulated sugar
- 1 cup packed brown sugar
- 4 large eggs
- 1 teaspoon vanilla extract
- 2 1/2 cups all-purpose flour
- 3/4 cup unsweetened cocoa powder
- 1 tablespoon baking powder
- 1/2 teaspoon baking soda
- 1/2 teaspoon salt
- 1 teaspoon ground cinnamon
- 1/2 teaspoon ground nutmeg
- 1/4 teaspoon ground cloves
- 1/4 teaspoon ground ginger
- 1 cup buttermilk
- 1/2 cup hot water
- 1/2 cup semisweet chocolate chips
Cooking Instructions:
- Preheat and Prepare the Pan: Preheat your oven to 350°F (175°C). Grease and flour a bundt pan to guarantee the cake releases easily after baking.
- Cream Butter and Sugars: In a large mixing bowl, cream together the softened butter, granulated sugar, and brown sugar until light and fluffy. This should take about 3-5 minutes with an electric mixer.
- Add Eggs and Vanilla: Beat in the eggs one at a time, making sure each is fully incorporated before adding the next. Mix in the vanilla extract.
- Combine Dry Ingredients: In a separate bowl, whisk together the flour, cocoa powder, baking powder, baking soda, salt, cinnamon, nutmeg, cloves, and ginger.
- Mix Wet and Dry Ingredients: Gradually add the dry ingredients to the butter mixture, alternating with the buttermilk, beginning and ending with the dry ingredients. Mix until just combined.
- Incorporate Hot Water and Chocolate Chips: Slowly stir in the hot water until the batter is smooth. Fold in the chocolate chips.
- Bake the Cake: Pour the batter into the prepared bundt pan, spreading it evenly. Bake in the preheated oven for 45-50 minutes, or until a toothpick inserted into the center comes out clean.
- Cool and Serve: Allow the cake to cool in the pan for about 15 minutes before inverting it onto a wire rack to cool completely. Once cooled, dust with powdered sugar or drizzle with chocolate glaze before serving.
Extra Tips:
When baking this Spiced Hot Chocolate Bundt Cake, it’s important to confirm all ingredients are at room temperature for a smoother batter and even baking.
If you don’t have buttermilk, you can make a substitute by adding a tablespoon of lemon juice or vinegar to a cup of milk and letting it sit for 5 minutes. Additionally, for an extra layer of flavor, consider adding a teaspoon of espresso powder to accentuate the chocolate.
This cake pairs wonderfully with a dollop of whipped cream or a scoop of vanilla ice cream for an added festive touch.