

There’s just something magical about the smell of holiday goodies baking in the oven. Creating festive treats like Reindeer Cupcakes and Snowman Sugar Cookies with kids is one of my favorite holiday traditions. These recipes are easy to follow and inspire creativity, making the kitchen a joyful space for little ones. Are you ready to see how simple ingredients can be transformed into delightful holiday treats? Let’s start this fun and festive baking journey together!
Reindeer Cupcakes
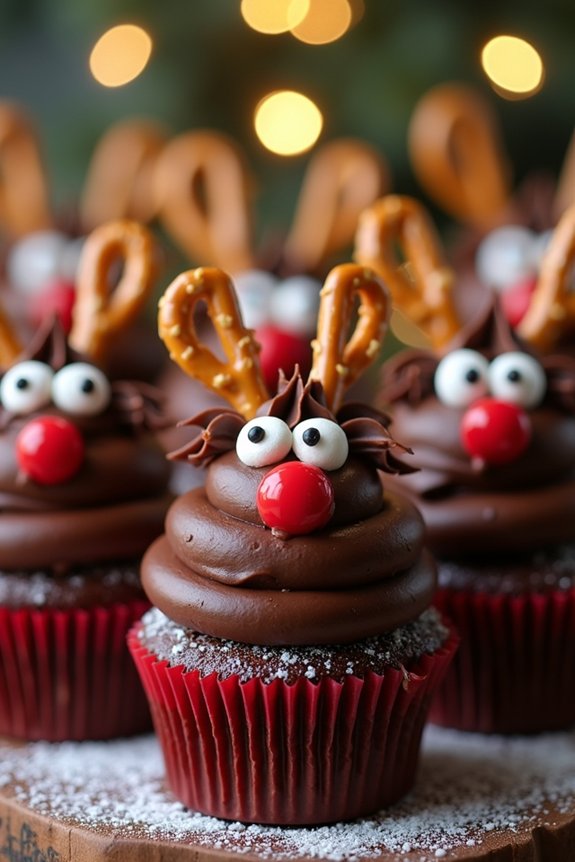
Christmas is a magical time, especially for children who enthusiastically await the festive treats that come with the holiday season. Reindeer Cupcakes are a delightful and fun baking activity that can be enjoyed by kids and adults alike. These charming cupcakes not only look adorable but are also delicious, with a soft, moist chocolate base and a delightful array of decorative toppings that transform them into the cutest reindeers. Perfect for holiday parties or as a fun family activity, these cupcakes will surely bring a smile to everyone’s face.
The great thing about Reindeer Cupcakes is that they’re as enjoyable to make as they’re to eat. Kids can get creative with the decorations, while learning some basic baking skills along the way. This recipe is designed to be approachable, making it easy for little hands to lend a big helping hand in the kitchen. With a few simple ingredients and a touch of festive cheer, you can whip up a batch of these delightful cupcakes that are sure to be a hit at any holiday gathering.
Ingredients (serving size: 4-6 people):
- 1 cup all-purpose flour
- 1/2 cup unsweetened cocoa powder
- 1 teaspoon baking powder
- 1/2 teaspoon baking soda
- 1/4 teaspoon salt
- 1/2 cup unsalted butter, softened
- 1 cup granulated sugar
- 2 large eggs
- 1 teaspoon vanilla extract
- 1/2 cup whole milk
- 1/2 cup mini marshmallows
- 12 pretzel twists
- 24 candy eyes
- 12 red candy-coated chocolates (for noses)
- Chocolate frosting (store-bought or homemade)
Instructions:
- Preheat and Prepare: Preheat your oven to 350°F (175°C). Line a cupcake tin with 12 cupcake liners to make it easier to remove the cupcakes after baking.
- Mix Dry Ingredients: In a medium bowl, whisk together the flour, cocoa powder, baking powder, baking soda, and salt. This will guarantee an even distribution of the leavening agents in your batter.
- Cream Butter and Sugar: In a large mixing bowl, beat the softened butter and granulated sugar together using an electric mixer on medium speed until the mixture is light and fluffy, which should take about 2-3 minutes.
- Add Eggs and Vanilla: Add the eggs, one at a time, beating well after each addition. Mix in the vanilla extract for an extra flavor boost.
- Combine Wet and Dry Ingredients: Gradually add the dry ingredients to the butter mixture alternately with the milk, beginning and ending with the dry ingredients. Mix until just combined, being careful not to overmix.
- Fill and Bake: Divide the batter evenly among the cupcake liners, filling each about two-thirds full. Bake in the preheated oven for 18-20 minutes or until a toothpick inserted into the center of a cupcake comes out clean.
- Cool and Decorate: Allow the cupcakes to cool in the pan for about 5 minutes before transferring them to a wire rack to cool completely. Once cooled, spread a layer of chocolate frosting over each cupcake.
- Create the Reindeer Faces: Place two mini marshmallows on each cupcake for eyes, adding a candy eye to each marshmallow. Use a red candy-coated chocolate as the nose, positioned just below the eyes. Break the pretzel twists in half and stick them into the frosting at the top of the cupcake to form reindeer antlers.
Extra Tips:
When decorating the cupcakes, encourage the kids to be creative with their designs. You can use different colors of candy-coated chocolates for the noses if you want a variety of reindeer. If you’re short on time, using a boxed cake mix for the cupcakes can be a great shortcut without compromising on fun.
For an extra festive touch, sprinkle a bit of edible glitter on top of the finished cupcakes. Make sure the cupcakes are completely cool before applying the frosting to prevent it from melting and sliding off. Enjoy your delightful and festive Reindeer Cupcakes!
Snowman Sugar Cookies
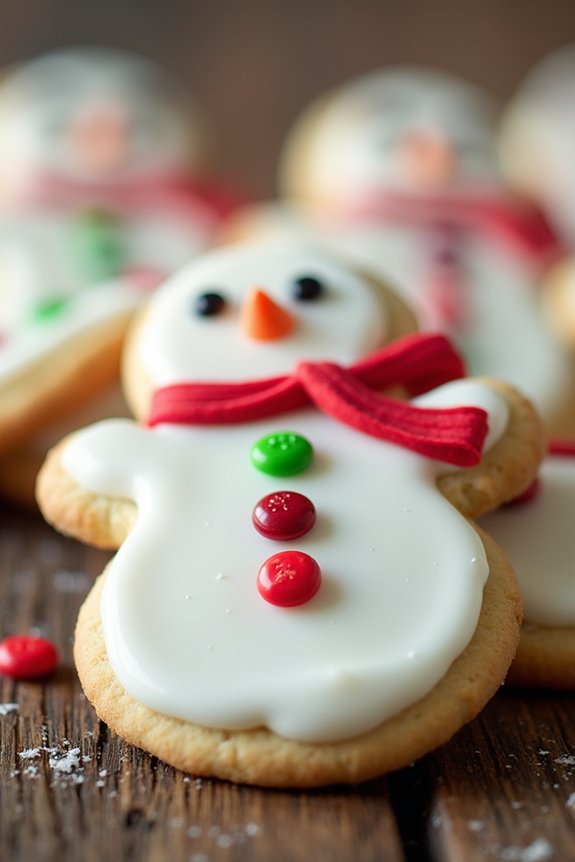
Snowman Sugar Cookies are a delightful treat that brings festive cheer to your holiday baking activities, especially when made with kids. These cookies aren’t only delicious but also fun to decorate. Shaped like adorable snowmen, they make for a perfect Christmas project to engage little hands and ignite their creativity.
As they roll the dough and apply the icing, kids can let their imagination run wild by personalizing their snowmen with various edible decorations. This recipe is a wonderful way to create lasting memories and delectable sweets for the season.
Making Snowman Sugar Cookies is a straightforward process that involves a classic sugar cookie dough, which is then shaped, baked, and decorated to resemble cute snowmen. The cookies are crisp on the outside, tender on the inside, and topped with a smooth layer of icing that serves as the perfect canvas for embellishments.
Once baked, the decorating phase becomes an exciting activity for kids, where they can use colorful candies, chocolate chips, and sprinkles to bring their snowman creations to life. This recipe serves 4-6 people, making it ideal for a small gathering or family baking session.
Ingredients:
- 2 1/2 cups all-purpose flour
- 1/2 teaspoon baking powder
- 1/4 teaspoon salt
- 3/4 cup unsalted butter, softened
- 1 cup granulated sugar
- 1 large egg
- 1 teaspoon vanilla extract
- 3 cups powdered sugar
- 3-4 tablespoons milk
- Food coloring (optional)
- Various candies and sprinkles for decoration
Instructions:
- Preheat the Oven: Preheat your oven to 350°F (175°C) and line two baking sheets with parchment paper.
- Mix Dry Ingredients: In a medium bowl, whisk together the flour, baking powder, and salt. Set aside for later use.
- Cream Butter and Sugar: In a large mixing bowl, beat the softened butter and granulated sugar together using an electric mixer on medium speed until light and fluffy, about 2-3 minutes.
- Add Egg and Vanilla: Add the egg and vanilla extract to the butter mixture and mix until well combined.
- Combine Ingredients: Gradually add the dry ingredients to the wet ingredients, mixing on low speed until a dough forms. If the dough is too sticky, add a little more flour, a tablespoon at a time.
- Roll Out the Dough: On a lightly floured surface, roll out the dough to about 1/4-inch thickness. Use round cookie cutters of different sizes to create the snowman shapes. You’ll need three circles per snowman (small, medium, and large).
- Bake the Cookies: Place the cut-out cookies on the prepared baking sheets, leaving space between each. Bake in the preheated oven for 8-10 minutes, or until the edges are lightly golden. Allow them to cool completely on a wire rack.
- Prepare the Icing: In a medium bowl, mix the powdered sugar with milk, one tablespoon at a time, until you achieve a thick but spreadable consistency. If desired, divide the icing into separate bowls and add food coloring.
- Decorate the Cookies: Once the cookies are cool, use the icing to join the circles together to form snowmen. Decorate with candies and sprinkles to create eyes, buttons, and scarves.
Extra Tips:
When making Snowman Sugar Cookies, make certain that the dough isn’t too sticky when rolling it out, as this can make shaping difficult.
If decorating with kids, prepare a workspace with all the decorating supplies within easy reach to keep the process organized and fun. You can also prepare the dough in advance and refrigerate it for up to 24 hours, which can help with handling and cutting.
Additionally, using different sizes of round cutters will give each snowman a unique character, adding to the fun of the decorating process.
Christmas Tree Brownies

Christmas Tree Brownies are a delightful and festive treat perfect for getting kids involved in the holiday baking spirit. These brownies aren’t only delicious but also provide a fun and creative activity for children as they decorate their own edible Christmas trees. The process is simple, and the results are sure to bring smiles to faces of all ages.
By using a basic brownie recipe and a few decorative touches, you can create a holiday masterpiece that doubles as both a dessert and a decoration.
The best part about making Christmas Tree Brownies is that it combines baking with artistic flair. Kids will love the chance to express their creativity while learning some basic baking skills. This recipe is designed to make about 12 Christmas tree brownies, which is perfect for serving 4-6 people.
Whether you’re preparing for a holiday party or just looking for a fun afternoon activity, these brownies are sure to become a family favorite.
Ingredients:
- 1 cup unsalted butter
- 2 cups granulated sugar
- 4 large eggs
- 1 cup cocoa powder
- 1 teaspoon vanilla extract
- 1 cup all-purpose flour
- 1/2 teaspoon baking powder
- 1/2 teaspoon salt
- Green frosting (store-bought or homemade)
- Sprinkles and edible decorations
- Candy canes
Instructions:
- Preheat and Prepare: Preheat your oven to 350°F (175°C). Line a 9×13 inch baking pan with parchment paper or lightly grease it to prevent sticking.
- Melt Butter: In a medium saucepan over low heat, melt the butter. Once melted, remove from heat and stir in the granulated sugar until well combined.
- Mix Wet Ingredients: Add the eggs one at a time to the butter and sugar mixture, stirring well after each addition. Mix in the vanilla extract.
- Add Dry Ingredients: In a separate bowl, sift together the cocoa powder, flour, baking powder, and salt. Gradually add this dry mixture to the wet ingredients, stirring until just combined.
- Bake: Pour the brownie batter into the prepared baking pan, spreading it evenly. Bake in the preheated oven for 25-30 minutes or until a toothpick inserted into the center comes out with a few moist crumbs.
- Cool and Cut: Allow the brownies to cool completely in the pan. Once cooled, remove the brownies from the pan and cut them into triangles to resemble Christmas trees.
- Decorate: Use green frosting to pipe on the “leaves” of the Christmas tree. Decorate with sprinkles and edible decorations to mimic ornaments, and insert a small piece of candy cane at the base of each triangle to serve as the tree trunk.
Extra Tips:
For a neater finish, chill the brownies in the refrigerator for about 15 minutes before cutting them into triangles. This will make the slicing process easier and more precise.
Additionally, when decorating, you can use small tubes of colored icing to add more details like garlands or stars on top of the trees. If you want to make the experience even more interactive for kids, set up a decorating station with various sprinkles and candies, encouraging them to let their imaginations run wild.
Make sure to store any leftover brownies in an airtight container to keep them fresh.
Gingerbread Men

Gingerbread Men are a classic Christmas treat that brings joy and warmth to the holiday season. Perfect for kids to make, these delightful cookies not only taste delicious, but they also provide a fun activity for the whole family. With their distinct spiced flavor and adorable shape, Gingerbread Men can be decorated in countless ways, allowing kids to express their creativity.
Whether you’re making them as gifts, for a holiday party, or simply for a cozy night in, these cookies are guaranteed to become a staple in your holiday baking routine. The aroma of ginger, cinnamon, and cloves filling the kitchen will instantly evoke the festive spirit.
This recipe is designed specifically for children to help with, making it an enjoyable family activity. From mixing the dough to cutting out the classic gingerbread shapes and decorating them, kids will love every step of the process. Not only do these cookies taste great, but they also make a beautiful centerpiece for your holiday table.
Ingredients (serving size: 4-6 people):
- 3 cups all-purpose flour
- 1 teaspoon baking soda
- 2 teaspoons ground ginger
- 1 teaspoon ground cinnamon
- 1/4 teaspoon ground cloves
- 1/4 teaspoon salt
- 1/2 cup unsalted butter, softened
- 1/2 cup brown sugar, packed
- 2/3 cup molasses
- 1 large egg
- 1 teaspoon vanilla extract
- Icing and candies for decoration
Cooking Instructions:
- Preheat the Oven: Start by preheating your oven to 350°F (175°C). This guarantees that the oven is at the right temperature when you’re ready to bake the cookies.
- Mix Dry Ingredients: In a medium bowl, combine the flour, baking soda, ginger, cinnamon, cloves, and salt. Whisk them together until well blended. This step guarantees that the spices are evenly distributed throughout the dough.
- Cream Butter and Sugar: In a large mixing bowl, beat the softened butter and brown sugar together with an electric mixer on medium speed until light and fluffy. This typically takes about 2 minutes.
- Add Wet Ingredients: Add the molasses, egg, and vanilla extract to the butter mixture. Mix until everything is well combined. The mixture should be smooth and creamy.
- Combine Wet and Dry Ingredients: Gradually add the dry ingredients to the wet mixture, mixing on low speed until a dough forms. It should be smooth and slightly sticky.
- Chill the Dough: Divide the dough into two equal parts, wrap them in plastic wrap, and refrigerate for at least 1 hour. Chilling the dough makes it easier to roll out and cut into shapes.
- Roll and Cut Dough: On a lightly floured surface, roll out the dough to about 1/4 inch thick. Use gingerbread men cookie cutters to cut out shapes and place them on a parchment-lined baking sheet.
- Bake the Cookies: Bake in the preheated oven for 8 to 10 minutes, or until the edges are firm. Keep an eye on them to avoid overbaking. Let the cookies cool on the baking sheet for 5 minutes before transferring them to a wire rack to cool completely.
- Decorate: Once the cookies are completely cool, decorate them with icing and candies. Let the kids get creative with their designs!
Extra Tips:
When working with children, it’s important to supervise them, especially when using the oven or handling sharp cookie cutters. To make the dough easier to handle, you can chill it in the freezer for about 15 minutes instead of the fridge for an hour if you’re short on time.
To avoid the dough sticking to the rolling pin, dust it lightly with flour. If you’re planning on hanging these as ornaments, use a straw to make a small hole at the top of each cookie before baking. Enjoy the process and make it a memorable holiday tradition!
Santa Hat Cupcakes
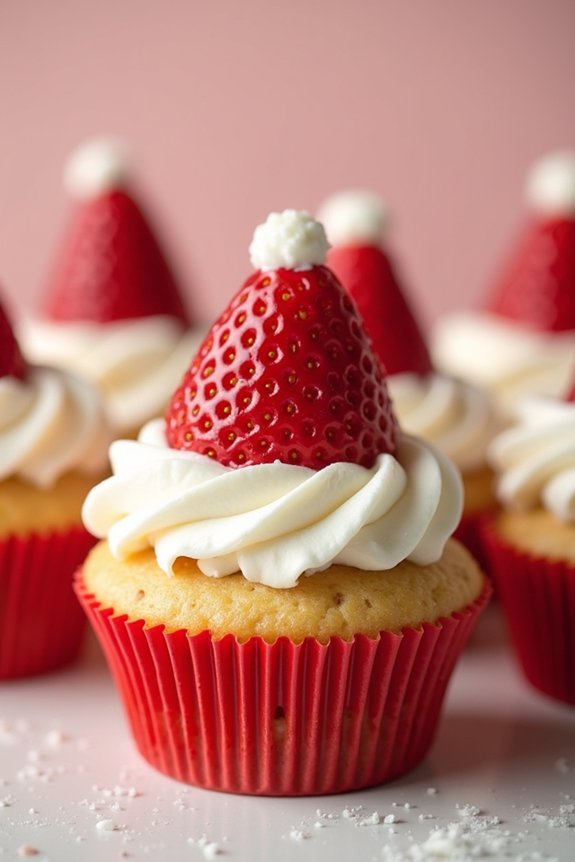
With the holiday season in full swing, there’s no better way to get into the festive spirit than by baking some delightful Santa Hat Cupcakes. Perfectly suited for kids, these cupcakes aren’t only fun to make but also delicious to eat. They offer a charming way to spend quality time with your little ones in the kitchen while creating edible pieces of art. The combination of a moist cupcake base, rich frosting, and a strawberry topper makes these treats irresistible to kids and adults alike.
The Santa Hat Cupcakes are an ideal project for budding bakers. The process is simple enough for children to follow, making it a fun and educational activity. The end result is a batch of cupcakes that look like tiny Santa hats, complete with a fluffy white pom-pom and brim made from frosting. These cupcakes will surely be a hit at any holiday gathering or as a sweet homemade gift. So gather your ingredients, preheat your oven, and let the festive baking begin!
Ingredients (Serves 4-6 people):
- 1 cup all-purpose flour
- 1 teaspoon baking powder
- 1/4 teaspoon salt
- 1/2 cup unsalted butter, softened
- 1 cup granulated sugar
- 2 large eggs
- 1 teaspoon vanilla extract
- 1/2 cup milk
- 1 cup heavy cream
- 1/4 cup powdered sugar
- 1 teaspoon vanilla extract (for frosting)
- 12 strawberries, hulled
- Red food coloring (optional)
Cooking Instructions:
- Preheat the Oven and Prepare the Cupcake Tin: Start by preheating your oven to 350°F (175°C). Line a 12-cup muffin tin with paper cupcake liners to prevent sticking.
- Mix the Dry Ingredients: In a medium bowl, whisk together the flour, baking powder, and salt. This guarantees the ingredients are evenly distributed and will result in a smooth batter.
- Cream Butter and Sugar: In a large bowl, beat the softened butter and granulated sugar together until light and fluffy. This process incorporates air into the mixture, which helps the cupcakes rise properly.
- Add Eggs and Vanilla: Add the eggs one at a time, beating well after each addition. Then, stir in the vanilla extract. This helps to enhance the flavor of the cupcakes.
- Combine Wet and Dry Ingredients: Gradually add the dry ingredients to the butter mixture, alternating with milk, starting and ending with the flour mixture. Mix until just combined to avoid overmixing, which can make the cupcakes dense.
- Bake the Cupcakes: Divide the batter evenly among the prepared cupcake liners. Bake in the preheated oven for 18-20 minutes or until a toothpick inserted into the center comes out clean. Allow them to cool completely on a wire rack.
- Prepare the Frosting: While the cupcakes cool, whip the heavy cream, powdered sugar, and vanilla extract until stiff peaks form. If you want a more vibrant color, you can add a few drops of red food coloring to the frosting.
- Decorate the Cupcakes: Once the cupcakes are cool, pipe a ring of frosting around the perimeter of each cupcake to create the brim of Santa’s hat. Place a hulled strawberry upside down in the center of each cupcake to form the hat. Add a small dollop of frosting on top of each strawberry to complete the Santa hat look.
Extra Tips:
When working with young children, it’s important to supervise them closely, especially when using the oven or mixer. Encourage creativity by allowing them to experiment with different frosting designs and colors. If you don’t have a piping bag, a plastic sandwich bag with a small corner snipped off will work just as well for applying the frosting.
Additionally, make sure the cupcakes are completely cool before decorating; otherwise, the frosting may melt and not hold its shape. These Santa Hat Cupcakes are a delightful way to celebrate the holiday season and create lasting memories with your kids.
Peppermint Bark
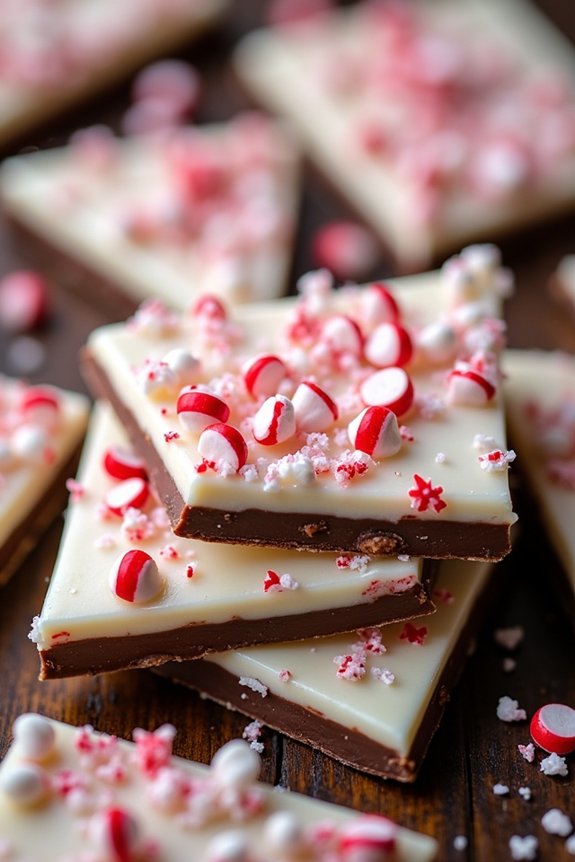
Peppermint Bark is a delightful holiday treat that’s perfect for kids to make with a little guidance. This sweet and minty confection isn’t only delicious but also fun to prepare, making it an ideal activity for the whole family during the festive season.
The simplicity of this recipe is matched by its festive flair, with the classic combination of rich chocolate and invigorating peppermint that captures the essence of Christmas. Plus, it makes for a lovely homemade gift that kids can proudly share with friends and family.
This recipe for Peppermint Bark is designed to serve 4-6 people, making it perfect for a small gathering or as a special treat for the household. Children will enjoy the hands-on experience of smashing candy canes and spreading the chocolate, while the adults can lend a hand with the stovetop work.
The result is a colorful, textured dessert that’s as pleasing to the eye as it’s to the taste buds. So gather your ingredients, set up your kitchen, and get ready to create a holiday tradition that everyone will look forward to year after year.
Ingredients for 4-6 Servings:
- 12 ounces of semi-sweet chocolate chips
- 12 ounces of white chocolate chips
- 1 teaspoon of peppermint extract
- 8 candy canes, crushed
- Parchment paper
Cooking Instructions:
- Prepare the Candy Canes: Place the unwrapped candy canes in a zip-top plastic bag. Use a rolling pin or a heavy skillet to gently crush the candy canes into small pieces. Set aside.
- Melt the Semi-Sweet Chocolate: In a microwave-safe bowl, melt the semi-sweet chocolate chips in 30-second intervals, stirring after each interval, until smooth. Alternatively, melt them using a double boiler over simmering water on the stovetop.
- Spread the Chocolate: Line a baking sheet with parchment paper. Pour the melted semi-sweet chocolate onto the parchment paper and spread it evenly with a spatula to form a thin layer. Refrigerate for about 20 minutes until set.
- Melt the White Chocolate: Using the same method as before, melt the white chocolate chips in a microwave-safe bowl or double boiler.
- Add Peppermint Extract: Stir the peppermint extract into the melted white chocolate until well combined.
- Layer the White Chocolate: Once the semi-sweet chocolate layer is set, pour the melted white chocolate over it. Spread evenly with a spatula.
- Add Crushed Candy Canes: Immediately sprinkle the crushed candy canes over the white chocolate layer, pressing down lightly so they adhere.
- Chill the Bark: Place the baking sheet in the refrigerator for at least 1 hour, or until the bark is completely set and hardened.
- Break into Pieces: Once the bark is completely set, lift it from the pan using the edges of the parchment paper and break it into pieces.
Extra Tips:
To guarantee your chocolate melts smoothly, make sure not to overheat it, as this can cause it to seize. If you find that the chocolate has become too thick, a teaspoon of coconut oil can help smooth it out.
For a twist, consider adding different toppings like sprinkles or nuts along with the crushed candy canes. Remember to store the Peppermint Bark in an airtight container in a cool place to keep it fresh and crisp.
Holiday Rice Krispie Treats
There’s something magical about the combination of marshmallows, butter, and crispy rice cereal that brings smiles to faces young and old. Holiday Rice Krispie Treats aren’t only a delightful snack but also a fantastic activity to enjoy with kids during the festive season. This simple recipe requires no baking, making it perfect for little hands to help with the stirring, mixing, and decorating.
With a few festive twists, these treats can be transformed into colorful holiday delights that add a cheerful touch to any Christmas gathering. These treats are versatile and can be customized with your favorite holiday colors and decorations. Whether you decide to shape them as traditional squares or get creative with cookie cutters, the options are endless.
Adding a touch of food coloring or festive sprinkles can elevate these classic treats into a holiday masterpiece. The best part? They’re ready in no time and can serve 4-6 people, making them a great option for holiday parties or a sweet surprise for family and friends.
Ingredients (serving size: 4-6 people):
- 3 tablespoons unsalted butter
- 1 package (10 ounces) regular marshmallows or 4 cups mini marshmallows
- 6 cups Rice Krispies cereal
- Red and green food coloring
- Holiday-themed sprinkles
Instructions:
- Prepare the Work Area: Line a 9×13-inch baking pan with parchment paper, making sure some overhang on the sides for easy removal later. Set aside.
- Melt the Butter and Marshmallows: In a large saucepan, melt the butter over low heat. Once melted, add the marshmallows. Stir continuously until the marshmallows are completely melted and smooth. Remove from heat.
- Color the Mixture: Divide the marshmallow mixture into two separate bowls if you wish to make both red and green treats. Add a few drops of red food coloring to one bowl and green to the other. Stir until evenly colored. Adjust the color intensity as desired with additional drops.
- Mix with Rice Krispies: Working quickly, add 3 cups of Rice Krispies cereal to each bowl of colored marshmallows. Stir until the cereal is well coated with the marshmallow mixture.
- Transfer to Pan: Pour the red cereal mixture into half of the prepared pan and press it down evenly using a spatula. Repeat with the green mixture on the other half of the pan. Make sure both colors are pressed firmly to avoid gaps.
- Add Sprinkles: While the mixture is still warm, sprinkle holiday-themed sprinkles over the top, pressing them gently into the surface so they adhere.
- Cool and Cut: Allow the Rice Krispie treats to cool completely at room temperature. Once set, use the parchment paper overhang to lift them out of the pan. Cut into squares or use festive cookie cutters for fun shapes.
Extra Tips:
When working with melted marshmallows, speed is key as they can set quickly. To make handling easier, lightly grease your spatula or hands with butter or non-stick spray.
If you prefer a thicker treat, you can use a smaller pan or double the recipe for a 9×13-inch pan. Remember to store any leftovers in an airtight container to keep them fresh and chewy. Finally, involve kids by letting them choose their favorite holiday sprinkles or assist with mixing colors—this not only makes the process fun but also creates lasting holiday memories.
Festive Candy Cane Cookies
Get into the holiday spirit with these delightful Festive Candy Cane Cookies that are perfect for kids to bake and enjoy. These cookies not only taste delicious, but they also add a touch of whimsy to your holiday dessert spread with their colorful, twisted shapes that resemble candy canes.
With simple ingredients and straightforward steps, this recipe is ideal for little hands enthusiastic to get involved in holiday preparations. This recipe yields enough cookies for about 4-6 people, making them perfect for a small gathering or a cozy family treat.
The classic sugar cookie dough is split and colored to create the iconic red and white stripes of a candy cane. These cookies are fun to make, giving kids the chance to practice their baking skills while also learning how to twist the dough into playful, festive shapes.
Ingredients:
- 2 3/4 cups all-purpose flour
- 1 teaspoon baking powder
- 1/2 teaspoon salt
- 1 cup unsalted butter, softened
- 1 cup granulated sugar
- 1 large egg
- 1 teaspoon vanilla extract
- 1/4 teaspoon almond extract
- Red food coloring
- 1/4 cup crushed peppermint candies (optional)
Instructions:
- Preheat and Prepare: Preheat your oven to 375°F (190°C). Line two baking sheets with parchment paper to prevent the cookies from sticking.
- Mix Dry Ingredients: In a medium bowl, whisk together the flour, baking powder, and salt. This will guarantee the baking powder is evenly distributed throughout the flour.
- Cream Butter and Sugar: In a large bowl, use an electric mixer to beat the softened butter and sugar until light and fluffy. This should take about 3 minutes.
- Add Eggs and Flavorings: Add the egg, vanilla extract, and almond extract to the butter mixture. Beat until fully combined.
- Combine Dry and Wet Ingredients: Gradually add the dry ingredients to the wet ingredients, mixing just until combined. Be careful not to overmix.
- Divide and Color the Dough: Split the dough into two equal portions. In one half, add a few drops of red food coloring and mix until the color is evenly distributed.
- Shape the Cookies: Take a small piece of red dough and a similar-sized piece of plain dough. Roll each into a 4-inch rope, then gently twist them together to create a candy cane shape. Repeat with the remaining dough.
- Bake: Place the twisted dough shapes onto the prepared baking sheets, about 2 inches apart. If desired, sprinkle some crushed peppermint candies on top. Bake for 8-10 minutes, or until the edges are just beginning to turn golden.
- Cool: Allow the cookies to cool on the baking sheets for a few minutes before transferring them to a wire rack to cool completely.
Extra Tips:
For the best results, make sure your butter is softened to room temperature, as this will help it cream smoothly with the sugar. If you want a more intense red color, you can gradually add more food coloring until you achieve the desired hue.
Additionally, if you don’t have almond extract, you can substitute it with an additional teaspoon of vanilla extract. To avoid the dough from becoming sticky while shaping, lightly flour your hands.
Finally, storing the cookies in an airtight container will keep them fresh and crisp for up to a week.
Elf Hat Cake Pops
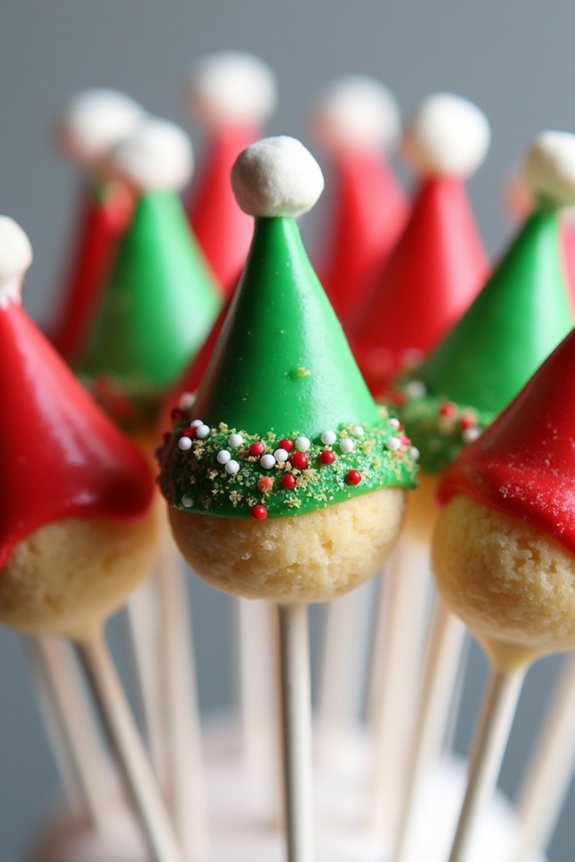
Elf Hat Cake Pops are a delightful treat that brings a touch of whimsy and festive cheer to your holiday baking repertoire. These charming cake pops are shaped like the pointy hats of Santa’s little helpers, making them an irresistible addition to any Christmas party or family gathering. Not only are they fun to make, but they’re also easy enough for kids to help with, turning your kitchen into a workshop full of sugary magic.
The process of making Elf Hat Cake Pops involves forming cake crumbs and frosting into small, conical shapes, which are then covered in vibrant candy melts or chocolate. Decorated with sprinkles, edible glitter, or any other festive adornments, these cake pops are sure to captivate both the young and the young at heart. Perfect for a serving size of 4-6 people, this recipe is a great way to get everyone involved in creating something sweet and special during the holiday season.
Ingredients:
- 1 box of cake mix (any flavor)
- Ingredients required for cake mix (usually eggs, oil, and water)
- 1 cup of frosting (store-bought or homemade)
- 12 ounces of red candy melts
- 12 ounces of green candy melts
- Lollipop sticks
- Sprinkles or edible glitter
- Wax paper
- Styrofoam block for drying
Instructions:
- Bake the Cake: Prepare the cake mix according to the package instructions. Once baked, allow the cake to cool completely.
- Crumble the Cake: Once the cake is cooled, crumble it into a large bowl until you have fine crumbs.
- Mix in the Frosting: Add the frosting to the cake crumbs. Mix thoroughly until the mixture is moist enough to hold together when shaped.
- Shape the Cake Pops: Take small amounts of the cake mixture and shape them into cone shapes to resemble elf hats. Place them on a baking sheet lined with wax paper.
- Chill the Cake Pops: Put the shaped cake pops in the refrigerator for about 1 hour to firm up.
- Melt the Candy Coatings: Melt the red and green candy melts in separate bowls according to the package instructions.
- Insert the Sticks: Dip the tip of each lollipop stick into the melted candy and insert it into the base of each cake pop. Allow the candy to set, which will help secure the sticks in place.
- Coat the Cake Pops: Dip each cake pop into the melted candy, covering it completely. Gently tap off any excess.
- Decorate the Pops: While the coating is still wet, sprinkle with festive decorations like sprinkles or edible glitter.
- Dry the Cake Pops: Insert the sticks into a Styrofoam block to allow the cake pops to dry upright.
Extra Tips:
When melting candy melts, make sure to do so slowly, using a microwave or a double boiler to prevent scorching. If the candy melts are too thick, you can add a small amount of vegetable oil to achieve the desired consistency.
Be creative with decorations—mini marshmallows can be used at the top of the elf hats for a fluffy detail. Also, to make the process more fun for kids, set up a decorating station with various sprinkles and edible decorations, allowing them to personalize their own elf hats.
Nutty Christmas Stars
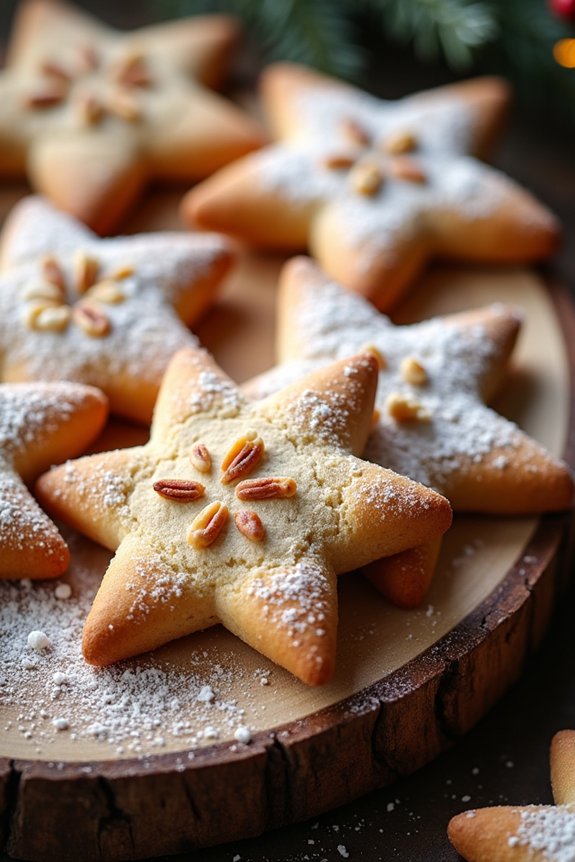
Nutty Christmas Stars are a delightful holiday treat that combines the rich flavors of nuts with the sweet, buttery taste of cookies. Perfect for getting kids involved in the kitchen, these cookies are both fun to make and delicious to eat. The star shape makes them festive and perfect for any holiday cookie platter.
Plus, they’re easy enough for little chefs to help with every step, from mixing to cutting out the star shapes. The recipe combines a buttery cookie dough with finely chopped nuts, adding a satisfying crunch to each bite. These cookies are perfect for sharing with family and friends during the holiday season.
Not only will kids enjoy making and decorating these Nutty Christmas Stars, but they’ll also love sharing them with loved ones. With a serving size of 4-6 people, this recipe makes plenty to go around and spread holiday cheer.
Ingredients for 4-6 servings:
- 2 cups all-purpose flour
- 1/2 teaspoon baking powder
- 1/4 teaspoon salt
- 1/2 cup unsalted butter, softened
- 3/4 cup granulated sugar
- 1 large egg
- 1 teaspoon vanilla extract
- 1/2 cup finely chopped mixed nuts (such as walnuts, pecans, or almonds)
- Powdered sugar for dusting
Instructions:
- Prepare the Dry Ingredients: In a medium-sized bowl, whisk together the all-purpose flour, baking powder, and salt. This helps guarantee that the baking powder and salt are evenly distributed throughout the flour.
- Cream the Butter and Sugar: In a large mixing bowl, beat the softened butter and granulated sugar together using an electric mixer on medium speed until the mixture is light and fluffy, about 3-4 minutes. This step is essential for creating a tender cookie texture.
- Add the Egg and Vanilla: Beat in the egg and vanilla extract until well combined. This will add moisture to the dough and help bind the ingredients together.
- Combine Wet and Dry Ingredients: Gradually add the flour mixture to the butter mixture, mixing on low speed until just combined. Avoid overmixing to keep the cookies tender.
- Incorporate the Nuts: Gently fold in the finely chopped nuts using a spatula or wooden spoon. Guarantee the nuts are evenly distributed throughout the dough.
- Chill the Dough: Wrap the dough in plastic wrap and refrigerate for at least 1 hour. This will make the dough easier to roll out and cut into shapes.
- Preheat and Prepare: Preheat the oven to 350°F (175°C) and line baking sheets with parchment paper.
- Roll and Cut the Dough: On a lightly floured surface, roll out the dough to about 1/4-inch thickness. Use a star-shaped cookie cutter to cut out the cookies and place them on the prepared baking sheets, leaving about 1 inch of space between each cookie.
- Bake the Cookies: Bake in the preheated oven for 10-12 minutes or until the edges are lightly golden. Remove from the oven and let the cookies cool on the baking sheets for a few minutes before transferring them to a wire rack to cool completely.
- Dust with Powdered Sugar: Once the cookies are completely cooled, dust them lightly with powdered sugar for a festive finish.
Extra Tips:
When baking Nutty Christmas Stars, guarantee that the butter is softened to room temperature before beginning. This will make it easier to cream with the sugar, creating a light and airy dough.
Also, feel free to experiment with different types of nuts or even add a hint of spice, such as cinnamon or nutmeg, to the dough for extra flavor. If you’re planning to bake these cookies with kids, let them have fun decorating each star with a drizzle of icing or a sprinkle of colorful sugar after dusting with powdered sugar.
Enjoy this festive activity as a family and make lasting holiday memories.
Frosted Christmas Wreath Donuts
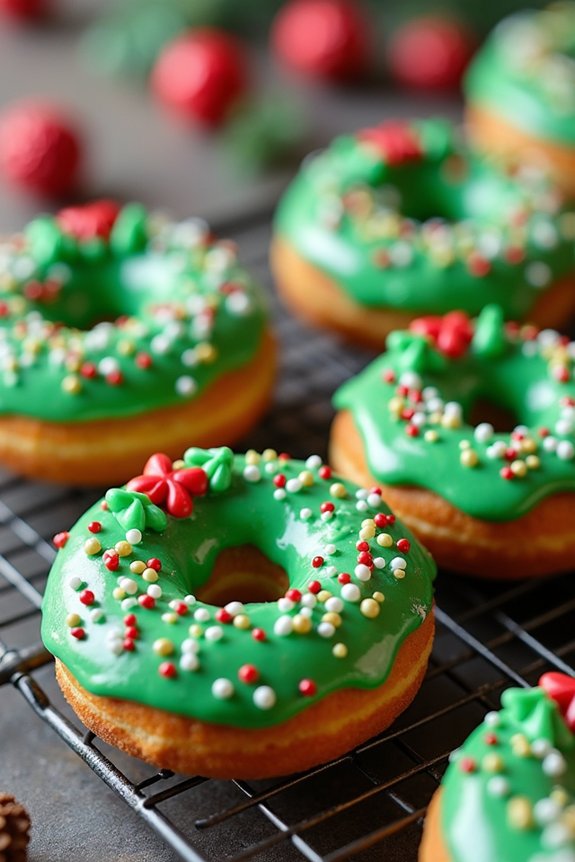
Frosted Christmas Wreath Donuts are a delightful and festive treat that will bring joy to any holiday gathering. These vibrant donuts aren’t only delicious but also fun to decorate, making them a perfect activity for kids during the Christmas season. Shaped like little wreaths, these donuts are adorned with colorful frosting and sprinkles, capturing the spirit of the holidays in every bite.
Whether served at breakfast, as a dessert, or packed in a holiday gift box, these donuts are bound to be a hit with children and adults alike.
Making Frosted Christmas Wreath Donuts is a wonderful opportunity for kids to get hands-on in the kitchen, learning basic baking skills while expressing their creativity. This recipe is designed to be simple enough for young bakers to follow, with a little help from an adult. The process involves mixing, frying, and decorating, providing a range of activities that are both educational and entertaining.
As the kitchen fills with the warm aroma of freshly fried donuts, kids will be filled with excitement and anticipation for the festive season ahead.
Ingredients (serving size: 4-6 people):
- 2 cups all-purpose flour
- 1/2 cup granulated sugar
- 2 teaspoons baking powder
- 1/2 teaspoon salt
- 1/2 cup milk
- 2 large eggs
- 1/4 cup unsalted butter, melted
- 1 teaspoon vanilla extract
- Vegetable oil, for frying
- 1 cup powdered sugar
- 2-3 tablespoons milk (for frosting)
- Green food coloring
- Assorted holiday sprinkles
Cooking Instructions:
- Prepare the Dough: In a large mixing bowl, combine the flour, granulated sugar, baking powder, and salt. In a separate bowl, whisk together the milk, eggs, melted butter, and vanilla extract. Gradually add the wet ingredients to the dry ingredients, mixing until a soft dough forms.
- Shape the Donuts: Lightly flour a clean surface and roll out the dough to about 1/2-inch thickness. Use a donut cutter or two round cutters of different sizes to cut out donut shapes from the dough. If you don’t have a donut cutter, you can use a large cookie cutter and a bottle cap for the center.
- Heat the Oil: In a deep frying pan or pot, heat the vegetable oil to 350°F (175°C). Use a thermometer to verify the oil reaches the correct temperature, as too hot or too cold oil will affect the donuts’ texture.
- Fry the Donuts: Carefully place a few donuts into the hot oil, making sure not to overcrowd the pan. Fry each side for about 1-2 minutes or until golden brown. Use a slotted spoon to remove the donuts and place them on a paper towel-lined plate to drain excess oil.
- Make the Frosting: In a small bowl, mix the powdered sugar with 2-3 tablespoons of milk until you reach a smooth, spreadable consistency. Add a few drops of green food coloring and stir until the frosting is evenly colored.
- Decorate the Donuts: Once the donuts have cooled slightly, dip the top of each donut into the green frosting. Place them on a wire rack and sprinkle with assorted holiday sprinkles to resemble a festive wreath.
Extra Tips:
For best results, verify the oil maintains a steady temperature throughout the frying process to achieve evenly cooked donuts. Encourage kids to get creative with their donut decorations; they can use various sprinkles, edible glitter, or even small candies to personalize their donuts.
If you prefer baked donuts, you can use a donut pan and bake them at 350°F (175°C) for about 10-12 minutes instead of frying. Remember to let the donuts cool slightly before frosting, as this helps the icing set properly without melting.
Rudolph’s Red-Nosed Pretzels
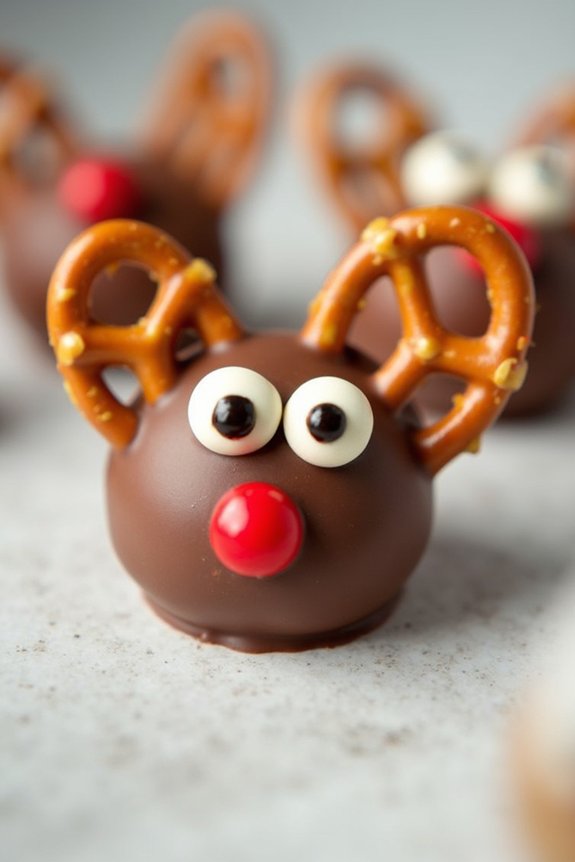
Rudolph’s Red-Nosed Pretzels are a delightful way to bring some holiday cheer into your kitchen with your little helpers. This fun and festive recipe is perfect for involving kids in Christmas baking, as it combines the joy of crafting with the deliciousness of a sweet and salty treat.
These adorable pretzel creations resemble Rudolph the Red-Nosed Reindeer, complete with a bright red nose and chocolate antlers, making them a hit at any holiday gathering or as a special homemade gift. Not only do these treats look charming, but they also allow kids to practice their motor skills while decorating and assembling the pretzels.
It’s a wonderful opportunity for bonding and creativity during the holiday season. Plus, the combination of pretzels, chocolate, and candy guarantees that these snacks will be a crowd-pleaser for both children and adults alike. Let’s get started on creating these whimsical and tasty Rudolph’s Red-Nosed Pretzels!
Ingredients (serving size: 4-6 people):
- 24 mini pretzel twists
- 12 large pretzel rods
- 1 cup milk chocolate chips
- 24 red candy-coated chocolates (like M&M’s)
- 48 candy eyes
- Wax or parchment paper
Instructions:
- Prepare the Setup: Line a baking sheet with wax or parchment paper to prevent sticking and make cleanup easier. This will be the surface where you’ll allow the pretzels to set.
- Melt the Chocolate: In a microwave-safe bowl, melt the milk chocolate chips in 30-second intervals, stirring in between, until smooth and completely melted. Be careful not to overheat the chocolate.
- Create Rudolph’s Head and Antlers: Dip one end of each pretzel rod (about 1 inch) into the melted chocolate, then immediately place a mini pretzel twist on each side of the rod, forming Rudolph’s antlers.
- Add the Eyes and Nose: While the chocolate is still soft, place two candy eyes just below the antlers on the chocolate-dipped part of the rod. Add a red candy-coated chocolate below the eyes to create Rudolph’s nose.
- Set the Pretzels: Place the assembled pretzels on the prepared baking sheet. Allow them to cool and set completely at room temperature, or speed up the process by placing them in the refrigerator for about 10 minutes.
- Serve and Enjoy: Once the chocolate has fully set, your Rudolph’s Red-Nosed Pretzels are ready to serve and enjoy. Arrange them on a festive plate or package them in clear bags with a holiday ribbon for gifting.
Extra Tips: For an easier assembly, you can use a toothpick to apply a small dab of melted chocolate to the back of the candy eyes and nose, guaranteeing they stick well. If you want to add some variety, you can use dark or white chocolate instead of milk chocolate for a different flavor profile.
When working with kids, verify that the chocolate isn’t too hot and supervise the melting process closely to prevent burns. Enjoy the process and encourage creativity—each Rudolph can have its own unique character!